Neilsen DENT MASTER CT3789 User manual

DENT MASTER CT3789
ORIGINAL INSTRUCTIONS
SAVE THESE INSTRUCTIONS AND PRECAUTIONS.
READ ALL PRECAUTONS AND INSTRUCTIONS BEFORE USE.
Cannon Tools Limited
Address: 20 Station Road, Rowley Regis, West Midlands, B65 0JU.UNITED KINGDOM

1
EC DECLARATION OF CONFORMITY
We CANNON TOOLS LTD
20 Station road, Rowley Regis, West Midlands,B65 0JU.U.K.
Declare that the following machine complies with the appropriate basic safety and
health requirements of the EC Directive based on its design and type, as brought
into circulation by us.
In case of alteration of the machine, not agreed upon by us, this declaration will
lose its validity.
Product description: DENT MASTER
Model: CT3789
Applicable EC Directives:
EC Low Voltage Directive 2014/35/EU
EC Directive of Electromagnetic Compatibility 2014/30/EU
Harmonized standards:
EN 60335-2-45, EN 60335-1, EN62233,
EN 55014-1, EN 55014-2,EN 61000-3-2, EN 61000-3-3
20 Station Road, Rowley Regis, West Midlands, B65 0JU.U.K.
Mr. Gurcharan Tony Singh Sanghera
Managing Director
CANNON TOOLS LTD
2019-04-02

2
Due to continuing improvements, actual product may differ slightly from the product
described here in. Tools required for assembly and service may not included.
SPECIFICATIONS
Glue Gun: 220V-240V~50Hz 40W
Crossbar Adjustment: 3” min to 5” max
UNPACKING
When unpacking, make sure that the item is intact and undamaged.
Check that no parts are missing.
IMPORTANT SAFETY INFORMATION
1. Always wear approved safety goggles and heavy duty work gloves during use.
2. Contains glue; keep away from children. This product is not a toy, do not allow
children to play with or go near this item.
3. Use as intended only.
4. Inspect before every use; do not use if parts are loose or damaged.
5. Maintain product label and name-plates. These carry important safety
information.
6. Always store is a safe, secure place.
7. Keep these instructions for future use.
INSTRUCTIONS
Please read the ENTIRE IMPORTANT SAFETY INFORMATION section at the
beginning of this document including all text under subheadings therein before set
up or use of this product.
1. Insert Glue Stick (2) into Glue Gun (1). Plug in Glue Gun and allow to warm up
for then to fifteen minutes before use.
2. Using clean cloth (not include), clean dent area with Release Agent (3). Then
apply heated glue from Glue Gun to end of desired Pull Tab (4).
3. Place Pull Tab on centre of dent and hold there for ten seconds. WARNING! Do
not push Pull Tab against dent.
4. Place cross bar (5) over Pull Tab, setting Adjusters (9) to desired length.
Thread Wing Nut (6) onto end of Pull Tab. Continue to twist Wing Nut until dent
is raised. Stop when dent returns to a normal surface level.
5. Unthread Wing Nut and remove Cross Bar and Pull Tab from surface. Apply
two drops of Release Agent to spot of dried glue. Use Scraper to peel off
softened glue patch.
6. If a high spot has been created, use a hammer (not include) and lightly tap
Dowel (8) against raised spot until desired smoothness is reached.
7. Note: The Dent Master repair kit will not repair all kinds of dents, regardless of

3
size. The Dent Master will also not work on aluminium panels or surfaces.
DENT REPAIR KIT-INSTRUCTIONS FOR USE
TROUBLE SHOOTING:
Ideal operation conditions:
In the shade and with a temperature range from 10-260C
The dent does not come out completely:
It may take up to 10 pulls to achieve the desired result and even then it may not be
100% equalised.
The dent has been pulled more than 10 times and there is still a very small
dent left:
The dent is too sharp for the “Dent Repair Kit”.
Glue stays on the dent pulling tab instead of the car:
This is ok; the glue may stay on the car or the pulling tab.
Large dent repair:
The system can repair dents up to the size of a grapefruit with excellent results:
Simply start at the outer edge of the dent with your “Dent Pulling Tab”.
Follow the steps 1-7 around the outer perimeter of the dent and slowly spiral your
way into the centre of the dent. Imagine a clock face, start at 12,3,6 and so, moving
in a spiral into the centre until the dent is removed.
SYMBOLS
Denotes risk of
personal injury or
damage to the tool
WARNING – To
reduce the risk of
injury, user must
read instruction
manual”
In accordance with
essential safety
standards of
applicable European
directives
Class II- The
machine is double
insulated; Earthing
wire is therefore no
necessary
Mandatory use of
eye protection
Wear noise
protection
WEEE
Do not dispose of
Waste Electrical
& Electronic
Equipment in with
domestic rubbish

4
See diagram & parts information
Part
Description
Qty
1
Hot Glue Gun
1
2
Glue stick
3
3
Release Agent
1
4
Dent pulling tabs
2
5
Pulling Bridge
1
6
Wing Nut
1
7
Glue Scraper
1
8
Knockdown
1
9
Adjuster
2
Please note: Parts are listed and shown for illustration purposes only, and are not
available as replacement parts.

5
WARNING: Using hand tools can be dangerous. Always use eye
protection and other protective safety wear when using this
product. Select the correct type and size of tool for work.
Keep away from children.
GLUE GUN – INSTRUCTIONS FOR USE
The glue sticks to many surfaces including wood, plastic ,paper and cardboard
OPERATION INSTRUCTIONS
Step 1
Insert one of the glue sticks through the
tunnel on the back of the gun
Step 2
Plug cord into an electrical outlet and
wait 5 minutes to heat up the glue.
Then apply the glue by continuously
pressing the trigger.
Step 3
Release the trigger to stop the flow of glue.
Apply pressure on the glued parts for
approximately 60 seconds for complete
bonding.
WARNING / CAUTON:
Do not touch the nozzle or melted glue. Operating temperature of the gun is 1500C
Always unplug the cord when the gun is not in use
Keep out of reach of children and store in a safe place.

6
ELECTRICAL INFORMATION
Warning
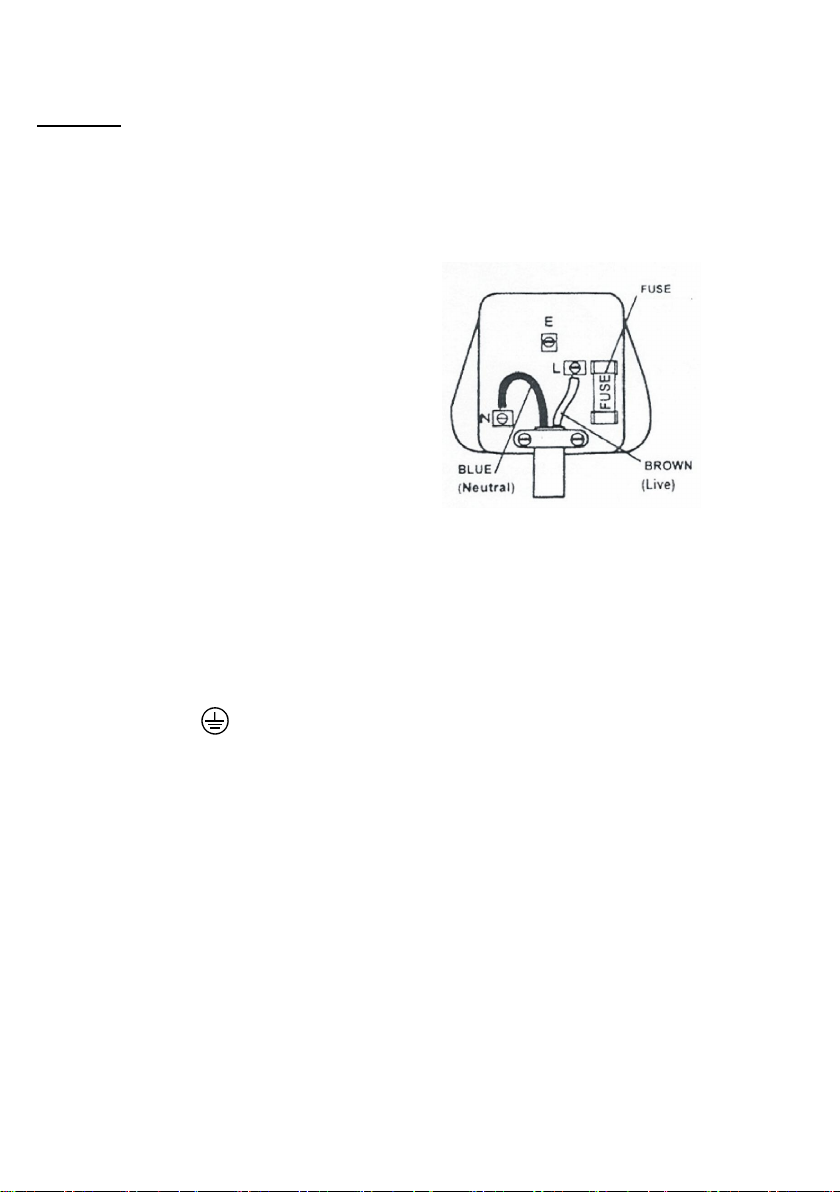
Mains plug replacement (UK & Ireland only)
If you need to replace the fitted plug of the tool, then follow the instructions below.
Machines that are connected direct to mains supply.
For machines that are double insulated, do not require a connection to earth.
If in doubt consult a qualified electrician
The wires are coloured as follows
Blue Neutral (N)
Brown Live (L)
3amp BS 1363A Fuse
Always secure the wires in the plug terminals carefully make sure no loose strands
are left exposed as they can short circuit and cause injury, fire and or damaged the
tool.
Secure the cable in the cord grip firmly.
Never use a light socket. Never connect the live (L) or neutral (N) wires to the earth
pin marked (E)
NOTE: If your mains wires differ from the above consult a qualified electrician.
Always make sure the mains supply is of correct voltage and you use the correct
fuse protection
Regularly inspect all machines electrical connection and wiring condition for
damage. Any faults detected should be immediately rectified before further use of
the machine. Always have the wiring checked by a qualified electrician
In use ensure all wiring and extension cords are kept clear of any cutting tools,
sharp objects and any other workshop hazards such as wet floors, chemicals,
solvents etc.
This machine is protected by a 3 amp fuse make sure the correct fuse is used
To prevent fire or shock hazards do not expose these products to rain or moisture.

7
CANNON TOOLS LTD
Add: 20 station road, Rowley Regis, west midlands,B65 0JU.U.K.
Made in China
Table of contents
Other Neilsen Glue Gun manuals
Popular Glue Gun manuals by other brands

Bosch
Bosch 3 603 BA2 0 Original instructions

ADEO Services
ADEO Services KL-1012 Legal Notices and Safety Instructions

Bostik
Bostik TG4 Technical data sheet

Parkside
Parkside PNKP 105 A1 Operation and safety notes

Parkside
Parkside PHP 500 D2 Translation of the original instructions

Sealey
Sealey AK292 instructions

CO/Tech
CO/Tech FL-188A-UK instruction manual

Ryobi
Ryobi PCL921 Operator's manual

Parkside
Parkside PNKP 105 A1 Translation of the original instructions

Stanley
Stanley 6-GR25 Original instructions

Buhnen
Buhnen HB 450 Translation of the original operating manual

STEINEL
STEINEL Gluematic 3002 operating instructions