manuals.online logo
Brands
  1. Home
  2. •
  3. Brands
  4. •
  5. Neilsen
  6. •
  7. Laboratory Equipment
  8. •
  9. Neilsen CT3154 User manual

Neilsen CT3154 User manual

PRODUCT USE AND CARE
This product is not a toy. Keep it out of reach of children.
Use the correct product for the correct vehicle. The correct product will do the job
better and safer at the rate for which it was designed. Do not modify this product or
use it for a purpose for which it is not intended.
Check for misalignment or binding of moving parts, breakage of parts and any other
condition that may affect the product's operation. If damaged, have the product
repaired before use. Use the product and accessories etc., in accordance with these
instructions and in the manner intended for the particular type of product, taking into
account the working conditions and the work to be performed. Use of the product for
operations different from those intended could result in a hazardous situation.
SAFETY INSTRUCTIONS
WARNING! Ensure Health and Safety, local authority and general workshop
practice regulations are adhered to when using tools.
WARNING! Always use caution when working around fuel systems. The fuel in the
fuel rail may be pressurised even if the engine is not running.
IMPORTANT: These instructions are provided as a guide only. Always refer to the
vehicle manufacturer's service instructions, or a proprietary manual, to establish
the current procedure and data, also any warnings or cautions particular to the
vehicle.
DO NOT use the set if any parts are missing or damaged.
DO NOT use this tool for any purpose other than that for which it is designed.
Switch off vehicle's ignition and disconnect the battery before commencing work
under the bonnet.
You must follow the vehicle's service manual cautions when working around the air
bag system. If the cautions are not followed the air bag may deploy unexpectedly
even after the ignition is turned 'OFF', resulting in personal injury.
Never lay tools on the vehicle's battery. This may short the terminals together,
causing harm to yourself, the tools, or the battery.
Operate in a well ventilated area. Do not inhale fuel vapours.
Wear approved eye protection. A full range of personal safety equipment is
available from your dealer.
Wear suitable clothing to avoid snagging. Do not wear jewellery and tie back long
hair.
Keep children and other unauthorised persons away from the working area.
Keep yourself, tools, and test equipment away from hot engine parts.
Always keep a fire extinguisher close by, that is suitable for fuel/ electrical/chemical
fires.
NEVER smoke or have open flames near vehicle.
Always relieve fuel pressure before disconnecting fuel lines from injectors.
Use a rag to cover fuel line fittings, when connecting or disconnecting fuel lines.
Avoid contact with fuel.
Clean up all fuel spills immediately and dispose of all rags properly.
Maintain the tool components in good and clean condition for best and safest
performance.
When work on the vehicle is finished, ensure all connections on vehicle are
restored, and that there are no tools left in the engine bay.
Replace tools in the carrying case and store in a safe, dry, childproof location.
Instruction Manual
14 PIECE INJECTOR EXTRACTOR WITH SLIDE HAMMER
CT3154
Note: The warnings, precautions and instructions discussed in this instruction manual cannot
co ver all possible conditions and situations that may occur. It must be understood by the
operator that common sense and caution are factors which cannot be built into this product, but
must be supplied by the operator.
Instruction Manual
Suitable for the fast and safe removal of Bosch, Delphi, Denso, and Siemens diesel
injectors. Set includes keys and deep, open profile sockets used to dismantle injectors
plus adaptors for attaching the slide hammer securely to the body of the injector. Ball
joint allows hammer to be used in confined areas.
INTRODUCTION& CONTENTS
ASSEMBLY
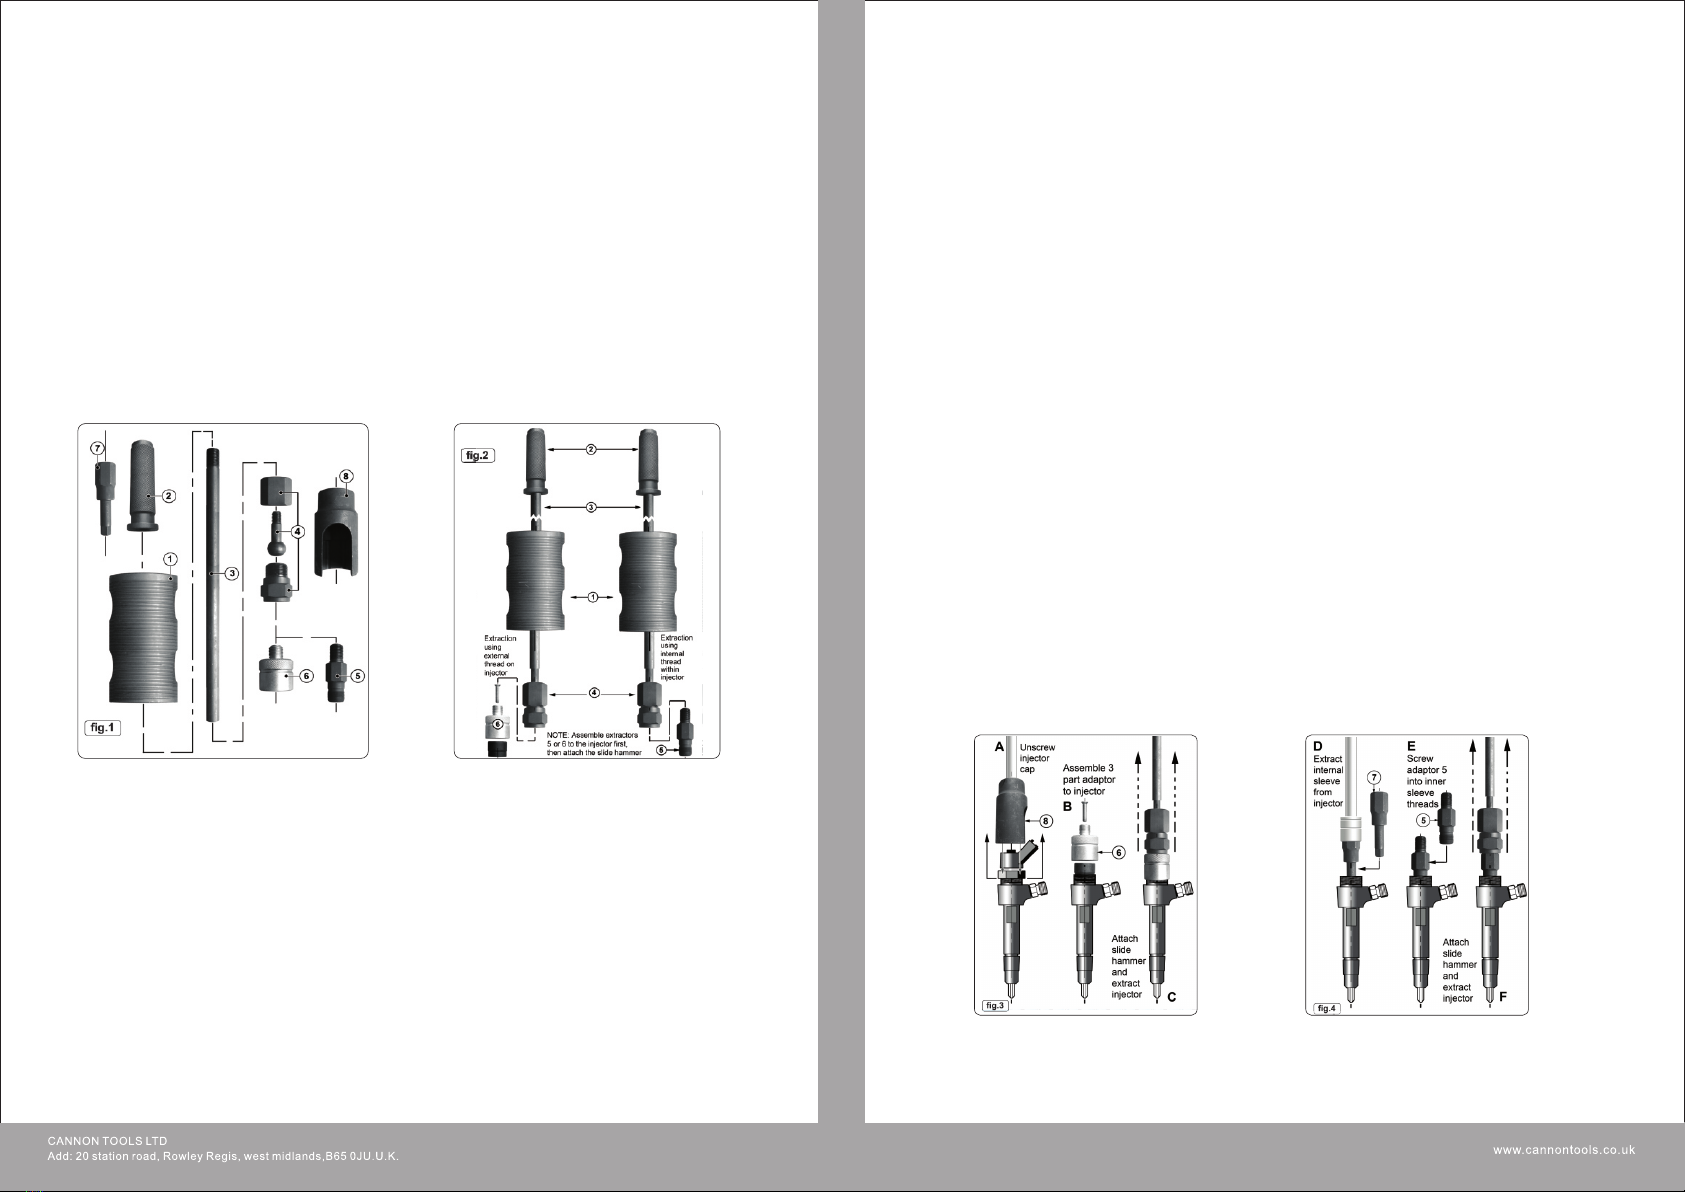
1. Referring to the individual components in fig.1. assemble the injector puller as shown
in fig.2. overleaf.
2. Use adaptor 6 when the injector is being extracted using the external thread revealed
when the injector cap has been removed.
3. Use one of the adaptors (5) when the injector is being extracted using the internal
thread revealed when the inner sleeve has been removed from the injector.
1. Before working on the fuel system, make sure that the fuel system is not
pressurised. Refer to the manufacturer's instruction manual on how to
de-pressurise the system.
a. Disconnect the injector wires and connections as per the manufacturer's
instructions.
b. Remove any carbon build up from around the injector.
c. Remove the cap from the injector using the appropriate size socket (8).(fig.3.A.)
2. Use of external adaptor (fig.3).
a. Identify the external thread adaptor (6) and separate the inner black part from the
outer silver part by removing the screw from the top of the adaptor.
b. Position the black part inside the top of the injector (see B) then place the silver
part over it, and screw it down firmly onto the external threads revealed when the
cap was removed.
c. Install the screw securely thus locking the adaptor parts tightly together with the
injector thread and wall in between. This ensures a more secure fastening and
reduces damage to the injector threads.
3. Use of internal adaptor (fig.4).
a. Remove the internal parts from the injector to gain access to use the security hex
key (7). It may be necessary to remove the injector veins by force. Insert the
security hex into the inner sleeve (see D). Turn the security hex anti-clockwise
using a 21mm socket to remove the inner sleeve.
b. Screw the appropriate internal adaptor (5) into the threads of the injector and
tighten with a suitable spanner (see E).
4. Removing the injector.
a. Screw the slide hammer assembly (handle, shaft and sliding hammer) securely
onto the adaptor.
b. The injector can now be removed using reasonable force on the slide hammer. Be
prepared for the sudden release of the injector from the cylinder head.
c. If the injector cannot be removed, it may be necessary to consult a main dealer or
a diesel specialist, to avoid damage to the engine.
d. When an injector has been removed, it is recommended that only a new or
refurbished injector is fitted. Follow manufacturers fitting and safety instructions.
Contents: (refer to fig.1)
Item Description
1 Sliding Hammer
2 Handle
3 Shaft
4 Ball Joint Adaptor (3 piece)
5 Adaptors - (5 Pieces - 4 internal thread, 1 external thread)
6 External Adaptor - (3 piece)
7 Security Hex Key - 1/2"sq. drive
8 Sockets - (4 pieces - M25, M27, M29, M30 - 1/2"sq. drive
OPERATION
NOTE: The technique required for removal of the injector will depend on which
system is fitted to the vehicle. Always use an external adaptor first if possible.
If by using reasonable force the injector cannot be removed, use an internal
adaptor.

Popular Laboratory Equipment manuals by other brands

SYSMEX CS-5100 LAS Instructions for use

SYSMEX

SYSMEX CS-5100 LAS Instructions for use

Hartridge HK853 user manual

Hartridge

Hartridge HK853 user manual

SciCan statim 2000 G4 Operator's manual

SciCan

SciCan statim 2000 G4 Operator's manual

Thermo Scientific ULT185-5-A instruction manual

Thermo Scientific

Thermo Scientific ULT185-5-A instruction manual

Agilent Technologies 990 user manual

Agilent Technologies

Agilent Technologies 990 user manual

Sigma 3-16K operating manual

Sigma

Sigma 3-16K operating manual

SYNBIOSIS Protos 3 quick guide

SYNBIOSIS

SYNBIOSIS Protos 3 quick guide

Streck ESR-Auto Plus 505 Operator's manual

Streck

Streck ESR-Auto Plus 505 Operator's manual

EF FR-DEVIRA user manual

EF

EF FR-DEVIRA user manual

GE AKTA ready operating instructions

GE

GE AKTA ready operating instructions

avantor VWR MICRO STAR 30 instruction manual

avantor

avantor VWR MICRO STAR 30 instruction manual

GE MicroCal iTC200 operating instructions

GE

GE MicroCal iTC200 operating instructions

Julabo HT60-M2 operating manual

Julabo

Julabo HT60-M2 operating manual

COXEM SPT-20 operating manual

COXEM

COXEM SPT-20 operating manual

dosatron D8RE3000 Troubleshooting

dosatron

dosatron D8RE3000 Troubleshooting

Metrohm 930 Compact IC Flex manual

Metrohm

Metrohm 930 Compact IC Flex manual

Thermo Scientific 815 Operating and maintenance manual

Thermo Scientific

Thermo Scientific 815 Operating and maintenance manual

TESTO 871s instruction manual

TESTO

TESTO 871s instruction manual

manuals.online logo
manuals.online logoBrands
  • About & Mission
  • Contact us
  • Privacy Policy
  • Terms and Conditions

Copyright 2025 Manuals.Online. All Rights Reserved.