Neitz BXa-13 User manual

Ophthalmoscope
BXα-13/BXα-13A
User’s Manual
Thank you for purchasing the NEITZ Ophthalmoscope BXα-13 and/or BXα-13A. This is a hand-
held ophthalmic device (direct ophthalmoscope) using dry-cell batteries to power a halogen
lightbulb for examination of the internal areas and fundus of the eye.
This device is available in 2 models, depending on the size of the batteries used:
Ophthalmoscope BXα-13 (hereinafter referred to as “BXα-13”) using 2 C-size batteries.
Ophthalmoscope BXα-13A(hereinafter referred to as “BXα-13A”) using 2 AA-size batteries.
Please read this User’s Manual carefully before use to avoid unexpected accidents and store it in
a safe place for future reference.
TD11-10750002E-2

i
Table of Contents
1Important Information................................................................................................................1
1.1 Intended Use...................................................................................................................... 1
1.2 Symbols ............................................................................................................................. 1
1.3 Labeling on Package.........................................................................................................2
1.3 Safety Information.............................................................................................................. 2
2Package Contents and Nomenclature...................................................................................... 4
3Operation................................................................................................................................... 5
3.1 Turning Illumination ON/OFF............................................................................................. 5
3.2 Correction Lens and Filters................................................................................................ 5
3.2.1 Rekoss Lens...............................................................................................................5
3.2.2 4000 K and Polarizing Filters ..................................................................................... 5
3.2.3 Observation Polarizing Filter...................................................................................... 6
3.2.4 Illumination Dial.......................................................................................................... 6
3.3 Viewing the Fundus...........................................................................................................6
4Maintenance.............................................................................................................................. 8
4.1 Cleaning.............................................................................................................................8
4.2 Replacing Batteries............................................................................................................ 8
4.3 Replacing the Lightbulb..................................................................................................... 8
4.4 Disposal.............................................................................................................................8
5Troubleshooting.........................................................................................................................9
6Specifications..........................................................................................................................10
7Contact Information..................................................................................................................11
ANNEX ........................................................................................................................................... 12

1 / 13
1 Important Information
For the U.S. Market;
CAUTION: Federal law restricts this device to sale by or on the order of a physician.
1.1 Intended Use
The NEITZ Ophthalmoscope BXα-13 or BXα-13A is a hand-held, battery-powered medical
device containing a halogen bulb for illumination and viewing optics for examination of the
media (cornea, aqueous, lens and vitreous) and retina of the eye.
Do not use this device for any purpose other than its intended use.
1.2 Symbols
The following symbols are used on this manual and/or package to assist you in proper
handling and use of the BXα-13 or BXα-13A, and to warn and caution you of potential
hazards to yourself and others.
Potentially hazardous situation which, if not avoided, could result in
death or serious injury
Potentially hazardous situation which, if not avoided may result in minor
or moderate injury or property damage
Prohibited actions (must not be performed)
Required actions (must be performed)
Consult User’s Manual for information on proper use
Temperature limits (°C) for storage and transport
Relative humidity limits (%) for storage and transport
Atmospheric pressure limits (hPa) for storage and transport
Fragile. Handle with care
Keep dry
Product complies with the European requirements for safety, health,
environment and customer protection.
Product must not be disposed of with general household waste under
the WEEE directive
Manufacturer’s name and address
Prohibited
Instruction

2 / 13
Barcode for traceability purposes
Serial number
Authorized representative in Europe
1.3 Labeling on Package
The following label has been adhered to the Outer Package of the BXα-13 or BXα-13A to
assist you in the proper transport and storage of the device.
1.3 Safety Information
For your safety, please comply with the following precautions.
Do not use in oxygen rich environments, in the presence of propane,
gasoline or other combustible gasses, or near dust and debris. Doing so may
cause explosion.
Do not leave the illumination on for prolonged periods or cover the device
during illumination. Doing so may cause the device to reach high
temperatures, resulting in fire, burns or device failure.
Never touch liquid which may have leaked from the batteries. In case of
contact with the eye(s), flush with clean water without rubbing, and consult a
physician immediately. If leaked liquid gets on skin or clothing, wash with
clean water immediately. Failure to do so may result in serious injury,
including loss of eyesight.
Do not attempt to disassemble or modify the device. Doing so may result in
electric shock, fire or device failure.
Do not touch the device with wet hands. Doing so may result in electric
shock.
Do not touch the Lightbulb immediately after turning the illumination off, as
the bulb may be extremely hot. Doing so may result in burns.
Prohibited
Prohibited
Prohibited
Prohibited
Prohibited
Prohibited
Environmental conditions for
transport and storage

3 / 13
Do not illuminate the patient’s eye for more than 1 minute per eye and be
sure to keep illumination at minimal intensity needed to view the fundus.
Use of accessories other than those specified or provided by the
manufacturer of this equipment could result in increased electromagnetic
emissions or decreased electromagnetic immunity of this equipment and
result in improper operation.
Do not apply strong force to the device or handle it roughly. Doing so may
result in injury or device failure.
Do not use in excessively humid or saline environments, or places where the
device may be sprayed with water. Doing so may result in electric shock or
device failure.
Do not expose the device to direct sunlight or harmful radiation. Doing so
may lead to unexpected heating and result in device failure.
Do not sterilize.
Do not use paint thinners, cleaning agents or boiling water to clean the
device. Doing so may cause deformation or device failure.
Do not immerse in cleaning detergents or rinse with water. Doing so may
cause device failure.
Do not use the BXα-13 or BXα-13A adjacent to or stacked with other
equipment. In cases where adjacent or stacked use is necessary, verify the
BXα-13 or BXα-13A operates normally prior to use.
Portable RF communications equipment (including peripherals such as
antenna cables and external antennas) should be used no closer than 30 cm
(12 inches) to any part of the BXα-13 or BXα-13A. Otherwise, degradation of
the performance of this equipment could result.
Be sure the head and handle are attached firmly before use.
Use only alkaline dry-cell batteries.
When replacing batteries, replace both cells at the same time using identical
batteries.
Remove batteries from the device during prolonged periods of disuse.
Allow the device to return to room temperature before unpacking. Not doing
so may cause condensation and lead to device failure.
Make sure the illumination is turned off during transport or storage and only
use the specified casing. Failure to do so may result in deformation, device
failure or fire.
Prohibited
Prohibited
Prohibited
Prohibited
Prohibited
Prohibited
Prohibited
Prohibited
Prohibited
Prohibited
Instruction
Instruction
Instruction
Instruction
Instruction
Instruction

4 / 13
2 Package Contents and Nomenclature
Make sure to match all items in the package with the components shown below and inspect
each item for damage. Should any items be missing or damaged, do not use the BXα-13 or
BXα-13A and immediately contact your local dealer.
1) Head Part of BXα(hereinafter referred to as “Head”)
①Viewing Window
②Rubber Stabilizer
③Aperture Shutter
④Rekoss Disc
⑤Auxiliary Lens Selector
⑥Diopter Indicator
⑦Illumination Dial
⑧Filter Lever
⑨Observation Polarizing Filter
⑩Lightbulb
⑪Manufacturer’s Logo
⑫Model Logo
⑬Country of Origin
⑭CE Mark
⑮Serial Number of Head Unit
2) Battery Handle (hereinafter referred to as “Handle”)
⑯C-size Battery Handle (BXα-13)
⑰AA-size Battery Handle (BXα-13A)
⑱Switch Button
⑲Switch Ring
⑳Bottom Cap
㉑CE Mark
㉒Serial Number of Handle
3) Dry Cell Batteries (Preassembled with the Head and Handle prior to shipping)
BXα-13: C-size batteries (2 pcs.)
BXα-13A:AA-size batteries (2 pcs.)
4) Spare Bulb
Type L-30 (1 pc.)
5) Carrying Case
6) Outer Package
7) User’s Manual

5 / 13
3 Operation
3.1 Turning Illumination ON/OFF
While pressing the Switch Button on the Handle,
rotate the Switch Ring to the left (towards ON) to
turn the illumination on (see Fig. 3.1).
The device is equipped with a built-in illumination
adjustment function. The further left the ring is
rotated, the brighter the illumination.
To turn the illumination off, rotate the Switch Ring
to the right until the Switch Button returns to the
OFF position.
3.2 Correction Lens and Filters
3.2.1 Rekoss Lens
The Rekoss Lens is used to adjust the diopter between the examiner and patient to bring
the fundus image into focus. Use the “+” lens to correct hyperopia and “-" lens to correct
myopia.
[Example]
For an examiner with myopia and a patient with hyperopia:
-5 D
+
+3 D
+
-2 D
=
-4 D
Examiner’s Myopia
Patient’s Hyperopia
Accommodation
Power
In the above example, it would be necessary to set the Rekoss Disc to -4 D.
However, in practice, the Rekoss Disc is rotated while observing the fundus to find the
appropriate diopter.
In cases of extreme myopia or hyperopia, where the image cannot be focused by using
only the Rekoss Disc, it is also possible to insert an auxiliary lens for accommodation. The
following ranges may be covered depending on the position of theAuxiliary Lens Selector:
Position
Range
-
-36 D to -13 D
・
-12 D to +11 D
+
+12 D to +35 D
3.2.2 4000 K and Polarizing Filters
It is possible to insert the following filters in the illumination system using the Filter Lever:
Position Filter Function
O Open No filter is inserted in the center position
F 4000 K A 4000 K filter is inserted into the illumination system. Use
for observation with light resembling natural light (daylight).
P Polarizing A polarizing filter is inserted into the illumination system.
Use in combination with the Observation Polarizing Filter.
Fig. 3.1
Switch Button
Switch Ring

6 / 13
3.2.3 Observation Polarizing Filter
The Observation Polarizing Filter is used when light reflected from the cornea interferes
with examination.
Rotate the disc to insert a polarizing filter into the observation system. When the white
mark on the disc faces up, the Observation Polarizing Filter is aligned perpendicular to the
Polarizing Filter mentioned in 3.2.2, for minimum reflection.
Rotating the disc further will rotate the polarizing axis to allow for a brighter image.Adjust
the disc to obtain the optimum image.
The disc will stop with a click to indicate that the Observation Polarizing Filter has been
disengaged.
3.2.4 Illumination Dial
The Illumination Dial can be used to adjust the illumination entering the patient’s eye as
follows:
Position Aperture/Filter Function
○Normal Aperture Used for typical fundus examinations
Small Aperture Used when examining small pupils. In particular, when
examining through constricted pupils such as during
examination of the macula.
RF Red-Free Filter Red tissue such as blood vessels appear black,
facilitating detection of minute fundal hemorrhages.
Concentric Scale
While observing the patient’s fundus, instruct the
patient to fixate on the center of the concentric scale. It
is possible the determine the presence of eccentric
fixation from the relation between the center of the
concentric scale and the patient’s foveola.
| Slit Using a slit illumination facilitates recognition of
roughness on the surface of the fundus.
3.3 Viewing the Fundus
WARNING
When observing the fundus, use only illumination with the least intensity
necessary for visualization, and do not
illuminate the patient eye for more than
one minute per eye.
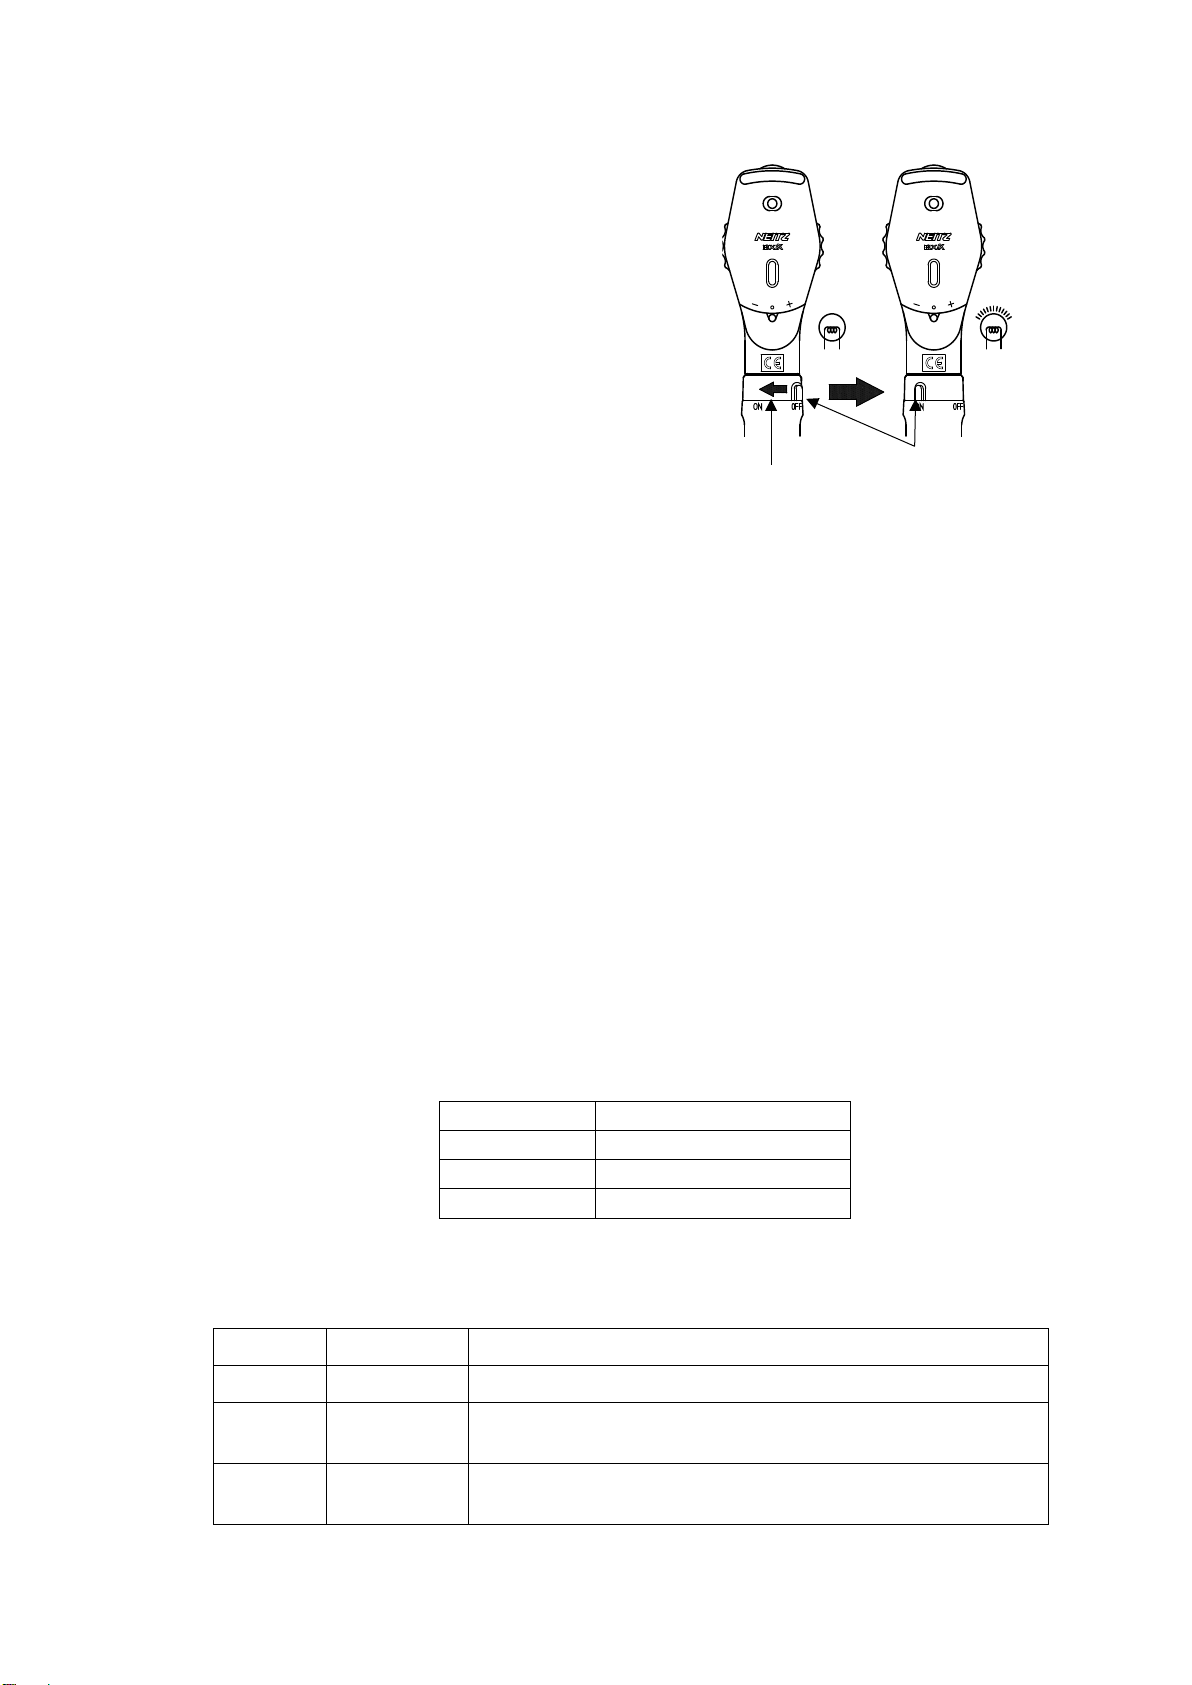
(1) Open theAperture Shutter until it clicks and turn on the
illumination.
(2) To examine the patient’s right eye, hold the
ophthalmoscope in your right hand and observe using
your right eye. To examine the left eye, use your left
hand and eye.
(3) Place your index finger on the edge of the Rekoss Disc
and grip the Handle with the remaining 4 fingers. Use
your index finger to rotate the Rekoss Disc as needed.
(4) Place the upper part of the ophthalmoscope against
the side of your nose and position it so that you have a
clear view when looking through the Viewing Window
(see Fig. 3.2).
(5) While looking at a distant target, rotate the Rekoss
Disc to correct your refractive error.
Fig. 3.2

7 / 13
(6) Sit the patient down away from ambient light and
instruct the patient to focus on a distant target.
(7) To examine the right eye, stand to the right of the
patient. Placing the ophthalmoscope firmly against
your face, direct the light into the patient’s pupil from
a distance of about 15 cm to check for the presence
of a red reflex.
(8) Paying attention not to lose sight of this red reflex,
slowly move closer, with the ophthalmoscope, to the
patient’s face. The fundus image should become
visible at a distance of about 2 cm to 3 cm (see Fig.
3.3).
(9) Rotate the Rekoss Disc as necessary to bring the
fundus image into focus.
(10)To examine other regions of the fundus, move both the ophthalmoscope and your face
in unison. Move in an arc with the patient’s pupil as the center of rotation so as to keep
directing illumination into the pupil.
(11)Turn off the illumination and close the Aperture Shutter once you are finished with the
examination.
Fig. 3.3

8 / 13
4 Maintenance
4.1 Cleaning
If the device becomes dirty, wipe clean with a dry, lint-free cloth.
Should dirt remain, moisten with diluted neutral detergent and wipe clean. Then, wipe dry.
To disinfect the device, only wipe with alcohol, and DO NOT STERILIZE.
Use an air blower or the like to remove dust and debris from the Viewing Window.
4.2 Replacing Batteries
As the batteries become depleted, the illumination will become dark, or will not light at all.
In such cases, follow the directions below to replace the batteries.
(1) Remove the Bottom Cap from the
Handle by turning counter-clockwise.
(2) Remove both batteries.
(3) Insert two (2) new batteries with the plus
terminal going in first (see Fig. 4.1).
(4) Screw the Bottom Cap shut by turning
clockwise.
4.3 Replacing the Lightbulb
WARNING
Do not touch
the Lightbulb immediately after turning the illumination off, as the
bulb may be extremely hot. Doing so may result in burns.
If the BXα-13 or BXα-13A does not light, the Lightbulb may have blown out. Follow the
directions below to check if the Lightbulb has blown out, and if so, to replace the Lightbulb.
(1) Holding the Head in one hand and the Handle in
the other, turn the Handle counter-clockwise to
detach from the Head (see Fig. 4.2).
(2) Remove the Lightbulb from the Head by pulling the
tip which can be found at the bottom of the Head.
(3) Check the Lightbulb, and if the filament has blown
out, replace with a new bulb.
(4) Insert the new Lightbulb until it comes to a stop.
When inserting the bulb, align the protrusion on the
bulb with either of the grooves located at the
bottom of the Head (see Fig. 4.3). Pay close
attention so as not to touch the glass part of the
bulb.
(5) Attach the Head and Handle by screwing the
Handle clockwise.
4.4 Disposal
Dispose of the BXα-13 or the BXα-13A and its accessories in accordance with your local
regulations and/or environmental guidelines.
Fig. 4.1
Handle
Bottom Cap
Direction of Batteries
Fig. 4.2
Fig. 4.3
Protrusion

9 / 13
5 Troubleshooting
If you experience any problems using the BXα-13 or BXα-13A, refer to the table below for
possible solutions. If the problem persists, stop using the device and immediately contact
your local dealer or Neitz directly.
Problem Possible Cause Solution
Light does not turn on
(Diopter Indicator
is dark)
Batteries not inserted. Insert batteries.
Batteries not oriented correctly. Re-insert batteries in the
correct orientation.
Batteries depleted. Replace with new batteries.
Lightbulb blown out. Replace with new Lightbulb.
Illumination blocked
(Diopter Indicator
lights up)
Illumination Dial mispositioned. Rotate the Illumination Dial
until it stops with a click.
Filter Lever mispositioned. Swing the Filter Lever until it
stops with a click.
Aperture Shutter shut. Open theAperture Shutter
until it stops with a click.
Poor illumination Batteries low. Replace with new batteries.
Unintentional use of filters. Disengage filters.
Narrow field of view Aperture Shutter partially shut. Open theAperture Shutter
until it stops with a click.
Rekoss Disc mispositioned. Rotate the Rekoss Disc until it
stops with a click.
Head becomes hot It is normal for heat to be generated during illumination.
The Head may reach temperatures where it feels warm or hot to
the touch.

10 / 13
6 Specifications
Product Specifications
Illumination Source L-30 Halogen Bulb (3 V, 2 W)
Correction Range -36 D to +35 D
Filter Lever (Illumination system) Polarizing filter, 4000 K filter
Observation Polarizing Filter ON/OFF
Illumination Dial Normal Aperture, SmallAperture, Slit, Concentric
Scale, Red-Free filter
Batteries BXα-13 C-size batteries (2 pcs.)
BXα-13A AA-size batteries (2 pcs.)
Illumination Time Approximately 80 min.
Dimensions*1 BXα-13 85 mm x 245 mm x 45 mm
Approximately 550 g
BXα-13A 85 mm x 245 mm x 45 mm
Approximately 450 g
*1: Values when stored in case.
Classification
Degree of protection against electric
shock
Internally powered ME equipment
Applied parts
No applied parts
Degree of protection against harmful
ingress of water or particulate matter
IPX0
Method(s) of sterilization
Do not sterilize
Suitability for use in an oxygen rich
environment
Do not use in oxygen rich environments
Mode of operation
Continuous operation
Safety Standards
Electric Safety
IEC 60601-1:2005+AMD1:2012
Electromagnetic Disturbances
IEC 60601-1-2:2014
Ophthalmic Instruments
ISO 15004-1:2006
Light Hazard
ISO 15004-2:2007
Direct Ophthalmoscopes
ISO 10942:2006
Environmental Conditions
Use
Storage
Transport
Temperature
+10 °C to +35 °C
-10 °C to +55 °C
-10 °C to +55 °C
(50 °F to 90 °F)
(14 °F to 131 °F)
(14 °F to 131 °F)
Relative Humidity
30 % to 90 %
10 % to 95 %
10 % to 95 %
(no condensation)
(no condensation)
(no condensation)
Atmospheric
Pressure
800 hPa to 1060 hPa 500 hPa to 1060 hPa 500 hPa to 1060 hPa

11 / 13
7 Contact Information
If you have any questions or need technical support, contact your local dealer or Neitz
located at the following address.
[LOCAL DEALER]
Neitz Instruments Co., Ltd.
4F Ichibancho Court, 15-21, Ichibancho, Chiyoda-ku
Tokyo 102-0082, Japan
Phone: +81-3-3237-0552 Fax: +81-3-3237-0554
e-mail: i[email protected].jp
URL: http://www.neitz-ophthalmic.com/
Medical Device Safety Service GmbH
Schiffgraben 41, D-30175 Hannover, Germany

12 / 13
ANNEX
EMC Guidance
The BXα-13 or BXα-13Ais a medical device and requires special precautions regarding EMC.
Refer to the following EMC information for appropriate installation and putting into service.
Take care when using portable and mobile RF communications equipment in proximity of the
BXα-13 or BXα-13A, as they can affect performance.
(1) Environments of intended use:
Professional healthcare facility environments and home healthcare environments
(2) Replaceable cables, transducers or accessories likely to affect compliance of the BXα-13 or
BXα-13A with the applied EMC Standard:
N/A
(3) Applied EMC Standard:
IEC 60601-1-2:2014
(a) Connection to the public mains network: None
(b) Applicable port(s): Enclosure Port
Electromagnetic Emissions
Phenomenon Applied Standard Emission Test Levels
Conducted and radiated RF
emissions CISPR 11 Class B Group 1
Electromagnetic Immunity
Phenomenon Applied Standard Immunity Test Levels
Electrostatic discharge IEC 61000-4-2 ± 8 kV contact
± 2 kV, ± 4 kV, ± 8 kV, ± 15 kV air
Radiated RF EM fields /
Proximity fields from RF
wireless communications
equipment
IEC 61000-4-3 10 V/m
80 MHz – 2.7 GHz
80 % AM at 1 kHz
385 MHz – 5785 MHz
Rated power frequency
magnetic fields IEC 61000-4-8 30 A/m
50 Hz or 60 Hz
(4) Effect of electromagnetic disturbances on essential performance
Essential Performance Outcome if Essential Performance is Lost or Degraded
Continuous steady illumination Flickering illumination

13 / 13
Notes:

Manufactured by
NEITZ INSTRUMENTS CO., LTD.
4F Ichibancho Court, 15-21, Ichibancho, Chiyoda-ku,
Tokyo 102-0082, Japan
Phone: +81-3-3237-0552 FAX: +81-3-3237-0554
E-mail: i[email protected].jp
URL: http://www.neitz-ophthalmic.com
Distributed by
As part of our policy of continued product improvement, we reserve the right
to alter and/or amend specifications at any time without prior notice.
TD11-10750002E-2
201901
Printed in Japan
This manual suits for next models
1
Table of contents
Other Neitz Medical Equipment manuals
Popular Medical Equipment manuals by other brands

Satelec
Satelec ACteon i-Surge+ user manual

3A HEALTH CARE
3A HEALTH CARE MINIASPEED Battery Evo Plus instruction manual

Handicare
Handicare LI2590.125 Series manual

Apex Digital
Apex Digital XT Fit instruction manual

B medical systems
B medical systems MRB 3000 SDD Instructions for use

MedNet
MedNet WB1000 instruction manual