NENZ NZ30-01 User manual

NZ30-01 Multi-functional Hammer with DDE
Operating Manual (Professional )
DDE: Dedicated Dust Extraction


Company Profile
NENZ Electric Technology(Dong Guan)Co., Ltd which
focuses on research and development of electric tools as well as
sales and after-sale service of those is one of the high-tech
enterprises. The company is composed of returnees who have
built a powerful team with strong design and development
capabilities, setting up a research and development center,
manufacturing center, marketing center in the forefront of the
world's most dynamic and innovative areas of Dong guan City,
Guangdong Province.
The company concentrates on research and development of all
kinds of its own professional-grade and industrial-grade brand of
power tools, hand tools and garden tools. The main products are
various DC (AC) rotary hammers, demolition hammers, polishers,
sanders, drills, angle grinders, planers, circular saws, cutting
saws, flashlights, chain saws, lawn mowers, etc. The company
pursues innovation constantly, adhering to the developmental
concept "superb technology, quality service and excellence“,
which always sticks to the business philosophy "serving for
customers and creating greater value for customers". It constantly
improves and enhances product quality and service quality. Our
products are widely used in building decorations, common
decorations, high-speed rail construction, shipbuilding industry,
water conservancy industry etc.. To ensure world-class quality
products, the company has introduced all kinds of internationally
advanced detection equipment, and strives to building the testing
center of domestic leading level.
NENZ —— CREATE THE FUTURE!
1

1. Power Input Terminals for DDE 2 .Power Output Terminals for DDE
3. Guide Convex Platform for Hammer 4. Guide Groove for DDE
5. DDE Button for Disassembly 6. Dust Box
7. Button for Dust Box 8 Depth Release Ring
9 Nozzle Top
2
3
1
4
5
8
9
Part Names
6
7
2

Operation
Introduction
s
2.Finished Installation
3
3. Uninstalling DDE
Press the DDE button at the
same time pulling out of DDE.
I. Installing and
Uninstalling DDE
Note: Only if you pull out the bit, you would
disassemble the DDE sucessufully.
DDE bottom should parallel with
that of hammer.
DDE button
1. Installing DDE
1). Rotate the side handle and make
it be in the vertical position of
hammer housing support,
2) .Make the DDE be upright and let
hammer guide convex platform aim
at DDE guide groove.

Operation
Instructions
1. Installing Bits
1).The bit inclinedly insert
into the nozzle top,
2).Then push the bit into chuck
horizontally.
3.Uninstalling Bits
1).Press the chuck and pull
out of bit horizontally,
2).Then inclinedly pull out of
the bit from nozzle top.
2. Finished Installation
II.Installing and
uninstalling Bit
4
Nozzle Top
Chuck

DF
1) Rotate the depth release
ring for unlock,
2)Then move the depth release
ring forward and backword
for setting the drilling depth,
3) Finally Rotate the depth
release ring for lock-up.
III.Setting the Drilling Depth
Operation
Instructions
5
Depth Release Ring
Drilling Depth
Drilling Depth

V. Installing and
Unstalling Dust Box
Operation
Instructions
1). Uninstalling Dust Box
Press two-side button to
pull out of the dust box.
2). Installing Dust Box
Push the dust box into DDE
housing along guide groove.
6
1). Uninstalling Nozzle Top
Press button to pull out of
nozzle top.
2). Installing Nozzle Top
Insert nozzle top into DDE
vertically.
Note: The hair brush and dust shield for nozzle top are wearing parts, For best performance,
you should change nozzle top assembly (including hair brush and dust shield )after you have
drilled 5000 holes.
IV. Installing and
Uninstalling Nozzle Top
Nozzle Top
Hair Brush
Dust Shield
Button
Button

2.After getting out of dust
box, you should dump dust
from the open mouth. If there
is residual dust, please tap its
side place to clean out dust.
Please notice that you must
not knock the top of box and
filter.
Filter shroud
Operation
Instructions
7
Maximum
1. You should tap DDE
housing after drill several
holes and observe whether
dust reaches the maximum
recommended capacity or
not from the transparent
window; if it does, you
must clean dust ,which
can ensure best
performance.
Top of Dust Box
Note: The filter is wearing part. For best performance, please change fliter after
you have drilled 5000 holes
VI.Cleaning Dust
Dust Box
Filter
Dumping Dust
Description:
The DDE is an accessory for use with the NZ30 hammer. The DDE has small size
and light weight, can be quickly and easily attached to the NZ30 hammer.
It is applicable to drill in the concrete materials, it's not suitable for use when drilling
in metal or wood. In order to keep the dust collection effect, please clean the dust of
dust box in time.
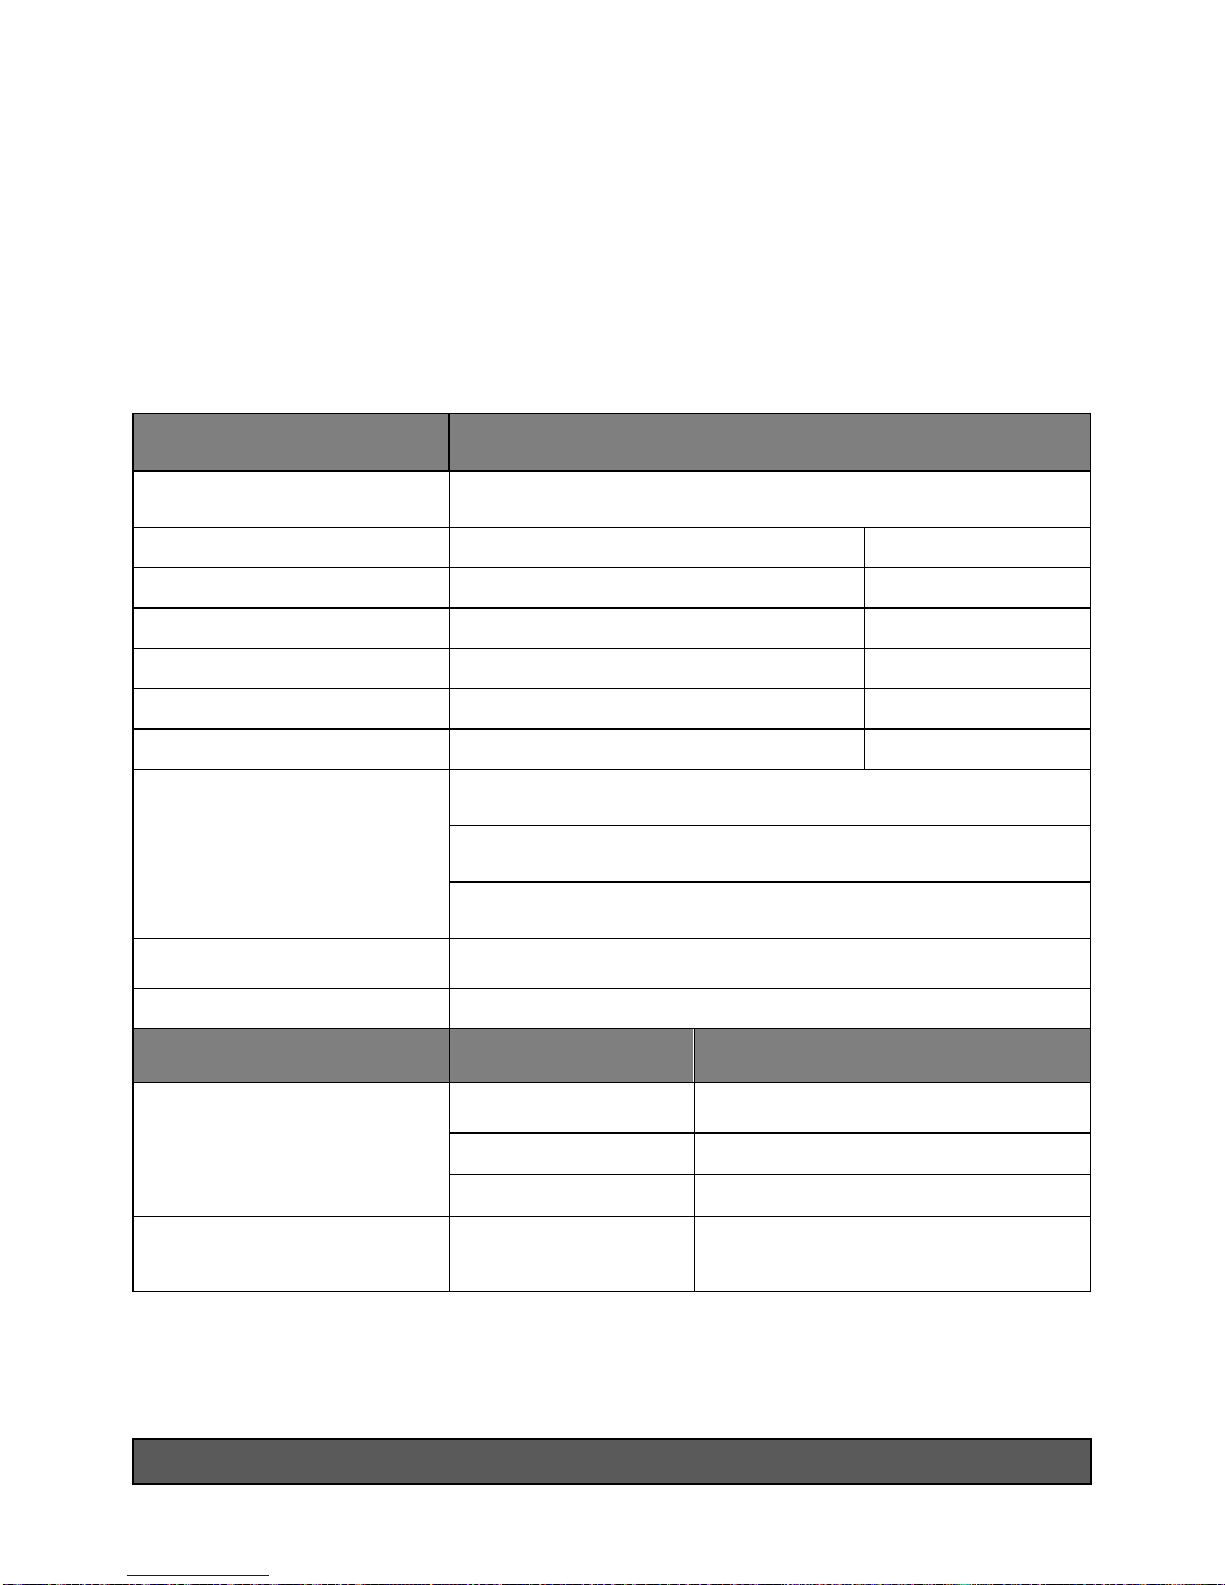
Technical Data
NZ30-01 Hammer with DDE
Production Code
NZ30-01 Hammer with DDE
Rated Voltage
DC 24 V
Voltage
Rated Power
35 W
Watt
Suction Power
10 inH2O
Inch H2O
Weight
0.72Kg
KG
Drilling Hole Depth
Max.84.5mm
MM
Drilling Hole Diameter
Min.Φ6mm~ Max.Φ16mm
MM
Dust Box Capacity
120 Holes(Horizontal drill bit Φ6mm, Depth30mm)
30 Holes (Horizontal drill bit Φ10mm,Depth 50mm)
20 Holes(Horizontal drill bit Φ12mm, Depth50mm)
Filter Capacity
5000 Holes
Nozzle Top Capacity
5000 Holes
Common Problems
Possible Reasons
Proper Measures
1.Dust Overflows
Too much dust in the
dust box
Clean Dust in the Dust Box
Nozzle Top is worn
Change the nozzle top assembly
Hair Brush is worn
Change the nozzle top assembly
2. Bit is not in the center
of nozzle top
it isn't good for
hammer with DDE
assembly
Check hammer with DDE assembly
8

1 SDS Plus Bit(Two Pits ,Two Groove and Round Handle)2 Dust Shield 3 Depth Gauge Rod
4 Button of Depth Gauge 5 Mode Selector Knob 6 Anti-Vibration System 7 F/RButton
8 Trigger 9 Plastic Handle Cover 10 Cord Strain Relief 11 Power Cord
12 Sliding Collar 13 Side Handle 14 Rapid Change Chuck
9
1
2
3
5
8
7
9
10
11
12
13
4
14
6
10
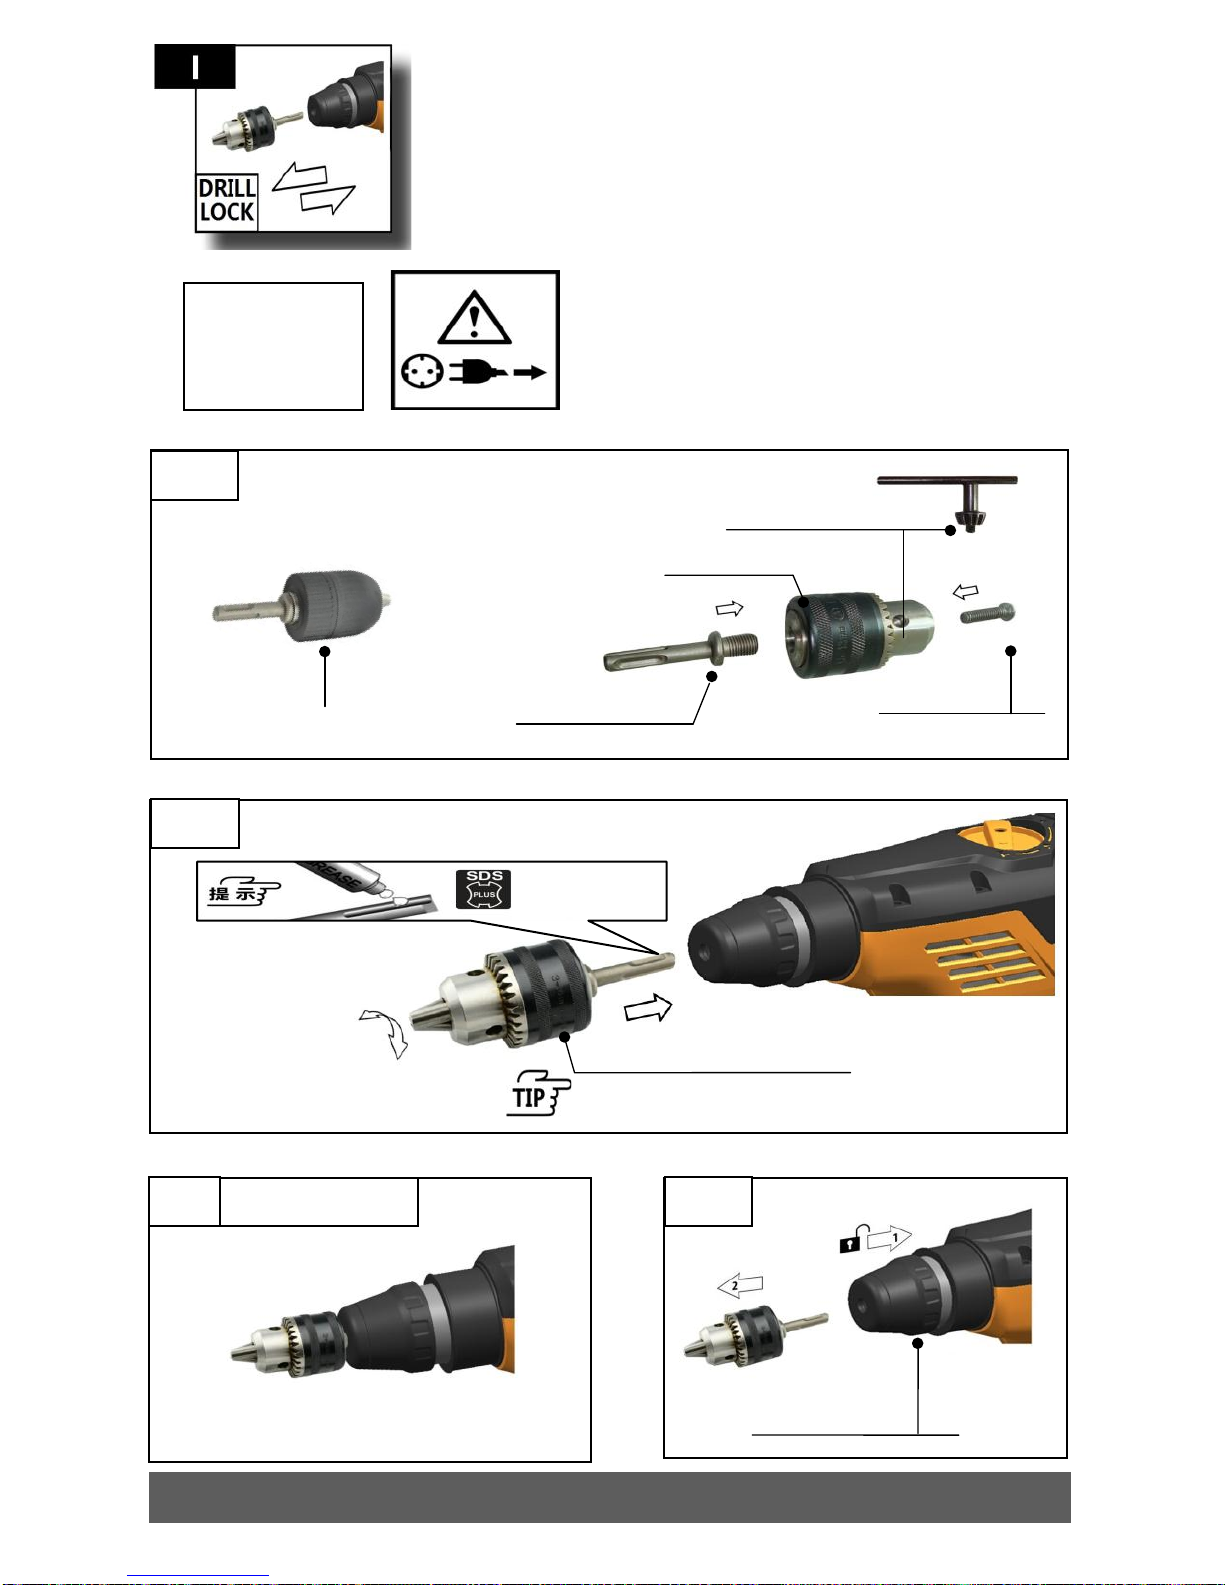
1.
2.
3.
1. Joint Lever
Quickly stick into chuck
4.
Keyless Chuck
Key Chuck
Drill Lock
Assembly
2. Screw connects with lever
Assemble bit by key
Add little
grease
Rotate it when it is inapplicable
Installation Drawing
Press chuck for
pulling out bit
11
1.
2.
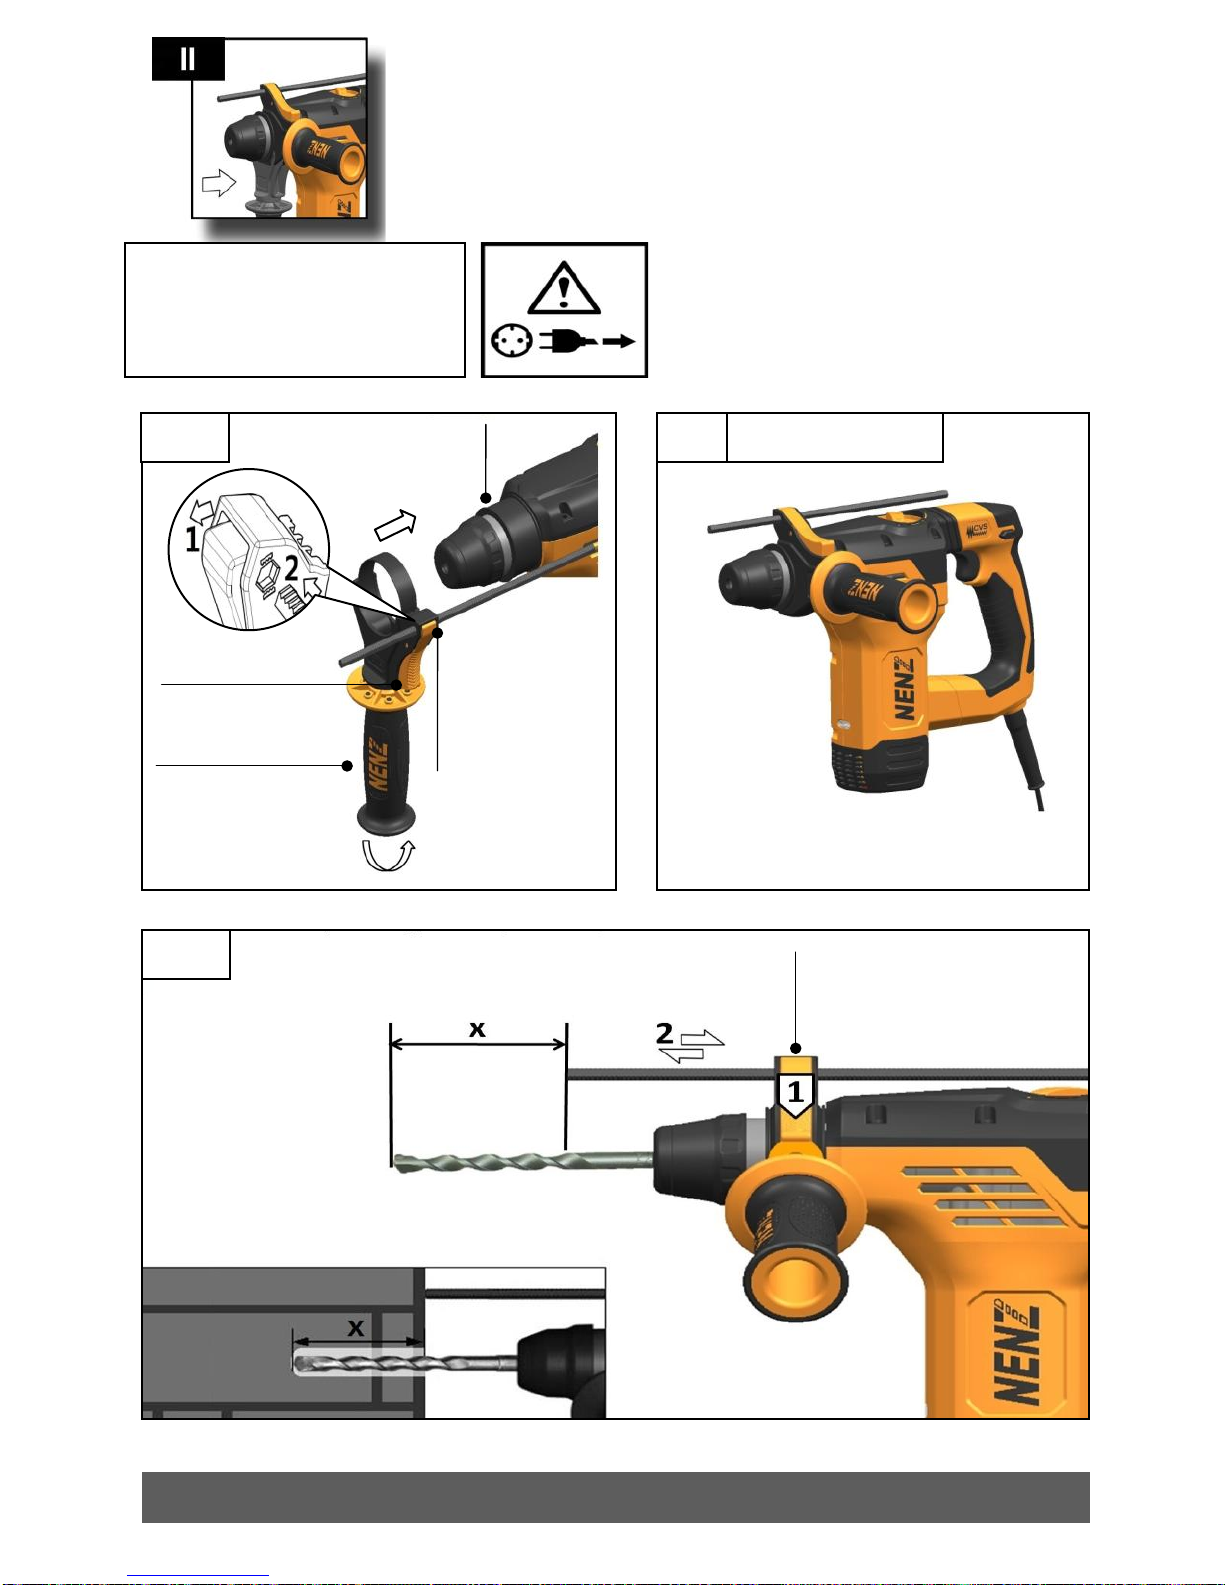
3
Side Handle and
Depth Guage Assembly
3.Assemble it
to the sleeve
Installation Drawing
2. Stick the depth
rod into auxiliary
handle hole along
the teeth direction
1.Press the button
4. Rotate the handle
until lock in the right
position
Press the button for
adjusting drill holes depth
12
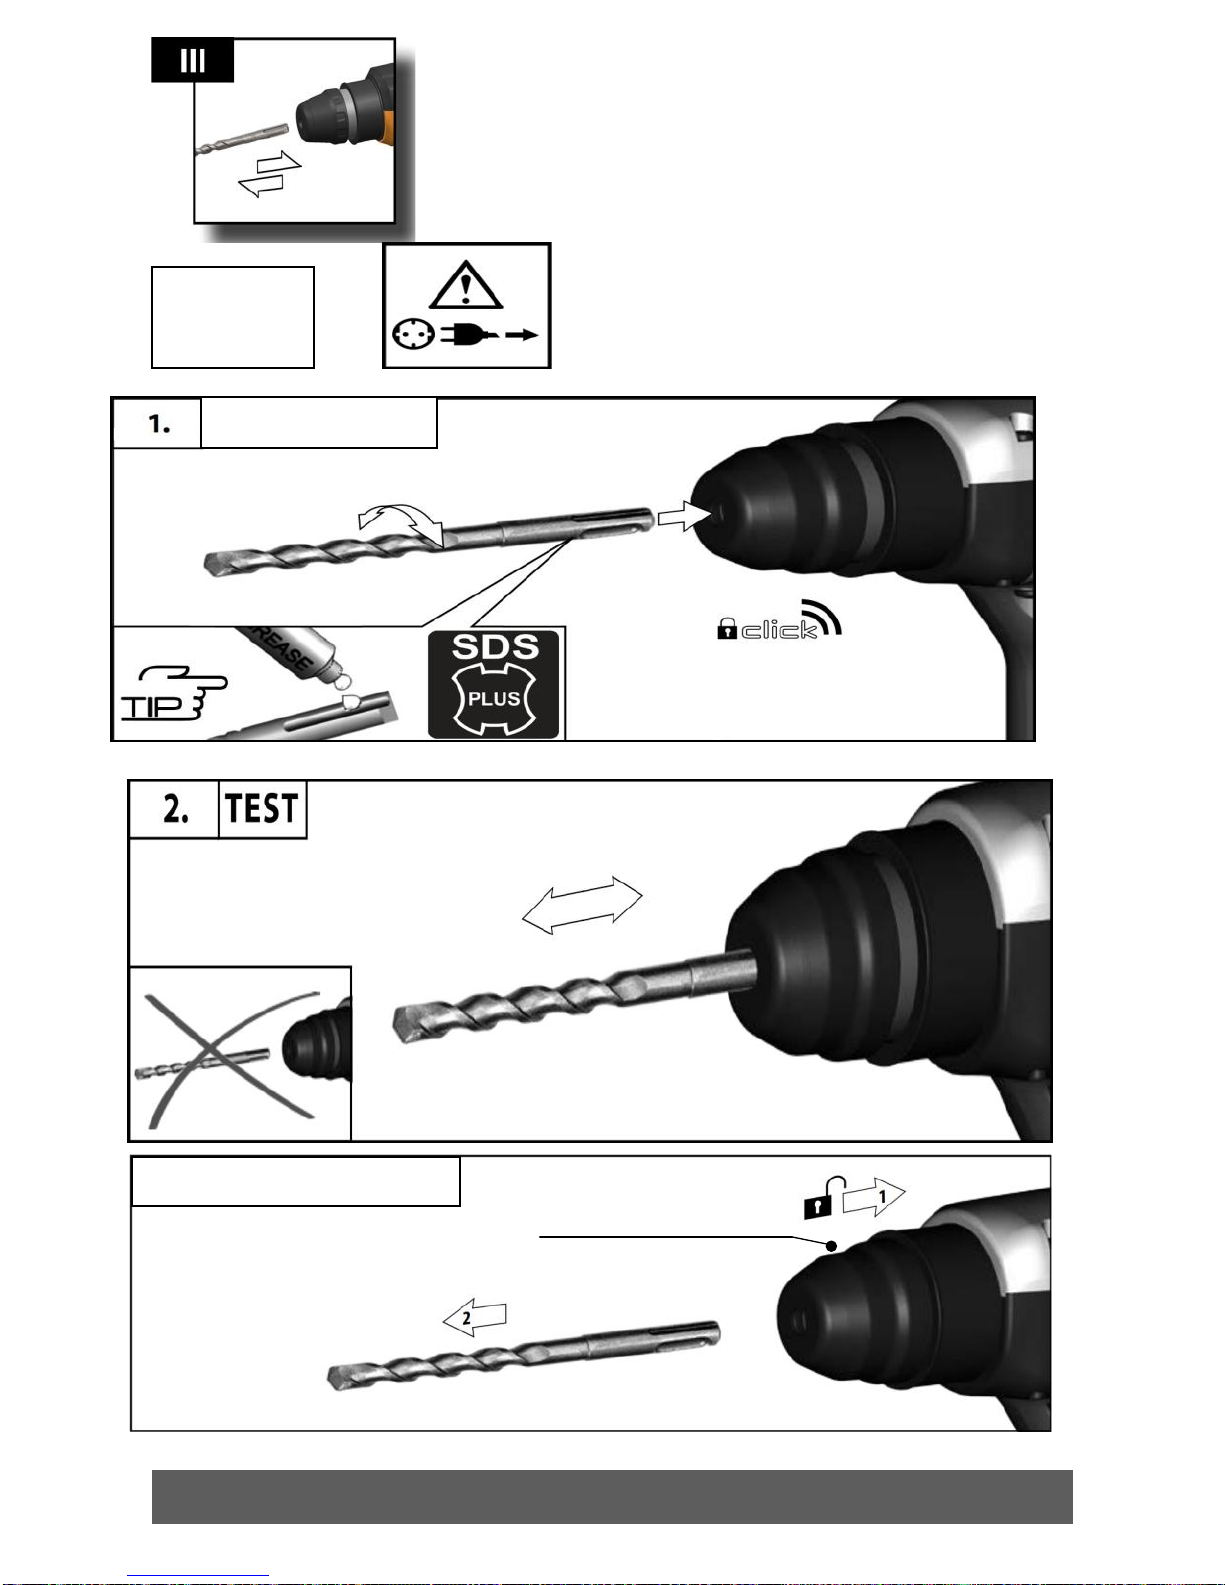
3.
Don't pull bit out
by lock
INSERTING
3. DISASSEMBLE
Bit
Assembly
Add little grease on the
nose of bit, rotate bit
and stick into chuck
Don't pull bit out from
the chuck after the bit
sticked into chuck
Get out the bit while
pressing the chuck

13
Trigger
Operation

h
14
Forward
Reverse
No touching

15
Mode Slector
Knob Operation

16
Too low
pressure
Moderate
pressure
Too high
pressure
Control Vibration System

Technical Data
NZ-30
Production Code
NZ-30
Rated Voltage
220-230 V
V
Rated Power
900 W
W
No-load Speed
0-1500 Min-1
BPM
Blows per Minute(BPM)
0-5000 Min-1
BPM
Impact Energy per Stroke
4 J
J
Wire Cord length
3 m
M
Maxium Drilling Diameter:
- Concrete
30 MM
MM
- Steel
13 MM
MM
- Wood
40 MM
MM
- Light Core Cutter in Bricks and Limestone
82 MM
MM
Chuck Neck Diameter
54 MM
MM
Tool Chuck
SDS Plus
Weight Acocording to EPTA-Produce 01/2009
3 KG
KG
Insulation Class
/ II
/ II
Trigger
Safety Clutch
Forward / Reverse
DDE
Accessories
Drill Chuck
Optional
Drill Bit
SDS-Plus
Soft anxiliary Handle
Depth rod
Nozzle Top with hair Brush and Dust Shield
1
Filter
1
Packing
BMC
0
Tool bag
Instruction Manual
1
17
安全规章

WARNING!
Please read the following safety
warnings and instructions. Failure to
follow them may result in electric shock,
fire and/or serious injury. Save all
warnings and instructions for future
reference. In the following items, it refers
to mains-operated (cord) power tools and
battery-operated (cordless) power tools.
1. Wear Eye Protection .
Please keep on eye protection. Please
use auxiliary handles because loss of
control can cause personal injury. And be
equipped with the safety tools, such as
dust shield, non-slip shoes and safety
helmet. When there is too much noise,
wear eye protection.
2. Workplace and Electric Safety
Keep workplace clean. Prohibit
operating tools in an easily-explosive
environment, such as flammable liquids,
gases and dusts. Avoid direct ground touch,
such as pipe, radiators and ranges. When
operating tools, your hands should hold
the insulation area. Avoid exposure to
rain or damp environment. Prohibit
abusing tools cord. When using tools
outdoor , please use extension cord that is
suitable for outdoor use. If operating
electric tools in a damp environment is
inevitable,use a ground fault circuit
interpreter protected supply.
3. Personal Safety
Stay alert. When operating a power
tool , stay awake. Prevent unintentional
starting. Ensure that switch turns off
when it connected with power supply or
battery pack or when you carry handling
tools. Before turning tools on, remove all
keys or wrench adjustment. Don't
overreaching. Keep proper footing and
balance at all the times. Please dress
properly, don not wear loosing clothes and
jewellery.
Use suitable detectors to determine if
utility lines are hidden in the work area to
avoid electric cables and gas or water
pipes. The dust produced when using this
tool may be harmful to health. Do not
inhale the dust. Use a dust absorption
system and wear a suitable dust protection
mask.
Observe correct mains voltage! The
voltage of power source must agree with
the voltage specified on the nameplate of
machine. Power tools marked 230 V can
also be operated with 220 V.。
The machine is intended for hammer
drilling in concrete, brick and stone, as
well as for lightly chiseling work. It is also
suitable for drilling without impact in
wood, metal, ceramic and plastic.
Machines with electronic control and
right/left rotation are also suitable for
screw driving.
The ventilation slots of the machine
must be kept clear all the time.
Important note:if the carbon brushes are
worn, the tool should be sent to after-sales
service or change them. If the supply cord
of this power tool is damaged, it must be
replaced by a specially prepared cord
available through the service. Use only
NENZ accessories and spare parts. Should
components need to be replaced, please
18
MAINS CONNECTION
SPECIFIED CONDITIONS OF USE
HAMMER SAFETY INSTRUCTIONS
MAINS CONNECTION
SPECIFIED CONDITIONS OF USE
MAINTENANCE
MAINS CONNECTION
Table of contents


