Neo Car Audio Neo for iPod User manual
Neo for iPod
INSTRUCTION MANUAL v.1006
With the Neo iPod adapter you can fully control the iPod at ALL times. This adapter does not disable your iPod screen, buttons or click
wheel. There are no special playlists that need to be setup, or specific naming of playlists. Your iPod will operate the same when
connected in the car as it does when you listen to it with headphones. You ll also have track, playlist, album and chapter control from
the radio buttons and steering wheel controls (if available). You will have simultaneous ipod and radio controls AND the iPod will
NEVER be locked out.
FEATURES
Direct Connect - iPod plugs directly into car radio s CD Changer port.
Radio Control – Change iPod songs, playlists, albums, chapters from CD Changer buttons on car radio.
Direct iPod control - Direct access and control of every playlist, song, artist and menu setting from iPod buttons
Charging and Power – iPod is powered and charging while in use, auto stops after 1 hour of non use.
Auxiliary input – Add a DVD, Satellite radio or any audio device in conjunction with iPod.
ADDITIONAL AUX INPUT OPTION
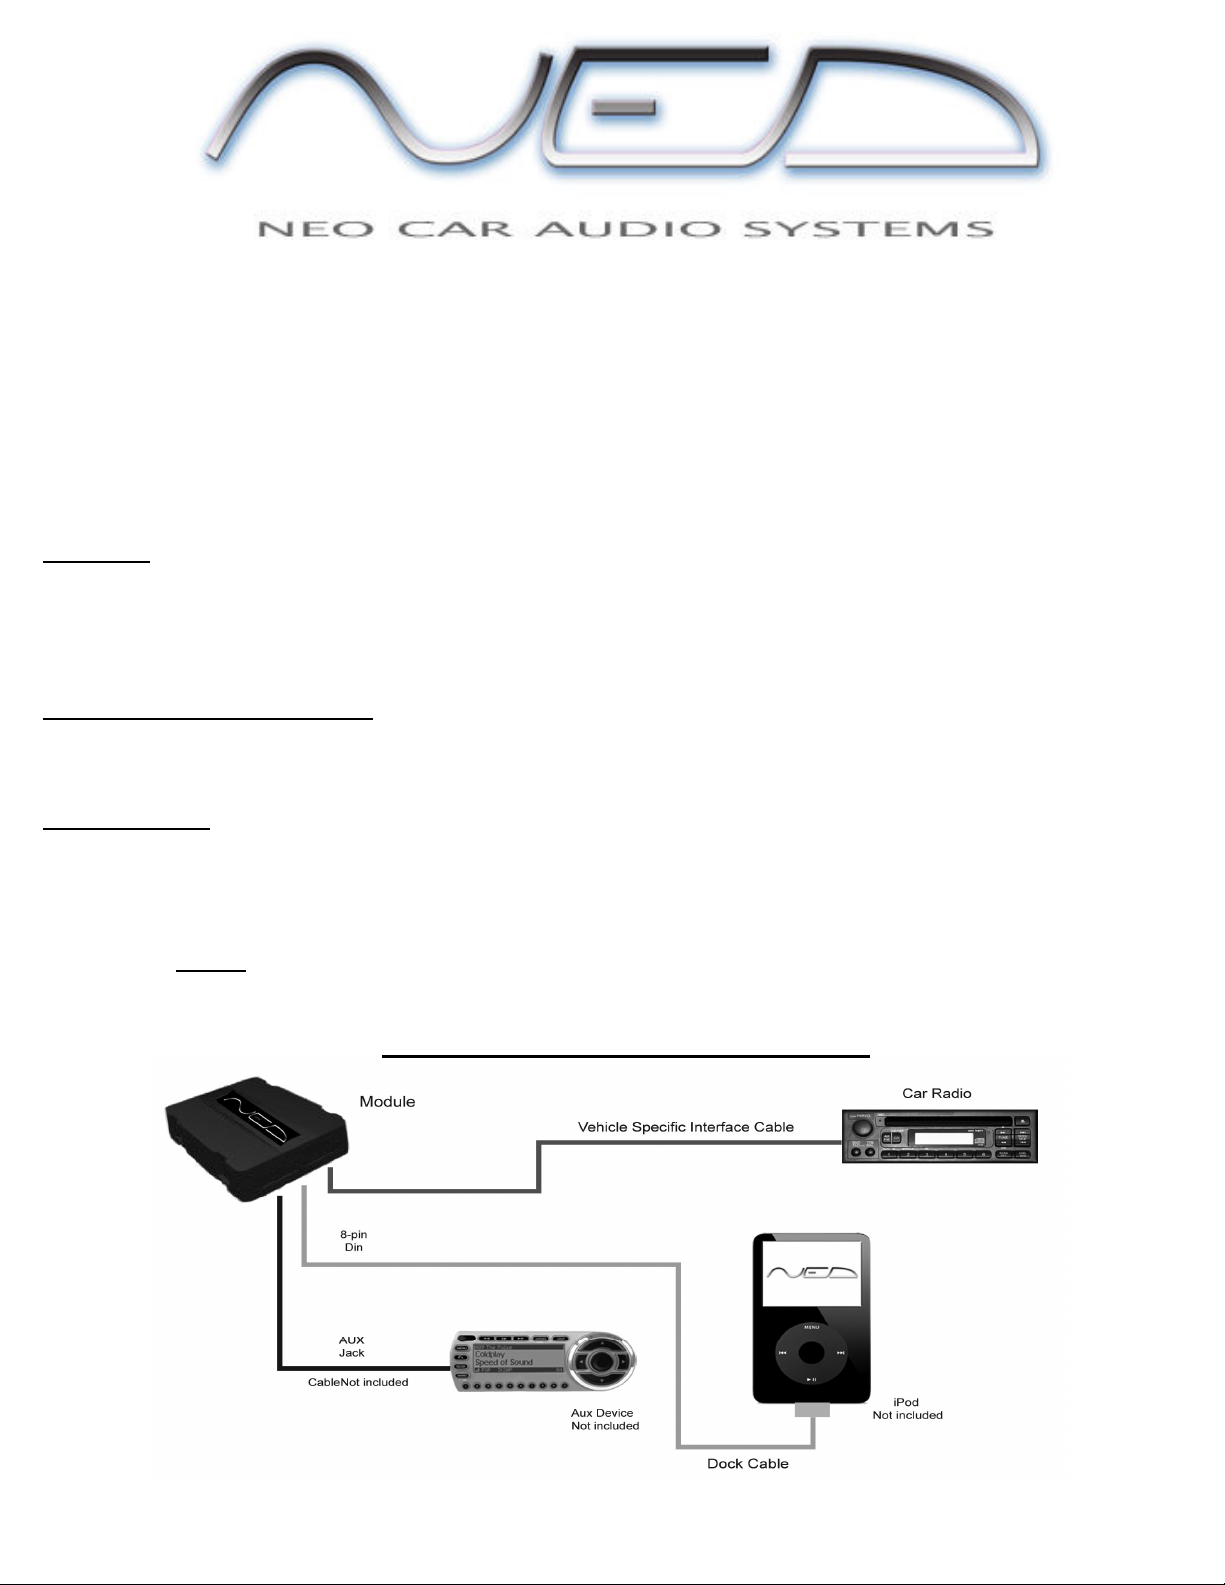
The Neo adapter comes equipped with a second AUX input. This second AUX input allows you to connect two devices to this adapter;
an iPod and any other audio device that has a headphone (1/8”) jack. You will need to use a headphone to headphone jack cable (not
included). To access AUX source, go to disc 5 and press next track.
COMPATIBILITY
The Neo adapter is compatible with all iPods with a DOCK connection located on the bottom of the iPod. This includes the following
iPods;
4
th
Generation, 5
th
Generation, Mini, Photo, U2, HP, Nano and Video.
The Neo adapter connects your iPod directly to your stereo by connecting to the external CD changer port on the back of the radio. It
will replace the external 6-disc CD changers. External CD changers plug into the actual radio and therefore it is not possible to have
both an external 6-disc CD changer and the Neo adapter connected at the same time. The CD player/changer which is an “in-dash” built
into the radio will not be affected.
CONNECTING YOUR NEO IPOD ADAPTER

IPOD CONFIGURATION
Advanced Mode
Advanced Mode allows you to experience all the adapter has to offer. You will be able to change tracks, shuffle through any one of your
playlists, change albums or chapters. Track number and time are accurate and match up to what is displayed on the iPod. Response time
between changing tracks is quick. And DON T worry, your ipod is fully functional, it is NOT LOCKED OUT like other adapters do.
Neo recommends this mode.
Important: After plugging in your iPod you will see an “ok to disconnect”, followed by a series of iPod initialization screens for a few seconds before
your iPod menu returns to normal. If your ipod does not go back to normal, you will need to UPDATE the ipod to the newest firmware.
Direct Mode
If you prefer to use the adapter for next and previous track ONLY, Direct Mode is the best option. Text, playlist, etc, are not supported.
Track numbers and times are not synchronized between the iPod and radio. Because there is less data to transfer between the iPod and
the radio, the response time is quicker than Advanced Mode.
Comparison: Track Time Radio Track Controls Playlist Control Ipod Controls
Advanced Mode YES YES YES YES
Direct Mode NO YES NO YES
INSTALLATION STEPS
Step 1: Remove radio from dash.
Step 2: Plug the vehicle cable into the port on the radio.
Step 3: Plug the other end of the cable into the Neo box.
Step 4: If using the AUX input, connect the audio output of your device to the AUX input jack on the Neo box.
Step 5: Plug the iPod cable into the Neo adapter box. (Do Not connect your ipod until install is complete).
Step 6: Test to make sure everything is working before you reinstall the radio.
Step 7: Reinstall the radio back into the dash of the vehicle.
*NOTE* Display of artist & song title on the radio LCD is ONLY supported on iPod-Text capable radio’s
To date, Mazda radios do not support CD/iPod text and thus do not show text on the radio. Normal Disc/Track #’s are shown
IS YOUR IPOD UP TO DATE? If the radio recognizes the adapter, but the control is NOT correct, your iPod is not up to
date. Check Apple for the latest FW version updates You must update your iPod
USING THE NEO ADAPTER
As mentioned before, setting up playlists is NOT required. But to take full advantage of our adapter when in Advanced Mode, we
recommend you have your music organized in playlists on your iPod before using your iPod Integration Kit. Once again this is not
needed, but may help in overall use.
Please review the owner's manual for specific radio button function. The manual does not provide answers to what every button on your
radio will do with our adapter. Every radio is different and have buttons assigned to perform specific functions. It is up to you to
determine which buttons correspond to the adapter s functions.
- Disc Selection (usually disc ^ or disc v button)
- Track up/Track down, Fast forward/rewind
- Steering wheel buttons
Important: Not all radio s have the capabilities to perform every function that adapter can, this will depend on the radio capabilities
and/or which level of radio came with your car (base, premium, etc..)
ACCESSING IPOD
Connect the iPod to the docking cable
Turn on your radio
Select the CD Changer source. (CD, CDC)
The iPod will cycle through a series of screens while it initializes Wait for the iPod screen to return to normal before using the
iPod buttons
If playback does not automatically begin, select a folder of your choosing. You can browse music directly on your iPod radio or steering
wheel. Both the iPod and radio controls are ALWAYS active in both modes.
CONTROLING IPOD ON RADIO
Controlling the iPod consists of using the Disc and Track buttons.

DISC # TRACK UP TRACK DOWN
Disc 1 Next Track Previous Track
Disc 2 Next Playlist Previous Playlist
Disc 3 Next Album Previous Album
Disc 4 Next Chapter Previous Chapter
Disc 5 Next Source Previous Source
Disc 6 Not Used Not Used
Changing Songs: To change songs, you MUST be on DISC 1. Press Track Up and song advances.
Changing Playlists: To change a playlist, Press Disc Up until you get to DISC 2, then your Track up/down button will cycle through
your playlists. Once you arrive on the playlist you want, return to DISC 1 to begin advancing through tracks in that playlist.
Changing to the Aux input: To change to your Aux device, press Disc up until you get to DISC 5, then press Track up and it will toggle
between the iPod and the AUX
AUX Source
The auxiliary input has settings for gain, bass and treble in order to optimize sound. To connect an AUX device to the Neo Adapter you
will need to use a 3.5mm headphone to headphone jack cable (not included).
NOTICES, WARNINGS, AND WARRANTY
One Year Limited Warranty
The quality controls used in the manufacture of this product ensure your satisfaction. This warranty applies only to the original purchaser of this product from an
authorized dealer. This warranty covers any supplied or manufactured parts of this product that, upon inspection by NEO CAR AUDIO authorized personnel, is
found to have failed in normal use due to defects in material or workmanship. This warranty does not apply to installation expenses. Operating this unit under
conditions other than those recommended or voltages other than the voltage indicated on the unit, or attempting to service or modify the unit, will render this
WARRANTY VOID. Unless otherwise proscribed by law, NEO CAR AUDIO shall not be liable for any personal injury, property damage or any incidental or
consequential damages of any kind (including water damage) resulting from malfunctions, defects, misuse, improper installation or alteration of this product.
All parts of this NEO CAR AUDIO product are guaranteed for a period of 1 year as follows:
Within the first 12 months from date of purchase, subject to the conditions above, NEO CAR AUDIO will repair or replace the product if it is defective in material
or workmanship providing it is returned to NEO CAR AUDIO, with PROOF OF PURCHASE from an authorized dealer. If you have a problem with this
product, please call or write to our Customer Service Dept. Neo does NOT warrant ANY installation.
All warranty repair must have a RMA number from our service department. Contact Neo Car Audio for further warranty repair info. Proof of purchase is
required Warranty does not cover normal tear and wear, damages due to negligence, improper installation or operation.
Warning:
1. This equipment may be reset by unintentional electrostatic discharge during operation. Exposure to direct sunlight or extreme heat may cause damage or
malfunction.
2. Do not disassemble or alter the cable and interface box. Make the connections correctly
3. Do not cut away the wire sheath and use the power for other equipments.
4. Do not install in locations which might hinder vehicle operation or create hazards for vehicle occupants.
5. Have the wiring and installation done by professionals.
6. Arrange wiring so it is not crimped or pinched.
7. Keep away from children. This adapter may contain small parts that could pose a choking hazard when handled by children.
8. Do not use this product for purposes other than stated for the vehicle.
Caution:
1. Use of headphones while operating an automobile or moving vehicle is not recommended and is unlawful in some countries and areas.
2. Driving is dangerous and requires full concentration, be careful and attentive on the road. The driver of a motor vehicle should not operate the Neo
Adapter while driving. Stop operation of the Neo Adapter by your passenger if you find their use disruptive or distracting while driving. Do not allow
this adapter to distract you from driving and responding to traffic conditions.
Copyrights, warnings, and other information
The illustrations, technical information, data and descriptions contained in this publication are subject to change without notice. This publication,
together with all information contained in it, and all intellectual property rights on this publication remain the property of NEO CAR AUDIO. The user
may not pass this publication on to third parties. No liability will be accepted for any inaccuracies or omissions in this publication, although due care
has been taken to make it as complete and accurate as possible. Unauthorized reproduction or reverse engineering is strictly prohibited! Intellectual
property included is distributed under specific license agreement with respective vendor(s). No warranty, explicit or implied, is stated and neither Neo
Car Audio Inc., nor any of its distributors, dealers or vendors shall be liable for damages. IN NO EVENT SHALL Neo Car Audio's LIABILITY
EXCEED THE PRICE PAID FOR THE PRODUCT FROM DIRECT, INDIRECT,
SPECIAL, INCIDENTAL, OR CONSEQUENTIAL DAMAGES RESULTING FROM THE USE OF THE PRODUCT, IT S ACCOMPANYING
SOFTWARE, OR ITS DOCUMENTATION.
iPod, 3rd Generation, 4th Generation, Mini, Photo, U2, HP, Nano and Video are registered trade marks of Apple Computers, Inc.
Product design and specifications are subject to change without notice, this includes the iPod CABLE, adapter BOX, etc. Neo does not guarantee the accuracy of
the retail product picture - changes are made without notice to our dealers. Neo uses several cases for its adapters, yet ONE common “retail” picture may be used.
Looking for an iPod Car Connection Kit for another vehicle radio?
Visit
www neocaraudio com
for more info.
Table of contents
Other Neo Car Audio Adapter manuals


