oticon BS-H200 User manual

Phone Adapter 2.0
Instructions for use

Introduction to this booklet
This booklet gives you guidance on how to use and maintain your new phone
adapter. Please read the booklet carefully including the Warnings section.
This will help you get the most out of your phone adapter.
If you have additional questions about the use of your phone adapter, please
contact your hearing care professional.
For your convenience, this booklet contains the below navigation bar to help
you navigate easily through the different sections.
About Installation Handling Warnings More info
Intended use
Intended use Phone Adapter 2.0 is intended to be used together with Oticon
ConnectClip, Oticon Streamer Pro, and Oticon wireless hearing aids.
This enables the hearing aid user to communicate wirelessly with a
phone conversation partner via a landline phone (analogue/PSTN).
Indications for use No indications for use.
Intended user Adults and children older than 36 months.
User environment Indoor.
Contraindications No contraindications.
Clinical benefits See clinical benefits of the hearing aid.

Table of content
About
Package content 6
Phone adapter overview 7
Installation
Installation 9
Connect the phone adapter to a power outlet 10
Connect with phone line and landline phone 12
Pair Streamer Pro with the phone adapter 14
Pair ConnectClip with the phone adapter 16
Use the phone adapter 18
Handling
Incoming calls Streamer Pro 20
Outgoing call Streamer Pro 23
Incoming calls ConnectClip 26
Outgoing calls ConnectClip 29
Additional information 32
Warnings
General warnings 35
More info
Conditions of use 36
Technical information 38
International warranty 45
Australia only 46
Warranty 47

Phone Adapter
2.0
Instructions for use
About Installation Handling Warnings More info
6 7
Package content
The packaging box consists of the following elements:
Phone Adapter 2.0 Power supply
(The power supply may vary from country to country)
Phone cable
This booklet
About
Phone adapter overview
Front
Phone indicator
Condition Power indicator Phone indicator
Power on, no connection to the Streamer or ConnectClip
Pairing with the Streamer or ConnectClip
The Streamer or ConnectClip is wirelessly connected
Incoming call
Phone conversation
Fault condition (contact your hearing care professional)
No light Blinking Steady
Power indicator

OUT
IN
AUX
POWER
About Installation Handling Warnings More info
8 9
Back
Power supply
For PSTN wall adapter
For landline phone
ConnectLine in/out*
For more information please refer to: www.oticon.global/connectline
Installation
Installation
Use the phone adapter for the first time
Before you can use the phone adapter with your hearing aids, the phone adapter
must be connected to a power outlet and the public telephone line.
This is a step-by-step guide on how to install the phone adapter.
All needed parts for the installation are included in the package.

12
About Installation Handling Warnings More info
10 11
Connect the phone adapter to a power outlet
Use the power supply with USB cable from box 1
1. Plug the USB connector into the “power” connector on the phone adapter.
2. Plug the power supply into the mains wall socket or another power source.
3. Check that power is turned on.
4. After a few seconds the power indicator on the front of the phone adapter
will light up green.
Box 1
4.
2. and 3.
1.
IMPORTANT NOTICE
When charging the phone adapter, use the supplied original power supply
5.0V/1A, CE and safety marked.

12
About Installation Handling Warnings More info
12 13
Connect with phone line and landline phone
Place the phone adapter in a suitable spot near your landline phone or base
station.
1. Unplug the phone line from the landline phone (or base station).*
2. Plug the phone line from the wall adapter into the phone adapter
“IN” connector.
3. Plug the phone cable from box 2 in the phone adapter “OUT” connector.
4. Plug the other end of the phone cable into the landline phone (or base
station).*
Please lift off the handset from your landline phone – you should now be able
to hear the dial tone from the handset speaker.
Box 2
3.
2.
1.
4.
* If your main phone or base station does not have a detachable plug for the landline connection, you should either try using an
alternative phone or a technician must be contacted to complete the installation.
About Installation Handling Warnings More info
14 15
ON/OFF
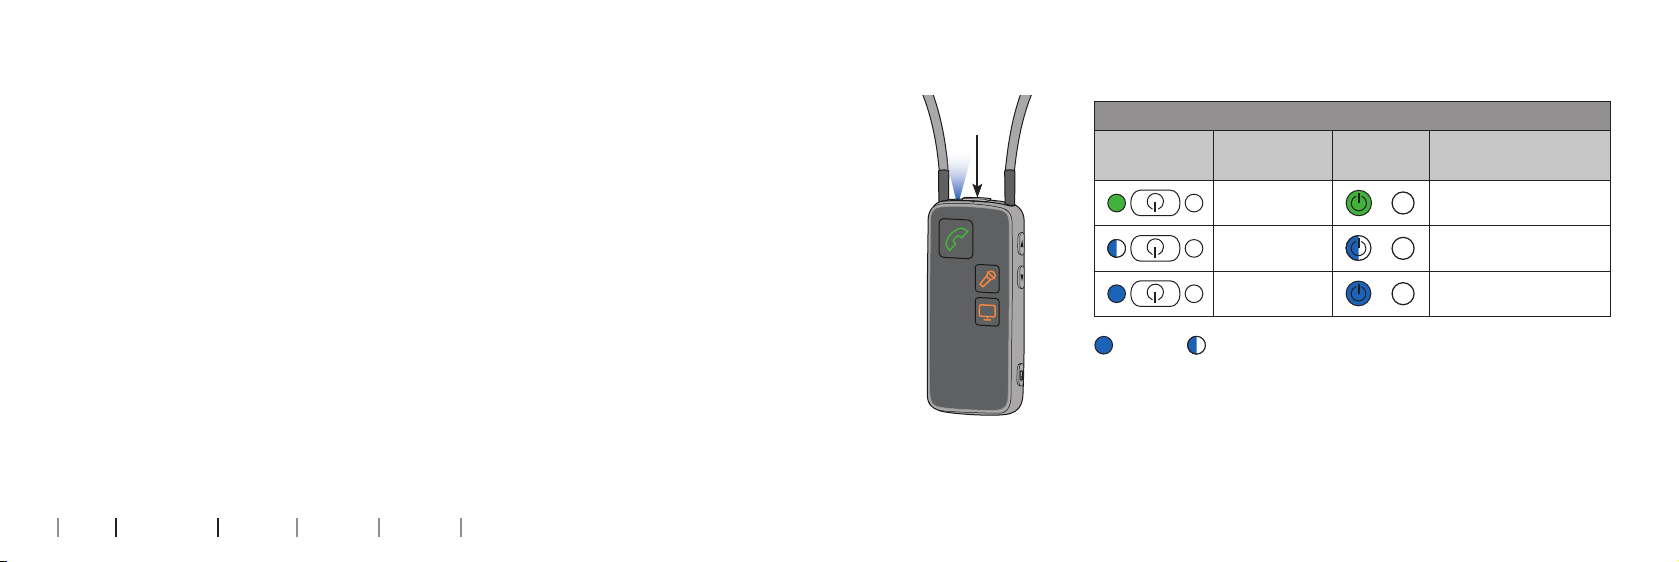
Pair Streamer Pro with the phone adapter
The very first time your Streamer is used with the phone adapter, it must
be paired to the phone adapter.
For pairing:
1. Make sure the phone adapter is powered on, i.e. the power indicator is
steady green.
2. Press the ON/OFF button on the Streamer for 5-6 seconds until the blue
light starts blinking.
3. Place the Streamer on top of the phone adapter – the pairing takes around
20–60 seconds.
4. The pairing is completed when the power indicator on the phone adapter
and the indicator on the Streamer turns steady blue. Pairing is done only
once and will normally not have to be repeated.
Pairing Streamer Pro
Streamer Pro
top status
Streamer Pro
front
Phone
adapter
Description
-Streamer and
phone adapter on
-Streamer in
pairing mode
-Pairing complete
Steady Blinking

About Installation Handling Warnings More info
16 17
B
Pair ConnectClip with the phone adapter
The very first time your ConnectClip is used with the phone adapter, it must be
paired to the phone adapter.
For pairing:
1. Make sure the phone adapter is powered on, i.e. the power indicator is
steady green.
2. Press the multi button AND volume up button on the ConnectClip (B) for about
6 seconds until the status indicator blinks blue.
3. Place the ConnectClip on top of the phone adapter – the pairing takes around
20–60 seconds.
4. The pairing is completed when the power indicator on the phone adapter and
the status indicator on the ConnectClip turns steady blue. Pairing is done only
once and will normally not have to be repeated.
Status
Pairing ConnectClip
ConnectClip
Status
ConnectClip
Power
Phone
adapter
Description
ConnectClip and
phone adapter on
ConnectClip in
pairing mode
Pairing complete
Steady Blinking Power

Streamer Pro
See Page
22
ConnectClip
See Page
30
About Installation Handling Warnings More info
18 19
Use the phone adapter
The phone adapter supports both incoming and outgoing phone calls. During
a phone call the hearing aids are used as headsets and the microphone, on the
Streamer or on ConnectClip, enables hands-free operation.
Ensure the phone adapter is correctly installed as described in the following
section before you use the Streamer or ConnectClip for phone conversations
for the first time.
To use the phone adapter, the Streamer or ConnectClip and phone adapter
must be wirelessly connected to each other. This connection is established
automatically when the Streamer and phone adapter are paired and within
reach. The phone adapter is connected to the Streamer or ConnectClip when
the power indicator on the phone adapter is steady blue.

About Installation Handling Warnings More info
20 21
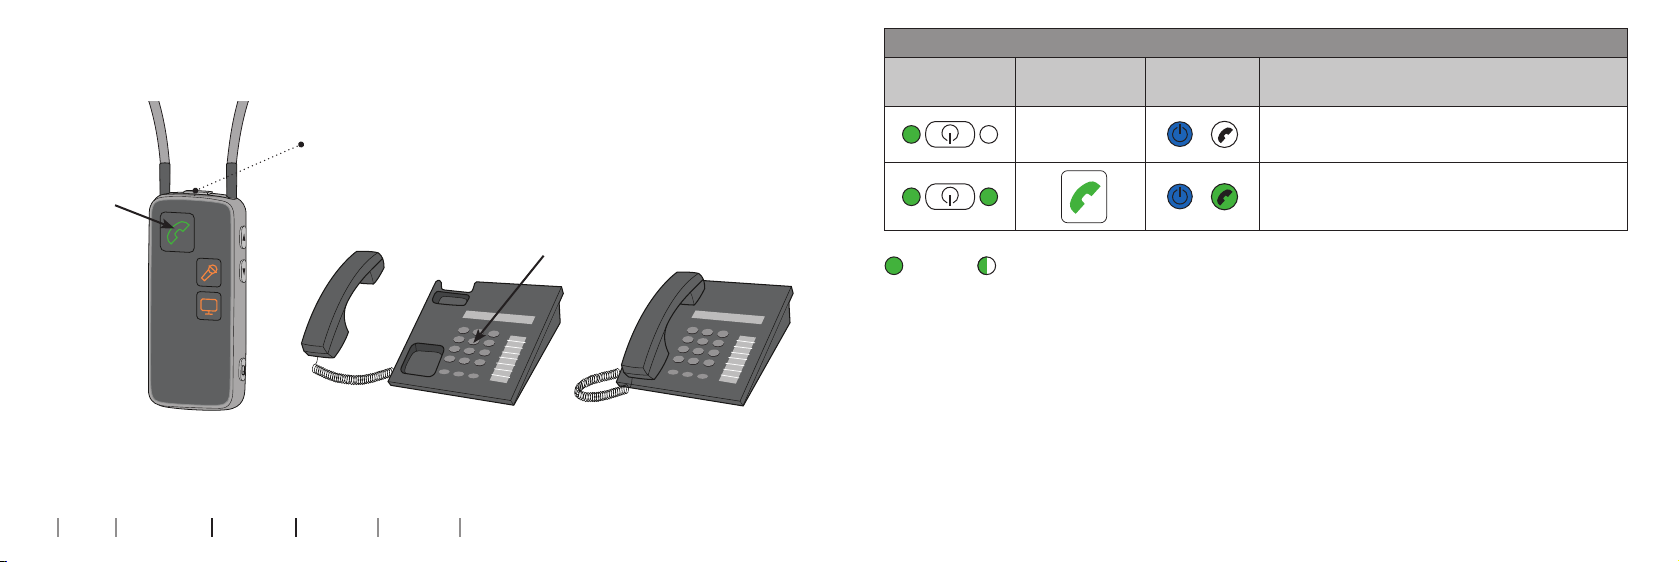
Incoming calls Streamer Pro
How to answer and end a call
Make sure that you are able to speak into the Streamer’s microphone.
When your landline phone rings, you will hear an incoming call notification in your
hearing aids. The phone indicator on the phone adapter blinks green and at the
same time the phone button on the Streamer and the indicator blinks green.
Press the phone button on the Streamer briefly to answer the call. You will hear
a confirmation beep in your hearing aids. The phone button and status indicator
on the Streamer and the phone indicator on the phone adapter is steady green.
To end the call,press the phone button on the Streamer briefly and the green
phone button on the Streamer turns off.
Microphone
Phone button
Handling

About Installation Handling Warnings More info
22 23
Receiving a call Streamer Pro
Streamer Pro
top status
Streamer Pro
front
Phone
adapter
Description
Streamer and phone adapter connected
Phone ringing: Phone indicator and Streamer top
status blinks green. You will hear an incoming
call notification in your hearing aids.
When the call is connected, you will hear a beep
acknowledging that the call is answered – you
are now able to listen and talk to the other party.
Steady Blinking
Outgoing call Streamer Pro
How to make a call
Make sure that you are able to speak into the Streamer’s microphone.
1. To make a call press the Streamer’s phone button briefly. The hook is now
off and you will hear a dial tone in the hearing aids. The phone button on the
Streamer and phone indicator on the phone adapter will turn steady green.
2. Pick up the handset on your landline phone (or press “Call” on the portable
phone) and dial the phone number as you normally do to make a call.
3. After a short while you will hear the call tone in your hearing aids indicating
that the call is now connected through your Streamer and hearing aids.
You can now put the handset back on (or press “end call” on the portable phone).
To end the call,press the phone button on the Streamer briefly.
Note: Make sure to put the handset correctly back on the phone – otherwise the phone line will block for incoming calls.
About Installation Handling Warnings More info
24 25
Microphone
Phone
button
Making a call
Streamer Pro
top status
Streamer Pro
front
Phone
adapter
Description
Streamer and phone adapter are connected
Press the Streamer’s phone button briefly and
you will hear a dial tone in the hearing aids
Steady Blinking

About Installation Handling Warnings More info
26 27
Incoming calls ConnectClip
How to make a call
Make sure that you are able to speak into the ConnectClip’s microphone (A).
When your landline phone rings, you will hear an incoming call notification in your
hearing aids. The phone indicator on the phone adapter will blink green and at the
same time the status indicator on the ConnectClip will blink green (B).
Press the multibutton on the ConnectClip briefly (C) to answer the call. You will
hear a small confirmation beep in your hearing aids. The status indicator on the
ConnectClip and the phone indicator on the phone adapter will now be steady
green.
To end the call, simply press the multi button on the ConnectClip briefly and the
status indicator turns blue.
CBA
Note: The ConnectClip can only be paired to one device at a time. See page 18 for pairing instructions.

About Installation Handling Warnings More info
28 29
Receiving a call ConnectClip
ConnectClip
Status
ConnectClip
Power
Phone
adapter
Description
ConnectClip and phone adapter are connected.
Phone ringing: Phone indicator and ConnectClip
status indicator blinks green. You will hear an
incoming call notification in your hearing aids.
When the call is connected, you will hear a beep
acknowledging that the call is answered – you are
now able to listen and talk to the other party.
Steady Blinking
Outgoing calls ConnectClip
How to make a call
Make sure that you are able to speak into the ConnectClip’s microphone (A).
1. To make a call press the ConnectClip’s multibutton briefly (B). The hook is
now off and you will hear a dial tone in the hearing aids. The status indicator
on the ConnectClip and the phone indicator on the phone adapter will turn
steady green.
2. Pick up the handset on your landline phone (or press “Call” on the portable
phone) and dial the phone number (C) as you normally do to make a call.
3. After a short while you will hear the call tone in your hearing aids indicating
that the call is now connected through your ConnectClip and hearing aids.
You can now put the handset back on (or press “end call” on the portable phone).
To end the call, simply press the multibutton on the ConnectClip briefly.
Note: Make sure to put the handset correctly back on the phone – otherwise the phone line will block for incoming calls.

About Installation Handling Warnings More info
30 31
BA
C
Making a call
ConnectClip
Status
ConnectClip
Power
Phone
adapter
Description
ConnectClip and phone adapter are connected
Press the multibutton on the ConnectClip briefly
and you will hear a dial tone in the hearing aids
Steady Blinking
IMPORTANT NOTICE
Use a soft, dry cloth to clean the phone adapter. The phone adapter must never be
washed or immersed in water or other liquids.

About Installation Handling Warnings More info
32 33
Additional information
Turn off the phone adapter
If you don’t want to receive phone calls to your Streamer, turn off the phone
adapter by disconnecting power. For normal use, the phone adapter uses very
little power so it is not necessary to turn it off.
Range
The phone adapter has a range of up to about 30 metres to the Streamer, and up
to about 20 meters to the ConnectClip depending on furniture and walls. Within
this range you can make hands-free phone conversations with good sound quality
(i.e. without “crackle” sound).
Normally you will be able to hear the incoming call notification in the hearing aids
at a distance of up to 30-40 metres, but then you have to walk closer to the phone
adapter to hear the phone partner’s voice clearly. This can be useful e.g. when
working in the garden.
Volume control
Use the volume button on the Streamer or ConnectClip to adjust the phone
volume level in the hearing aids. Adjust the volume by pressing up or down briefly.
Repeat the brief press for further adjustments.
The phone volume level set by the Streamer is memorised. This means that
next time a phone call is made, the memorised volume level will be applied. This
feature is not available with the ConnectClip.
Hear only the phone sound
The hearing aid microphones are turned on by default.
However, the hearing aid microphones can be muted, allowing you to better hear
the phone conversation.
Press volume down for about 3 seconds (Streamer Pro and ConnectClip) during
conversation to re-activate the hearing aid microphones.

About Installation Handling Warnings More info
34 35
IMPORTANT NOTICE
Please refer to your hearing aid’s instructions for use for details on the functionality of
your specific hearing aid.
For detailed user instructions on the Streamer, please refer to its Instructions for
Use.
For detailed user instructions on the ConnectClip, please refer to its Instructions
for Use
For further support or tips please check the information on
www.oticon.global/support
For your personal safety and to ensure correct
usage, you should familiarise yourself fully with
the following general warnings before using
your phone adapter. Consult your hearing care
professional if you experience unexpected
operations or serious incidents with your phone
adapter during use or because of its use. Your
hearing care professional will support you with
issue handling and, if relevant, reporting to the
manufacturer and/or the national authorities.
Connection to external equipment
The safety of the use of phone adapter when
connected to external equipment with an
auxiliary input cable and/or with USB cable
and/or directly, is determined by the external
signal source. When connected to external
equipment plugged into a wall outlet, this
equipment must comply with IEC-62368-1
or equivalent safety standards.
Interference
The phone adapter has been thoroughly tested
for interference according to the most stringent
international standards. However, interference
between the phone adapter and other devices
may occur. If this occurs, increase the distance
between the phone adapter and the interfering
device.
Fire hazards
The power source in your phone adapter has
insufficient energy to cause fire in normal usage
conditions.
Use of third party accessories
Only use accessories, transducers or cables
supplied by the manufacturer. Incompatible
accessories may result in reduced
electromagnetic compatibility (EMC) of
your device.
General warnings
Warnings

About Installation Handling Warnings More info
36 37
Conditions of use
Operating conditions Temperature: +5°C to +40°C
Humidity: 15% - 93% relative humidity, noncondensing
Atmospheric pressure: 700 hPa to 1060 hPa
Transportation and
storage conditions
Temperature and humidity shall not exceed the below limits for
extended periods during transportation and storage:
Temperature: -25°C to +70°C
Humidity: 15% - 93% relative humidity, noncondensing
Atmospheric pressure: 700 hPa to 1060 hPa
More info

About Installation Handling Warnings More info
38 39
Phone Adapter 2.0 contains a wireless
transmitter using 2.4 GHz technology.
The emission power from Phone Adapter 2.0
is max. 10 dBm EIRP.
Phone Adapter 2.0 complies with
international standards concerning radio
transmitters, electromagnetic compatibility
and human exposure.
This product is intended for connection to the
public switched analogue telephone network
and may be operated in EU and EFTA countries
Due to the limited space available on Phone
Adapter 2.0 relevant approval markings can be
found in this document.
Additional information can be found in the:
Technical Data Sheets (TD) on
www.oticon.global.
USA and Canada
This device contains a radio module with the
following certification ID numbers:
FCC ID: UXZBSH200
IC: 8191A-BSH200
Note
The device complies with Part 15 of the
FCC Rules and with Industry Canada’s licence-
exempt RSSs standards. Operation is subject
to the following two conditions:
1. this device may not cause harmful
interference, and
2. this device must accept any interference
received, including interference that may
cause undesired operation.
Note
Changes or modifications not expressly
approved by the party responsible for
compliance could void the user’s authority to
operate the equipment.
This Class B digital apparatus complies with
Canadian ICES-003.
Note: This equipment has been tested and
found to comply with the limits for a Class B
digital device, pursuant to part 15 of the FCC
Rules. These limits are designed to provide
reasonable protection against harmful
interference in a residential installation. This
equipment generates, uses and can radiate
radio frequency energy and, if not installed
and used in accordance with the instructions,
may cause harmful interference to radio
communications. However, there is no
guarantee that interference will not occur in a
par-ticular installation. If this equipment does
cause harmful interference to radio or
television reception, which can be determined
by turning the equipment off and on, the user
is encouraged to try to correct the interference
by one or more of the following measures:
- Reorient or relocate the receiving antenna.
- Increase the separation between the
equipment and receiver.
- Connect the equipment into an outlet on
a circuit different from that to which the
receiver is connected.
- Consult the manufacturer or an experienced
radio/TV technician for help.
Technical information
Model name BS-H200
Table of contents
Other oticon Adapter manuals

oticon
oticon FittingLINK 3.0 User manual

oticon
oticon ConnectLine TV 2.0 User manual

oticon
oticon Phone 2.0 User manual

oticon
oticon ConnectLine BS-F200 User manual

oticon
oticon ConnectLine Phone Adapter 2.0 User manual

oticon
oticon TVA3 User manual

oticon
oticon ConnectLine Phone Adapter 2.0 User manual

oticon
oticon TVA3 User manual

oticon
oticon ConnectLine User manual

oticon
oticon ConnectLine User manual


SF user manual")
