Neposmart Outdoor NS14BG User manual
6You should now be able to view the
video feed of your Neposmart
anywhere, anytime!
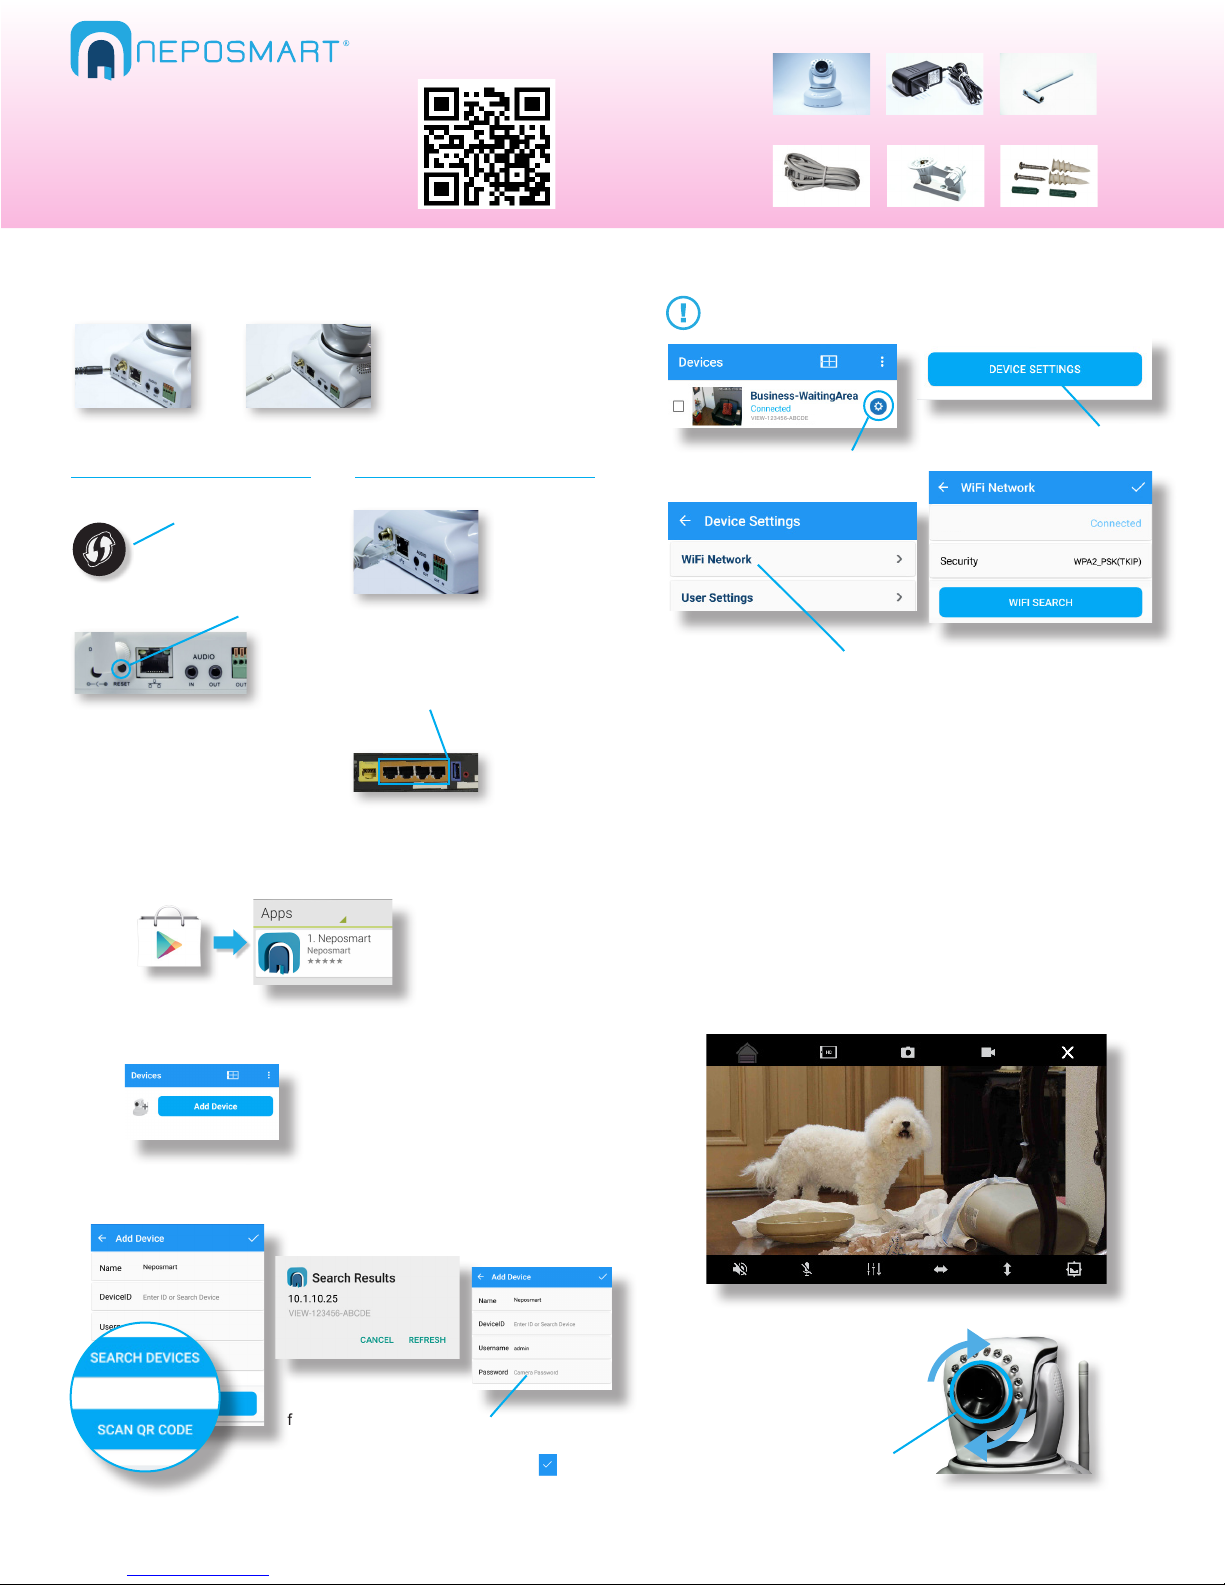
Android Quick Start Guide
1Connect
b) WiFi Antenna
a) Press “Search Devices”
b) Select your device
from the Search Results c) Enter default
password 123456
and tap
To ensure that you’ve entered the correct password for your WiFi
router, and that it has successfully connected to your WiFi Network,
go back to “Device Settings” > “WiFi Network” and check that the
name of your WiFi Network is displayed. If not, repeat step 5.
Make sure your Android is connected to your wireless router
a) Press settings icon next to
your device
b) Press “Device Settings”
d) Select your WiFi network
and enter your WiFi password
to complete setup
c) Press “WiFi Network”
a) Power
a) Ethernet cable
b) Connect other end to your
wireless router in any of the
four ports
2Download Neposmart App from
the Play Store and Launch
Whats in the box?
3Press “Add Device” from main screen
4Search and add your Neposmart
5Add Device to your Wireless Network
The next page shows how to congure your Device Settings
Mounting Screws
Mount
WiFi AntennaAC Adapter
Ethernet Cable
Neposmart
We continually improve the app and add more features.
To get the latest information on setup and features, visit
www.neposmart.com/support or scan QR code
Note: Ethernet cable is required for setup only.
Once you complete step 5 you can unplug the
Ethernet cable from your router.
(Search will display all Neposmart
devices within the same WiFi network)
© 2016 Nepoware Corporation. All Rights Reserved
Alternate method: Scan QR code on the bottom of the
device or enter known device ID to manually add.
Complete information can be found in the User Manual at www.neposmart.com/support
My WiFi Network
VIEW-123456-ABCDE
Internet of Things Company
c) Connect Neposmart using one of the methods below
If the process fails, repeat or connect
using method 2
a) Locate your router WPS button
and press for few seconds
Method 1 - No Ethernet Cable Method 2 - With Ethernet Cable
Check that your video
image is clear. If not,
Slowly adjust the focus ring
by rotating clockwise or
counter-clockwise until video
becomes sharp and clear
Note: If you have connected your Neposmart using the WPS method, it has already
been added to your wireless network and you may skip to step 6.
b) Press Camera reset button for
5 seconds to connect
e) Unplug the Ethernet Cable. Go back to Device List, drag list down
to refresh (this make take a moment to reconnect). If not, restart the
camera to reconnect to your wireless network.
c) Restart camera by unplugging
power adapter and plug back in to
connect to your WiFi network
3
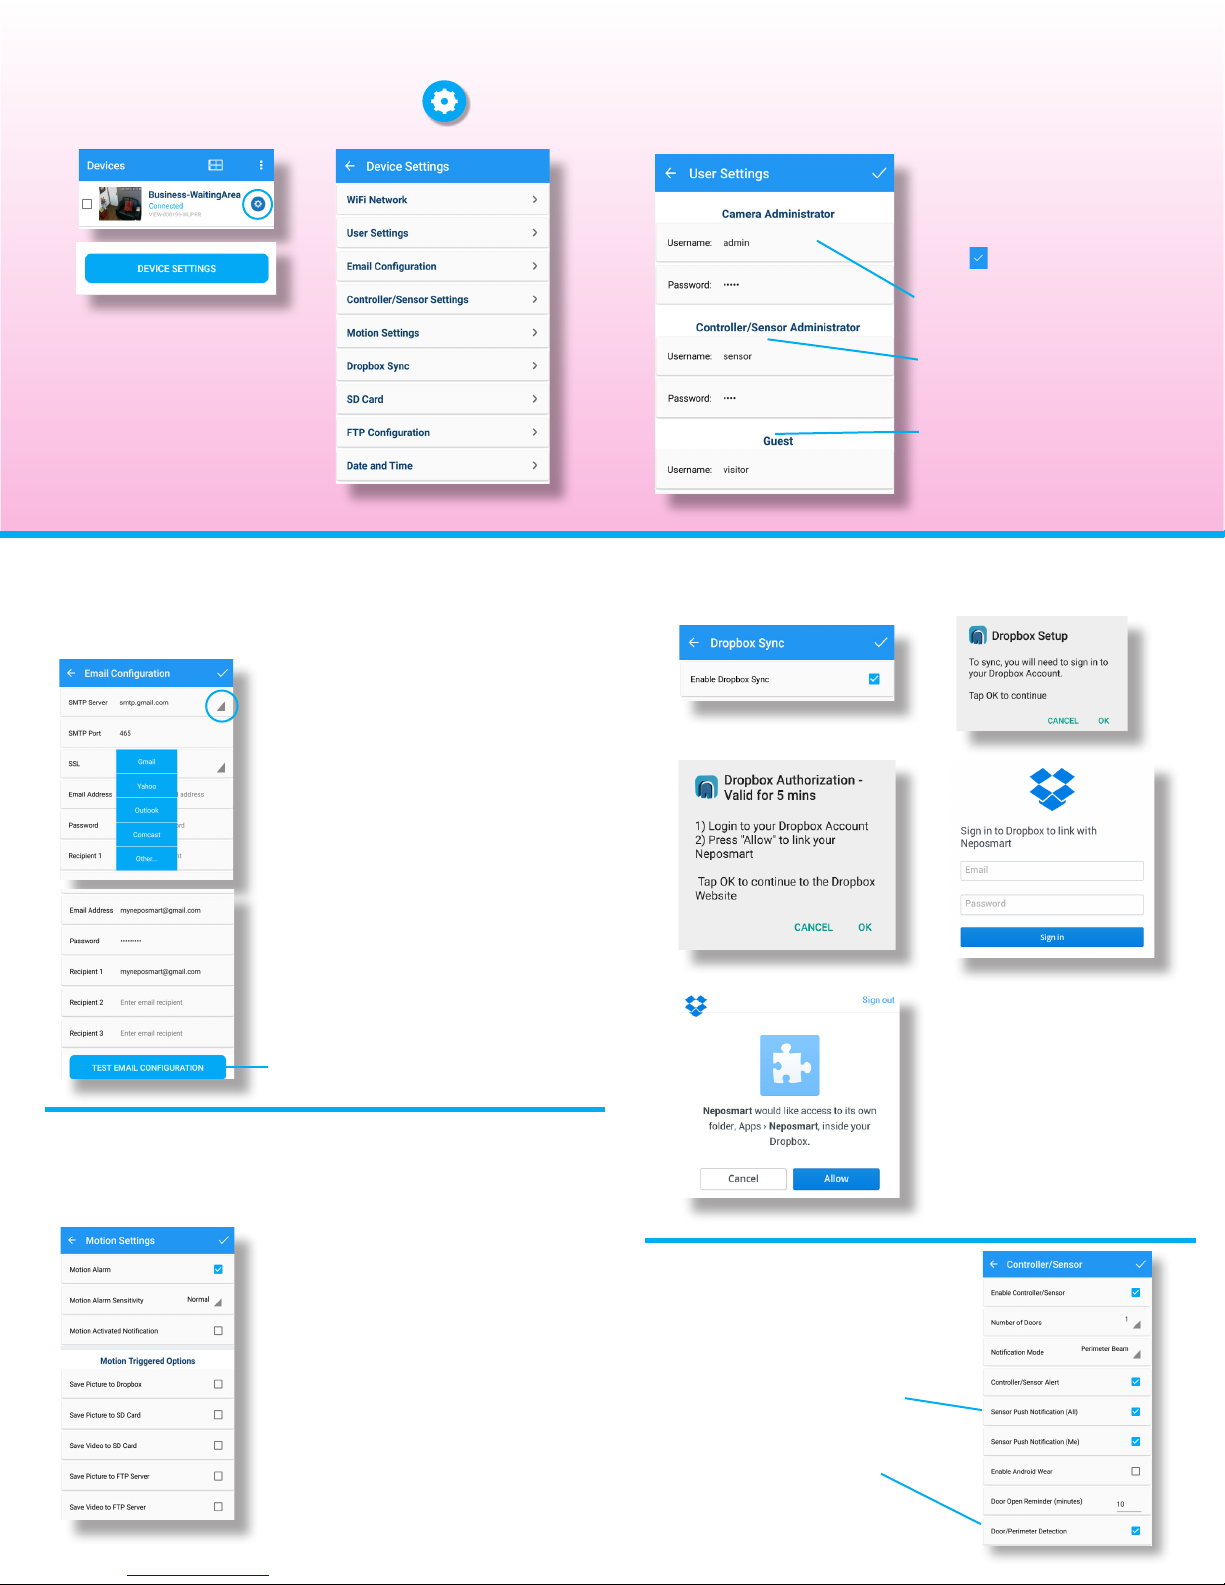
Conguring your Device Settings
Change Default User Settings
Conguring Email Alerts Sync Images to Dropbox
Key settings can be found in this screen by pressing
from your “Devices” list > Device Settings
Detailed information can be
found in the User Manual at
www.neposmart.com/support
Device Settings > User Settings
Device Settings > Email Conguration Device Settings > Dropbox Sync
Add email addresses to receive Email Notications
SMTP Server: Select primary
email provider from the dropdown.
If your email provider isn’t listed
tap “other”, and enter your email
provider’s Server, SMTP Port and
SSL Settings.
1 2
3
5
4
1
2
Enter your own Camera
Username and Password
Enter your own Controller/Sensor
Username and Password
Enter your own Guest
Username and Password
© 2016 Nepoware Corporation. All Rights Reserved
For your own security, change
the default username/password.
Ensure passwords are dicult
for others to guess but
something you can remember.
Press when nished
Complete information can be found in the User Manual at www.neposmart.com/support
Email Address/Password: Enter the primary
email and password. This will be the email that
will be used to send your Neposmart alerts.
Recipients: Enter up to 3 email recipients. You
can also receive text message alerts by entering
the SMS email of your wireless carrier. A list of
SMS email info for all US carriers can be found at
http://emailtextmessages.com
Test Email Conguration: Tap to test your email
credentials to ensure they are correct.
Device Settings > Motion Settings
You can receive motion and perimeter breach
alerts by enabling respective settings:
1
2
3
4
Images synced to Dropbox
Images/Video saved to built-in SD Card
Email Notications
Images/Video saved to your own FTP
Server: Go to FTP conguration and enter
your server details
Enable Alerts (Motion, Perimeter)
Device Settings >
Controller/Sensor Settings
Enable Push
Notications
Receive alerts straight to your
Android when sensor triggers
1. Enable Push Notications
Controller/Sensor Settings >
Enable “Sensor Push Notication”
2. Enable Door/Perimeter
Detection
Controller/Sensor Settings >
Enable “Door/Perimeter Detection”
Enable Dropbox Sync > Login to
your Dropbox Account
All your images will be saved under
the Apps/Neposmart folder. Do not
rename or delete the Apps/Neposmart
folder to avoid sync problems with
your Neposmart.
You can, however, delete the camera
subfolder or individual les.
This manual suits for next models
1


