Nera SatLink 1000 User manual

Nera Broadband Satellite AS


Nera SatLink Terminal User Guide – Revision P
1
Nera SatLink Terminal
User Guide

Nera SatLink Terminal User Guide – Revision P
2
©Copyright 2002-2005, Nera Broadband Satellite AS
All rights reserved. Reproduction, adaptation or translation without prior written
permission is prohibited, except as allowed under the copyright laws.
®
™
The names of products (hardware and/or software) mentioned herein are regarded to be
the property of their respective companies, regardless of whether or not registration is
indicated.
Notice The information in this publication is subject to change without notice. Nera Broadband
Satellite AS makes no warranty of any kind with regard to this material, including, but
not limited to, the implied warranties or merchantability and fitness for particular
purposes. Moreover, Nera Broadband Satellite AS shall not be held liable for errors that
may occur herein or for incidental or consequential damage in connection with the
furnishing, performance, or use of this material.
Publication no. 101557
Revision P, July 1st, 2005
File: Nera SatLink Terminal User Guide Rev P
Nera Broadband Satellite AS
Bergerveien 12
PO Box 91
N-1375 Billingstad, Norway
Tel: +47 67244700, Fax: +47 66859115
E-mail: [email protected]
Website: http://www.nera.no/

Nera SatLink Terminal User Guide – Revision P
3
Table of Contents
1. INTRODUCTION...........................................................................................................5
1.1 This User Guide.............................................................................................................6
1.2 Configuration tool overview...........................................................................................7
2. UNPACKING.................................................................................................................8
3. INSTALLATION.............................................................................................................8
3.1 Before installation..........................................................................................................8
3.2 SatLink Terminal front and back panels........................................................................9
3.3 IDU Installation............................................................................................................12
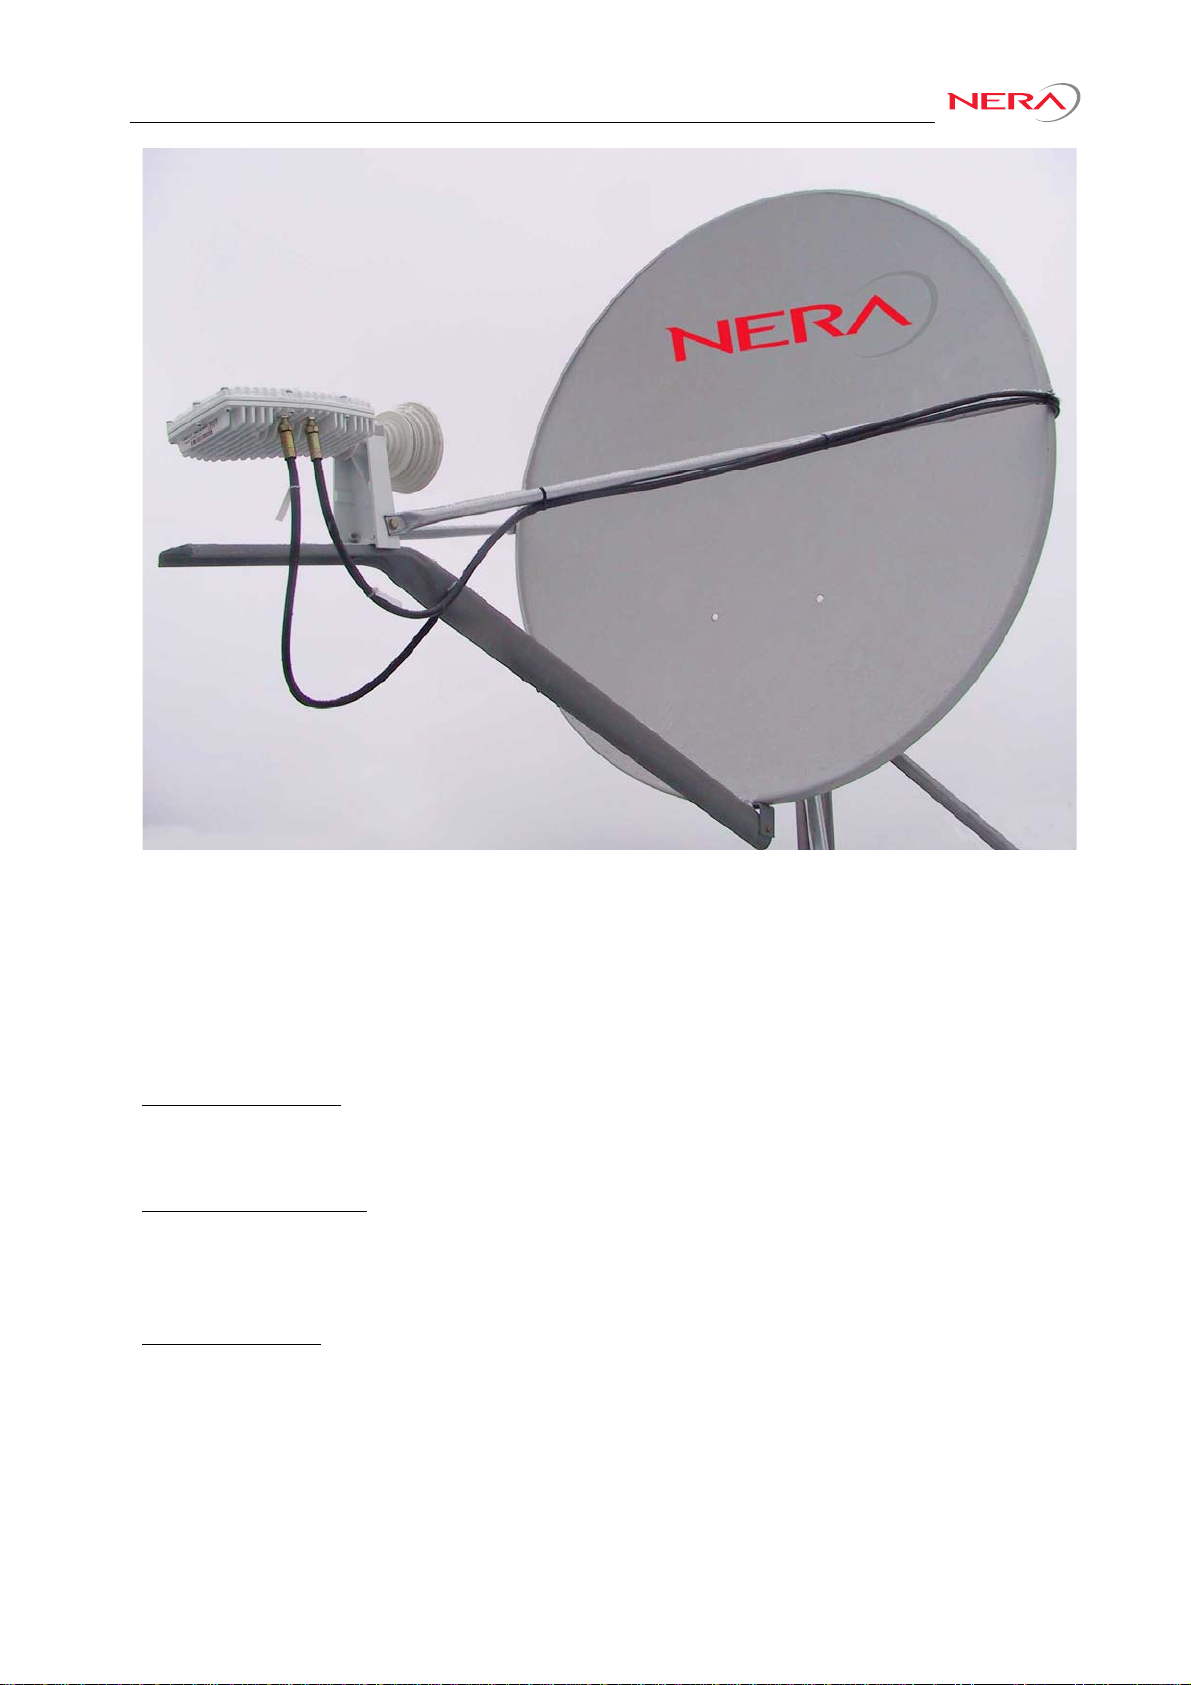
3.4 Antenna installation.....................................................................................................13
3.5 Interface connections ..................................................................................................13
4. PC CONFIGURATION ................................................................................................14
4.1 Windows TCP/IP configuration....................................................................................14
5. USING THE COMMAND LINE INTERFACE OF THE SATLINK TERMINAL .............17
5.1 Start-up sequence.......................................................................................................17
5.2 CLI users access rights...............................................................................................18
5.3 Online help ..................................................................................................................18
5.4 Logging of events........................................................................................................19
5.5 CLI command summary ..............................................................................................20
6. NERA SATLINK TERMINAL CONFIGURATION ........................................................22
6.1 Power on and logon.....................................................................................................22
6.2 Initial configuration of parameters ...............................................................................23
6.3 Forward Link acquisition, Tx power calibration, and fine adjustment of antenna
pointing and polarisation..............................................................................................30
6.4 Test of DVB-RCS connection......................................................................................34
6.5 Prepare the Nera SatLink Terminal for normal operation............................................35
6.6 Backing up the current configuration...........................................................................35
7. LAN DHCP SERVER..................................................................................................36
7.1 Configuration of the DHCP server...............................................................................36
7.2 Changing the SatLink Terminal LAN Interface IP address..........................................37
8. QUALITY OF SERVICE ..............................................................................................38
8.1 Configuring QoS for the return link..............................................................................39
9. BANDWIDTH ON DEMAND........................................................................................41
10. TRAFFIC INITIATED LOGON.....................................................................................43
11. ROUTING OF MULTICAST TRAFFIC ........................................................................43
11.1 Setting up routing of multicast traffic from the SatLink Terminal LAN to the gateway.43
12. UPDATING THE NERA SATLINK TERMINAL SW.....................................................45
12.1 Automatic software update..........................................................................................45
12.2 Manual software update..............................................................................................46
12.3 Restoring the backup software....................................................................................47
13. SOFTWARE OPTIONS...............................................................................................48
13.1 Network Address Translation ......................................................................................49
13.2 Generic Routing Encapsulation (GRE) and IP Tunnelling...........................................53
13.3 TCP Performance Enhancing Proxy (PEP).................................................................54

Nera SatLink Terminal User Guide – Revision P
4
14. DEFINITIONS, ACRONYMS AND ABBREVIATIONS.................................................56
15. REFERENCES............................................................................................................57
APPENDIX A. USING THE WEB INTERFACE ......................................................................58
APPENDIX B. ACCESSING THE COMMAND LINE INTERFACE VIA RS-232....................73
APPENDIX C. TFTP SERVER................................................................................................76
APPENDIX D. TELNET CLIENT.............................................................................................77
APPENDIX E. MANAGEMENT VIA SNMP.............................................................................78
APPENDIX F. CHANGING PRE-CONFIGURED PARAMETERS..........................................79
APPENDIX G. ODU INSTALLATION......................................................................................80
APPENDIX H. IDU OUTPUT POWER CALIBRATION WHEN USING OTHER BUCS THAN
SATLINK 3000 AND 403X.........................................................................................100
APPENDIX I. THE BOOT SW .............................................................................................103
APPENDIX J. TROUBLESHOOTING ..................................................................................104
APPENDIX K. TCP ENHANCEMENT AND TUNING...........................................................110
APPENDIX L. CABLE SPECIFICATION..............................................................................113
APPENDIX M. COMPLIANCE...............................................................................................115
APPENDIX N. RECEIVER AND TRANSMITTER AUTO START .........................................116
APPENDIX O. ACCESSING THE FORWARD LINK SIGNALLING......................................117

Nera SatLink Terminal User Guide – Revision P
5
1. Introduction
The Nera SatLink 1000, 1900, 1901 and 1910 are members of the Nera SatLink Terminal family of DVB-
RCS Terminals. They act as IP routers to interface one or more PCs for bilateral communication via the
satellite network. This User Guide covers the installation and operation of the Nera SatLink
1000/1900/1901/1901, commonly also referred to as the indoor unit (IDU) of the DVB-RCS terminal,
together with the accompanying outdoor unit (ODU) equipment.
The parameters of equipment transmitting to satellites are regulated by national and international
authorities in several countries in the world and by the satellite operators themselves. The standards now
in force are described in references [7], [8], [9] and [10]. The SatLabs group, of which Nera Broadband
Satellite is a member, now works to establish type approval for DVB-RCS terminals in cooperation with
Cetecom. Nera will certify its DVB-RCS terminals by these type approval guidelines as soon as they have
been finalised.
Figure 1: Nera SatLink 1000 Indoor Unit (IDU)
Figure 2: Nera SatLink 1900/1901/1910 Indoor Unit (IDU)

Nera SatLink Terminal User Guide – Revision P
6
Figure 3: Nera SatLink Outdoor Unit (ODU)
1.1 This User Guide
This User Guide is intended for DVB professionals, such as service providers and installers. Therefore, it
does not contain information for non-professional users, such as given in the user manuals of consumer
electronics products.
The information given pertains to the following software (SW) and hardware (HW) versions and releases:
SatLink IDU Software
•Nera SatLink Boot loader, P/N 101225, SW build 1.8.0.2 and later
•Nera SatLink Boot loader, P/N 106267, version 9.0.0 and later
•Nera SatLink DVB-RCS Terminal Software, P/N 101224, version 9.1.3 and later
SatLink IDU HW models
•Nera SatLink 1000, P/N 103346
•Nera SatLink 1900, P/N 100715
•Nera SatLink 1901, P/N 102105
•Nera SatLink 1910, P/N 103798
Ku-band Equipment
Transceivers
•Nera SatLink 4033, P/N 104804
•Nera SatLink 4035, P/N 106546
•Nera SatLink 4036, P/N 106547
BUCs
•Nera SatLink 3000, P/N 100716
•Norsat 1010/1020XRT, P/N 101338
•Invacom TUL-204, P/N 104041

Nera SatLink Terminal User Guide – Revision P
7
•JRC NJT5017F
•NGN-9200
LNBs
•Invacom LNB/OMT SPV - 1SM, P/N 100816
•Zinwell ZK-VJ1, P/N 104730
•JRC NJR2535S
•JRC NJR2536S
•JRC NJR2537S
•NGN-9200
Antennas
•Channel Master Type 960 - 0.96m Antenna, P/N 100883
•Channel Master Type 123 - 1.2m Antenna, P/N 100882
•Channel Master Type 184 - 1.80m Antenna, P/N 104216
•Channel Master Type 244 – 2.40m Antenna, P/N 104612
•Visiosat Tx/Rx 75cm Offset Antenna, P/N 104213
•Visiosat Tx/Rx 90cm Offset Antenna, P/N 105645
C-band Equipment
BUCs
•JRC NJT5652, P/N 105268
•JRC NJT5656, P/N 105269
•Norsat 3050XPTF, P/N 105271
•Zinwell ZTX-C3301F, P/N 105276
•Zinwell ZTX-C3701F, P/N 105274
LNB
•Zinwell ZK-VD1, P/N 105267
•Norsat 8000 series
Antennas
•Channel Master Type 183 – 1.8m Rx/Tx Linear Cross Polar Feed, P/N 104905
•Channel Master Type 243 – 2.4m Linear Cross Polar Feed, P/N 104908
•Channel Master Type 183 – 1.8m Left Hand Circular Polarisation, P/N 104960
•Channel Master Type 183 – 1.8m Right Hand Circular Polarisation, P/N 105281
•Channel Master Type 243 – 2.4m Left Hand Circular Polarisation, P/N 104911
•Channel Master Type 243 – 2.4m Right Hand Circular Polarisation, P/N 105282
1.2 Configuration tool overview
The Nera SatLink Terminal must be configured before it can communicate via the satellite to and from
the network operator Gateway. The parameters to be configured are explained in section 6.2.
The configuration of the terminal can be carried out using the configuration tools:
•Command Line Interface
-Via RS232/Terminal emulator (e.g. HyperTerminal)
-Telnet
•Web-interface
•SNMP
Configuration via CLI and Web-interface is presented in this document. For terminal management via
SNMP, the reader is referred to [6].

Nera SatLink Terminal User Guide – Revision P
8
2. Unpacking
Check that the following items are in the box received, then unpack.
•SatLink 1000, 1900, 1901, or 1910
•Stand for vertical placement (SatLink 1000 only)
•Power supply (SatLink 1000 only)
•Mains cord
•Brackets for 19” rack mounting (SatLink 1900/1901/1910 only)
•CD with documentation
3. Installation
3.1 Before installation
3.1.1 Safety
Follow these guidelines to ensure general safety:
•Always comply with national and local electrical codes.
•Keep the installation area clear and dust free during and after installation.
•Keep tools and all components away from walk areas.
•Do not wear loose clothing, jewellery (including rings and chains), or other items that might get
caught on the IDU, the ODU or the interconnecting cables.
•Do not work on the system or connect or disconnect cables during lightning storms.
Follow these guidelines when working with electrical equipment:
•Disconnect all power and external cables before installing or removing a SatLink Terminal.
•Do not work alone when potentially hazardous conditions exist.
•Never assume that power has been disconnected from a circuit; always check.
•Do not act in any way that creates a potential hazard to people or makes the equipment unsafe.
•Never install equipment that appears damaged.
•Carefully examine your work area for possible hazards such as moist floors, unearthed mains
extension cables and missing protective earths.
Should an electrical accident occur:
•Be cautious – do not become a victim yourself.
•Turn off electrical power to the system.
•If possible, send another person to get medical aid. Otherwise, assess the condition of the victim and
then call for help.
•Determine if the victim needs artificial respiration or external cardiac compressions; then take
appropriate action.
3.1.2 Site requirements
The Nera SatLink Terminal shall be connected to the mains 110/230 VAC, 50-60Hz.

Nera SatLink Terminal User Guide – Revision P
9
3.2 SatLink Terminal front and back panels
3.2.1 SatLink 1000 front and back panel
Figure 4: SatLink 1000 Front panel
LED Colour, indicates
Power Blue, lights steadily when power switch is on and unit is powered. Flashes when loading
software.
Error Red, lights steadily when an error event occurs and during reboot.
Satellite Receive Blue, flashes when the receiver is searching for the carrier.
Lights steadily when receiver is on and functioning properly.
Flashes when IP packets are received from the Satellite Interface (the Gateway).
Transmit Blue, flashes rapidly when a continuous wave (CW) is transmitted.
Lights steadily when the terminal is logged on to the DVB-RCS gateway.
Flashes when IP packets are transmitted to the Satellite Interface (the Gateway).
Ethernet Link/Act Blue, lights steadily when Ethernet connectivity is OK.
Flashes slowly when Ethernet packets are transferred via the Ethernet interface.
Table 1: SatLink 1000 front-panel LEDs
Figure 5: SatLink 1000 back panel
Item Description
On/off switch Mains power on (1) or off (0).
Mains Connector Connector for cable to the 24 V DC power transformer (external power supply provided
with Nera SatLink 1000 Terminal)
Ethernet
Connector RJ45 connector for IP traffic to connect to a PC, Ethernet switch, IP router etc. 10BASE-T
or 100BASE-T modes are detected automatically.
COM1 Connector Nine-pin connector for connecting CLI interface to a computer serial RS232 interface.
Rx coaxial jack Coaxial 75 ΩF-type jack for the cable to the LNB.
Tx coaxial jack Coaxial 75 ΩF-type jack for the cable to the BUC.
Table 2: SatLink 1000 back panel description

Nera SatLink Terminal User Guide – Revision P
10
3.2.2 SatLink 1910 front and back panel
Figure 6: SatLink 1910 Front panel
LED Colour, indicates
Power Blue, lights steadily when power switch is on and unit is powered. Flashes when loading
software.
Error Red, lights steadily when an error event occurs and during reboot.
Satellite Receive Blue, flashes when the receiver is searching for the carrier.
Lights steadily when receiver is on and functioning properly.
Flashes when IP packets are received from the Satellite Interface (the Gateway).
Transmit Blue, flashes rapidly when a continuous wave (CW) is transmitted.
Lights steadily when the terminal is logged on to the DVB-RCS gateway.
Flashes when IP packets are transmitted to the Satellite Interface (the Gateway).
Ethernet Link/Act Blue, lights steadily when Ethernet connectivity is OK.
Flashes slowly when Ethernet packets are transferred via the Ethernet interface.
Table 3: SatLink 1910 front-panel LEDs
Figure 7: SatLink 1910 back panel
Item Description
On/off switch Mains power on (1) or off (0).
Mains Connector Standard recessed plug for Mains cord.
Ethernet
Connector RJ45 connector for IP traffic to connect to a PC, Ethernet switch, IP router etc.
10BASE-T or 100BASE-T modes are detected automatically.
COM1
Connector Nine-pin connector for connecting CLI interface to a computer serial RS232
interface.
Cover for Accessory
Card Not used.
Rx coaxial jack Coaxial 75 ΩF-type jack for the cable to the LNB.
Tx coaxial jack Coaxial 75 ΩF-type jack for the cable to the BUC.
Table 4: Description of SatLink 1910 back panel

Nera SatLink Terminal User Guide – Revision P
11
3.2.3 SatLink 1900 and 1901 front and back panels
Figure 8: SatLink 1900 and 1901 front panel.
LED Colour, indicates
Power Blue, lights steadily when power switch is on and unit is powered. Flashes when the software
is loading.
Error Red, lights steadily when an error event occurs; lights steadily during reboot.
Satellite Receive Blue, flashes when the receiver is searching for the carrier.
Lights steadily when receiver is on and functioning properly.
Flashes when IP packets are received from the Satellite Interface (the Gateway).
Transmit Blue, flashes rapidly when a continuous wave (CW) is transmitted
Lights steadily when the terminal is logged on to the DVB-RCS gateway.
Flashes when IP packets are transmitted to the Satellite Interface (the Gateway).
Ethernet Receive Blue, lit when Ethernet packets from the local network are being received.
Transmit Blue, lit when Ethernet packets are sent to the local network.
Table 5: SatLink 1900 and 1901 front-panel LEDs
Figure 9: SatLink 1900/1901 Back panel
Item Description
On/off switch Mains power on (1) or off (0).
Mains Connector Standard recessed plug for Mains cord.
COM1
Connector Nine-pin connector for connecting CLI interface to a computer serial RS232 interface.
Ethernet
Connector RJ45 connector for IP traffic to connect to a PC, Ethernet switch, IP router etc.
10BASE-T or 100BASE-T modes are detected automatically.
Node/Hub
Push-button toggle Selects HUB or NODE configuration of the Ethernet port. NODE normally is used
when connecting to an Ethernet switch or Ethernet hub, while HUB is used when
connecting directly to a single PC.
External I/O Not used
Rx coaxial jack Coaxial 75 ΩF-type jack for the cable to the LNB.
Tx coaxial jack Coaxial 75 ΩF-type jack for the cable to the BUC.
Table 6: SatLink 1900 and 1901 back panel connectors and switches

Nera SatLink Terminal User Guide – Revision P
12
3.3 IDU Installation
3.3.1 On desktop or shelf
Place the Nera SatLink Terminal on a flat, stable surface, such as a desktop or shelf, close to the PC or
network device to which it will be connected. Keep its top, bottom and all sides unobstructed to ensure
free airflow. Rubber feet on the bottom provide adequate clearance. Ensure that there is at least 10 cm
clearance at the back to allow room for cable connections.
3.3.2 In rack
Warning: The rack or cabinet should be properly secured to prevent tipping. Equipment that is
installed in a rack or cabinet should be mounted as low as possible, with the heaviest units lower
down, and lighter units toward the top.
Precautions:
•Ensure that the mains circuits are properly earthed and use the mains cord supplied with the
SatLink Terminal to connect it to the mains outlet.
•If your installation requires a different mains cord than the one supplied, ensure that the cord used is
certified as indicated by the stamped or embossed logo of the electrical safety authority in your
country.
•If the on/off switch on the back panel is difficult to reach when the unit is fitted in the rack, ensure
that the mains outlet into which it is plugged can be reached so it may be unplugged if need be.
•Ensure that the unit does not overload the mains circuit, wiring or over-current protection. To
determine the possibility of overloading the supply circuits, add together the ampere ratings of all
devices installed on the same circuit as the Nera SatLink Terminal and compare the total with the
rating limit for the circuit. The maximum ampere ratings are usually printed on units near their mains
connectors.
•Do not install the Nera SatLink Terminal in a location where the operating ambient temperature may
exceed 45°C.
•Ensure that the airflow around the sides and back of the router is not restricted.
The Nera SatLink 1900/1901/1910 can be mounted in any EIA-standard 19-inch telecommunications rack
or cabinet. The Nera SatLink 1000 needs to be placed on a shelf if it is to be placed in a rack.
Use a Torx screwdriver and attach the mounting brackets to the router with the screws supplied. Hold the
unit securely, brackets attached, and move it vertically until rack holes line up with the bracket notches,
then insert and tighten the four screws holding the brackets to the rack.
Figure 10: Rack Mounting

Nera SatLink Terminal User Guide – Revision P
13
3.4 Antenna installation
Install the antenna as described in Appendix G and references [1], [2], [3], [4]and [5].
3.5 Interface connections
3.5.1 Rx/Tx cables between IDU and ODU
The coaxial cables from the ODU are connected to the type F coaxial jacks on the back panel of the Nera
SatLink Terminal. See Appendix L for specification of the cables to be used.
•Connect one coaxial cable from the ODU Tx module input to the jack marked Tx.
•Connect one coaxial cable from the LNB to the port marked Rx on the back panel.
Note
Do not connect the Tx cable before the initial configuration of the Nera SatLink Terminal is
performed to ensure that incorrect or hazardous signals are not sent to the satellite.
Note
Use only 75 Ωcoaxial cables fitted with type F plugs for the Rx and Tx cables.
Note
Do not connect and disconnect the coaxial cables with power connected to the Nera SatLink
Terminal.
Hint
Use different colour marking on the Tx and Rx coaxial cables to reduce the probability for
interchanging the cables.
3.5.2 Ethernet connection to a Local Area Network (LAN)
The Nera SatLink Terminal may be connected to a single PC or to a network via the RJ-45 Ethernet jack
on the back panel.
•Plug one end of the Ethernet cable into the RJ-45 jack on the back panel.
•Plug the other end of the Ethernet cable into the RJ-45 jack a Local Area Network (LAN) device such
as an Ethernet hub, switch or router, according to its manufacturer’s instructions.
For the Nera SatLink 1900 and 1901, toggle the back panel push button to set Ethernet HUB or NODE
mode. Toggle to NODE when connecting to an Ethernet switch or an Ethernet hub and toggle to HUB
when connecting to a single PC.
For the Nera SatLink 1000 and 1910 there is no push button on the back panel as Ethernet HUB or NODE
mode will be auto-detected and the correct mode chosen automatically.
3.5.3 Mains connection
The Nera SatLink 1900/1901/1910 models have internal power supply and consequently are connected
directly to a 110/230 VAC 50/60Hz outlet using a standard 230 VAC mains cord.
3.5.4 Power supply
The Nera SatLink 1000 has an external power supply that is connected to a 110/230 VAC 50/60Hz outlet
using a standard mains cord.
Warning: The Nera SatLink 1000 must only be connected to the external power supply that is
approved by Nera, PN 104170 (LEI-S2425D / Model No. STD-2425). Use of another power supply
will void warranty.

Nera SatLink Terminal User Guide – Revision P
14
4. PC configuration
After installation as described in Chapter 3 is carried out, the Nera SatLink Terminal is ready to be
powered on.
4.1 Windows TCP/IP configuration
Verify that the TCP/IP configuration for PCs connected to the Terminal LAN is correct. Push the start-
button in Windows, select the Control panel and then open Network Connections. Right-click on the
relevant Local Area Connection and select Properties. A new window showing the Network Connection
Properties will pop up. In the General submenu of this window, scroll down, select Internet Protocol
(TCP/IP) and then push the Properties button shown in Figure 11. Then configure the PC client to obtain
the IP address automatically from the Terminal (section 4.1.1) or configure the PC with a static IP address
(section 4.1.2).
Figure 11: Windows XP menu for configuring the client TCP/IP configuration.

Nera SatLink Terminal User Guide – Revision P
15
4.1.1 Dynamic IP configuration of PCs connected to the Nera SatLink Terminal LAN
By default the DHCP server in the Nera SatLink Terminal is enabled. When the Nera SatLink Terminal is
powered on, all PCs connected to the Nera SatLink LAN can automatically retrieve their IP configuration
from the DHCP server. The user should verify that the Window clients are configured to obtain an IP
address and DNS server address automatically. Figure 12 shows the correct Windows XP configuration
when the DHCP server is enabled in the Terminal.
Figure 12: Windows XP TCP/IP setting when DHCP server is enabled in the Terminal
From an MS-DOS window, the user may type ipconfig /all command to verify that the computer has
received correct configuration parameters from the DHCP server such as IP address, subnet mask, default
Gateway, DNS servers and lease time.
Figure 13: ipconfig /all print out from an MS-DOS window

Nera SatLink Terminal User Guide – Revision P
16
4.1.2 Static IP configuration of PCs connected to the Nera SatLink Terminal LAN
When the DHCP server in the SatLink Terminal is disabled, all PCs attached to the Nera SatLink
Terminal LAN must be configured with static IP addresses that are within range of the Nera SatLink
Terminal subnet (see section 6.2.1). The IP configuration parameters to use for PCs connected to the Nera
SatLink Terminal LAN are supplied from the system operator or service provider. Please configure the IP
address, Subnet mask, Default gateway, Preferred DNS server, and optionally the Alternate DNS server
as shown in Figure 14.
Note
Ensure that the actual IP addresses supplied by the system operator / service provider are
configured and not the IP addresses in the example figure.
Figure 14: Windows XP TCP/IP setting when DHCP server is disabled in the Terminal
Example:
A host may have the following configuration; IP address 192.168.0.2, Subnet mask 255.255.255.0 and
default gateway 192.168.0.1, where the IP address of the default gateway should be the IP address of the
Nera SatLink Terminal LAN interface.

Nera SatLink Terminal User Guide – Revision P
17
5. Using the Command Line Interface of the SatLink Terminal
The command line interface can be accessed via either Telnet or the RS-232 port for management of the
Nera SatLink Terminal as well as for showing status and reports.
5.1 Start-up sequence
When turning on the Nera SatLink Terminal first the Boot SW is loaded. A message such as the one
below is displayed on the CLI/RS-232 when the boot SW starts. Note that Telnet is not available before
the application has been started.
Nera SatLink Boot-loader
- SW ID 106267, Revision 9.0.0.1
File system initialised
Press return to enter boot-loader
Under normal circumstances the user should not need to enter the boot-loader and should ignore the
“press return to enter boot-loader” message. The DVB RCS application will load automatically once the
boot SW load has completed. See Appendix I for further details concerning the boot SW. If access to the
boot-loader is required, press return within 10 seconds to display the login-prompt for entering the boot-
load.
After the timer has expired, the DVB-RCS application will be loaded. The message Loading
application will be shown when the application starts to load.
When the DVB-RCS application starts to run a message similar to this will be shown:
Nera SatLink 1000
- Main Board ID 102805, Revision R6.0
- SW ID 101224, Revision 9.1.3 Build 56
The application will then initialise the file system, restore all configuration parameters from flash, do
initial configuration, and start the DVB-RCS receiver and transmitter if these are configured to start
automatically.
The following messages on CLI show when the Nera SatLink Terminal has successfully restored all
configuration parameters from the MIB (from the configuration file on the flash file system), when lock
on the forward link is achieved, and when successful DVB-RCS logon has been achieved:
State : CLI message
Configuration completed : Retrieving configuration....done
Lock on forward Link achieved : Forward link up
Successful logon : Return link up
Two-way link established

Nera SatLink Terminal User Guide – Revision P
18
5.2 CLI users access rights
Four levels of CLI user access rights are available for differentiating user privileges:
•Level 2: installer
•Level 3-5: end users
When shipped from the factory, one user is pre-configured in the Nera SatLink Terminal1:
User name Factory default password Privilege level
install dvbrcs 2
When accessing the CLI via RS-232, if the login prompt is not displayed type ENTER. The login prompt
Login: should then be displayed. Then login with the install user:
Login: install
Password: dvbrcs
When the command prompt is displayed you will now have access to the CLI with privilege level 2.
New users may be added with the CLI command user add, existing users deleted with the CLI
command user del, and the password of the current user or users with lower privilege levels can be
changed with the CLI command user passwd. To list all defined users with lower privilege level than
the user currently logged in, use the CLI command user show. Type ? user to get further help on the
user commands.
For security reasons we strongly recommend that you change the factory set password to your own
personal one.
5.3 Online help
In the CLI a list of available commands can be displayed by typing ? <ENTER> (question mark and the
ENTER). The CLI command groups will then be shown:
Example:
# ?
To list the commands in a sub-menu type '? <sub-menu>'
device : Device configuration
dvb : Configure DVB interface
eth : Show Ethernet status
ip : IP configuration
misc : Miscellaneous commands
odu : ODU configuration
sw : Software upgrade configuration
user : User configuration
log : Event log
#
1Nera SatLink Terminals that have Boot SW release 8.x.x or earlier, will have factory default password
satlink for the install user.
Other manuals for SatLink 1000
1
This manual suits for next models
3
Table of contents
Other Nera Marine GPS System manuals