Nesco NC-57100 NORU User manual
Instruction Manual
คู่มือการใช้งาน
VACUUM CLEANER
MODEL : NC-57100 NORU
400 W 220 V 50 Hz

1


3

4
5

6
7


11

English
VACUUM CLEANER
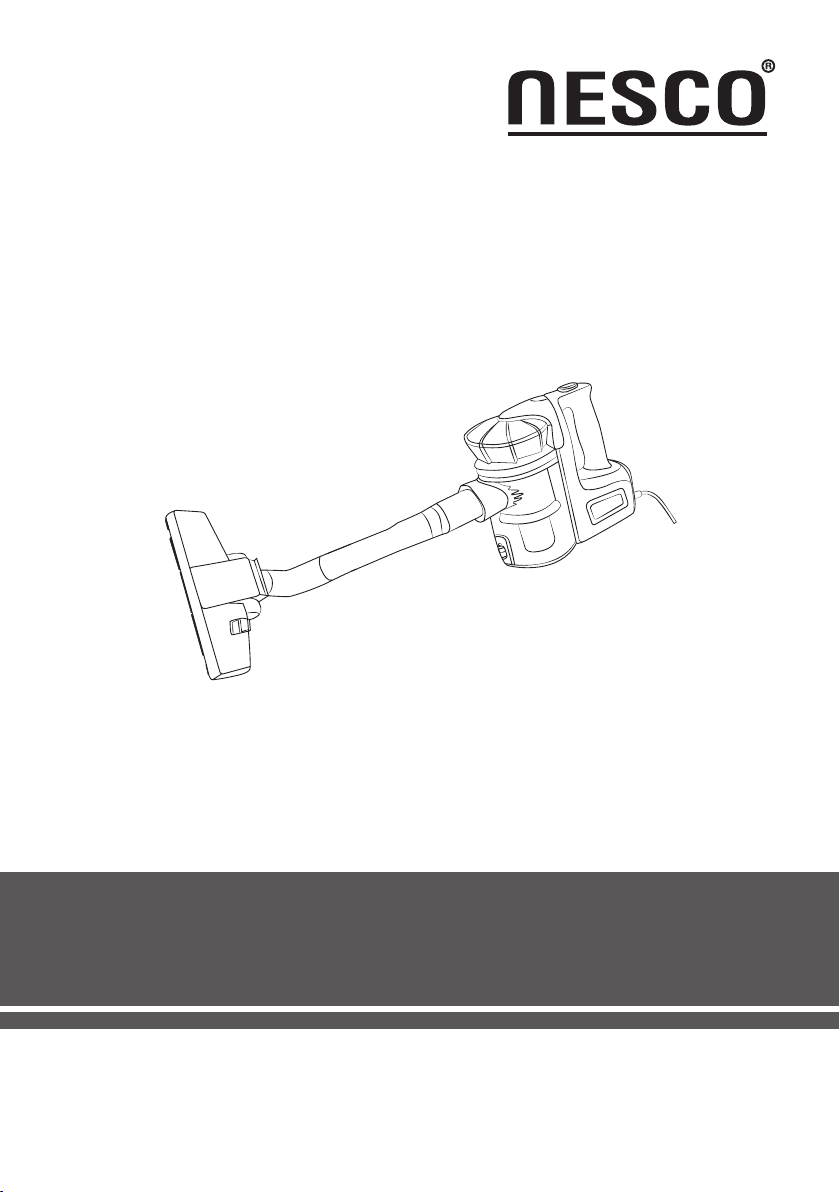
DESCRIPTION
Dear Customer Thank you for choosing a Nesco appliance. The experience,
design, feature and technology of this appliance, as well as the strict quality
controls used during manufacture, will provide full satisfaction for many years.
A. On/off button
B. Handle
C. Wind output grille
D. Power cord
E. Connector
F. Extension tube
G. Floor brush
H. 2 in 1 Crevice brush
I. Dust release button
J. Filtration net
K. Inlet
L. Dust canister release button

13

14
TIP & SAFTY PRECAUTIONS
1.Warnings
Before using this appliance, read and follow all warnings and instructions in this
manual, even if you are familiar with this product.
This appliance is not intended for use by persons (including children) with
reduced physical, sensory or mental capabilities, or lack of experience and
knowledge, unless they have been given supervision or instruction concerning
use of the appliance by a person responsible for their safety.
Young children should be supervised to ensure that they do not play with the
appliance.
2.Safety Direction
Please read this instruction manual carefully before rst use. It is advisable to
keep this instruction manual for future reference.
DO NOT vacuum water, wet objects, liquids, ashes, hot coals, cigarette butts,
matches or any hot, smoking or burning objects, etc.
DO NOT pick up ammable or combustible materials (i.e. lighter uid, petrol,
kerosene, etc.) or use in the presence of explosive liquids or vapour.
DO NOT pick up toxic material (i.e. chlorine bleach, ammonia, drain cleaner,
etc.)
DO NOT vacuum Toner (for laser printer, copy machines etc) as there is a risk
of re and explosion.
DO NOT vacuum plaster, cement etc. as the lter can become blocked.
DO NOT use the vacuum without all the lters tted.
DO NOT store or use the appliance near high temperature areas.
DO NOT run over the power cord with the vacuum cleaner.
DO NOT use the vacuum cleaner if it is blocked. Turn off and clear all
blockages before continuing.
DO NOT use the vacuum cleaner with blocked lters. Clean lters before
continuing. (refer to User Maintenance section).
DO NOT use the vacuum cleaner if the appliance malfunctions, abnormal
noise, smell, smoke, is dropped or damaged in any manner or any breakage
is found during operation. Return appliance to the nearest authorized service
agent or similarly qualied person for a thorough examination, repair, electrical
or mechanical adjustment.
DO NOT misuse the cord. Never pull the appliance by the cord or pull to
disconnect it from the outlet. Instead, grasp the plug and pull to disconnect.
DO NOT use the vacuum cleaner to pick up large objects, hard or sharp
objects such as glass, nails, screws, coins, etc. that are likely to cause damage.
DO NOT use with damaged cord or plug.
DO NOT use vacuum cleaner if it has been dropped, damaged, left outdoors,
or dropped into liquid (water etc.)
DO NOT close door on cord, or pull cord around sharp edges or corners.
Cord Rewind -DO NOT allow the cord and plug to whip back at full speed.
Guide the cord and plug in gently.
DO NOT handle plug or vacuum cleaner with wet hands.
DO NOT put any objects into openings.

15
DO NOT use with any openings blocked and do not restrict airow.
DO NOT operate the appliance with a damaged cord or plug.
If the supply cord is damaged, it must be replaced by the manufacturer, its
service agent or similarly qualied persons in order to avoid a hazard.
DO NOT use without lters in place.
DO NOT attempt to modify this product in any way.
DO empty the dust bin regularly for optimal operation of the vacuum.
DO keep hair, loose clothing, ngers, feet and body parts away from openings
or moving parts.
DO disconnect the appliance from the mains supply before connecting the
suction hose.
DO turn off controls before you connect or disconnect the appliance to or
from the mains supply.
DO disconnect the appliance from the power supply when not in use, before
changing the dust lter, cleaning the lters or connecting / disconnecting the
accessories.
DO use only on dry, indoor surfaces.
DO use only as described in this manual. Use only manufacturer’s
recommended attachments.
DO Keep cord away from heated surfaces.
DO Keep all openings free of dust, lint. hair, and anything that may reduce
airow.
DO use extra care when vacuuming on stairs.
DO keep your work area well lit.
DO store your appliance indoors in a cool. dry area.
DO ensure children and babies cannot play with plastic bags or any
packaging materials.
DO operate the appliance from a power source of the same voltage,
frequency and rating as indicated on the product identication plate
If this appliance is used by a third party, DO supply the instruction manual with
it.
No liability can be accepted for any damage caused by non-compliance
with these instructions or any other improper use or mishandling of appliance.
This product has not been designed for any uses other than those specied in
this manual.
ONLY for domestic use. Industrial or commercial use invalidates the warranty.
Read and Save These Instructions
3.Transporting your Vacuum
To move your vacuum cleaner from room to room, unplug the unit and carry
using the carry handle.
Never pull or carry the vacuum cleaner by its cord.
Never carry the vacuum cleaner by the hose.

Instruction for use
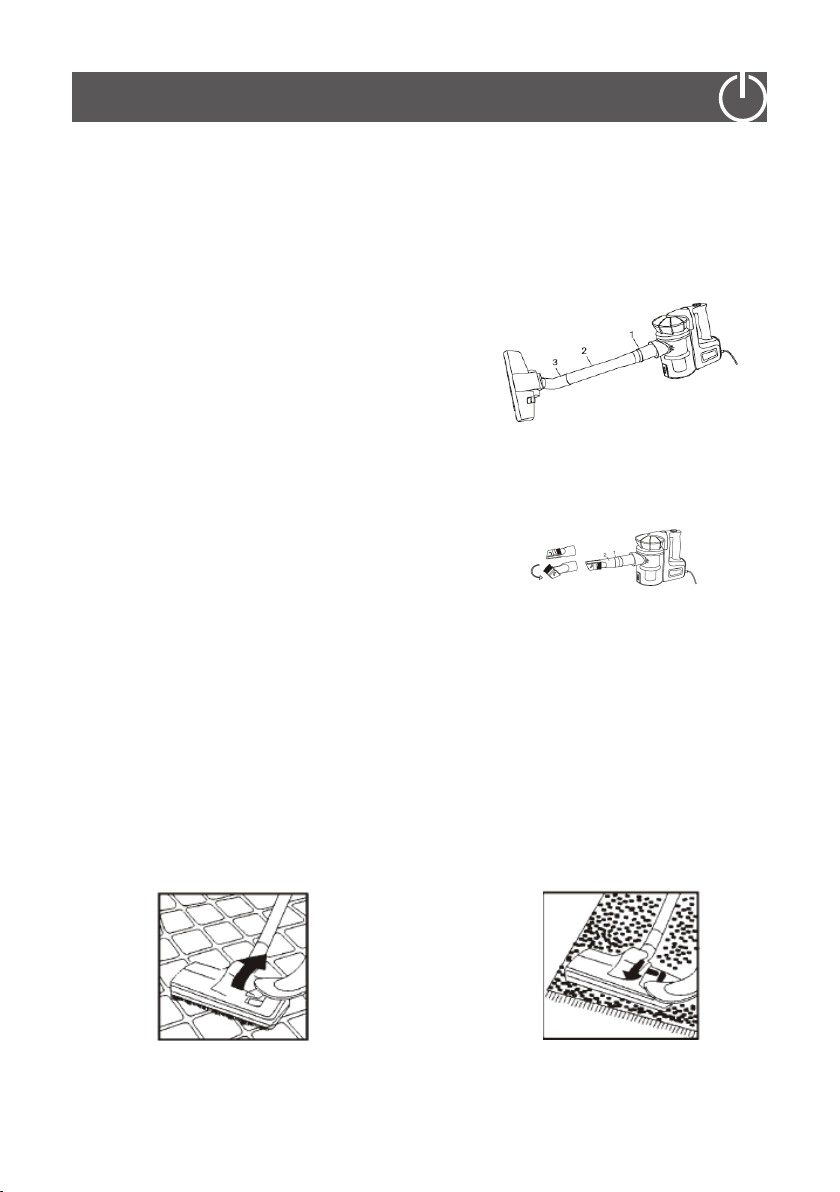
1. Assembly Method
Note:
- Before assembly, please ensure that you have received all parts listed in
the parts list.
- Always transport / send the appliance in its original packaging so that it
does not become damaged.
- Always remove the plug from the power socked before tting or removing
accessories.
1.1 Fitting tube and accessories(PIC.1)
- Insert the connector(1) into inlet on appliance.
- Connect the end of 1pc tube with connector.
- Connect 2pcs of tube(2).
- Insert another end of tube into the oor brush head(3).
1.2 2 in1 Crevice brush (PIC.2)
The Crevice tool is used for cleaning down the side of sofas and into corners,
etc.
The Crevice tool with brush is used for cleaning grilles and vents, etc.
- Insert the connector(1) into inlet on appliance.
- Connect tool(2) with connector.
2. Controls
2.1 Power and Power cord
- United the cord, insert the plug into the power supply
- Press the On /Off button to start the motor.
- After using, unplug and tie the cord together.
16
PIC.1

17
2.2 Using the cleaning accessories
Dual-position carpet/ oor brush.
Pos.1: bristles extended, for hard oors Pos.2: bristles retracted, for carpets
PIC.3
Narrow nozzle : For cleaning radiators, comers, edges, drawers etc.
Small brush : For cleaning curtains, shelves, books, inlaid nite lamps and other
delicate objects.
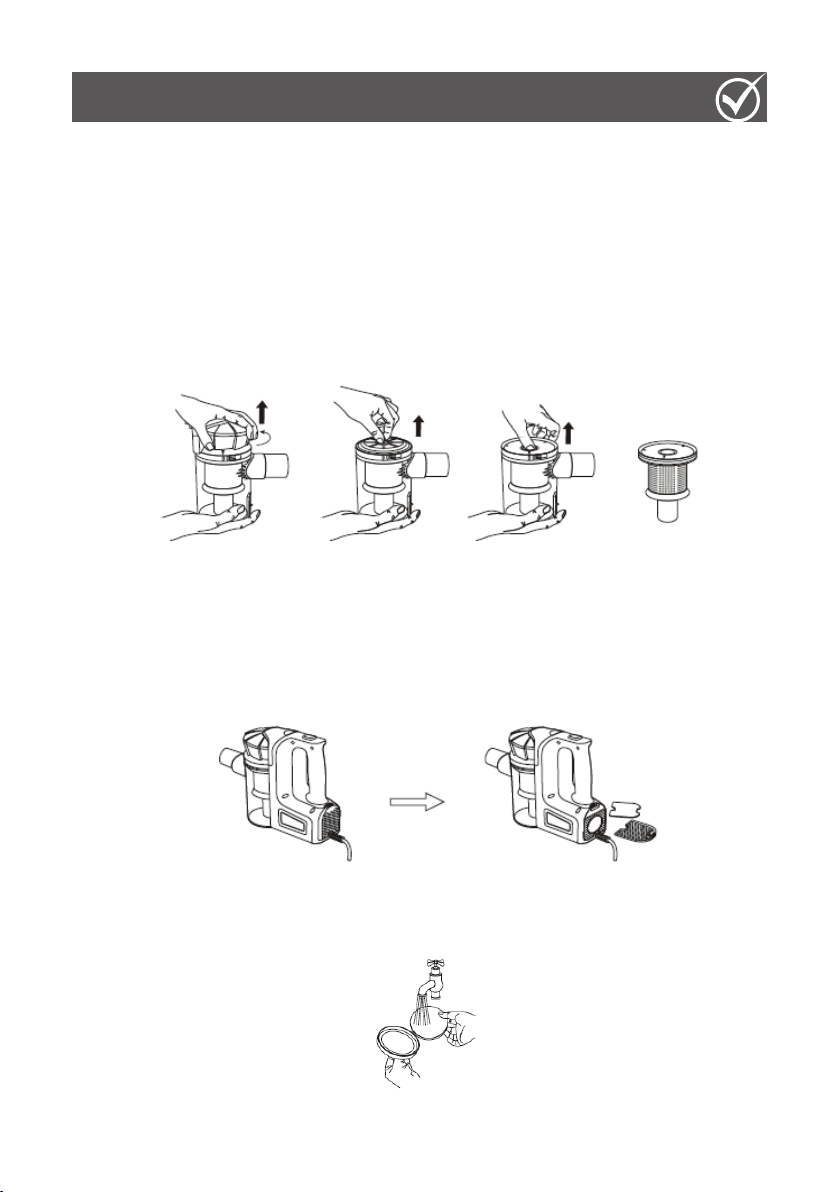
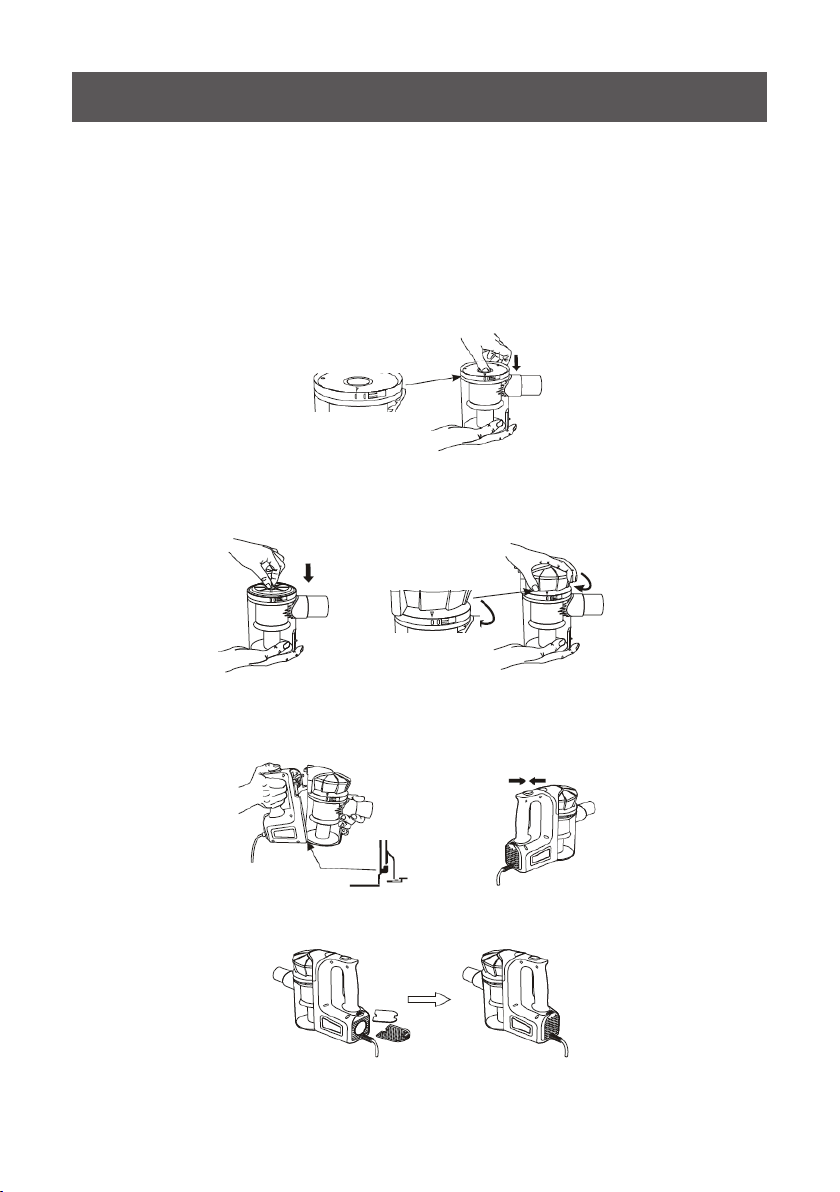
3. Emptying the Dust Canister
Empty the Dust Canister as frequently as possible or when the suction power
is reduced.
WARNING: The plug must be removed from the power socket before
emptying.
3.1 Emptying Method I:
Hold the appliance over a dustbin, press the dust release button to open
bottom and
release the dirt (PIC.3).

3.2 Emptying Method II
- Remove the dust canister from the product by pressing dust canister
release button
(PIC.4) and pulling the dust canister away from the product as the arrowhead
shown.
(PIC.5)
- Holding the dust canister over a dust bin, press the dust release button as
shown
(PIC.6), the bottom of the dust canister will drop down to release the dirt.
- Close the bottom of the dust canister by pressing the base upwards until
1. Cleaning the lters and ltration net
Warning: when the lters are obviously covered with dust or the suction
decreases considerably, Please clean it in time, for this can improve the
working efciency and
extend the lifetime of the cleaner.
Never use the cleaner without lters.
IMPORTANT: Please put the cleaner on the oor before you clean the lter.
- Remove the dust canister from the product by pressing dust canister release
button and pulling the dust canister away from the product.
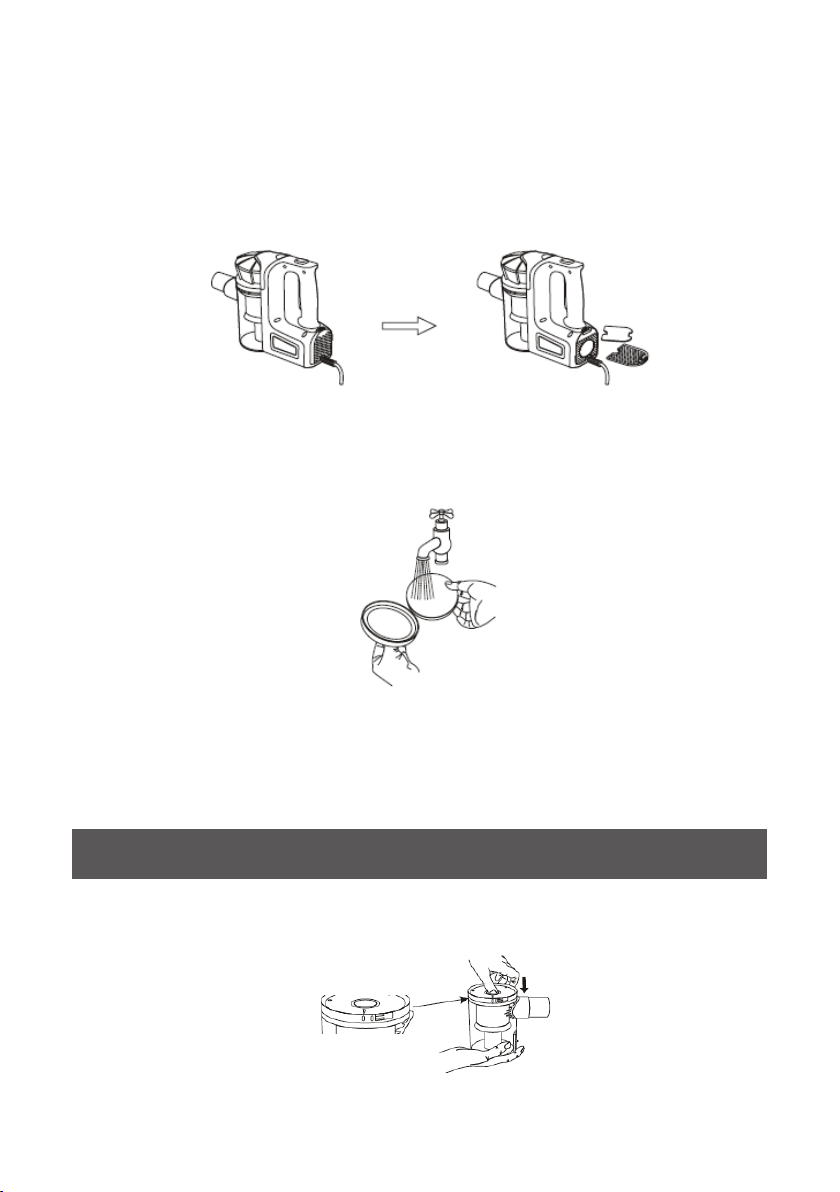
- Unscrew the cover counterclockwise (PIC.7), take out the lters (PIC.8) and
ltration net (PIC.9).
PIC.4 PIC.5 PIC.6
pass
CLEANING AND CARE
Exhaust Air Filter (PIC.10)
The exhaust air lter cleans the air a nal time before it leaves the vacuum
cleaner.
You can access and clean the exhaust air lter as follows: this is located at the
rear of the vacuum cleaner inside the grille.
- Unclip the grille by pressing the tab downward and remove to expose the
lter inside the grille.
- For the easy clean, hold the lters and/or ltration net over a dustbin, knock
gently against all sides. If needed, rinse them under the tap (PIC.11). Please use
a soft brush to clean the lters. Hard brush will damage to the lters.
NOTE: After cleaning, the ltration material must be completely dry before
re-assembling into the product to avoid any possible damage to the products.
We suggest leaving it in open air for at least 24hours after cleaning.
1. Ret the lters and ltration net
- Ret the ltration net into the bowl by lining up the triangle mark (on top
plate of net) and the line mark on the side of bowl. (PIC.12)
PIC.11
WARNING
Table of contents
Languages:
Other Nesco Vacuum Cleaner manuals


