Nesco Spider 1000 User manual


1
2
3

4
ภาษาไทย
A.
B.
C.
D.
E.
F.
G.
H.
I.
J.
K.
L.
เครื่องดูดฝุ่นแบบไม่ใช้ถุงเก็บฝุ่น
พร้อมระบบเป่า
รุ่น Spider 1000 NC-5018
ถึงท่านผู้มีอุปการะคุณทุกท่าน
ขอขอบคุณทุกท่านที่ไว้วางใจเลือกใช้
ผลิตภัณฑ์ของเนสโก้ด้วยประสบการณ์
และการออกแบบที่ทันสมัยและโดดเด่น
ของผลิตภัณฑ์ที่มากด้วยคุณประโยชน์
ในการใช้งานจะสามารถตอบสนองความ
พึงพอใจในการใช้งานของท่านได้อย่าง
คุ้มค่า
ส่วนประกอบ
คำเตือนเพื่อความปลอดภัย
- กรุณาอ่านคู่มือเล่มนี้ให้ละเอียดก่อน
การใช้งานเครื่อง
-แกะกล่องสินค้าด้วยความระมัดระวัง
และตรวจสอบว่าสินค้าอยู่ในสภาพสมบูรณ์
- ไม่ควรใช้เครื่องดูดฝุ่นโดยไม่ได้ประกอบ
ตัวกรอง
- ควรใช้เครื่องดูดฝุ่นให้ถูกวิธี ในกรณีที่
มีฝุ่นรั่วออกมาแสดงว่าช่องเก็บฝุ่นเต็ม
ควรเทฝุ่นออกและทำความสะอาดตัวกรอง
หากเกิดปัญหาอื่นๆกับเครื่องควรส่งตรวจสอบ
และซ่อมแซมโดยช่างผู้ชำนาญเท่านั้น
- ห้ามใช้เครื่องดูดฝุ่นดูดน้ำหรือของเหลว
ใด ๆเพราะจะทำให้เกิดความเสียหายต่อ
เครื่อง
- ควรเก็บเครื่องดูดฝุ่นให้ห่างจากแหล่ง
ช่องเก็บฝุ่น
สายไฟ
ปุ่มปิด/เปิดเครื่อ
ปุ่มเปิดช่องเก็บฝุ่น
สายสะพาย
หัวแปรงพื้น
ถุงใส่อุปกรณ์
หัวต่ออเนกประสงค์(เก็บอยู่กับตัวเครื่อง)
ข้อต่อหัวแปรงอเนกประสงค์
หัวต่อดูดและเป่า(ใช้งานทั้งระบบ
ลมดูดและลมเป่า)
หัวเป่า
หัวแปรงอเนกประสงค์(เก็บอยู่กับตัวเครื่อง)
5
M.
N.
O.
P.
Q.
R.
S.
T.
U.
V.
W.
อุปกรณ์หัวเป่า 1
อุปกรณ์หัวเป่า 2
อุปกรณ์หัวเป่า 3
ตัวกรองแบบ HEPA filter
ท่อต่อยาว (3 ชิ้น)
ข้อต่อท่ออ่อนยาว
หัวแปรงกลม
ท่ออ่อนยาว
แผ่นกรองระบายอากาศ
ช่องระบายอากาศ
ตัวหมุนเก็บสายไฟ

6
กำเนิดความร้อน
- ห้ามใช้เครื่องดูดฝุ่นกับวัตถุใดๆที่เกิดการ
เผาไหม้และลุกไหม้ได้หรือของที่มีคมเช่น
ก้นบุหรี่เถ้าถ่านตะปูเป็นต้น
- ควรเก็บเครื่องดูดฝุ่น ในสถานที่ที่แห้ง
ปราศจากความชื้น
- ห้ามให้เด็กใช้งานเครื่องเนื่องจากเครื่อง
ดูดฝุ่นนี้เหมาะสำหรับใช้งานโดยผู้ใหญ่
เท่านั้น
- ไม่ควรใช้งานเครื่องหากสายไฟหรือ
ปลั๊กไฟชำรุด
- การถอดปลั๊กควรจับและดึงที่ตัวปลั๊ก
เท่านั้นไม่ควรถอดปลั๊กด้วยการดึงหรือ
กระชากสายไฟ
- ควรถอดปลั๊กทุกครั้งเมื่อไม่ใช้งานและ
ก่อนทำความสะอาดหรือเก็บเครื่อง
- ทางบริษัทจะไม่รับผิดชอบต่อความเสีย
หายใดๆ ที่เกิดจากการใช้งานที่ไม่ถูกวิธี
- เนื่องจากเครื่องดูดฝุ่นมีกำลังสูงฉะนั้น
ควรแน่ใจว่าสวิตซ์เปิดปิดเครื่องอยู่ใน
ตำแหน่ง ปิด ก่อนเสียบปลั๊กทุกครั้ง
- เครื่องดูดฝุ่นนี้เป็นไปตามมาตรฐาน
ความปลอดภัยโดยเมื่อมอเตอร์มีความร้อน
กว่าปกติเครื่องดูดฝุ่นจะปิดการทำงาน
อัตโนมัติหากเกิดกรณีนี้ขึ้นให้ถอดปลั๊ก
ทันทีแล้วถอดตัวกรองออกมาทำความสะอาด
รอจนกว่าเครื่องเย็นลงจากนั้นเสียบปลั๊กแล้ว
ใช้งานได้ตามปกติ
การใช้งานแบบลมเป่า
- ควรระมัดระวังการใช้งานลมเป่าในการ
เป่าลมให้วัตถุพองตัวที่เสี่ยงกับการแตก
หรือระเบิดของวัตถุเช่นการเป่าลมลูกโป่ง
ควรใช้งานให้ห่างจากดวงตาและควรมี
การป้องกันดวงตา
-ไม่ควรห่อหุ้มหรือปิดช่องลมเป่าด้วย
วัสดุใดๆทั้งสิ้น
- ควรเอาใจใส่อย่างมากในการเป่าลมให้
วัตถุพองตัว และในพื้นผิวของวัตถุบาง
ชนิดอาจมีอุณหภูมิอุ่นขึ้นเล็กน้อยถือเป็น
เรื่องปกติ
- ไม่ควรปล่อยเครื่องทิ้งไว้ในขณะที่
เครื่องทำงานเป่าลมให้กับวัตถุใดๆ อยู่
คำแนะนำการใช้งาน
- ก่อนการใช้งานควรตรวจสอบให้แน่ใจ
ว่ากระแสไฟฟ้าของเครื่องตรงกับกระแส
ไฟฟ้าที่ใช้ในบ้านของท่าน
- การเชื่อมต่อหรือประกอบอุปกรณ์อื่นๆ
ที่มากับเครื่องให้ปฏิบัติตามคำแนะนำในคู่มือ
- หลังจากใช้งานเสร็จให้กดสวิตซ์เพื่อปิด
เครื่องทุกครั้ง
- ถอดปลั๊กออก
วิธีการใช้งาน

7
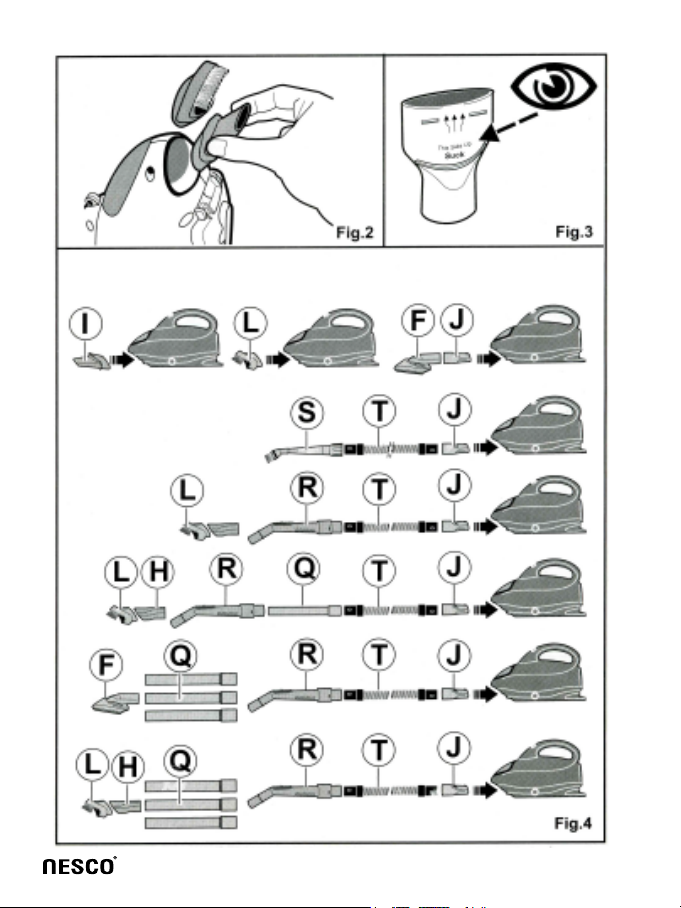
การประกอบอุปกรณ์เครื่องดูดฝุ่น
- อุปกรณ์ทั้งหมดมี14 ชิ้น มี 2
ชิ้นที่ประกอบเก็บอยู่กับเครื่องคือหัวต่อ
อเนกประสงค์(I) และหัวแปรงอเนก
ประสงค์(L)
- ดูภาพประกอบ Fig.1 เมื่อต้องการถอด
อุปกรณ์ออกมาจากตัวเครื่อง
- ดูภาพประกอบ Fig.1 เมื่อต้องการ
ประกอบเก็บอุปกรณ์เข้ากับตัวเครื่อง
- ก่อนการประกอบใช้งานหัวต่อดูดและ
เป่าเข้ากับตัวเครื่องให้สังเกตุสัญลักษณ์
“This Side Up Blow” (สำหรับ
การเป่า)และ “This Side Up
Suck” (สำหรับการดูด)
- สำหรับการใช้งานหัวแปรงดูดและเป่า
ในงานดูดฝุ่นให้หันด้านที่มีคำว่า“This
Side Up Suck” ขึ้นด้านบนและ
เสียบด้านนั้นเข้าไปดูภาพประกอบ Fig.3
ซึ่งเครื่องดูดฝุ่นจะทำงานก็ต่อเมื่อใส่
หัวต่อในตำแหน่งนี้เท่านั้น
การประกอบหัวต่อใช้งานต่าง ๆ
- อุปกรณ์ทุกชิ้นที่มากับเครื่องสามารถ
เลือก ใช้งานได้หลากหลายตามความ
เหมาะสมกับลักษณะการใช้งาน
- การประกอบใช้งานหัวแปรงหรือ
อุปกรณ์แต่ละแบบให้ดูภาพประกอบ
Fig.4
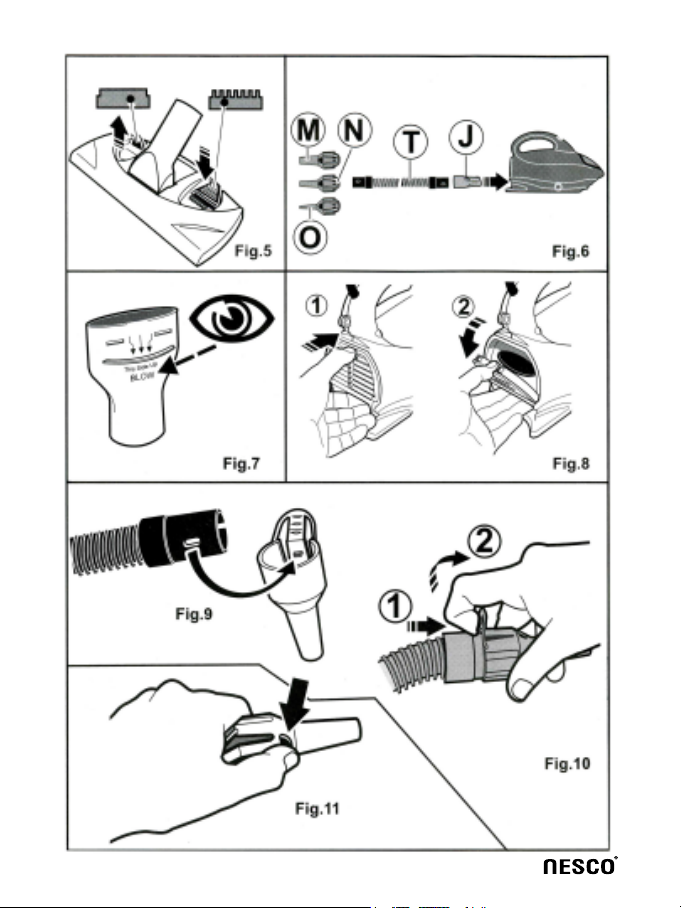
- หัวแปรงพื้นของเครื่องดูดฝุ่นถูกออกแบบ
มาพิเศษสามารถใช้งานได้กับทุก
พื้นผิว ไม่ทำลายพื้นผิวแม้แต่พื้นผิวที่
เป็นไม้ปาร์เก้สามารถใช้หัวแปรงโดย
เลือกใช้ขนแปรงหรือไม่ใช้ขนแปรงก็ได้
ด้วยสวิตซ์ด้านบนหัวแปรง โดยเลือก
ใช้ขนแปรงในการทำความสะอาดพื้นผิวที่
สกปรกหรือพื้นผิวที่ทนทานต่อขนแปรง
และไม่ต้องใช้ขนแปรงในการทำความ
สะอาดพื้นพรมต่างๆ
การใช้อุปกรณ์ต่างๆ ในการใช้งานลมเป่า
- ควรแน่ใจว่าส่วนประกอบต่างๆ ของ
เครื่องดูดฝุ่นอยู่ในตำแหน่งที่ถูกต้องและ
ครบถ้วน
- ในการใช้งานลมเป่า ควรวางเครื่องบน
พื้นที่มั่นคงแข็งแรงก่อนเปิดสวิตซ์การ
ใช้งาน
- การต่ออุปกรณ์ต่างๆในการใช้งานลมเป่า
ให้ดูภาพประกอบFig.6
- เพื่อให้สะดวกกับการใช้งาน สามารถ
ประกอบท่อยาวเพิ่มได้ตามความเหมาะสม
- สำหรับการใช้งานหัวแปรงดูดและเป่า
ในการใช้งานลมเป่าให้หันด้านที่มีคำว่า
“This Side UpBlow”ขึ้นด้านบน
และเสียบด้านนั้นเข้าไปดูภาพประกอบ
Fig.7 ซึ่งเครื่องจะทำงานก็ต่อเมื่อใส่หัวต่อ
ในตำแหน่งนี้เท่านั้น
- ในการประกอบหัวต่อเพื่อใช้งานลมเป่า

8
ขั้นตอนการดูแลรักษา
ต้องเปิดฝาช่องระบายอากาศด้านท้ายของ
เครื่องดูดฝุ่นออกก่อนทุกครั้ง
- การเปิดฝาช่องระบายอากาศด้านท้าย
เครื่องทำได้โดยสอดนิ้วมือเข้าไปบริเวณ
รูด้านบนของฝาช่องระบายอากาศ
แล้วดึงเปิดฝาช่องระบายอากาศออกมา
ดูภาพประกอบFig.8
- จากนั้นใส่หัวต่อดูดและเป่าเข้าไปในช่อง
- ต่อท่ออ่อนยาวโดยใส่ปลายด้านใดด้าน
หนึ่งเข้ากับหัวต่อดูดและเป่า
- การประกอบอุปกรณ์หัวเป่า (M,N,O)
ให้ใส่ปลายท่ออ่อนยาวเข้าไปในอุปกรณ์
หัวเป่าค่อยๆใส่เข้าไปจนได้ยินเสียงคลิก
โดยรูเล็กๆ บริเวณปลายท่ออ่อนยาวต้อง
ลงล็อกสนิทกับปุ่มพลาสติกด้านในอุปกรณ์
หัวเป่าดูภาพประกอบFig.9
- สำหรับการถอดอุปกรณ์หัวเป่าออกจาก
ท่ออ่อนยาวให้วางนิ้วไปบริเวณพลาสติก
ที่ยื่นออกมาจากอุปกรณ์หัวเป่าแล้วใช้ปลาย
นิ้วดันขึ้นพร้อมกับดึงออกอย่างระมัดระวัง
ดูภาพประกอบFig.10
- ในระหว่างการเป่าลมเข้าไปให้วัตถุ
พองตัวท่านสามารถเพิ่มแรงเป่าได้โดย
ใช้นิ้วปิดบริเวณช่องด้านข้างของอุปกรณ์
หัวเป่า ดูภาพประกอบ Fig.11
- ควรแน่ใจว่าภายในท่ออ่อนยาวสะอาด
ก่อนเป่าลมเข้าไปในวัตถุ
การทำความสะอาดเมื่อฝุ่นเต็ม
- คุณสามารถตรวจสอบช่องเก็บฝุ่นว่าเต็ม
หรือไม่โดยดูจากช่องใสด้านบนช่องเก็บฝุ่น
- หากพบว่าช่องเก็บฝุ่นเต็มต้องเทฝุ่นด้าน
ในออกโดยกดบริเวณปุ่มเปิดช่องเก็บฝุ่น
แล้วเทฝุ่นด้านในออก
การเปลี่ยนและการทำความสะอาดตัวกรอง
HEPA filter
- ตัวกรอง HEPA filter ประกอบอยู่ใน
บริเวณช่องเก็บฝุ่น
- หากต้องการถอดตัวกรอง ให้เปิดช่อง
เก็บฝุ่นออก แล้วกดบริเวณด้านบนของ
ตัวกรองดันให้ออกจากล็อกแล้วใช้มือจับ
ด้านบนของตัวกรองเพื่อหยิบตัวกรองออกมา
ดูภาพประกอบFig.12
- เมื่อถอดตัวกรองออกจากตัวเครื่องแล้ว
ให้ถอดตัวHEPA filter แผ่นสีขาวออกจาก
กรอบพลาสติกสีดำอีกครั้งFig.13
- การทำความสะอาดตัวกรองทำได้โดย
การสะบัดหรือเคาะฝุ่นออกหรือใช้ขนแปรง
ปัดก็ได้
- เพื่อความสะอาดกว่า ตัวกรองทั้งสองชิ้น
สามารถล้างในน้ำได้และต้องแน่ใจว่าแห้ง
สนิทก่อนนำเข้าประกอบที่เดิม
- การประกอบตัวกรองกลับเข้าที่เดิม

9
- สัญญาการรับประกันมีระยะเวลา 1ปี
นับจากวันที่ท่านซื้อสินค้า
- การรับประกันจะมีผลกับความ
บกพร่องที่เกิดจากความผิดพลาดของ
บริษัทเท่านั้นทางเราจะไม่รับประกันสินค้า
ที่เสียหายจากการที่ท่านไม่ปฏิบัติตาม
คำแนะนำในคู่มือนี้เด็ดขาดรวมถึงการ
ตกแตก การสึกหรอจากการใช้งาน
- หากท่านดัดแปลง เปลี่ยนชิ้นส่วนใดๆ
ที่ไม่ใช่อุปกรณ์ที่มาเป็นชุดของผลิตภัณฑ์
การรับประกันสินค้าถือว่าเป็นโมฆะทันที
- หากเครื่องของท่านเกิดความเสียหาย
แล้วอยู่ในเงื่อนไขการรับประกัน ท่าน
สามารถส่งเครื่องคืนศูนย์ตัวแทนจัด
จำหน่ายได้โดยบรรจุหีบห่อผลิตภัณฑ์
ให้เรียบร้อยแล้วเขียน ชื่อ ที่อยู่
เบอร์โทรศัพท์และเขียนสาเหตุที่ส่ง
เครื่องคืนว่าเป็นเพราะเหตุใดพร้อมแนบ
สัญญาการรับประกันมาด้วย
ให้ใส่ตัวกรองกลับเข้าที่เดิมบริเวณด้านใน
ช่องเก็บฝุ่นกดบริเวณพลาสติกด้านบน
ตัวกรองแล้วดันเข้าไปในช่องเดิมให้สนิท
การเปลี่ยนตัวกรองระบายอากาศ
- แผ่นกรองระบายอากาศจะอยู่บริเวณ
ด้านท้ายเครื่อง โดยต้องเปิดช่องระบาย
อากาศออกก่อน
- นำแผ่นกรองระบายอากาศแผ่นเดิมออก
แล้วใส่แผ่นใหม่เข้าไป
- ตรวจสอบให้แน่ใจว่าใส่แผ่นถูกต้องตาม
ตำแหน่งเดิม
การเก็บเครื่อง
- เก็บอุปกรณ์ทุกชิ้นใส่ถุงให้เรียบร้อย
- เพื่อความสะดวกในการเก็บสายไฟ ให้
ดึงตัวหมุนเก็บสายไฟบริเวณฝาเปิดช่อง
เก็บฝุ่นด้านล่างของเครื่อง(W) แล้วหมุน
ออกมา ดูภาพประกอบ Fig.14
- บริเวณฐานด้านท้ายเครื่องจะมีร่องที่
ใช้สำหรับม้วนสายไฟ
- ให้ม้วนสายไฟจากตัวหมุนเก็บสายไฟ
(W)ไปยังฐานด้านท้ายเครื่องเพื่อเก็บสายไฟ
การทำความสะอาด
- ถอดปลั๊กก่อนทำความสะอาด แล้วเช็ด
ด้วยผ้าชุบน้ำหมาดๆหรือหยดน้ำยาทำ
ความสะอาดลงไปเล็กน้อยก็ได้
- ห้ามจุ่มตัวเครื่องลงน้ำหรือของเหลวใดๆ
เงื่อนไขการรับประกันสินค้า
ทั้งสิ้นและอย่าปล่อยให้เครื่องตั้งอยู่ใกล้
บริเวณก๊อกน้ำที่มีน้ำไหลอยู่
- หลีกเลี่ยงการใช้ฝอยขัดทำความสะอาด
ซึ่งจะทำให้เครื่องเกิดรอยขูดขีด

สินค้าจะหลุดพ้นจากการรับประกันเมื่อ
-รับประกันเฉพาะในพื้นที่รับประกัน
เท่านั้น ( รับประกันเฉพาะมอเตอร์)
- เพื่อเป็นการพัฒนาสินค้า บริษัทขอสงวน
สิทธิ์ในการเปลี่ยนแปลงรายละเอียดของ
คู่มือการใช้และคุณสมบัติของสินค้าโดยไม่
ต้องแจ้งให้ทราบล่วงหน้า
- เสียหายจากการใช้งานไม่ถูกต้อง
(ไม่ปฏิบัติตามคู่มือ) หรือดัดแปลงสินค้า
- เสียหายจากการขนส่ง
- เสียหายจากการใช้งานเป็นประจำ หรือ
ขาดการดูแลรักษาเครื่อง
- เสียหายจากการสูญหาย หรือชิ้นส่วน
บางอย่างหายไปจากการถอดประกอบสินค้า
หมายเหตุ
10
Dear Customer
Thank you for choosing a
NESCO appliance.The experi-
ence, design, feature and tech-
nologyof thisappliance, aswell
as the strict quality controls
used during manufacture, will
provide full satisfaction for
many years.
Bagless Vacuum Cleaner With
Blower
Model:NC-5018 Spider 1000
Description
A.
B.
C.
D.
E
F.
G.
H.
I.
J.
K.
L.
M.
Safety recommendations
and precautions
English N.
O.
P.
Q.
R.
S.
T.
U
V.
W.
Chamber
Cable
On/Off button
Chamber opening button
Shoulder strap
Base
Bag
Multi- use brush adaptor
Multi- use nozzle
(integrated in body)
Universal adaptor
Jet nozzle
Multi- use brush
(integrated in body)
Blower accessory 1
Blower accessory 2
Blower accessory 3
HEPA filter
Tubes (3 unit)
Hose grip
Cleaning brush
Hose
Air vent filter
Air vent grid
Cable-winder accessory
- Please read this instructions
pamphlet carefully before
using your appliance.
- Unpack it completely and
checkitisin perfect condition
and functioning well, as any
factory defect or damage
caused during transport is
covered by the NESCO
guarantee.
- Do not use the vacuum-
cleaner fail to operate
properly, or else should a dust
leakbedetected,this might be
due to the fact that the filter
is full. Proceed to clean. If the
problem does not disappear, 11

12
getin touchwithan authorized
TechnicalAssistance Service.
- Do not use the cleaner to
collect up water or any other
liquid.
- Do not use the cleaner when
any inflammable gases are
present.
- Never use the cleaner to
collect up burning or cutting
items (light cigarette buts,
ashes, nails...)
- Store your cleaner away
from heat sources.
- Keep it in a dry place away
from any damp atmosphere.
- This appliance has been
made to be used by adults. Do
not allow children to
manipulate it.
- Never use the appliance if
the wire or plug is damaged.
- Disconnect the cleaner by
pulling on the plug, never on
the wire itself.
- Disconnect the cleaner from
themainswhen notinuse, and
always before proceeding
with any cleaning or
maintenance task.
- The manufacturer is not
liable for any damages
incurred as a result of
improperuseof the appliance.
- This appliance is very
powerful.
Before connecting it to the
power, ensure the On/Off
button is switched off.
- This appliance is fitted with
a safety system that
automatically switch the
vacuum cleaner off if it
detects overheating of the
motor. If this happens,
disconnect he appliance from
thepower, clean thefiltersand
wait for the appliance to cool
down. Then, the vacuum
cleaner may be reconnected
to the power supply and used
as normal.
Blow function
- The blow function of this
vacuum cleaner may break
objectsbeinginflated or make
them explode (for example,
balloons) near eyes, which
may cause slight injuries.
13
Operating Instruction
Always use some form of eye
protection when inflating a
balloon, inflatable raft or any
other inflatable object.
- Do not permanently cover
the openings of the inflating
accessories.
- Take care when using the
inflating accessories… Some
surfaces may warm up
slightly.
- Do not leave the appliance
when inflating something.
Instructions for use
- Before connecting the
vacuum cleaner, ensure that
the mains supply voltage
corresponds to that indicated
on the base of the appliance.
- To connect the different
accessories that come with
this appliance, follow the
Vacuum cleaner accessories
instructions, which appear
below.
- When finished, switch off
theappliance usingtheOn/Off
switch.
-Disconnectthe plug fromthe
mains.
Vacuum cleaner accessories
- 2 of the 14 accessories
incorporated in this appliance
are kept in the body of
appliance: The multi-use
Nozzle (I) and the multi-use
Brush (L).
-Followtheinstructionsin Fig.
1 to attach them to or remove
them from the body of the
vacuum cleaner.
-Followtheinstructionsin Fig.
1 to insert these accessories
to the vacuum cleaner nozzle
.2.
How to connect the universal
Adaptor (J)
- Before connecting the
Universal Adaptor to the
appliance,payattentiontothe
signs found on both sides of
theadaptornozzle: “This Side
Up Blow” and “This Side Up
Suck”
- To vacuum, ensure that the
“This Side Up Suck” part is
facing upwards, as indicated

14
in Fig.3. The vacuuming
function only works in this
position.
How to connect the
accessories
- The accessories incorporated
in this vacuum cleaner can be
used in various ways
depending on the task to be
done.
- Follow the instructions in
Fig.4.to connect the different
accessories.
- The base of this vacuum
cleanerisparticularlysuitable
for vacuuming all kinds of
surfaces, including Parquet
flooring. It has a retractable
brush activated by the
switches located at the top
(Fig.5). Use the hidden brush
position to clean carpets and
rugs and the extended brush
position to clean all kinds of
hard flooring.
Blow function accessories
- Ensure that each accessory
is correctly attached before
use.
-ATTENTION: On using the
Blow function accessories,
hold the hose firmly before
switching the appliance on.
-Followtheinstructionsin Fig.
6.to connect the accessories
for this function.
- The tubes can also be
attached to increase the
flexibility when using the
appliance.
- When connecting the
Universal Adaptor (J) to use
the blow function, ensure that
the “This Side Up Blow” part
is facing upwards, as shown
in Fig.7. The blow function
only works in this position.
- To attach the Universal
Adaptor to the vacuum
cleaner, open the rear grid of
the vacuum cleaner.
- Insert a finger in the hole in
the upper part of the grid and
pull. Then, open the grid to
uncover the hole where the
Universal Adaptor must be
inserted. (Fig.8).
- Attach the Universal
Adaptor.

15
Cleaning
- Next, attach the hose, by
either end, to the adaptor.
- To attach any of the three
blow accessories, the hole in
thehosenozzlemust coincide
with the small plastic stop of
theblowaccessory. (Fig.9).To
attach the hose nozzle to the
accessory, the hose must be
carefully placed inside and
downwards. Push the hose
untilitclicks.
- To separate the accessory
from the hose, carefully place
a finger between the plastic
part that sticks out of the
accessory and the hose
nozzle and carefully pull.
(Fig.10.)
- During inflation, control the
air pressure by carefully
covering the hole in the upper
part of the accessory with
your fingertip. (Fig.11).
ATTENTION: Do not
permanently cover the air
pressure control hole.
- ATTENTION: Ensure the
hose is clean before inflating
any object.
Emptying the deposit
- With the transparent
chamber you can see when it
isfull.
- When the chamber is full,
empty it. To empty the
chamber, press the chamber
opening button (D).
Changing and cleaning
the HEPA filter
- The HEPA filter is
accessible on opening the
dust-collection chamber.
- To remove the HEPA filter
from its housing, Press
inwards and lift the plastic
button up at the same time.
(Fig.12)
- Once out of its housing,
separate the HEPAfilter from
the plastic cover.(Fig.13)
- The HEPA filter can be
shaken clean or by using the
fine bristle brush.
- Both parts can be washed in
water for a better clean.
Ensure that the HEPA filter
and cover are completely dry.

16
- Return the HEPAfilter to its
housing pressing the plastic
button inwards.
Ensure that it is correctly
attached in its housing.
Changing the air outlet
filter
- It is accessible on opening
the rear grid of the appliance.
-Removethe spongefilterand
put a new one in its place.
- Ensure that it is perfectly
placed in its housing.
Storage
- Put all the accessories in the
bag.
-Tofacilitatethe cablewinder,
extract the small plastic guide
from the chamber lid (Cable-
windersaccessory-W)turning
it in either direction. (Fig.14).
- The rear struts of this
appliance act as guides to
winding the cable.
- Wind in the cable making it
pass through the struts and the
cable-winder guide (W).
Cleaning
a damp cloth impregnated
withafewdropsof detergent.
Never submerge the
appliance in water or any
other liquid, and do not let it
stand under a running tap.
Do not use solvents or
abrasive product to clean it.
Warranty:
Waranty motor only
-Damage or defective from
manufacturer, dealer &
service.
-1 year warranty for house
hold use only.
-Use according to this
instruction carefully.
-Damage or defect from
misunderstand how to use or
service from non authorized
people.
-Electrical shock or any
electrical problem.
-Lost or damage some part by
accident or natural damage.-
Warranty only in service area.
- Company reserved the right
to change all details before
notice.
Unplug the appliance before
cleaning it. Rub it gently with
Warranty is expired
When(void of warranty)

This manual suits for next models
1
Table of contents
Languages:
Other Nesco Vacuum Cleaner manuals


