Nesco AVENGER 1000 User manual
VACUUM CLEANER
MODEL : NC-60101 AVENGER 1000
1000 W 220-240 V 50/60 Hz
Instruction Manual
คู่มือการใช้งาน

1

1.
2.
3.
4.
5.
6.
7.
8.
9.
10.
11.
12.
13.
14.
15.
16.
17.
18.
2

3
1.
2.
3.
4.
5.
6.
7.
8.
9.
10.
11.
12.
13.
14.
15.
16.
17.
18.
19.
20.
21.
22.
23.

4
24.
1.
2.
3.
4.
5
1.
2.
3.
1.
2.
1.
2.
1.
2.
3.
1.
2.
1.
2.
3.
1.
2.
3.
1.
2.
3.
1.
2.
3.
6
1.
2.
3.
1.
2.
3.
4.
5.
6.

7
•
•
•
•
•
•
•
•
•
•
8

English
Dear Customer
Thank you for choosing a NESCO appliance. The experience, design, feature
and technology of this appliance, as well as the strict quality controls used during
manufacture, will provide full satisfaction for many years.
Introduction
Carefully read and understand this manual and any label attached to the tool
before using. Keep this instruction manual with the product for future reference.
Ensure all persons who use and service this product are acquainted with this
instruction manual.
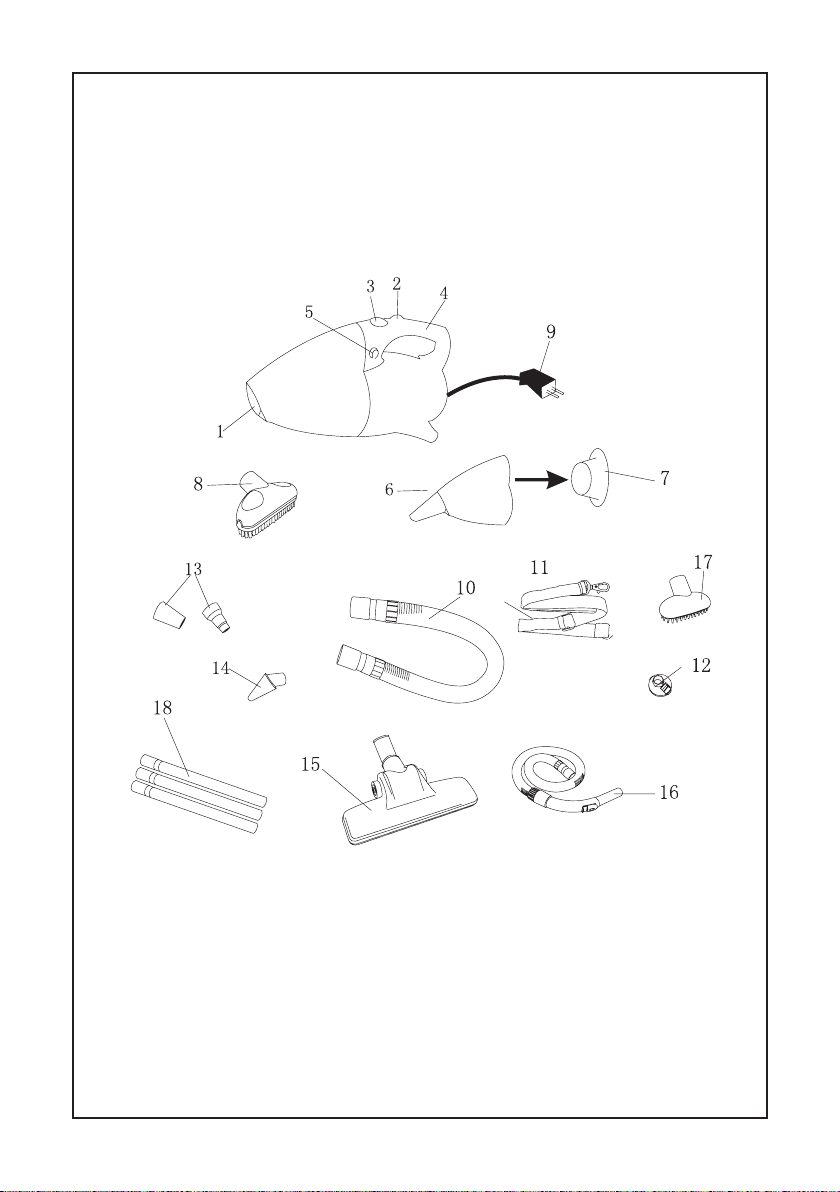
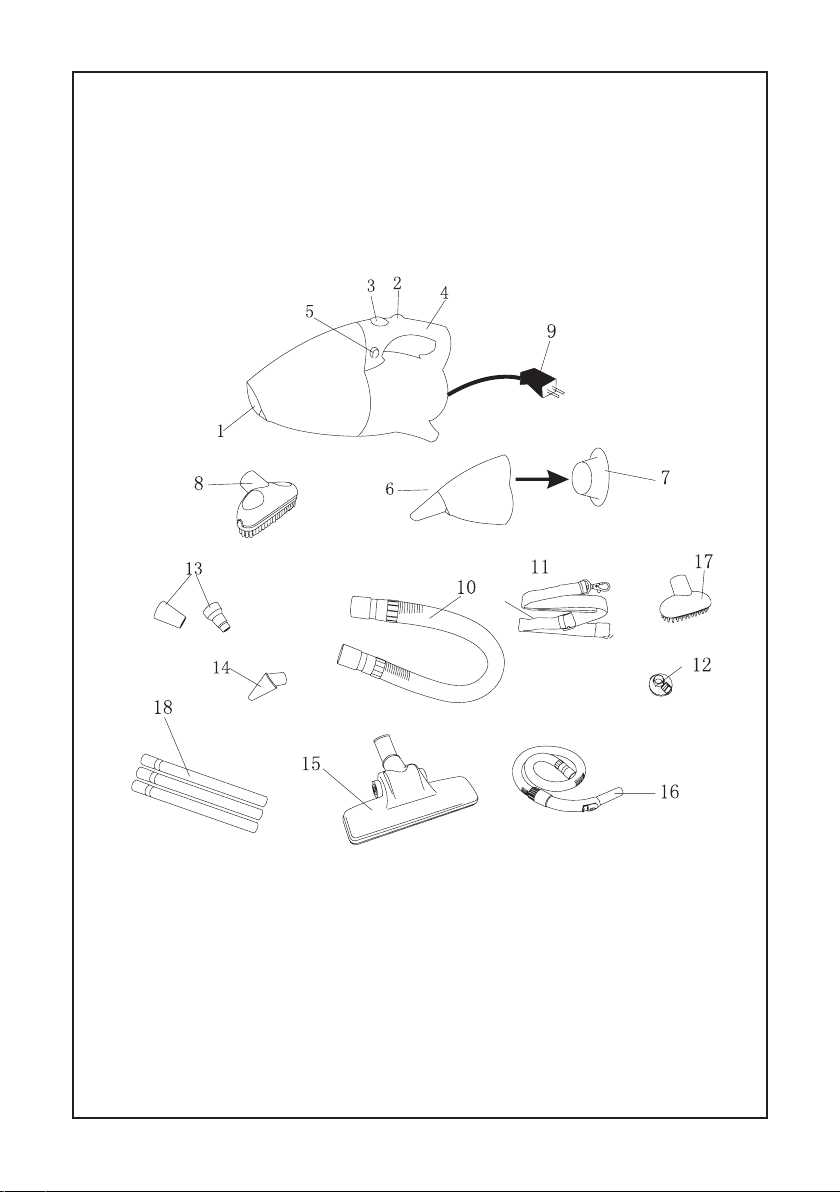
1.
2.
3.
4.
5.
6.
7.
8.
9.
10.
11.
12.
13.
14.
15.
16.
17.
18.
Suction Hole
Hole for attaching the shoulder strap
Power switch
Handle
Push to open dust cup
Dust cup (container)
Dust cup lter
Upholstery nozzle
Power cord
Hose
Hose belt
Back blower
2pcs blowing attachment
Crevice nozzle
Carpet brush
Long hose
Pet brush
3pcs extension tubes
9

When using an electrical appliance, basic safety precautions should always be
observed including the following.
Read all instructions before using your turbo handy vacuum cleaner
Warning: To reduce the risk of re, electrical shock or injury:
1.
2.
3.
4.
5.
6.
7.
8.
9.
10.
11.
12.
13.
14.
15.
16.
17.
18.
19.
20.
21.
22.
23.
24.
Do not leave appliance when plugged in. Unplug from outlet when not in use
and before serving.
Do not use this appliance outdoors or on wet surfaces.
Do not allow the unit to be used as a toy. Close attention is necessary when
used by or near children.
Use only as described in this instruction manual. Use only manufacturers
recommended attachments.
Do not use with damaged cord or plug. Do not use handy vacuum cleaner if it
has been dropped, damaged left outdoors, or dropped in water, return to an
authorized service center.
Do not pull or carry by cord, use cord as a handle, close a door on cord, or pull
cord around sharp edges or corners.
Do not run appliance over cord. Keep cord away from heated surfaces.
Do not unplug by pulling on cord. To unplug, grasp the plug, not the cord.
Do not handle plug or appliance with the hands.
Do not put any object into openings. Do not use with any opening blocked,
keep free of dust, lint hair and anything that may reduce airow.
Keep hair, loose clothing, ngers, and all parts of body away from openings
and moving parts.
Do not pick up anything that is burning or smoking, such as cigarettes, matches,
or hot ashes.
Turn off the control before unplugging.
Use extra care when cleaning on stairs.
Do not use to pick up ammable or combustible liquids such as gasoline or use
in areas where they may be present.
Look on your handy vacuum cleaner and follow all label and marking instructions.
Keep end of hose, wands and other openings away from your face and body.
Do not use the handy vacuum cleaner without dust cup lter in place.
Always unplug this appliance before connecting or disconnecting handy vacuum
hose.
Store the handy vacuum indoors. Put the handy vacuum cleaner away after
using in order to prevent tripping accidents.
Using improper voltage may result in damage to the motor and possible injury
to the user. Correct voltage is listed on the rating label.
Use only on dry, indoor surface.
Do not use for any purpose other than described in this instruction manual.
If the cleaner is damaged, it must be repaired by the manufacturer or its
service
agents or a similarly qualied person in order to avoid a hazard.
10
1.
2.
3.
4.
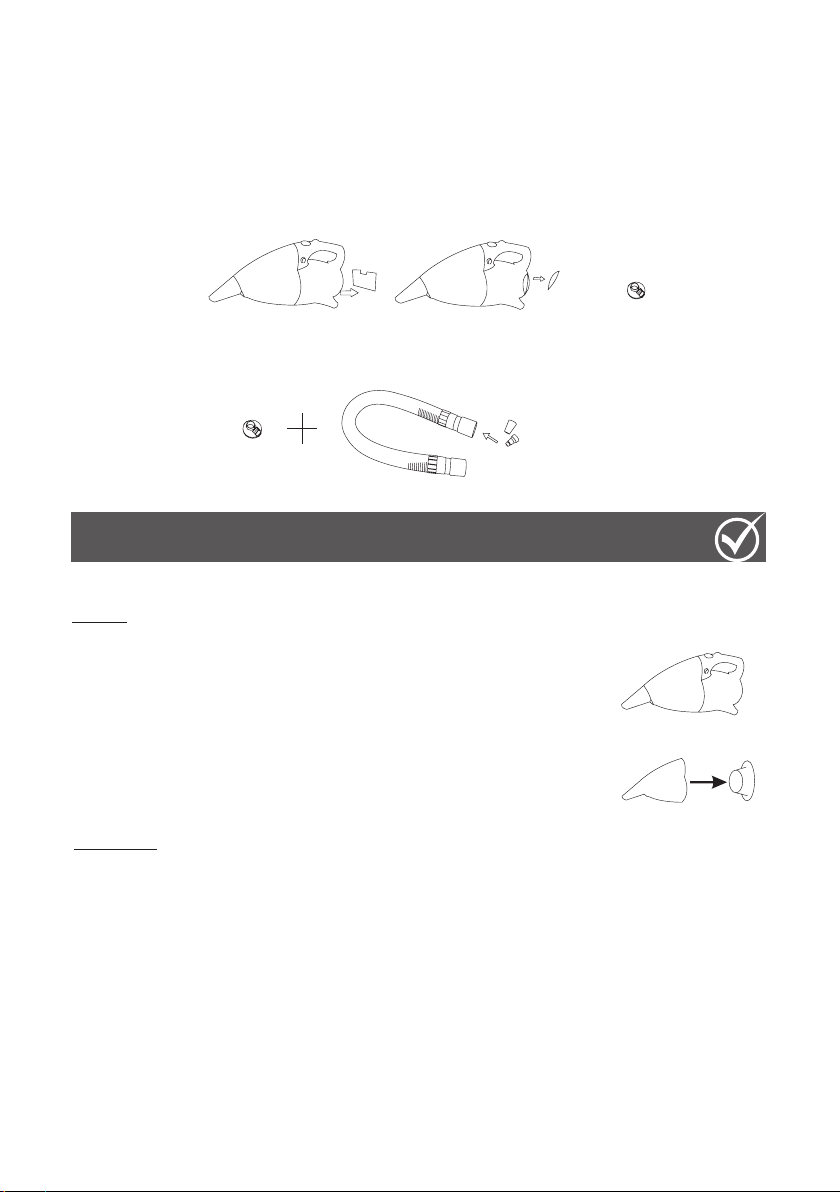
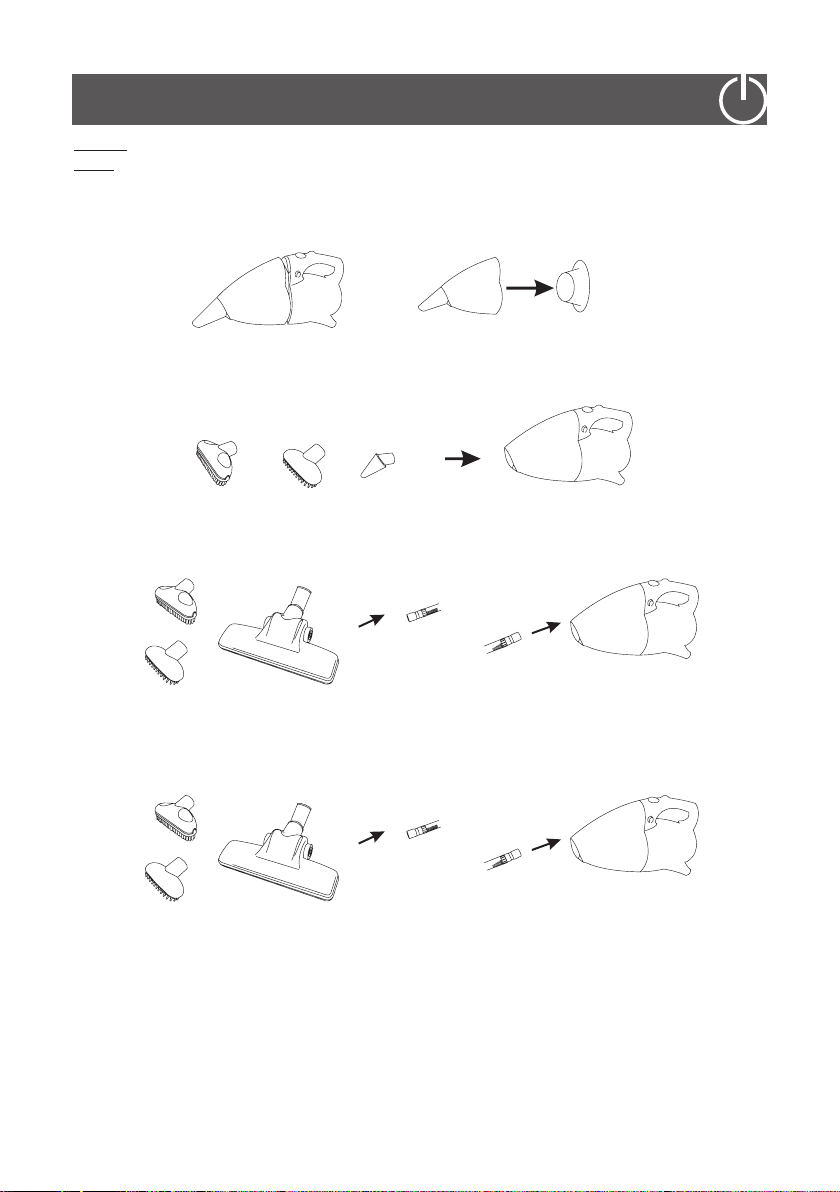
To open the dust cup (container) (6), push button (5) and pull out the dust cup
(6). Verify that the dust cup lter (7) is inside, then attach the dust cup (container)
(6) to the handy vacuum cleaner.
To attach the upholstery nozzle (8), crevice nozzle(14) or pet brush (17) to the
vacuum cleaner, choose one of the brush as mentioned to be assembled into
the suction hole(1), as shown below.
To use the exible hose(10), push the end of the hose into the suction hole(1),
then attach the desired brush (8,15 or 17) to the other end of the exible hose
(10) as shown below.
To attach the long hose to the suction hole(1) and then attach the connected
3 extension tube to the other side of hose, you may choose carpet brush (15),
pet brush (17) or upholstery nozzle (8) to assemble at the end of tube as shown
below.
Warning: Always unplug from electrical outlet before opening the cup (container) (6)
Note: Dust cup lter (7) must be used when operating the handy vacuum cleaner.
11
1.
2.
3.
Hold the handy vacuum cleaner rmly with your handy on the handle (4).
Push the on/off power switch (3) to on position.
Start vacuuming.
How to operate your handy vacuum cleaner.
Caution: the handy vacuum cleaner is a very powerful unit. Make sure that you
hold it rmly otherwise it can slip out of your hand and cause injury.
1.
2.
1.
2.
3.
1.
2.
3.
1.
2.
3.
1.
2.
3.
1.
2.
1.
2.
3.
1.
2.
Power cord not rmly
plugged into outlet.
No power in wall outlet.
Handy vacuum will
not operate.
Plug unit rmly.
Check fuse or breaker. Replace
fuse/reset breaker.
Take it to the authorized service.
Empty dust cup lter.
Turn off and unplug from wall
outlet, remove dust cup lter
and check for object (S) in air
dust and remove.
Clean or replace dust cup
lter.
Empty dust cup lter.
Review dust cup lter instruction.
Replace dust cup lter.
Remove hose and/ or brushes.
Remove obstruction from hose.
Empty and clean dust cup lter.
Dust cup lter is full. Unit
clogged.
Dust cup lter needs
cleaning.
Dust cup lter is full.
Dust cup lter is not
installed correctly.
Puncture hole in dust
cup lter.
Hose clogged.
Dust cup lter is full.
Handy vacuum will
n
ot pick-up or suction
power is weak.
Dust escaping from
handy vacuum
Handy vacuum hose
or brushes will not
pick-up
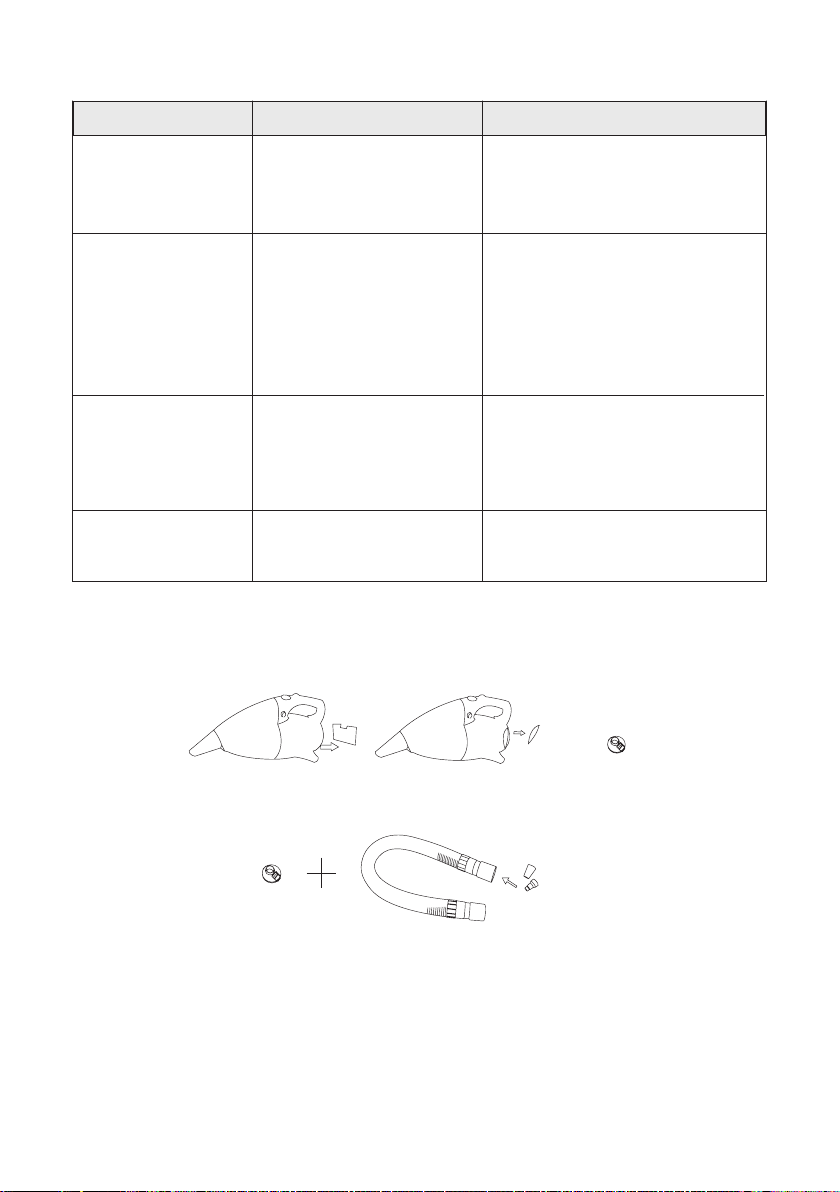
Changing back blowing cover
To clean the back lter at the back blower cover. Please unscrew the back blower
cover and take out the back lter. You may shake the lter lightly or clean it in
soapy water. Please x it back when it is completely dry.
New function
To use the back blower cover, connecting the 3pcs blowing attachment can inate
and deate (see below picture)
Trouble shooting guide
Problem Possible reason Possible solution
or
change
1-push
2-open
12
(g.1)
(g.2)
1.
2.
3.
1.
2.
3.
4.
5.
6.
Hold the vacuum cleaner rmly with your hand on the handle.
Push the on/off power switch to “on” position.
Blow the wet surface away or blow away materials away from the back blower
hole.
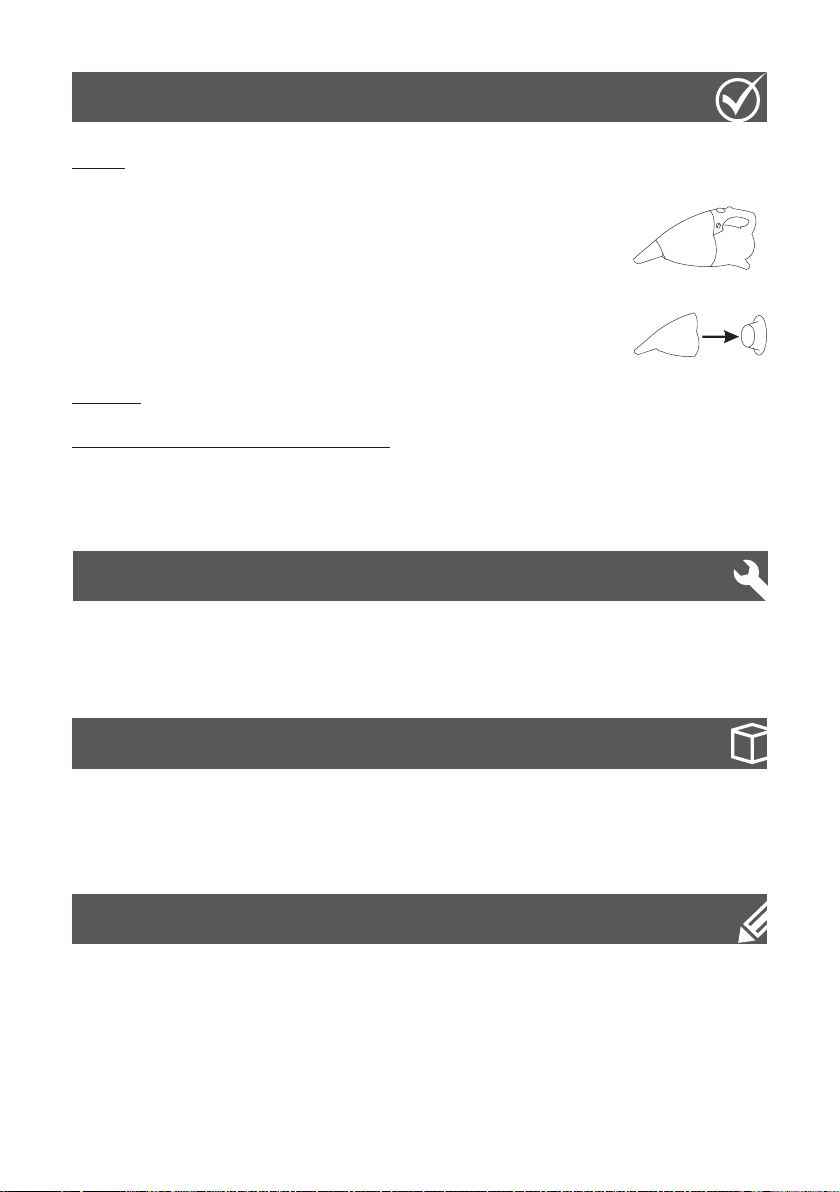
Changing and cleaning the dust cup lter
Warning: Always unplug from electrical outlet before opening the dust cup (container)
(6).
Caution: The suction hole (1) must be open, free of any obstructions at all times.
Otherwise, the motor will overheat and could get damaged.
How to use multifunction back blower
•
•
•
•
•
•
Damage or defect from misunderstand how to use or service from
non authorized people.
Electrical shock or any electrical problem.
Lost or damage some part by accident or natural damage.
Warranty only in service area.
This instruction manual may be changed without prior notice.
Company reserved the right to change all details before notice.
Warranty moter only
•
•
•
Damage or defective from manufacturer, dealer & service.
1 year warranty for house hold use only.
Use according to this instruction manual carefully.
To open the dust cup (container) (6), push button (5) and pull out the dust
(container) (6) (g.1).
Pull out the dust cup lter (7) (g.2).
Empty the dust from the dust cup lter (7).
Rinse the dust cup lter (7) in cold water, and then wait
until it dries up before replacing it into the dust cup (container) (6).
Place the dust cup lter (7) carefully into the dust cup
(container) (6).
Attach dust cup (container) (6) to the handy vacuum cleaner.
13


บริษัท เนสโก้ โปรดักส์ (ประเทศไทย) จำ�กัด
www.nescoproduct.com
This manual suits for next models
1
Table of contents
Languages:
Other Nesco Vacuum Cleaner manuals


