Nesco NC-59103 TORNADO User manual

Instruction Manual
คู่มือการใช้งาน
CANISTER VACUUM CLEANER
MODEL : NC-59103 TORNADO
1200Wnom.1400Wmax. 220 V 50 Hz
1

A.
B.
D.
F.
G.
H.
I.
J.
K.
L.
M.
P
Q.

3
1.
3.
4.
5.
6.
7.
8.
-
-
-
-
-
-
-

4
-
-
1.
3.

5
4.
1.

6
1.
3.
4.
1.
1.
3.
4.
7

-
-
-
8

9

10

English
Dear Customer
Thank you for choosing a NESCO appliance. The experience, design, feature
and technology of this appliance, as well as the strict quality controls used during
manufacture, will provide full satisfaction for many years.
Introduction
Carefully read and understand this manual and any label attached to the tool
before use. Keep these instructions with the product for future reference. Ensure
all persons who use and service this product are acquainted with this manual.
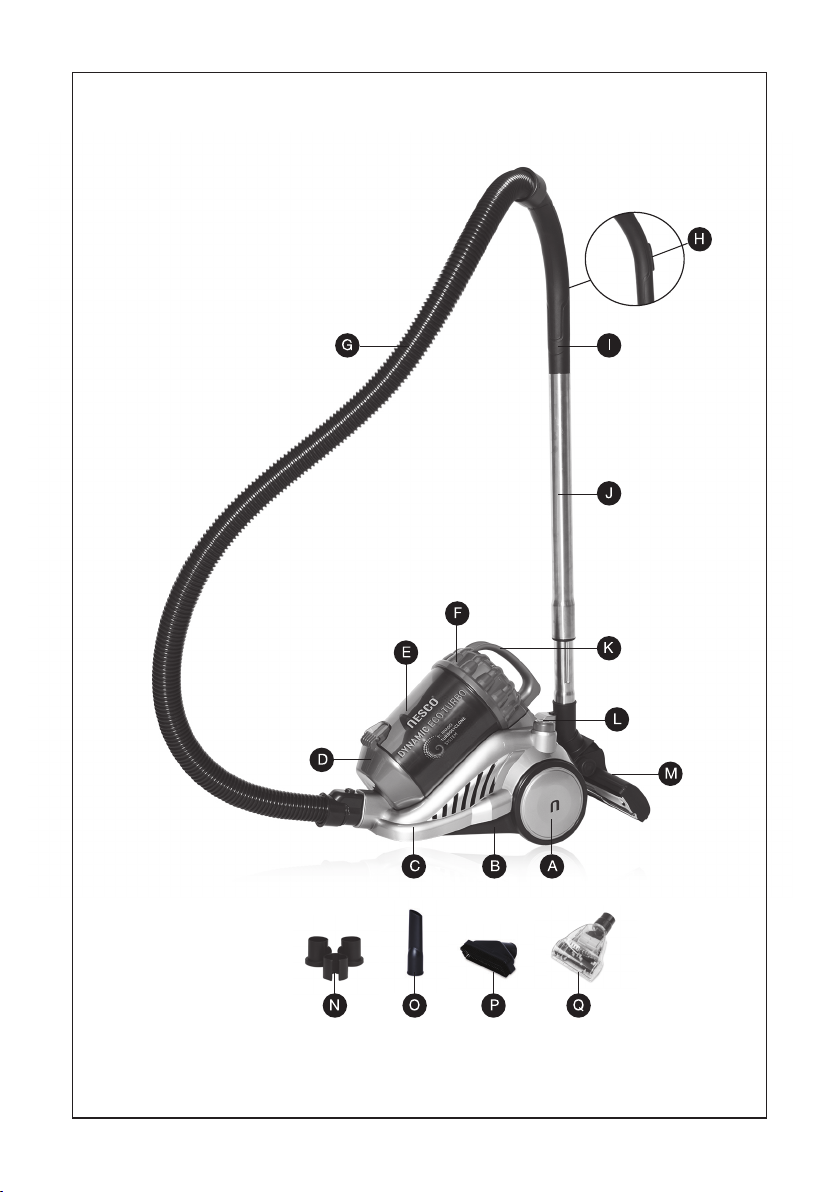
A.
B.
C.
D.
E.
F.
G.
H.
I.
J.
K.
L.
M.
N.
O.
P.
Q.
Big wheel
Base
House
Rear cover of dust tank
Dust tank
Cover of dust tank
Hose
Speed control knob
Extension tube of hose
Tube
Handle
On/off&Speed control button
Brush
Holder of accessory
Crevice nozzle
2 in 1 small brush
Mini Turbo Brush
11

•
•
•
•
•
•
•
1.
2.
3.
4.
5.
6.
7.
8.
9.
Do not suck up liquids!
Do not suck up hot ashes or pointed or sharp object!
Do not use the appliance in humid rooms!
Never use without the lter. Check that the lter is inserted correctly!
Hair, Clothing and body parts away from the vacuum nozzle during use!
Keep the vacuum cleaner away from sources of that like radiators, ovens, etc!
In order to ensure your children’s safety, please keep all packaging (plastic
bag, boxes, polystyrene etc.) out of their reach.
Read the operating instruction carefully before putting the appliance into
operation and keep the instructions including the warranty, the receipt and,
if possible, the box with the internal packing.
The appliance is designed exclusively for private use and for the envisaged
purpose. This appliance is not t for commercial use. Do not use it outdoors
(except if it is designed to be used outdoors). Keep it away from sources of
heat, direct sunlight, humidity (never dip it into any liquid) and sharp edges.
Do not use the appliance with wet hand. If the appliance is humid or wet,
unplug it immediately. Do not put it in water.
When cleaning or putting it away, switch off the appliance and always pull
out the plug from the socket (pull on the plug, not the cable) if the appliance
is not being used and remove the attached accessories.
Do not operate the machine without supervision. If you should leave the
work-place, always switch the machine off or remove the plug from the
socket (pull the plug itself, not the lead).
To protect children from the dangers posed by electrical appliances, make
sure that the cable is hanging low and that children do not have access to
the appliance.
Check the appliance and the cable for damage on a regular basis. Do not
use the appliance if it is damaged.
Do not try to repair the appliance on your own. Always contact an
authorized technician. To avoid the exposure to danger, always have a
faulty cable be replaced only by the manufacturer, by our customer service
of by a qualied person and with a cable of the same type.
Use only original spare parts.
Pay careful attention to the following “Special Safety Instructions”
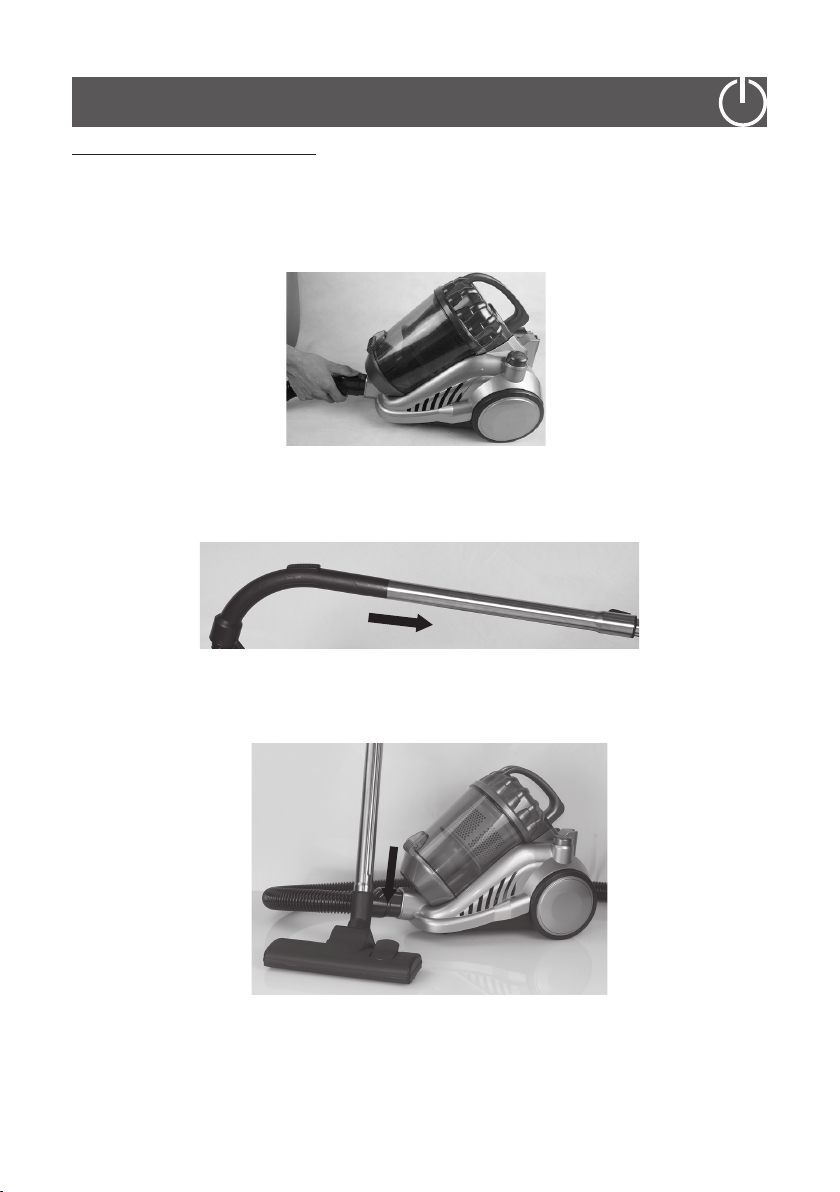
Assembling vacuum cleaner
Always remove the power plug from the wall outlet before assembling or removing
accessories.
1.
2.
3.
Attaching the exible hose into the vacuum connect the exible hose into
the air intake duct, push in until you hear a “click”, indicating it is in its locked
position.
Fitting the Stainless steel telescopic tube to the curved wand/hose
extension. Push the stainless steel telescopic tube into the curved wand/hose
extension.
Fitting the Floor Brush to the telescopic tube. Push the telescopic tube into
the oor brush. Adjust the tube to the desired length.
13

Assembling the dust tank
4.
1.
2.
Fitting Accessory.Push the tube into Crevice nozzle/2 in 1 small brush
Press the knob on the handle. Lift dust tank up
There is logo “I” on dust tank. A logo “ ” and logo“ ” on cover.When
the logo “I” point at “ ”.The dust tank was locked.Rotate the tank clockwise
to unlock the dust tank.
14

3.
4.
Take out the centric lter.Rotate the air inlet lter clockwise to unloc the inlet
lter.Then take out sponge lter.
Opposite above steps to assemble the dust tank.
Empty the dust tank
1.
2.
Press the knob on the handle .Lift dust barrel up.
Press knob on low end of dust tank to open the dust tank rear cover.
15

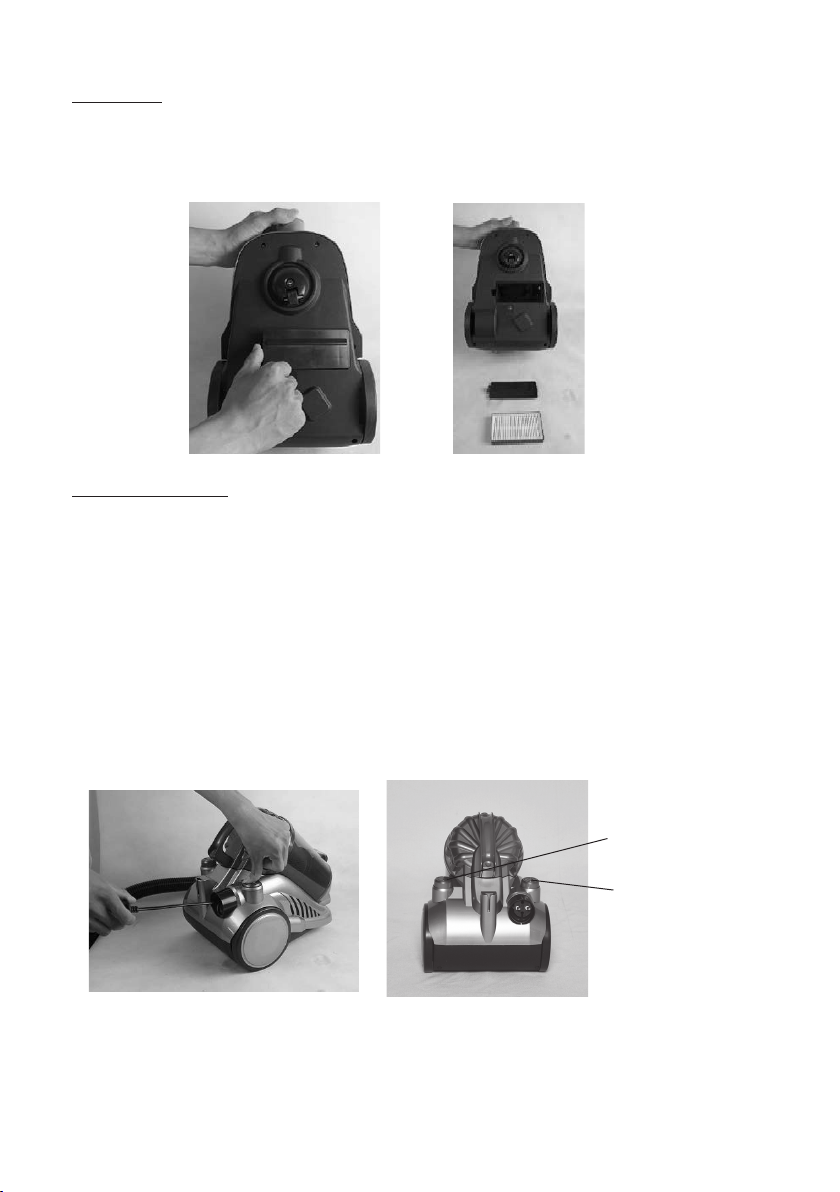
Air outlet lter
Variable Suction Control
1.
2.
1.
2.
3.
4.
Press the air outlet grid knob to open.
Take out the air outlet lter for clean and change.
Insert the power plug into the wall outlet.
Press the power on/off button located the unit to turn the vacuum cleaner “on”.
To rewind the power cord, press the cord rewind button with one hand and
guide the power cord with the other hand to ensure that it dose not whip
causing damage or injury.
On/Off switch&speed control
Cord rewinder
To adjust the suction, rotate the speed control button to control the suction
power of the vacuum cleaner.
16

Motor Thermostat (Optional)
Important:
This motor is equipped with a motor protective thermostat. If for some reason the
vacuum cleaner should overheat, the thermostat will automatically turn the unit
off. Should this occur unplug the vacuum cleaner from the wall outlet and turn off
switch. Remover dust cup and empty Clean dust cup lter. Allow the unit to cool
for approximately 1 hour. To restart, replug into wall outlet and turn switch back on.
NOTE:
The sponge lter material in the cleaner will became dusty over time. This is normal
and will not affect the performance of the lter. If the sponge lter is so dusty that
suction does not return to 100%, then we suggest that the lter be removed then
rinsed under the faucet and allowed to dry for 24 hours by airing not near the re
or some high temperature objects before retting into the vacuum. This should be
done once six months or when suction appears to be reduced obviously.
Important:
Please note that there is a safety switch inside the vacuum to prevent the unit from
being run with high vacuum rate. If the vacuum is too high ,the safety switch will be
turned on. In this case, it can minish the vacuum rate and protect the motor from
being broken.
Note:
The suction hole must be open, free of any obstructions at all times. Otherwise, the
motor will overheat and could become damaged.
Important:
All lters should be checked regularly for signs of damage, preferably after each
cleaning task. The lters must be replaced immediately if they become damaged.
Always disconnect the vacuum from the electrical outlet when checking the lters.
-
-
-
Pull the plug out of the socket before cleaning!
Clean the casing with a dry cloth.
Clean the motor protection lter suggestion 4 page. 17
Cleaning
17

•
•
•
•
•
•
•
•
Damage or defect from misunderstand how to use or service form non
authorized people.
Damage or defect from or follow this instruction manual.
Electrical shock or nay electrical problem.
Lost or damage some part by accident or natural damage.
Some parts are shelf life, need replacement.
Warranty only in service area
This instruction may be changed without prior notice.
Company reserved the right to change all details before notice.
Warranty moter only
•
•
•
Damage or defective from manufacturer, dealer & service
1 year warranty for household use only
Use according to this instruction carefully.
18

บริษัท เนสโก้ กรุ๊ป จำ�กัด 46/178 ชั้น 3 หมู่ 12 ถนนนวลจันทร์ แขวงคลองกุ่ม
เขตบึงกุ่ม กรุงเทพฯ 10230 โทรศัพท์ 0-2363-7757-62 แฟ็กซ์ 0-2363-7763
Nesco Group Co.,Ltd. 46/178 3 Floor Moo 12 Nuanchan Rd. Klongkum
Buengkum Bangkok Thailand 10230 Tel 0-2363-7757-62 Fax 0-2363-7763
www.nescoproduct.com
rd
Table of contents
Languages:
Other Nesco Vacuum Cleaner manuals


