NETO COLORFLEX Series User manual

COLORFLEX SERIES
7-IPX / 18-IPX
HEX PAR USER MANUAL

USER MANUAL
Colorflex™ User Manual
Released by Neto Lighting Inc in 2020
Text and Images property of Neto Lighting Inc
All Rights Reserved
Initial Release
Document Version 1.6
Updated January 2021
Software Version 2.0
Check online at
WWW.NETOLIGHTING.COM
For supplementary information including
Downloadable DMX Profiles
Updated User Guides
Recent Revisions
Neto Lighting Inc.
4850 St-Ambroise, Unit 110
Montreal, QC H4C3N8, CANADA
+1 (514) 933 - 4476 | [email protected]
2


USER MANUAL
LEGAL DISCLAIMER
©2020 Neto Lighting inc all rights reserved. The text contained in this document, the Neto™
and Colorflex™ names and logos are trademarks of Neto Lighting inc. All trademarks of
non-Neto Lighting inc products mentioned in this document are hereby acknowledged as
being the exclusive property of their respective owners.
This document is intended solely for information purposes, is subject to change without
notice, and does not represent a commitment by Neto Lighting Inc or any affiliate or
subsidiary companies. Neto Lighting inc makes no guarantee to the completeness of this
document, and assumes no liability or responsibility for any errors or inaccuracies that may
appear herein. Neto Lighting produces professional grade products which should only be
installed and operated by properly qualified and insured users.
Neto Lighting inc and all parent, affiliate and subsidiary companies hereby disclaim liability
for any injury, damage, direct or indirect loss, or other loss caused by the use of, inability to
use, or reliance on, any information contained in this document, or by negligent, improper, or
unsafe installation or operation of the equipment described herein.
WARRANTY INFORMATION
To register your Neto™ product, please follow the instructions on the included warranty card
by completing and mailing it in. Registration is not necessary for your warranty to be valid,
however contributing your information to our product owner’s database will help us
communicate with you regarding important updates specific to your product, including
firmware updates, new documentation and dmx profiles, and in rare cases, product recalls.
When returning a product to Neto Lighting inc or an authorized service center for repair,
ALWAYS include a RA (Return Authorization) number supplied by Neto™ on both the
shipping package and on a repair note detailing the service required inside the package. If a
product is receiving service under warranty be sure to supply a copy of the purchase receipt
detailing purchase date, vendor information, and serial numbers of the units in question.
For questions about warranty coverage, Neto™ support & service, or to obtain a RA number,
please contact our customer service department by email at [email protected] with
your inquiry.
4
WWW.NETOLIGHTING.COM
SAFETY INFORMATION
READ BEFORE USE
This manual contains important safety information. Before powering on your Neto™ product
for the first time, familiarize yourself with all warnings and safety instructions. This manual
may be updated from time to time - to obtain the most recent product information, user
guides, and manuals, visit www.NetoLighting.com
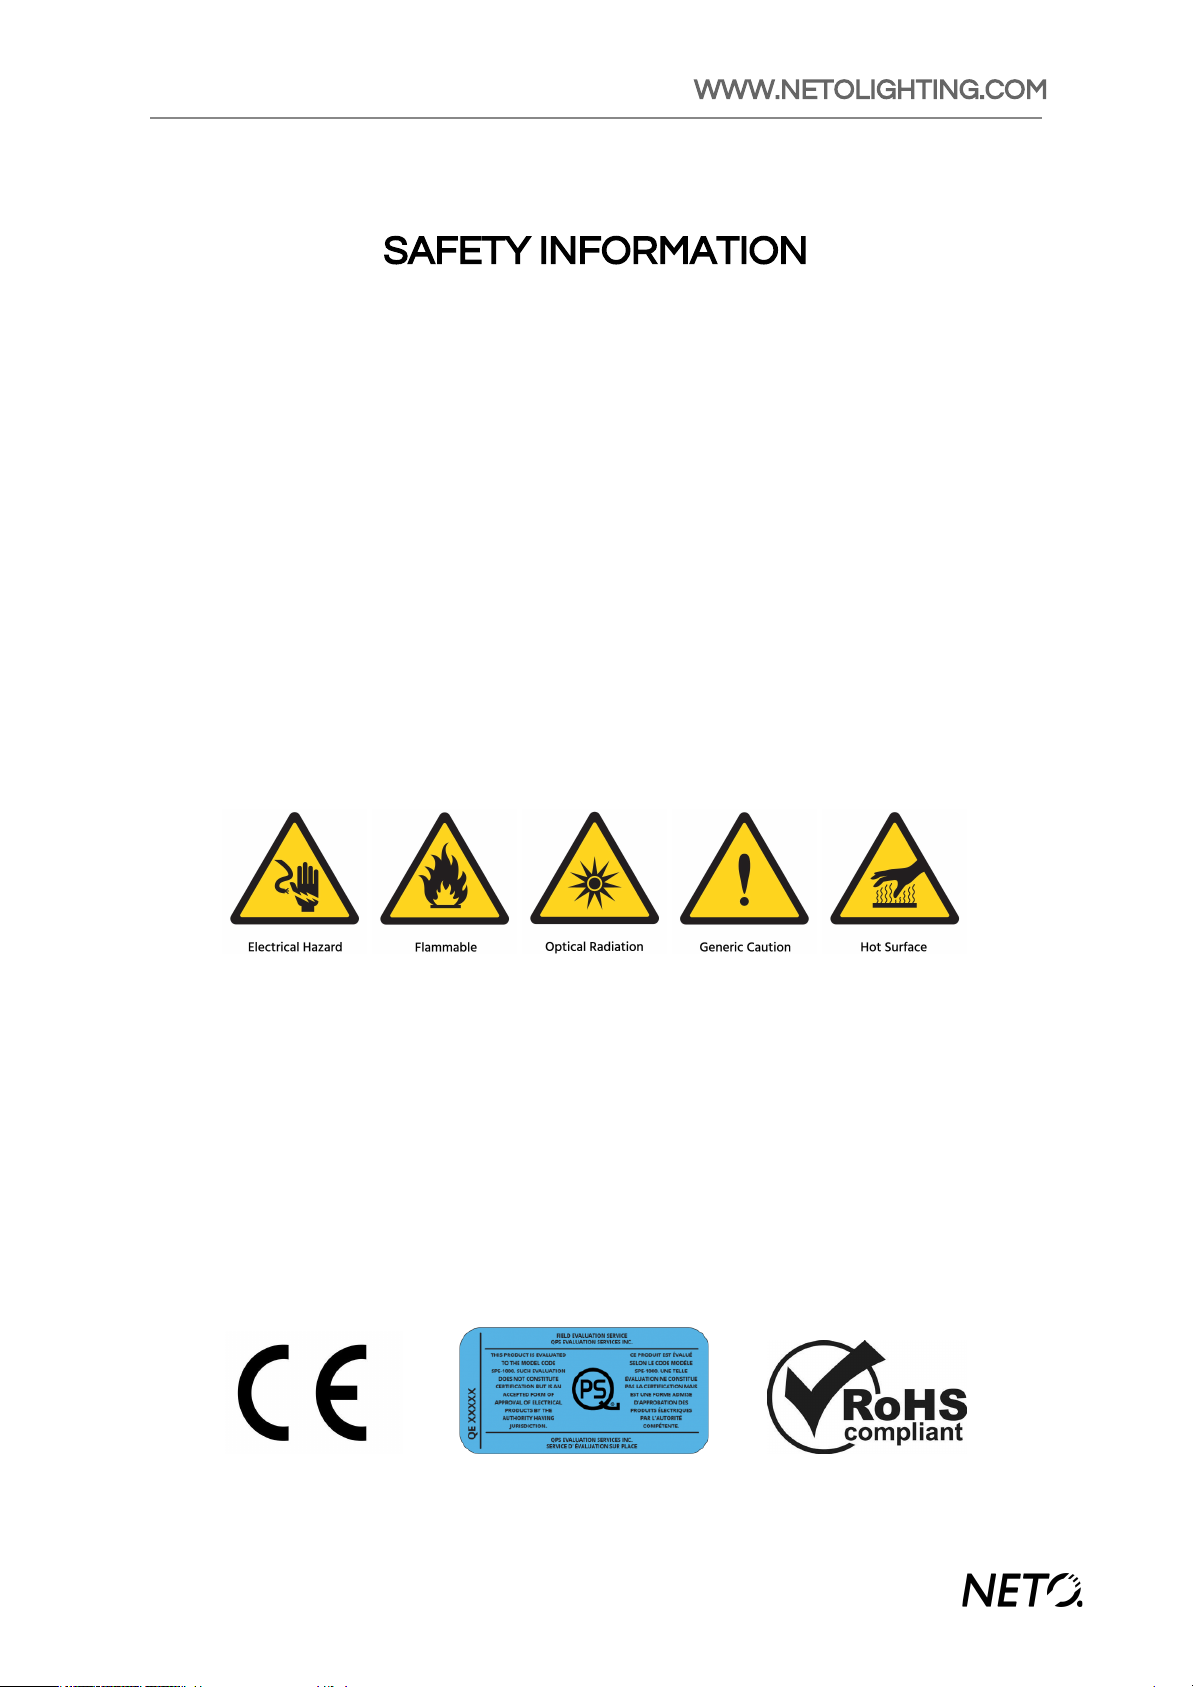
SAFETY SYMBOL IDENTIFICATION
This manual and Neto™ products use the following symbols to highlight possible safety
hazards and important warnings.
OPERATING ENVIRONMENT
Do not operate the product if ambient temperature is below -15˚C (5˚F) or above 45˚C
(113˚F).
Do not operate the product in excessively wet or humid environments.
Do not operate the product in excessively dusty or dirty environments.
Product is not intended for household use. Consult a professional before use in residential
applications.
5
USER MANUAL
INSPECT PRIOR TO USE
Before connecting to a power source, inspect the product for damage or abnormalities. Do
not connect to a power source if any moisture or water appears to have entered the product
casing. Ensure no screws are loose or missing. Product seals may be compromised if the
casing is warped or bent. Risk of sharp edges if the front lens is cracked or broken. Do not
install above ground level if the mounting bracket or any rigging safety feature is bent,
broken, or missing parts.
ELECTRICAL HAZARD
Power down or unplug product when not in use to minimize potential risks.
Disconnect from power immediately if power plug or any cable, seal, plug,
cover, or other component is damaged or is showing signs of overheating.
Do not reconnect to a power source until the problem has been resolved by
a properly qualified technician.
Use only a properly grounded and ground-fault protected power source that complies with
local electrical laws and regulations. Before connecting the unit, ensure that all power cables
and devices supplying power are in perfect condition and rated for total power requirements
of all devices connected on the circuit. When linking power output from a unit, never exceed
the maximum number of linked units indicated on the device. Do not connect product to a
power circuit with a dimmer or rheostat.
PREVENTING BURNS AND FIRE
Surface temperature of Colorflex™ casing may reach temperatures up to
85˚C (185˚F) during operation. Avoid direct skin contact with the luminaire
during operation to protect from burns. Unplug or turn off the product and
allow it to cool for 10 minutes before handling.
Keep any flammable materials a minimum of 50cm (20in) from the fixture
when plugged in. Keep all combustible materials (wood, fabric, paper
products, etc.) a minimum 50cm (20in) from every side of the luminaire
during operation. Do not illuminate surfaces less than 30cm (12in) from the
light output. Use only in a ventilated space.
Do not use any filters, masks, lenses, or other covers on the optical component of the
luminaire unless they are specifically intended for such an application and rated for high
6
WWW.NETOLIGHTING.COM
temperature applications. Never install directly on the surface of the luminaire - ensure there
is an adequate air gap for ventilation.
PREVENTING DAMAGE TO EYES AND SEIZURES
This product produces powerful, concentrated light output. Direct exposure
to the light output from close proximity may cause retinal damage. Do not
look directly into the optical component when close to the fixture.
Connection to power or DMX signal may cause the fixture to light up
unexpectedly. When installing and testing the fixture, ensure adequate
ambient light in the work environment to maintain dilated pupils. Never use
optical magnification devices such as magnifying glasses, lenses, telescopes, binoculars
which may concentrate the light output when the fixture is in operation.
When using the Purple (UV 395-405nm) color LED this unit produces light in the UV-A or
Near-Ultraviolet range of the electromagnetic spectrum, in the same range as UV-A
radiation produced by the sun. Extended or high-intensity exposure to UV radiation is known
to cause premature skin aging and can contribute to the development of skin cancer among
other health consequences. Certain chemicals and medications can cause increased
sensitivity to UV radiation.
A small percentage of individuals may experience a seizure when exposed to certain visual
stimuli including flashing lights. Even people with no history of seizures may experience a
“photosensitive epileptic seizure.” This fixture includes a “Strobe” feature and may also flash
rapidly as part of a dmx control program. If you or someone around you is experiencing a
seizure, discontinue use of the fixture immediately and seek medical attention.
REPAIRS AND SERVICING
Neto Lighting™ products are not intended for any service or repair except by properly
qualified and insured technicians. Attempting to service or repair a Neto Lighting™ product
may create a safety hazard, cause damage, and/or void product warranties. Service only as
directed by product manuals or by the manufacturer.
7
USER MANUAL
PRODUCT OVERVIEW
INTRODUCTION
The Neto™ Colorflex™ Series LED Pars are designed to offer a rugged and versatile lighting
solution for a wide variety of standalone or DMX controlled applications. With a six color
(RGBWA+UV) light chip and high quality lenses at the heart of the optical engine, Colorflex™
lights can produce a smooth color output across a range of trillions of colors. Adjustable
dimming frequency, dimmer curve and white balance calibration allow flexible use in
professional camera applications. An adjustable two arm mounting bracket can be used as
a rigging point or a floor stand. To ensure a durable and reliable product, each unit features
a fully sealed enclosure with ip65 rated connections, controls, and display.
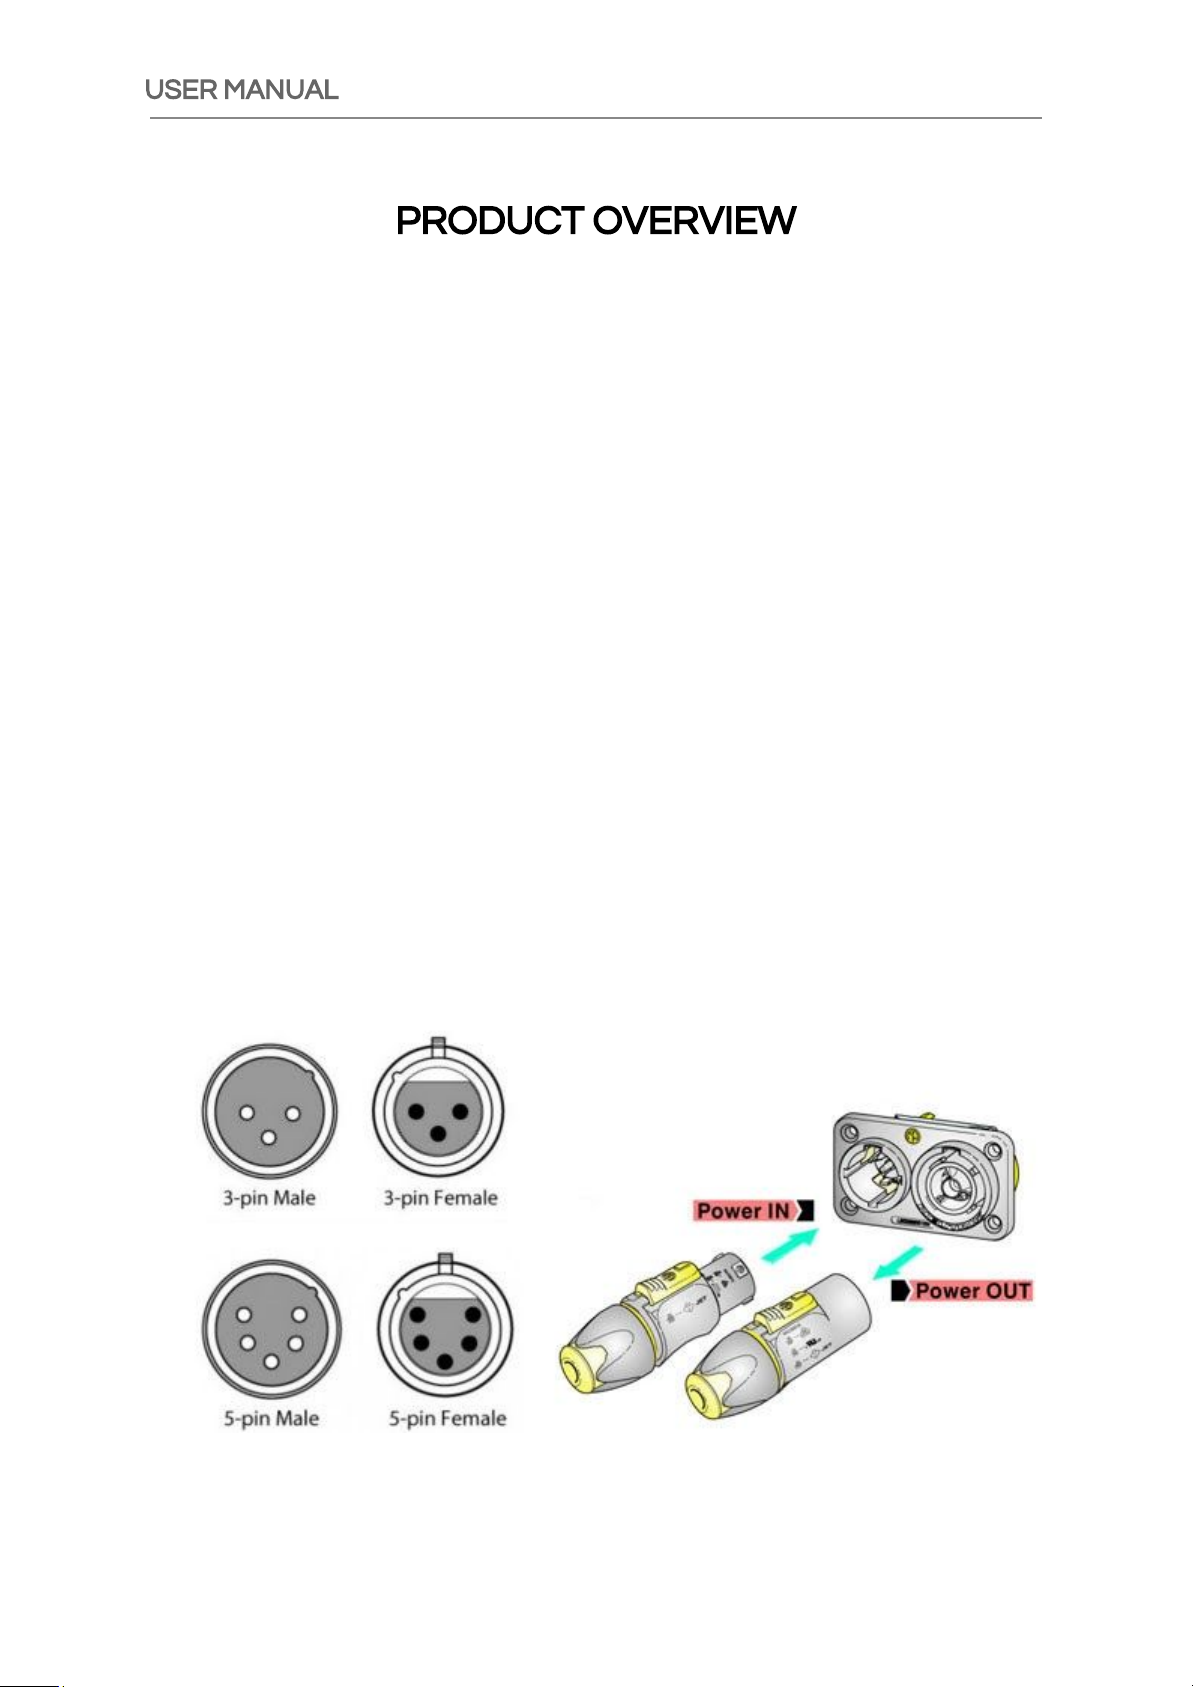
PHYSICAL CONNECTIONS
Each Colorflex™ series fixture provides four physical connections for managing power and
data. Seetronic™ brand shockproof and water resistant panel mount connectors with rubber
sealing sleeves help to protect the unit from environmental hazards. POWER IN and POWER
OUT are connected in Parallel using the Seetronic™ SAC3MPX and SAC3FPX connector
standard. DMX DATA IN and DATA OUT are available in either 3pin or 5pin XLR connector
format.
8

WWW.NETOLIGHTING.COM
DISPLAY AND CONTROLS
The Colorflex™ features a two line, 8 character backlit matrix LCD display and four control
buttons to navigate and configure the menu options. The display and control module is laid
out as follows:
The functions of the four buttons are as follows:
- MENU / BACK
Moves back one menu tree level, or exits a control value setting window
- UP / INCREMENT
Moves up one item in a menu, or increments a control value setting,
- DOWN / DECREMENT
Moves down one item in a menu, or decrements a control value setting
- SELECT / ENTER
Selects a menu option or confirms entry of a control value setting (save value)
9

USER MANUAL
INSTALLATION GUIDE
RIGGING SAFETY
Neto products are intended for professional applications and should only be
installed by qualified technicians with proper insurance coverage. When
installing a Neto Lighting™ product overhead, use only the prescribed
rigging points on the mounting brackets. Make sure that all rigging
hardware is installed properly and is rated for the particular use case.
Always be sure to use a properly rated steel safety cable in addition to the
principal attachment.
When installing the fixture to any kind of support such as truss or an architectural feature,
always ensure that the attachment point can safely support at least 10 times the weight of
the fixture.
POWERING THE UNIT
Colorflex™ series fixtures use the Seetronic™ TR1 twist lock power connectors for both
POWER IN and POWER OUT on the chassis. Use either the supplied power cable or a
properly rated cable assembly with minimum 18AWG conductors. Always ensure that the
power source is compatible with the operating voltage range and AC frequency indicated on
the fixture.
When using the POWER OUT of the unit, never link more units than the maximum total
quantity indicated on the label. When not in use ensure that the rubber connector cover is
properly closed. Always ensure that the total power consumption of all devices connected to
a power source does not exceed the 80% of the maximum power rating of the circuit.
CONNECTING DMX
The Colorflex™ IPX series is controllable remotely via DMX 512 (USITT DMX512/1990). Each
unit features Seetronic™ waterproof DATA IN and DATA OUT connectors in either XLR3 or
XLR5 format. Both XLR connectors and IP XLR connectors will fit without the need for
adapters. DMX cables should be minimum 24AWG shielded 2 conductor cables with an
impedance of 120ohms. It is recommended to have a DMX Opto-Splitter in the signal path
between the controller and fixture, it will reduce potential data issues and protect both the
fixture and console from damaging each other in the event of serious malfunction.
10

WWW.NETOLIGHTING.COM
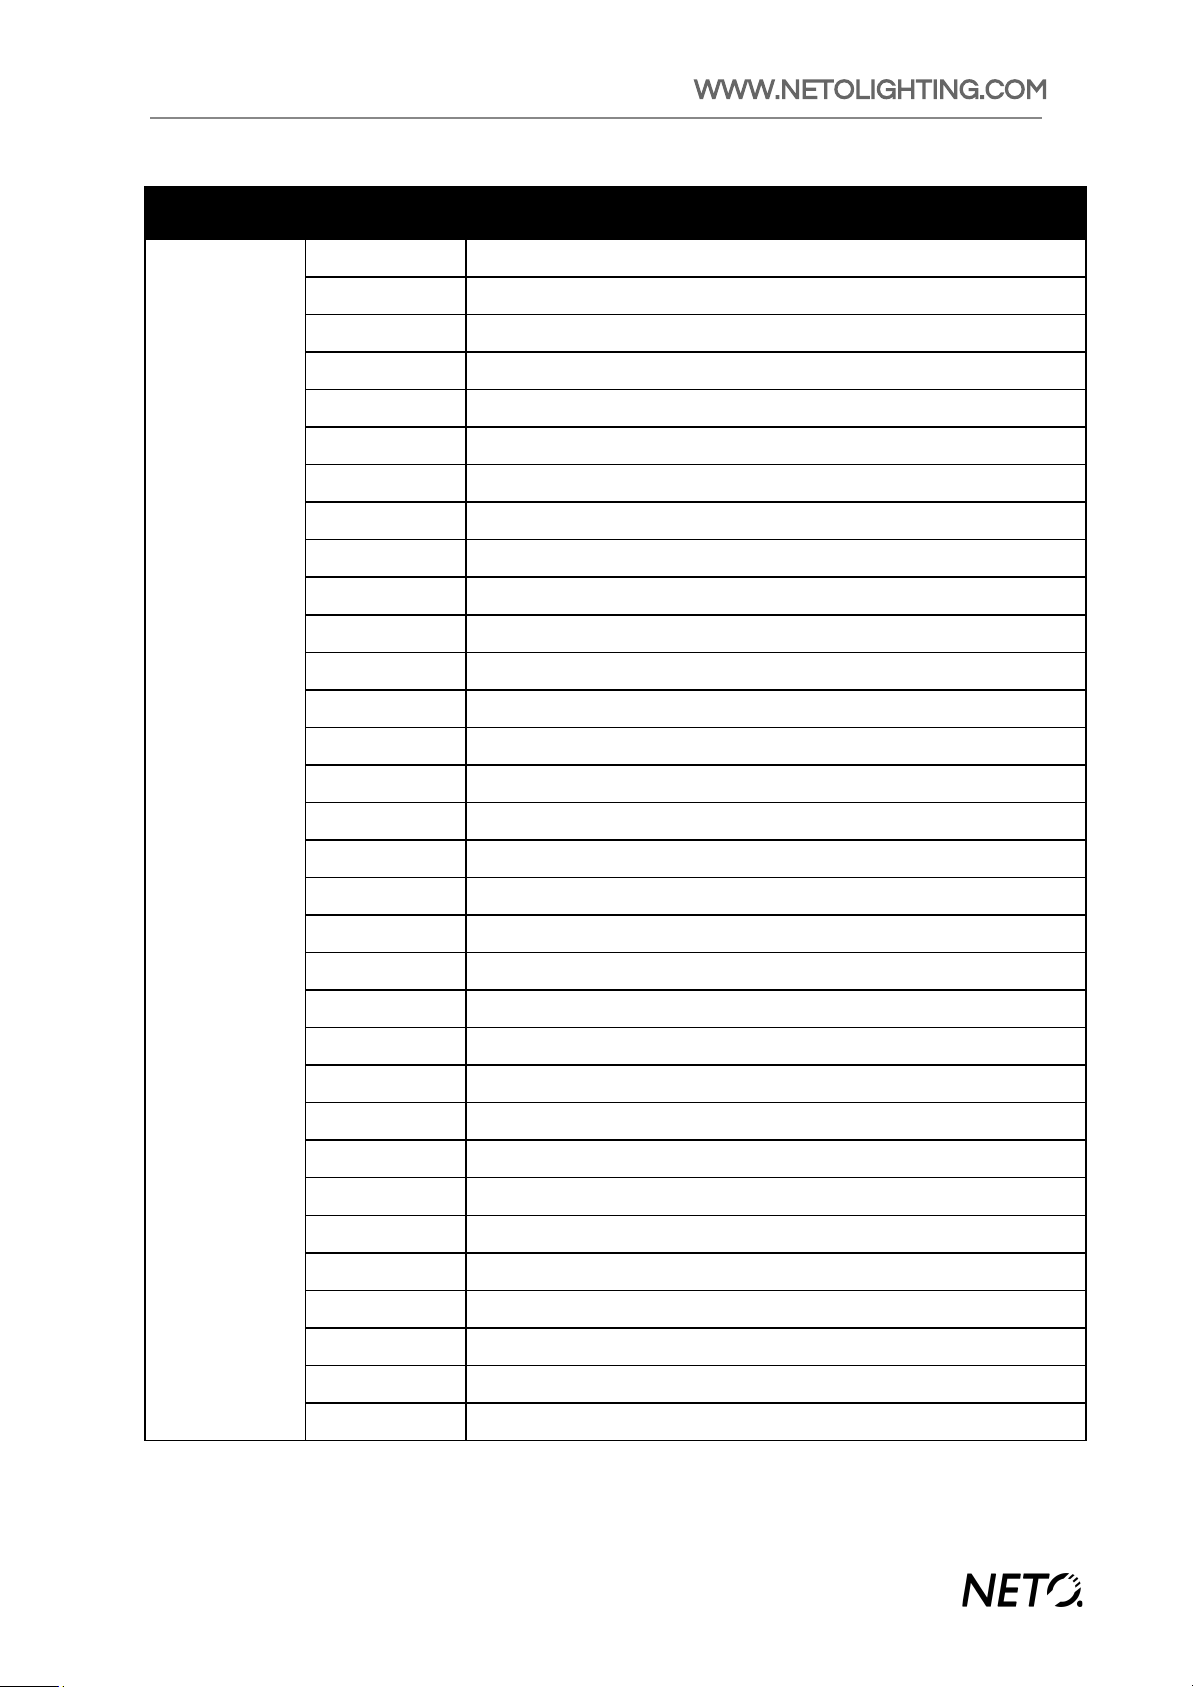
NAVIGATING MENU OPTIONS
11
TOP MENU
SUB MENU
PARAMETER
VALUE
Static
Color
STATIC
[ Solid ]
SOLID
[ Cor 1 - 63 ]
STATIC
[ Manual ]
MANUAL
[ Red ]
MANUAL
< R = 000 - 255 >
[ Green ]
< G = 000 - 255 >
[ Blue ]
< B = 000 - 255 >
[ White ]
< W = 000 - 255 >
[ Amber ]
< A = 000 - 255 >
[ Purple ]
< P = 000 - 255 >
[ Strobe ]
< S = 000 - 255 >
Auto Program
Program
[ Pro 01 - Pro 10 ]
Speed
[ 001 – 100 ]
DMX Address
DMX ADDR
[ ADDR = 001 - 512 ]
DMX Mode
DMX Mode
[ 6 CH ]
[ 8 CH ]
[ 12 CH ]
[ HSV ]
[ HSI ]
Slave Mode
SLAVE
[ Slave ]
[ Master ]
White Balance
Blance
[ Red ]
[ Green ]
[ Blue ]
Red / Green / Blue
[ 255 – 000 ]
Dimmer Mode
Speed
[ OFF ]
[ Curve1 ]
[ Curve2 ]
[ Curve3 ]
Refresh Rate
Refresh
[ 800HZ ]
[ 2KHZ ]
[ 4KHZ ]
[ 10KHZ ]
[ 20KHZ ]
[ 25KHZ ]

USER MANUAL
MENU OPTIONS EXPLAINED
STATIC COLOR mode sets the light to output a specific color determined by the user. Using
this mode will set the device SLAVE mode to MASTER automatically.
- STATIC SOLID mode allows the user to select between 63 pre-mixed colors (chart on
next page)
- STATIC MANUAL mode allows the user to mix a precise color output by setting the
intensity of each LED color in the chip
AUTO PROGRAM mode allows the user to select between 10 color chase programs, and to
set the playback speed of the programs from slow to fast. Using this mode will set the device
SLAVE mode to MASTER automatically.
DMX ADDRESS allows the user to select the dmx address for the fixture from a value range
of 1 - 512. The first DMX channel of this fixture will now receive data at that DMX address,
with subsequent channels following incrementally.
DMX MODE allows the user to choose between 5 different DMX profiles built into the fixture.
The channel control values are laid out later in this manual in the DMX PROFILE CHART.
SLAVE MODE allows a unit to be set as a MASTER or SLAVE unit for stand-alone daisy-chain
applications.
WHITE BALANCE allows the user to adjust the relative color balance of Red, Green, and Blue
by reducing the maximum intensity for any or all of these colors.
DIMMER MODE allows the user to choose between four options for the fixture dimmer
response curve - OFF (instantaneous), Curve 1 (Square Law Dimming), Curve 2 (Inverse
Square Law Dimming), and Curve 3 (S-Curve Dimming)
REFRESH RATE allows the user to select between a variety of LED PWM refresh rates for
different professional filming requirements.
KEYS LOCK locks the fixture automatically after 30 seconds of inactivity. The button
passcode sequence to unlock the menu is UP - DOWN - UP - DOWN - ENTER
12
Keys Lock
Lock
[ No ]
[ Yes ]
WWW.NETOLIGHTING.COM
13
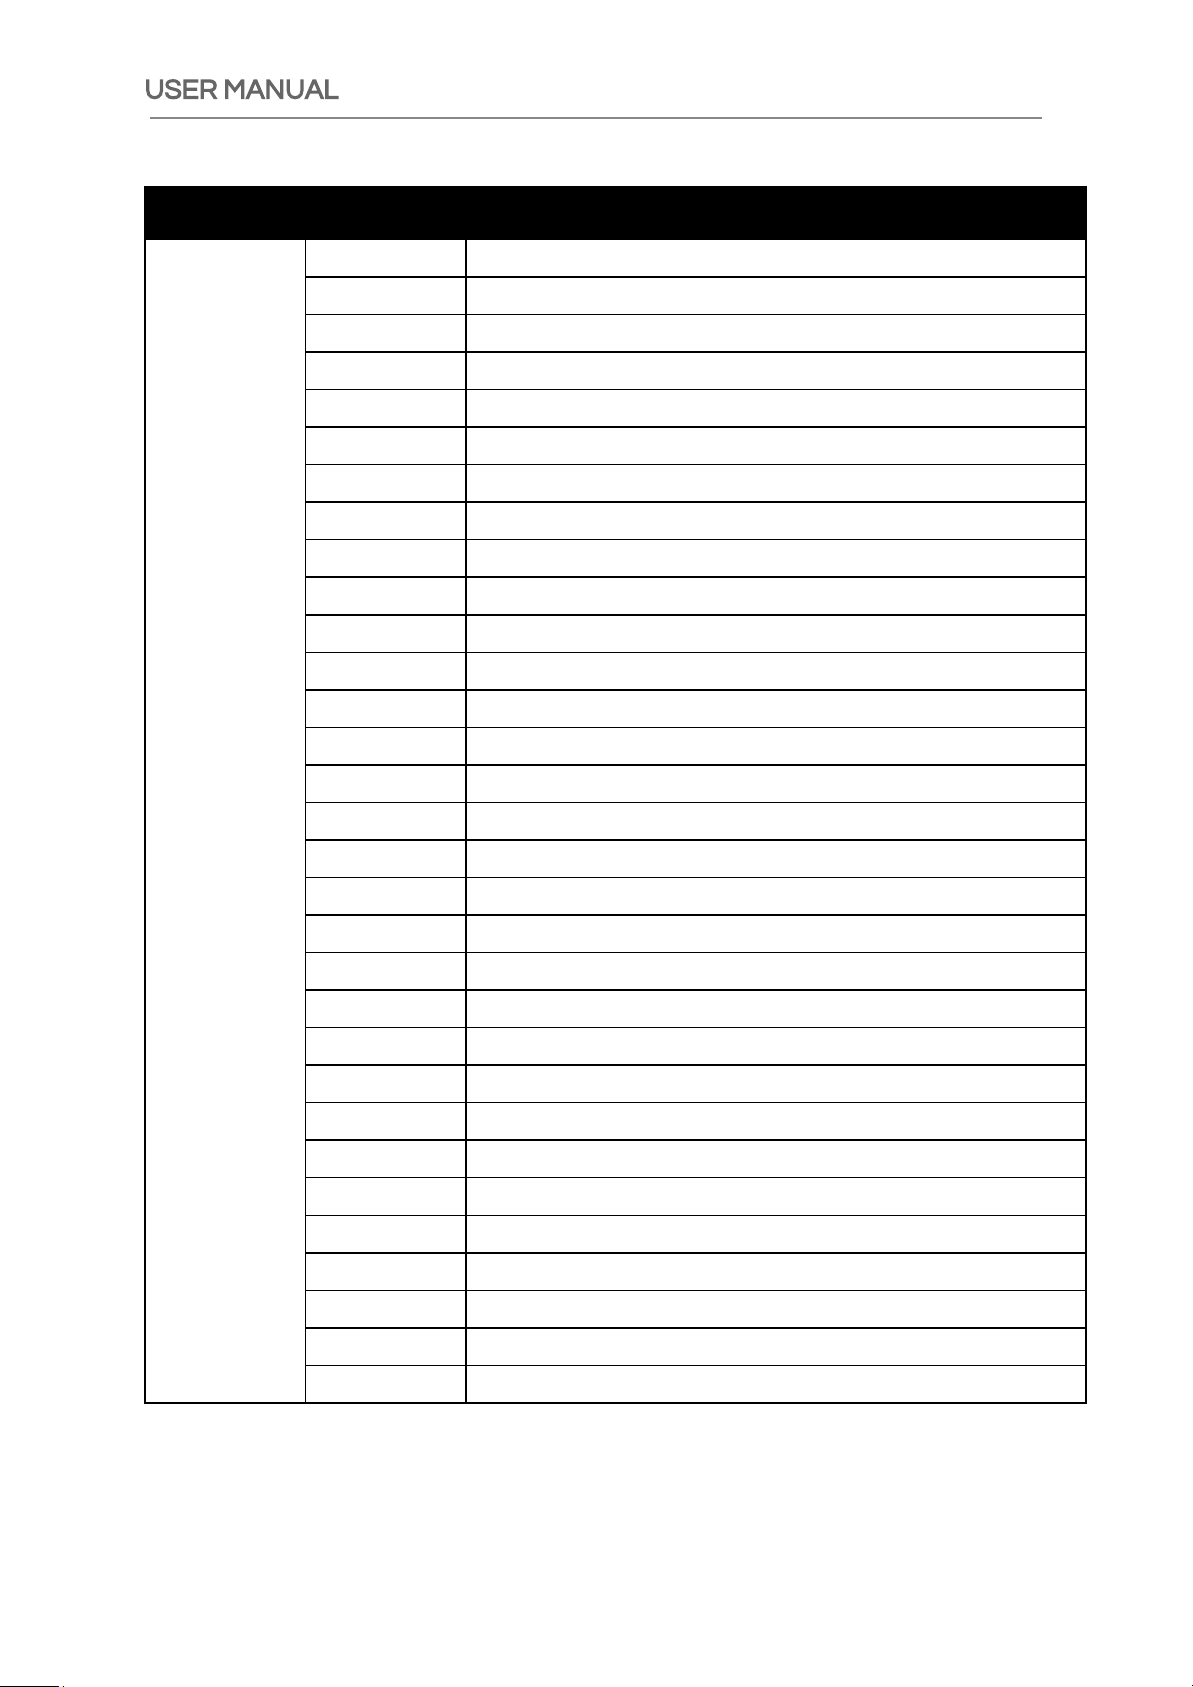
MODE
VALUE
COLOR MIX
STATIC [Solid]
Color 1
Red
Color 2
Green
Color 3
Blue
Color 4
White
Color 5
Amber
Color 6
Purple
Color 7
Red + Green
Color 8
Red + Blue
Color 9
Red + White
Color 10
Red + Amber
Color 11
Red + Purple
Color 12
Green + Blue
Color 13
Green + White
Color 14
Green + Amber
Color 15
Green + Purple
Color 16
Blue + White
Color 17
Blue + Amber
Color 18
Blue + Purple
Color 19
White + Amber
Color 20
White + Purple
Color 21
Amber + Purple
Color 22
Red + Green + Blue
Color 23
Red + Green + White
Color 24
Red + Green + Amber
Color 25
Red + Green + Purple
Color 26
Red + Blue + White
Color 27
Red + Blue + Amber
Color 28
Red + Blue + Purple
Color 29
Red + White + Amber
Color 30
Red + White + Purple
Color 31
Red + Amber + Purple
Color 32
Green + Blue + White
USER MANUAL
14
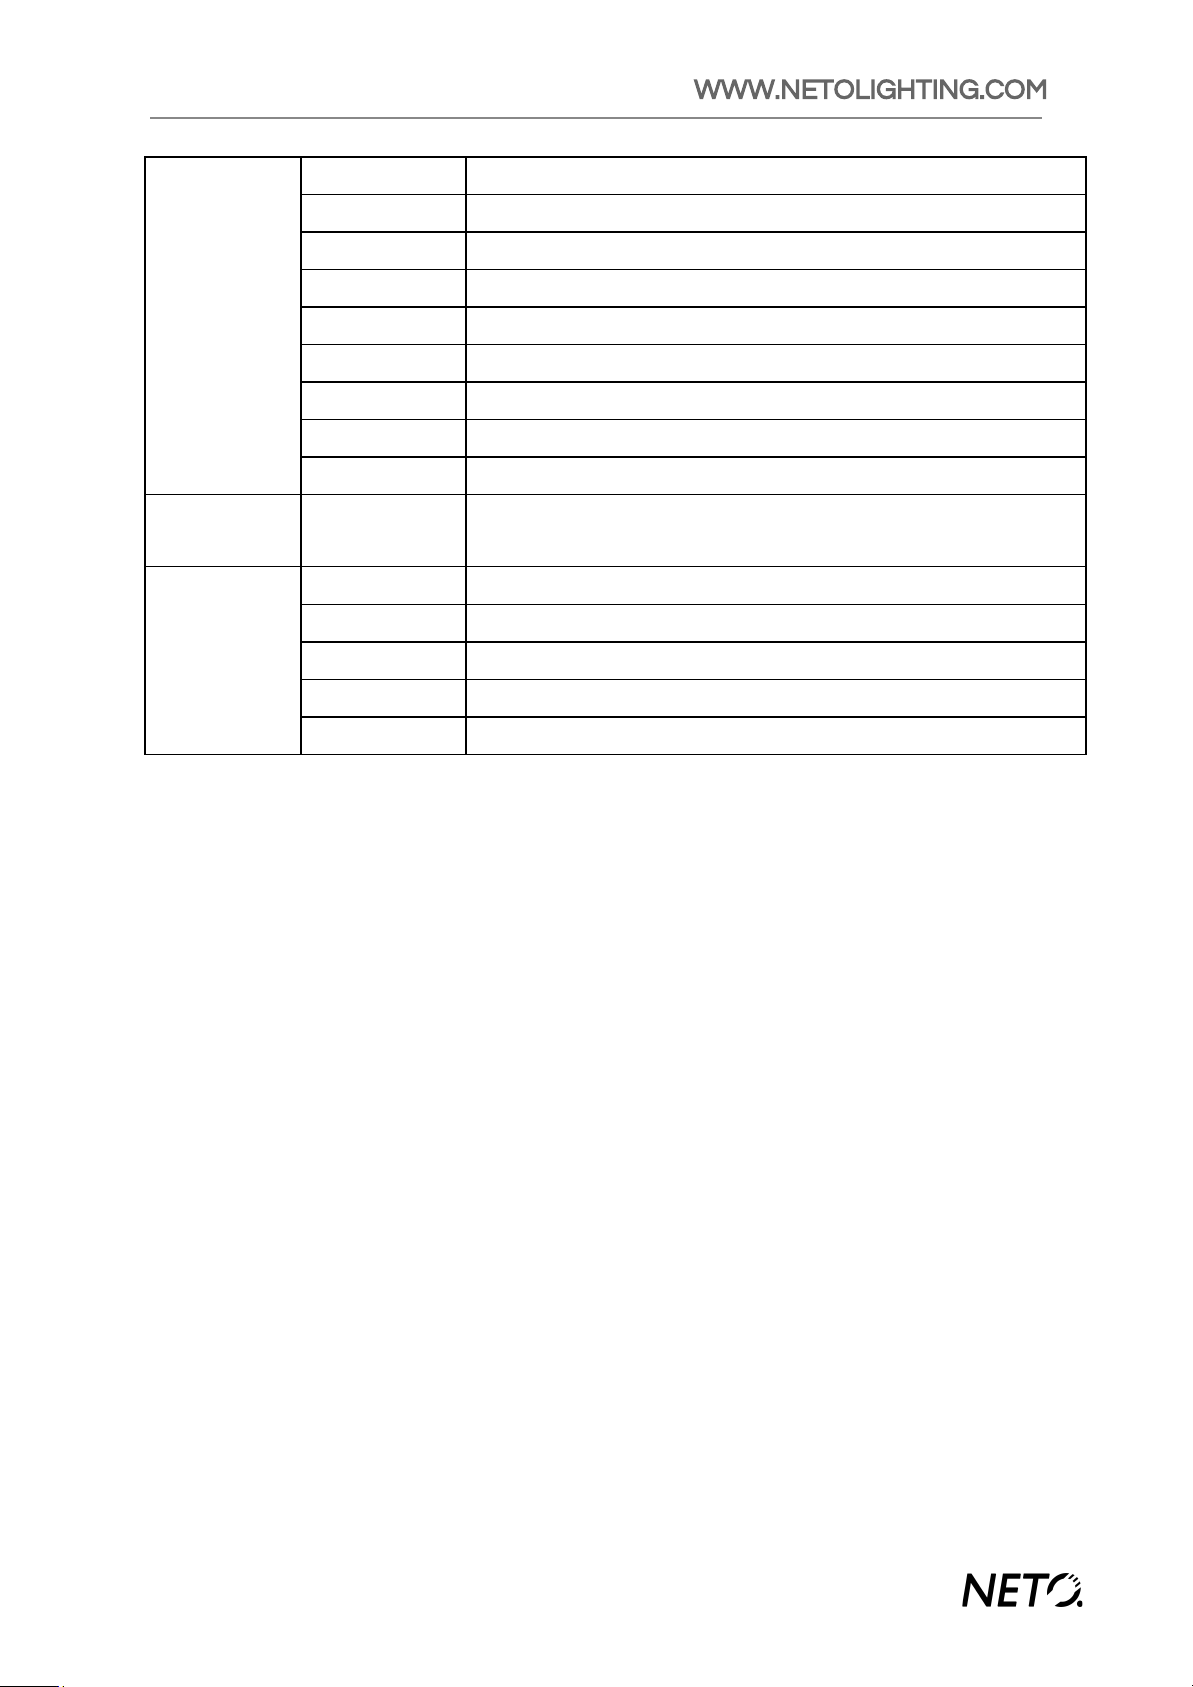
MODE
VALUE
COLOR MIX
STATIC [Solid]
Color 33
Green + Blue + Amber
Color 34
Green + Blue + Purple
Color 35
Blue + White + Amber
Color 36
Blue + White + Purple
Color 37
White + Amber + Purple
Color 38
Blue + Amber + Purple
Color 39
Green + White + Amber
Color 40
Green + White + Purple
Color 41
Green + Amber + Purple
Color 42
Red + Green + Blue + White
Color 43
Red + Green + Blue + Amber
Color 44
Red + Green + Blue + Purple
Color 45
Red + Green + White + Amber
Color 46
Red + Green + White + Purple
Color 47
Red + Green + Amber + Purple
Color 48
Red + Green + White + Amber
Color 49
Red + Blue + White + Purple
Color 50
Red + Blue + Amber + Purple
Color 51
Red + White + Amber + Purple
Color 52
Green + Blue + White + Amber
Color 53
Green + Blue + White + Purple
Color 54
Green + Blue + Amber + Purple
Color 55
Green + White + Amber + Purple
Color 56
Blue + White + Amber + Purple
Color 57
Red + Green + Blue + White + Amber
Color 58
Red + Green + Blue + White + Purple
Color 59
Red + Green + Blue + Amber + Purple
Color 60
Red + Green + White + Amber + Purple
Color 61
Red + Blue + White + Amber + Purple
Color 62
Green + Blue + White + Amber + Purple
Color 63
Red + Green + Blue + White + Amber + Purple

WWW.NETOLIGHTING.COM
DMX PROFILE CHART
DMX HSV MODE
DMX HSI MODE
DMX 6 CH MODE
15
CHANNEL
DMX VALUE
FUNCTION
1
[ 000 - 255 ]
Hue 0 - 100% ( H )
2
[ 000 - 255 ]
Saturation 0 - 100% ( S )
3
[ 000 - 255 ]
Brightness 0 - 100% ( V )
CHANNEL
DMX VALUE
FUNCTION
1
[ 000 - 255 ]
Hue 0 - 100% ( H )
2
[ 000 - 255 ]
Saturation 0 - 100% ( S )
3
[ 000 - 255 ]
Intensity 0 - 100% ( I )
CHANNEL
DMX VALUE
FUNCTION
1
[ 000 - 255 ]
RED Intensity 0 - 100%
2
[ 000 - 255 ]
GREEN Intensity 0 - 100%
3
[ 000 - 255 ]
BLUE Intensity 0 - 100%
4
[ 000 - 255 ]
WHITE Intensity 0 - 100%
5
[ 000 - 255 ]
AMBER Intensity 0 - 100%
6
[ 000 - 255 ]
PURPLE ( UV ) Intensity 0 - 100%

USER MANUAL
DMX 8 CH & 12 CH MODE
16
CHANNEL
DMX VALUE
FUNCTION
1
[ 000 - 255 ]
MASTER DIMMER Intensity 0 - 100%
2
[ 000 - 255 ]
RED Intensity 0 - 100%
3
[ 000 - 255 ]
GREEN Intensity 0 - 100%
4
[ 000 - 255 ]
BLUE Intensity 0 - 100%
5
[ 000 - 255 ]
WHITE Intensity 0 - 100%
6
[ 000 - 255 ]
AMBER Intensity 0 - 100%
7
[ 000 - 255 ]
PURPLE ( UV ) Intensity 0 - 100%
8
[ 000 - 009 ]
STROBE - OFF
[ 010 - 255 ]
STROBE rate 1Hz - 20Hz
CHANNELS 9-12 OPERATIONAL IN 12CH MODE ONLY
9
(12ch mode)
[ 000 - 010 ]
No Function
[ 011 - 030 ]
Red 100%, Green 0% - 100%, Blue 0%
[ 031 - 050 ]
Red 100% - 0%, Green 100%, Blue 0%
[ 051 - 070 ]
Red 0%, Green 100%, Blue 0% - 100%
[ 071 - 090 ]
Red 0%, Green 100% - 0%, Blue 100%
[ 091 - 110 ]
Red 0% - 100%, Green 0%, Blue 100%
[ 111 - 130 ]
Red 100%, Green 0%, Blue 100% - 0%
[ 131 - 150 ]
Red 100%, Green 0% - 100%, Blue 0% - 100%
[ 151 - 170 ]
Red 100% - 0%, Green 100% - 0%, Blue 100%
[ 171 - 200 ]
Red 100%, Green 100%, Blue 100%, White 100%
[ 201 - 205 ]
White 01
[ 206 - 210 ]
White 02
[ 211 - 215 ]
White 03
[ 216 - 220 ]
White 04
[ 221 - 225 ]
White 05
[ 226 - 230 ]
White 06
[ 231 - 235 ]
White 07
[ 236 - 240 ]
White 08
[ 241 - 245 ]
White 09
[ 246 - 250 ]
White 10
[ 251 - 255 ]
White 11
10
(12ch mode)
[ 000 - 015 ]
No Function
[ 016 - 039 ]
Auto Program 01
WWW.NETOLIGHTING.COM
17
[ 040 - 063 ]
Auto Program 02
[ 064 - 087 ]
Auto Program 03
[ 088 - 111 ]
Auto Program 04
[ 112 - 135 ]
Auto Program 05
[ 136 - 159 ]
Auto Program 06
[ 160 - 183 ]
Auto Program 07
[ 184 - 207 ]
Auto Program 08
[ 208 - 231 ]
Auto Program 09
[ 232 - 255 ]
Auto Program 10
11
(12ch mode)
[ 000 - 255 ]
AUTO PROGRAM Speed 0 - 100%
12
(12ch mode)
[ 000 - 051 ]
Default Dimmer ( use value set by control panel )
[ 052 - 101 ]
Dimmer Curves OFF ( instant dimmer )
[ 102 - 152 ]
Dimmer Curve 1 (Square Law Dimming)
[ 153 - 203 ]
Dimmer Curve 2 (Inverse-Square Law Dimming)
[ 204 - 255 ]
Dimmer Curve 3 (S-Curve Dimming)
USER MANUAL
MAINTENANCE GUIDE
With proper care and maintenance Neto Lighting™ fixtures are designed to be long lasting
and reliable. While there are no user serviceable parts on the fixture, following a few basic
guidelines will help to get the most out of each Colorflex™ unit.
INSPECT THE UNIT REGULARLY
Make sure screws on the unit casing are all tight. If any are loose, use the appropriate tool to
tighten. Inspect the screen and front glass plate for any signs of humidity inside the
enclosure. If water or moisture are present, unplug and contact Neto Lighting™ service.
If the casing is bent or damaged the seal may be compromised and components may
require repair or replacement.
KEEP THE UNIT CLEAN
Excessive dirt or moisture may compromise the functionality of the unit over time. Clean the
glass cover with a soft cloth dampened with water. Use a light soap or glass cleaner if
necessary. Remove any dirt buildup on the exterior surface of the casing with a damp cloth.
Keep the rubber connector covers closed when not in use to minimize accumulation of dirt
and debris. Ensure that the power and data cables used to not show any excessive wear or
exposed wiring. Any cabling that is damaged, dried or cracked should be replaced.
REPAIRS AND SERVICING
Neto Lighting™ products are not intended for any service or repair except by properly
qualified and insured technicians. Attempting to service or repair a Neto Lighting™ product
may create a safety hazard, cause damage, and/or void product warranties. If your unit
requires repair or service, contact [email protected] with a description of the
problem.
18

WWW.NETOLIGHTING.COM
TECHNICAL SPECIFICATIONS
19
NETO COLORFLEX 18-IPX™
NETO COLORFLEX 7-IPX™
Power supply: 100~240 V AC, 50/60 Hz ~
Power supply: 100~240 V AC, 50/60 Hz ~
Power consumption: 180 W
Power consumption: 60 W
DMX control channels: 12, 8, 6, HSV, HSI
DMX control channels: 12, 8, 6, HSV, HSI
DMX512 connection: 3-pin or 5-pin XLR
DMX512 connection: 3-pin or 5-pin XLR
LED type: 12W 6-in-1 RGBWA+UV
LED type: 12W 6-in-1 RGBWA+UV
Number of LEDs: 18
Number of LEDs: 6
Beam angle: 25°
Beam angle: 15°
Dimensions (LxWxH): 310 x 310 x110 mm
Dimensions (LxWxH): 235 x 215 x 110 mm
Weight: 5.5 kg
Weight: 2.6 kg
Max ambient temperature range: -15°C -
40°C
Max ambient temperature range: -15°C -
40°C
Maximum housing temperature TC (steady
state): 75° C
Maximum housing temperature TC (steady
state): 65° C
Min. distance from flammable surfaces: 0.5 m
Min. distance from flammable surfaces: 0.5 m
Min. distance to lighted object: 30cm (12in)
Min. distance to lighted object: 30cm (12in)

USER MANUAL
20
This manual suits for next models
2
Table of contents
Other NETO Lighting Equipment manuals


