MONTAGGIO
Piegare il telo Aa metà
lunghezza, con il rovescio
del tessuto sul lato esterno
e poggiarlo su un piano.
Nota per 3 archi: Fare in
modo che la parte anteriore
del telo (etichetta PRUA) sia
rivolta verso l’alto e la parte
posteriore verso il piano.
Se il telo è piegato
correttamente, la fascia
centrale è rivolta
verso il piano.
Inserire gli archi C del telaio
nelle fasce del telo A,
controllando che i fori ai
margini dell’arco siano
rivolti verso l’alto.
La sequenza di
inserimento più comoda è:
poppa, centrale e prua.
Posizionare gli archi C uno
sull’altro, mantenendo
dal basso verso l’alto
la sequenza: poppa, centro,
prua.
Nota per 4 archi: La
sequenza dal basso verso
l’alto sarà: poppa, centro
posteriore, centro anteriore,
prua.
Assemblare i braccetti
laterali B agli archi C
inserendo prima la boccola
di finitura Ee poi avvitando
le viti M4x14 D.
Installare il tenditore F
come da videoguida online:
Per fissare il tendalino
all’imbarcazione vi
consigliamo sempre
accessori Nettuno Marine
Equipment che potete
trovare disponibili sul web
all’indirizzo
www.nettunome.it
MONTAGE
Pliez la toile Aà moitié
longueur, avec l’envers du
tissu à l’extérieur et placez-la
sur une surface.
Remarquepour 3 arceaux:
assurez-vous que la partie
antérieure du tissu (étiquette
vers la PROUE) est face vers
le haut et la partie po-
stérieure vers la surface.
Si la toile est plié correcte-
ment, la bande centrale fait
face vers la surface.
Insérez les arceaux Cdu
cadre dans les bandes de la
toile A, vérifiant que les trous
sur les bords de l’arceau
sont face vers le haut. La
séquence de l’insertion la
plus confortable est: poupe,
centrale et proue.
Placez les arceaux Cun sur
l’autre, en gardant de bas en
haut la séquence : poupe,
centre, proue.
Remarque pour 4 arceaux: la
séquence du bas vers le haut
sera: poupe, centre arrière,
centre avant, proue.
Assemblez les bras latéraux
Baux arceaux Cen insérant
d’abord la douille de finition
Epuis visser les vis M4x14 D.
Installer le tendeur Fselon le
guide vidéo en ligne:
Pour fixer le taud au bateau
nous recommandons
toujours accessoires Net-
tuno Marine Equipement
disponibles sur le web
www.nettunome.it
MONTAJE
Doblar la lona Apor la mitad,
con el revés de la tela en el
exterior y colocarla sobre una
superficie.
Nota para 3 arcos: Asegurar-
se que el frente de la lona
(etiqueta hacia PROA) es mi-
rando hacia arriba y la parte
posterior a la superficie.
Si la lona está doblada
correctamente, la banda
central se enfrenta hacia la
superficie.
Insertar los arcos Cdel marco
en las bandas de la lona
A, comprobando que los
agujeros en los bordes del
arco estén hacia arriba.
La secuencia de la inserción
más cómoda es: popa, cen-
tral y proa.
Colocar los arcos Cuno por el
otro, manteniendo de abajo
hacia arriba la secuencia:
popa, centro, proa.
Nota para 4 arcos: la secuen-
cia de abajo hacia la parte
superior será: popa, centro
trasero, centro delantero,
proa.
Montar los brazos laterales
Ba los arcos Cprimero
insertando el casquillo de
recorte Ey luego atornillar
los tornillos M4x14 D.
Instalar el tensor Fsegún la
guía de video en línea:
Para arreglar el toldo al bar-
co siempre recomendamos
accesorios Nettuno Marine
Equipment disponibles en
la web www.nettunome.it
EINBAU
Falten Sie das Tuch Ain der
Mitte Länge, mit der
Rückseite des Stoffes nach
außen und legen Sie es auf
eine Oberfläche.
Hinweis für 3 Bögen: Achten
Sie auf die Vorderseite
des Tuches (Etikett in
Richtung BUG): soll
nach oben sein und die
Rückseite nach die
Oberflache.
Wenn das Tuch richtig
gefaltet ist, das mittlere
Band zeigt nach vorne
Richtung Oberfläche.
Setzen Sie die C-Bögen des
Rahmens ein in den
Bändern von Tuch A
überprüfen, ob die Löcher
Bogenränder
nach oben gerichtet sind.
Die Folge von bequemstes
Einführen ist: Heck, Mitte
und Bug.
Platzieren Sie die Bögen
Ceins auf dem anderen,
von unten nach oben die
Reihenfolge: Heck, Mitte,
Bögen. Hinweis für 4 Bögen:
Die Reihenfolge von unten
nach oben ist: Heck, Mitte
hinten, vorne Mitte, Bug.
Montieren Sie die
Seitenarme Bzu Bögen C
zuerst durch einfügen die
Fertigung buchsen Eund
dann verschrauben das
M4x14 DSchrauben.
Den Spanner F
einbauen gemäß
Online-Videoanleitung:
Zur Befestigung des Bimini
beraten wir immer zum
Boot Zubehör Nettuno
Marine Equipment, die im
Web verfügbar sind.
www.nettunome.it
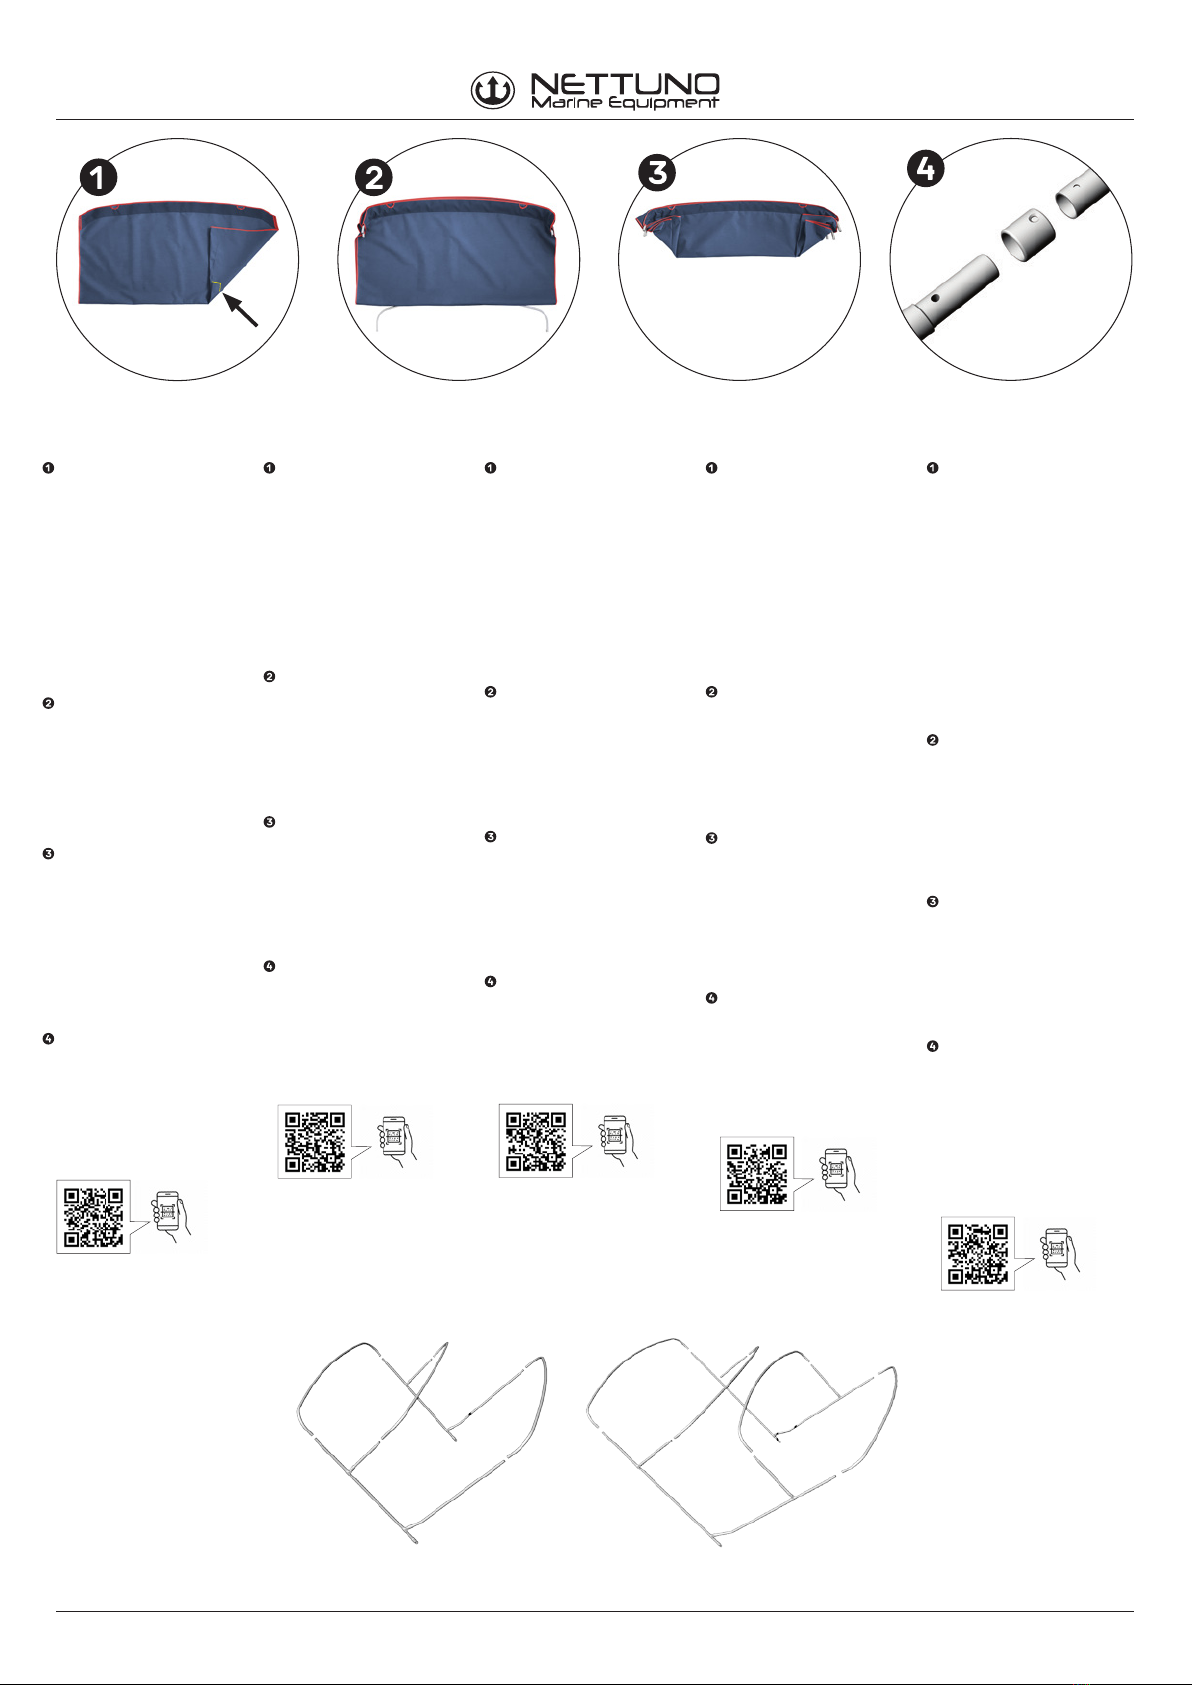
ASSEMBLY
Fold the canvas Ain half
length, with the back side of
the fabric on the outside and
place it on a flat surface.
Note for 3 arches: Do in so
that the front of the canvas
(label towards BOW) is facing
up and the rear side towards
the surface.
If the canvas is folded
correctly, the central band is
facing towards the surface.
Insert the C-arches of the
frame in the bands of canvas
A, checking that the holes
at the edges of the arch
are facing upwards. The
most comfortable insertion
sequence is: stern, central
and bow.
Place the C-arches one on
the other, keeping from the
bottom to the top the se-
quence: stern, center, bow.
Note for 4 arches: the se-
quence from bottom to the
top will be: stern, center rear,
center front, bow.
Assemble lateral brackets
Bto the arches Cby inserting
finishing bushing Efirst
and then screwing M4x14
screws D.
Install strap Fas per online
video guide:
To fix the Bimini to the boat
we always recommend
accessories Nettuno Marine
Equipment available on the
web www.nettunome.it
Designed by NETTUNO MARINE EQUIPMENT Technical Design Dept.
3 ARCHI
3 ARCHES • 3 ARCEAUX
3 ARCOS • 3 BÖGEN
4 ARCHI
4 ARCHES • 4 ARCEAUX
4 ARCOS • 4 BÖGEN


