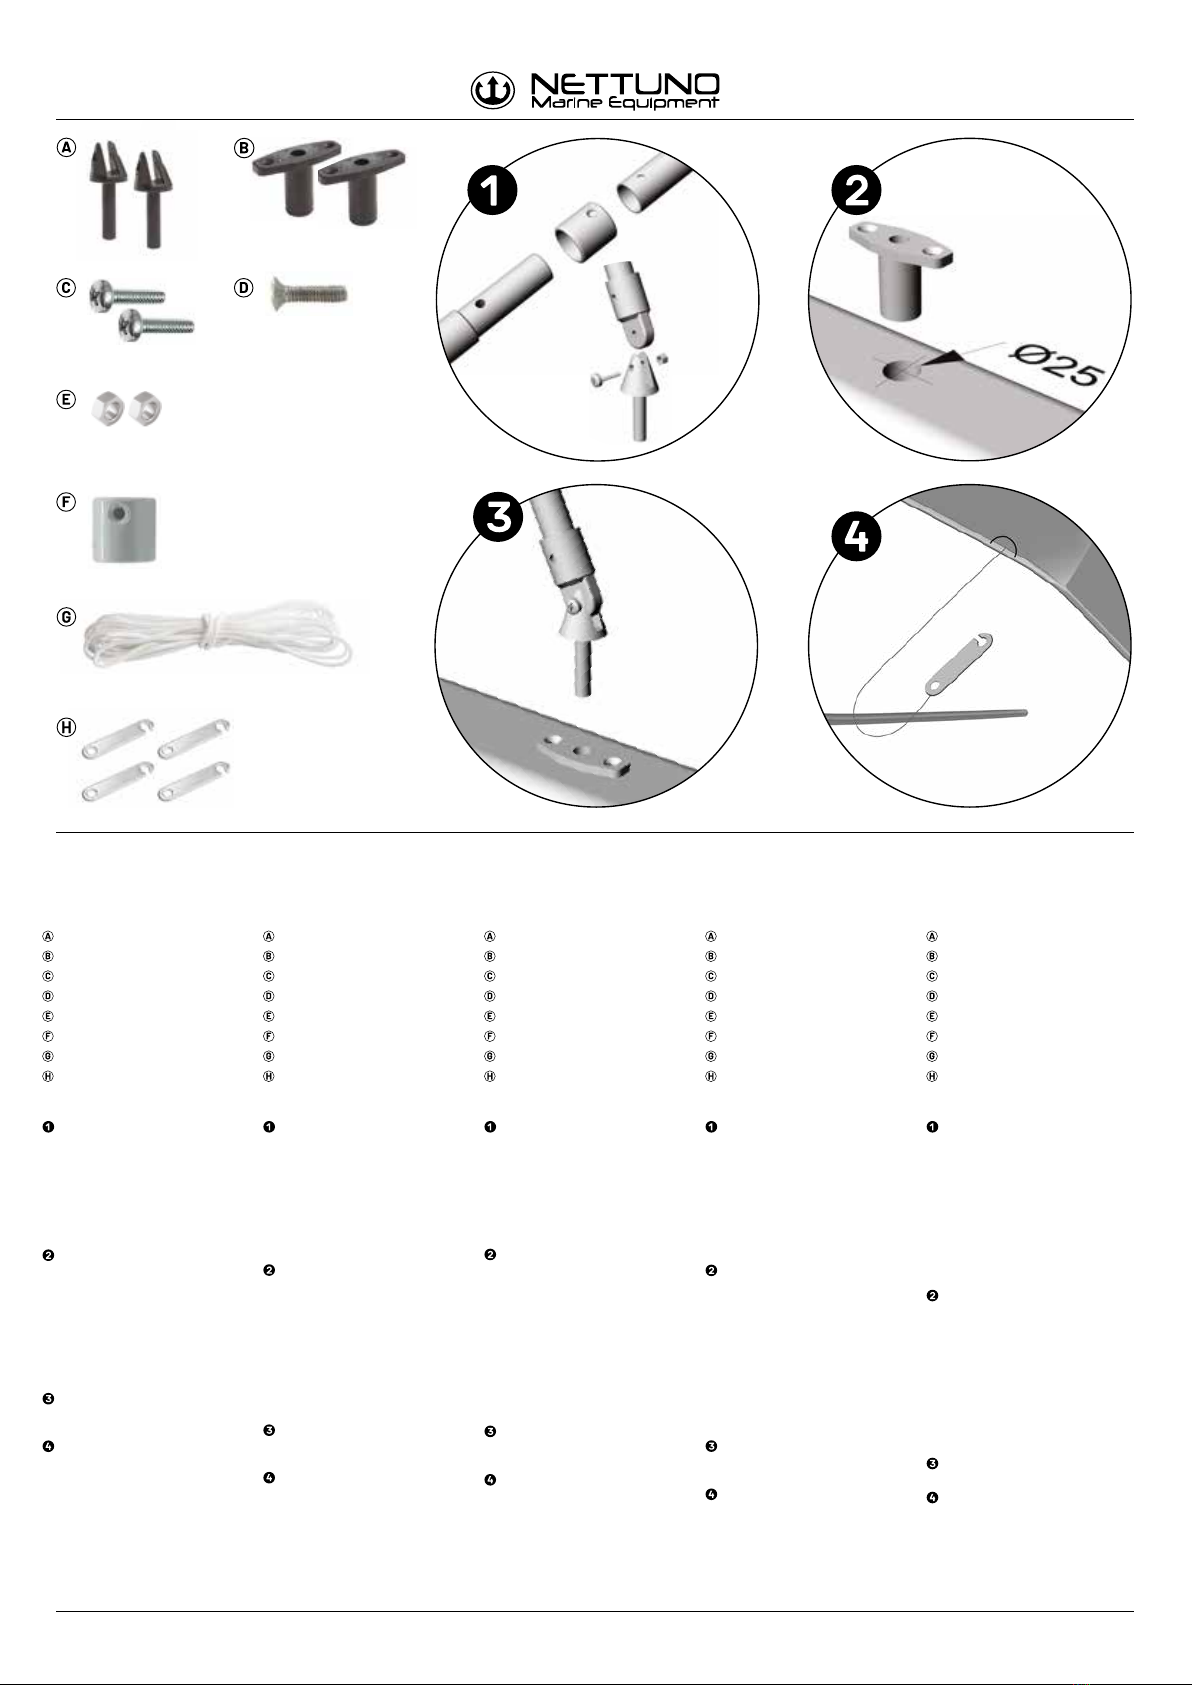
CONTENUTO
N°2 PIEDINI
N°2 BOCCOLE
N°2 VITI M5x2O
N°6/8 VITI M4x14
N°2 DADI M5
N°6/8 BOCCOLE DI FINITURA
N°1 MATASSINA CORDA
N°4 PIASTRINE TENDICORDA
MONTAGGIO
Assemblare i braccetti laterali
agli archi inserendo prima
la boccola di finitura F e poi
avvitando le viti M4x14 D.
Assemblare i due piedini A
al telaio con le due viti Ced i
due dadi E.
Fissare le boccole B
all’imbarcazione (posizione
boccola = metà della
lunghezza totale tendalino).
Forare l’imbarcazione ed
installare la boccola con due
viti autofilettanti. Si consiglia
di sigillare le forature.
Infilare i piedini del tendalino
nelle boccole.
Tagliare la corda Gin quattro
parti uguali per creare i tiranti.
Passare la corda dietro un
punto fisso (bitta, corrimano,
ponticello) ed agganciare la
piastrina Halla corda stessa.
Design by NETTUNO MARINE EQUIPMENT Technical Design Dept.
ITALIANO
CONTENTS
N°2 BASES
N°2 BUSHINGS
N°2 M5x2O SCREWS
N°6/8 M4x14 SCREWS
N°2 M5 NUTS
N°6/8 FINISH BUSHINGS
ROPE
N°4 TENSIONER PLATES
ASSEMBLY
Assemble the lateral
brackets to the arches by
inserting finish bushing
Fand then screwing the
screws M4x14 D.
Assemble the two bases A
to the frame with the two
screws Cand two nuts E.
Secure the bushings Bto
the boat (bushing position:
half of the total Bimini
length).
Drill the boat and install
the bushing with two
self-tapping screws.
It is recommended to seal
the drillings.
Insert the Bimini bases
in the bushings.
Cut rope Gin four equal
parts to create straps.
Pass the rope behind a
fixed point (bollard,
handrail, jumper) and hook
the plate Hto the rope
itself.
ENGLISH
CONTENU
N°2 PIEDS
N°2 DOUILLES
N°2 VIS M5X2O
N°6/8 VIS M4X14
N°2 ÉCROUS M5
N°6/8 DOUILLES DE FINITION
N°1 CORDE
N°4 TENDEURS
MONTAGE
Monter les bras latéraux
aux arceaux en insérant la
douille de finition Fet serrer
les vis M4x14 D.
Assemblez les deux pieds A
à la structure avec les deux
vis Cet les deux écrous E.
Fixez les douilles Bau
bateau (position douille =
moitié de la longueur totale
du taud).
Percer le bateau et installez
la douille avec deux vis
autotaraudeuses.
C’est recommandé de
sceller les trous.
Insérez les pieds du taud
dans les douilles.
Couper la corde Gen
quatre parties égales pour
créer les tendeurs. Passez la
corde derrière un point fixe
(bitte, main courante, pon-
tet) et accrochez la platine
Hà la corde elle-même.
FRANÇAIS
CONTENIDO
N°2 BASES
N°2 CASQUILLOS
N°2 TORNILLOS M5X2O
N°6/8 TORNILLOS M4X14
N°2 TUERCAS M5
N°6/8 CASQUILLOS DE RECORTE
N°1 CUERDA
N°4 TENSORES
MONTAJE
Ensamblar los brazos
laterales a los arcos
insertando primero el
casquillo de recorte Fy luego
atornillando los tornillos
M4x14 D. Ensamblar las dos
bases Aal marco con los dos
tornillos Cy las dos tuercas E.
Asegurar los casquillos B
al barco (posición casquillo:
mitad de longitud total del
toldo).
Perforar el barco y instalar
el casquillo con dos
tornillos autorroscantes.
Es recomendado de sellar
los agujeros.
Insertar las bases del toldo
en los casquillos.
Cortar la cuerda Gen
cuatro partes iguales para
crear los tensores. Pasar la
cuerda detrás de un punto
fijo (bita, pasamanos,
pasacincha) y enganchar
el tensor Ha la cuerda.
ESPAÑOL
PACKUNGSINHALT
N°2 FÜSSE
N°2 BUCHSEN
N°2 SCHRAUBEN M5X2O
N°6/8 SCHRAUBEN M4X14
N°2 MUTTERN M5
N°6/8 FERTIGSTELLUNGBUCHSEN
N°1 LEINE
N°4 SPANNER
EINBAU
Montieren die Seitenarme
zu den Bögen durch
erstmaliges Einsetzen der
Fertigstellungbuchse Fund
dann die M4x14-Schrauben
Deinschrauben. Montieren
die beiden Füße Azum
Rahmen mit den beiden
Schrauben Cund die zwei
Muttern E.
Sichern die Buchsen B
zum Boot (Position Buchse:
die Hälfte der Gesamtlänge
des Bimini Tops). Bohren
das Boot und Installieren
die Buchse mit zwei
selbstschneidende
Schrauben. Es wird
empfohlen die Einstiche
abzudichten.
Setzen die Füße des Bimini
Tops ein in den Buchsen.
Leine Gin vier gleiche Teile
schneiden, um die Spanner
zu erstellen. Führen die Leine
hinter einen Fixpunkt (Poller,
Handlauf, Fenderöse) und
haken die Spanner Han die
Leine selbst.
DEUTSCH


