Neuropulse MC-01 User manual

INSTRUCTIONS FOR USE
READ CAREFULLY BEFORE USE
Neuropulse Model MC-01
Rev.1.0

INSTRUCTIONS FOR USE
Model MC-01
Rev. 1.0
2
Dear Customer,
Thank you for choosing the Neuropulse MC-01 Device.
Neuropulse manufacturers high-quality, thoroughly
tested products for the application of gentle electro-
therapy for the purpose of pain relief, resulting in the
natural holistic healing of the body.
The Neuropulse application also provides excellent results
in the conditioning of the body pre- and post strenuous
exercise, which reduces recovery time.
Neuropulse also helps with the recovery from injuries,
open wounds, chronic pain conditions, chronic
inflammatory conditions and poor blood circulation.
Please read these instructions for use carefully and keep
them for later use.
Best regards,
Your Neuropulse Team
INSTRUCTIONS FOR USE
Model MC-01
Rev. 1.0
3
Table of Contents
1.
Contents
............................................................... 4
2.
Get To Know The Neuropulse Mc-01 Device
.......... 5
3.
Quickstart Guide
................................................... 6
4. Operating Instructions ........................................ 11
5. Electrode Pad Placement For Area Specific
Treatment .......................................................... 20
6.
Precautions
, Safety Measures And Warnings ...... 26
7.
Principles Of Design & Device Description
........... 29
8. Contraindications ............................................... 30
9. Electrode Pads .................................................... 31
10. Troubleshooting ................................................. 33
11.
Neuropulse
Warranty: ........................................ 37

INSTRUCTIONS FOR USE
Model MC-01
Rev. 1.0
4
1.
CONTENTS
a. 1 x Neuropulse MC-01 Device
b. 1 x 12V Power Supply
c. 2 x Electrode Leads
d. 4 x Electro pads (in one re-sealable plastic bag)
e. 1x High Quality Canvas Carry Bag

INSTRUCTIONS FOR USE
Model MC-01
Rev. 1.0
5
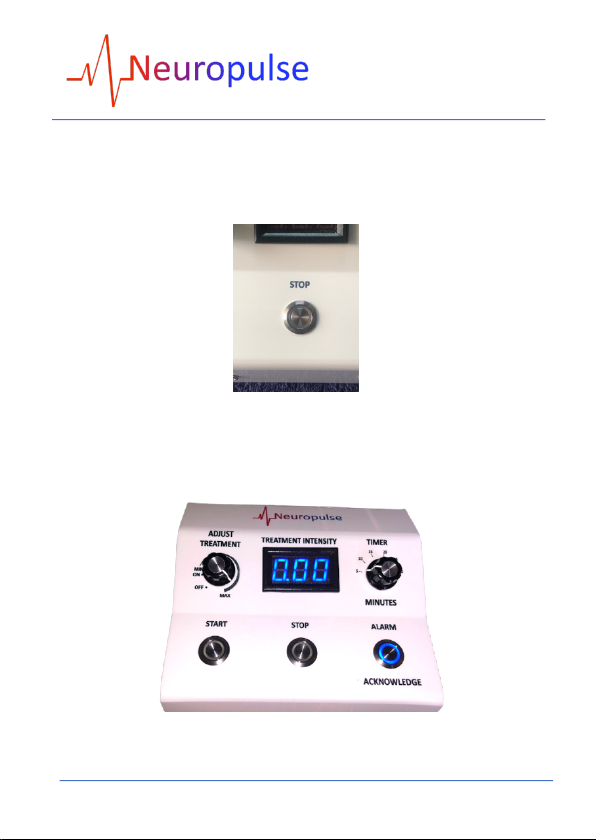
2.
GET TO KNOW THE NEUROPULSE MC-01 DEVICE
• ON/OFF and Treatment Intensity Knob: Switch the
device on and off and also adjust the treatment
Intensity
• Timer Knob: Set the required treatment time in
increments of 5 minutes from 5 to 30 minutes
• Treatment Intensity Display: Display the treatment
level or intensity in real time
• Start Button: Start the treatment and timer
• Stop Button: Interrupt treatment and timer
• Alarm Acknowledge Button: Silence the Alarm and
Light flashing when treatment is stopped

INSTRUCTIONS FOR USE
Model MC-01
Rev. 1.0
6
3.
QUICKSTART GUIDE
1. Remove Content from Neuropulse Bag
2. Connect the Neuropulse MC-01 device to the 12V
Power Supply and the Power Supply to an Electricity
Source.

INSTRUCTIONS FOR USE
Model MC-01
Rev. 1.0
7
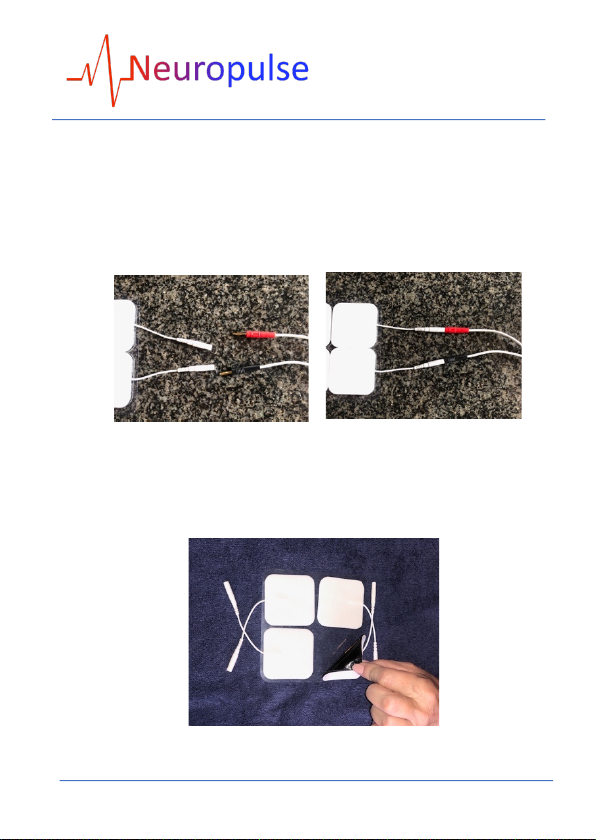
3. Connect the Electrode Leads to the Neuropulse
Device
4. Connect the Electrode Leads to the Electrode Pads
5. Peel the electrode pads from their protective plastic
shield by holding and lifting one corner of the pad
and pulling
INSTRUCTIONS FOR USE
Model MC-01
Rev. 1.0
8
6. Place the Electrode Pads on the area to be treated
7. Set the Timer to the required treatment time
8. Switch "ON" the Neuropulse Device

INSTRUCTIONS FOR USE
Model MC-01
Rev. 1.0
9
9. Pres the "START" Button to start the treatment and
the timer
10. Adjust Treatment Intensity to a comfortable level
11. To Stop the Treatment before the Timer runs out
press the "STOP" Button

INSTRUCTIONS FOR USE
Model MC-01
Rev. 1.0
10
12. When the Timer runs out or if the STOP Button is
pressed an Audible Alarm will Sound and the "ALARM
ACKNOWLEDGE" Light will flash. Press the "ALARM
ACKNOWLEDGE" Button to silence the Alarm.
13. The Treatment is now complete and the Neuropulse
Device can be switched OFF.

INSTRUCTIONS FOR USE
Model MC-01
Rev. 1.0
11
4. OPERATING INSTRUCTIONS
A. PREPARING FOR SESSION
• Before use make sure your skin is clean and free of
any moisturising agents where the pads will be
placed. You can use Alcohol wipes or soap and
water to clean the area.
B. AFTER YOUR TREATMENT SESSION
• When the Neuropulse device is switched off,
remove the electrode pads from your skin by
holding the pad itself and gently pulling. Be careful
not to pull the wires as this may damage them.
• Replace the electrode pads to their protective
plastic shield and return them to the re-sealable
plastic bag.
Note: When removing the electrode pads, DO NOT PULL
ON LEAD WIRES.
C. CLEANING & STORAGE
• Clean the case and lead wires at least once a week
by wiping with a damp cloth and a solution of mild
soap and water. Wipe dry.
• Do not immerse your Neuropulse device in water.
• Do not use any other cleaning solution than soap
and water.

INSTRUCTIONS FOR USE
Model MC-01
Rev. 1.0
12
D. OPERATION OF THE NEUROPULSE DEVICE
It is recommended to always start a treatment in the
below described manner and not to resume treatment at
previously set positions.
1. Open the high quality canvas bag and remove the
Neuropulse MC-01 Device , Power Supply, Electrode
Leads and Pads from the bag.
2. Connect the Neuropulse MC-01 device to the 12V
power supply and the power supply to an Electricity
Source.

INSTRUCTIONS FOR USE
Model MC-01
Rev. 1.0
13
3. Connect the electrode leads to the Neuropulse
device
4. Ensure that the electrode lead connector is securely
placed into the socket on the Neuropulse device as it
may cause a bad connection which can result in
improper treatment.
INSTRUCTIONS FOR USE
Model MC-01
Rev. 1.0
14
5. Connect the electrode leads to the electrode pads.
Ensure that the electrode lead connector is securely
placed into the electrode pad socket as it may cause
a bad connection which can result in improper
treatment.
6. Peel the electrode pads from their protective plastic
shield by holding and lifting one corner of the pad
and pulling

INSTRUCTIONS FOR USE
Model MC-01
Rev. 1.0
15
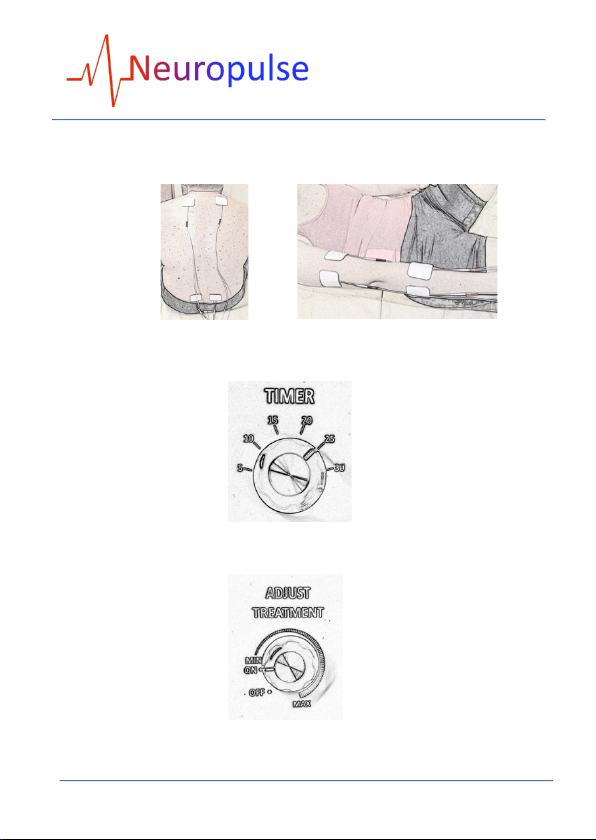
7. Place the electrode pads on the area to be treated.
Please refer to "Section 5" for more information on
where to place the pads for specific treatments.
8. Set the "TIMER" to the required treatment time.
Treatment time can be set from 5 minutes to 30
minutes in 5 minute increments.

INSTRUCTIONS FOR USE
Model MC-01
Rev. 1.0
16
9. Switch "ON" the Neuropulse device, but do not turn
the knob further than the "ON" position for now.
10. Pres the "START" Button to start the treatment and
the timer. The timer provides a little bit extra time
than selected to allow the treatment intensity to be
adjusted to the required level. This will ensure that
you will receive treatment time for the required
time.

INSTRUCTIONS FOR USE
Model MC-01
Rev. 1.0
17
11. Adjust Treatment Intensity to a comfortable level by
rotating the "ON/OFF" and Intensity Level knob
clockwise from minimum towards maximum. Adjust
the knob until you feel a slight tingling sensation on
the skin. Then slowly turn the knob further upwards
to a comfortable level. Do not exceed the level of
comfort as the Neuropulse device is very effective
even on low level of treatment. This is the correct
treatment level. Sit back and enjoy the Neuropulse
treatment for the duration of the set time.
INSTRUCTIONS FOR USE
Model MC-01
Rev. 1.0
18
12. If you want to stop the treatment before the timer
runs out it can be done by simply pressing the "STOP"
button.
13. When the timer runs out or if the "STOP" button is
pressed an audible alarm will sound and the "ALARM
ACKNOWLEDGE" Light will flash.

INSTRUCTIONS FOR USE
Model MC-01
Rev. 1.0
19
14. Press the "ALARM ACKNOWLEDGE" button to silence
the alarm.
15. The Treatment is now complete and the Neuropulse
device can be switched OFF.
INSTRUCTIONS FOR USE
Model MC-01
Rev. 1.0
20
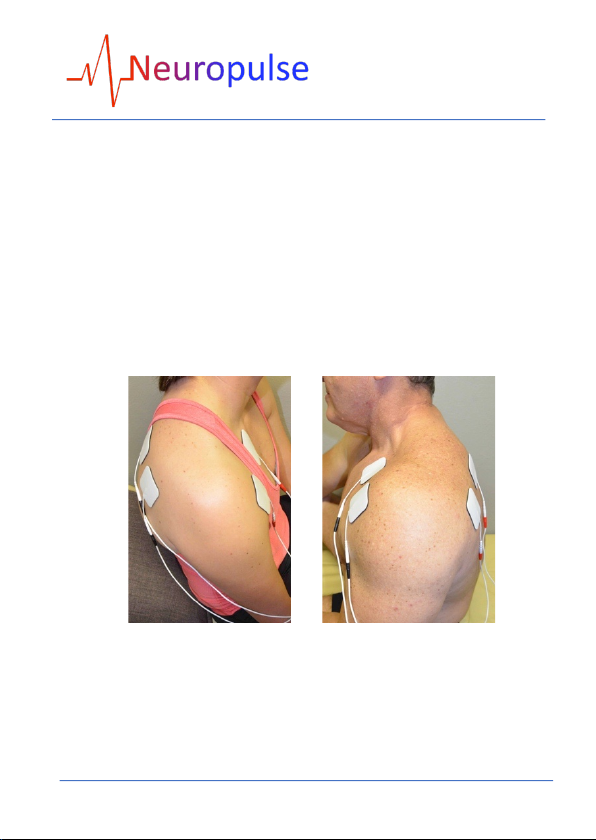
5. ELECTRODE PAD PLACEMENT FOR AREA
SPECIFIC TREATMENT
• Imagine a straight line going through the worst
pain area. The Electrode Pads can be placed above
and below pain leaving a couple of inches on each
side or through in case of placing the pads in front
and behind the pain area. Example, through
shoulder;
• The ends of the Electrode lead wires are coloured
Black and Red. This coding is provided to identify
the direction of current flow. The red wires will be
placed furthest away from the body core and the
black wires closest to the body core. This will allow
Table of contents
Popular Medical Equipment manuals by other brands

Direct Supply
Direct Supply Attendant owner's manual

Erbe
Erbe APC 3 Service manual

Welch Allyn
Welch Allyn Connex Vital Signs Monitor 6000 Series Service manual

O-Two
O-Two 01MN1000 Operator's manual

Carex
Carex B660-00 parts list

Getinge
Getinge Arjohuntleigh Skin IQ Microclimate Manager Instructions for use


