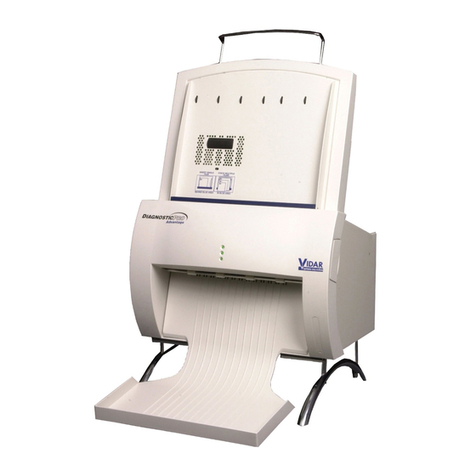
VIDAR DiagnosticPRO Advantage Operating instructions

Installation and
operation guide for
DIAGNOSTICPRO™Advantage
DOSIMETRYPRO™Advantage
CADPRO™Advantage
with 50 sheet SmartFeeder™
and 100 sheet SmartFeeder™
Serial Numbers 300000 to 339999

Warranty information
for VIDAR film digitizers
Instructions: 365 Herndon Parkway
1. Cut along dotted line at left. Herndon, VA20170 USA
2. Fill in. Phone: 1-703-471-7070 Fax: 1-703-471-7665
3. Make a copy for your records. E-mail: medtech@vidar.com
4. E-mail or fax to VIDAR.
Date___________________________
System integrator information
System integrator administrative contact
Name Title
Company name Telephone no.
E-mail address Fax no.
System integrator technical contact
Name Title
Company name Telephone no.
E-mail address Fax no.
Shipping information
Company name
Street address
City State Postal code
Country Telephone no. Fax no.

Product information
What product are you registering? (Select only one)
VXR-12 Plus TeleradPRO SIERRA: SIERRA plus:
DiagnosticPRO Single film feeder Single film feeder
DiagnosticPRO plus Multi-film feeder Multi-film feeder
What is the product’s serial number? __________________________________________
What is the SCSI ID? ___________________ How is the SCSI termination set? On Off
Where is this film digitizer installed? (Orwhere will it be installed?)
Hospital Office
Clinic Other _________________________________
Why did you purchase this product? (Select all that apply and rate importance)
Feature Not important Important
Price 1 2 3 4 5
Performance 1 2 3 4 5
Style 1 2 3 4 5
Reliability 1 2 3 4 5
Size 1 2 3 4 5
Maintenance record 1 2 3 4 5
Image quality 1 2 3 4 5
Packaging 1 2 3 4 5
Documentation 1 2 3 4 5
Software (TWAIN) 1 2 3 4 5
Multi-sheet capability 1 2 3 4 5
Service and support 1 2 3 4 5
Other ___________________ 1 2 3 4 5

End user information
End user administrative contact
Name Title
Company name Telephone no.
E-mail address Fax no.
End user technical contact
Name Title
Company name Telephone no.
E-mail address Fax no.


1
Part Number: 16667-004 REVA
April, 2005 Printed in the USA.
© Copyright 2005 by VIDAR Systems Corporation. All rights reserved.
No part of this publication may be reproduced, stored in a retrieval system, or
transmitted, in any form or by any means, electronic, mechanical, photocopying,
recording or otherwise, without the prior written permission of VIDAR Systems
Corporation.
Terms denoted by the trademark symbol (™ or ®) used in this publication are trademarks
or service marks registered in the United States or other countries.
NOTE
The VIDAR digitizers are used to digitize radiographs (X-ray film) or other transparent targets. When the
digitizer is used to digitize radiographic films, the digital image is intended for use in primary, secondary
and over reading applications.
The digitizers do not include application specific software (Picture Archiving and Communications [PAC]
system, Teleradiology, Oncology Systems, or Computer Aided Detection [CAD] software). The
manufacturer of the application software will determine specific indications for use. These third-party
software packages or complete systems are approved separately from a regulatory perspective.
The digitizers are marketed as a component to application software development companies, who will
incorporate the digitizer into their respective PACS or Teleradiology, CAD system(s). The software
developer is ultimately responsible for detailing the Contradictions for the PACS System (or Teleradiology
software package) or Oncology Systems as a whole, including the digitizer.
Caution: No operator-serviceable parts inside. Refer servicing to qualified personnel.
Achtung: Gehäuse nicht öffnen. Wartung uno reparatur nur durch eletrofachkräfte.
Attention: Aucune piece ne peut etre remplacee par l’utilisateur. Toute operation de
maintenance doit etre effectuee par une personne qualiee.
Atencion: Acceso interno solo autorizado a personal tecnico cualificado.
Attenzione: Non appire. Rivolgersi a personale qualificado.
Sales: +1.800.471.SCAN or +1.800.471.7226365 Herndon Parkway
Herndon, VA 20170 U.S.A. Email: sales@vidar.com
Phone: +1.703.471.7070 Technical Support:
Fax: +1.703.471.7665 +1.703.471.7070 or +1.800.471.7226
Internet: www.filmdigitizer.com E-mail: medtech@vidar.com
Emergo Europe Phone: (31) 1114 11515Authorized representative
The Netherlands
VIDAR Advantage Series Installation and Operation Guide

2
Radio Frequency Emissions
This equipment has been tested and found to comply with the limits for a Class A digital
device, pursuant to Part 15 of the FCC Rules. These limits are designed to provide
reasonable protection against harmful interference when the equipment is operated in a
commercial environment. This equipment generates, uses, and can radiate radio
frequency energy and, if not installed and used in accordance with the instruction manual,
may cause harmful interference to radio communications. Operation of this equipment in
a residential area can cause harmful interference, in which case the user will be required
to correct the interference at his or her own expense.
Product compliance testing was conducted using VIDAR shielded cables. Modifications
to the digitizer or the VIDAR shielded cables or the use of cables other than those
available from VIDAR could void the user’s authority to operate the equipment.
CE Declarations
VIDAR Systems Corporation declares the product is classified as a Class I medical
device per Annex IX, Rule 10 and are in conformity with the essential requirements and
provisions of Council Directive 93/42/EEC and conforms to standards; EN60601-1: 1998
with Amendments 1 and 2, UL60601-1(2003), CAN/CSA C22.2 NO.601.1-M90 with
Amendments 1 and 2.
This device is classified as a Group 1 Class A device for Electro Magnetic Compatibility
per EN55011:1998. This device complies with standards: EN55011, EN60601-1-2: 2001
(EN61000-3-2: 1995 with Amendments A1, 2 and 14, EN61000-3-3:1995, EN61000-4-
2:1995 with Amendments 1 and 2, EN61000-4-3:1997 with Amendment 1, EN61000-4-
4:1995 with Amendments 1 and 2, EN61000-4-5:1995 with Amendment 1, EN61000-4-
6:1996 with Amendment 1, EN61000-4-8:1993, EN61000-4-11 with Amendment 1).
FDA (501)k Certification
CADPRO™ Advantage: 993598
DIAGNOSTICPRO™ Advantage and DOSIMETRYPRO™ Advantage: 993599
Acceptable shipping conditions
Temperature: –25° to +65°C (–13° to +150°F)
Relative humidity: 10% to 95%, non-condensing
Atmos. pressure: 500 to 1060hPa (+18,000 to –1,200ft)
Operating conditions
Temperature: 10°C to 35°C (50°F to 100°F)
Relative humidity: 20% to 80%, non-condensing
Atmos. pressure: 697 to 1060hPa (10,000 to –1,200ft)
Electrical supply Voltage: 100 to 240 VAC Current: 1.5 to 0.75 A Frequency: 47 to 63 Hz

3
Safety and compliance information
MEDICAL EQUIPMENT WITH RESPECT TO ELECTRIC SHOCK,
FIRE AND MECHANICAL HAZARDS ONLY IN ACCORDANCE
WITH UL60601-1, IEC60601-1 AND CAN/CSA C22.2 No. 601.1
5RA9 DIAGNOSTICPRO™ Advantage, DOSIMETRYPRO™ Advantage and CADPRO™ Advantage
carry the CE mark, issued by BSI
This product’s function and intended use is as an X-ray Film Digitizer.
To maintain Medical Equipment Certification, the digitizer must be connected to a host
computer that has been configured in accordance with IEC 60601-1-1.
This product is in the Ordinary Equipment Class. It provides no protection against the
ingress of water.
This product is not suitable for use in the presence of flammable anesthetic mixtures with
air or with oxygen or with nitrous oxide.
Class I Medical Device; No Applied Parts. This product provides Class I medical device
protection against electrical shock.
Power cords used with this device in North America must be rated by Underwriters
Laboratories for hospital use. Power cords used with this device in Europe must meet the
requirements of IEC 227 Designation 53 or IEC 245 Designation 53.
The use of portable or mobile communications equipment and/or the presence of strong
electromagnetic and/or x-ray fields may interfere with proper operation of this product.
This product should not be used adjacent to or stacked with other equipment. If adjacent
or stacked use is necessary, verify normal operation in the configuration in which it will
be used. Should such interference occur, the user is required to provide adequate
isolation between the digitizer and the source of the interference. Isolation is typically
achieved by moving the digitizer away from the source of the interference.
This product is intended to be turned on and left on. Operation is continuous.
Correct and safe operation of the digitizer requires familiarity
with information that is not marked on the product. The
following symbol indicates the operator should consult the
manual for additional information.
Turn off the scanner before mounting or removing the feeder. Mount the feeder to the
scanner by mating the connector found on the bottom of the feeder to the connector found
on the top of the scanner. Secure the feeder to the scanner with the three thumbscrews.
To remove the feeder, reverse the mounting process.

4
Contents
DIAGNOSTICPRO™Advantage and DOSIMETRYPRO™ Advantage Installation
Guide....................................................................................................................7
Unpacking..........................................................................................................................8
1. Look for damage................................................................................................8
2. Unpack the shipping carton................................................................................9
3. Unpack the accessory box...............................................................................10
4. Unwrap.............................................................................................................12
5. Identify the components...................................................................................13
6. If anything is missing........................................................................................14
7. Activate your product warranty.........................................................................14
Setting up.........................................................................................................................15
Identify important features....................................................................................16
Assemble the digitizer..........................................................................................17
Connect the power cord.......................................................................................23
Where to go from here.........................................................................................24
CADPRO™Advantage Installation Guide ........................................................25
Unpacking........................................................................................................................26
1. Look for damage..............................................................................................26
2. Unpack the shipping carton..............................................................................27
3. Unpack the accessory box...............................................................................28
4. Unwrap.............................................................................................................30
5. Identify the components...................................................................................32
6. If anything is missing........................................................................................33
7. Activate your product warranty.........................................................................33
Setting up.........................................................................................................................34
Identify important features....................................................................................35
Assemble the digitizer..........................................................................................36
Connect the power cord.......................................................................................40
Where to go from here.........................................................................................41
Interfacing Guide ..............................................................................................43

5
VIDAR Drivers and Toolkit Installation
CD and Driver Information……………………..…Tab 4
VIDAR device driver summary.............................................................................45
About the STI drivers ...........................................................................................45
SCSI settings...................................................................................................................47
If necessary, set the digitizer’s SCSI ID...............................................................48
If necessary, terminate the SCSI bus...................................................................49
Connect the SCSI cable to the digitizer...............................................................50
Installing SCSI hardware................................................................................................51
1. Install the SCSI card. .......................................................................................53
2. Configure the SCSI BIOS ................................................................................55
Installing SCSI drivers....................................................................................................59
Installing USB drivers.....................................................................................................67
USB interface requirements.................................................................................67
Updating a previous VIDAR STI driver installation ..............................................68
Installing the USB drivers.....................................................................................69
Updating the VIDAR Toolkit............................................................................................79
Advantage Series Operating Guide.................................................................83
Operating
D
IAGNOSTIC
P
RO
™ Advantage and D
OSIMETRY
P
RO
™
Advantage
................................................................................................................84
About digitizers and film sizes..............................................................................84
About films ...........................................................................................................86
Basic operating instructions.................................................................................87
Digitizing a single film...........................................................................................88
Digitizing multiple films.........................................................................................90
Operating
C
AD
P
RO
™ Advantage
........................................................................
93
Film sizes and scanning specifications................................................................93
About films ...........................................................................................................94
Operating instructions..........................................................................................95
Advantage Series Other Information...............................................................97
Preventive maintenance.................................................................................................98
Cleaning theAuto-Feed Roller [DIAGNOSTICPRO™ Advantage and
DOSIMETRYPRO™ Advantage only]............................................................98

6
Cleaning theAuto-Feed Roller and Suction Cups [CADPRO™ Advantage
only]....................................................................................................................99
Cleaning the diffuser [all Advantage models].....................................................102
Replacing the lamp cartridge [all Advantage models]........................................106
Troubleshooting............................................................................................................107
Reading the LEDs..............................................................................................107
In case of difficulty.............................................................................................. 111
Weights and dimensions..............................................................................................114
SCSI information and troubleshooting guide ............................................................115
Introduction ........................................................................................................115
Digitizer and SCSI controller compatibility.........................................................115
SCSI cable.........................................................................................................116
Troubleshooting..................................................................................................117
Packing the film digitizer for shipment......................................................................120
1. Turn off the digitizer........................................................................................120
2. Disconnect the power cord and SCSI or USB cable......................................121
3. Remove the exit tray from the digitizer base .................................................122
4. Remove the feeder from the digitizer base....................................................123
5. Remove the digitizer base from the stand [DIAGNOSTICPRO™ Advantage
and DOSIMETRYPRO™ Advantage only].................................................124
6. Prepare the feeder [CADPRO™ Advantage only] ...........................................125
7. Wrap certain items .........................................................................................126
8. Pack the accessory box.................................................................................127
9. Pack the shipping carton................................................................................131
Electromagnetic guidance ...........................................................................................137

7
DIAGNOSTICPRO™Advantage
and
DOSIMETRYPRO™ Advantage
Installation Guide

8
Unpacking
1. Look for damage
Before unpacking the film digitizer, examine the shipping carton for
damage.
If the carton is damaged, notify the shipper immediately.
IMPORTANT: Save the carton and all packing materials. If you
need to ship the digitizer later, you must repack it using the
original wire ties, plastic bags, foam supports and cartons.
Instructions for repacking are provided in “Appendix: Packing
the film digitizer for shipment.”

9
2. Unpack the shipping carton
Remove items from the shipping carton in the order shown below.
1
Upper foam support
Feeder
Digitizer base
Accessory box
Shipping carton
Leave in box:
lower foam support
2
3
4
Note: For clarity, this
illustration does not show
the plastic bags surrounding
the digitizer and feeder.

10
3. Unpack the accessory box
a. Remove these items from the accessory box:
5
Documentation in
padded bag (bag
not shown)
SCSI kit*
Accessory box
1
SCSI cable
or USB cable*
2
4
Power cord
*as specified at
time of order
Film support bar
in padded bag
(bag not shown)
3

11
b. Then remove these items from the accessory box:
5
Cardboard retainer
Accessory box
7
Stand
6
Exit tray
Note: For clarity, this
illustration does not show
the plastic bag surrounding
the exit tray.

12
4. Unwrap
a. Unwrap all items.
b. Remove the foam block from the rear of the digitizer base:
IMPORTANT: Save the carton and all packing materials. If you
need to ship the digitizer later, you must repack it using the
original wire ties, plastic bags, foam supports and cartons.
Instructions for repacking are provided in “Appendix: Packing
the film digitizer for shipment.”

13
5. Identify the components
Item
Digitizer base
Exit tray
Film feeder
Film support bar
Stand
Power cord: 115V (p/n 4043-001) or 230V (p/n 2104-006)
Important Safety Information card (on film feeder)
Quick setup card
Digitizer base Film feeder
Film support bar
Stand Exit tray
Other items* (see footnote)
Adaptec 2930 SCSI kit (p/n 3053) and
SCSI cable: 6 foot MMD-50 to SCSI III 68-pin male (p/n 4270)
USB cable: 6 foot (p/n 4618)
*You will receive either a SCSI kit and SCSI cable or a USB cable, as specified at
time of order.

14
6. If anything is missing...
Immediately contact your VIDAR supplier.
7. Activate your product warranty
Complete the warranty information/customer survey form at the back of
this manual and mail it to VIDAR Systems Corp.
If your digitizer needs service, this information should be on file at
VIDAR.
Contact VIDAR Technical Support if you have any questions
about installing or using your VIDAR film digitizer:
Phone: +1.800.471.SCAN (+1.800.471.7226)
+1.703.471.7070 outside the U.S.
E-mail: medtech@vidar.com
NEXT: Go to “Setting up”

15
Setting up
The digitizer must be placed on a counter or tabletop.
SAFETY WARNING
Never place the digitizer on the floor.
VIDAR Advantage Series Installation and Operation Guide
This manual suits for next models
2
Table of contents
Other VIDAR Medical Equipment manuals