Neurotech kneehab User manual

Advan ed Therapy for Knee Injuries
Instruction manual
Caution: In the United States of Ameri a
federal law restri ts the devi e to sale or
use by, or on the order of a physi ian or
other pra titioner li ensed by the laws of
the state in whi h he/ she pra ti es.

2
INTRODUCTION & CONTACT DETAILS
Introduction
Dear Customer
Thank you for choosing neehab XPTM neurotech®has developed neehab XPTM to provide a unique, convenient, user-friendly
treatment for quadriceps atrophy (thigh muscle weakness). Utilising MULTIPATHTM stimulation technology, which is a highly ad-
vanced form of muscle stimulation for injury rehabilitation, neehab XPTM is designed to deliver strong, comfortable quadriceps
contractions thereby ensuring a faster rehabilitation period.
To see the benefits of neehab XPTM and MULTIPATHTM technology in more detail, please see the Frequently Asked Questions on
page 7 for a full explanation.
Your neehab XPTM pack contains everything you need to begin treatment, including your neehab XPTM Control Unit, neehab XPTM
garment, a set of adhesive electrodes, battery charger and a user manual.
The adhesive electrodes need to be replaced periodically and are readily available by contacting your local neurotech®supplier.
If you have further questions regarding neehab XPTM, please contact your prescribing clinician or contact your neurotech®
team at the address/ phone numbers below.
Yours sincerely,
The neurotech®Team.
If you have questions or require further information please contact:
neurotech®
Bio-Medical Research Ltd.,
Parkmore Business Park West,
Galway,
Ireland.
Tel: +353 (0)91 774 377
Fax: +353 (0)91 774 303
Email: info@neurotech.ie
Web: www.neurotech.ie
Customer Carelines:
Republic Of Ireland:
Freephone: 1800 511 511
N. Ireland/ UK:
Lo-Call: 0845 600 1332

3
TABLE OF CONTENTS
1.0 Safety Information ___________________________________________________
2.0 Contra-Indications ___________________________________________________
2.1 Warnings ____________________________________________________________
2.2 Precautions __________________________________________________________
3.0 Frequently Asked Questions __________________________________________
4.0 Getting to Know Kneehab XPT ________________________________________
4.1 neehab XPTM Pack Contents ___________________________________________
4.2 Description of Controls _________________________________________________
4.3 Description of Unit Display ______________________________________________
4.4 Description of Garment ________________________________________________
5.0 Setting-Up a Kneehab XPT Treatment ________________________________
5.1 Step-By-Step Treatment Guide _________________________________________
6.0 Problem Solving Guide _______________________________________________
7.0 System aintenance _________________________________________________
7.1 Accessories __________________________________________________________
8.0 Technical Specifications _____________________________________________
9.0 Warranty ___________________________________________________________
4
5
5
5
7
9
9
10
11
11
12
14
17
18
19
20
21

4
SAFETY INFOR ATION
1.0 Safety Information
Validity
The information and technical data contained in this document relates to the neehab XPTM Electrical Muscular Stimulator pro-
vided with this User Manual. Each neehab XPTM unit is attributed a serial number which is located on the back of the Control
Unit. The information and technical data disclosed in this document are proprietary to Bio-Medical Research Ltd. (BMR?Ltd.) and
may only be used and disseminated for the purposes and to the extent specifically authorised in writing by the company.
Disclaimers
All items of equipment manufactured and sold by BMR Ltd. are rigorously checked and tested prior to shipment. However, the
use of this equipment is outside of the control of the company. BMR Ltd. only accept responsibility for the safety, reliability and
performance of the equipment when it is operated in accordance with the instructions herein and within the given specifications.
Therefore, the user must bear full responsibility for any actions arising out of the use or misuse of this equipment. Any modifications,
repairs or servicing must be undertaken by authorised BMR Ltd. personnel.
neehab XPTM is designed by and manufactured for BMR Ltd., Parkmore Business Park West, Galway, Ireland. Copyright © 2007
by BMR Ltd., all rights reserved. neurotech®is a registered trademark of BMR Ltd. neehab is a registered trademark of BMR Ltd.
in the EU. Registration is pending in the U.S.
The sale and/or operation of this equipment is subject to legislation in a number of localities. Compliance with this legislation
rests with the importer, dealer, or user of the equipment as appropriate.
Intended Use: Neuromuscular Electrical Stimulation
neehab XPTM applies muscle and nerve stimulation using the principles of Neuromuscular Electrical Nerve Stimulation (NMES),
which is defined below. It applies brief electrical pulses through skin surface adhesive electrodes.
Neuromuscular Electrical Stimulation (N ES)
NMES may be defined as the application of electrical stimulation of the peripheral nervous system to contract a muscle either
through the direct activation of the motor neurons in the mixed peripheral nerve, or indirectly through reflex recruitment.
N ES Indications
• Muscle re-education
• Prevention or retardation of disuse atrophy
• Maintaining or increasing range of motion

5
2.0 Contra-Indications
•Powered muscle stimulators should not be used on patients with cardiac demand pacemakers / defibrillators.
2.1 Warnings
•The long-term effects of chronic electrical stimulation are unknown.
•Stimulation should not be applied over the carotid sinus nerves, particularly in patients with a known sensitivity to the carotid
sinus reflex.
•Stimulation should not be applied over the neck or mouth. Severe spasm of the laryngeal and pharyngeal muscles may occur
and the contractions may be strong enough to close the airway or cause difficulty in breathing.
•Stimulation should not be applied transthoracically, in that the introduction of electrical current into the heart may cause
cardiac arrhythmias.
•Stimulation should not be applied transcerebrally.
•Stimulation should not be applied over swollen, infected, or inflamed areas or skin eruptions, e.g. phlebitis, thrombophlebitis,
varicose veins, etc.
•Stimulation should not be applied over, or in proximity to, cancerous lesions.
2.2 Precautions
• The safety of powered muscle stimulators for use during pregnancy has not been established.
• Caution should be used for patients with suspected or diagnosed heart problems.
• Caution should be used for patients with suspected or diagnosed epilepsy.
• Caution should be used in the presence of the following:
- When there is a tendency to haemorrhage following acute trauma or fracture;
- Following recent surgical procedures when muscle contraction may disrupt the healing process;
- Over the menstruating or pregnant uterus;
- Over areas of the skin which lack normal sensation.
• Some patients may experience skin irritation or hypersensitivity due to the electrical stimulation or electrical conductive medium.
• Electrode placement and stimulation settings should be based on the guidance of the prescribing practitioner.
• Powered muscle stimulators should be kept out of the reach of children.
• Powered muscle stimulators should be used only with the leads and electrodes recommended for use by the manufacturer.
• (FOR PORTABLE DEVICES ONLY): Portable powered muscle stimulators should not be used while driving, operating machinery,
or during any activity in which involuntary muscle contractions may put the user at undue risk or injury.
• Operation in close proximity to shortwave or microwave therapy equipment may produce instability in the stimulator output.
• Electronic monitoring equipment (such as ECG monitors and ECG alarms) may not operate properly when the stimulator is in use.
SAFETY INFOR ATION

6
SAFETY INFOR ATION
Please do not use Kneehab XPT if:
•Positioning the electrodes necessitates placement over areas at which drugs/ medicines are administered by injection (short
term or long term) e.g. Hormone treatment.
Adverse Reactions
•Skin irritation and burns beneath the electrodes have been reported with the use of powered muscle stimulators. Contact Bio-
Medical Research Ltd. or neurotech®if any irritation, skin reaction, hypersensitivity or other adverse reaction is experienced -
discontinue use in the meantime. Note, however, that a slight reddening of the skin is quite normal under the electrodes during
and for a short time after treatment.
Note:
•You should always leave at least 6 hours between treatment sessions to reduce the potential for muscle fatigue.
•For hygiene reasons, the garment and electrodes are for single-person use only.
Important
• There is a separate neehab XPTM garment for use with the right or left leg. Under no circumstances should the left garment
be used on the right leg or vice versa. A letter printed on every garment (L or R) indicates which leg that garment is designed
for i.e. L: left, R: right.
• Position your neehab XPTM only as outlined in this User Manual. Ensure the light-blue binding at the narrow end of the gar-
ment is placed just above the kneecap.
• Do not adjust the neehab XPTM garment when the unit is switched on; pause the device, make the adjustment then recom-
mence treatment.
• The safety information provided in this User Manual must be followed.
European Union Only
Note: In accordance with the laws within the member state, safety testing on the device should be carried out every two years.
Note: In compliance with German law, product safety testing must be conducted every two years by an authorised test service.

7
FREQUENTLY ASKED QUESTIONS
3.0 Frequently Asked Questions
Q: What is Kneehab XPT ?
A: neehab XPTM is a unique, innovative, garment-based Electrical Muscle Stimulation (EMS) product designed specifically to
treat quadriceps atrophy (thigh muscle weakness). Clinical research has shown EMS technology to be an efficacious treatment
for quadriceps atrophy, which is a symptom of almost all knee injuries. neehab XPTM can be used both pre- and post-opera-
tively to accelerate knee rehabilitation. neehab XPTM is also effective in the treatment of quadriceps atrophy resulting from
certain hip or lower limb conditions e.g. hip osteoarthritis or after hip replacement surgery.
Q: What is ULTIPATH™?
A: neehab XPTM utilises MULTIPATH™ stimulation technology, which is a highly advanced form of electrical muscle stimulation
for injury rehabilitation. MULTIPATH™ optimises rehabilitation through strong, comfortable quadriceps contractions.
EMS has been used for over 50 years to re-activate and strengthen weak muscles. MULTIPATH™ is a major breakthrough in this
area, utilising sophisticated modern engineering and software technology to focus stimulation precisely in those parts of the
muscle that optimise muscle contraction.
MULTIPATH™ stimulation enables neehab XPTM to deliver highly-focused, accurate and comfortable quadriceps contractions.
Q: What should Kneehab XPT feel like when operating?
A: When you switch neehab XPTM on and gradually increase the intensity, you will feel a mild, comfortable “tingling” or
“buzzing” sensation in your quadriceps muscles. As you increase the intensity, the muscles will begin to contract.
The channel on the inside of your thigh will increase the intensity in the inner part of the quadriceps (called the Vastus Medialis).
For some conditions, your clinician may recommend you only use this channel. The channel on the outside of your thigh will
increase the intensity in the rest of the quadriceps. Both channels are used together in general use.
neehab XPTM assists in the stabilisation of the knee by contracting the inner quadriceps before the outer quadriceps.
Q: How can Kneehab XPT help rehabilitate the knee?
A: The quadriceps muscle is the most important stabiliser of the knee. After knee injuries or knee surgery, pain and swelling
often cause disuse, which leads to muscle atrophy. An essential component of rehabilitation after knee injury is strengthening of
the quadriceps muscle. neehab XPTM works by re-educating and strengthening the quadriceps muscle through cycles of contrac-
tion and relaxation. neehab XPTM is a highly effective, yet simple and convenient way to rehabilitate quadriceps atrophy after in-
jury or surgery.
Q: How often should I use Kneehab XPT ?
A: Your prescribing clinician will advise you on the duration of your treatment program.

QUESTIONS & ANSWERS
8
Q: What should I do if treatment becomes uncomfortable?
A: Effective treatment should not cause undue discomfort. If treatment becomes painful, try lowering the intensity level slightly,
then gradually build back up to previous level. If discomfort persists, neurotech®recommends that you contact your prescribing
clinician who will advise you on usage of neehab XPTM to minimise discomfort.
Q: Can Kneehab XPT be used in conjunction with other forms of therapy?
A: neehab XPTM can be used as an adjunct to most forms of therapy for knee injuries. See page 4 of the User Manual for Contra-
Indications (situations when neehab XPTM should not be used).
Q: How often should I replace the adhesive electrodes?
A: This depends on a number of factors including skin type, storage conditions and regularity of use. As a general rule, however,
with daily application the electrodes should last at least 4 weeks. If usage is less than this, replacement should be less frequent.
Please store the adhesive electrodes in accordance with the instructions on page 16 of the User Manual.
Q: How do I position Kneehab XPT on the leg?
A: See pages 12-16 of this User Manual for full instructions on positioning
neehab XPTM
on the leg.
Q: Can Kneehab XPT be used on other body parts?
A: neurotech®strongly recommends that neehab XPTM only be used as directed in this User Manual and not applied to any other
body parts.
Q: How should I care for my Kneehab XPT ?
A: See page 18 of the User Manual for full instructions on caring for your neehab unit
Q: Can I move around while using Kneehab XPT ?
A: If you need to move around during a treatment session, press the On/Off (Pause) button briefly, to pause the treatment. To
complete the treatment session, just press the On/Off (Pause) button a second time.
Q: Who should I contact if I have additional queries?
A: Contact your prescribing clinician or your neurotech®team if you have any questions regarding usage of neehab XPTM.
Q: What should I do if I experience an adverse reaction?
A: If any irritation, skin reaction, hypersensitivity or other adverse reaction is experienced, discontinue use and contact your
prescribing clinician. A slight reddening of the skin is normal under the electrodes during and for a short time after treatment.
This should disappear within approximately 30 minutes.
9
GETTING TO KNOW KNEEHAB XPT
4.0 Getting to know Kneehab XPT
neehab XPTM is a portable, two-channel transcutaneous electrical muscle stimulator which operates using constant current
pulses to stimulate the nerves in the quadriceps area of the body using neurotech®’s MULTIPATH™ technology. These pulses are
designed to cause muscular contractions through the application of electrical stimulation to the peripheral nervous system.
neehab XPTM is an easy to use, garment-based solution, specifically designed for home use.
Battery Information
The unit is powered by a 3.6V NiMH rechargeable battery. A battery charger is included with the product.
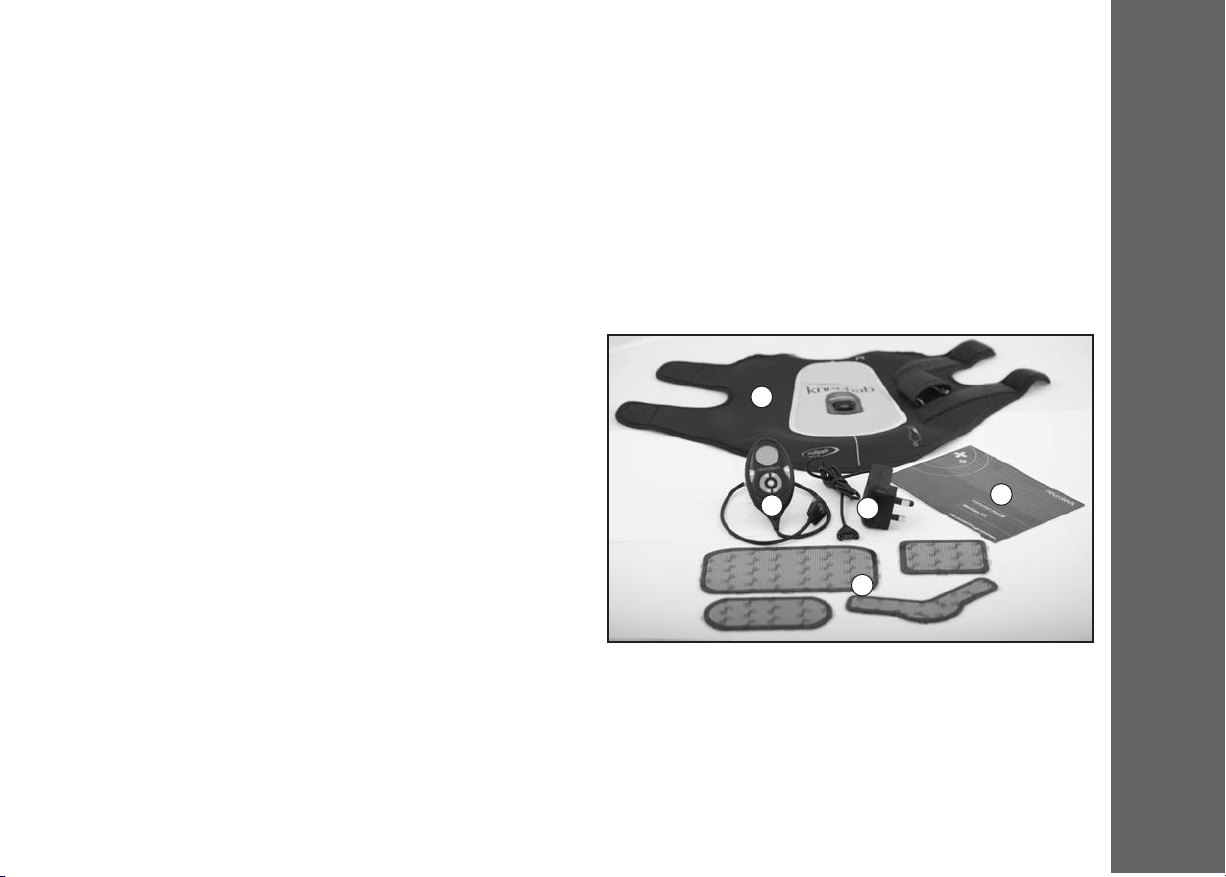
4.1 Kneehab XPT Pack Contents
1. Kneehab XPT Control Unit
The unit generates signals which are sent, via the electrodes, to
your muscles, to make them contract. Your unit is rechargeable
and takes approximately 3 hours to charge fully.
2. Kneehab XPT Garment:
Universally sized garment, which fastens around your thigh, above
the kneecap, for quick and easy use. It contains a connector socket,
into which the Control Unit is plugged. Please ensure you have the
correct garment (Left/ Right leg) before using neehab XPTM.
3. Battery Charger:
neehab XPTM is supplied with a charger. To charge the battery
pack, connect the Control Unit to the charger and plug the
charger into a main’s supply socket.
4. Kneehab XPT Adhesive Electrodes:
The electrodes are placed on the garment to conduct signals from the unit to the quadriceps muscles.
5. Kneehab XPT User anual:
The neehab XPTM User Manual provides a guide to product use and safety information.
1
2
3
4
5
UNIT CONTROLS
10
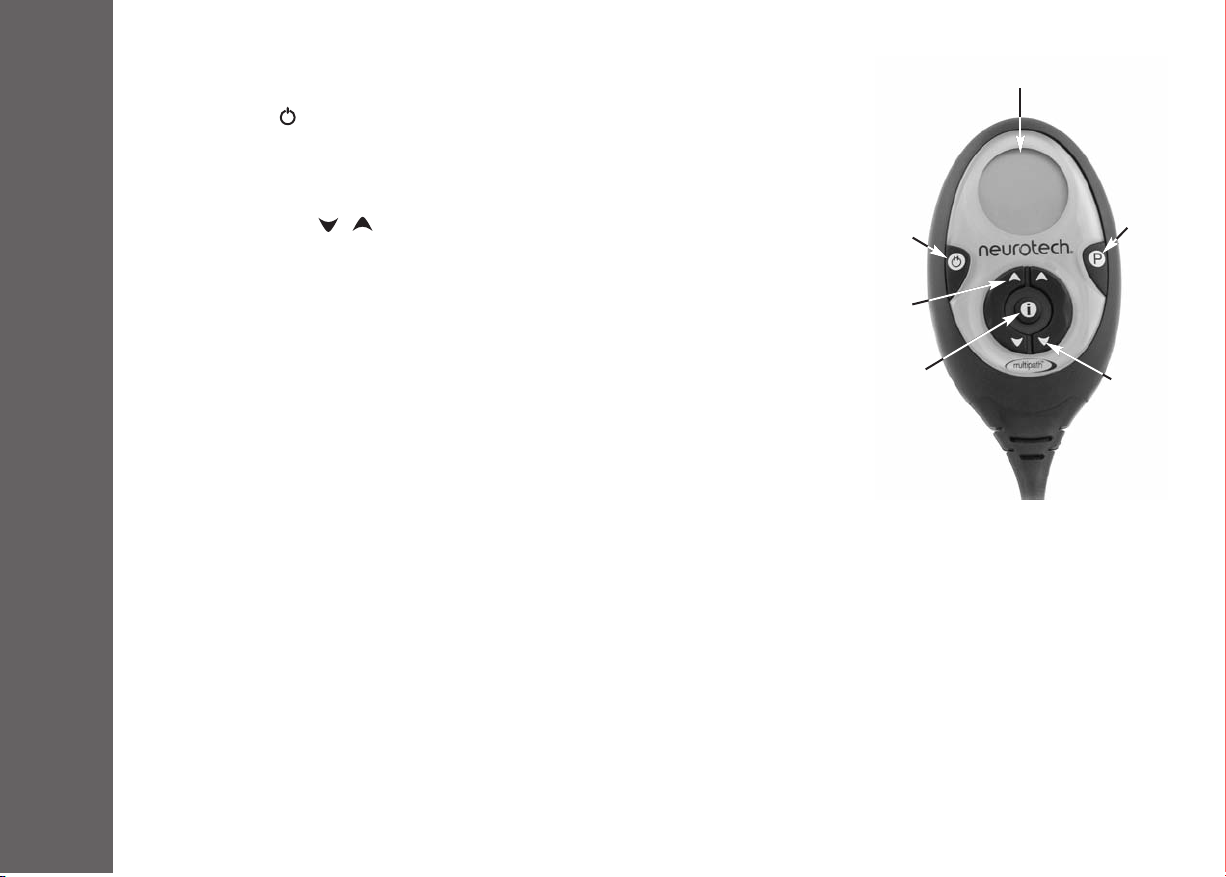
4.2 Description of Unit Controls
1. On/Off Button ( )
Press and hold this button for 3 seconds to turn your unit on or off. During a treatment
session, you can pause the stimulation by briefly pressing this button. To un-pause, briefly
press this button again.
2. Intensity Buttons ( / )
Press and hold these buttons to increase and decrease the intensity of the stimulation. The
right-hand buttons control the right-hand side of the garment. The left-hand buttons control
the left-hand side of the garment.
3. Programme Button (P)
Press and hold this button for 3 seconds before starting a treatment session to change the
selected stimulation program.
Note: Your prescribed neehab XPTM model may only have 1 stimulation programme.
Press and hold this button for 3 seconds during a treatment session to activate/ deactivate
the intensity button lock function. You can use this function to prevent accidental changes
of intensity during a treatment session.
4. Information Button (i)
Press this button briefly at any time to toggle through the following displays:
•Current Intensity level for left and right sides
•Total Treatment Time in hours and minutes
•Average Intensity level over the last 4 sessions for left and right sides
•Return to original display
Press and hold this button for 3 seconds to activate/ deactivate the mute function.
1
2
2
4
3
Unit Display

11
UNIT DISPLAY & DESCRIPTION OF THE GAR ENT
4.3 Description of Unit Display
The following icons appear on the Unit Display at various times throughout the treatment.
Toning intensity from the left-hand side of the garment
Toning intensity from the right-hand side of the garment
Counts down the time left in the current session in minutes and seconds.
Indicates that the session has been paused.
Indicates that the mute function is activated
Intensity button lock is active
This warning symbol indicates a poor contact between the unit and garment or between the electrodes and the skin (see
page 17 for more details).
Shows the battery power remaining.
Shows the programme currently running.
This symbol appears around the edge of the display during each contraction phase.
4.4 Description of The Garment
The inside of the garment has been printed with electrode placement
guides, showing you exactly where to place the 4 electrodes. Two of the
locations will vary depending on your size (A/aand B/b).
For example, the correct position for the large electrode if you are tall is
marked ‘A’, whereas a smaller person would place the same electrode
within the area marked ‘a’.
See page 13 for full details on how to determine your correct electrode
placement.
A/a
B/b
SETTING-UP A TREAT ENT
12
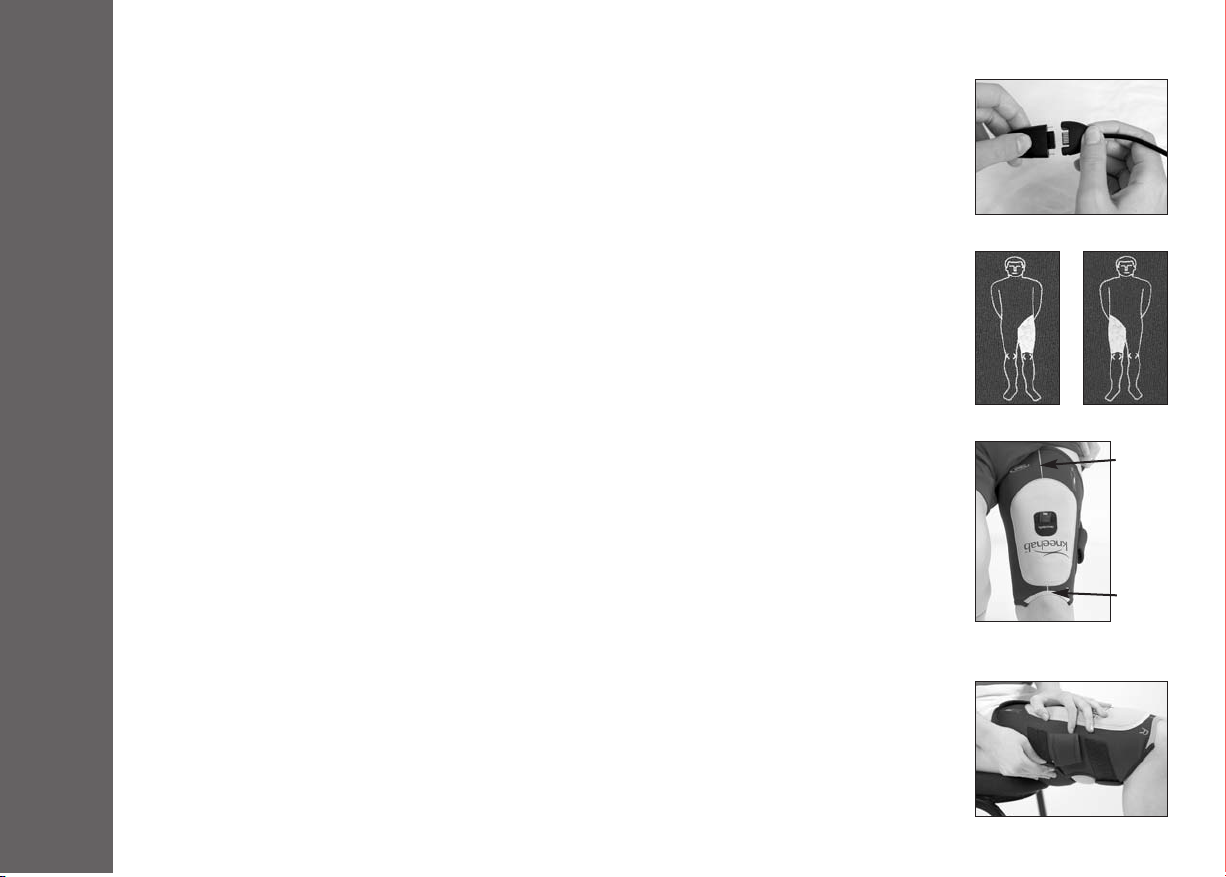
5.0 Setting-Up A Kneehab Treatment
Step 1 - Charge the battery
Connect the Unit to the charger (Fig. a) and plug the charger into a main’s supply socket. To remove
the Unit from the charger press the buttons on each side of the unit connector and pull apart.
You will know the battery pack is on charge when the unit display shows a battery symbol with 3
bars that turn on and off. It will take approximately 2-3 hours to fully charge. The battery pack is
fully charged when the battery symbol and its 3 bars remain on.
Notes:
•Do not leave your unit connected to the charger when the battery is fully charged.
•Do not leave your charger connected to mains supply when not in use.
Step 2 – Correct garment confirmation
Important:
The correct garment MUST be used for the leg being treated. L is printed on the garment designed
specifically for the left leg. The printed figure of a human also shows the garment positioned on the
left leg (Fig. b). R is printed on the garment designed specifically for the right leg. The printed figure of
a human also shows the garment positioned on the right leg (Fig. c).
Please check now to ensure you have the correct garment for the leg to be treated. If the garment you
have is not for the correct leg, please contact your prescribing clinician or the neurotech®office.
Step 3 – Initial garment fitting
•Sit down with your leg as straight as possible. For the best fit and most effective treatment it is
important to have your leg as straight as possible during garment fitting.
•Place the garment on you leg so that the light blue binding lies just above the kneecap (approx.
0.5cm/ .25”) and the printed Median Line lies along the centre of your thigh (Fig. d).
•Fasten both pairs of straps (Fig. e). For the best fit, fasten the pair of straps closest to the neecap
first. When the straps are fastened the garment should have a comfortable yet firm fit.
Fig. a
Fig. b Fig.
Fig. d
Median
Line
Light
Blue
Binding
Fig. e
13
SETTING-UP A TREAT ENT
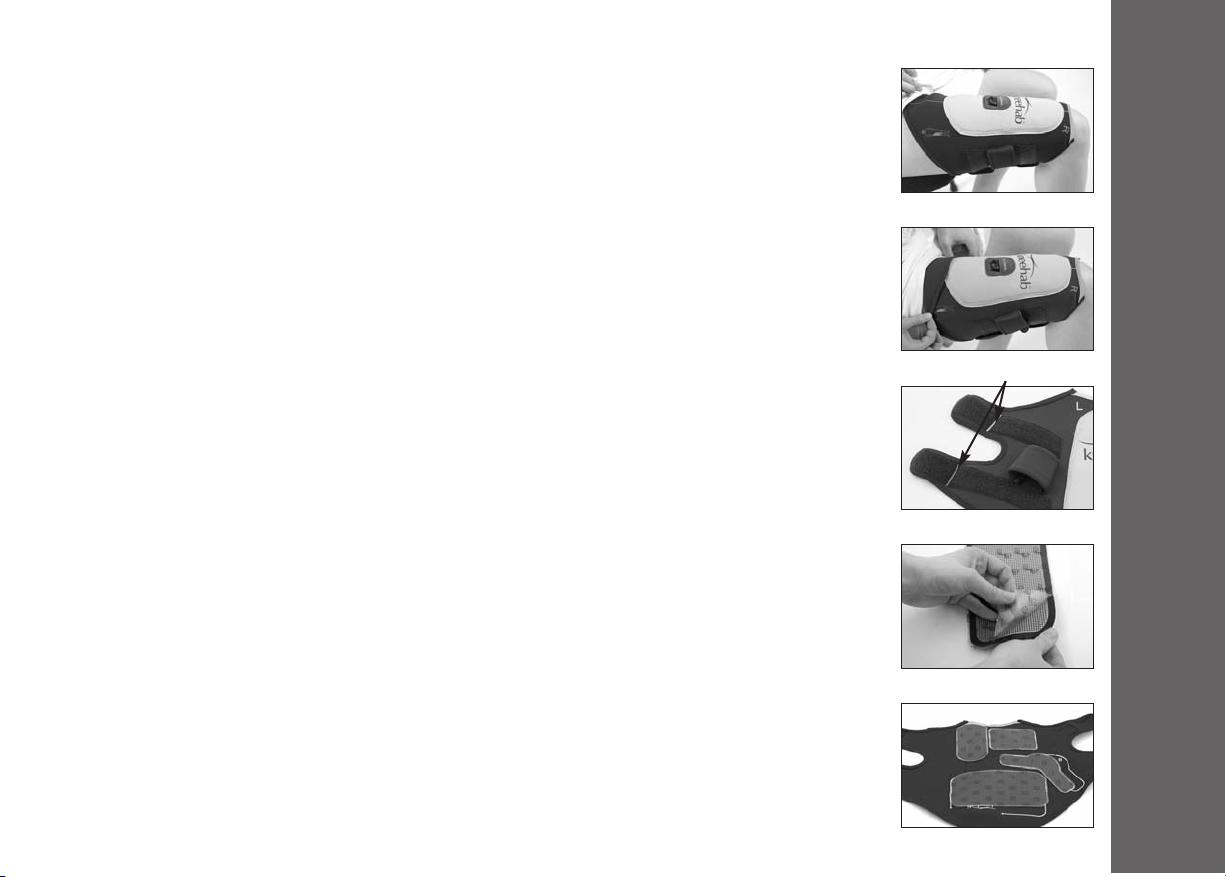
Step 4 – Sizing determination
With the garment still fastened to your leg, sit upright with your knee bent at 90° (Fig.f).
To determine length sizes:
•If the whole garment lies flat along the length of your thigh (Fig. f), you are a Tall fit and must place
the large rectangular electrode within the area marked ‘A’.
•If you have to fold down the top of the garment at the groin (Fig. g), you are a Small fit and must
place the large rectangular electrode within the area marked ‘a’.
To determine width sizes:
There is a line printed on the garment near one end of the straps (Fig. h) to help you determine
whether you are a wide or a narrow fit. If you have difficulty seeing this line, there is also a gap in the
fastening material to help you (Fig. h).
•If the strap does not overlap the printed line, or if you can still feel the gap, you are a Wide fit and
must place the L-shaped electrode within the area marked ‘B’.
•If the strap does overlap the printed line, or if you cannot feel the gap, you are a Narrow fit and
must place the L-shaped electrode within the area marked ‘b’.
Step 5 – Adhesive Electrode Placement
•Remove the garment from your thigh and place it on a flat surface with the white electrode placement
guides facing you.
•neehab XPTM is supplied with a pack of four electrodes. Remove these from their plastic bag.
•Remove the liners from the
patterned
side of the electrodes (Fig. i). eep these liners for later.
•Stick the electrodes onto the garment within their respective printed outlines.
•Do not remove the liners from the
black
sides of the electrodes yet.
Important:
•Place the largest electrode within outline “A” or “a” depending on your sizing, determined in Step 4.
•Place the L-shaped electrode within outline “B” or “b” depending on your sizing, determined in Step
4.
•The remaining two electrodes should be placed within their respective matching outlines (Fig. j).
•Ensure that all electrodes lie perfectly within the electrode placement guides on the garment.
•Ensure the metal studs are completely covered by all of the electrodes.
•Press the edges of each electrode firmly onto the garment to ensure good adhesion.
•Replacement electrodes are available from your local neurotech®supplier. See page 6.
Your Kneehab XPT is now set up and ready to use.
Fig. h - Line & Gap
Fig. g
Fig. f
Fig. i
Fig. j

STEP-BY-STEP TREAT ENT GUIDE
14
5.1 Step-By-Step Treatment Guide
Step 1 - Garment Fitting
Using mild soap and water, cleanse the area where you will be placing the garment. The electrodes do
not adhere well to dirt, oil, creams or other cosmetics on the skin. Ensure the skin is dry.
Remove the liners from the
black
side of each electrode (Fig. a). Do not dispose of these liners, as
they will need to be placed back onto the electrodes between treatment sessions.
Sit down with your leg as straight as possible. For the best fit and most effective treatment it is
important to have your leg as straight as possible during garment fitting.
Place the garment on your leg so that the light blue binding lies just above the kneecap (approx.
0.5cm/ .25”) and the printed Median Line lies along the centre of your thigh (Fig. b).
Fasten both pairs of straps. For the best fit, fasten the pair of straps closest to the neecap first. When
the straps are fastened the garment should have a comfortable yet firm fit.
Note:
If you are a very narrow fit, the straps may overlap some of the adhesive electrodes. However, for an
effective and safe treatment, it is important that the whole surface of all four electrodes is in contact
with the skin. You can eliminate the overlapping problem by folding the straps inwards at the printed
line before fastening (Fig. c).
Before starting a treatment session:
We recommend sitting with your knee at an angle between 0 - 60 degrees (Fig. d) or lying down with
the leg straight. Before beginning treatment, ensure that all of the electrodes are flat against your
skin.
Fig. a
Fig. d
Fig.
Fig. d
Median
Line
Light
Blue
Binding
60°
15
STEP-BY-STEP TREAT ENT GUIDE
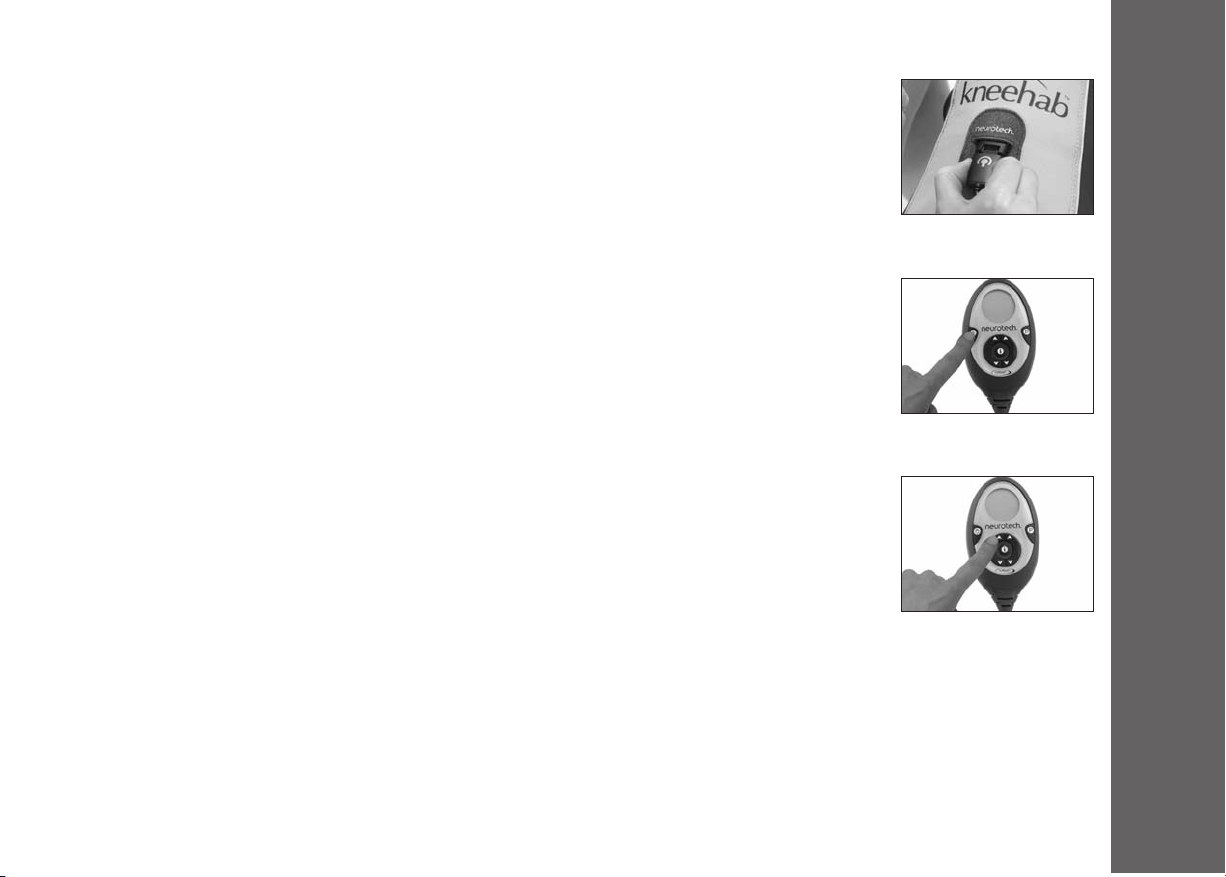
Step 2 – Connect the unit and switch it on
Connect the unit to the garment by plugging it into the garment socket (Fig. e). Switch on the unit by
pressing the On/ Off button for 3 seconds (Fig. f). The unit display will show the programme number
selected, the duration of the programme and the battery status.
Notes:
•When connected to a Left garment the unit will display ‘L’ for 3 seconds at start up.
•When connected to a Right garment the unit will display ‘r’ for 3 seconds at start up.
Please check that your unit displays the correct code for the garment to which it’s connected.
If the unit does not display the expected code, please contact the neurotech®office.
Step 3 – Begin treatment
Begin increasing the intensity (Fig. g). This starts the treatment session and the timer will begin to
count down. As you increase the left or right intensity button you will feel the stimulation increasing
on the corresponding side of your leg. You will also see the intensity level for that side increasing on
the unit’s display. Increase the intensity on both sides of your leg until you feel a firm, comfortable
contraction of the quadriceps. The intensity level ranges from 0 - 99.
Important Notes:
•Typically, you should increase the intensity to the inside of your leg first and to optimise contractions,
the intensity level for the inner thigh should be set at a higher level than the outer thigh. As you
become more experienced using neehab, you will quickly find the levels which suit you best.
•The treatment is delivered in contraction and relaxation cycles. See your Programme Information
Card for more details.
•Changing the intensity at any time will trigger the start of a contraction cycle.
Fig. f
Fig. g
Fig. e

STEP-BY-STEP TREAT ENT GUIDE
16
Step 4 – Finishing Treatment & Storage
The treatment session is completed when the counter reaches zero. The unit will beep to indicate this.
Switch the unit off by pressing the On/ Off button for 3 seconds. Should you forget to do this, the unit
will switch off automatically after 20 seconds anyway.
Disconnect the unit from the garment by pressing the buttons on either side of the connector and
pulling the two sections apart (Fig. a).
Remove the garment by carefully peeling the electrodes off your leg. Ensure that the electrodes
remain attached to the garment. Place the garment on a flat surface with the electrodes facing
upward and replace the liners on the
black
side of each one. If the electrodes have lifted from the
garment, press the edges back into position.
Close the straps on the garment, ensuring that the electrodes all remain flat. Store the garment, with
the electrodes still attached, on a flat surface in a cool dry place.
Fig. a

17
PROBLE SOLVING GUIDE
6.0 Problem Solving Guide
Problem
The display doesn’t come on and
there’s no signal from the unit
The battery symbol is flashing/
there’s ineffective stimulation
The contractions are very weak,
even when the intensity is high
The warning symbol appears on
the display
Unpleasant feeling beneath the
electrodes
ERR has appeared on the display
Possible cause
•Unit not switched on
•Battery pack is fully discharged
•The battery charge is low
•Electrodes are not covering the
metal studs
•Inadequate contact between the
electrodes and the skin
•Electrodes not fully in contact with
the skin
•Electrodes are worn
•Unit is not properly attached to the
garment
•Electrodes not fully in contact with
the skin
•Electrodes are worn
•Lotions, pigmented areas or dry
spots present on the skin
•Error message, indicating a problem
with the unit
Solution
•Press and hold the On/Off button for 3
seconds to switch the unit on
•Recharge the battery pack
•Recharge the battery pack
•Place the electrodes completely over
the metal studs
•Fasten the straps more tightly
•Ensure the electrodes are pressed
firmly against the skin
•Contact your local neurotech®supplier
for replacement electrodes
•Ensure the unit and garment are
properly connected
•Ensure the electrodes are pressed
firmly against the skin
•Contact your local neurotech supplier
for replacement electrodes
•Remove any lotions or oils by washing
•Switch the unit off and on again. It should
now work without problems. If the error
message persists, call the helpline
7.0 System aintenance
Caring for your Kneehab - Washing Instructions:
Important:
Detach the Control Unit from the garment before cleaning.
You should never let your neehab Control Unit get wet, but it may be cleaned using a soft cloth, lightly dampened in mild,
soapy water. The garment is washable but you must first remove the Control Unit and electrodes. Replace the liners on the
pat-
terned
side of each electrode until you are ready to use your neehab unit again. You must always follow the instructions on
the label when washing the garment.
Never machine wash your neehab garment. Hand wash in lukewarm water and NEVER wring to remove water. This
protects the internal composition of the garment from damage.
Do not use any bleach when washing your neehab garment.
Do not dry clean your neehab garment.
Do not tumble dry your neehab garment. The garment should be dried on a flat surface. Do not dry over anything hot
(e.g. a radiator or any other direct heat source). Ensure the garment is completely dry before use. The straps should be
fastened prior to washing.
The neehab garment should not be ironed.
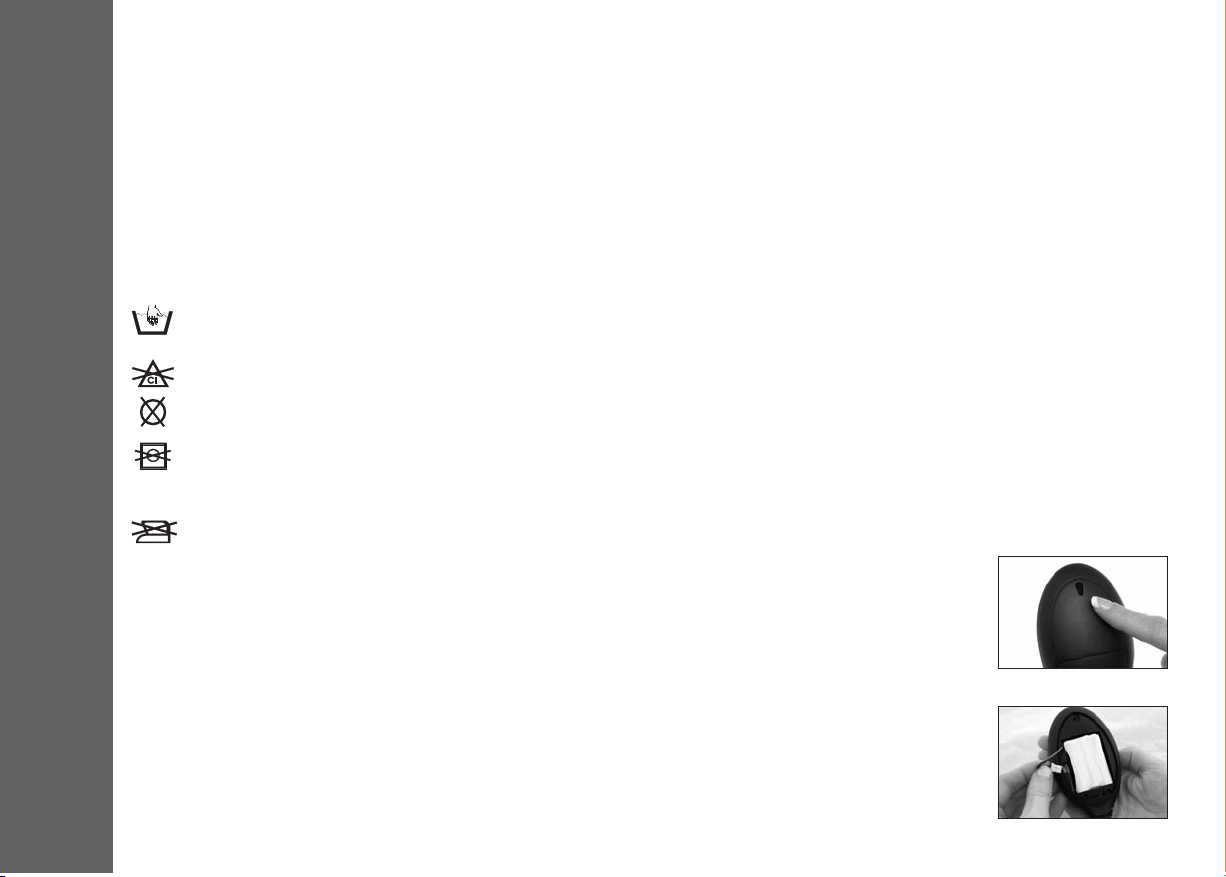
Battery Power / Replacing the Battery
The battery icon on the display will flash when the battery is low and needs to be recharged. After a pe-
riod of time, you may find that the battery will only power your unit for a limited number of sessions, re-
quiring you to charge it more frequently. This is because rechargeable batteries have a limited number of
charge cycles and may eventually need to be replaced.
Should you need to replace the rechargeable battery pack, remove the small rubber plug from the back
cover of your unit (Fig. a), unscrew the back cover and remove it. Replace the existing battery pack with a
new battery pack (Fig. b). Replace the battery cover and rubber plug. You can purchase a new battery pack
by contacting your local neurotech supplier.
SYSTE AINTENANCE
18
P
Fig. a
Fig. b

19
ACCESSORIES & WARRANTY INFOR ATION
Repair, Service & odification
Access to the interior is not required for maintenance purposes.
If your unit is damaged, you should not use it, but should return it to neurotech or your local distributor for replacement or
repair. Repairs, service and modifications may not be carried out by anyone other than qualified service personnel authorised by
neurotech. Bio-Medical Research Ltd. will not accept any responsibility if these guidelines and instructions are not followed.
7.1 Accessories
Kneehab Adhesive Electrodes: Type: 613/ 614/ 615/ 616
neehab uses adhesive electrodes which have been specifically designed for this unit. Replacement adhesive electrodes are
available. To order replacement electrodes, please contact your local neurotech supplier. Only electrodes specified by Bio-
Medical Research Ltd. for use with neehab may be used. Using other electrodes may degrade performance levels. All adhesive
electrodes are provided with their own instructions where necessary, including cleaning, storage and care instructions.
Kneehab Battery Pack: (3.6V NiMH)
Important:
Under no circumstance should anything other than the correct type of battery pack (rechargeable, 3.6V NiMH) be used with your
unit. These can be purchased from the neurotech office.
Disposal of electrodes & battery packs
Used electrodes and battery packs must never be disposed of in a fire, but in accordance with your country’s national laws
governing the disposal of such items. Return all other contents to Bio-Medical Research Ltd.

TECHNICAL INFOR ATION
20
8.0 Technical Information
General Specifications:
Product Type: 411
Intended use: Electrical Muscle Stimulator
Waveform: Symmetrical bi-phasic square waveform when measured into a standard bodyload.
Garment aterial:
Outer Fabri : 100% Nylon
Inner Fabri : 70% Polychloroprene, 30% Polyurethane
Binding: 82% Nylon, 18% Elastane
Fastenings: 100% Nylon
Environmental Specifications:
Operating Range: Temperature: 0 to 35 °C / 32 to 95 °F
Humidity: 20 to 65 % RH
Storage Range: Temperature: 0 to 55 °C / 32 to 131 °F
Humidity: 10 to 90 % RH
Electrical Specifications:
Rated Outputs – Voltage / Currents
Parameter 500 Ω1 kΩ1.5 kΩ
Output RMSV 9.2V 17.4V 21.0V
Output RMSA 18mA 17mA 14mA
Output Frequency 35 - 50Hz 35 - 50Hz 35 - 50Hz
DC Component: Approx 0 0 0
Positive Pulse Width 100 - 400 µS 100 - 400 µS 100 - 400 µS
Negative Pulse Width 100 - 400 µS 100 - 400 µS 100 - 400 µS
Interphase Interval 40 µS 40 µS 40 µS
Table of contents
Other Neurotech Medical Equipment manuals


