Neurotech MediTens XP User manual
MediTens XP IM W Europe_Layout 1 01/12/2010 12:29 Page 3

2
TABLE OF CONTENTS
1.0 Safety Information ___________________________________________________
2.0 Contra-Indications ___________________________________________________
2.1 Precautions & Warnings ________________________________________________
2.2 Warranty _____________________________________________________________
3.0 Description Of Unit And Controls ______________________________________
4.0 Description Of Unit And Display _______________________________________
5.0 Step-By-Step Treatment Guide ________________________________________
6.0 System Maintenance _________________________________________________
7.0 Troubleshooting ______________________________________________________
8.0 Technical Specifications ______________________________________________
9.0 Program Information _________________________________________________
10.0 Accessories __________________________________________________________
10.1 Unit Settings __________________________________________________________
11.0 Electrode Placement Diagram _________________________________________
11.1 Suggested Electrode Placement _________________________________________
3
4
4
6
7
8
10
13
14
15
17
18
18
19
20
Table of Contents
MediTens XP IM W Europe_Layout 1 01/12/2010 12:29 Page 4

1.0 Safety Information
Validity
The information and technical data contained in this document relates to the MediTens®XP pain relief unit provided with this
manual. Each MediTens XP unit is assigned a serial number, which is located on the back of the unit.
The information and technical data disclosed in this document is proprietary to Bio-Medical Research Ltd. (BMR Ltd) and may be
used and disseminated only for the purposes and to the extent specifically authorized in writing by the company.
Disclaimers
All units manufactured and sold by BMR Ltd are rigorously checked and tested prior to shipment. However, the company is not
responsible for the product’s use. BMR Ltd accepts responsibility only for the safety, reliability and performance of the equipment
when it is operated in accordance with the instructions herein and within the given specifications. Therefore, the user must bear full
responsibility for any actions arising out of the use or misuse of this equipment. Any modifications, repairs or servicing must be
undertaken by authorized BMR Ltd personnel.
This manual is intended for the guidance of the clinician, who should also decide the placement of the electrodes.
Restrictions
The sale and/ or operation of this equipment is subject to law in the various countries. Compliance with this legislation rests with
the importer, dealer, or user of the equipment as appropriate.
3
SAFETY INFORMATION
English
MediTens XP IM W Europe_Layout 1 01/12/2010 12:29 Page 5

Intended Use:
MediTens XP delivers stimulation based on the principles of transcutaneous electrical nerve stimulation (TENS), where short
electrical pulses are sent via self-adhesive electrodes to the surface of the skin, as described below:
Transcutaneous Electrical Nerve Stimulation (TENS)
TENS is a pain therapy based on the stimulation of the nerve fibres, via the application of electrical stimuli to the skin. There are
two methods: The “pain gate” theory, which blocks the pain signals to the brain and through the increased release of endorphins,
which inhibits the emergence of pain.
Indications
• The symptomatic relief and management of chronic and acute pain.
2.0 Contra-Indications
• Patients with electronic implants (e.g., pacemakers and defibrillators) may not use the unit!
2.1 Precautions & Warnings
• If in doubt, always seek medical advice.
• Caution is recommended in patients diagnosed with heart problems or suspected heart problems.
• Medical advice must be obtained before use on persons who are insulin-dependent diabetics or for persons who are under
medical supervision for any cognitive dysfunction.
• Medical opinion must be obtained before persons with any serious illness or injury apply muscle stimulation.
• Safety has not been established for the use of muscle stimulation by pregnant women, persons with cancer or epileptics.
• Do not apply stimulation in the region of recent surgery without medical approval.
•
Avoid applying over recent scars or on broken or inflamed skin, areas of infection,
areas susceptible to acne, thrombosis or
other vascular problems (e.g. broken veins or varicose veins).
• Avoid placing the electrodes directly over metal implants if there is not at least 1 cm of muscle fibre in between. However
placement on the nearest muscle is possible. If in doubt, seek medical advice.
• Precautions should also be taken if muscle stimulation occurs during heavy menstruation or in the same month as the insertion
of an IUP (inter-uterine pessary, e.g. coil). The same applies to the period (6 weeks) after giving birth. We recommend that
stimulation is only applied around the abdominal or lower abdominal region following medical approval.
• Medical advice must be obtained before applying stimulation on recent fractures or to parts of the body where feeling is limited.
•
In all cases, ensure that stimulation does not exceed the patient’s tolerance level.
• When repositioning electrodes during treatment, always turn the intensity to minimum or pause the unit.
•
Lead pins and electrodes must not be connected to other objects.
4
SAFETY INFORMATION
MediTens XP IM W Europe_Layout 1 01/12/2010 12:29 Page 6

5
SAFETY INFORMATION
• When the leads are attached to the electrodes, ensure that the pins are fully inserted into the electrode sockets. Ensure that
no metal is visible.
• The device should be kept safely out of the reach of children.
• Simultaneous connection of a patient to high frequency surgical equipment may result in burns at the site of the stimulator
electrodes, and possible damage to the stimulator.
• Operation in close proximity to shortwave or microwave therapy equipment may produce instability in the stimulator output.
• Electronic monitoring equipment (such as ECG monitors and ECG alarms) may not operate properly when the stimulator is in
use.
• It may not be appropriate to use MediTens XP on a person at the same time as other equipment. You should check suitability
before use.
• The MediTens XP unit should be used only for its intended purpose and in the manner described in this manual. You should
also use only those electrode positions indicated by your clinician.
• A small number of isolated skin reactions have been reported, including allergies and acne.
• Stimulation should not be applied until the cause of the pain is identified and a precise diagnosis rendered.
• To avoid infection electrodes may only be used by a single individual.
• TENS is not intended to treat psychosomatic illness.
• TENS primarily treats symptoms by suppressing pain, which in turn serves as a protective mechanism.
•
This device can deliver current densities in excess of
2mA/cm2when used at a high intensity with small electrodes. See
“Technical Data” for more details.
• The long-term effects of continuous electrical stimulation have not been investigated.
If any irritations, skin reactions, over-sensitivity or other side effects occur, please contact BMR Ltd In such cases stop use imme-
diately. Irritations can usually be reduced by changing the position of the electrodes. Note, however, that a slight reddening of the
skin is quite normal under the electrodes during and for a short time after treatment.
Please do not use the MediTens XP unit in the following way:
• Stimulation must never be applied transcerebrally (across or through the head), directly on the eyes, covering the mouth,
transthoracicly (electrodes placed on the chest and the upper back or crossing over the heart - as such an application of
electrical current into the heart may cause arrhythmia), or on the front of the neck (especially the carotid sinus nerves).
• Do
not use the MediTens XP unit with the electrodes positioned on injection sites (of medications/
drugs), such as hormone
treatment sites.
• Do not use while driving or operating machinery.
•
MediTens XP must not be used with any other unit that delivers electrical current to the body (e.g. interferential or another
muscle stimulator).
English
MediTens XP IM W Europe_Layout 1 01/12/2010 12:29 Page 7

6
SAFETY INFORMATION
General description of the MediTens XP
MediTens XP is a battery operated, portable, two-channel TENS unit
intended for the treatment of chronic and acute pain. Based
on the principles of TENS, MediTens XP sends short, electrical impulses through
the surface of the skin via adhesive electrodes. 5
treatment programs are available for selection. See ‘Program Information’ on page 17
for a description.
MediTens XP has been specifically designed for home use.
The meaning of each icon is explained during the course of this manual.
Your MediTens XP package includes:
1. MediTens XP unit 2. Instruction Manual 3. A 9-volt battery
4. Connecting Leads 5. Electrodes 6. Device box
2.2 Warranty
Should your unit develop a fault within two years of purchase, neurotech®will undertake to replace or repair the unit and parts
found to be defective with no charge for labour or materials *, provided the unit:
• has been used for its intended purpose and in the manner described in this instruction manual.
• has not been connected to an unsuitable power source.
• has not been subjected to misuse or neglect.
• has not been modified or repaired by anyone other than an approved neurotech agent.
This warranty complements existing national guarantee obligations and does not affect your statutory rights as a consumer.
*excludes electrodes and battery pack.
MediTens XP IM W Europe_Layout 1 01/12/2010 12:29 Page 8
7
DESCRIPTION OF UNIT & CONTROLS
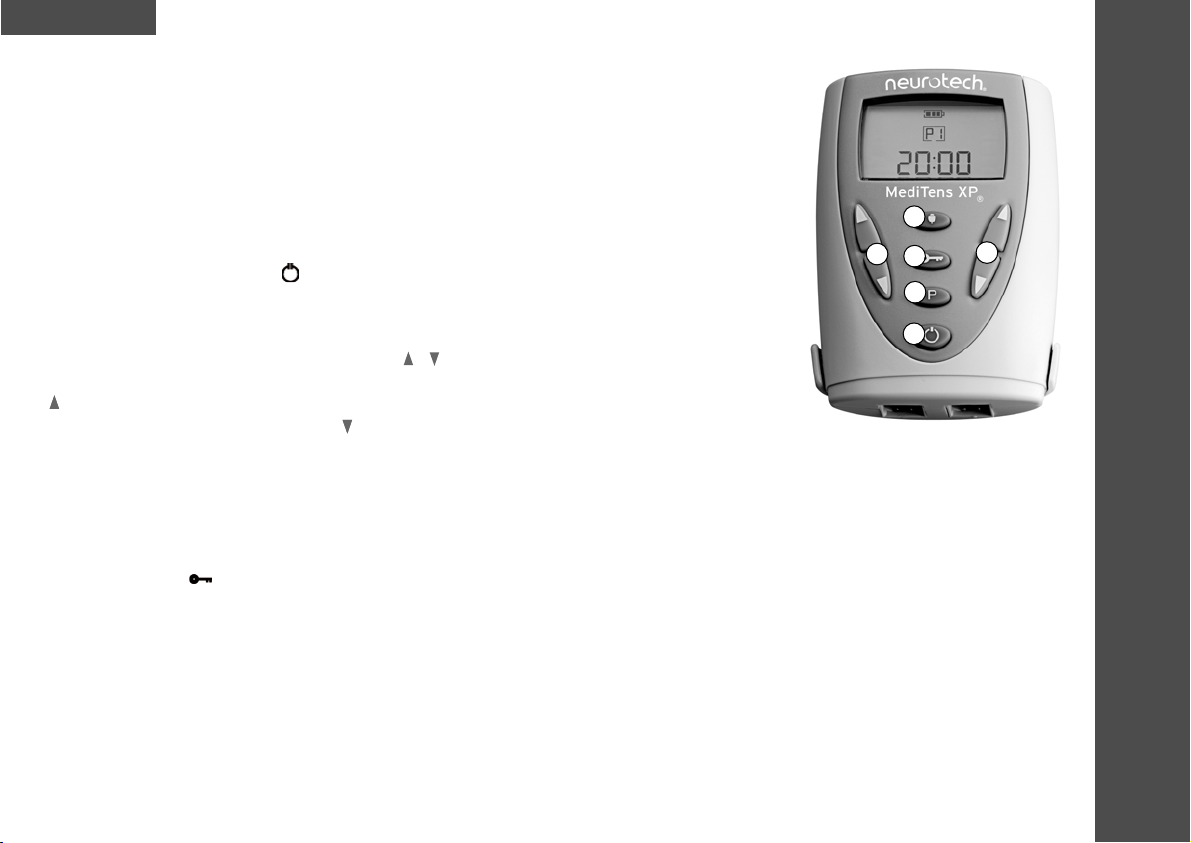
3.0 Description of Unit & Controls
MediTens XPis easy to use. All buttons are push buttons. The functions are defined by icons
printed on each button (see below). MediTens XPhas a built-in audio indicator that emits a
high-pitched tone when a valid button is pressed and a low tone when an invalid button is
pressed.
Buttons and Button Functions (Fig. 1)
MediTens XPhas the following buttons and functions:
1. On / Off (Pause) Button ( )
This button switches the unit on and off and is also used to pause the treatment session. You
must press and hold the button (for 2 seconds) to switch the unit off at the end of a treatment.
2. Intensity Controls - Channels 1 and 2 ( / )
Each intensity control governs the channel on that side of the unit. Pressing the upper button
() during treatment increases the intensity level by a factor of one for that channel.
Similarly, pressing the lower button () decreases the intensity level by a factor of one. The
numerical intensity indicator on the display changes in single increments to indicate this.
3. Program Select Button (P)
The Program Select button enables the user to select the required treatment program. To change the program hold down the
program selection button (P) for at least 3 seconds.
4. Lock Button ( )
The Lock button allows the user to lock the intensity controls to prevent accidental changes in the intensity level. It is also used
to lock the Trigger button.
To set the Total Treatment Time.
To reset the total treatment time, press the lock button and the program selection button. The user must first press the Lock button
and then the Program Select button for approximately 3 seconds. A tone will sound and the display will reset to zero. This
function is available only at the start of a treatment session.
1. On / Off (Pause) Button ( )
4. Lock Button ( )
1
2
3
4
5
2
Fig. 1
English
MediTens XP IM W Europe_Layout 1 01/12/2010 12:29 Page 9

8
DESCRIPTION OF UNIT & DISPLAY
5. Trigger/Burst Button ( )
Program 1:
When the Trigger button is pressed, the signal frequency increases from 4Hz to 99Hz. To disable the High Frequency Trigger mode
press the Trigger button a second time.
Program 2 & 3:
When the Burst button is pressed once, the Burst mode is enabled. To disable the Burst mode press the button a second time. If
Burst mode is selected during Program 2, the unit delivers a signal with a frequency of 99Hz at a pulse width of 120µs for 3
seconds. This then returns to the normal program frequency and pulse width for 1.5 seconds. If Burst mode is selected during
Program 3, the unit delivers a signal with a frequency of 4Hz at a pulse width of 120µs for 3 seconds, before returning to the
normal program frequency and pulse width for 3 seconds.
Program 4 & 5:
When the Trigger button is pressed once, the Trigger mode is enabled. When the button is pressed a second time the unit enters
a contraction cycle which lasts as long as the button remains pressed. When the button is released the unit enters the relaxation
cycle. Trigger mode is disabled by pressing the intensity button and the stimulation builds over a 2-second period to the previously
set amplitude level.
4.0 Description of Unit & Display
Battery Information
The unit is powered by 1 x 9-volt DC battery. The battery compartment is located on the rear of the
unit.
We recommend using an alkaline battery. The MediTens XP has an indicator that shows the
battery status. When the battery is nearing discharge, the battery outline will flash. To insert,
replace or check the battery, follow the instructions provided on page 13.
Connecting Leads
Two sockets are positioned at the base of the unit for the insertion of the leads (Fig. 2). The leads are
connected to the electrodes via moulded pins. The electrodes and leads are removable and can be
replaced if necessary. Each lead is a separate channel, one of which is light blue and the other dark
blue. Two plastic moulded pins are found at the end of each lead.
Fig. 2
5. Trigger/Burst Button ( )
MediTens XP IM W Europe_Layout 1 01/12/2010 12:29 Page 10

MediTens XP display (Fig. 3)
MediTens XPhas a unique display, which gives the user a precise overview of the battery
status, the completed treatment time, contraction/ relaxation phases and program selection.
1.
The Lock button is activated and prevents unwanted changes to the
intensity level.
2. Load Sense Feature: this appears when a poor connection between a lead and its
electrode or between an electrode and the skin is detected.
3. During treatment the intensity bars will rise and fall corresponding to the contraction/
relaxation cycle on each channel.
4. Displays the length of time left/ elapsed in the current session in hours, minutes and seconds. For a set treatment
time program, the timer will count down in minutes and seconds. For an open treatment time it will count up from zero
in minutes and hours.
5. Battery status indicator, indicates battery power remaining.
6. The clock icon appears when the total treatment time is displayed and when the clock is counting upwards.
7. Indicates which treatment program you are running (1 to 5).
8. Trigger mode enabled. (Programs 1, 4 and 5)
Burst mode enabled. (Programs 2 and 3)
9. The pause indicator appears when the treatment has been paused.
9
DESCRIPTION OF UNIT & DISPLAY
Fig. 3
1.
2.
3.
5.
6.
7.
8.
4. 9.
English
MediTens XP IM W Europe_Layout 1 01/12/2010 12:29 Page 11
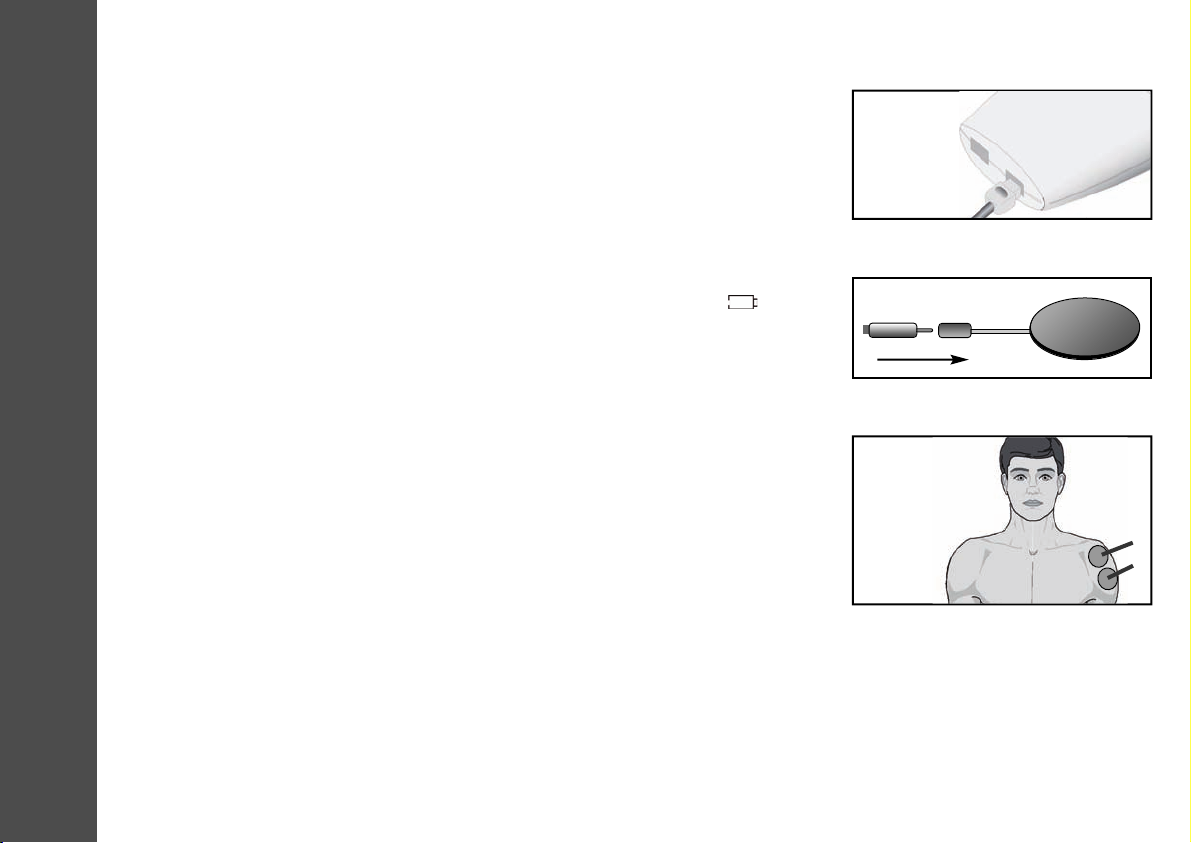
5.0 Step by Step Treatment Guide
1. Using a mild soap and water solution, clean the skin thoroughly in the area you will
be placing the electrodes. The electrodes do not adhere well if any dirt, oils, creams or
other cosmetics are still on the skin.
2. Ensure that the device is switched off.
3. Insert, exchange or check the battery as described on page 13. The battery should be
replaced when the 3 bars have disappeared and the empty battery icon ( ) flashes
on the display.
4. The leads supplied with the MediTens XPare inserted into the sockets on the underside
of the device. Push the plug end of the lead into the socket. The leads are designed so
that once inserted, they are held firmly in position (Fig. 4). After connecting the leads
to the unit, attach each lead to an electrode (Fig. 5).
5. MediTens XPis supplied with a set of electrodes. Remove the liners from the adhesive
side of each pad and position the pads correctly. The electrodes should be handled as
stated in the manual.
Please note the following points:
• Placement of the electrodes must be determined by a therapist.
• The safety information provided in this manual must be followed.
• The lead pins must be fully inserted into the electrode connector with no metal pin visible.
• The complete surface of these electrodes should be in contact with the skin (Fig. 6).
• Once the electrodes are attached, you may separate the leads to allow for better
electrode placement.
• MediTens XPis supplied with a belt clip. You may attach the unit at the waist by attaching
it to a belt. Alternatively, the unit can be hand-held.
10
STEP-BY-STEP TREATMENT GUIDE
Fig. 5
Fig. 4 Insert plugs into sockets
Fig. 6 The complete surface of the
electrodes should make contact
with the skin.
MediTens XP IM W Europe_Layout 1 01/12/2010 12:29 Page 12

11
STEP-BY-STEP TREATMENT GUIDE
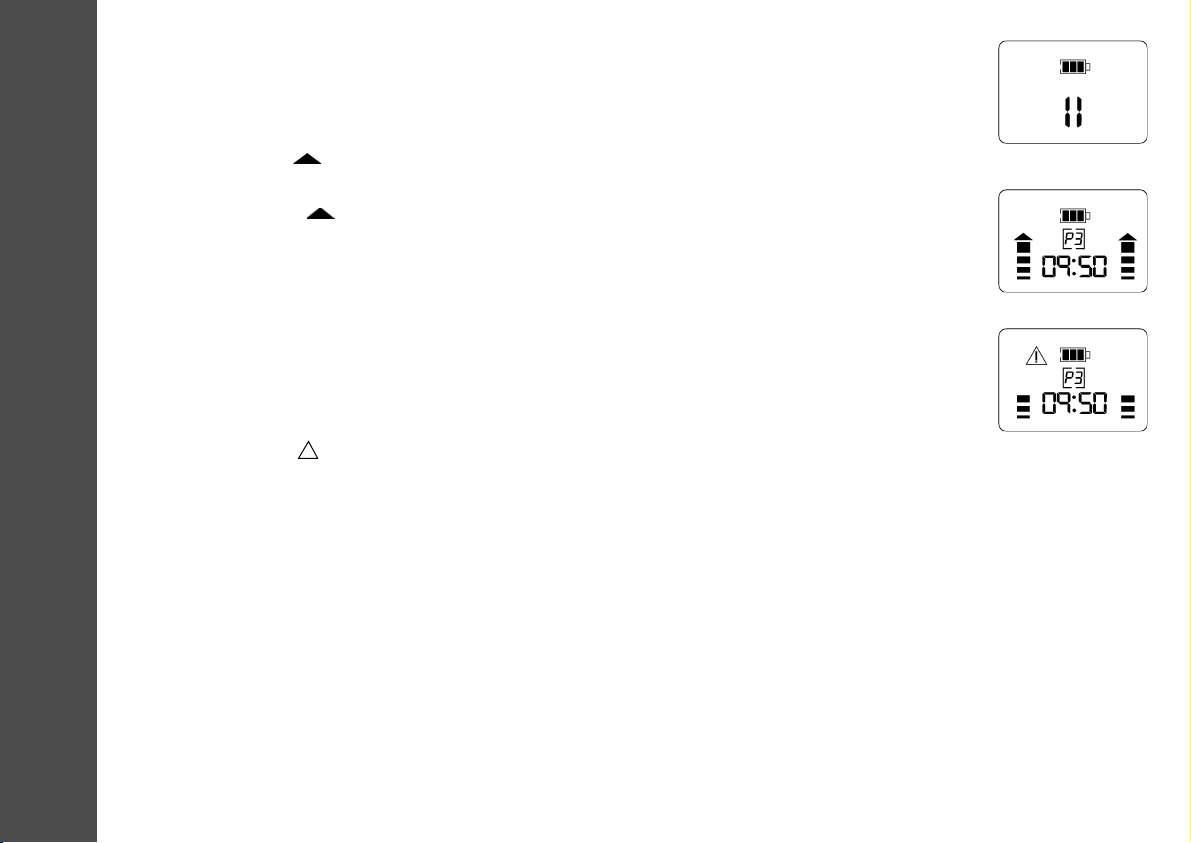
Display 1 up to 3 Sec.
Display 2 After 3 Sec.
Display 3
Display 4
6. When the MediTens XPis switched on, you hear a high-pitched tone. The screen displays the total treatment
time in hours and minutes for a period of 3 seconds (Display 1). After 3 seconds the screen changes to that
shown in Display 2.
7. To change the program, hold down the program selection button for at least 3 seconds. The user is then
presented with each available program (1-5) in turn.
Note: You cannot change a program during treatment.
8. Programs 1 -5 are not limited in terms of time (Display 2).
9. If you wish to reset the total treatment time, press the Program Select and Lock buttons simultaneously for a
period of 3 seconds. The total treatment time will reset to zero (Display 3). The maximum total treatment time
is 99 hours and 59 minutes. It will reset back to 00:00 when the maximum treatment time is reached.
10. Slowly begin to increase the intensity on the channel you wish to use by pressing the corresponding intensity
control. As the intensity is being increased for a particular channel, the stimulus will be felt from the
corresponding electrodes and the intensity bars will rise and fall with the contraction/ relaxation cycles.
The level will be indicated (0 to 99) on the display (Display 4). The treatment timer will begin once the
intensity is first increased.
11.
If necessary repeat the process for the other channel. The intensity level of
each channel is shown on the
display.
12. Continue to increase the intensity until the desired level has been reached. Where more than one channel
is being used, you may increase the intensity completely for one channel before increasing the intensity from
the other. Display 5 shows the screen during a contraction cycle during an open treatment time program. The
timer displays hours and minutes, and is counting up.
13. Once the desired intensity level is reached, the user can press the Lock button to prevent accidental
changes in intensity. To do so, press the Lock button once. The lock icon ( ) will appear on the display
(Display 6). To disable the Lock function, simply press the lock button once again and the lock icon
disappears from the display.
Display 5
Display 6 Lock button
activated.
English
MediTens XP IM W Europe_Layout 1 01/12/2010 12:29 Page 13
14. If you want to interrupt the treatment session (e.g. to reposition the electrodes), briefly press the on/off
button. The unit issues a beep and the pause icon appears on the screen (Display 7). To deactivate the pause
function, press the on/off button again. Then the treatment session is restarted from where it was paused
and the pause icon disappears from the display.
15. The Burst mode ( ) can be used during Programs 2 and 3. Pushing the button enables Burst mode.
To deactivate the function, press the button again (Display 8).
The Trigger mode ( ) can be used during Programs 1, 4, and 5. When the Trigger button is pressed
while in program 1, the signal frequency increases from 4Hz to 99Hz. Press the Trigger button a second
time to disable Trigger mode. When the Trigger button is pressed once during program 4 or 5, Trigger
mode is enabled. When the button is pressed a second time the unit enters a contraction cycle which lasts
as long as the button remains pressed. When the button is released the unit enters the relaxation cycle.
Trigger mode is disabled by pressing the intensity button and the stimulation builds over a 2-second period to
the previously set amplitude level
16. MediTens XPhas a load sense function that monitors the connection between the lead and its electrode
and between the electrode and the skin. When poor skin contact is detected (Display 9):
• The intensity bars of the channel affected will flash.
• The warning icon ( ) flashes on the display.
• An audible beep will emit from the unit.
• The treatment session timer pauses.
• The intensity value falls to zero and the intensity increase button is deactivated.
When proper contact is restored, stimulation builds over a 2-second period to the previously set intensity level.
12
STEP-BY-STEP TREATMENT GUIDE
!
( )
( )
MediTens XP IM W Europe_Layout 1 01/12/2010 12:29 Page 14

13
SYSTEM MAINTENANCE
6.0 System Maintenance
The unit should be cleaned regularly using a soft cloth, lightly dampened with soapy water.
Do not allow the interior of the unit or any of the connectors to become wet during cleaning. Do not
use detergents, alcohol, spray aerosols or strong solvents on your unit.
The battery icon ( ) will appear at all times during operation in the top centre of the display. As the
battery of the MediTens XPdischarges, the three bars on the battery icon slowly disappear. Once all
three bars have disappeared, the outline of the battery icon starts to flash. This means that the battery
must be replaced.
The battery compartment is located on the rear of the MediTens XP unit. In order to open the battery
compartment, insert your thumb into the symbol shown ( ) on the battery compartment to unlock it
and press it forwards. This unlocks the battery compartment.
Now open the cover completely.
To remove a battery, press firmly against the base of the battery and lift it out carefully.
The battery image in the compartment indicates the correct direction of the poles and insertion of the battery. You need a 9-volt
battery.
To close the battery compartment, push the battery cover downwards and click it back into place (Fig. 8).
Note: Keep the battery cover closed when the unit is on.
It is advisable to use a leak-proof battery to help prevent corrosion. We suggest using
alkaline batteries. Never leave a battery in
the unit if it is not intended to be used for a long period of time. If you do, the battery may leak causing damage to the unit. You
should be aware that some batteries sold as ‘leak-proof’ can still release corrosive substances, which may damage the unit. Under
no circumstances should anything other than the correct type of battery be used.
Fig. 7
Fig. 8
The battery icon ( ) will appear at all times during operation in the top centre of the display. As the
!
English
MediTens XP IM W Europe_Layout 1 01/12/2010 12:29 Page 15

14
TROUBLESHOOTING
7.0 Troubleshooting
Problem
The display does not come on and
there is no signal from the unit
The unit turns on, but does not carry
out commands
Battery symbol flashing; Ineffective
stimulation
Commands performed irregularly,
only at high intensity, or not at all
Increasing intensity causes
unpleasant sensation
Alarm symbol is on, unit beeping
Possible Cause
Battery discharged
Battery was incorrectly positioned
Lead not fully inserted
Broken lead
The battery is low
Faulty lead
Check your skin for lotions,
pigment marks, dry spots or
other factors that could increase
resistance
Faulty lead assembly
Electrode faulty
Poor skin/ electrode contact
Solution
Replace battery
Remove battery, replace correctly
Remove plug, reinsert
Replace electrode/ lead assembly
Replace the battery
Replace lead
Slowly move electrode to an area
where the stimulus feels strongest
(always pause the unit first)
Moisten electrodes
Wash any oils from the skin
Check connections, replace if broken
Replace electrode
Check electrode contact with skin
!
MediTens XP IM W Europe_Layout 1 01/12/2010 12:29 Page 16
15
Nominal output voltage / power
Parameter 500Ω1kΩ1.5kΩ
Output RMS Voltage (RMSV) 6.6 V 11.2 V 12.4 V
Output RMS Current (RMSA) 13 mA 11 mA 8.2 mA
Output Frequency 4-99 Hz 4-99 Hz 4-99 Hz
DC Component 0 C 0 C 0 C
Pulse Width 120-150 µs 120-150 µs 120-150 µs
Current Intensity Range (per pulse) 0-75 mA 0-75 mA 0-75 mA
8.0 Technical Information
General Specifications:
Product Type: 458
No. of Channels: 2
Waveform: Symmetric Bi-Phasic
Environmental Specifications:
Operation: Temperature 0° to 35° C
Humidity 20 to 65 % RH
Storage: Temperature 0° to 55° C
Humidity 10 to 90 % RH
Physical Specifications:
Unit Dimensions: 105 x 71 x 31mm
Weight
• Unit 93 g
• Unit with battery 140 g
XP units are products of Bio-Medical Research Ltd., Parkmore
Business Park West, Galway, Ireland.
Safety Features
Safe start: The intensity is set automatically to zero when the
unit is turned on.
Multiplexing: Pulse delivery to each channel is off-set so that
only one channel is energised at any instant. This ensures there
is no interaction between the electrodes of each channel.
Electrode area less than 6.5 cm2can cause current densities
in excess of 2m/cm2at maximum intensity. If in doubt, contact
neurotech or your clinician.
TECHNICAL INFORMATION
English
MediTens XP IM W Europe_Layout 1 01/12/2010 12:29 Page 17

A number of symbols are provided on your unit. Those not already explained are described below:
Power Requirements: 9-Volt, DC Battery (Type 6F22). Inside the battery compartment ‘+’ indicates positive polarity and ‘-’ indicates
negative polarity. DC (Direct Current) is indicated by the symbol:
Output RMS Current (RMSA): Stands for the effective current output, which is the root mean square current measured into a
resistive load.
Output RMS Voltage (RMSV): Stands for the effective voltage output, which is the root mean square voltage measured into a
resistive load.
Power (P): Maximum power output measured in Watts (W) into a 500Ωload.
Frequency (F): Number of pulses output by the unit per second, measured in Hertz (Hz).
This icon means “Warning, read the accompanying documentation”.
This symbol means type BF applied parts.
SN stands for “serial number”. On the rear of each XP model is the unit’s individual serial number. The letter preceding the serial
number indicates the year of manufacture, where “O” denotes 2009, “P” denotes 2010, etc.
This icon on your XP model shows that the device meets the 93/42/EEC Directive for medical devices. 0366 is the
number of the notified body (VDE).
Disposal of device
At the end of the product lifecycle, do not throw this product into the normal household garbage, but bring it to a collection
point for the recycling of electronic equipment.
Some product materials can be re-used if you bring them to a recycling point. By re-using some parts or raw materials
from used products you make an important contribution to the protection of the environment. Please contact your local
authorities if you need more information about collection points in your area.
Waste Electrical and Electronic Equipment can have potentially harmful effects on the environment. Incorrect disposal
can cause harmful toxins to build up in the air, water and soil and can be harmful to human health.
16
!
0366
TECHNICAL INFORMATION
MediTens XP IM W Europe_Layout 1 01/12/2010 12:29 Page 18

17
9.0 Program Information
Program
No.
1
2
3
4
5
Frequency
(Hz)
4
35
99
Channel 1: 4
Channel 2: 99
4 - 99
Treatment
Time (min)
open
open
open
open
open
Pulse duration
(µsec)
150
150
150
150
150
Burst or Trigger
High Frequency Trigger
Burst - Frequency of 99Hz, pulse width 120µsec. for
3 sec.; Will return to program settings for 1.5 sec.
Burst - Frequency of 4Hz, pulse width 120µsec. for 3
sec.; Will return to program settings for 3 sec.
Trigger
Trigger
Indications
Chronic Pain
Joint Pain
Labour Pain (Trigger)
Acute Pain
Acute Pain
Pain Block
Chronic & Acute Pain
Arthritic Pain
Severe Acute Pain
Arthritic Pain
Period Pain
PROGRAM INFORMATION
Program 1 (High Frequency Trigger):
Program 1 delivers a stimulus of 4Hz. When the Trigger button is pressed a high frequency 99Hz stimulus is delivered. To disable High
Frequency Trigger mode press the Trigger button a second time.
Program 2, 3 (Burst Mode):
Burst mode is available on Programs 2 and 3. When the Burst button is pressed Burst mode is enabled. To disable Burst mode press
the button a second time. If Burst mode is selected during Program 2, it results in a frequency of 99Hz at a pulse width of 120µs for 3
seconds. This then returns to the normal program frequency and pulse width for 1.5 seconds. If Burst mode is selected during Program
3, it results in a frequency of 4 Hz at a pulse width of 120µs for 3 seconds, before returning to the normal program frequency and
pulse width for 3 seconds.
Program 4 (Trigger) Dual Frequency:
When program 4 is selected channel 1 and channel 2 deliver stimuli at different frequencies. Channel 1 delivers a stimulus of 4 Hz while
channel 2 delivers a stimulus of 99Hz.
Program 5 (Trigger) Massage:
Program 5 is a variable program. This delivers a stimulus of 4 to 99Hz.
Trigger mode is available on Program 4 and 5. When the Trigger button is pressed Trigger mode is enabled. When the button is pressed
a second time the unit enters a contraction cycle for as long as the button is pressed. When the button is released the unit enters the
relaxation cycle. When Trigger mode is disabled, by pressing the intensity button, the stimulation builds over a 2-second period to the
previously set amplitude level.
English
MediTens XP IM W Europe_Layout 1 01/12/2010 12:29 Page 19

18
10.0 Accessories
Only electrodes specified by BMR Ltd for use with MediTens XP may be used. Using other electrodes and leads may degrade per-
formance levels.
Do not dispose of used electrodes and batteries in household rubbish or in an open flame; dispose of them in accordance with
regulations in your country.
Electrodes wear out over time: If they are dirty or no longer adhere properly, they need to be replaced. Replace the leads if the
sheathing is damaged and exposes the copper wire.
Repair, Service & Modification
Access to the interior is not required for maintenance purposes.
Repair, service and modifications may not be carried out by anyone other than qualified service personnel authorised by
BMR Ltd
Do not use the unit if it is defective. Please return it to neurotech. BMR Ltd will not accept any responsibility where the guidelines
and instructions are not followed.
10.1 Unit Settings
ACCESSORIES & UNIT SETTINGS
Your personal therapy program is program no.
When switched on this can always be seen on
the unit’s display!
Use the Burst function (8)Yes No
(possible with programs 2, 3)
Use the Trigger function (8)Yes No
(possible with programs 1, 4, 5)
Note: If the unit’s display shows a different program from the
one prescribed by the clinician when you switch it on, please
do the following:
1. Switch the unit off and on then again.
2.
Hold down “P” button
(for at least 3 seconds each time
you want to change the program) until the program
prescribed by the clinician appears again. (The programs
advance from 1 - 5 and not in reverse, 5 - 1)
3. Start the therapy
MediTens XP IM W Europe_Layout 1 01/12/2010 12:29 Page 20

19
ELECTRODE PLACEMENT DIAGRAM
Right Left Left Right
Back
Front
Note for the clinician:
Please enter the desired electrode
placement in the adjacent drawing!
Connect the two electrodes from the
same channel with a straight line.
11.0 Electrode Placement Diagram
English
MediTens XP IM W Europe_Layout 1 01/12/2010 12:29 Page 21
20
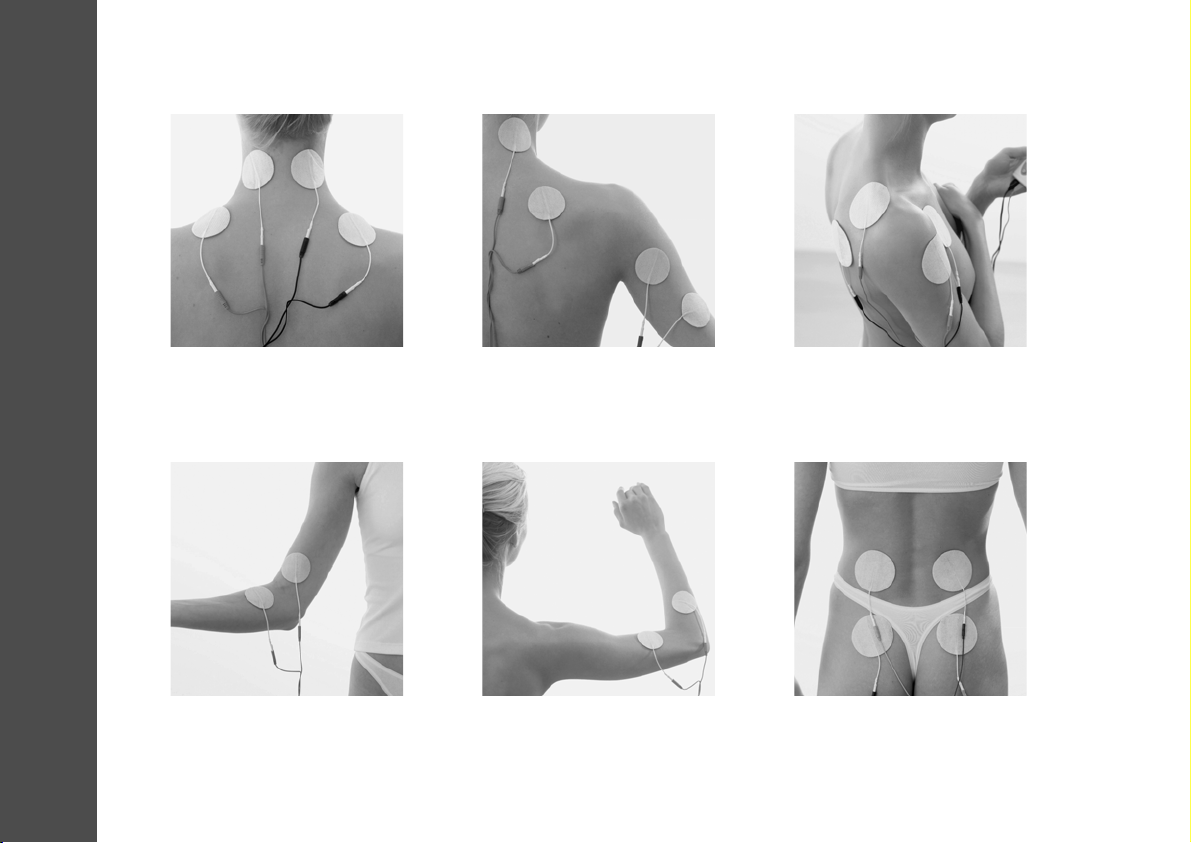
SUGGESTED ELECTRODE PLACEMENT
LWS Syndrome | Lumboischialgia |
Pseudoradicular Back Pain
Criss-cross placement
Program 4
8.0 Suggested Electrode Placement
Tendopathies
e.g., Epicondylitis radialis
Program 1
HWS Syndrome |
Shoulder-Arm Syndrome
Program 5
Shoulder Pain | Bursitis | PHS
Criss-cross placement
Program 4
Tendopathies
e.g., Epicondylitis radialis
Program 1
HWS Syndrome | Cervicogenic
Headache (Cervical Syndrome) |
Migraines | Tension Headaches
Program 4
MediTens XP IM W Europe_Layout 1 01/12/2010 12:29 Page 22
Table of contents
Languages:
Other Neurotech Medical Equipment manuals


