Neurotech Vital User manual

NT Vital QSG 3L_Layout 1 26/07/2012 13:11 Page 2

Contents
Right Stress
Garment
Left Stress
Garment
Electrodes
Stress
Lead
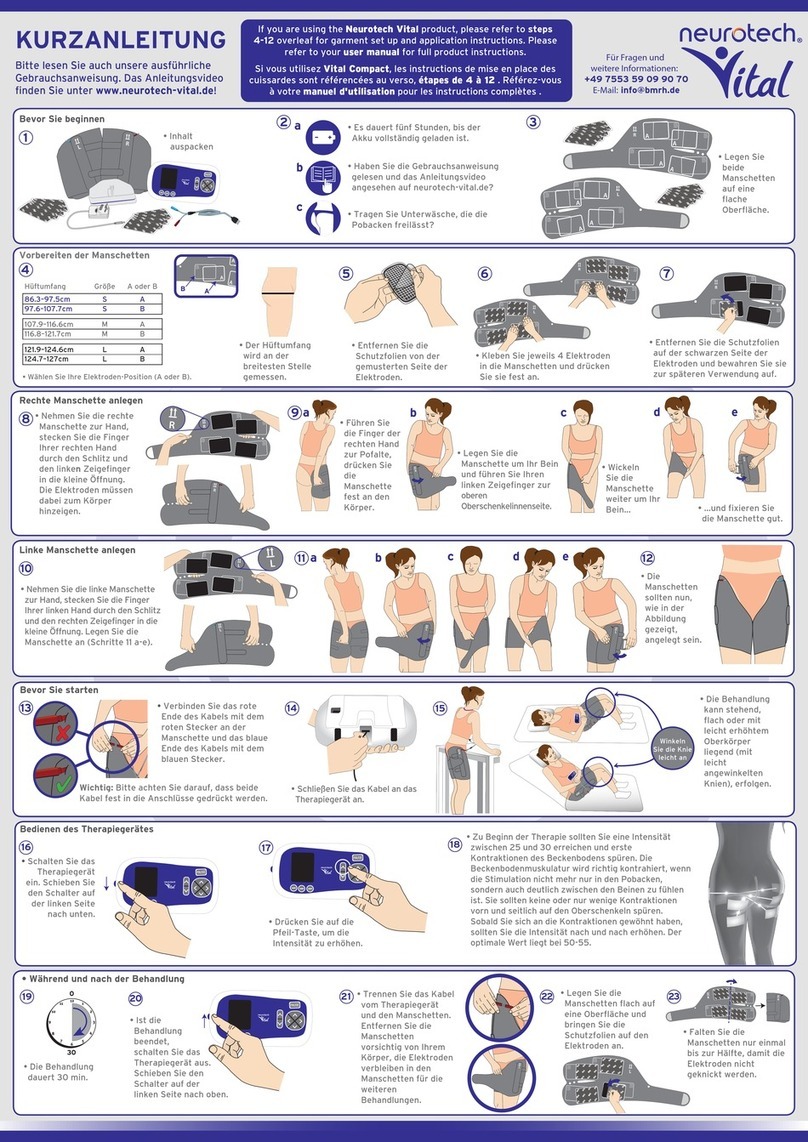
Quick Start Guide
2
You should charge your NEUROTECH VITAL™controller for at least 5 hours before using it for
the first time. Always read the full instructions before use.
i
English
NT Vital QSG 3L_Layout 1 26/07/2012 13:11 Page 3

3
Step 1: Positioning the electrodes.
Remove the liners from the patterned
side of the first 4 electrodes. Lay the right stress garment on a flat surface
with the inner surface facing upwards.
Place the 4 electrodes,
patterned side
down within either the A or B outlines,
as prescribed by your clinician.
Repeat step 1 with the left stress garment.
i
English Deutsch Français
NT Vital QSG 3L_Layout 1 26/07/2012 13:11 Page 4

4
Step 2: Applying the right Stress Garment.
Remove the liners from the
black
side of the 4 electrodes.
POSITIONING GUIDE
Locator 2
Locator 1
Pick up the garment and place your
left
index finger into
Locator 1
.
Then place the fingers
on your
right hand
into
Locator 2
.
Ensure the electrodes
are facing your body
and the arrows are
are pointing up....
.... Next, guide your
left
index finger
towards the upper
inner part of your
thigh, just below
the groin, as shown
here.
Keep liners for later use.
Upper inner
thigh
English
i
NT Vital QSG 3L_Layout 1 26/07/2012 13:11 Page 5

5
Next, guide your
right-hand
fingers towards the crease
of your buttocks...
FINAL POSITION GUIDE
...then wrap the garment
around your leg and
fasten securely. REAR VIEW
Ensure
Locator 2
is
lined-up with
the crease of
your buttocks.
English
NT Vital QSG 3L_Layout 1 26/07/2012 13:11 Page 6

6
Step 3: Applying the left Stress Garment.
Remove the liners from the
black
side of the 4 electrodes.
POSITIONING GUIDE
Locator 1
Locator 2
Pick up the garment and place your
right
index finger into
Locator 1
.
Then place the fingers
on your left
hand
into
Locator 2
. Ensure the
electrodes are
facing your body
and the arrows are
pointing up....
.... Next, guide
your
right
index
finger towards
the upper inner
part of your
thigh, just below
the groin, as
shown here.
Keep liners for later use.
Upper inner
thigh
English
i
NT Vital QSG 3L_Layout 1 26/07/2012 13:11 Page 7

7
Next, guide your
left-hand
fingers towards the crease
of your buttocks...
FINAL POSITION GUIDE
...then wrap the garment
around your leg and
fasten securely. REAR VIEW
Ensure
Locator 2
is
lined-up with
the crease of
your buttocks.
English
NT Vital QSG 3L_Layout 1 26/07/2012 13:11 Page 8

8
Correct Electrode Positioning
We strongly recommend that the patient wears high-thigh underwear (e.g. a thong), which leaves
the buttocks exposed (Fig. a).
If they are wearing full brief underwear, they must adjust the back of the briefs to expose the buttocks.
This is because the electrodes need to make full contact with the skin on the buttocks and the hips.
When positioned correctly, the 8 electrodes should be positioned as shown in Fig. b.
Fig. a Fig. b
English
NT Vital QSG 3L_Layout 1 26/07/2012 13:11 Page 9

9
IMPORTANT INFORMATION
Before connecting the garments to the stress lead, check
that the buttock electrodes are correctly positioned.
CORRECT POSITIONING INCORRECT POSITIONING
Note to the Clinician: Once the patient has applied their right and left stress garments, check that
all of the electrodes have been positioned exactly as shown on page 8.
For each garment:
Ensure
Locator 1
is positioned at the
upper inner thigh,
just below the groin.
For each garment:
Ensure
Locator 2
is lined-up with
the crease of your
buttocks.
For each garment:
Ensure
Side Panel
is aligned with the
leg.
Check the following to ensure
the garment is applied correctly
English
NT Vital QSG 3L_Layout 1 26/07/2012 13:12 Page 10

10
Step 4: Connecting the unit
Connect the
blue
end of
the controller lead to the
blue
pin on the
left
stress
garment.
Then connect the
red
end of the controller
lead to the
red
pin
on the
right
stress
garment and begin
your treatment
session.
Please read the stress
instruction manual for
treatment session advice.
Ensure:
Blue Connector = Left Stress Garment
Red Connector = Right Stress Garment
i
Connect the main lead
connector to the socket on
the NEUROTECH VITAL™
controller and switch on
the controller.
English
NT Vital QSG 3L_Layout 1 26/07/2012 13:12 Page 11

11
Step 5: During the Treatment
During the treatment, it is recommended that
you stand slightly bent over, with your feet flat
on the ground and your hands resting on a
stationary object, such as a table. However, if the
table is not suitable, you may sit or lie down. A
chair should be nearby in case you need to sit.
On very rare occasions, first-time users of NMES
have reported feeling light-headed or faint. We
recommend that you sit down if you experience
this feeling.
English
NT Vital QSG 3L_Layout 1 26/07/2012 13:12 Page 12

12
Step 6: Removing the Left Garment
After the treatment session, switch off the NEUROTECH VITAL™controller and disconnect the leads
from the garments.
Unfasten the strap and slowly
remove the garment from the
left leg:
Peel the garment from the
front of the leg first, until
it is half detached...
...then start to peel
the other end from
the rear...
... and finally unfasten
and slowly remove the
stress garment from
the right leg in the
same way.
Lay the garments on a flat surface and
replace the covers on the
black
side of
the 4 electrodes.
English
NT Vital QSG 3L_Layout 1 26/07/2012 13:12 Page 13

13
Step 8: Switching the controller off
At the end of a session, switch off the controller
using the On/Off Button (to “0“). If you don’t do
this, after 2 minutes, the controller will display
the “Power Off Unit” screen (Fig. c) and will emit
three beeps every 30 seconds to remind you to
switch it off. Should you simply press a screen
b u t t o n t o c l e a r t h i s from the screen, it will appear
again after 2 minutes and the controller will
continue to beep every 30 seconds until the
controller is switched off.
Step 7: Removing the Right Garment
Once the left garment has been removed and
the electrodes covered, repeat the process
with the right leg garment, then pack
everything away until the next session.
Important:
You should only fold
the garments once in
half, which allows the
electrodes to remain
flat between sessions.
Fig. c
English
NT Vital QSG 3L_Layout 1 26/07/2012 13:12 Page 14

Caring for your NEUROTECH VITAL™garments
Washing Instructions
Important: Detach the Controller and Stress Lead from the Garments before cleaning. Before washing, remove all eight electrodes. We
recommend that it be washed when you are replacing the electrodes.
You should wash the Garments in a receptacle which allows you to lay them flat (e.g. a bath or tub). NEVER wring the Garments during or
after washing. This protects the internal composition of the Garment from damage.
Always follow the instructions on the label when washing the Garments.
Never machine wash the Garments. Always handwash them in lukewarm water.
Do not use any bleach when washing your Garments.
Do not dry clean your Garments.
Do not tumble dry your Garments. The Garments should be hung up to dry. Do not dry over anything hot (e.g. a radiator or any
other direct heat source). Ensure the Garment is completely dry before use. Do not fold while drying.
The Garments should not be ironed.
Note: Replace the Garment if the material is damaged and exposes the wiring within.
Garment materials
Outer material: 100% Nylon; Inner Material: 100% Polyurethane; Fastening: 100% Nylon
14
English
NT Vital QSG 3L_Layout 1 26/07/2012 13:12 Page 15

15
English
NT Vital QSG 3L_Layout 1 26/07/2012 13:12 Page 16

NT Vital QSG 3L_Layout 1 26/07/2012 13:12 Page 1
Table of contents
Other Neurotech Medical Equipment manuals
