New World DFT91 Installation and operating instructions

Instructions for use
-
Installation advices
SINGLE OVEN
DUAL FUEL COOKER
NEW WORLD DFT91
GB
IE

Read the instructions carefully before installing and using the appliance.
CAUTION: this appIiance must only be installed in a permanently ventilated room in
compliance with the applicable regulations.
Dear Customer,
Thank you for purcha ing a NEW WORLD Single Oven Dual Fuel
Cooker.
The afety precaution and recommendation in the e in truction
are for your own afety and that of other . They will al o provide a
mean by which to make full u e of the feature offered by your
appliance.
Plea e keep thi booklet in a afe place. It may be u eful in the
future, either to your elf or to other in the event that doubt
hould ari e relating to it operation.
This appliance must be used only for its intended purpose , that
is for the domestic cooking of foodstuffs. Any other form of usage
is to be considered as inappropriate and therefore dangerous.
The manufacturer declines all responsibility in the event of
damage caused by improper, incorrect or illogical use of the
appliance.
2
This cooker has been designed, constructed and marketed in compliance with:
- safety requirements of Directive “Gas” 2009/142/EC;
- safety requirements of Directive “ ow voltage” 2006/95/EC;
- protection requirements of Directive “EMC” 2004/108/EC;
- requirements of Directive 93/68/EEC.
Customer Care number: 0844 815 3747
GB
IE
3
Important:
This appliance is designed and manufactured solely for the cooking of domestic
(household) food and is not suitable for any non domestic application and therefore
should not be used in a commercial environment.
The appliance guarantee will be void if the appliance is used within a non domestic
environment i.e. a semi commercial, commercial or communal environment.
FIRS USE OF HE OVEN
Follow the instructions below:
– Furnish the interior of the oven by placing the wire racks as described in
“Cleaning and maintenance”.
– Insert shelf and tray.
– Switch the empty oven on to max to eliminate grease from the heating elements.
– et the oven cool down and clean the interior of the oven with a cloth soaked in
water and neutral detergent, then dry carefully.
IMPOR AN INFORMA ION FOR CORREC DISPOSAL OF HE PRODUC IN
ACCORDANCE WI H EC DIREC IVE 2002/96/EC.
At the end of its working life, the product must not be disposed of as
urban waste. It must be taken to a special local authority differentiated
waste collection centre or to a dealer providing this service.
Disposing of a household appliance separately avoids possible nega-
tive consequences for the environment and health deriving from inap-
propriate disposal and enables the constituent materials to be recov-
ered to obtain significant savings in energy and resources. As a
reminder of the need to dispose of household appliances separately,
the product is marked with a crossed-out wheeled dustbin.

IMPOR AN SAFEGUARDS AND RECOMMENDA IONS
After unpacking the appliance, check to ensure that it is not damaged and that the oven
doors close correctly. If in doubt, do not use and consult your supplier or a professional-
ly qualified technician.
Packing materials (i.e. plastic bags, polystyrene foam, nails, packing straps, etc.) should
not be left around within easy reach of children, as these may cause serious injuries.
• ATTENTION: please peel plastic cover off both sides and front of the appliance
before use.
• Do not attempt to modify the technical characteristics of the appliance as this may
cause danger to users.
• Do not carry out any cleaning or maintenance operations on the appliance without
first disconnecting it from the electric power supply.
• If you should decide not to use this appliance any longer (or decide to substitute an
older model), before disposing of it, it is recommended that it is made inoperative in
an appropriate manner in accordance to health and environmental protection regula-
tions, ensuring in particular that all potentially hazardous parts be made harmless,
especially in relation to children who could play with unused appliances.
• After use, always ensure that the control knobs are in the off position.
• Household appliances are not intended to be played with by children.
• Keep children away from the appliance during use.
• Children, or persons with a disability which limits their ability to use the appliance,
should have a responsible person to instruct them in its use. The instructor should be
satisfied that they can use the appliance without danger to themselves or their sur-
roundings.
• During and after use of the cooker, certain parts will become very hot.
Do not touch hot parts.
• Some appliances are supplied with a protective film on steel and aluminium parts.
This film must be removed before using the appliance.
4

• WARNING
When correctly installed, your product meets all safety requirements laid down for this
type of product category. However special care should be taken around the rear or
the underneath of the appliance as these areas are not designed or intended to be
touched and may contain sharp or rough edges, that may cause injury.
• Fire risk! Do not store flammable material in the oven or in the storage compartment.
• Make sure that electrical cords connecting other appliances in the proximity of the
cooker cannot come into contact with the hob or become entrapped in the oven door.
• Do not line the oven walls with aluminium foil. Do not place baking trays or the drip
tray on the base of the oven chamber.
• The manufacturer declines all liability for injury to persons or damage to property
caused by incorrect or improper use of the appliance.
• The various components of the appliance are recyclable. Dispose of them in accor-
dance with the regulations in force in your country. If the appliance is to be scrapped,
remove the power cord.
• Always use oven gloves when removing the shelves and food trays from the oven
whilst hot.
• Do not hang towels, dishcloths or other items on the cooker or its handle – as this
could be a fire hazard.
• Clean the oven regularly and do not allow fat or oils to build up in the oven base or
trays. Remove spillages as soon as they occur.
• Do not stand on the cooker or on the open oven door.
• Always stand back from the cooker when opening the oven door to allow steam and
hot air to escape before removing the food.
• Important: This appliance has been designed for domestic use only.
The appliance is not suitable for use within a semi-commercial, commercial or com-
munal environment.
• Do not operate your appliance by means of an external timer or separate remote-con-
trol system.
5

COOKING HOB
Fig. 1.1
2
4
2
1
3
GAS BURNERS
1. Auxiliary burner (A) 1,00 kW
2. Semi-rapid burner (SR) 1,75 kW
3. Rapid burner (R) 3,00 kW
4. Triple-ring burner (TR) 3,50 kW
Important Notes:
The electric ignition is incorporated in the knobs.
The appliance has a safety valve system fitted, the flow of gas will be stopped if and
when the flame should accidentally go out.
1
1
6
CONTROL PANEL
Fig. 2.1
134 6782
9
CON ROL PANEL - Controls description
1. Electronic clock
2. Fan oven switch knob
3. Fan oven thermostat knob
4. Front left burner control knob
5. Rear left burner control knob
6. Central burner control knob
7. Rear right burner control knob
8. Front right burner control knob
Pilot lamp:
9. Oven temperature indicator light
5
2
2
Please note: This appliance incorporates a safety cooling fan which you will hear oper-
ating whenever the oven or grill are in use.
This fan may continue to run for several minutes after the appliance has been switched
off.
This fan is to reduce the external temperature of the appliance and cool the internal
components.
7
USE OF COOKING HOB
3
3
Fig. 3.1
- The maximum aperture position per-
mits rapid boiling of liquids, whereas
the minimum aperture position allows
slower warming of food or maintain-
ing boiling conditions of liquids.
- To reduce the gas flow to minimum,
rotate the knob further anti-clockwise
to the small flame symbol.
- Other intermediate operating adjust-
ments can be achieved by positioning
the indicator between the maximum
and minimum aperture positions, and
never between the maximum aper-
ture and closed positions.
GAS BURNERS
Each burner is controlled by a gas tap
which opens and closes the gas supply.
Turning the knob so that the indicator
line points to the symbols printed on the
panel achieves the following functions:
– symbol ●: off
– symbol : full on (nominal rate)
– symbol : reduced rate
N.B. When the cooker is not being
used, set the gas knobs to their closed
positions and also close the cock valve
on the gas bottle or the main gas supply
line.
Caution!
the cooking hob becomes very hot
during operation.
eep children well out of reach.
8

CHOICE OF HE BURNER
On the control panel, near each knob,
there is a diagram that indicates which
burner is controlled by that knob.
Select the burner that is most suitable
for the diameter and capacity of the pan
to be used.
As an indication, the burners and the
pans must be used in the following way:
It is important that the base diameter of
the pot is at least the same diameter as
the burner ring to obtain an efficient
heat transfer.
Always position pans centrally over the
burners.
Adjust the size of the flame so that it
does not lick up the side of the pan.
Position pan handles so that they
cannot be accidentally knocked.
Fig. 3.3
BURNERS POT DIAMETER
Auxiliary 12 - 14 cm
Semi-rapid 16 - 24 cm
Rapid 24 - 26 cm
Triple-ring 26 - 28 cm
do not use pans with concave or convex bases
Fig. 3.2
LIGH ING GAS BURNERS FI ED
WI H SAFE Y VALVE DEVICE
To ignite the burner, the following
instructions are to be followed:
1) Press in the corresponding knob and
turn counter-clockwise (fig. 3.2) to
the full flame position marked by the
symbol (fig. 3.1) and hold the
knob in until the flame has been lit.
In the case of a mains failure light the
burner with a match or lighted taper.
2) Wait for about ten seconds after the
gas burner has been lit before letting
go of the knob (valve activation
delay).
3) Adjust the gas valve to the desired
position.
If the burner flame should go out for
some reason, the safety valve will auto-
matically stop the gas flow.
To re-light the burner, return the knob to
the closed ●position, wait for at least
1 minute and then repeat the lighting
procedure.
If your local gas supply makes it difficult
to light the burner with the knob set to
maximum, set the knob to minimum and
repeat the operation.
9
Attention: the oven door becomes
very hot during operation.
eep children away.
GENERAL FEA URES
With your new Fan oven it is possible to
cook a variety of food using the 2 differ-
ent cooking functions.
The 2 positions, thermostatically con-
trolled, are obtained by 2 heating ele-
ments.
– Grill element 2850 W
– Circular element 2500 W
Note:
Upon first use, it is advisable to operate
the oven at the maximum temperature
(thermostat knob on position 250) for 60
minutes in the position and for
another 15 minutes in the mode in
order to eliminate any traces of grease
from the electrical resistances.
FAN OVEN
4
4
OPERA ING PRINCIPLES
Cooking functions available in this cavity
are:
a. Fanned oven
The element and the fan work togeth-
er to produce even results - with no
need to pre-heat.
b. Grill
Food is cooked using the grill element.
c. Fan only
Acts as a defrost function - accelerat-
ing the defrosting of frozen foods.
WARNING:
The door is hot, use the handle.
During use the appliance becomes
hot. Care should be taken to avoid
touching heating elements inside the
oven.
Fig. 4.1 Fig. 4.2
10

HERMOS A KNOB
(Fig. 4.2)
This only sets the cooking temperature and does not switch the oven on. Rotate clock-
wise until the required temperature is reached (from 50 to 250°C).
The light above the thermostat selector knob will illuminate when the oven is switched
on and turns off when the oven reaches the correct temperature.
The light will cycle on and off during cooking.
FUNC ION SELEC OR KNOB (fig. 4.1)
Rotate the knob clockwise to set the oven for one of the following functions:
OVEN LIGH
By turning the knob onto this setting we light the oven cavity.
The oven remains alight while any of the functions is on.
DEFROS ING FROZEN FOODS
Only the oven fan is on. To be used with the thermostat knob on OFF position. The defrost-
ing is done by simple ventilation without heat.
Recommended for:
To rapidly defrost frozen foods; 1 kilogram requires about one hour.
The defrosting times vary according to the quantity and type of foods to be defrosted.
HO AIR COOKING
The circular element and the fan are used. The heat is circulated around the cavity.
Recommended temperatures are between 50 - 250 °C.
There is no need to pre-heat the oven.
Recommended for:
For foods that must be well done on the outside and tender or rare on the inside, i.
e. lasagna, lamb, roast beef, whole fish, etc.
11

GRILLING
The infra-red heating element is switched on.
Use with the function selector knob to position and the thermostat knob between
50°C and 225°C.
The oven door must be closed.
For correct use see chapter “USE OF THE GRI ”
Before using the grill, preheat for about five minutes.
Always grill with the oven door closed.
Note: It is recommended that you do not grill for longer than 30 minutes at any one
time.
Attention: the oven door becomes very hot during operation. eep children away.
Recommended for:
Intense grilling action for cooking with a broiler; browning, crisping, “au gratin”, toasting, etc.
COOKING ADVICE
S ERILIZA ION
Sterilization of foods to be conserved, in
full and hermetically sealed jars, is done
in the following way:
a. Set the switch to position .
b. Set the thermostat knob to position
185 °C and preheat the oven.
c. Fill the dripping pan with hot water.
d. Set the jars onto the dripping pan
making sure they do not touch each
other and the door and set the ther-
mostat knob to position 135 °C.
When sterilization has begun, that is,
when the contents of the jars start to
bubble, turn off the oven and let cool.
REGENERA ION
Set the switch to position and the
thermostat knob to position 150° C.
Bread becomes fragrant again if wet
with a few drops of water and put into
the oven for about 10 minutes at the
highest temperature.
OVEN COOKING
Before introducing the food, preheat the
oven to the desired temperature.
For a correct preheating operation, it is
advisable to remove the tray from the
oven and introduce it together with the
food, when the oven has reached the
desired temperature.
ROAS ING
To obtain classical roasting, it is neces-
sary to remember:
– that it is advisable to maintain a tem-
perature between 180 and 200 °C.
– that the cooking time depends on the
quantity and the type of foods.
12
SIMUL ANEOUS COOKING OF
DIFFEREN FOODS
Fanned oven, allows you to cook differ-
ent kinds of food at the same time.
Different foods such as fish, cake and
meat can be cooked together without
mixing the smells and flavours together.
This is possible since the fats and
vapours are oxidized while passing
through the electrical element and
therefore are not deposited onto the
foods.
The only precaution to follow are:
– The cooking temperatures of the dif-
ferent foods must be as close to as
possible, with a maximum difference
of 20° - 25 °C.
– The introduction of the different dish-
es in the oven must be done at differ-
ent times in relation to the cooking
times of each one.
This is a much more efficient method of
cooking - saving both time and energy.
USE OF HE GRILL
eave to warm up for approximately 5
minutes with the door closed.
Place the food inside positioning the
rack as near as possible to the grill.
Insert the drip pan under the rack to
collect the cooking juices.
Grill with the oven door closed.
Do not grill for longer than 30 minutes
at any one time
(Grilling for longer than
the recommended time may mean the
appliance overheats).
Caution: the oven door becomes very
hot during operation. eep children
well out of reach.
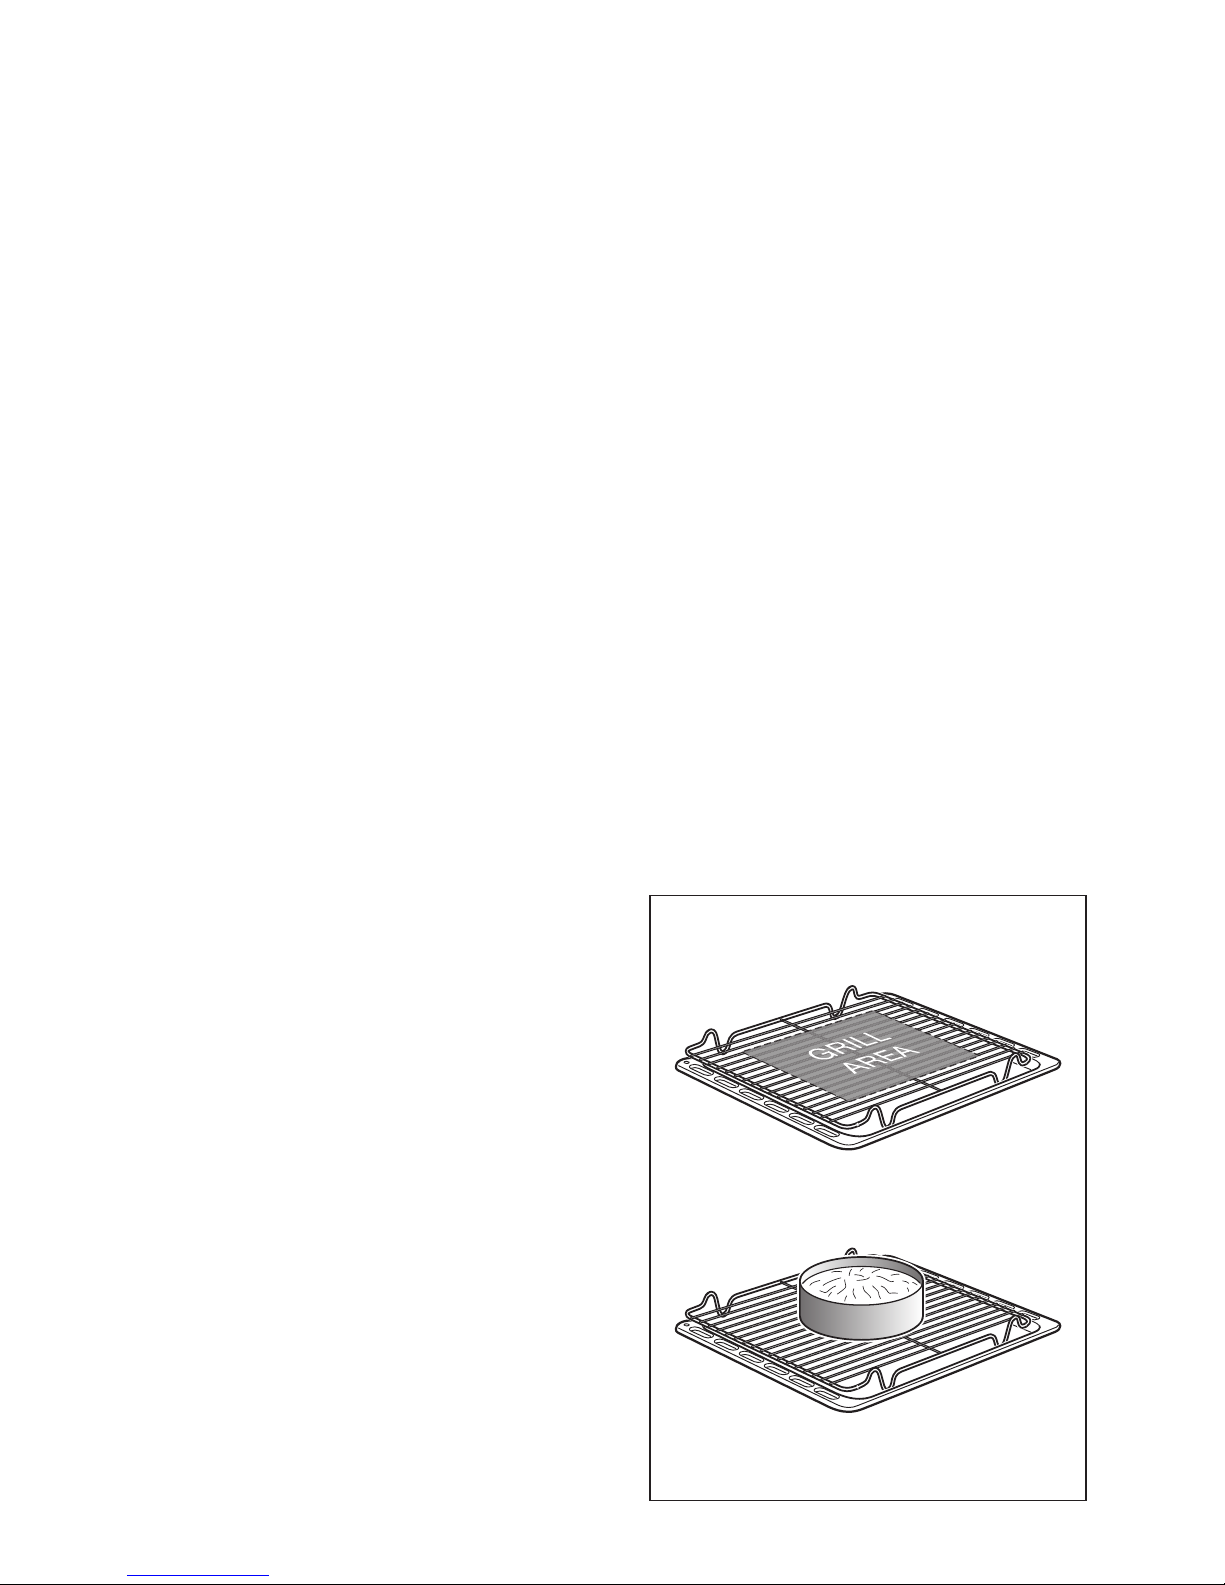
GRILL PAN AND BAKING RAY
Grilling
In order to get the best results from
your grill, please grill in the grill area - as
shown in the illustration 4.3 - this will
given the most even results in the short-
est time.
Baking
In order to achieve optimum results
while baking, we recommend that you
place your baking tin / tray on top of the
grill pan and grid inside the oven.
This will ensure that even baking results
are achieved.
You can then place the grill pan in the
shelf position you require as shown the
recipe you are using.
Please be aware that as with all cook-
ing, results depend on personal taste -
always check your food regularly.
Fig. 4.3 13
NOTE: Reduce the oven temperature by 10 – 20°C for fan assisted ovens.
For dishes that take over an hour to cook, reduce the cooking time by 10 minutes per
hour.
COO ING CHART
Food Temperature Cooking Time (approx)
°C Gas Mark
CA ES
Victoria Sandwich 180 4 20 – 25 mins
Small cakes/buns 180 4 15 – 20 mins
Rich Fruit Cake 150 2 2 hours
Scones 220 7 – 8 8 – 10 mins
Whisked Sponge 190 5 25 mins
BREAD & PASTRY
Bread oaf (500g Flour wt) 225 7 – 8 20 – 25 mins
Bread Rolls 225 7 – 8 10 – 15 mins
Pizza Dough 225 8 15 – 20 mins
Shortcrust pastry 200 6 20 – 30 mins
Quiches/Flans 180 - 190 4 - 5 30 – 40mins
ROAST MEATS
Beef – medium joint 190 5 20 – 25 mins/lb + 20mins
amb 190 5 25 – 30mins/lb + 25mins
Pork 190 5 30mins/lb + 30mins
Chicken 190 5 20 – 25mins/lb + 30mins
Turkey 180 4 15 – 20mins/lb + 20mins
Stews/Casseroles 170 311/2- 2hours
Temperature and times given are approximate, as they will vary depending on the
quality and amount of food being cooked.
Remember to use ovenproof dishes and to adjust the oven temperature during cooking
if necessary.
COOKING GUIDE
5
5
14

Fig. 6.1
ELECTRONIC CLOCK
6
6
ELEC RONIC CLOCK
This appliance comes with an electronic
24 hour clock with minute minder.
SE ING HE IME OF DAY
Once connected to the electricity sup-
ply, the display will show 0.00.
Press the function button, and then use
the plus and minus buttons to set the
correct time of day.
We advise that you do this as soon as
your appliance is operational.
In the event of a power cut, or if the
appliance is unplugged, you will need to
re-set the time of day once power is
restored.
USING HE MINU E MINDER
The minute minder can be set for a
maximum of 99 minutes.
To set the minute minder, press the plus
and minus buttons until the desire
length of time is set. The bell symbol
will illuminate, and the count down will
begin immediately.
At the end of the time period, an alarm
will sound. Press the plus button to
turn the alarm off.
Note: The alarm will sound for a maxi-
mum of 7 minutes.
To cancel the minute minder at any
time, press the plus and minus buttons
together for a few seconds - then
release the plus button first.
Important note: This facility is a minute
minder alarm only. The appliance will
remain operational once the time has
elapsed. You must switch the appli-
ance off manually when cooking has fin-
ished.
O SELEC A ONE
There are three tones to chose from.
To chose a tone which best suits your
needs, press the minus button to listen
to the tone.
When the minus button is released, the
last tone listened to is selected.
15

CLEANING AND MAINTENANCE
7
7
GENERAL ADVICE
– When the appliance is not being
used, it is advisable to keep the gas
tap closed.
– Every now and then check to make
sure that the flexible tube that con-
nects the gas line or the gas cylinder
to the appliance is in perfect condition
and get it replaced if it shows any
signs of wearing or damage.
– The periodical lubrication of the gas
taps must be done only by spe-
cialised personnel.
– If a tap becomes stiff, do not force;
contact your local Service Centre.
– Important:
the use of suitable protective cloth-
ing/gloves is recommended when
handling or cleaning of this appli-
ance.
IMPOR AN NO ES
Installation, and any demonstration,
information or adjustments are not
included in the warranty.
The cooker must be installed by a quali-
fied person in accordance with the rele-
vant Standards.
IMPORTANT:
Before cleaning or carrying out any maintenance disconnect the appliance
from the electrical supply and wait for it to cool down.
Attention
The appliance gets very hot, mainly around the cooking areas. It is very impor-
tant that children are not left alone in the kitchen when you are cooking.
Do not use a steam cleaner because the moisture can get into the appliance
thus make it unsafe.
WARNING
When correctly installed, your product
meets all safety requirements laid down
for this type of product category.
However special care should be taken
around the rear or the underneath of the
appliance as these areas are not
designed or intended to be touched and
may contain sharp or rough edges, that
may cause injury.
16

ENAMELLED PAR S
All the enamelled parts must be cleaned
with a sponge and soapy water or other
non-abrasive products.
Dry preferably with a soft cloth.
Acidic substances like lemon juice,
tomato sauce, vinegar etc. can damage
the enamel if left in contact for too long.
GAS APS
In the event of operating faults in the gas
taps, call the After Sales Service
Department.
S AINLESS S EEL, ALUMINIUM
PAR S AND SILK-SCREEN PRIN ED
SURFACES
Clean using an appropriate product.
Always dry thoroughly.
IMPORTANT: these parts must be
cleaned very carefully to avoid scratch-
ing and abrasion. You are advised to use
a soft cloth and neutral soap.
CAUTION: Do not use abrasive sub-
stances or non-neutral detergents as
these will irreparably damage the sur-
face.
INSIDE OF OVEN
The oven should always be cleaned
after use when it has cooled down.
The cavity should be cleaned using a
mild detergent solution and warm water.
Suitable proprietary chemical cleaners
may be used after first consulting with
the manufacturers recommendations
and testing a small sample of the oven
cavity.
Abrasive cleaning agents or scouring
pads/cloths should not be used on the
cavity surface.
• NOTE: The manufacturers of this
appliance will accept no responsibility
for damage caused by chemical or
abrasive cleaning.
Attention: Do not store flammable
material in the oven.
Let the oven cool down and pay
special attention no to touch the hot
heating elements inside the oven
cavity.
FLEXIBLE UBE
From time to time, check the flexible
tube connecting the gas supply to the
cooker.
It must be always in perfect condition;
in case of damage arrange for it to be
replaced by a suitably qualified and reg-
istered person.
17

Fig. 7.2
BURNERS
The burners can be removed and washed
with soapy water only.
They will remain perfect if always
cleaned with products used for silver-
ware.
After cleaning, check that the burner-
caps and burner-heads are dry before
placing them in the respective hous-
ings.
Note:
• Do not clean burners in a dishwasher.
• To avoid damage to the electric igni-
tion do not use it when the burners
are not in place.
CORREC REPLACEMEN OF HE
BURNERS
It is very important to check that the
burner flame distributor F and the cap C
has been correctly positioned (see figs.
7.1 - 7.2) - failure to do so can cause a
poor burner flame and/or damage to the
burner and hob.
Check that the electrode S(figs. 7.1,
7.3) is always clean to ensure trouble-
free sparking.
Check that the probe T(figs. 7.1, 7.3)
next to each burner is always clean to
ensure correct operation of the safety
valves.
Both the probe and ignition plug must
be very carefully cleaned.
Fig. 7.1
S
F
C
T
18

Fig. 7.5
RIPLE RING BURNER
The triple ring burner must be correctly positioned (see fig. 7.3); the burner rib must be
enter in their logement as shown by the arrow.
The burner must be correctly positioned so that it cannot rotate (fig. 7.4).
Then position the cap Aand the ring B(fig. 7.4 - 7.5).
Fig. 7.4
AB
S
T
Fig. 7.3
19

Fig. 7.6
Fig. 7.7
OVEN FI ING OU
• Assemble the wire racks to the oven walls using the 2 screws (Fig. 7.7).
• Slide in, on the guides, the shelf and the tray (fig. 7.6).
The shelf must be fitted so that the safety catch, which stops it sliding out, faces the
inside of the oven.
• To dismantle, operate in reverse order.
20
This manual suits for next models
2
Table of contents
Other New World Kitchen Appliance manuals


