Nice NX FIT MB 534 SH BD Technical specifications

Nice
EN - Instructions and warnings for installation and use
Tubular Motor
NX FIT MB 534 SH BD
NX FIT MB 1020 SH BD

Note for reading this Manual – Some of the figures referred to in the text appear at the end of the manual.
GENERAL WARNINGS: SAFETY - INSTALLATION - USE (original instructions in Italian)
ATTENTION Important safety instructions. Follow all instructions as improper installation may cause serious damage
ATTENTION Important safety instructions. It is important for you to comply with these instructions for your own and other
people’s safety. Keep these instructions
•Before commencing the installation, check the “Technical characteristics” (in this manual), in particular whether this product is suitable for
automating your guided part. If it is not suitable, DO NOT continue with the installation
•The product cannot be used before it has been commissioned as specified in the chapter on “Testing and commissioning”
ATTENTION According to the most recent European legislation, the implementation of an automation system must comply
with the harmonised standards provided by the Machinery Directive in force, which enables declaration of the
presumed conformity of the automation. Taking this into account, all operations regarding connection to the
electricity grid, as well as product testing, commissioning and maintenance, must be performed exclusively by a
qualified and skilled technician!
•Before proceeding with the installation of the product, check that all the materials are in good working order and suited to the intended
applications
•This product is not intended to be used by persons (including children) whose physical, sensory or mental capacities are reduced, or who
lack the necessary experience or skill
•Children must not play with the appliance
•Do not allow children to play with the fixed control devices of the product. Keep the remote controls away from children
ATTENTION In order to avoid any danger from inadvertent resetting of the thermal cut-off device, this appliance must not be powered
through an external switching device, such as a timer, or connected to a supply that is regularly powered or switched off by
the circuit
•Provide a disconnection device (not supplied) in the plant’s power supply grid, with a contact opening distance permitting complete
disconnection under the conditions dictated by overvoltage category III
•Handle the product with care during installation, taking care to avoid crushing, denting or dropping it, or allowing contact with liquids of any
kind. Keep the product away from sources of heat and naked flames. Failure to observe the above can damage the product, and increase
the risk of danger or malfunction. Should this happen, stop installation immediately and contact Customer Service
•The manufacturer assumes no liability for damage to property, items or persons resulting from non-compliance with the assembly instructions.
In such cases the warranty for material defects is excluded
•The weighted sound pressure level of the emission A is lower than 70 dB(A)
•Cleaning and maintenance to be carried out by the user must not be carried out by unsupervised children
•Before working on the system (maintenance, cleaning), always disconnect the product from the mains power supply
•Check the system periodically, in particular all cables, springs and supports to detect possible imbalances, signs of wear or damage. Do not
use, if repairs or adjustments are necessary, since installation failure or an incorrectly balanced automation may cause injury
•The packing materials of the product must be disposed of in compliance with local regulations
•There must be at least 0.4 m between the driven parts and any fixed elements
•The wording on the tubular motors can be covered after assembly
•Motor with removable power cable and dedicated connector: if the power cable is damaged, it must be replaced by the manufacturer or
by the latter’s technical assistance service, or by a similarly qualified person, in order to prevent any type of risk.
•Be careful with moving shutters and keep away from them until they have lowered fully
•Do not activate the awning when maintenance activities – such as window cleaning – are being carried out nearby
•Disconnect the awning from the power supply when maintenance activities such as window cleaning are being carried out nearby. Warning
for ‘shades with automatic control’
INSTALLATION WARNINGS
•Prior to installing the drive motor, remove any unnecessary cables and disable any appliance not required for motorised operation
•Install the manoeuvring assembly for manual release at a height below 1.8 m
NOTE: if removable, the manoeuvring assembly must be kept close to the door
•Make sure that the control devices are kept far from moving parts but nonetheless in a visible position.
The manoeuvring assembly of a switch kept manually closed must be located in a position visible from the guided part but far from moving
parts. It must be installed at a minimum height of 1.5 m
•The fixed control devices must be installed in a visible position
•For drive motors that allow for accessing unprotected moving parts once they have been installed, such parts must be installed 2.5 m above
the floor or other surface form which they can be accessed
1– English

PRODUCT DESCRIPTION AND
INTENDED USE
1
This product is a tubular motor for automating roller shutters. Do not use it for any
other purpose! The manufacturer declines all liability for damage resulting
from improper use of the product or any other use than that specified in this
manual.
The product has the following functional characteristics:
• it is mains powered (see the motor’s nameplate ratings);
• it installs inside the winding roller; the part of the motor that protrudes from the roller
(electronic head) mounts to the ceiling or wall with brackets (not included);
• it has a built-in radio receiver and control unit with encoder technology that elec-
tronically controls the movement and precision of the limit switches;
• can be configured for both ONE-WAY and TWO-WAY transmission. Nice’s new
two-way radio protocol enables communication in both directions between the
transmitter and receiver, as does the mesh network which can connect to any Nice
automation within radio range. The transmitter signal confirms that the control has
been received correctly and allows the position of the automation to be controlled
at all times. Wireless technology makes even initial programming simple and user-
friendly.
• it is compatible with all Nice control electronics using the NRC radio system (trans-
mitters and climate sensors, the latter can only be used if the motor is configured
for operation in ONE-WAY mode);
• it can be controlled with a radio transmitter or cabled wall-mounted button panel
(see fig. 1);
• it can move the awnings, blind or shutter up or down; stop it at the upper limit
switch, the lower limit switch or various intermediate positions (up to 30 if the mo-
tor is configured for operating in ONE-WAY mode or up to 6 if it is configured for
operating in TWO-WAY mode);
• is equipped with a “thermal protection device” which, in case of extended use, pro-
tect the motor against excessive overheating by limiting the motor speed to the min-
imum speed; in this way, the continuous usage time increases, allowing extended
use (until the thermal protection device intervenes);
• it is available in several versions, each with a certain motor torque (power).
INSTALLATION OF THE MOTOR AND
THE ACCESSORIES
2
2.1 - Preliminary checks before installation and
limitations on use
• Check the condition of the product right after unpacking it.
• This product is available in several version, each with a specific motor torque. Each
version is designed to drive roller shutters of a certain size and weight. Therefore,
before installation make sure the product’s motor torque, rotation speed and op-
eration time are suitable for automating your roller shutter (see the “Guide to Selec-
tion” section, in the Nice Product Catalogue – www.niceforyou.com). In particular,
do not install the product if its motor torque is lower than that needed to
move your roller shutter.
• Check the diameter of the winding roller. This must be chosen according to the
motor torque, as follows:
– for motors that are size “M” (Ø = 45 mm) and have a torque of up to 35 Nm (in-
cluded, the minimum inside diameter of the winding roller must be 52 mm.
• Before automating a roller shutter, check that there is enough free space in front of
it for it to be completely opened.
• If the motor is to be installed outdoors, adequate protection against atmospheric
agents must be guaranteed.
ERA P BDERA W BD
1
English – 2

(A)(B)
L
N
1
2
3
ERA P BDERA W BD
2.2 - Assembling and installing the tubular motor
Caution! – Read the safety warnings before proceeding. Incorrect installa-
tion could cause severe physical injury.
To assemble and install the motor, refer to fig. 3. Moreover, consult the Nice product
catalogue or go to www.niceforyou.com to choose the crown of the limit switch (fig.
3-a), the drag wheel (fig. 3-b), and the motor fastening bracket (fig. 3-f).
2.3 - Installation of accessories (optional)
After installing the motor, install the accessories, if required. In order to identify those
that are compatible and choose the models desired, see the Nice product cata-
logue, also viewable at www.niceforyou.com. Fig. 2 shows the type of accessories
that are compatible and their connection to the motor (all of these are options and
not included in the package).
ELECTRICAL CONNECTIONS AND
FIRST POWER UP
3
The electrical connections must be made only after installing the motor and compat-
ible accessories required.
The electrical cord of the motor is made up of the following internal cables (fig. 2):
Cable Colour Connection
1 Brown Power supply phase
ac
220-230 VAC
50-60 Hz
2 Blue Neutral
3 Yellow-green Earth
3.1 - Connection of motor to electricity mains
Utilise cords 1, 2, 3 (fig. 2) to connect the motor to the main and pay attention to
the warnings:
– improper connection can cause breakdowns and hazardous situations;
– scrupulously respect the connections indicated in this manual;
– in the power supply network of the motor you must install a disconnection device
having an opening distance of the contacts that allows complete disconnection in
the overvoltage category III conditions, in conformity with the installation rules (dis-
connection device not supplied with the product).
3.2 - Connection of accessories to motor
• Accessories can be connected by a radio (portable transmitters and climatic
sensor models with radio data transmission): memorise these accessories in the
motor during the programming phases; refer to the procedures given in this man-
ual and those given in the manuals supplied with the devices.
PROGRAMMING AND ADJUSTMENTS
4
4.1 - TWO-WAY and ONE-WAY operation
The motor can operate with both TWO-WAY and ONE-WAY transmission. The trans-
mission mode is determined by the first transmitter paired with the motor (ONE-WAY
or TWO-WAY).
WARNING: if the motor is new (and does not have any remote control mem-
orised), at the start-up run one of the memorisation procedures for the first
transmitter described at points B.1 motor configured for ONE-WAY commu-
nication, A.1 motor configured for TWO-WAY communication, or C.1 motor
configured for ONE-WAY communication and OLD generation transmitter
lacking the PRG and ESC buttons. In this way, the motor will be configured
in the TWO-WAY mode (and thus will be able to accept all two-way transmit-
ters) or ONE-WAY mode (and thus will be able to interact only with one-way
transmitters), depending on which transmitter is memorised first.
4.2 - Groups of programming and adjustment pro-
cedures
There are 4 groups of programming and adjustment procedures:
Group A – for motors
congured for TWO-WAY
communications
BiDi
These procedures apply only when the
motor is congured for TWO-WAY com-
munications.
Group B – for motors
congured for ONE-WAY
communications.
MONO
These procedures apply only when the
motor is congured for ONE-WAY com-
munications.
Group C – for motors
configured for ONE-WAY
communication and using
a transmitter lacking the
PRG and ESC buttons.
MONO UP
STOP
DOWN
These procedures only apply when the
motor is configured for ONE-WAY com-
munication and a transmitter is used
that has the ▲(UP), ■(STOP) and ▼
(DOWN) buttons, but lacks the PRG and
ESC buttons.
Group D – QUICK pro-
gramming procedures
For information on these procedures, re-
fer to the quick guide supplied with the
product and available in digital format on
the website www.niceforyou.com.
LEGEND
1 Brown wire A“ERA W BD” portable transmitter
2 Blue wire B“ERA P BD” portable transmitter
3 Yellow-green wire
2
3– English

d
M10 mm
e
c
a
3
i
b
f
Support for fixing the motor head.
g
Cap for fixing the roller to the bracket (not
included).
1
1
2
hRemoving the connector if
necessary
English – 4

4.3 - Transmitter to be used for programming
procedures
• Procedures that can only be completed with a Nice “ERA P” or “ERA W”
transmitter having the PRG and ESC keys, or with transmitters equipped
with a STOP key.
• All the programming procedures must be completed by selecting a single
channel on the transmitter.
• The programming procedure must be performed exclusively with a transmitter
memorised in “Mode I” (see procedure B.1 - A.1 - C.1).
• If the transmitter used for programming controls multiple automation units, you
must select the “unit” corresponding to the automation you are programming before
sending a command during a procedure.
4.3.1 - Report messages sent by the motor
The motor repeats the report message on the status of the installation by performing
some brief movements when a movement is commanded. To understand the signifi-
cance of these movements read Table A.
TABELLA A – Movement signals
No. of MOVEMENTS Meaning
0 movements (START & STOP) = 2 limit switches programmed
1 movement (START & STOP) = 1 limit switch programmed
2 movements (START & STOP) = no limit switch programmed
4.4 - Positions in which the roller shutter stops
automatically
The electronic system that controls the roller shutter’s movement at all times can au-
tomatically stop the movement when the roller shutter reaches a certain position pro-
grammed by the installer. The programmable positions are (fig. 4):
– position “0” = UPPER (fully wound roller shutter);
– position “1” = LOWER (fully unwound roller shutter);
– position “H” = INTERMEDIATE (partially open roller shutter).
0
1
H
4
When the limit switches are not programmed yet, the roller shutter can be moved only
in the “hold-to-run” mode, i.e. keeping the control key pressed for the desired dura-
tion of the manoeuvre; the movement stops as soon as the user releases the key.
However, after programming the limit switches, briefly pressing the appropriate key
will start the roller shutter and it will stop moving automatically as soon as the roller
shutter reaches the required position.
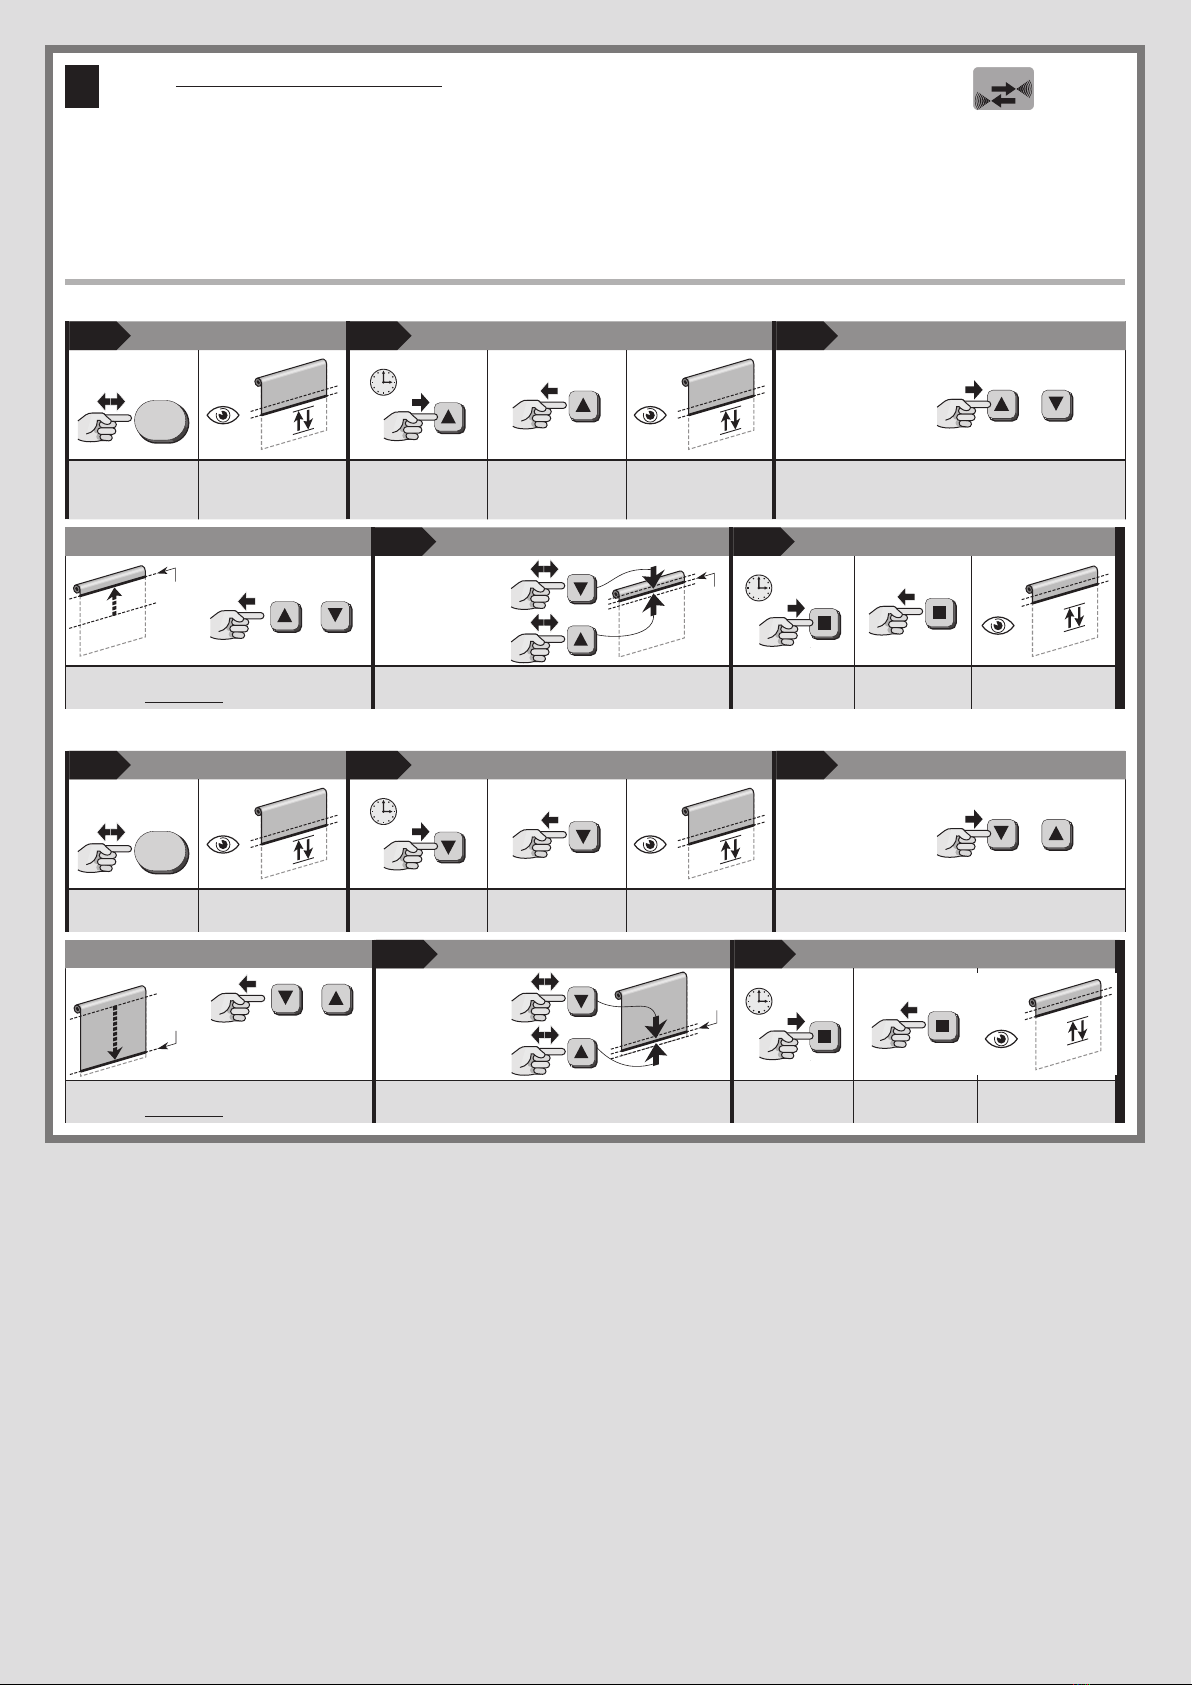
To adjust the distances “0” and “1” various procedures are possible; to choose the
appropriate one, take into account the supporting structure of your roller shutter (see
the summary in the table).
WARNING! – If you want to again adjust again the height of the limit switches
adjusted previously, consider the following:
– If you would like to adjust them with an alternative procedure different
from the one used previously, you must FIRST delete the heights by fol-
lowing procedure B.7, A.6 or C.4.
– If you wish to adjust the same procedure used previously, you need not
delete them.
The programming of the limit switches simultaneously combines the two directions
of rotation of the motor to the respective shutter raising key (▲) and shutter lowering
key (▼) of the control device (initially, when the limit switches are not programmed
yet, the combination is random and it can happen that when pressing the ▲key, the
roller shutter moves down instead of up, or vice versa).
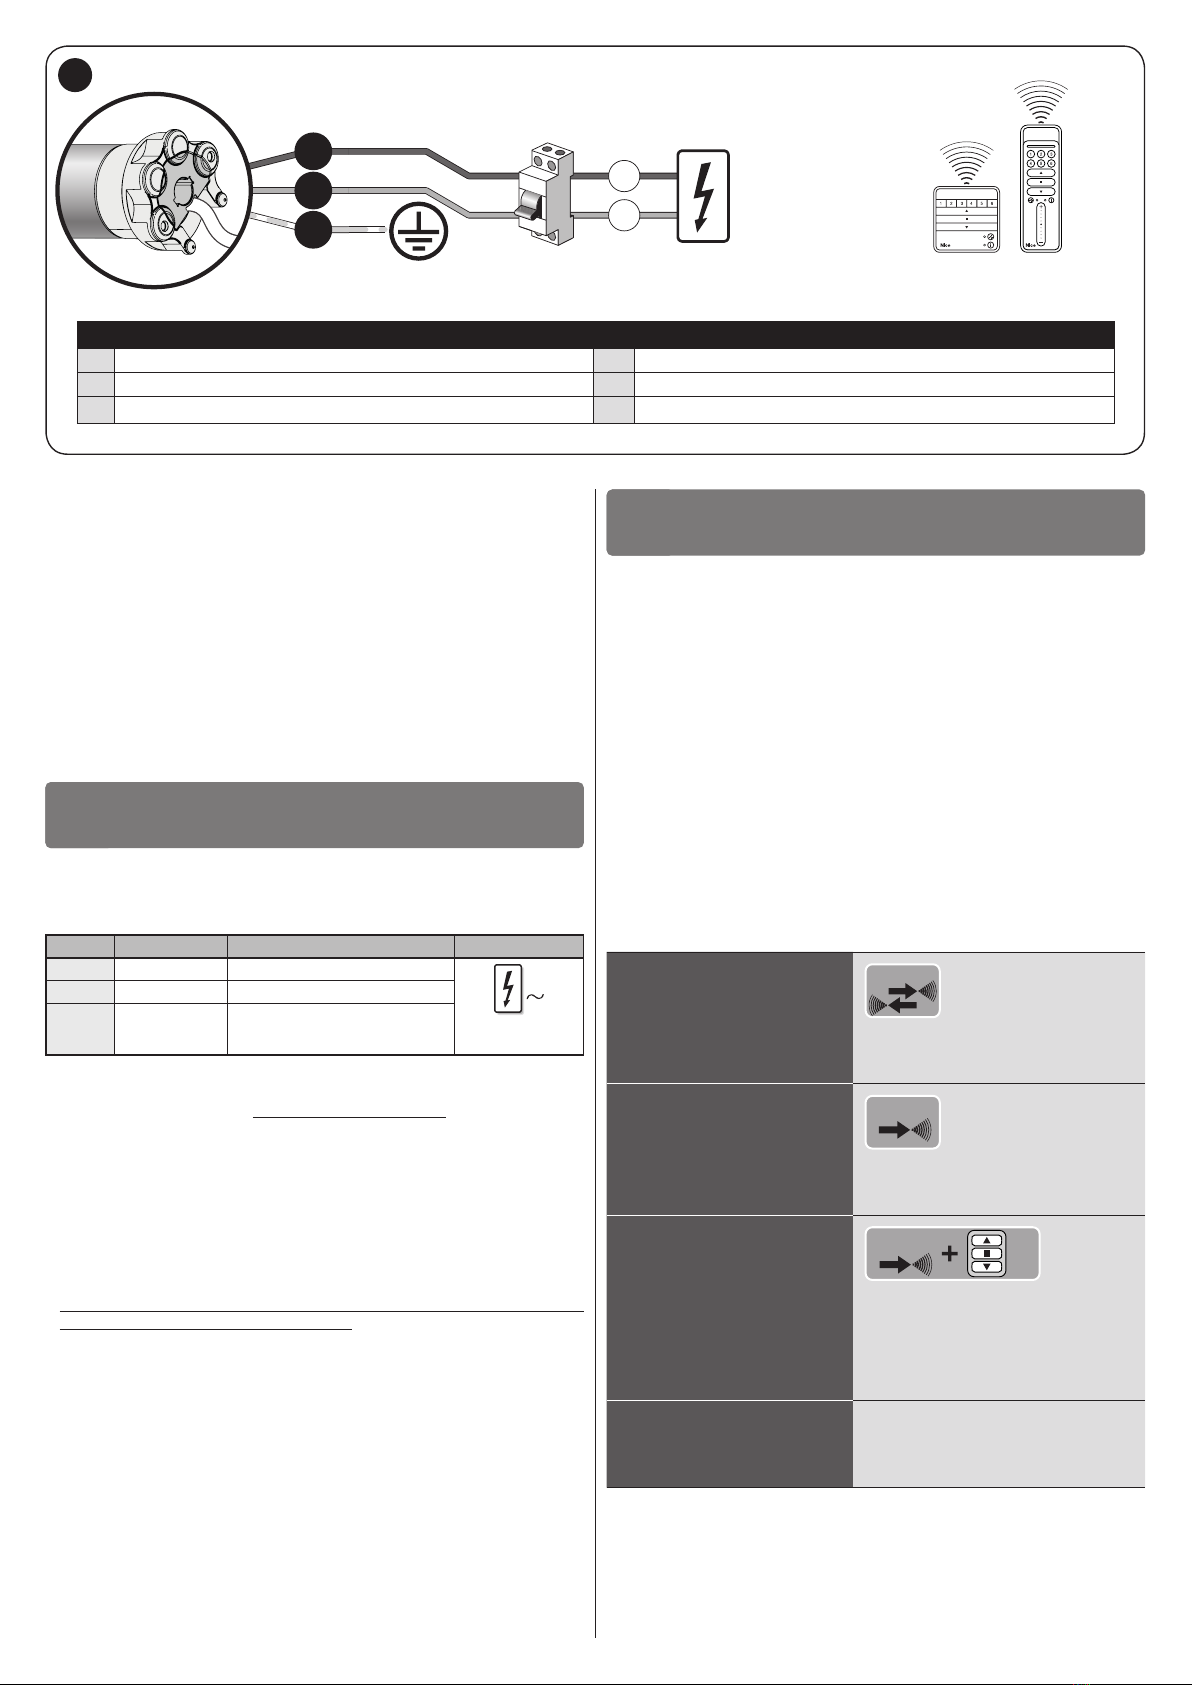
4.5 - General warnings
• The limit switch must be adjusted after installing the motor in the roller shutter and
connecting it to the power supply.
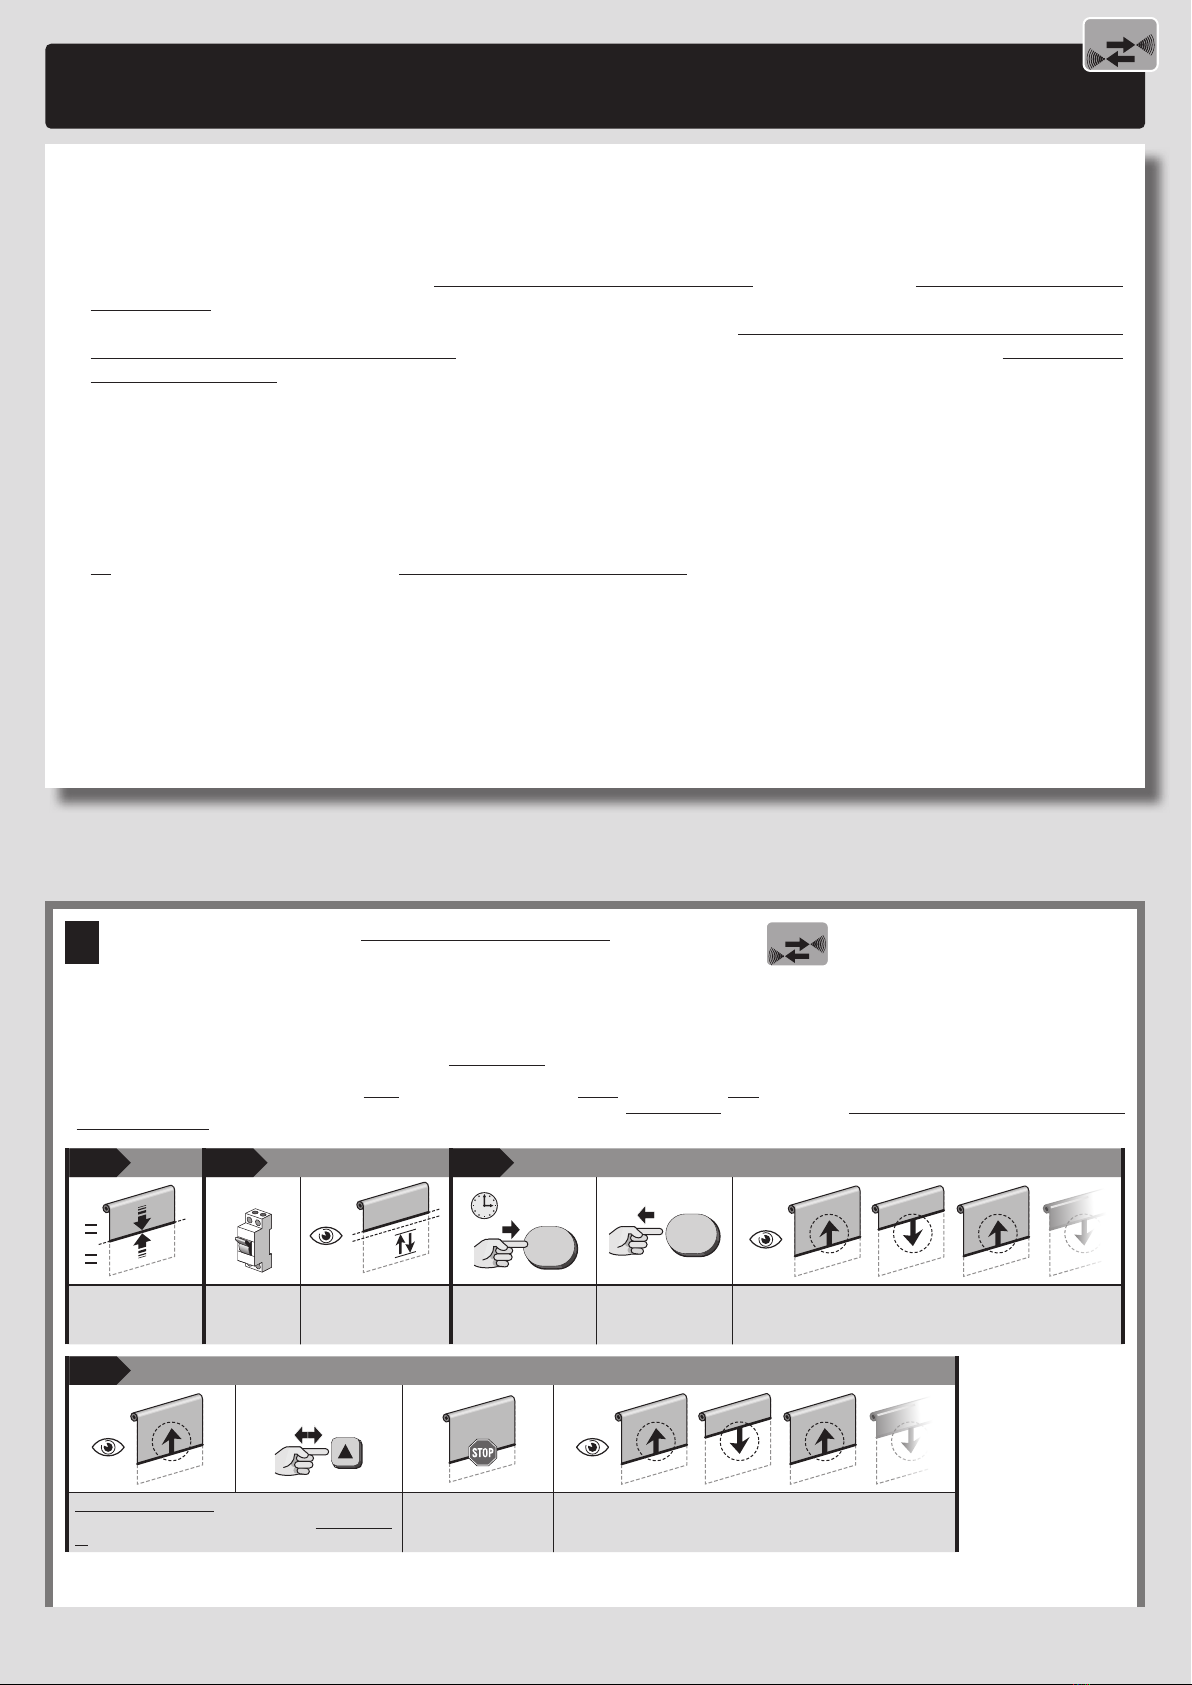
• Comply strictly with the time limits indicated in the procedures: after releasing a key,
you have 60 seconds to press the next key indicated in the procedure; otherwise,
when the time is up, the motor will perform 6 movements to communicate cancel-
lation of the procedure in progress.
• During programming the motor performs a certain number of brief movements
as a “response” to the command sent by the installer. Count these movements
regardless of their direction. The movements are indicated in the procedures with a
number followed by the symbol .
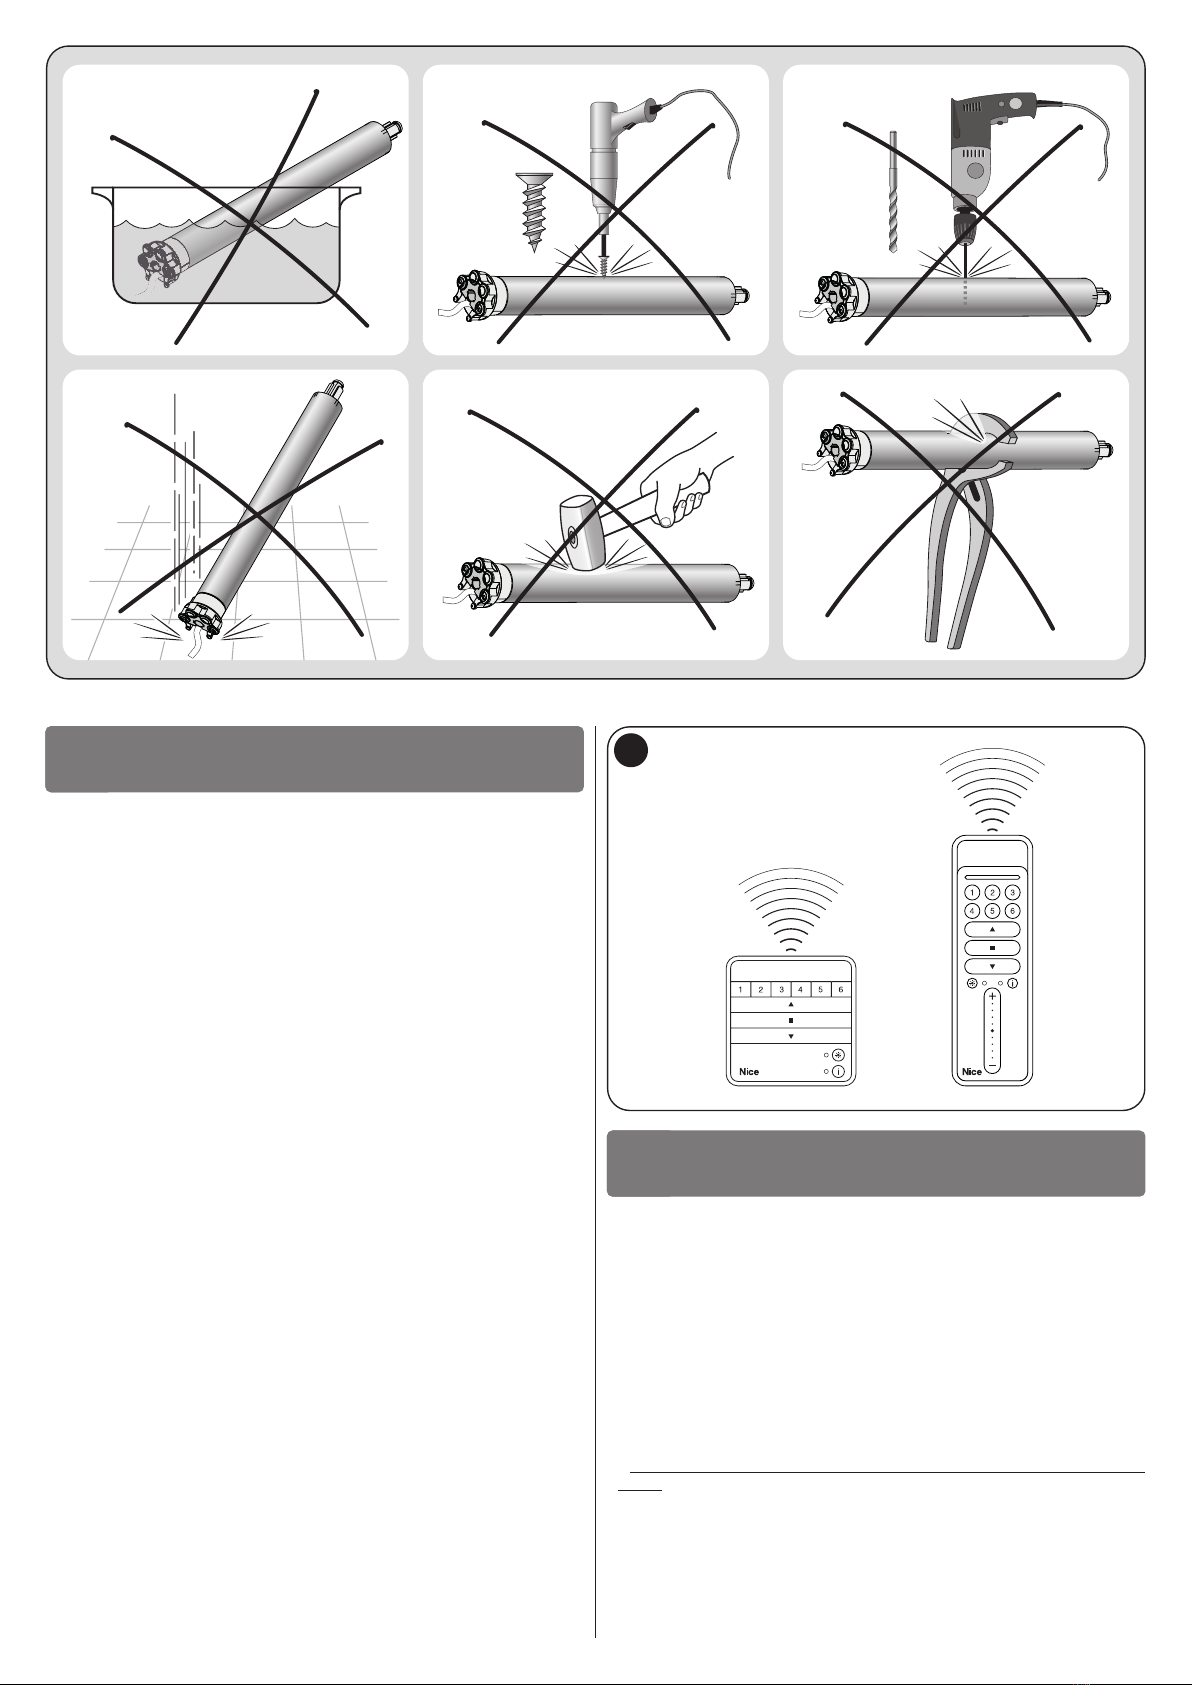
4.6 - Important warnings for memorising the radio
transmitters
• To select transmitter compatible with the motor’s receiver, refer to the “Nice
Screen” catalogue, which is also available on www.niceforyou.com.
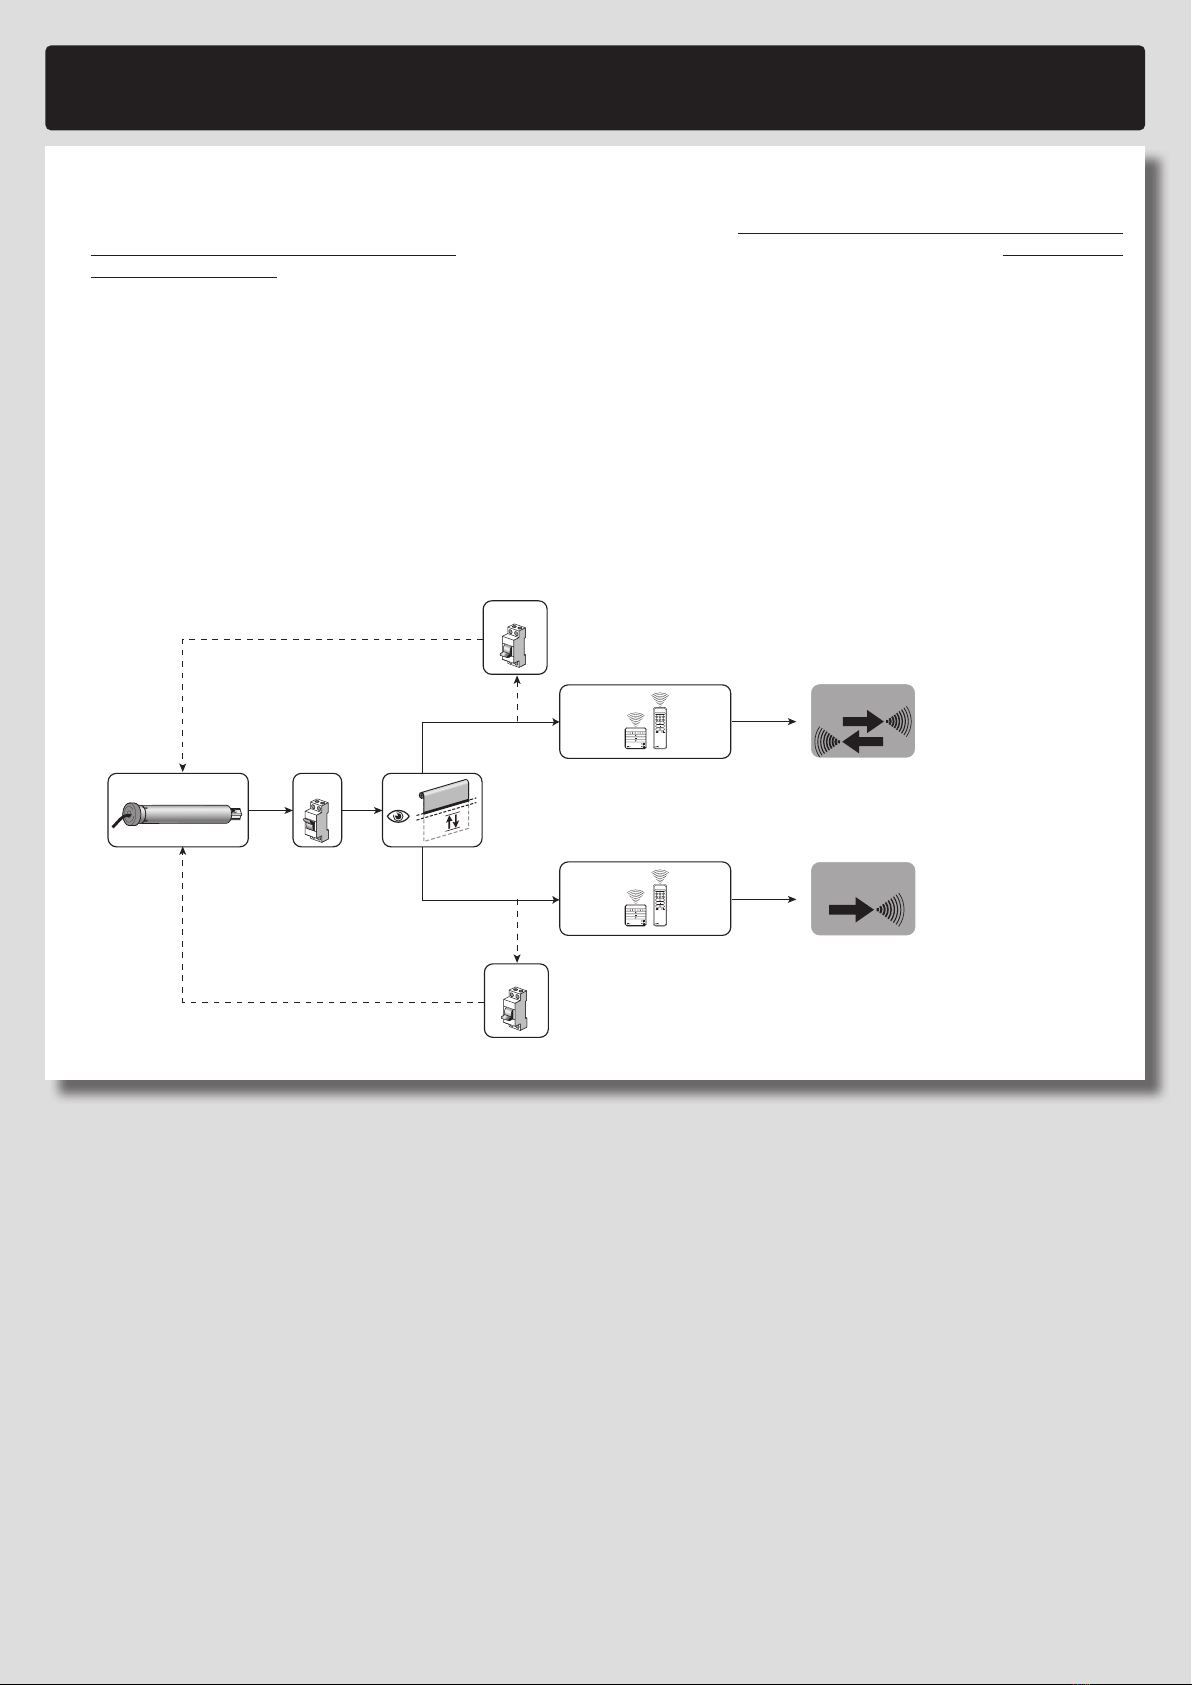
• When the motor’s memory does not contain any transmitter, to memorise the
FIRST transmitter, perform the “Communication mode configuration procedure
(ONE-WAY or TWO-WAY)” and subsequently use only one of the following pro-
cedures: B.1 (motor configured as ONE-WAY); A.1 (motor configured as TWO-
WAY); C.1 (motor configured as ONE-WAY and OLD generation transmitter lack-
ing the PRG and ESC keys). If instead one or more transmitters have already been
memorised, to memorise SUPPLEMENTARY transmitters use one of following
procedures only: B.5 (motor configured as ONE-WAY); A.5 (motor configured as
TWO-WAY); C.2 (motor configured as ONE-WAY and OLD generation transmitter
lacking the PRG and ESC keys).
4.6.1 - Two procedures to memorise the keys of a transmitter
There are two categories of transmitter memorisation procedures:
A - Procedures which memorise the buttons in “Mode I”
(“Standard mode”)
They are procedures B.1 - B.5.1 (motor configured as ONE-WAY); A.1 -
A.5 (motor configured as TWO-WAY); C.1 - C.2.1 (motor configured as
ONE-WAY and OLD generation transmitter lacking the PRG and ESC
keys). These allow you to memorise all buttons at the same time, so that
each button corresponds to a basic motor command in a standard fashion.
B - Procedures which memorise the buttons in “Mode II”
(“Custom mode”, only applicable when the motor is con-
gured for ONE-WAY communications
These are procedures B.5.2, A.5 and C.2.2. These allow you to memorise
individual buttons and map them to any of the commands given in the mo-
tor’s “list of commands” (this list is given in each procedure). The button and the
command are selected by the installer, as required by the installation.
4.6.2 - Number of transmitters that can be memorised (only
applicable when the motor is configured for ONE-WAY
communications)
You can memorise 30 transmitters, if these are all memorised in “Mode I”, or you
can memorise 30 single commands (keys) if they are all memorised in “Mode II”.
The two modes can coexist up to a maximum limit of 30 memorised units.
4.6.3 - Number of transmitters that can be memorised (only
applicable when the motor is configured for TWO-WAY
communications)
You can memorise 30 transmitters.
5– English

Communication mode (ONE-WAY or TWO-WAY)
GENERAL WARNINGS RELATING TO THE PROCEDURES
• Before starting any programming, move the roller shutter to an intermediate position, away from the Up and Down limit switches.
• When the motor is powered up, if it makes 2 movements this means that: at least one transmitter has been memorised
and no limit switch has been programmed; if, on the other hand, it makes 1 movement this means that: no transmitter
has been memorised.
• When running a procedure, you can abort the procedure at any time by pressing ESC (on the back of the transmitter).
•To change the motor’s configuration (from ONE-WAY to TWO-WAY and inversely), it is necessary to perform the “TOTAL
deletion of the memory” (B.7 motor configured for ONE-WAY communication, A.6 motor configured for TWO-WAY com-
munication or C.4 motor configured for ONE-WAY communication and OLD generation transmitter, lacking the PRG and
ESC buttons) and then switch the motor off and on again.
WARNING: if the motor is new (and does not have any remote control memorised), at the start-up run one of the
memorisation procedures for the first transmitter described at points B.1 motor configured for ONE-WAY com-
munication, A.1 motor configured for TWO-WAY communication, or C.1 motor configured for ONE-WAY com-
munication and OLD generation transmitter lacking the PRG and ESC buttons.
In this way, the motor will be configured in the TWO-WAY mode (and thus will be able to accept all two-way transmitters)
or ONE-WAY mode (and thus will be able to interact only with one-way transmitters), depending on which transmitter is
memorised first.
OFF
OFF
ERA
P
ERA
W
ERA
P
BD
ERA
W
BD
NEW ON
1
GROUP “A”
PROCEDURES
GROUP “B” or
GROUP “C”
PROCEDURES
BiDi
MONO
English – 6

–– GROUP “A” PROCEDURES ––
for motors configured for TWO-WAY communications
Procedures which can only be completed with a Nice transmitter with the ▲, ■, ▼, PRG, ESC keys (eg. “ERA P BD”, “ERA W BD”)
GENERAL WARNINGS RELATING TO THE PROCEDURES
• Before starting any programming, move the roller shutter to an intermediate position, away from the Up and Down limit
switches.
• All the programming procedures must be completed by selecting a single channel on the transmitter.
• If the programming transmitter controls multiple groups of screen motors, before sending a command requested by
the procedure, select the group to which the motor being programmed belongs.
• When the motor is powered up, if it makes 2 movements this means that: at least one transmitter has been memorised
and no limit switch has been programmed; if, on the other hand, it makes 1 movement this means that: no transmitter
has been memorised.
• When running a procedure, you can abort the procedure at any time by pressing ESC (on the back of the transmitter).
• When the Up and Down limit switches are not programmed, the roller shutter can only be commanded in hold-to-run mode
- i.e. you must hold the button down until the roller shutter reaches the desired position. The movement stops when you
release the button in any position.
• When the Up and Down limit switches have been programmed, the roller shutter can be controlled by simply pressing and
releasing the buttons. Doing so starts the movement, which is stopped automatically by the system when the roller shutter
reaches the programmed position.
•All procedures require you to use a transmitter memorised in “Mode I” (e.g., memorised with procedure A.1 or with pro-
cedure A.5).
•The “deletion carried out with a non-memorised transmitter” procedure does not appear in this section as, for motors con-
figured in TWO-WAY communication mode, it is always possible to access it by completing the “Memorising the FIRST
TRANSMITTER A.1” procedure.
•To change the motor’s configuration (from ONE-WAY to TWO-WAY and inversely), it is necessary to perform the “TOTAL
deletion of the memory” procedure (B.7 motor configured for ONE-WAY communication, A.6 motor configured for TWO-
WAY communication or C.4 motor configured for ONE-WAY communication and OLD generation transmitter, lacking the
PRG and ESC buttons) and then switch the motor off and on again.
BiDi
A.1 - Memorising the FIRST TRANSMITTER (in “Mode I”)
BiDi
NOTES AND WARNINGS
• To memorise further transmitters,m use the procedure described under section B.5 (motor congured for ONE-WAY communication), A.5 (motor congured for TWO-
WAY communication) or C.2 (motor congured for ONE-WAY communication and OLD generation transmitter lacking the PRG and ESC keys).
• If all transmitters memorised in the motor are deleted, the rst transmitter you memorise thereafter must be memorised with this procedure.
• If the installation has multiple motors, the procedure must be repeated for each motor separately.
• On completing this procedure, button ▲will Raise the roller shutter, button ▼Lower it, and button ■Stop the movement.
• If within the transmitter’s range there are multiple powered up motors, to memorise the rst transmitter in any one of them, it is not necessary to disconnect power
to all other motors; simply proceed as follows.
1 2 3 4
ON
1
PRG
= 5sec
PRG
Move the roller
shutter to a half-
way position.
Switch on
mains power,
count 1 movement. Hold down the but-
ton and
release it after 5
seconds;
over the next 2 minutes, all motors within the transmitter’s
range in which no transmitters have yet been memorised will
move their awnings up and down, for random periods of time.
45
!!! (x 1)
Select the roller shutter you wish to program and, at
the start of an UP movement, stop it IMMEDIATE-
LY, by pressing and releasing the button (1 time):
the movement will
stop briefly (= com-
mand received) and ...
... the roller shutter will resume its up and down movements,
each of random duration.
A
7– English

A.2 - Temporarily deactivating (and reactivating) motors you do not wish to program
BiDi
NOTES AND WARNINGS
• This procedure temporarily deactivates (for 5 minutes) only motors whose up and down limit switches have already been programmed.
A.2.1 - To temporarily deactivate motors you do not wish to program
1 2 end
(x 1)
ESC
“0”
The system locks out only those motors whose lim-
it switches have already been programmed. It has
no effect on motors which have not yet been pro-
grammed.
The deactivation is temporary and lasts for 5
minutes.
Press and release
the button (1 time);
press and release the
button;
you will see a brief down movement
and a movement which stops the roller
shutter at the Up limit “0”.
For a period of 5 minutes, the locked out motors will
not respond to commands.
A.2.2 - To reactivate temporarily locked out motors
You can reactivate the motors in two ways:
option – A
1end
After 5 minutes the locked out
motors are automatically reactivat-
ed by the system.
Wait for 5 minutes ... ... the system will then move the roller
shutter to the mid position.
option – B
1end
During the 5 minute period the
locked out motors can be reacti-
vated at any time by the user.
(x 1)
ESC
During the 5 minutes, at any time... Press and release
the button (1 time);
press and release the
button;
... the system will then move the
roller shutter to the mid position.
A
5end
!!! (x 1)
3
Observe the same roller shutter and, at the start of
a DOWN movement, stop the movement IMMEDI-
ATELY, by pressing and releasing the button (1 time):
the movement will
stop;
count 3 movements.
English – 8

A.3 - MANUAL programming of the UP (“0”) and DOWN (“1”) limit switches
BiDi
NOTES AND WARNINGS
• This procedure is obligatory only for roller shutters without a mechanical stop at the Up position.
•This procedure can be used if the limit switches have been programmed using the semiautomatic procedure (A.5).
• After the limit positions have been programmed, the roller shutter can be controlled by simply pressing the appropriate buttons on the control unit. The roller shutter
will move between the positions set with procedures A.3.1 and A.3.2.
• If the limit switches have not been programmed yet, the roller shutter’s direction of movement might not match the pressed button.
A.3.1 - To program the UP limit switch (“0”)
1 2 3 continues
(x 1)
PRG
2
= 5sec
2
Command
an UP
movement
()
Press and re-
lease the button (1
time);
count 2 movements. Hold down the but-
ton and
release it after 5
seconds;
count 2 movements. Hold down the button ▲(or ▼) and wait ...
3 4 5 end
↕
“0”
()
Finely adjust-
ing the posi-
tion of limit
switch “0”
“0
”
= 5sec
3
... release the button as soon as the roller shut-
ter reaches position “0” (UP limit switch).
Press the buttons until you reach the desired position. Hold down the
button and
release it after 5
seconds;
count 3 movements.
A.3.2 - To program the DOWN limit switch (“1”)
1 2 3 continues
(x 1)
PRG
2
= 5sec
2
Command
an DOWN
movement
()
Press and release
the button (1 time);
count 2 movements. Hold down the but-
ton and
release it after 5
seconds;
count 2 movements. Hold down the button ▼(or ▲) and wait ...
3 4 5 end
↕
()
“1”
Finely adjust-
ing the posi-
tion of limit
switch “1”
“1”
= 5sec
3
... release the button as soon as the roller shut-
ter reaches position “1” ( DOWN limit switch).
Press the buttons until you reach the desired position. Hold down the
button and
release it after 5
seconds;
count 3 movements.
A
9– English

A.4 - Programming an INTERMEDIATE POSITION (position “H”)
BiDi
NOTES AND WARNINGS
• This procedure memorises an intermediate position (position “H”) between the Up (“0”) and Down (“1”) limit switch positions. When the automation is being used,
after giving the intermediate position command, the system will automatically stop the roller shutter at the programmed “H” position.
• Up to 30 “H” positions can be memorised if the motor is configured to operate in ONE-WAY mode, or up to 6 “H” positions if the motor is configured to operate in
TWO-WAY mode, in any desired position, provided that they are within the space delimited by the two limit switches. These positions can only be programmed after
the limit switch positions. Repeat this procedure for each position you wish to memorise.
• The first “H” position must be programmed using the buttons ▲+▼, on the transmitter used to run the procedure itself. However, each subsequent position
“H” must be programmed using a button on another non-memorised transmitter.
• To change an existing “H” position, move the awning to the desired height and run this procedure; in step 06, however, press the button associated with the exist-
ing “H” position you are changing.
1 2 3 4
“H”
(x 1)
PRG
2
= 5sec
2
Move the roller shutter to
the desired “H” position.
Press and release
the button (1 time);
count 2 movements. Hold down both buttons... release them after 5 sec-
onds;
count 2 movements.
4 5 6 ...
Precisely ad-
justing the
“H” posi-
tion
“H
”
= 5sec
3
Select one of the following potions
and execute it:
• option A – to memorise the
FIRST “H” position.
• option B – to memorise a SUP-
PLEMENTARY “H” position.
Press the buttons until you reach the desired position. Hold down the but-
ton and
release it after 5 sec-
onds;
count 3 movements.
option – A
6end
option – B
6end
= 5sec
4
= 5sec
...
...
4
Hold down both but-
tons...
release them
after 5 sec-
onds;
count 4 movements. On ANOTHER transmitter,
which has NOT been memo-
rised: hold down any button
you wish;
release it after
5 seconds;
count 4 movements.
A
A.5 - Memorising ANOTHER TRANSMITTER (second, third, etc.)
BiDi
NOTES AND WARNINGS
• The motor configured to operate in TWO-WAY mode can memorise up to 16 transmitters.
• To run procedures A.5 you must have a new transmitter to memorise and an old previously memorised transmitter. The two transmitters must have the “PRG” and
“ESC” buttons (like “ERA P” and “ERA W” transmitters).
• Procedures A.5 memorise all the new transmitter’s buttons in “Mode I”, with the same configuration as the old transmitter (for details about “Mode I” see par. 4.6.1).
1 2 3
OLD
PRG
(x 1)
2
NEW
= 5sec
2
On the OLD transmitter: Press
and release the button (1 time);
count 2 movements; On the NEW transmitter: hold
down the button and
release it after 5
seconds;
count 2 movements;
3 4 end
OLD
PRG
(x 1)
2
NEW
(x 1)
3
On the OLD transmitter: Press
and release the button (1 time);
count 2 movements; On the NEW transmitter: Press
and release the button (1 time);
count 3 movements
(= transmitter
memorised).
A
English – 10

A.6 - TOTAL or PARTIAL deletion of memory
BiDi
NOTES AND WARNINGS
• In order to carry out the following deletion procedures, the transmitter must be memorised in mode I.
• To change the motor’s configuration (from TWO-WAY to ONE-WAY), after completing the “FULL deletion of the memory” procedure, it is necessary to switch the mo-
tor off and then on again.
• Once the transmitter has been deleted from the motor’s memory, it is necessary to delete from the transmitter’s memory the motor that is no longer
associated, to prevent “no motor” error messages from appearing on the transmitter (refer to the transmitter manual).
A.6.1 - Procedure run with a memorised transmitter
1 2 3 4
PRG
(x 1)
2
PRG
(x 1)
2
PRG
(x 1)
3
Press and release
the button (1 time);
count 2 movements. Press and release
the button (1 time);
count 2 movements. Press and release
the button (1 time);
count 3 movements.
4 5 ...
PRG
(x 1)
4
Select one of the following potions and execute it:
• option A (*) – delete the motor’s ENTIRE memory
• option B (*) – delete ALL memorised transmitters
• option C (*) – delete ONE memorised transmitter
• option D (*) – delete ALL positions (“0”, “1”, “H”, etc.). Caution! – This deletion should only be performed if you wish re-
program the distances using a procedure different from the one used previously (e.g. you have used manual distance pro-
gramming (A.3) and would now like to use the semi-automatic procedure (A.5).
(*) Warning! – Once the procedure relative to the chosen option (A, B, C or D) has been completed, perform the
dissociation procedure for the two-way remote control (refer to the instructions of the two-way remote con-
trol).
Press and release
the button (1 time);
count 4 movements.
option – A
5end
option – B
5end
PRG
(x 1)
5
= 5sec
5
Press and release the
button (1 time);
count 5 movements. Hold down the button and release it after 5 seconds; count 5 movements.
option – C
5 6 end
= 5sec
3
= 5sec
5
Hold down the but-
ton and
release it after 5
seconds;
count 3 movements. On the transmitter to be deleted: hold down
any key either the key memorised in mode 2 or
the climatic conditions sensor;
count 5 movements.
option – D
5end
= 5sec
5
Hold down both but-
tons...
release them after 5
seconds;
count 5 movements.
A.6.2 - Procedure run with a transmitter which has not yet been memorised
If there is a transmitter that has not been memorized, it must be memorized with procedure A.1.
Then carry out procedure A.6.1 to perform the desired type of cancellation.
A
11 – English

B.1 - Memorising the FIRST TRANSMITTER (in “Mode I”)
MONO
NOTES AND WARNINGS
• This procedure must be used only for memorising the FIRST TRANSMITTER. If the motor does not perform the procedure, it means that one or more trans-
mitters are already memorised; therefore, to memorise further transmitters,m use the procedure described under section B.5 (motor congured for ONE-WAY
communication), A.5 (motor congured for TWO-WAY communication) or C.2 (motor congured for ONE-WAY communication and OLD generation transmitter lack-
ing the PRG and ESC keys).
• If all transmitters memorised in the motor are deleted, the rst transmitter you memorise thereafter must be memorised with this procedure.
• If the installation has multiple motors, the procedure must be repeated for each motor separately.
• Once the first transmitter has been memorised, the raising and lowering direction of the roller shutter will not yet be associated with the ▲and ▼buttons of the
transmitter. This combination will occur automatically when adjusting the up (“0”) and down (“1”) limit switches (see procedure B.3); moreover, the roller shutter will
only move in “hold-to-run” mode during the time in which the limit switches have not yet been adjusted.
• If within the transmitter’s range there are multiple powered up motors, to memorise the first transmitter in any one of them, it is necessary to disconnect the power
supply to all other motors and proceed as follows:
1 2 3 end
ON
1
PRG
= 5sec
3
PRG
Move the roller
shutter to a half-
way position.
Switch on
mains power,
count 1 movement. Hold down the but-
ton and
release it after 5 sec-
onds;
release the button.
B
–– GROUP “B” PROCEDURES ––
for motors configured for ONE-WAY communications
procedures which can only be completed with a Nice “ERA P” or “ERA W” transmitter with the ▲, ■, ▼, PRG, ESC keys
GENERAL WARNINGS RELATING TO THE PROCEDURES
• Before starting any programming, move the roller shutter to an intermediate position, away from the Up and Down limit
switches.
• All the programming procedures must be completed by selecting a single channel on the transmitter.
• If the programming transmitter controls multiple groups of screen motors, before sending a command requested by
the procedure, select the group to which the motor being programmed belongs.
• When the motor is powered up, if it makes 2 movements this means that: at least one transmitter has been memorised
and no limit switch has been programmed; if, on the other hand, it makes 1 movement this means that: no transmitter
has been memorised.
• When running a procedure, you can abort the procedure at any time by pressing ESC (on the back of the transmitter).
• When the Up and Down limit switches are not programmed, the roller shutter can only be commanded in hold-to-run mode
- i.e. you must hold the button down until the roller shutter reaches the desired position. The movement stops when you
release the button in any position.
• When the Up and Down limit switches have been programmed , the roller shutter can be controlled by simply pressing
and releasing the buttons. Doing so starts the movement, which is stopped automatically by the system when the roller
shutter reaches the programmed position.
•To perform all the procedures, it is necessary to use a transmitter memorised in “Mode I” (for example, the one memorised
with procedure B.1 motor configured for ONE-WAY communication, A.1 motor configured for TWO-WAY communication
or C.1 motor configured for ONE-WAY communication and OLD generation transmitter lacking the PRG and ESC keys).
•To change the motor’s conguration (from ONE-WAY to TWO-WAY and inversely), it is necessary to perform the “TOTAL
deletion of the memory” procedure (B.7 motor congured for ONE-WAY communication, A.6 motor congured for TWO-
WAY communication or C.4 motor congured for ONE-WAY communication and OLD generation transmitter, lacking the
PRG and ESC buttons) and then switch the motor off and on again.
MONO
English – 12

B.3 - MANUAL programming of the UP (“0”) and DOWN (“1”) limit switches
MONO
NOTES AND WARNINGS
• This procedure is obligatory only for roller shutters without a mechanical stop at the Up position.
•This procedure can be used if the limit switches have been programmed using the semiautomatic procedure (B.5).
• After the limit positions have been programmed, the roller shutter can be controlled by simply pressing the appropriate buttons on the control unit. The roller shutter
will move between the positions set with procedures B.3.1 and B.3.2.
• If the limit switches have not been programmed yet, the roller shutter’s direction of movement might not match the pressed button.
B.3.1 - To program the UP limit switch (“0”)
1 2 3 continues
(x 1)
PRG
2
= 5sec
2
Command
an UP
movement
()
Press and release
the button
(1 time);
count 2 movements. Hold down the but-
ton and
release it after 5
seconds;
count 2 movements. Hold down the button ▲(or ▼)and wait ...
3 4 5 end
↕
“0”
()
Finely adjust-
ing the posi-
tion of limit
switch “0”
“0
”
= 5sec
3
... release the button as soon as the roller shutter
reaches position “0” ( UP limit switch).
Press the buttons until you reach the desired position. Hold down the
button and
release it after
5 seconds;
count 3 movements.
B
B.2 - Locking and unlocking the motor’s memory
MONO
NOTES AND WARNINGS
• Locking the motor’s memory stops any other (unscheduled or unauthorised) transmitters being memorised in it.
1 2 3 4
PRG
(x 1)
2
PRG
(x 1)
2
PRG
(x 1)
3
Press and release
the button (1 time);
count 2 movements. Press and release
the button (1 time);
count 2 movements. Press and release
the button (1 time);
count 3 movements.
4 5 ...
= 5sec
4
Select one of the following potions and execute it:
• option A – LOCK motor’s memory.
• option B – UNLOCK motor’s memory.
Hold down both buttons... release them after 5 sec-
onds;
count 4 movements.
option – A
5end
option – B
5end
= 5sec
3
= 5sec
5
Hold down the but-
ton and
release it after 5
seconds;
count 3 movements. Hold down the but-
ton and
release it after 5
seconds;
count 5 movements.
B
13 – English

B.3.2 - To program the DOWN limit switch (“1”)
1 2 3 continues
(x 1)
PRG
2
= 5sec
2
Command
an DOWN
movement
()
Press and release
the button (1 time);
count 2 movements. Hold down the but-
ton and
release it after 5
seconds;
count 2 movements. Hold down the button ▼(or ▲) and wait ...
3 4 5 end
↕
()
“1”
Finely adjust-
ing the posi-
tion of limit
switch “1”
“1
”
= 5sec
3
... release the button as soon as the roller shut-
ter reaches position “1” (DOWN limit switch).
Press the buttons until you reach the desired position. Hold down the
button and
release it after 5
seconds;
count 3 movements.
B.4 - Programming an INTERMEDIATE POSITION (position “H”)
MONO
NOTES AND WARNINGS
• This procedure memorises an intermediate position (position “H”) between the Up (“0”) and Down (“1”) limit switch positions. When the automation is being used,
after giving the intermediate position command, the system will automatically stop the roller shutter at the programmed “H” position.
• Up to 30 “H” positions can be memorised if the motor is configured to operate in ONE-WAY mode, or up to 6 “H” positions if the motor is configured to operate in
TWO-WAY mode, in any desired position, provided that they are within the space delimited by the two limit switches. These positions can only be programmed after
the limit switch positions. Repeat this procedure for each position you wish to memorise.
• The first “H” position must be programmed using the buttons ▲+▼, on the transmitter used to run the procedure itself. However, each subsequent position
“H” must be programmed using a button on another non-memorised transmitter.
• To change an existing “H” position, move the awning to the desired height and run this procedure; in step 06, however, press the button associated with the exist-
ing “H” position you are changing.
1 2 3 4
“H”
(x 1)
PRG
2
= 5sec
2
Move the roller shutter to
the desired “H” position.
Press and release
the button (1 time);
count 2 movements. Hold down both buttons... release them after 5 sec-
onds;
count 2 movements.
4 5 6 ...
Precisely ad-
justing the
“H” posi-
tion
“H”
= 5sec
3
Select one of the following potions
and execute it:
• option A – to memorise the
FIRST “H” position.
• option B – to memorise a SUP-
PLEMENTARY “H” position.
Press the buttons until you reach the desired position. Hold down the but-
ton and
release it after 5 sec-
onds;
count 3 movements.
option – A
6end
option – B
6end
= 5sec
4
= 5sec
...
...
4
Hold down both but-
tons...
release them
after 5 sec-
onds;
count 4 movements. On ANOTHER transmitter,
which has NOT been memo-
rised: hold down any button
you wish;
release it after
5 seconds;
count 4 movements.
B
English – 14

B.5 - Memorising ANOTHER TRANSMITTER (second, third, etc.)
MONO
NOTES AND WARNINGS
•The motor configured to operate in ONE-WAY mode can memorise up to 30 transmitters.
• To run procedure B.5.1, you must have a new transmitter to memorise and an old previously memorised transmitter. The two transmitters must have the “PRG”
and “ESC” buttons (like “ERA P” and “ERA W” transmitters).
•To run procedure B.5.2 you must have a new transmitter to memorise, chosen from the “Nice Screen” catalogue , and an old previously memorised transmitter.
B.5.1 - To memorise the transmitter buttons in “Mode I” (“Standard mode”)
• Procedure B.5.1 memorise all the new transmitter’s buttons in “Mode I”, with the same configuration as the old transmitter (for details about “Mode I” see par. 4.6.1).
12
OLD
PRG
2
1
sec.
2
PRG
On the OLD transmitter: hold down the
button and
count 2 movements; wait
again...
count 2 more move-
ments;
release the button.
2 3 end
NEW
PRG
= 5sec
PRG
2
OLD
PRG
(x 1)
3
On the NEW transmitter: hold down
the button and
release it after 5
seconds;
count 2 movements. On the OLD transmitter: press and
release the button (1 time);
count 3 movements (= transmitter
memorised). If the system makes 6
movements (= memory locked or full,
transmitter not memorised).
B.5.2 - To memorise the transmitter buttons in “Mode II” (“Custom mode”)
• Procedure B.5.2 memorise a single button on the new transmitter in Mode II; i.e. they associate with the button (chosen by the installer) one of the commands in the
motor’s “list of commands” (for details on “Mode II” see section 4.6.1).
• Procedures B.5.2 memorise a single button. Repeat this operation to memorise another button.
1 2 continues
OLD
PRG
2
1
sec.
2
PRG
NEW
PRG
= 5sec
On the OLD transmitter: Hold
down the button and wait...
count 2 movements; wait
again...
count 2 more move-
ments;
release the but-
ton.
On the NEW transmitter: hold down the but-
ton and
2 3continues
PRG
2
Select the desired
option and pro-
gram it
as follows OLD
(x ...)4 OPTIONS:
1 press = Open > Stop > Close > Stop > ...
2 presses = Open
3 presses = Close
4 presses = Stop
release it after 5 seconds; count 2 movements. On the OLD transmitter: Press and release the button the number of times indicated
in the option you have chosen;
3 4end
7
sec.
?
nNEW
= 5sec
...
...
3
After about 7 seconds, the motor performs a
number of movements equal to the number
of pulses entered.
On the NEW transmitter: select the button
you want to memorise; hold it down and
release it after 5
seconds;
count 3 movements (= transmitter memo-
rised). If the system makes 6 movements (= mem-
ory locked or full, transmitter not memorised).
B
15 – English

B.6 - Memorisation of a climate sensor connected via radio
MONO
NOTES AND WARNINGS
• To run this procedure you need the climate sensor you want to memorise, chosen from the “Nice Screen” catalogue, and an old transmitter memorised in Mode I
(see par. 4.5.1).
• When performing the procedure, you can cancel the programming at any time by holding down ■and ▼together for 4 seconds. Alternatively, do not press any keys
and wait 60 seconds for the motor to perform 6 movements.
1 2 3 end
sensor
P1
= 10 sec
P1
OLD ...
(x 3)
sensor
P1
(x 1)
3
On the climate SENSOR: hold
down the yellow button “P1”;
release it after 10
seconds;
On the OLD transmitter: press
and release (3 times) any button.
On the climate sensor: press and
release (1 time) the yellow button
“P1”;
count 3 movements (= sen-
sor memorised). If the system
makes 6 movements (= mem-
ory locked or full, sensor not
memorised).
B
B.7 - TOTAL or PARTIAL deletion of memory
MONO
NOTES AND WARNINGS
• In order to carry out the following deletion procedures, the transmitter must be memorised in mode I.
• To change the motor’s configuration (from TWO-WAY to ONE-WAY), after completing the “FULL deletion of the memory” procedure, it is necessary to switch the
motor off and then on again.
B.7.1 - Procedure run with a memorised transmitter
1 2 3 4
PRG
(x 1)
2
PRG
(x 1)
2
PRG
(x 1)
3
Press and release
the button (1 time);
count 2 movements. Press and release
the button (1 time);
count 2 movements. Press and release
the button (1 time);
count 3 movements.
4 5 ...
PRG
(x 1)
4
Select one of the following potions and execute it:
• option A – delete the motor’s ENTIRE memory
• option B – delete ALL memorised transmitters
• option C – delete ONE memorised transmitter
• option D – delete ALL positions (“0”, “1”, “H”, etc.). Caution! – This deletion should only be performed if you wish re-
program the distances using a procedure different from the one used previously (e.g. you have used manual distance pro-
gramming (B.3) and would now like to use the semi-automatic procedure (B.5).
Press and release
the button (1 time);
count 4 movements.
option – A
5end
option – B
5end
PRG
(x 1)
5
= 5sec
5
Press and release the
button (1 time);
count 5 movements. Hold down the button and release it after 5 seconds; count 5 movements.
option – C
5 6 end
= 5sec
3
= 5sec
5
Hold down the but-
ton and
release it after 5
seconds;
count 3 movements. On the transmitter to be deleted: hold down
any key either the key memorised in mode 2 or
the climatic conditions sensor;
count 5 movements.
B
English – 16

option – D
5end
= 5sec
5
Hold down both but-
tons...
release them after 5
seconds;
count 5 movements.
B.7.2 - Procedure run with a transmitter which has not yet been memorised
NOTES AND WARNINGS
• In order to carry out the following procedures, a transmitter with a PRG button should be used.
1 2 3 4
OFF
5
sec.
ON
Disconnect the elec-
trical power supply to
the motor.
Reconnect the electrical pow-
er supply to the motor once
again.
4 5 6 7
NEW
= 5sec
2
Hold down the button and; release them after 5 sec-
onds;
< – – – – – – – – – – Within 10 seconds – – – – – – – – – – >
7 8 9 10 ...
OFF
5
sec.
ON
Run procedure B.7.1
in full.
Disconnect the elec-
trical power supply to
the motor.
Reconnect the electrical pow-
er supply to the motor once
again.
17 – English

C.1 - Memorising the FIRST TRANSMITTER (in “Mode I”) MONO UP
STOP
DOWN
NOTES AND WARNINGS
• This procedure must be used only for memorising the FIRST TRANSMITTER. If the motor does not perform the procedure, it means that one or more trans-
mitters are already memorised; therefore, to memorise further transmitters, use the procedure described under section B.5 (motor congured for ONE-WAY com-
munication), A.5 (motor congured for TWO-WAY communication) or C.2 (motor congured for ONE-WAY communication and OLD generation transmitter lacking
the PRG and ESC keys).
• If all transmitters memorised in the motor are deleted, the rst transmitter you memorise thereafter must be memorised with this procedure.
• If the installation has multiple motors, the procedure must be repeated for each motor separately.
• Once the memorisation has been completed, the Up and Down directions of the roller shutter will not yet be associated with the respective ▲and ▼buttons of the
transmitter. This will occur automatically when adjusting limit switches “0” and “1” (see procedure C.5); moreover, the roller shutter will move in “hold-to-run” mode
until the limit switches have been adjusted.
• If within the transmitter’s range there are multiple powered up motors, to memorise the first transmitter in any one of them, it is necessary to disconnect the power
supply to all other motors and proceed as follows:
1 2 3 end
ON
1
5
sec.
3
Move the roller
shutter to a half-
way position.
Switch on
mains power,
count 1 movement. Hold down the but-
ton and
release it after 5 sec-
onds;
release the button.
C
–– GROUP “C” PROCEDURES ––
for motors configured for ONE-WAY communication mode
feasible only with a Nice transmitter equipped with buttons ▲, ■, and ▼alone and lacking the PRG and ESC buttons
GENERAL WARNINGS RELATING TO THE PROCEDURES
• Before starting any programming, move the awning to an intermediate position, away from the Up and Down limit switch-
es.
• All the programming procedures must be completed by selecting a single channel on the transmitter.
• If the programming transmitter controls multiple groups of screen motors, before sending a command requested by
the procedure, select the group to which the motor being programmed belongs.
• When the motor is powered up, if it makes 2 movements this means that: at least one transmitter has been memorised
and no limit switch has been programmed; if, on the other hand, it makes 1 movement this means that: no transmitter
has been memorised.
• When performing the procedure, you can cancel the programming at any time by holding down ■and ▼together for 4
seconds.
• When the Up and Down limit switches are not programmed, the awning can only be commanded in hold-to-run mode -
i.e. you must hold the button down until the awning reaches the desired position. The movement stops when you release
the button in any position.
• When the Up and Down limit switches have been programmed , the awning can be controlled by simply pressing and
releasing the buttons. Doing so starts the movement, which is stopped automatically by the system when the awning
reaches the programmed position.
•All procedures require you to use a transmitter memorised in “Mode I” (e.g., memorised with procedure C.1 or with pro-
cedure C.2.1).
MONO UP
STOP
DOWN
English – 18

C.2 - Memorising ANOTHER TRANSMITTER (second, third, etc.) MONO UP
STOP
DOWN
NOTES AND WARNINGS
•The motor configured to operate in ONE-WAY mode can memorise up to 30 transmitters.
• To run procedure C.2.1, you must have a new transmitter to memorise and an old previously memorised transmitter. The two transmitters must have the “PRG”
and “ESC” buttons (like “ERA P” and “ERA W” transmitters).
•To run procedure C.2.2 you must have a new transmitter to memorise, chosen from the “Nice Screen” catalogue , and an old previously memorised transmitter.
C.2.1 - To memorise the transmitter buttons in “Mode I” (“Standard mode”)
• Procedure C.2.1 memorise all the new transmitter’s buttons in “Mode I”, with the same configuration as the old transmitter (for details about “Mode I” see par. 4.6.1).
1 2 3
NEW
8
sec.
OLD
(x 3)
On the OLD transmitter: hold down the but-
ton and
release it after 8 sec-
onds.
On the OLD transmitter: press and release the but-
ton (3 times), provided the button is memorised.
3end
NEW
(x 1)
3
On the NEW transmitter: press and
release the button (1 time);
count 3 movements (= transmitter memorised). If
the system makes 6 movements (= memory locked or
full, transmitter not memorised).
C.2.2 - To memorise the transmitter buttons in “Mode II” (“Custom mode”)
• Procedure C.2.2 memorise a single button on the new transmitter in Mode II; i.e. they associate with the button (chosen by the installer) one of the commands in the
motor’s “list of commands” (for details on “Mode II” see section 4.6.1).
• Procedures C.2.2 memorise a single button. Repeat this operation to memorise another button.
• When performing the procedure, you can cancel the programming at any time by holding down ■and ▼together for 4 seconds. Alternatively, do not press any keys
and wait 60 seconds for the motor to perform 6 movements.
1 2 3
NEW
8
sec.
...
...
OLD
5
sec.
4
On the NEW transmitter: hold down the but-
ton you want to memorise;
release it after 8 sec-
onds;
On the OLD transmitter: hold down the
button and
release it after 5
seconds;
count 4 movements.
3continues
Select the desired
option and program
it as follows OLD
(x ...)
4 OPTIONS:
1 press = Open > Stop > Close > Stop > ...
2 presses = Open
3 presses = Close
4 presses = Stop
On the OLD transmitter: press and release the button the number of times indicated in the option you have chosen;
3 4end
7
sec.
?
nNEW
5
sec.
...
...
3
after about 7 seconds, the motor performs a
number of movements equal to the number of
pulses entered.
On the NEW transmitter: hold down the
same button you pressed in Step 1;
release it after 5
seconds;
count 3 movements (= transmitter memo-
rised). If the system makes 6 movements (= mem-
ory locked or full, transmitter not memorised).
C
19 – English
Other manuals for NX FIT MB 534 SH BD
3
This manual suits for next models
1
Table of contents
Other Nice Remote Control manuals

Nice
Nice MIGHTY MULE MMT103 User manual

Nice
Nice Oview User manual

Nice
Nice easyK Series Product manual

Nice
Nice SMILO Series User manual

Nice
Nice ECCO5 User manual

Nice
Nice STX100 User manual

Nice
Nice FLOR Series User manual

Nice
Nice TX FLOR-S User manual

Nice
Nice Era INTI1 User manual

Nice
Nice DS100 Technical specifications