Nicefeel FC1596 User manual

Thank You For Purchasing a Nicefeel Oral Irrigator
Model: FC1596
User Manual
Portable Oral Irrigator
Thank you for choosing a Nicefeel oral irrigator!
You’re on your way to a more hygienic life!
Thank you for purchasing a portable oral irrigator from Nicefeel, a
pioneering and innovative brand with the world's most advanced
high-pressure water pulse technology.
Conventional toothbrushes cannot easily remove food debris hidden in
the oral cavity, while most dental floss can only reach a limited area
under the gums. In contrast, Nicefeel oral irrigators can quickly and
efficiently remove food debris from deep in the gums and between the
teeth to ensure perfect hygiene.
Fly Cat Electrical Co., Ltd.
101-401 Building 28; 101, 301, 401 Building 30; Longwangmiao Industrial
Zone, East District, Baishixia Community, Fuyong Street, Baoan District,
Shenzhen
Tel: 0755-2727-3346
Website: www.fly-cat.com.cn

0201
IMPORTANT SAFEGUARDS
When using electrical products, especially when children are present,
basic safety precautions should always be followed, including the
following:
READ ALL INSTRUCTIONS BEFORE USING.
DANGERS-To reduce the risk of electrocution:
1.Do not use while bathing.
2.Do not place or store product where it can fall or be pulled into a tub,
shower stall or sink.
3.Do not place in or drop into water or other liquid.
4.Do not reach for a product that has fallen into water. Unplug
immediately.
5.Do not handle charger with wet hands when charging.
WARNING-To reduce the risk of burns,
electrocution, fire, or injury to persons.
1.A product should never be left unattended when plugged in.
Exception: Contact lens disinfectors, toilet seat assemblies, and similar
products.
2.Close supervision is necessary when this product is used by, on, or
near children or invalids.
3.Use this product only for its intended use as described in this manual.
Do not use attachments not recommended by the manufacturer.
4.Never operate this product if it has a damaged cord or plug, if it is not
working properly, if it has been dropped or damaged, or dropped into
water. Return the product to a service center for examination and repair.
5.Keep the cord away from heated surfaces.
6.Never block the air openings of the product or place it on a soft
surface, such as a bed or couch, where the air openings may be
blocked. Keep the air openings free of lint, hair, and the like.
7.Never use while sleeping or drowsy.
8.Never drop or insert any object into any opening or hose.
9.Unplug this product before filling. Fill (reservoir) with water only unless
otherwise specified
by manufacturer. Do not overfill (or specify filling instructions)
10.The instructions for appliances having a part ofclass III construction
supplied from a detachable power supply unitshall state that the
appliance is only to be used with the power supply unit provided with the
appliance.
11.This product needs to be charged with the charger specified by the
manufacturer, do not use the charger not specified or other charger.
12.This appliance contains batteries that are non-replaceable.
13.This appliance is not intended for use by persons (including children)
with reduced physical,sensory or mental capabilities, or lack of
experience and knowledge, unless they have beengiven supervision or
instruction concerning use of the appliance by a person responsible for
their safety.
14.Children should be supervised to ensure that they do not play with
the appliance.
15.Use this product only for its intended use as described in this
manual. Do not use attachments not recommended by the manufacturer.
FCC STATEMENT
This device complies with Part 15 of the FCC Rules. Operation is
subject to the following two conditions: (1) this device may not cause
harmful interference, and (2) this device must accept any interference
received, including interference that may cause undesired operation.
Warning: Changes or modifications to this unit not expressly approved
by the party responsible for compliance could void the user’s authority
to operate the equipment.
NOTE: This equipment has been tested and found to comply with the
limits for a Class B digital device , pursuant to Part 15 of the FCC Rules.
These limits are designed to provide reasonable protection against
harmful interference in a residential installation . This equipment
generates , uses and can radiate radio frequency energy and, if not
installed and used in accordance with the instructions, may cause
harmful interference to radio communications.However, there is no
guarantee that interference will not occur in a particular installation.If
this equipment does cause harmful interference to radio or television
reception , which can be determined by turning the equipment off and
on, the user is encouraged to try to correct the interference by one or
more of the following measures:
--Reorient or relocate the receiving antenna.
--Increase the separation between the equipment and receiver.
--Connect the equipment into an outlet on a circuit different from that
to which the receiver is connected.
--Consult the dealer or an experienced radio/TV technician for help.
SAVE THESE INSTRUCTIONS

0403
Safety Measures Warning: To reduce the risk of burns, electric
shock, fires, and other injury hazards, please
observe the safety guidelines below.
Basic safety precautions should be observed during the use of electrical
products, especially when children are present.
Please read all safety guidelines before using this device.
Warning: To reduce the risk of electric shock and
other hazards, please observe the safety
guidelines below:
1. Check if the charger or power cord are damaged before initial and
during continued use of this device. If either are damaged, do not
attempt to use the device. Instead, contact after-sales services for a
replacement.
2. Do not throw the device into a fire or other heated environments.
3. Do not immerse the device into water, as this may cause damage.
4. Do not attempt to plug or unplug the charger while your hands are
wet. When plugging or unplugging the device, do so using the charger,
not the power cord.
5. Do not modify, damage, or destroy the charging equipment. Do not
forcefully stretch, bend, or twist the power cord. Do not place heavy
objects on the power cord or stick the power cord between other
objects.
6. Do not drop or insert foreign objects into any of the device openings.
7. Do not place the device, charger, or power cord on heated surfaces.
8. Do not place the device in a hot or humid location, nor any locations
exposed to direct sunlight.
9. Before cleaning and maintenance, ensure that the device is turned off
and not charging.
1. Do not use this device in any manner other than those outlined in the
manual.
2. Do not use this device while a nozzle is not installed.
3. Persons (including children) without the full mental capacity or
relevant experience and knowledge must
clean and maintain this device under the supervision of a guardian.
4. Place this device outside of the reach of children and infants. Do not
allow this device to be used as a toy.
5. Users suffering from periodontitis or those who have undergone oral
surgery within the past 2 months should consult a doctor before using
this device.
6. Only the nozzles and accessories included with, sold with, or
recommended by this device should be used.
7. Do not disassemble or swap out parts from this device.
8. To prevent burns, do not fill the tank or attempt to clean your mouth
with water over 40℃.
9. Do not use this device for any purpose other than oral hygiene.
10. To prevent injury, do not press the nozzle forcefully into your gums
or teeth.
11. Do not use this device in outdoor locations where aerosols (sprays)
or oxygen supplies are in use.
12. Remove all cosmetic teeth accessories before using this device.
13. Do not use iodine, salt water, or concentrated essential oils that are
insoluble in water with this device. Doing
so will reduce its performance and shorten its service life.
14. Do not fill the device with pure mouthwash liquid. If you wish to use
a mouthwash, dilute it in accordance with the proper proportions.
Store this manual for future reference!

Table of Contents I. Package Contents
We reserve the right to final interpretation in case of any typographical
errors or misunderstandings found in the contents of this manual. Device
upgrades and updates will be incorporated into a new version of the
manual without notice. The appearance and color of the product is
subject to the packaged model, which shall take precedence over any
illustrations of descriptions found in this manual.
Mode Button
Display
Switch Button
Uninstall Button
USB Charging
Port
Nozzle
Water Inlet
Water Tank
0605
Safety warning and FCC Statement 01-02..................................................
Table of Contents 05..........................................................................................
Safety Measures 03-04....................................................................................
......................................................................................I. Package Contents 06
......................................................II. Accessories and Specifications 07-08
........................................................................V. Environmental Protection 13
.......................................................................................VI. Troubleshooting 14
.............................................................................VIII. After-Sales Services 16
..........................................................................VII. Hazardous Substances 15
................................................................................................III. Steps 08-12
............................................................. 12-13IV. Cleaning and Maintenance
...........
.............................
.............
...............
........................
.............
............
.................
0807
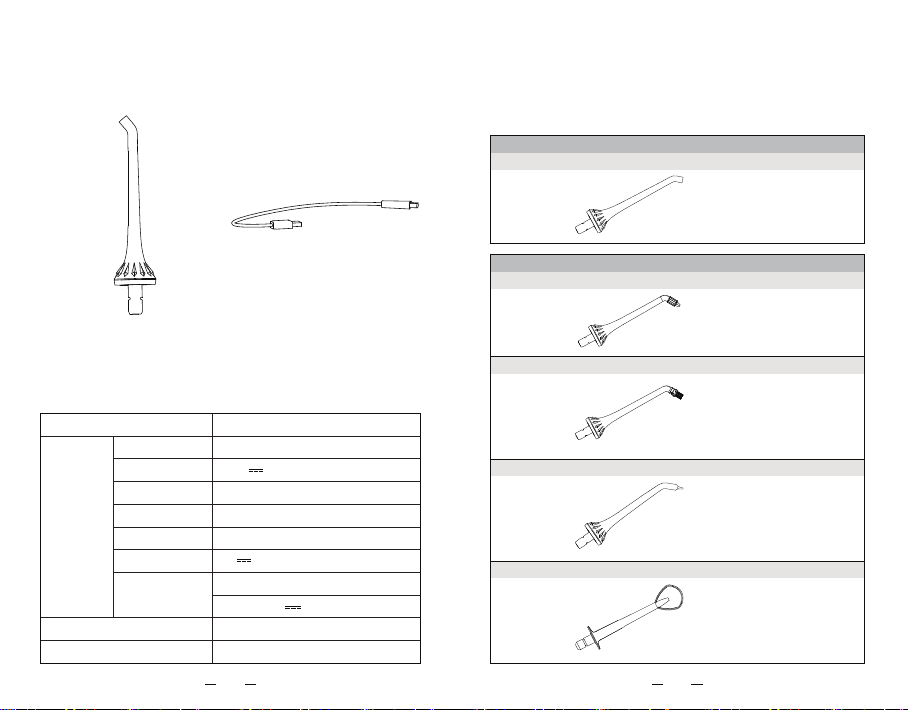
Accessories can be purchased from the vendor
Product Name
FC1596
5W
IPX7
2~3h
Product No.
Rated Voltage
Power Rating
Waterproof Rating
Charge Time
Input
Adaptor
Rating Value
Place of origin China
Implemented National Standards GB4706.1-2005 GB4706.59-2008
Oral Irrigator
Nicefeel Oral Irrigator
5V 1A
3.7V
Power Cord x1
Nozzle x2
Instructions:
Standard Nozzle Application
Normal Cleaning
Replace every 6 months
Orthodontic Nozzle Application
Replace every 3 months
The Nicefeel oral irrigator comes with: 2 standard nozzles, 1 orthodontic
nozzle, and 1 dental plaque nozzle. If you wish to purchase additional
nozzles, visit the Nicefeel official website or an authorized vendor.
.....................................
Braces
Normal Cleaning
...................................
Dental Plaque Nozzle Application
Dental Implants
Bridges
Crowns
Normal Cleaning
...................................
Periodontal Pocket Nozzle Application
Braces
Normal Cleaning
...................................
Tongue Scraper Application
Braces
Normal Cleaning
...................................
II. Accessories and Specifications
Product Specifications:
Product Accessories:
Input:100-240V~50/60Hz 0.3A
Output:5V 1A 5.0W
Table of contents
Other Nicefeel Personal Care Product manuals

Nicefeel
Nicefeel FC1591 Parts list manual

Nicefeel
Nicefeel FC3680 Series User manual

Nicefeel
Nicefeel FC2520 Series User manual

Nicefeel
Nicefeel FC163 User manual

Nicefeel
Nicefeel FC5120 User manual

Nicefeel
Nicefeel FC259 Parts list manual

Nicefeel
Nicefeel FC5170 User manual

Nicefeel
Nicefeel FC256 Parts list manual


