Nickel-Electro Clifton Series User manual
Hotplates & Stirrers
THE Clifton RANGE
Round and Rectangular Boiling Baths
with Energy Regulator
1000ER and 1100ER Series
PDF created with pdfFactory Pro trial version www.software-partners.co.uk
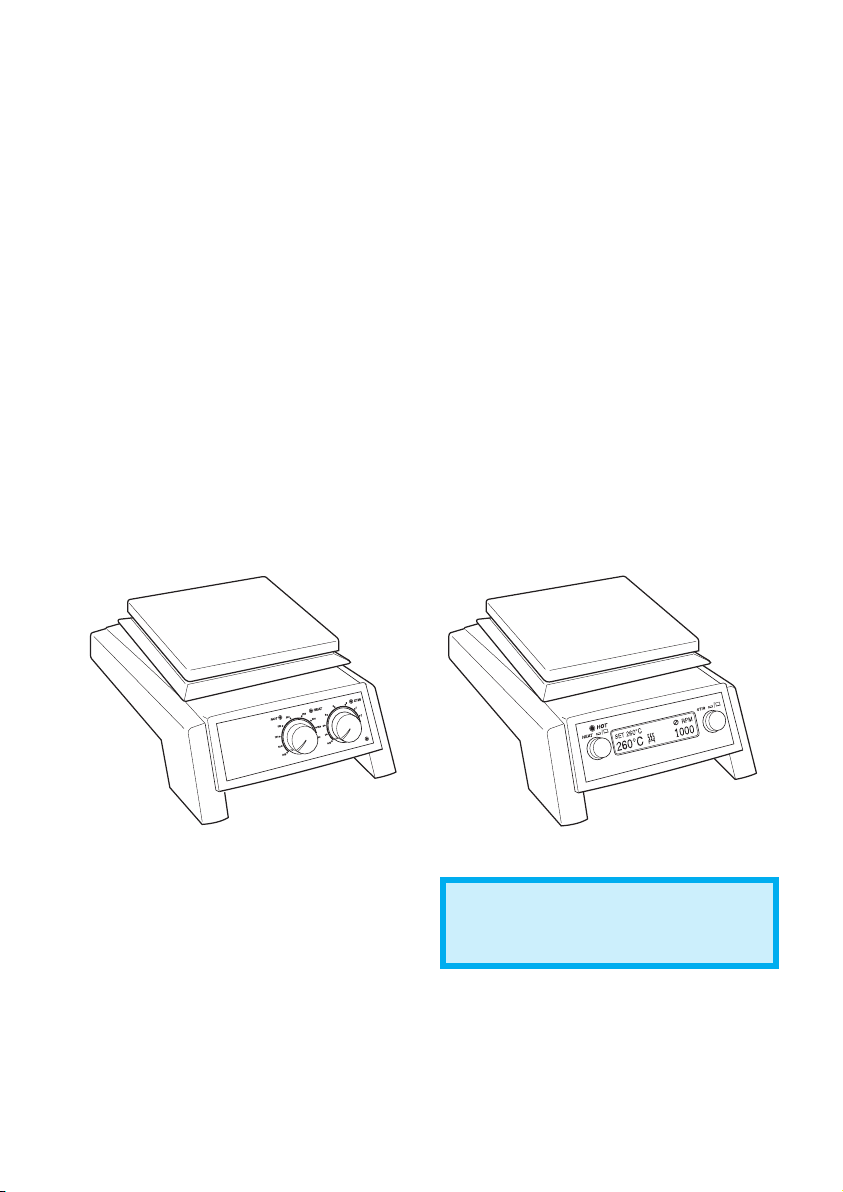
MSH-1 MSH-1D MSH-3
CH-1E CHS-1E CHS-2E

Analogue models
Figure
2 - Rear view
IEC socket
Retort rod fitting
Figure
1 - Front view
‘Hot’ warning light
Heater on light
Stirrer
on
light
Mains on light
‘Hot’ warning light
IEC socket
External probe
socket
Retort rod fitting
Digital display
Stirrer control
Heater control
Digital models
Figure
3 - Front view
Figure
4 - Rear view
The Clifton Range - 3 Year Warranty 2High Quality Products at Affordable Prices

Thank you for purchasing this Clifton product. To get the best performance from the
equipment, and for your personal safety, please read these instructions carefully before use.
Clifton hotplates and stirrers are designed to operate under the following conditions:-
❖For indoor use only
❖Use in a well ventilated area
❖Ambient temperature range +5°C to +40°C
❖Altitude to 2000m
❖Relative humidity not exceeding 80%
❖Mains supply fluctuations not exceeding 10% of nominal
❖Overvoltage category II IEC60364-4-443
❖Pollution degree 2 IEC664
❖Use with a minimum distance all round of 200mm from walls or other items
If the equipment is not used in the manner described in this manual the protection provided by the
equipment may be impaired.
Electrical Installation
THIS EQUIPMENT MUST BE EARTHED
Before connection please ensure that the line supply corresponds to that stated on the
rating label.
Power requirements:
Model Wattage Model Wattage
CH-1E 550W MSH-1 750W
CHS-1E 550W MSH-1D 750W
CHS-2E 1200W MSH-3 3 x 700W
There is an IEC socket at the rear of the instrument for connection to the mains supply, (see figure 2).
The unit is supplied with two mains leads fitted with IEC plugs for connection to the instrument.
One has a U.K. 3 pin plug and the other has a 2 pin “Shuko” plug for connection to the mains.
Choose the lead appropriate for your electrical installation and discard the other.
Should neither lead be suitable, take the lead with the U.K. plug and replace the plug with a suitable
alternative. See the enclosed instruction sheet for advice on how to carry out this procedure.
Should the mains lead require replacement a cable of 1mm2of harmonised code H05W-F connected
to an IEC 320 plug should be used.
IF IN DOUBT CONSULT A QUALIFIED ELECTRICIAN
The mains lead should be connected to the instrument BEFORE connection to the mains supply.
NOTE that when connected to the mains supply a green neon light on the front of the unit
illuminates, (see figure 1).
The Clifton Range - 3 Year Warranty 3High Quality Products at Affordable Prices

The Clifton Range - 3 Year Warranty 4High Quality Products at Affordable Prices
Operation
Heating, analogue models
The control knob labelled on the front panel controls the heat output and hence the plate
temperature. It is graduated with an approximate temperature scale. This scale refers to the
temperature of the top plate and not to the temperature of the contents of the vessel being heated,
When the heat is switched on an amber pilot light illuminates, (see figure 1).
When the surface becomes too hot to touch a red warning light on the front panel will begin to
flash, (see figure 1). This will continue to flash while the plate temperature is above 50°C so long
as the unit remains connected to the electricity supply.
WARNING: The top surface of the instrument may be HOT In free air a surface temperature of
450°C can be achieved on the ceramic top models and 325°C on the metal top models. Do not
leave heaters switched on when not in use.
Stirring, analogue models
The control knob labelled on the front panel controls the stirrer speed. When switched on an
amber pilot light illuminates, (see figure 1).
The knob is graduated with an arbitrary 1-9 scale. Turning the knob to a higher number increases the
stirrer speed.
Heating, digital models
Ensure that the external temperature probe is NOT connected to the instrument.
The control knob on the left hand side of the display controls the heating function.
To switch on the heating function briefly press and release the knob. Repeat to turn off the heating
function.
When switched on the display will show actual plate temperature at the bottom of the screen and the
set temperature directly above. The heating icon will show , indicating that the displayed
temperatures are those of the plate surface.
The plate temperature can be selected and controlled to a resolution of 1°C.
To increase the set temperature turn the knob clockwise until the required setting is shown in the
display. To decrease the setting turn the knob anti-clockwise.
The unit will now begin to heat until the set temperature is reached and then will hold the plate at
this value. The actual plate temperature is continuously displayed at the bottom of the screen. When
the set temperature is reached an alarm will sound. When the plate surface is too hot to touch (>
50°C) a red warning light on the front panel will begin to flash. This will continue to flash while
the plate temperature is above 50°C even after the heating function is turned off.
WARNING: The top surface of the instrument may be HOT. In free air a
surface temperature of 450°C can be achieved on the ceramic top CHS-1E model and 325°C
on the metal top MSH-1D model. Do not leave heaters switched on when not in use.
Use as a Stirrer
The control knob on the right hand side of the front panel controls the stirrer speed.
To switch on the stirring function briefly press and release the knob. Repeat to turn off the stirring
function When switched on the icon on the display will revolve and the display will show the set
speed.
Turning the knob clockwise increases speed from 100rpm to 1300rpm. Turning the knob
anti-clockwise decreases the speed.

The Clifton Range - 3 Year Warranty 5High Quality Products at Affordable Prices
Use as a Temperature Controller using the External Probe CHS-1E, MSH-1D only
These units are supplied with a temperature probe to allow direct control of liquid temperature.
NOTE: Before attaching probe, mains supply must be turned off.
To use the probe first insert the connector into the socket on the rear of the instrument (see fig 2)
and place the probe into the vessel containing the liquid. Switch on the heating function by briefly
depressing the control knob. The heating icon in the display will show indicating that the displayed
temperatures are those of the liquid rather than the plate surface.
When switched on the display will show actual liquid temperature at the bottom of the screen and
the set temperature directly above.
The liquid temperature can be selected and controlled to a resolution of 1°C.
To increase the set temperature turn the knob clockwise until the required setting is shown in the
display. To decrease the setting turn the knob anti-clockwise.
The unit will now begin to heat until the set temperature is reached and then will hold the liquid at
this value. The actual liquid temperature is continuously displayed at the bottom of the screen.
Note that the maximum liquid temperature is limited to 200°C.
Guidance Notes
1. For optimum temperature control please ensure the contents of the beaker are stirred adequately.
2. Keep the unit out of strong drafts.
3. Allow the temperature adequate time to stabilise.
Safety Advice
❖Do not use the instrument to heat flammable liquids
❖Never lift or carry the instrument until it has been switched off and allowed to cool for at least 30
minutes. The hot warning light will give guidance.
❖The unit should be carried using both hands with the fingers under the side edges.
❖Never move or carry the unit with containers on the top plate or while still connected to the mains
supply.
❖There is a danger of liquid spillage if containers are over-filled and stirred at high speed. Always
build stirrer speed slowly and never stir more rapidly than necessary.
❖NEVER place a cold glass vessel onto a hotplate which is already hot.
Cleaning and Care
Before attempting cleaning:-
Ensure that the top is cool, disconnect from the mains electricity supply.
The metal casing should be cleaned using a damp cloth and a mild detergent solution.
Ceramic top units:
A damp cloth will normally remove most types of contamination. For more difficult stains a domestic
cream cleanser is recommended.
Cleaning is made easier if spillages are attended to promptly. In any case, spillages of alkali,
phosphoric acid and hydrofluoric acid MUST be removed immediately as these chemicals can
attack and damage the glass ceramic. Ensure that the appropriate safety precautions are
observed.
During cleaning and general operation take care not to scratch the surface of the top plate as this
could result in subsequent thermal breakage.
WARNING: A ceramic top which is scratched, chipped, chemically etched or damaged must not
be used.

The Clifton Range - 3 Year Warranty 6High Quality Products at Affordable Prices
Metal top units:
The metal top plate should be cleaned using a damp cloth and a mild detergent solution.
Cleaning is made easier if spillages are attended to promptly. In any case, spillages of acids
and alkalis MUST be removed immediately as these chemicals can attack and damage the
the surface of the aluminium alloy. Ensure that the appropriate safety precautions are
observed.
Preparation of Media
Take particular care when heating liquids having a high viscosity. Viscous liquids can act as thermal
insulators and can cause thermal breakage of the glassware. This is very important with media
solutions as the viscosity will usually increase as the temperature rises.
❖Check that the stirring action is sufficient to agitate the whole of the liquid. Unstirred areas in the
liquid can result in uneven heat transfer and “hot spots” in the glassware. This can induce thermal
stress and so cause failure.
❖Check the stirring action regularly to ensure that it remains adequate as the viscosity of the solution
increases.
❖Always use the largest magnetic follower possible and, if necessary, use a mechanical overhead
stirrer.
❖Do not use glass vessels with thick walls, e.g. Pyrex Heavy Duty Ware or standard beakers and flasks
having capacities of 5 litres or greater.
❖NEVER heat glass bottles on a hotplate.
❖Ensure that the heat is built up slowly to avoid localised overheating.
❖Ensure the glassware is completely free from scratches or other defects.
❖Place the hotplate in a tray large enough to contain the liquid in the event of glassware failure.
❖Wear the appropriate safety clothing - e.g. gloves, goggles, protective apron etc.
Accessory
A rod is available to support apparatus used with the instrument. The instrument is equipped with a
fitting on the rear to accept the support rod (see figure 2). To fit the rod to your instrument, first
isolate from the mains supply and allow to cool. Then simply screw the threaded end of the support
rod into the fitting on the rear of the instrument.
Servicing and Repair
This product range does not require any routine servicing.
Note: There are no internal user replaceable parts.
In the event of product failure it is recommended that any repair is only undertaken by suitably
qualified personnel. For advice or to receive a service manual please contact the Service Department
of Nickel-Electro Ltd.
Only spare parts supplied by Nickel-Electro Ltd or its agent should be used. Fitting of non-approved
parts may affect the performance of the safety features of the instrument and void warranty.
Note: The magnetic stirrer drive utilises strong magnets.
If in doubt, please contact the Service Department of;
Nickel-Electro Ltd, Oldmixon Crescent, Weston-Super-Mare, North Somerset BS24 9BL
Tel: +44 (0)1934 626691 Fax: +44 (0)1934 630300

The Clifton Range - 3 Year Warranty 7High Quality Products at Affordable Prices
Warranty
Nickel-Electro warrants this instrument to be free from defects in material and workmanship, when
used under normal laboratory conditions, for a period of three (3) years. In the event of a justified
claim Nickel-Electro will replace any defective component free of charge.
This warranty does NOT apply if,
1. A ceramic top has broken due to mechanical impact, scratching, chipping or chemical etching.
2. Any repair has been made or attempted other than by Nickel-Electro or its agent.
Stirrer Hotplates

NICKEL-ELECTRO Ltd.
Manufacturers of laboratory, medical and clinical equipment.
Oldmixon Crescent, Weston-Super-Mare,
North Somerset, BS24 9BL, United Kingdom
Tel: +44 (0)1934 626691
Fax: +44 (0)1934 630300
Email: [email protected]
www.nickel-electro.co.uk
www.nickel-electro.co.uk
This manual suits for next models
6
Table of contents
Popular Cooktop manuals by other brands


Frigidaire
Frigidaire FGC26C3HW specification

Panasonic
Panasonic KY-E227E Operating & installation instructions

Admiral
Admiral A3875XRA Use and care

Frigidaire
Frigidaire FEC26C2AS - 26" - Coil Electric Cooktop Specifications

Blomberg
Blomberg CTE 30400 Use & care manual

Hoover
Hoover HV-C90CG quick start guide


