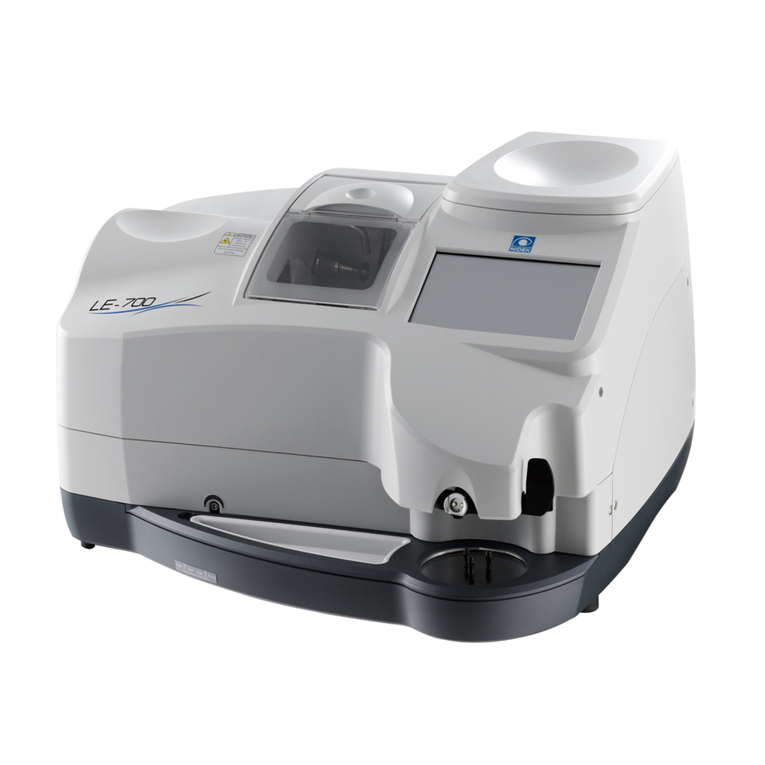
Nidek Medical LE-700 Instruction sheet

Read Before Use
使用前请阅读
Vor Gebrauch Bitte Lesen
A Lire Avant l'Utilisation
Lea Antes del Uso
Leggere Prima dell'Uso
English
German
French
Spanish
Italian
Chinese

NIDEK CO., LTD. : 34-14, Maehama, Hiroishi-cho, Gamagori, Aichi 443-0038, Japan
(Manufacturer) Telephone: +81-533-67-6611
Facsimile: +81-533-67-6610
NIDEK CO., LTD. : 3F Sumitomo Fudosan Hongo Bldg., 3-22-5, Hongo,
(Tokyo Office) Bunkyo-Ku, Tokyo 113-0033, Japan
Telephone: +81-3-5844-2641
Facsimile: +81-3-5844-2642
NIDEK INCORPORATED : 47651 Westinghouse Drive, Fremont, California 94539, U. S. A.
(United States Agent) Telephone: +1-510-226-5700
Facsimile: +1-510-226-5750
NIDEK S.A. : Europarc 13, rue Auguste Perret, 94042 Créteil, France
(EU Authorized Representative) Telephone: +33-1-49 80 97 97
Facsimile: +33-1-49 80 32 08
April 2013
45301-P990-A
Printed in Japan
Original instructions
2013 NIDEK CO.,LTD.
C

1
For Safe Use
Safety Precautions
Before use, read this “Read Before Use” guide and the complete OPERATOR’S
MANUAL (found on the included CD in PDF format).
This “Read Before Use” guide describes safety precautions. Keep this guide available for refer-
ence whenever necessary.
For the operating procedures, read the complete OPERATOR’S MANUAL (found on the included
CD in PDF format). It is recommended to print out the manual for ease of use.
If you encounter any problems or have questions about the instrument, please contact NIDEK or
your authorized distributor.
In this guide, signal words are used to designate the degree or level of safety alerting. The
definitions are as follows.
WARNING
Indicates a potentially hazardous situation which, if not avoided, might result in death or serious
injury.
CAUTION
Indicates a potentially hazardous situation which, if not avoided, might result in minor or moderate
injury or property damage accident.
Even situations that are labeled CAUTION might result in serious injury under certain condi-
tions. Safety precautions must be followed strictly at all times.
Read Before Use
ޓ
ޓ
ޓ
ޓ
Edging Station
45301-P990-A

2
Overview of Electronic Operator’s Manual
For more detailed product information, refer to the operator’s manual (PDF format) included in the
supplied CD-ROM (Windows version)*1.
1 Boot the PC and insert the CD-ROM into the CD-ROM drive.
2From the displayed contents of the CD-ROM, double-click the PDF file “LE-
700_Select_language.pdf”.
3Select an operator’s manual or installation manual.
●Clicking the field corresponding to the language displayed to the left displays its operator’s manual
(PDF file).
●Clicking the field displayed to the right displays the English installation manual (PDF file).
∗If necessary, save PDF files to the PC or such.
*1. Microsoft and Windows are registered trademarks or trademarks of Microsoft Corp. in the United
States and/or other countries.
*2. Adobe is a registered trademark or trademark of Adobe Systems Inc. in the United States and/or
other countries.
• If Adobe Reader*2is not installed on the PC, download its installer from the web site of Adobe Systems
Inc.
Other MANUALS
Other
MANUALS
OPERATORS MANUAL
OPERATORS MANUAL
English
Chinese
BEDIENUNGSANLEITUNGBEDIENUNGSANLEITUNG
German
French
MODE DEMPLOI
MODE DEMPLOI
English
MANUAL DE USUARIOMANUAL DE USUARIO
Spanish
OPERATORS MANUALOPERATORS MANUAL
MANUALE DELLOPERATOREMANUALE DELLOPERATORE
Italian
INSTALLATION MANUALINSTALLATION MANUAL
Operator’s manuals Installation manual (English)

3
Usage Precautions
Before use
WARNING
• Use a hand cart when moving the instrument. At least two
persons are necessary to lift the instrument.
Failure due to dropping of the instrument, backache, or
stumbling may occur.
• Be sure to lift the instrument by holding it at the points ,
, , and at the bottom of both sides (see the fig-
ure to the right). Do not lift the instrument by its cover.
Failure to do so may cause the instrument to fall resulting
in injury or malfunction.
• Be careful not to get fingers caught when setting the instru-
ment down.
Fingers may get caught between the table and instrument resulting in injury.
• Set the instrument on a table whose area is larger (50 mm or more) than the outer dimensions of the
instrument as shown below. A table height of 650 to 700 mm is recommended to allow space for the pump
tank to be installed under the table.
Additionally, the table must be sturdy enough to bear the weight of the instrument (33 kg) and be provided
with adjusters on its legs to allow it to be level and stable.
Failure to do so could cause the instrument to fall in the event of impact or accidents.
An opening must be made in the table to pass the pipe through.
• Install the instrument in a stable and level place where vibration or shock does not occur.
Tilting or vibration can cause the instrument to fall or prevent normal lens processing.
B
A
D
C
26.5
316.5
490
543
50
3-
115
304
2-R50 R70
237 242
261
269
Position of instrument rubber foot (three spots)
Opening for drain pipes
Opening for cooling water and cleaning
water pipes
(unit: mm)
Instrument perimeter
Table perimeter (example)
A height of 650 to 700 mm
recommended

4
CAUTION
• The LE-700 is an instrument that uses data from the Satellite Tracer or a host computer to block a lens
with a lens cup and then process the lens at a high speed to fit into frames. Do not use this instrument for
any purposes other than the intended purpose.
NIDEK is not responsible for accidents or malfunction caused by misuse.
• Only personnel authorized by NIDEK or a NIDEK distributor are allowed to install the instrument.
• Install the instrument in an environment that meets the following conditions.
The following conditions must be maintained during use.
•Use conditions
Temperature: 5 to 40°C (41 to 104°F)
Humidity: 30 to 80% (5 to 31°C [41 to 87.8°F])
The minimum acceptable relative humidity is 30%. The maximum acceptable relative humidity is 80% for tem-
peratures up to 31°C (87.8°F) which decreases linearly to 50% at 40°C (104°F).
Altitude: Up to 2,000 m
Installation location: Interior (with low dust and free from smoke, vibration, and impact)
• Install the instrument in a location with an adequate operating area in front of the instrument as shown in
“Maintenance” (page 6).
• Be sure to wear protective gloves when using a utility knife during unpacking.
Contact by bare hands with a utility knife or sharp edge of cardboard may result in injury.
• Install the instrument on a table with a height and depth that allows comfortable operation.
Continued use in an awkward posture may result in backache.
• Do not block the cooling fan on the rear of the instrument.
Should the fan be blocked, rise in temperature inside the instrument may occur resulting in fire.
• Avoid installing the instrument where it is exposed to caustic material such as corrosive gas, acid, or salt.
Corrosion or malfunction may occur.
• Do not use the power cord other than those supplied. Also do not connect the supplied cord to any other
instrument.
Malfunction or fire may result.
If a replacement power cord is required, contact a NIDEK distributor or NIDEK service personnel.
• Do not overload the electrical outlet.
A multi-outlet supplying power to too many instruments may become overheated and cause fire.
• Install the instrument in area where the outlet that the power plug is inserted into is easily accessible dur-
ing use. In addition, ensure that the power cord can be disconnected without the use of any tool.
Otherwise, it may interfere with disconnecting of the power from the input power source in case of abnormality.
• Be sure to use a wall outlet which meets the power specification requirements.
If the line voltage is too high or too low, the instrument may not perform properly. Malfunction or fire may result.
• Completely insert the power plug into a grounded outlet as far as the prongs will go.
Electric shock or fire may result in the event of malfunction or power leakage.
• Do not place heavy objects on the power cord.
A damaged power cord may cause fire or electric shock.
• Check the connection of the feedwater and drain hoses before activating the instrument.
Electric shock due to water leakage or injury caused by wet slippery floor may result.
5
During use
WARNING
• Only personnel authorized by NIDEK or a NIDEK distributor are allowed to remove the cover fastening
screws and covers, disassemble, or touch the interior of the instrument.
Electric shock, injury, or malfunction may result.
• Never touch the wheel while it is rotating.
Injury may occur.
• Never open the processing chamber cover during lens processing.
Spray containing processing waste may cause eye damage.
• Be sure to use the instrument only to process spectacle lenses.
If any other materials are processed, injury may occur.
• Do not inhale vapor and particles produced during lens processing. Wear a protective mask, glasses, and
such as necessary.
Vapor or particles may be toxic depending on the materials.
CAUTION
• In the event of smoke or strange odors, immediately turn off the instrument and disconnect the power plug
from the wall outlet. Once it is confirmed that the smoke has stopped, contact NIDEK or your authorized
distributor.
Usage of the instrument under such abnormal conditions may cause fire or electric shock. In case of fire, use a
dry chemical (ABC) extinguisher to extinguish the fire.
• Immediately replace the power cord if the internal wires are exposed, power is intermittent when the
power cord is moved, or the cord and/or plug are hot to the touch.
Electric shock or fire may occur.
• In the event of malfunction, disconnect the power cord from the wall outlet. Never touch the interior of the
instrument and contact NIDEK or your authorized distributor.
Electric shock or fire may occur.
• Be careful not to injure your hand on any sharp edges when removing the processed lens.
The lens edge may cause finger injury.
• Safety bevel the front and rear surfaces of glass lenses after processing.
Subtle burrs may damage one’s skin.
• Be careful not to get fingers caught when chucking (securing) a lens, pattern, or calibration jig.
Injury may result.
• Do not splash water into the interior of the instrument. Protect the display from splashing water. Also,
never operate the display with wet hands.
Water seeping into the instrument may result in electric shock, malfunction, or fire.
• Always clean up any spilled water from the pump tank with a clean dry cloth.
A slippery wet floor may cause injury.
• Keep eyes away from spray.
Spray containing processing waste may cause eye damage.
• When removing the lens cup by twisting the cup remover, hold the lens with a soft cloth or such.
If the lens is held directly, hands may be injured by the lens edges.

6
After use
Maintenance
CAUTION
• Do not pull the power cord to disconnect it from the wall outlet. Always hold it by the plug.
This can damage the metal core of the cord and may result in fire, short circuit or electric shock.
• Occasionally clean the prongs of the power plug with a dry cloth.
If dust settles between the prongs, the dust will collect moisture, and short circuit or fire may occur.
• If the instrument is not to be used for a long time, disconnect the power cord from the wall outlet.
Fire may result.
• Do not store the instrument in an area that is exposed to rain, water, or where toxic gas is present or any
liquids are stored.
• Maintain the surrounding temperature and humidity at the following ranges during transport and storage of
the instrument.
•Environmental conditions
Temperature: -20 to 60°C (-4 to 140°F)
Humidity: 20 to 85% (non-condensing)
Transport handling: To prevent leakage, keep the right side up, and handle with care. Only stack up to the
specified number of units.
• When transporting the instrument, use the special packing materials to protect the instrument from shock
or impact.
Excessive vibration or impact to the instrument may cause malfunction.
WARNING
• Contact NIDEK or your authorized distributor for wheel replacement.
Wheel replacement by other than authorized service personnel may result in injury.
• In dressing mode, the wheels are rotating with the processing chamber cover open. Work with special
care during dressing.
• Wear protective glasses for wheel dressing.
Spray containing processing waste may cause eye damage.
• Be sure to check before use and after use. It is recommended to have regular maintenance checks every
two years.
As malfunction or injury may occur, do not replace any parts other than fuses, cooling fan filter, or stocking
filter. Do not attempt to repair or disassemble the instrument.
• Use only the specified fuses for replacement.
Use of any fuses other than those specified may result in fire.
•Fuse rating
T 12 AL 250 V: AC 100 to 120 V regions
T 8 AL 250 V: AC 230 V regions
• Before fuse replacement, turn off the instrument and disconnect the power cord from the wall outlet.
Electric shock may occur.
• Hold the dressing stick with both hands. Hold the dressing stick with a minimum of 2 or 3 mm protruding
when dressing the wheel.
Failure to do so may cause injury by hand contact with the wheel as the dressing stick wears away.
• When the dressing stick is worn to the length of 4 cm, replace it with a new one.
It is hard to hold the shortened dressing stick resulting in finger injury or wheel damage.

7
Disposal
CAUTION
• When moving the instrument on the specified table, disconnect all units installed in the table such as the
pump tank before moving the instrument.
The units installed in the table may fall resulting in injury or malfunction.
• When performing maintenance work, secure a sufficient maintenance space.
Maintenance work in an insufficient space may result in accident or injury.
CAUTION
• Follow the local ordinances and recycling regulations regarding disposal or recycling of the components. It
is recommended to commission the disposal to a designated industrial waste disposal contractor.
Inappropriate disposal may contaminate the environment.
• When disposing of packing materials, sort them by material and follow local ordinances and recycling reg-
ulations.
Inappropriate disposal may contaminate the environment.
• When disposing of lens processing waste, follow local ordinances.
Inappropriate disposal may contaminate the environment.
[Operating area, maintenance work area]
Maintenance work area
[Operating area]
Approx. 500 mm Approx. 500 mm
Approx. 1,000 mm
Approx. 500 mm
Approx. 500 mm
Approx. 543 mm
Approx. 490 mm
* A maintenance work area of 750 mm above the table surface on which the in-
strument is placed is required.

8
Labels and Symbols
Some labels and indications are provided on the instrument to convey important information. If labels
are curling up or characters fading and becoming illegible, contact NIDEK or your authorized distrib-
utor.
Indicates that the operator is advised to refer to the related instructions in the opera-
tor’s manual.
Indicates that caution must be taken. Refer to the operator’s manual before use.
Indicates that dangerous voltage may be present.
Indicates where hand or fingers may be caught by the moving parts.
Indicates the state of the power switch. If this symbol of the switch is pressed down,
power is not supplied to the instrument.
Indicates the state of the power switch. If this symbol of the switch is pressed down,
power is supplied to the instrument.
Indicates that the instrument must be supplied only with alternating current.
Indicates a fuse.
Indicates the year of manufacture.
Indicates the manufacturer.

9
Operation Flow
Power-on
Check before use
Startup
Loading shape data
Pattern tracing
Demo lens tracing
Loading data from the internal memory
Loading data from the server
Loading data from a tracer
Layout data entry
Processing Conditions Entry
Entering layout data for single vision lenses
Entering layout data for bifocal lenses
Entering layout data for progressive power lenses
Entering layout data for Ex lenses
Shape Change
Blocking
Lens Blocking
Processing
Beveling
Flat Edging
Grooving
Editing the Next Shape during Processing
Size check
Size Check and Retouching
Processing the opposite lens
Opposite Lens Processing
Power-off
Shutdown
Check after use

10
Check before and after Use
Check before use
1 Connect the power cord to the power inlet.
2After confirming that the power switch is
turned off , connect the power cord to
a wall outlet.
3Confirm that instruments connected to the
LE-700 using the RS-232C cable or USB
cable are turned on.
4Is the amount of processing water in the tank proper?
The water level must be between the Max and Min lines inscribed on the tank.
If processing water becomes very dirty, replace it. Failure to do so may decrease the accuracy of pol-
ishing.
5Check visually that wheels are not be chipped or cracked.
Check after use
Be sure to check the following after use of the day.
It is recommended that a checklist be prepared and the check results recorded.
•Is the power turned off?
•Is the processing chamber clean?
•Is the instrument free from dirt or damage?
•Are the display and lens table clean?
•Are all the accessories accounted for and free from damage?
“Accessories” (page 14).
WARNING
• Be sure to check the instrument before every use. It is recommended that a checklist be prepared and the
check results recorded.
• Before turning on the power switch, be sure to check the instrument, power plug, wall outlet, and wheel
cracks.
Failure to do so may result in injury, accident, or instrument malfunction.
Power switch
Power cord
Power inlet
WARNING
• Should the wheels be chipped or cracked, immediately stop the instrument and contact NIDEK or your
authorized distributor.

11
Troubleshooting
In the event that the instrument does not work correctly, attempt to correct the problem in accor-
dance with the following table before contacting NIDEK or your authorized distributor.
∗If the symptom cannot be corrected with the above remedy, contact NIDEK or your
authorized distributor.
Symptom Remedy
The instrument does not work
even though the power switch is
turned on .
•Confirm that the power cord is properly connected.
•Confirm that voltage applied to the wall outlet is within the range specified.
•Check the fuses. If any fuses are blown, replace all fuses with new ones.
Communication cannot be per-
formed. •Confirm that the RS-232C cable or LAN cable is properly connected.
A part of the displayed lens shape
on the layout screen blinks after
lens shape measurement.
•The lens diameter is insufficient. The blinking section indicates where the
diameter is insufficient. After pressing to release the lens, replace the
lens with a larger one or change the layout. (To change the layout, return to
the layout screen.)
Processing does not start even
though is pressed.
•Confirm that the processing chamber cover is closed.
•The instrument is attempting to process a lens that is already processed.
Switch the side of the lens to be processed.
The lens cup cannot be inserted
into the lens adapter smoothly or
easily detached.
•Adjust the plunger of the cup holder.
A maintenance message is dis-
played and the instrument stops.
•Perform the remedy according to the maintenance message. If the mainte-
nance message is displayed again, contact NIDEK or your authorized distrib-
utor.
An error message is displayed
and the instrument stops.
•An abnormality has been detected. Turn off and on the instrument. If an error
message is displayed again, contact NIDEK or your authorized distributor.
The traced or processed size,
axis, bevel, groove position, or
such has suddenly become devi-
ated.
•Perform readjustment after calibration.

12
Safety Features
For safe use, the instrument is provided with the following features.
●Processing chamber cover check function at the start of processing
Lens processing will not start unless the cover is closed.
●Self-diagnosis function
This instrument is equipped with a self-diagnosis function, which monitors the instrument during
operation.
If any malfunction occurs, the instrument stops automatically and an error code is displayed on the
display. Please report the error code as well as the symptoms when contacting NIDEK or your
authorized distributor regarding the malfunction. This will assist in accurate servicing.
The following table indicates the contents of the error codes. Attempt to correct the problem
according to the remedy in the table before reporting the malfunction.
●Error code table
WARNING
• Should the processing cover be opened during processing, the wheels will not stop their rotation immedi-
ately. Never open the processing chamber cover during lens processing.
Before opening the processing chamber cover after processing, confirm that the wheels have come to a
complete stop.
Code Error indication Details of the error Remedy
101 Roughing not completed. Roughing does not come to comple-
tion.
Check that the wheel for glass
lenses is sufficiently dressed.
Check the lifetime of the plastic
roughing wheel or abnormality.
102 Finishing not completed. Finishing does not come to comple-
tion.
Check that the wheel is suffi-
ciently dressed.
103 Polishing not completed. Polishing does not come to comple-
tion.
Contact NIDEK or your autho-
rized distributor.
104 Grooving not completed. Grooving does not come to comple-
tion.
105 Edging complete sensor
error
Processing completion sensor
detection voltage is abnormal.
201 Feeler off error The feelers become detached during
lens measurement.
Check that the lens diameter is
sufficient.
202 There is no lens. No lens is detected at the start of
lens measurement.
Check that the lens diameter is
sufficient. If tracing or processing
is started without chucking any
lens, turn the power switch off
and on without anything to be
chucked.
203 Front & rear measuring data
error
Abnormal measurement data (front
and rear surfaces intersect)
Check that the lens does not
warp during lens shape mea-
surement due to its thinnest.

13
204 Start & end measuring data
error
Start point and end point do not
match.
Contact NIDEK or your autho-
rized distributor.
205 Feeler lift up error The feeler is caught on a lens during
measurement.
Check the cleanliness of the lens
surface.
206 Exceeded the measurement
limit. The lens is too thick. The lens is too thick to process.
208 LMU origin error Response abnormality of LMU sen-
sor Turn off power and clean the
feeler unit.
209 RMU origin error Response abnormality of RMU sen-
sor
210 Pattern is not set. No pattern is detected at the start of
pattern measurement.
Check that a pattern is set. If
tracing is started without chuck-
ing any pattern, turn the power
switch off and on without any-
thing to be chucked.
401 XYRf initialization error X, Y, and Rf axes do not initialize.
Contact NIDEK or your autho-
rized distributor.
402 X initialization error X axis does not initialize.
403 Y initialization error Y axis does not initialize.
404 Rf initialization error Rf axis does not initialize.
405 Rr initialization error Rr axis does not initialize.
406 XY initialization error X and Y axes do not initialize.
407 XR initialization error X and R axes do not initialize.
408 YR initialization error Y and R axes do not initialize.
501 Chuck origin sensor Response abnormality of origin sen-
sor
502 Chuck close error Chucking is not accomplished.
601 Main wheel does not rotate. The wheel for the outside shape
does not rotate.
602 Groove wheel does not
rotate. The grooving wheel does not rotate.

14
Specifications
O
Dimensions and mass
O
Chucking
O
Accessories
•Dimensions 543 (W) × 490 (D) × 345 (H) mm
•Mass 33 kg or less (main body only)
•Power supply voltage AC 100 to 120 V / 230 V
•Frequency 50/60 Hz
•Power consumption 1.0 kVA max. (AC 100 to 120 V), 1.3 kVA (AC 230 V)
•Lens chucking Chucking method Electric system
Chuck pressure 45 kgf ±5 kgf
* Can be set for plastic / high index plastic, glass, and other
lenses. Pressing the “Chuck” button first lightly chucks the lens
temporarily and then chucks the lens more firmly for process-
ing.
•Standard accessories Spare fuse (2 units), Hexagonal wrench (2.0 mm, 2.5 mm, 4.0 mm), Half-eye lens cup
(green/red 5 units each), Double-coated adhesive pad for half-eye lens cup, Dressing
stick for glass roughing wheel, Dressing stick for finishing wheel, Dressing stick for pol-
ishing wheel, Cup remover, Pattern holder, Calibration jig, Adapter set, Power cord,
OPERATOR’S MANUAL (CD), Read Before Use (printed version)

15
为安全使用
安全注意事项
使用前,请阅读 “使用前请阅读”指南及完整的使用说明书 (可在随附的 CD 中找到,
PDF 格式)。
本 “使用前请阅读”指南描述了安全注意事项。请妥善保存本指南,以备不时之需。
如欲了解操作规程,请阅读完整的使用说明书 (可在随附的 CD 中找到, PDF 格式)。建议打印
本说明书,以便于使用。
如果您遇到任何问题或对设备存有疑问,请联系 NIDEK 或当地授权经销商。
在本说明书中,标志语用于指定安全警示的程度或级别。定义如下。
警告
表示可能存在危险的情况;如果不加以避免的话,可能会导致死亡或严重受伤。
注意
表示可能存在危险的情况;如果不加以避免的话,可能会导致轻微或中等程度的伤害或财产损害
事故。
即使标有 “ 注意”的情形也可能在一定条件下造成严重伤害。
必须始终严格遵守安全注意事项。
ޓޓ
ޓޓ
ᴎ㛑⺼䖍ᴎ

16
电子版使用说明书概述
如欲了解更详细的产品信息,请参阅随附 CD-ROM 中包含的使用说明书(PDF 格式)。(Windows 版
)*1.
1 启动 PC,将 CD-ROM 放入光驱中。
2从CD-ROM 的显示内容中,双击 PDF 文件 “LE-700_Select_language.pdf”。
3选择使用说明书或安装说明书。
●点击与左侧所显示语言对应的一栏,显示其使用说明书 (PDF 文件)。
●点击右侧显示的一栏,显示英文版安装说明书 (PDF 文件)。
∗如必要,请将 PDF 文件保存至 PC 或类似设备中。
*1. Microsoft 和Windows 是微软公司在美国和 /或其他国家的注册商标或商标。
*2. Adobe 是Adobe Systems Inc. 在美国和 /或其他国家的注册商标或商标。
•如果 PC 上未安装 Adobe Reader *2,请从 Adobe Systems Inc 网站上下载其安装程序。
Other MANUALS
Other
MANUALS
OPERATORS MANUAL
OPERATORS MANUAL
English
Chinese
BEDIENUNGSANLEITUNGBEDIENUNGSANLEITUNG
German
French
MODE DEMPLOI
MODE DEMPLOI
English
MANUAL DE USUARIOMANUAL DE USUARIO
Spanish
OPERATORS MANUALOPERATORS MANUAL
MANUALE DELLOPERATOREMANUALE DELLOPERATORE
Italian
INSTALLATION MANUALINSTALLATION MANUAL
使用说明书 安装说明书 (英文)

17
使用注意事项
使用前
警告
•移动设备时,请使用手推车。抬起设备需要至少两个人。
如果一个人试图搬运本设备的话,可能导致背部受伤或绊
倒。
•抬起设备时,请抓紧两侧底部的缺口 、、和
点 (参见右图)。抬起设备时,请勿抓紧其外罩。
否则,可能导致设备跌落,引起人员受伤或设备故障。
•放下抬起设备时,注意不要让手指被卡住。
手指被卡在工作台和设备之间,可能会导致受伤。
•请将设备放置设备外部尺寸大于如下所示尺寸 (50 mm 或50
mm 以上)的工作台上。建议工作台高度为 650 至700 mm,
以便留出空间,将泵水槽安装在工作台上。
另外,工作台必须足够坚固,承受设备的重量 (33 kg),并且工作台支柱配有调节器,以保持平整和稳定。
否则,一旦出现撞击或意外,可能导致设备跌落。
工作台必须开一个孔,以便让管子穿过。
•请将设备安装在稳定、平整的场所,不会发生振动或冲击。
倾斜或振动会导致设备跌落或妨碍正常的镜片加工。
B
A
D
C
26.5
316.5
490
543
50
3-
115
304
2-R50 R70
237 242
261
269
设备橡胶支脚 (三点)
排水管开孔
冷却水管和清洁水管开孔
(单位:mm)
设备周界
工作台周界 (示例)
建议高度为 650 至700 mm

18
注意
• LE-700 是一种采用来自 Satellite Tracer (附属扫描仪)或电脑主机的数据对带有镜片吸盘的镜片进行中心
定位,然后高速加工镜片使之与镜架匹配的仪器。除预期用途外,请勿将本仪器用作任何其他用途。
NIDEK 对因使用不当造成的意外或故障不承担任何责任。
•只有经 NIDEK 或NIDEK 经销商授权的工作人员才能安装设备。
•请将本设备安装于符合以下条件的环境中。
使用期间,必须维持以下条件。
•使用条件
温度:5 至40 °C (41 至104 °F)
湿度:30 至80% (5至31 °C [41 至87.8 °F])
[最小可接受相对湿度为 30%。温度达 31 °C (87.8 °F) 时,最大可接受相对湿度为 80%,40 °C (104 °F) 时,线
性降低至 50%]
海拔高度:最高 2,000 m
安装地点:室内 (灰尘含量低,不存在烟雾、振动和冲击)
•请将本设备安装在
“维护”(第
20
页)
上描述的设备前方拥有充分操作区域的场所中。
•使用美工刀拆封时,务必佩戴防护手套。
赤手接触美工刀或纸板锐边,可能导致人员受伤。
•请将设备安装在高度和深度允许舒适操作的工作台上。
以不舒服的姿势继续使用设备,可能导致背痛。
•请勿遮挡设备后部的冷却风扇。
如果风扇被挡住,设备内部温度可能会升高,从而引发火灾。
•避免将设备安装在接触到腐蚀性材料 (如:腐蚀性气体、酸或盐)的场所。
否则,可能发生腐蚀或故障。
•请勿使用非厂家提供的电源线。亦不要将厂家提供的电源线连接至任何其他设备。
否则,可能导致故障或火灾。
如果需要更换电源线,请联系 NIDEK 经销商或 NIDEK 服务人员。
•切勿使电源插座过载。
为过多设备提供电力,可能导致过热和火灾。
•请将设备安装在使用期间可轻易检修插有电源插头的插座的区域。此外,确保电源线无需使用任何工具即可
断开连接。
否则,一旦出现异常,可能会干扰从输入电源上切断电源的操作。
•务必使用符合电源规格要求的壁式插座。
如果线电压过高或过低,本设备可能无法充分发挥性能。有可能导致运行异常或火灾。
•请将电源插头紧紧插入至插座中。
一旦发生故障或漏电,可能引发电击或火灾。
•请勿在电源上放置重物。
电源线受损,可能造成火灾或电击。
•激活设备前,请检查给水管和排水管的连接情况。
否则,可能因漏水造成电击,或地面湿滑造成人员受伤。
Other manuals for LE-700
2
Table of contents
Languages:
Other Nidek Medical Edger manuals

Nidek Medical
Nidek Medical ME 1200 Service manual

Nidek Medical
Nidek Medical LE-700 User manual

Nidek Medical
Nidek Medical Lex 1000 User manual

Nidek Medical
Nidek Medical LE-9000LX User manual

Nidek Medical
Nidek Medical LE-9000SX User manual

Nidek Medical
Nidek Medical Le 1000 User manual

Nidek Medical
Nidek Medical LE-700 User manual

Nidek Medical
Nidek Medical ME-1000 User manual

Nidek Medical
Nidek Medical SE-9090 Express User manual

Nidek Medical
Nidek Medical SE-9090 Supra User manual