FORM NO. 56041433 / SELECTSCRUB 17 - 7
INSTALLING T E BRUS OR PAD OLDER
WARNING!
Moving par s - urn he Solu ion Swi ch (15), Brush Swi ch (13)
and Vac Swi ch (14) OFF and disconnec he Ba ery Connec or
/ Charger Plug (17) before servicing.
IMPORTANT!
Emp y he solu ion and recovery ank before ipping he machine
back o ins all or change a brush, or o ins all or urn over a pad.
1If using a pad, ins all he pad on he pad holder.
2Make sure he brush drive mo or is in he raised posi ion.
3Remove he Squeegee Assembly (8), ip he machine back and flip
down he Kick S and (20) a he fron of he machine. Use he Kick S and
(20) o hold he machine up while ins alling he brush or pad holder.
4Align he slo s on he brush or pad holder wi h he lugs on he drive hub.
5Turn he brush or pad holder coun er-clockwise ( o he lef ) un il i locks
in o place.
6La ch he Kick S and (20) back in o place and ip he machine back
forward. Re-ins all he Squeegee Assembly (8).
INSTALL T E SQUEEGEE
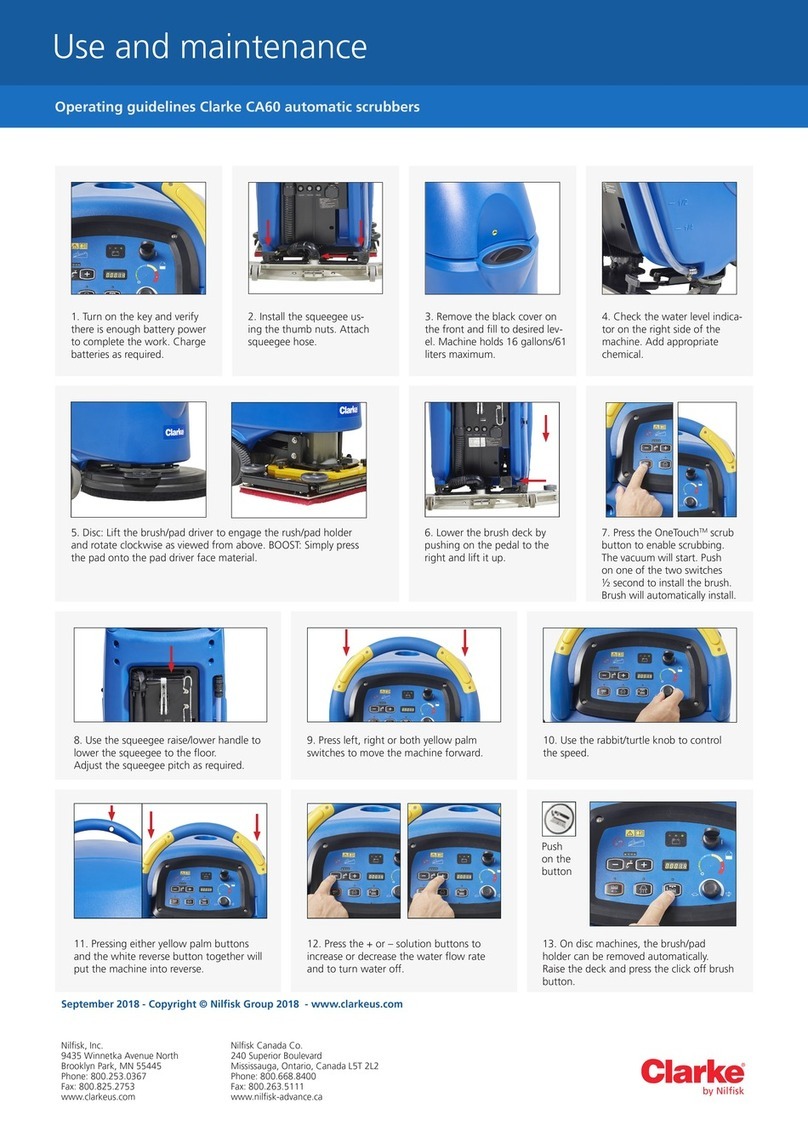
1Ins all he Squeegee Assembly (8) on o he Squeegee Moun (18) as
shown on page 1 (Figure A). Tigh en he humb nu s securely.
2A ach he Squeegee Hose (6) o he Squeegee Assembly (8) as shown.
FILLING T E SOLUTION TANK
Fill he solu ion ank wi h a maximum of 23 li ers (6 gallons) of cleaning solu ion.
Do no fill he solu ion ank above 8 cm (3 inches) from he op of he ank. The
solu ion should be a mix ure of wa er and he proper cleaning chemical for he
job. Always follow he dilu ion ins ruc ions on he chemical con ainer label. The
amoun of solu ion in he Solu ion Tank can be de ermined a -a-glance wi h he
Solu ion Level Indica or (21). Line up he solu ion level in he clear Solu ion
Tank Drain Hose (7) wi h he marks (21) on he side of he Solu ion Tank (22).
The op mark indica es a full ank or 23 li res (6 gallons) and each mark under
ha indica es a drop of 5.75 li res (1-1/2 gallons) or 1/4 ank.
CAUTION!
Use only low-foaming, non-flammable liquid de ergen s in ended
for machine applica ion.
MAC INE OPERATION - WET SCRUBBING
Note: Bold numbers in parentheses indicate an item illustrated on page
2 (Figure A).
1Move Squeegee Raise / Lower Handle (3) down o lower he squeegee
assembly.
2Lower he Brush Raise / Lower Pedal (5) by pushing he foo pedal down
and o he righ .
3Posi ion he Solu ion Flow Con rol Lever (16) a i s mid range.
4Turn he Brush Swi ch (13), Vac Swi ch (14) and Solu ion Swi ch (15)
ON. The solu ion will no come ON unless he Brush Swi ch (13) is ON.
5Grip he Opera or Handle Tube (1) and push he machine forward o
scrub a a slow walking speed for bes resul s.
CAUTION!
To avoid damaging he floor, keep he machine moving while
he brush is urning.
6Re-adjus he Solu ion Flow Con rol Lever (16) so a hin , even layer
of solu ion can be seen in fron of he Squeegee Assembly (8).
7The Recovery Tank (9) has an Au oma ic Floa Shu -Off (12) o block
he vacuum sys em when he recovery ank is full. You can ell when
he floa closes by he sudden change in he sound of he vacuum
mo or. When he floa closes, he recovery ank mus be emp ied. The
machine will not pickup wa er wi h he floa closed.
8When he Recovery Tank (9) is full, urn he Solu ion Swi ch (15), Brush
Swi ch (13) and Vac Swi ch (14) OFF and raise he Squeegee
Assembly (8) and Brush (5). When he Brush Swi ch (13) is urned OFF
he solu ion valve will also au oma ically shu off. Move he machine
o a designa ed “DISPOSAL SITE”.
NOTE: The brush mo or WILL NOT shu off when he brush is raised
off he floor, so make sure you urn he Brush Swi ch (13) OFF before
raising he brush.
9To emp y he Recovery Tank (9) open he Solu ion / Recovery Tank
Cover (11) un il he prop rod ca ches and direc he Recovery Tank
Drain Hose (10) o a designa ed “DISPOSAL SITE” and remove he
plug.
WET VACUUMING
Fi he machine wi h op ional a achmen s for we vacuuming.
1Disconnec he Squeegee Hose (6) from he Squeegee Assembly (8).
2Ins all a 3.8 cm (1-1/2” ) dia. hose coupler in o he end of he Squeegee
Hose (6).
3A ach a 3.8 cm (1-1/2” ) dia. vacuum hose o he coupler. Then a ach
a wo bend wand and squeegee floor ool o he hose.
4Turn he Vacuum Swi ch (14) ON.
AFTER USE
1Turn he Solu ion Swi ch (15), Brush Swi ch (13) and Vac Swi ch (14)
OFF.
2Raise he brush (or pad) and raise he squeegee. Move he machine
o a designa ed “DISPOSAL SITE”.
3To emp y he solu ion ank, ake he Solu ion Tank Drain Hose (7) off
i s Barbed Elbow Connec or. Direc he hose o a designa ed “DIS-
POSAL SITE”. Rinse he ank wi h clean wa er. Inspec he solu ion
hoses; replace if kinked or damaged.
4To emp y he recovery ank, open he Solu ion / Recovery Tank Cover
(11) un il he prop rod ca ches and ake ou he Recovery Tank Drain
Hose (10). Direc he hose o a designa ed “DISPOSAL SITE” and
remove he plug. Rinse he ank wi h clean wa er. Inspec he recovery
and vacuum hoses; replace if kinked or damaged, clean ou if clogged.
Also inspec he recovery ank cover gaske .
5Remove he brush or pad holder. Rinse he brush or pad wi h warm
wa er and hang i up o dry. Allow buffing pads o dry comple ely before
using again.
6Remove he squeegee, rinse i wi h warm wa er and hang i up o dry.
7Check he main enance schedule and perform any required main e-
nance before s orage.
