Nine Eagles galaxy visitor7 User manual

Quick-Start Instructions V1.0
QUADCOPTER
We reserve the right to change the manual without prior notice.
Please visit www.nineeagle.com to find the latest version.
Shanghai Nine Eagles Electronic Technology Co., Ltd
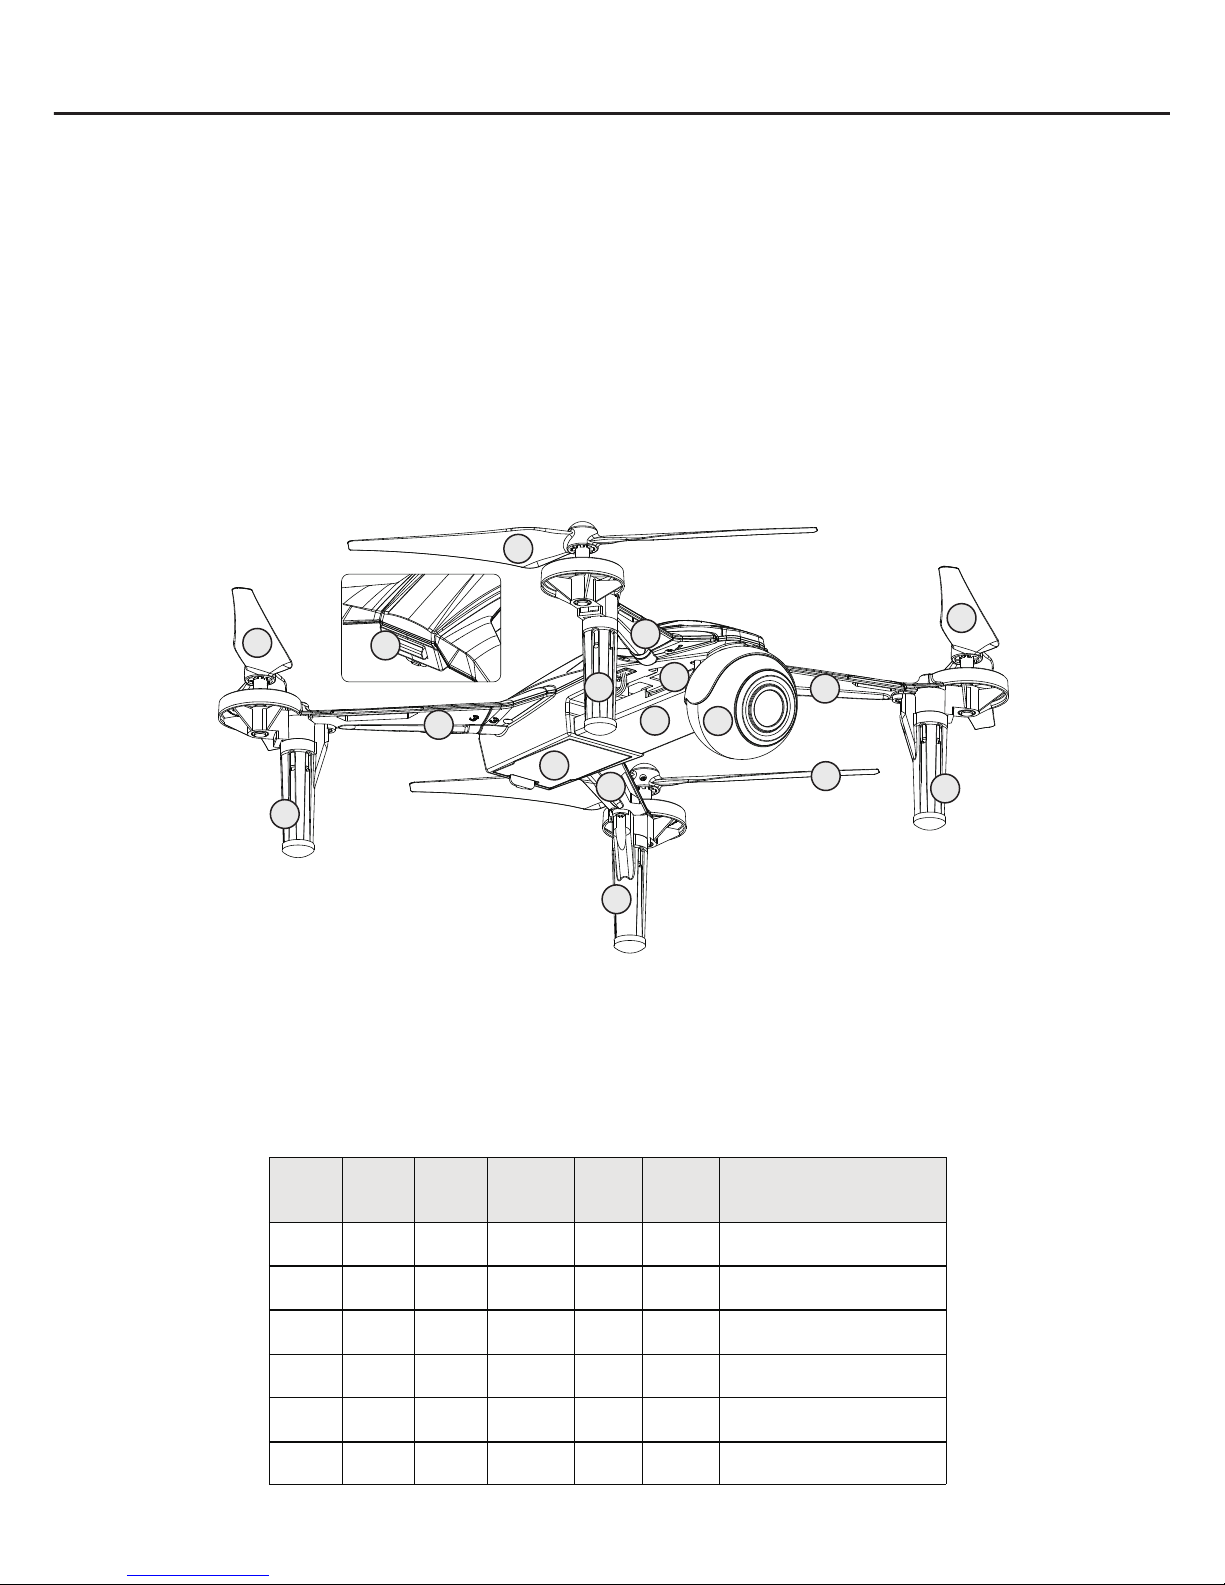
About GALAXY VISITOR 7
● Indicator light status illustration:
01
04 05
06
10
08
07
12
13
08
07
05
02
03 09
06
11
【Picture1】
Please read this instruction carefully before your flight in order to guarantee the safety of you and the
others.
Thank you for purchasing GALAXY VISITOR 7 quadcopter produced by Shanghai Nine Eagle Electronic
Technology Co., Ltd (hereinafter referred to Nine Eagle Technology).
GALAXY VISITOR 7 is equipped with 2.4G&5.8G WIFI camera, which can take photo and make video by
buttons in the transmitter or by APP in your mobile devices, such as smart phone, tablet, etc. The photo &
video can be easily shared to your social networks by APP. You can use the transmitter to control the
quadcopter flying and at the same time use your mobile devices as your FPV screen. You can also use the
mobile devices to control the quadcopter flying directly, and at the same time monitor what’s camera
viewing by your screen of mobile devices.
GALAXY VISITOR 7 quadcopter is 2.4GHz 4 channel model quadcopter, whose controller internally
installed three-axis gyro and three-axis accelerating sensor with excellent control function.
The APP supports Android and IOS operating system.
GALAXY VISITOR 7 is not a Toy, only for people more than 14 years old.
01 Front clockwise blade
02 Front anticlockwise blade
03 Back clockwise blade
04 Back anticlockwise blade
05 Clockwise motor
06 Anticlockwise motor
07 Front indicator light
08 Back indicator light
09 Tail indicator light
10 Battery compartment
11 Camera
12 Micro SD card socket
13 Camera indicator light
Front left
indicator
light
Front right
indicator
light
Back left
indicator
light
Back right
indicator light
Tail
indicator
light
Camera
indicator
light
Status
solid on / / solid on / orange light
solid on
No connection with mobile devices.
Stand by.
flash
rapidly / / flash rapidly / orange light
solid on
No connection with mobile devices.
Quadcopter is moving.
solid on solid on solid on solid on solid on blue light
solid on
Successful connection with mobile
devices. Camera working under 2.4G.
solid on solid on solid on solid on solid on orange light
solid on
Successful connection with mobile
devices. Camera working under 5G.
flash
slowly
flash
slowly
flash
slowly flash slowly flash
rapidly flash Low voltage in li-po battery.
solid on solid on solid on solid on flash flash Calibration mode.

S p ecif i c a t ion of G a l a x y V isit o r 7
72 mm
241 mm
∅160 mm
199 mm
● C ( Type:NE-OT019)amera
Image sensor
:OV 2710 1/2.7”;200 effective magpixels(total 200 magpixels)
Camera lens
:FOV 130° 4.82mm f/2.6;unlimited clear without defocus 4 sets 4 pieces
ISO range
:100~2400(video);100~2400(picture)
Electronic shutter speed
:Automatic adjust
Picture Max resolution
:1920x1080
Picture shooting mode
:Single picture shooting; continuous shooting for more pictures
Recording resolution
:FHD: 301080P@
Video store biggest stream
:10Mbps
File memory format
:File system:FAT32; Picture format: JPEG; Video format:MP4
Supported SD card type
:Micro SD card, the maximum supported capacity is 32GB,the transmission speed
is or higher than 10, or Micro SD card reach to UHS-1 rating ro SD card
Working temperature
:0° ~ 40° C
Working frequency
:2.4GHz(Default Setting), 5.8GHz(User defined)
WiFi mode
:802.11 a/b/g/n automatic adjustment
Control distance
:50m@2.4GHz,100m@5.8GHz(in the condition without obstacle and interference)
Certificate
:FCC, CE, TELEC, RCM
● Lithium battery ( Type:NE480379)
Battery type
:LiPo 1S
Voltage
:3.7 V
Capacity
:700 mAh
Power
:2.59Wh
Working
:0~40℃
Output port
:JST
Weight
:bout A 19 g
● Charge ( Type:NE-CH1020M)
Input Voltage
:DC 5V
Input port
:USB
Output port
:JST
● Quadcopter ( Type:NE-MASF25)
Flying weight(include Lipo)
:130 g
Max Width( Not include rotor blade)
:199 mm
Max Length(Not include rotor blade)
:199 mm
Max height
:72 mm
Rotating diameter of blade
:φ160 mm
Diagonal Wheelbase
:241 mm
Flying time
:about 10min

1.Power on transmitter
【Picture2】
MODE 2
3.Prepare mobile devices
1) During flight, the APP performance will be greatly affected if phone call comes or other
interruption come across, so it is suggested to have your mobile set as No-disturbing mode.
2)Enter the setting menu-wireless and network-WLAN, check the WIFI signal connection status.
And it takes about 30-60 seconds from WIFI signal searching to connection.
3) Choose WIFI signal of the quadcopter(FPV_X231), enter with the password(1234567890).All the
indicator lights will be solid on after successful connection.
4) Enter the main interface of APP.
5) Add the camera by clicking icon(01). Then mobile device will show the preview in the screen.
After about 2 seconds, APP enters into "connection interface".
HOW TO FLY?
1) Move the throttle stick to the lowest position.
2) Turn on transmitter
3) Release the throttle stick
Attention: Please do move the throttle stick to
the lowest position when powering on transmitter.
Otherwise the quadcopter won’t start.
Move the throttle stick to the lowest position,
and turn on transmitter. Then release the throttle
stick.
2.Connect Li-po battery to quadcopter
1)Plug Micro SD card into card slot of the camera.
2)Remove the battery cover off the quadcopter, pull out the power connection line.
3)Put the quadcopter horizontally, connect the quadcopter with the li-po battery.
4)Put the battery inside the battery compartment and close the cover.
5)Make sure to keep the quadcopter horizontally still and quite.

【Picture3】
4.Transmitter controlled flying
Place the quadcopter in empty place and let its tail face to pilot. (Take Mode 2 for example)
1)Take off:Press the TAKE OFF button on the transmitter. The quadcopter will take off automatically
and hover at the height 1 meter.
【Picture6】【Picture7】
【Picture4】【Picture5】
5.Mobile devices controlled flying
2)Transmitter controls:See instruction for sticks on Picture 5
3)Land:Press LAND button on transmitter. Quadcopter will land slowly to the ground.
Attention: Make sure the landing area is clear and landing won’t hurt people before pressing LAND button.
4)Emergency Landing:In case of emergency, move the throttle stick to the bottom and press the land button. Motor
will stop rotating at once and quadcopter will fall down immediately.
Attention: This function is only for emergency use. Please think carefully before using it because it may
damage the quadcopter.
APP connection interface:
01 Add camera: connect the mobile device with the quadcopter.
02 Camera: operation interface
03 Photo album: download, delete and share photos & videos.
04 Users center: download manual or teaching videos
05 Setting: camera, flight parameter and APP setting.
Camera
02
03 04
05
01
Photo album Users center Setting
Nineeagle +
Throttle
Stick
Climb
Descend
Rotage
Right
Rotate
Left
Cyclic
Stick
Forward
After
Right
Left

【Picture8】
After successful
connection between
mobile device and
quadcopter, the screen of
mobile device will show
control interface
automatically.
【Picture9】
06 back to main interface
07 control mode switch
stick mode
gravity mode
08 flight mode switch
Primary mode: easy to operate for beginners
Senior mode: quick and agile reaction. Gain setting can
be adjusted in setting menu.
09 Calibration: calibrate acceleration sensor calibration by
this button before flying.
Trim: trim hovering during flying.
10 Emergency Landing: During flying, after touching this button,
11 Video shooting
12 Photo taking
13 Left operating stick
14 Right operating stick
15 Take off or Land switch
16 Wifi signal strength indicator
17 Current battery capacity indicator: Green: enough for flying.
Yellow: low battery and need to fly home. Red: battery runs
out and need to land immediately.
motors will stop rotating and quadcopter will fall down at once.
1)Take off:Click 15 Take off switch and motors on quadcopter start to rotate. Then quadcopter will
take off automatically and hover at the height 1 meters in the air.
2)Quadcopter flying control
Using stick mode for flying control:●
Throttle stick is the Right operating stick in mode 1 Throttle stick is the Left operating stick in mode 2
mode 1
Rotate to
left
Right Stick
Climb
Rotate to
right
Descend
Slide to
left
Left Stick
Forward
Slide to
right
Backward
Rotate to
left
Left Stick
Climb
Rotate to
right
Descend
Slide to
left
Right Stick
Forward
Slide to
right
Backward
mode 2
gravity
mode
06 07 08 09 10 11 12
13 14
171615
Senior
mode Trim
stick
mode
Primary
mode Calibration

●Using gravity mode for flying control:
When switching to gravity mode, the control interface only shows throttle stick and rudder stick.
【Picture10】
Left or Right: Tilting the mobile device left or right will cause the quadcopter tilt and start moving that
direction.
Forward or Backward: Tilting the mobile device forward or backward will cause the quadcopter to tilt and
start moving that direction.
Climb or Descend: Keep pressing the throttle stick. Then moving it up or down will cause the quadcopter
to climb or descend.
Nose Rotates: Keep pressing rudder stick. Then moving it left or right will cause the quadcopter nose to
rotate that direction.
3)Land. Click 15 Land switch. Quadcopter will land slowly to the ground.
4)Emergency Land In case of emergency.click 10 Emergency Landing. Motor will stop rotating at once and
quadcopter will fall down immediately.
gravity
mode Trim
Primary
mode
6.Video/Photo Shooting
7.Switch between High rate and Low rate
1)Video shooting
● By transmitter - Press button “VIDEO /PICTURE ON” one time on the top right corner of transmitter
backside, and WIFI camera will start camera shooting. Press button “VIDEO OFF” one time on the top
left corner of transmitter backside to stop shooting and save video.
● By APP- Click 11 Video shooting to start (the icon 11 Video shooting on the screen will flash), and click
11 Video shooting again to stop video shooting.
Attention: Before removing the li-po battery, please make sure to stop the video shooting to save
video. Otherwise, the video can not be saved.
2)Photo Shooting
● By transmitter - Under above video shooting mode, press the button “VIDEO /PICTURE ON” one time
on the top right corner of transmitter backside, WIFI camera will take one picture.
● By APP - Click 12 Photo taking to take one photo. Keep pressing the icon 12 Photo taking, camera will
take photos continuously
Note: Time interval for continuous photo shooting can be adjusted in APP Setting.
Low rate: Suitable for beginners or indoor flying.
High rate: Suitable for advanced beginners or outdoor flying.
Quickly press right stick one time and transmitter will sound
“Bi” between high rate and low rate. The voice “Bi” sounds
loud and clear when low rate turns to high rate. The voice
“Bi” sounds not loud when high rate turns to low rate.
Quadcopter flight performance is more flexible under the
high rate mode.
High rate/Low
rate switch
【Picture11】

9.Hovering trim
After taking off, if there is no external interference(for example wind blows ), the quadcopter should
hover stably in small range without too much moving. If quadcopter moves to some direction in big range,
hovering trim is necessary
There are two ways to do hovering trim.
● By transmitter – Fly the quadcopter at the height about 1 meter in the air. Then use the trim buttons on
the transmitter.
● By APP – Fly the quadcopter at the height about 1 meter in the air. Then release both Left operating stick
and Right operating stick and observe quadcopter's moving direction. Click 09 Trim to enter into trim
mode. If quadcopter moves forward, move the elevator stick backward a little and quadcopter will slow
the moving forward. Keep moving the elevator stick until quadcopter hovers stably in small range. At last,
click 09 Trim to save.
8.Gain setting
Power on the transmitter and connect li-po battery to
the quadcopter.
After successfully bound, lower the throttle stick to its
lowest position.
Press the right stick and keep pressing. The constant
voice “Bi” will appear. Now the transmitter enters into
gain setting mode.
Push throttle stick upper to the value you need. The
voice will turn to incontinuous “Bi, Bi, Bi”.
Throttle stick position higher than middle position
gains more flexible.
Throttle stick position in middle position gains the
default setting.
Throttle stick position lower than middle position will
gains more slow.
Then release the right stick and then the transmitter
will save the value.
【Picture12】
Low
Factory set
High
Table of contents
Other Nine Eagles Quadcopter manuals

Nine Eagles
Nine Eagles Galaxy Visitor 2 User manual

Nine Eagles
Nine Eagles GALAXY VISITOR 3 User manual

Nine Eagles
Nine Eagles Galaxy Visitor 7 User manual

Nine Eagles
Nine Eagles NE-MASF33 User manual

Nine Eagles
Nine Eagles Galaxy Visitor 2 NE-MASF11 User manual

Nine Eagles
Nine Eagles Galaxy Visitor 3 NE2529M1 User manual


