Nine Eagles NE-MASF33 User manual

Important Notice:
1 Please read carefully before using and follow this manual;
2 Improper operation may result in aircraft damage, lost, and likely to cause injury;
3 This manual is subject to be updated without further notices. You can check the latest version at our homepage: www.nineeagle.com.
NE-MASF33 20160908
Instruction Manual
EN V1.0

is equipped with 20mm low-deformity camera, high-accuracy anti-shocked gimbal and 2.4GHz & 5.8GHz double
INTRODUCTION
Thank you so much for purchasing Tourist 1 of the Shanghai Nine Eagles Electronic Technology Co.,Ltd (so called 'Nine Eagles
Tech' below).
Please enjoy flying with 'Tourist 1' for good!
Tourist owns an aircraft, a camera with gimbal, a remote controller and other accessories.
The aircraft is with built-in flying control system and attached camera gimbal under it.
You can control the aircraft and camera through the remote controller, meanwhile, you can enjoy the first person view (real-time
image transmission), too.
The Tourist 1
frequency image/video transmission systems. The camera can produce 4 Mega Pixel photo and Full HD video.
Through flying the Tourist 1, you own broad and wide view and create unique masterpieces.
Through the Real-time video/image transmission, you can share joy via social network platform with your friends any time anywhere.
Tourist 1 is equipped with Nine Eagles Tech self-researched and developed aero-flying control system for outstanding control and
safety Tourist 1 your perfect mate of household and traveling lives, can fly both indoor and outdoor fields.

CONTENTS
1 Warning ........................................................................... 1
1) Safe Flight Notice............................................................. 1
2) Flight Environment Requirements........................................ 1
3) Aircraft Low Battery Alarm and Protection Function................ 1
4) Auto Home Return ........................................................... 1
5) Aircraft Failsafe function..................................................... 1
(1) Failsafe function under GPS mode................................. 1
(2) Failsafe function under Attitude mode............................. 1
6) Compass Calibration......................................................... 1
7) About Gimbal Lifting System .............................................. 2
2 Intelligent Flight Battery Guidance................................. 3
1) Battery use ..................................................................... 3
2) Battery Charging .............................................................. 3
3) Battery storage ................................................................ 3
4) Battery disposal ............................................................... 4
3 Safety and Environment Protection................................ 4
1) Disclaimer and Warning..................................................... 4
2) FCC Regulation Claims ..................................................... 4
4 Technical Support............................................................ 5
5 About Tourist 1 ................................................................ 6
Aircraft Diagram and Indicator Lights Status ............................. 6
6 Charge Li-po Battery....................................................... 7
1) Intelligent Battery Function Description................................. 7
2) Turn-on and Turn-off Battery .............................................. 7
3) Charge Aircraft Li-po Battery and Remote Controller.............. 7
7 Transmitter Operation Instruction .................................. 8
1) Transmitter Function Instruction (mode 2)............................. 8
2) Transmitter status indicator............................................... 10
3) WIFI image transmission signal status description................ 10
4) How to bind the aircraft................................................... 10
5) How to use transmitter to memorize waypoints
and perform flying.......................................................... 11
6) Use Remote Controller to Shoot Video .............................. 11
7) Use Remote Controller to take Photo ................................ 11
8) Switch Mode 1 and Mode 2............................................ 11
9) Remote Controller Calibration .......................................... 11
8 Preparation Before Using.............................................. 11
1) Download, install APP ..................................................... 11
2) Get user manual and tutorial videos .................................. 11
3) Checklist before flying..................................................... 11
4) Install propeller .............................................................. 12
5) Take off the camera cover and the fixed stand.................... 12
6) Install mobile device on the remote controller ..................... 12
7) Install aircraft battery....................................................... 13
8) Placement of Aircraft ..................................................... 13
9 Use Remote Controller to Fly ........................................ 13
1) Turn on Remote Controller............................................... 13
2) Turn on Aircraft .............................................................. 13
3) Start APP, Connect to Mobile Device ................................. 13
4) Start Motors.................................................................. 13
5) Take-off, Hover and Landing ............................................ 14
6) Stop motors.................................................................. 14
10 Technical Parameter and Specification ..................... 15
1) Aircraft (NE-MASF33)..................................................... 15
2) Remote Controller (NE-TXOS219B).................................. 15
3) Battery ........................................................................ 15
4) Charger........................................................................ 15
5) Gimbal (NE-OT018B) ..................................................... 15
6) Camera (Model number : NE-OT017 ) .............................. 15
11 Introduction of APP main functions .......................... 16
1) Main menu ................................................................... 16
2) Main Control Interface .................................................... 17
3) Use APP Control the Aircraft ........................................... 18
(1) Recordings ............................................................... 18
(2) Taking Pictures .......................................................... 18
4) Disconnect the Power Supply Of Aircraft ............................ 18
5) Data Reading ................................................................ 18

1
Tourist 1 NE-MASF33
1 Warning
1) Safe Flight Notice
(1) Tourist 1is an aircraft not a toy, which is Not suitable for children under 14 years old.
(2) Please clarify the local regulations and flight environment, away from the prohibited site. Please fly inside the allowable area
before flying.
(3) Please assure the aircraft fly under the range of visibility. Do Not fly the aircraft behind the barriers otherwise it'll be out of control
and cause any accident.
(4) Please keep the remote controller and the mobile device connected to the App in your hand for easy and quick controlling from
any accidents.
(5) Please follow the manual strictly while using the Li-po battery. Please be always aware of it while charging.
(6) In order to ensuring requirements of aviation radio stations on electromagnetic environment, all kinds of remote controllers are
not prohibited to use in a circular region with airport runway as center point and radius as 5000 meters. Following the order of
relevant department on radio control in certain area during certain period, remote controller should not be used accordingly.
2) Flight Environment Requirements
Please choose wide field and keep away from buildings, trees, high-voltage cables and other barriers, also the crowd and animals.
Do not fly the aircraft in severe weathers, like stormy, rainy, snowy and foggy days.
Please keep away from tall buildings, high-voltage cables, communication stations and wifi hot spot, and other like facilities which
impact on the aero data and then cause accidents.
3) Aircraft Low Battery Alarm and Protection Function
About low battery alarm:
When battery level is low, Low Battery Alarm starts to work. The aircraft is still controllable and APP response as below:
Aircraft : Rear indicator light turns red and blinks slowly. APP: in APP prompt box turns red and APP gives a hint.
Critical Low Battery Alarm:
When battery level is critical low, rear indicator light turns red and blinks quickly.
At the same time, aircraft is forced landing. The throttle is not controllable during landing.
4) Auto Home Return
When more than 8 pcs satellite being connected and in GPS mode, Tourist 1 can automatically record the take-off point and the
track in the map. The take-off point is regarded as the defaulted home point. The aircraft will auto return in the below cases.
(1) When turning on 'Auto Home Return', User can pull the left upper switch to 'Auto Home Return', then the aircraft is under Auto
Home Return mode.
(2) When it's low battery, the aircraft will automatically switch to Auto Home Return mode.
(3) When the aircraft is disconnected with the remote controller, the aircraft will automatically switch to Auto Home Return mode.
During flying, please assure it flies under visible range and Do NOT fly behind barriers (ex. buildings and trees etc,) Otherwise once
the aircraft disconnects with the remote controller because of the barriers, it leads to Auto Home Return mode. And during the auto-
returning, it causes the collisions and accidents.
5) Aircraft Failsafe function
(1) Failsafe function under GPS mode
On GPS mode and more than 8 pcs satellites available, once aircraft disconnects to remote controller, Aircraft will hover for
5 seconds. If it cannot re-connect, the Aircraft will perform auto Home Return.During Auto Home Return, once the aircraft is
connected to remote controller again, it will stop auto returning and hover for new orders from remote controller. At this time, user
can re-control Aircraft. If no new command, Aircraft will automatically descend at low battery Level.
(2) Failsafe function under Attitude mode
When battery level is critical low, rear indicator light turns red and blinks quickly.
At the same time, aircraft is forced landing. The throttle is not controllable during landing.
6) Compass Calibration
If the following status occurs, please calibrate Compass.
(1) To fly in a new field.
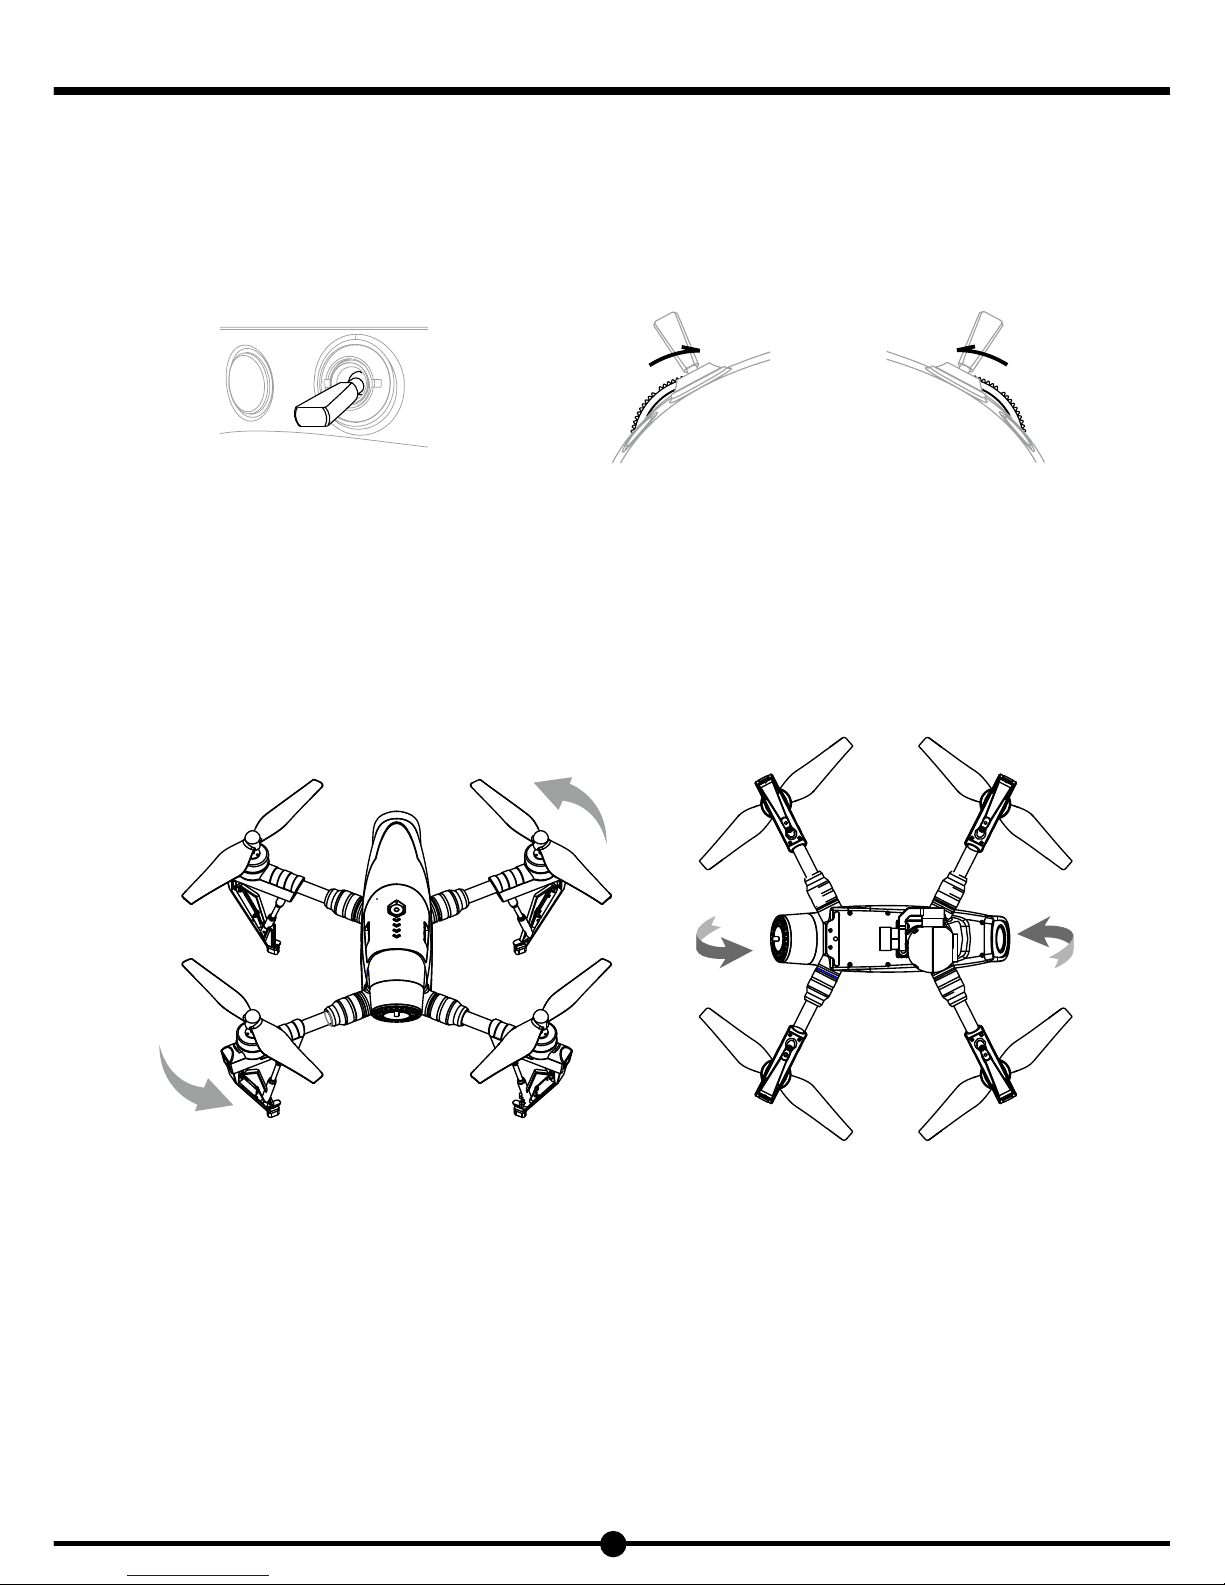
Move the left toggle switch‘B’
to this position. Move the leftmost wheel to the rightmost position, and the rightmost
wheel to the leftmost position at the same time and hold.
A B
EF
Figure 1
Figure 2 Figure 3
2
Tourist 1
NE-MASF33
(2) App and aircraft notifies to calibrate Compass.
(3) Severe drifting while hovering or flying.
Steps for Calibration:
(1) Enter into Calibration
Power on the remote controller, move 'B' to one side of the remote controller, then move wheel 'E' to the rightmost position, wheel
'F' to the leftmost position and hold it (as the below graphic shown), then power on the Aircraft.
(2) Please finish the below calibration operation within 30 seconds:
Hold the Aircraft in horizon and turn it for several circles horizontally.
When rear flight indicator turns green in solid, please hold the aircraft with its left body downward and its right body upward, turn it
for several circles horizontally.
(3) When the aircraft rear flight indicator enters into stand-by status, the calibration is done. In stand-by status, the rear light flashes
in green slowly when it's in GPS mode and 8 satellites connected, and the rear light flashes in yellow slowly when less than 8
satellites connected.
If rear flight indicator blinks in red and yellow by turns, the calibration fails. Please repeat the above steps.
7) About Gimbal Lifting System
In order to obtain a better camera viewfinder composition, Tourist 1 has built-in Gimbal lifting mechanism. After the aircraft takes
off to more than 20 meters, the gimbal descends when move.
the wheel 'F' of the remote controller clockwise. When the aircraft lands, the gimbal retracts by moving the wheel 'F' counter-
clockwise.
During auto return process, the aircraft hovers at about 20 meters away from the ground. It lands after the gimbal retracts to the
aircraft body.
When the battery is in severe low voltage (the aircraft rear light flashes in red), the gimbal retracts automatically.
However, the flyer should pay close attention to the state of the camera when the aircrafts lands to avoid damage of collision.

Warning:
3
Tourist 1 NE-MASF33
2 Intelligent Flight Battery Guidance
Please read the entire user manual to become familiar with the features of this product before operating. Failure to
operate the product correctly can result in damage to the product or personal property and cause serious injury. This
is a sophisticated product. It must be operated with caution and common sense and requires some basic mechanical ability. Failure
to operate this product in a safe and responsible manner could result in injury or damage to the product or other property. This
product is not intended for use by children. Do not use with incompatible components or alter this product in any way outside of the
documents provided by Nine Eagle technology. This manual contain instructions for safety, operation and maintenance. It is essential
to read and follow all of the instructions and warnings in the user manual, prior to assembly, setup or use, in order to operate the
product correctly and avoid damage or serious injury.
To avoid fire, serious injury, and property damage, observe the following safety guidelines when using, charging, or storing your
batteries.
1) Battery use
(1) Do not allow the batteries to come into contact with any kind of liquid. Do not drop the battery into water. Do not leave batteries
out in the rain or near to a source of moisture. If the inside of the battery comes into contact with water, chemical decomposition
may occur, potentially resulting in the battery catching on fire, and may even lead to an explosion.
(2) Never use non Nine Ealges batteries. Please go to www.nineeagle.com to check relative battery purchaisng information. Nine
Ealges takes no responsibility for any damage caused by non Nine Eagles batteries.
(3) Never involve the battery in a crash. Please do not put any living beings over the battery or charger.
(4) The battery should be used in temperatures from -10℃to 40℃, Use of the battery in environments above 50℃can lead to
a fire or explosion. Use of battery below -10℃can lead to permanent damage.
(5) Do not use the battery in strong electrostatic or electromagnetic environments. Otherwise, the battery control board may
malfuntion and cause a serious accident during flight.
(6) Never disassemble or pierce the battery in any way or the battery may leak, catch fire, or explode.
(7) Electrolytes in the battery are highly corrosive. If any electrolytes make contact with your skin or eyes, immediately wash the
affected area with fresh running water for at least 15 minutes, and then see a doctor immediately.
(8) Do not use the battery if it was involved in a crash or heavy impact.
(9) If the battery falls into water with the aircraft during flight, take it out immediately and put it in a safe and open area. Maintain
a safe distance from the battery until it is completely dry. Never use the battery again, and dispose of the battery properly as
described in the Battery Disposal section below. Do not heat batteries. Put out any battery fire using a dry powder fire extinguisher
with the following sequence: water or waterfog, sand, fire blanket, dry powder, Carbon-dioxide fire extinguishers.
(10) Do not put batteries in a microwave oven or in a pressurized container.
(11) Do not place loose battery cells on any conductive surface, such as a metal table.
(12) Do not use conducting wire or other metal objects which may cause short-circuit.
(13) Please clean battery terminals with a clean, dry cloth. Or else, it may cause loose contact that the power wasted or fails to
charge.
2) Battery Charging
(1) Please always use a Nine Eagles approved adapter. Nine Eagles takes no repsonsibility if the battery is charged using a non-Nine
Eagles charger.
(2) Please charge the battery on the concrete surface, without flammable materials around. Never leave the battery unattended
during charging.
(3) Do not charge battery immediately after flight, because the battery temperature may be too high. Do not charge the battery until
it cools down to near room temperature. Charging the battery outside of the temperature range of 5℃~ 40℃may lead to
leakage, overheating, or battery damage.
(4) Disconnect the charger when not in use. Examine the charger regularly and maitain charge. Never use a damaged charger.
3) Battery storage
(1) Keep batteries out of the reach of children and pets. Please seek medical assistance immediately if there's small parts swallowed
by children.
(2) Do not leave the battery near heat sources such as a furnace or heater, or direct sunlight, or leave the batteries inside of a

4
Tourist 1
NE-MASF33
vehicle on hot days. The ideal storage temperature is 22℃~ 28℃.
(3) Keep the battery dry. Never drop the battery into water or area where may leak of water.
(4) Do not crush, strike, impale, or manually short-circuit the battery.
(5) Keep the battery away from metal objects such as glasses, watches, jewelry, and hairpins.
(6) Never transport a damaged battery or a battery with power level higher than 50%.
(7) Please discharge the battery capacity to 40%-65% to store, if the battery would not be used within 10 days. It can extend the
battery life.
(8) Do not store the battery in long time after completely discharge the battery, in case the battery enter into over discharge status
that the core damaged and cannot be used any more .
(9) If the battery capacity is serious shortage and idle for a long time, the battery enters into deep sleep mode. Please charge the
battery to get the battery out of deep sleep mode.
(10) Please discharge the battery to its capacity under 5%, and put the battery in dry place , before bring the battery into the
airplane.
4) Battery disposal
(1) Disposal of the battery in specific recycling boxes only after a complete discharge. The battery is dangerous chemical product.
Do not place the battery in regular trash containers. Strictly follow your local regulations regarding the disposal and recycling of
batteries.
(2) The over discharged battery cannot be used any more. Please dispose it as scrap.
3 Safety and Environment Protection
1) Disclaimer and Warning
Tourist 1is not a toy! You must ensure operation safe during usage. This product is not suitable for children under the age of 14
years old. Please do not make the product exposed to children, especially pay more attention when children appear in the place of
using this product.
If you do not have extensive flight experience, we recommend that you learn to fly under the guidance of an experienced pilot.
Be sure to read this document carefully before using the product, learn more about your legal rights, responsibilities and safety
instructions. Otherwise, it may bring the property loss, accidents and personal safety risks. Once using this product, that is to say, as
you have understood, recognized and accepted all the terms and content of this statement.
User will be responsible for their behavior and all the consequences arising therefore. User commitment for legitimate purpose to
use this product, and agree this terms and 'Nine Eagles Technology' may formulate any policies or guidelines.
Nine Eagles Technology accepts no liability for damage, injury or any legal responsibility or indirectly from the use of this product.
The user shall observe safe and lawful practices including, but not limited to, those set forth in the document.
2) FCC Regulation Claims
This device complies with FCC part 15th articles, operating procedures was subject to below two conditions:
1) the device shall not cause negative interference;
2) the device must bear any interference received, including interference caused by accidental operation.
Note: This device has been tested and comply with FCC part 15th articles in the provisions concerning class B
digital device. It's to ensure that the device can provide reasonable assurance and protect against harmful
interference when operating the device in a residential area. This device generates, uses, and the radiation
of radio frequency energy.
This device generates, uses and radiates radio frequency, it may causes harmful interference to radio communications if you do not
assemble and follow the instructions. However, we cannot guarantee that interference will not occur in a particular installation. If the
device interrupt the radio and TV signals, it causes a lot of disturbance, signals wave, we encourage users to do one or more of the
following measures to redress.
1) Increase the separation between the equipment and receiver;
2) Connect the device to a different circuit on the socket;
3) Consult the dealer or an experienced radio TV technician.

5
Tourist 1 NE-MASF33
4 Technical Support
Nine Eagles Technology ensure that all products have to undergo a rigorous factory inspection, testing.
We will publish it on the website in time if there is any technology updates or modification. You're also welcomed to visit the Nine
Eagles Technology website, www.nineeagle.com, and open relative links to check out.
If you have any problems or questions, please contact your local dealer to get technical support or purchase the required spare
parts.
Please contact us at sales@nineeagle.com.
3) FCC Radiation Exposure Statement
the device has been evaluated to meet general RF exposure requirement,
The device can be used in portable exposure condition without restriction.

Figure 4
Nose
indicator light CCW
Blade CW
Motor Rear
indicator light
CCW
Motor
Aircraft status
indicator light
CCW
Blade
CCW
Motor Collision Avoidance
module
CW
Blade
Nose
indicator light
Camera &
3-Axis gimbal
CW
Blade CW
Motor
Gimbal
indicator
Camera
indicator
Reset button
6
Tourist 1
NE-MASF33
5 About Tourist 1
Aircraft Diagram and Indicator Lights Status
Aircraft status indicator Status description
Red Green and yellow lights flashes alternately: the system is initializing;
Green light flashes slowly: GPS mode and there's more than 8 satellites;
Green light flashes fast: Auto home return status;
Yellow light flashes slowly: Gesture flight mode;
Yellow light flashes fast: Out of control state;
Red light flashes slowly: Low-voltage alarm;
Red light flashes fast: Severe low voltage alarm;
Three red lights flashes slowly: Uneven placement or great sensor error;
Red and yellow light flashes alternately: Compass calibration is needed;
Yellow light is solid on: Compass calibration mode;
Green light is solid on: Compass calibration in horizontal direction is done;
Red light is solid on: Serious error.
Aircraft rear light status discription
Status description
Green light is solid on: GPS mode and there's more than 8 satellites.
Yellow light is solid on: Altitude mode or alarm .
Red light is solid on: Severe alarm.
Camera indicator Status description
Blue light is solid on: Initializing.
Blue light flashes slowly: Normal working.
Gimbal indicator Status description
Blue and purple light flashes alternately: Initializing.
Blue light is solid on: Normal working.
Blue and purple light are solid on: Abnormal working.

Figure 5
POWER
HighLow Battery
level
25% 50% 75% 100%
Use appropriate adaptor plug
according to local standard.
Reset button
Figure 6
7
Tourist 1 NE-MASF33
6 Charge Li-po Battery
1) Intelligent Battery Function Description
(1) Battery level indicator: Current battery remaining capacity can be indicated by indicator light.
(2) Over-discharge protection: Over-discharge damages battery. Do not discharge battery much to protect the battery.
(3) Short circuit protection: When battery detects short circuit, battery stops the discharge to protect itself.
(4) Electric cell damage detection: When battery detects electric cell damage or serious imbalance, battery indicatoflashes in red.
2) Turn-on and Turn-off Battery
Turn-on Battery: In the status of Battery off, press the battery button
shortly, then keep pressing it for 2 seconds at least and it's on.
Turn-off Battery: In the status of battery on, press the battery button
shortly, then keep pressing it for 2 seconds at least and it's off.
NOTE: Please press the power button, the indicator of the
battery is on. You can know the balance battery capacity
according to the indicator status.
While using the aircraft, please make sure the battery is
OFF when plug it in or take it out of the aircraft. If NOT, it
might causes the connector oxidized and influences the
function and life time of the battery.
If the battery cannot be turned off when using, please
press the reset button to turn off the battery.
3) Charge Aircraft Li-po Battery and Remote Controller
NOTE: This graphic only indicates the wiring method. In the actual charging operation, it is not allowed to
charge the aircraft Li-po battery and remote controller at the same time. So only to charge aircraft Li-po
battery or remote controller each time.
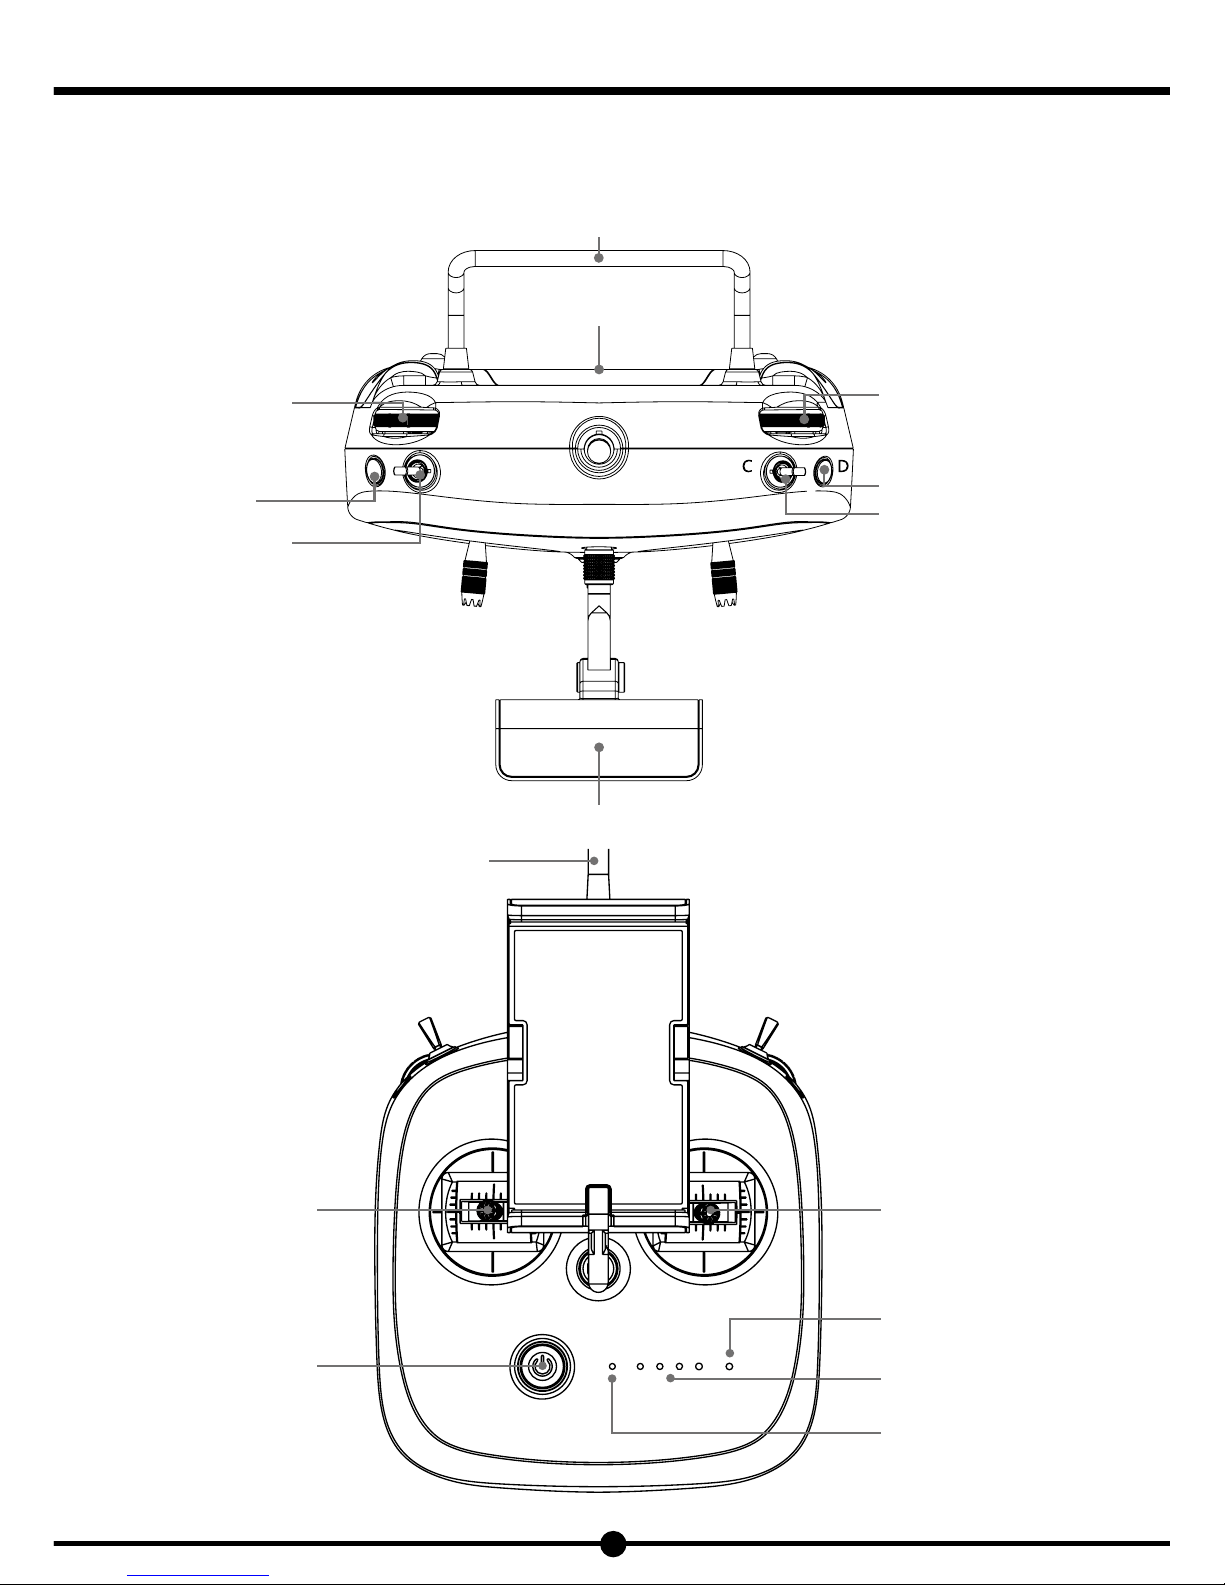
Carrying handle
USB
E Camera pitch
control scroll wheel
A Video button
B Left toggle switch
F Auxiliary operation roller
D Picture button
C Right toggle switch
Mobile device holder
Figure 7
Antenna
Left stick
Power
Right stick
Remote controller battery
level indicator
WIFI image transmission
signal status description
Remote controller
status indicator
A B
E F
8
Tourist 1
NE-MASF33
7 Transmitter Operation Instruction
1) Transmitter Function Instruction (mode 2)
A
Left
Right
Left
Right
9
Tourist 1 NE-MASF33
Video button
Press 'Video' button (A) to start recording. Press 'Video' button (A) once again to stop recording.
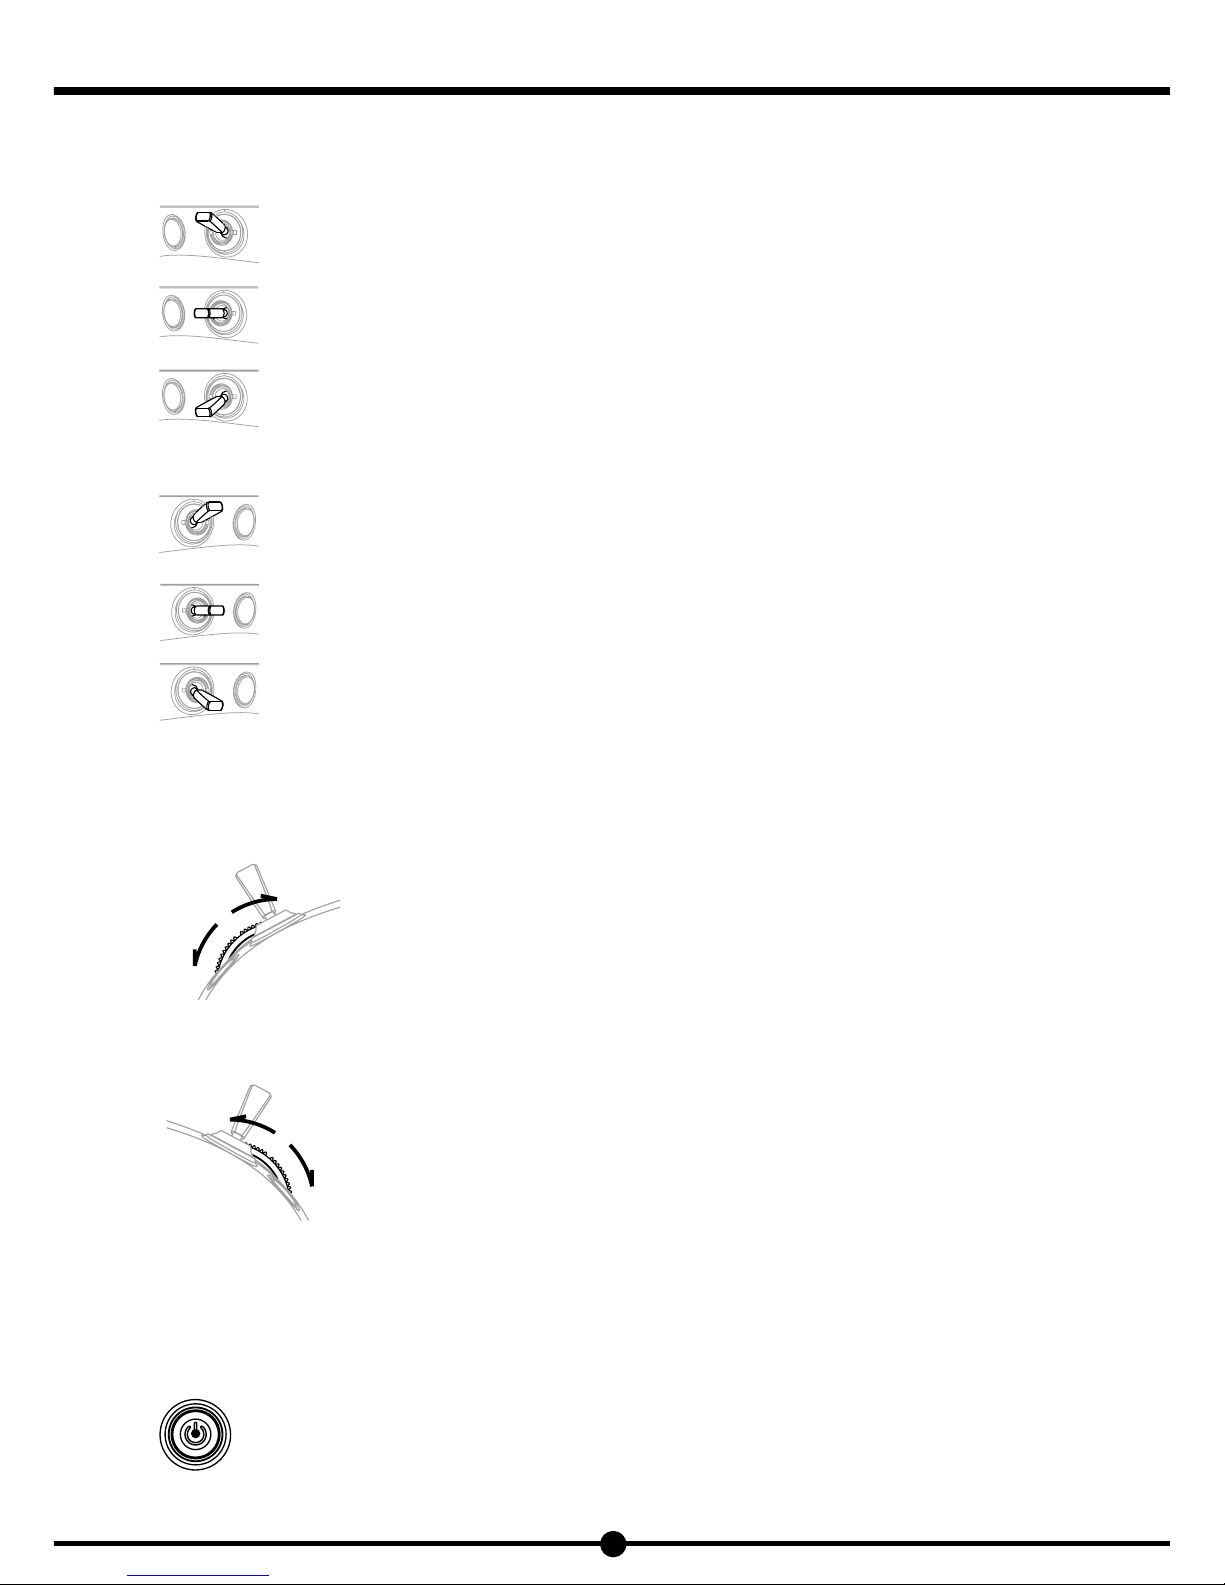
B Left toggle switch
Way point memory mode: In GPS mode, switch it to way point memory position as the left graphic shown, then
scroll 'F' Auxillary Operation Roller ll downward one time to memorize the current flight way point.
Normal mode: Turn on the transmitter, make sure to move the left switch to this position.
Auto home return mode: GPS mode and connecting with more than 8 satellites are required. Once Auto Home
Return is activated, the aircraft will automatically fly back to the take-off point and land. After the aircraft lands,
please switch the toggle switch to the middle position.
C Right toggle switch
Attitude flight mode: Less than 8pcs satellite being connected, aircraft can fly but functions based on location
will be not available.
GPS flight mode: More than 8 pcs satellite available, aircraft is ready to fly. Functions based on GPS positioning
can work now.
Memory way point flight mode: More than 8pcs satellite available, after way points are memorized, switch
button to this position to implement. Aircraft will automatically fly according to memorized way points. Switch C to
middle postion to quit.
D Picture button
Press 'Photo' button (D) to take photo, one pressing leads to one shoot.
E Camera pitch control scroll wheel
Scroll down the wheel and camera will pitch up.
Scroll up the wheel and camera will pitch down to maximum 90 degrees.
F Auxiliary operation roller
Function 1: When toggle switch 'B' is in the middle position, the roller can control gimbal ascending or descending.
When move the switch to the most left side and keep for more than two seconds, the gimbal will retract
upward.
When move the switch to the most right side and keep for more than two seconds, the gimbal will
descend that the camera can obtain the best viewfinder position.
Function 2: When toggle switch "B" is in the back position, the roller can memorize or clean way
points. At this time, move the roller clockwise to memorize the way points.
Up to 30 way points can be memorized each time. Scroll the roller in counter-clockwise direction to clear all points.
Note: This function works only when it matches left toggle switch 'B' and right toggle switch 'C'.
Power
Power On: Gently press one time and then press for 2 seconds.
Power Off: Gently press one time and then press for 2 seconds.
Attention: Before powering off remote controller, remember to disconnect aircraft battery first.
Important Notice: Make sure left stick, right stick, camera pitch control scroll wheel(=E), way point
memory wheel(=F) back to the middle and move Auto home return switch(=B) and Flight modes
switch(=C) situated in the middle. Otherwise, remote controller can not be turned on.

HighLow Battery level
Figure 8
Figure 9
Forwards
Backwards
Rotating Leftwards Rotating Rightwards
Climb
Descend
Rotating Leftwards Rotating Rightwards
Climb
Descend
Leftwards Rightwards
Forwards
Backwards
Leftwards Rightwards
(2) Mode 2 Throttle on left stick
(1) Mode 1 Throttle on right tick
(2) Mode 2 Throttle on left stick
(1) Mode 1 Throttle on right tick
Right stick
Left stick
10
Tourist 1
NE-MASF33
Transmitter battery level indicator
Stick
2) Transmitter status indicator
Sound
Status description
B-,B-,B-...
Red light flashes quickly, abnormal alarm.
B--,B--...
Red light flashes quickly, low battery warning
B-B-B-...
White light flashes quickly, In the process of powering on and off.
B--,B--...
Green light flashes fastly,, remote controller alarms when stand-by time is more than 9 minutes.
none
Normal working status when the green light is solid on.
3) WIFI image transmission signal status description
Blue light:Repeater is armed.
Green light: Mobile devices is connected.
Red light: Camera is connected.
4) How to bind the aircraft
The aircraft and transmitter has been bound before coming out of factory. Please follow the follwing steps:
(1) Remove the propeller from the quadcopter.
(2) Please power on the transmitter firstly, then power on the quadcopter.
(3)Press the button A and D on the transmitter at the same time, it enters into binding mode when the transmitter's indicator is green
and flashes fastly, and the quadcopter's indicator flashes in red, yellow and green color alternatly.
(4) When the the quadcopter finishes binding after entering into stand-by status.
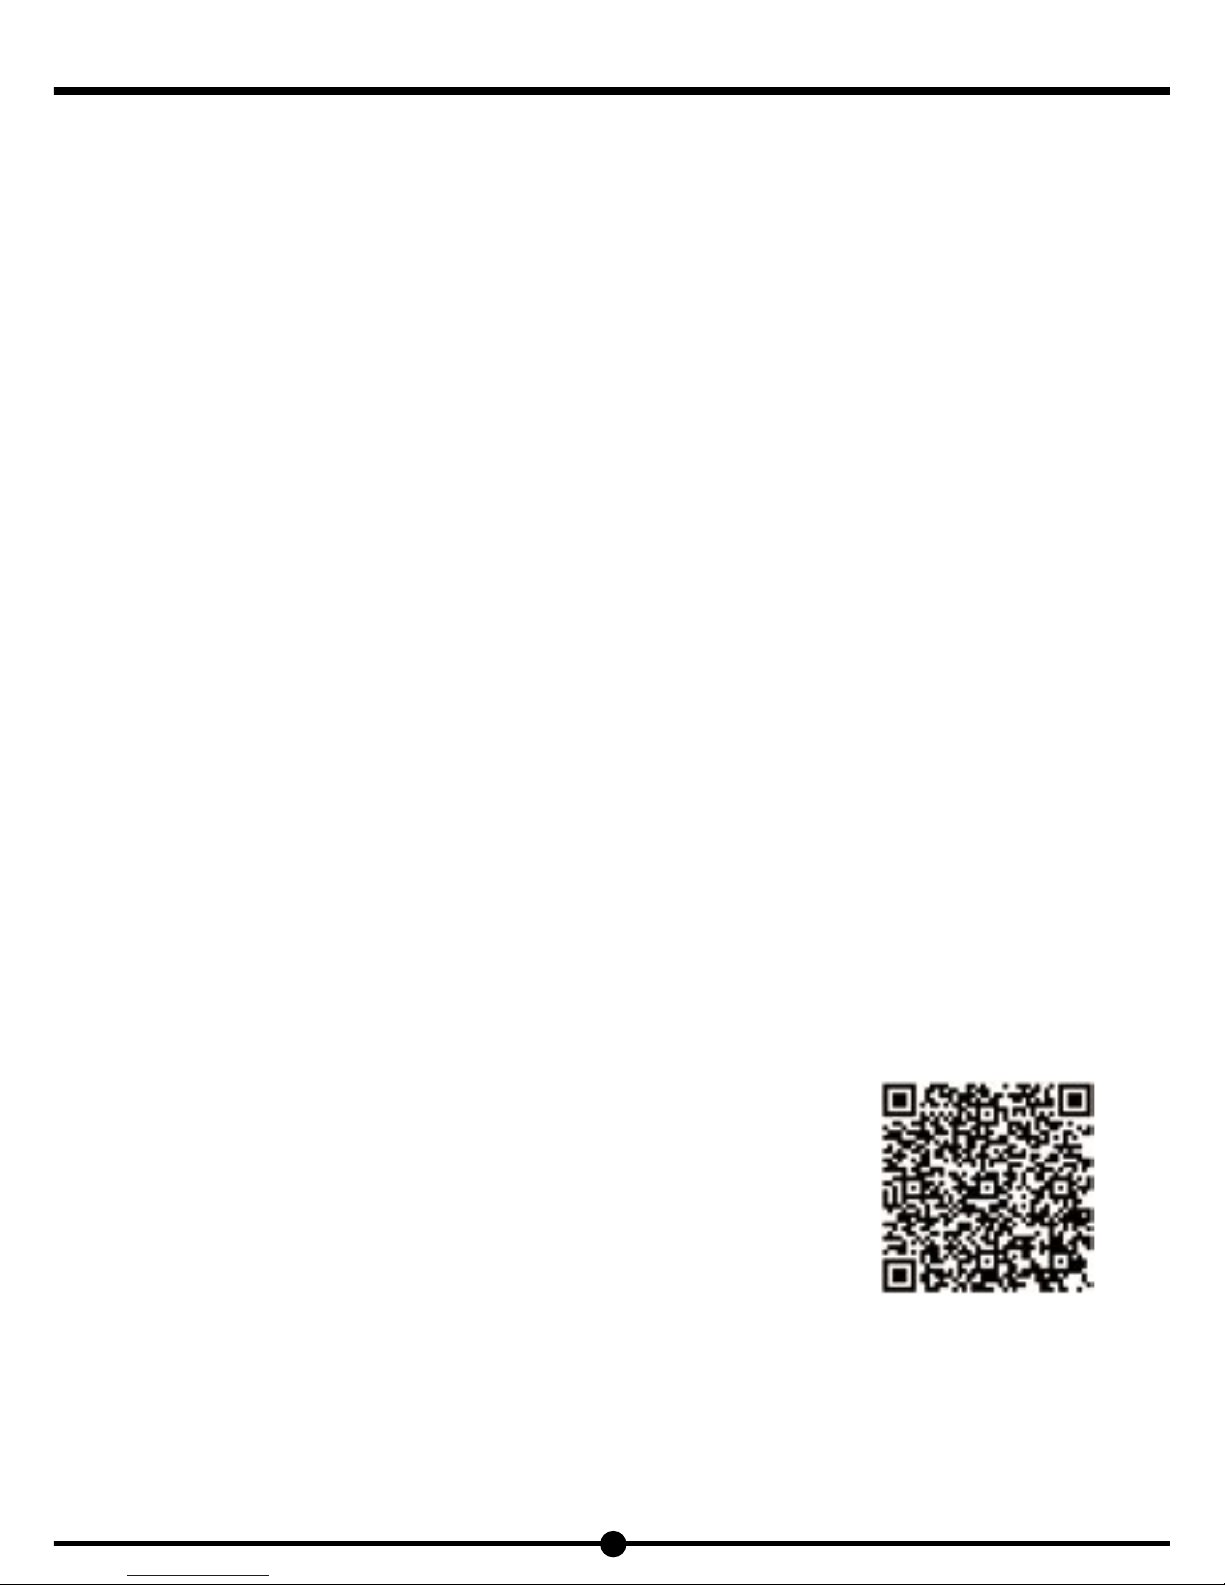
Figure 10
11
Tourist 1 NE-MASF33
5) How to use transmitter to memorize waypoints and perform flying
(1) The transmitter is in GPS mode and GPS signal is normal.
(2) Move the transmitter's toggle switch 'B' to waypoint memory mode position.
(3) Move the wheel 'F' clockwise once when flying, the aircraft memorize one waypoint. Move the wheel 'F' counter-clockwise to
clear all memory waypoints. About 30 waypoints can be memorized one time.
(4) Move Left toggle switch B to the middle position after memorizing all waypoints needed.
(5) Move the transmitter to memory waypoint flight mode, the aircraft will fly to the first, seconod until the last memory waypoint.
Move the right toggle switch C to the middle position to exit current mode when flying.
6) Use Remote Controller to Shoot Video
Press 'Video' button (A) to start recording. Press 'Video' button (A) once again to stop recording.
7) Use Remote Controller to take Photo
Press 'Photo' button (D) to take photo, one pressing leads to one shoot.
8) Switch Mode 1 and Mode 2
How to switch between Mode 1 and Mode 2 .
Move the left stick to its highest position and keep pressing after powering on remote controller, then connect lipo battery to aircraft.
Now remote controller is in Mode 2 after the aircraft's self-inspection..
Move the right stick to its highest position and keep pressing after power on remote controller, then connect lipo battery to aircraft.
Now remote controller is in Mode 1.
Aircraft will remember the latest mode type and there is no need to switch between Mode 1 and Mode 2 each time.
9) Remote Controller Calibration
After long time using, it is necessary to do remote controller calibration to correct deviation. Calibration procedures are here:
Make sure remote controller is off. Keep pressing 'Video' button, gently press Power button one time and long press it for 2
seconds, then release all the buttons. Remote controller status indicator light blinks red and it sounds 'di--, di--'. Now Remote
controller enters into calibration mode.
Move the left and right stick to its maximum position in four directions: up, down, left and right, then move Camera pitch control
scroll wheel and way point memory wheel to its maximum position on the left and right.
Press 'Photo' button to quit calibration, turn off the transmitter to complete the calibration..
8 Preparation Before Using
1) Download, install APP
NOTE: APP in the following description may not be the latest version, 'Nine Eagle Technology'will continue
updating. Please log on Nine Eagle Technology official website for the latest
information, or log on 'google play' to check below page.
https://play.google.com/store/apps/details?id=com.cam.mola&hl=en
Or open your mobile browser to scan QR code, you can directly enter into the download page to
download MOLA APP.
After the download is complete, follow the prompts to install the APP.
2) Get user manual and tutorial videos
Enter 'Technical Support' page of 'User Center' in the APP, or enter 'Nine Eagle Technology' official
website (www.nineeagle.com) to find this product introduction page. You can obtain relevant
product manuals and tutorial videos.
3) Checklist before flying
(1) Refer to 'Flying Environment Requirement', and choose the proper flying site.
(2) Check the battery level of the remote controller. Please change it when the battery level is lower than 50%.
(3) Check the battery level of the Aircraft. Please change it when the battery level is lower than 50%.
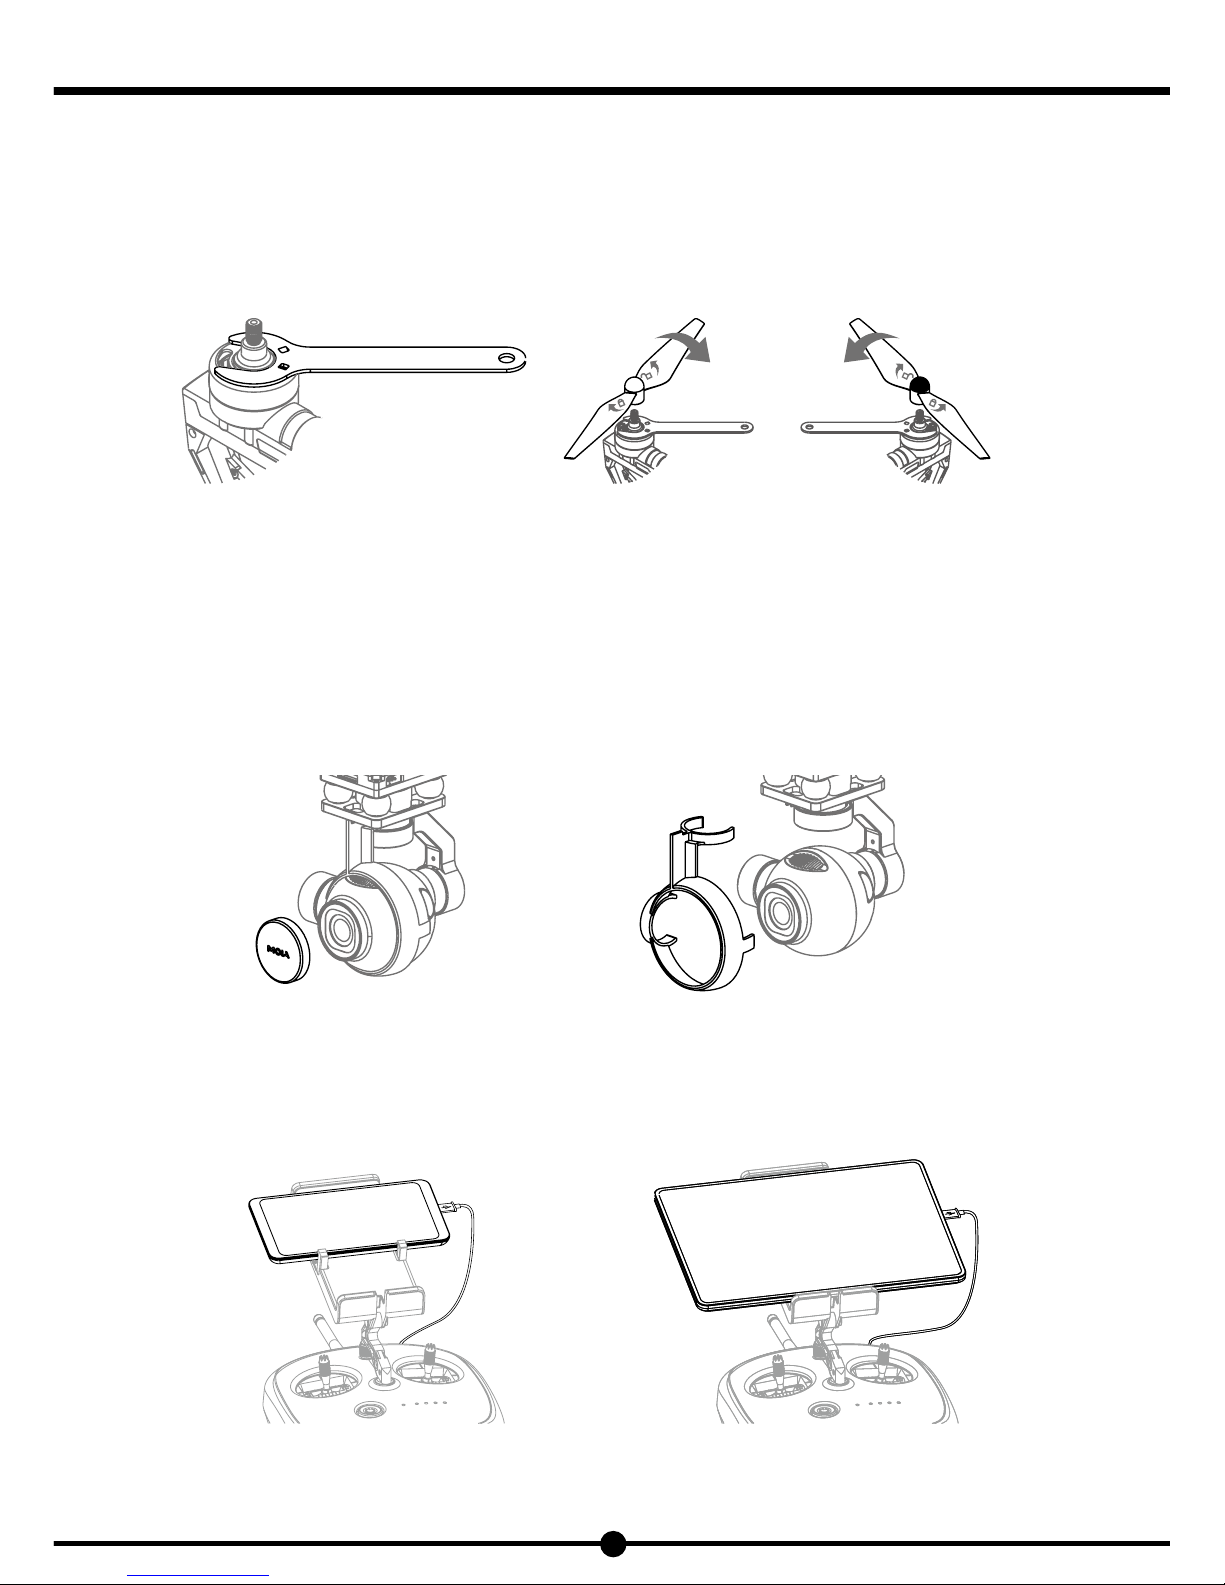
Figure 11
Mobile phone installation. Lock the clockwise Propeller
into theclockwise motor. Lock the counter-clockwise Propeller
into the counter-clockwise motor.
Figure 12 Figure 13
Figure 14 Figure 15
Figure 16 Figure 17
Mobile installation Pad installation
12
Tourist 1
NE-MASF33
(4) Check the propeller if it's broken or deformed. If so, please replace with a new one.
(5) Check the aircraft to see any outlook damaged. If so, please quit flying and connect with our agent for better solution.
(6) Check if SD card in inside the camera. If not please install it.
(7) Check the status of the remote controller, it should be: two sticks are in their middle position. Auto home return switch (=B) and
Flight mode switch (=C) is also in the middle position.
4) Install propeller
Step 1: Use the wrench for holding the motor.
Step 2: Put the propeller with white cap onto the corotation motor shaft printed with 'CW'. Put the propeller with black cap onto the
reverse motor shaft printed with 'CCW'.
Lock the propeller according to the rotating direction. Remove the wrench after finishing.
Important notice: Make sure to lock propellers firmly Otherwise accident may occur in flight.
5) Take off the camera cover and the fixed stand
6) Install mobile device on the remote controller
(1) Check tightness of screw on the holder. If the rotation is too flexible, please tighten the screw.
(2) Install the mobile device, and make sure mobile device fixed into holder firmly.
(3) Connect mobile devices and remote control with USB cable.
Notice: Before installing the mobile device, please make sure mobile device holder fixed firmly!

Figure 18
13
Tourist 1 NE-MASF33
7) Install aircraft battery
As the Figure 18 shown above, please insert the battery inside
the battery compartment and make sure the snap-joints
locked the body of the aircraft firmly.
Attention:
(1) Please get the battery well-installed, otherwise,
the battery may fall out from aircraft while flying!
(2) Please get the battery well-installed first, then
power on the battery. If not, it'll reduce greatly the
life time of the battery.
8) Placement of Aircraft
Please put the aircraft at the wide, roof-free and even ground.
Attention:
(1) Make sure to place aircraft on a horizontal surface. Otherwise, taking off on a slant surface will cause
accident. If its inclination angle is too big, the aircraft can not finish self-check procedure, therefore will not
be controlled!
(2) If the aircraft is under shelter (for example indoor), GPS module can not receive satellite signals. It would
causes functions that relate to positioning disabled.
9 Use Remote Controller to Fly
After finishing all the checklist, please follow the following steps to fly the aircraft.
1) Turn on Remote Controller
Press 'Power' button slightly and then make a long press for 2 seconds.
2) Turn on Aircraft
Press 'Power' button slightly and then make a long press for 2 seconds. Once Aircraft turns on, it comes to self-check procedure.
During this procedure, please keep Aircraft still. Once it's ready, the tail LED light turns Green (or yellow) and blinks slowly. Then next
steps can be operated.
3) Start APP, Connect to Mobile Device
(1) Mobile device Set Up
If it comes a call or other disturbance during flight, it influences App's working and distract your attention. So it is suggested to have
your mobile set in No-disturbing mode.
(2) Android system device connecting
a) Turn on the transmitter, a 'Mobile Network Sharing' prompt box will show in the mobile device, start 'USB sharing network' (Please
make sure using USB wire connecting the transmitter and mobile device, as shown in page 17).
b) Start APP, after enter the APP main interface, click the icon '+' on the right upper corner of APP interface, an interface of 'Aircraft
nearby' pops up. Choose aircraft (The initial name is: X435_xxxx,xxxx is an serial No. composed with letters and numbers), click
'Add', APP returns to main interface.
c) APP displays video preview window on the main interface. Click on the bottom right corner of the preview window screen icon,
you can enter the main control interface.
(3) IOS system device connecting
a) Turn on the transmitter.
b) Connect repeater: Enter the setting menu of mobile device, open WiFi, then open Choose A Network. Then there'll be nearby WiFi
signal listed, choose repeater ( The initial name is NERP_xxxxxx, xxxxxx is an serial No. composed with letters and numbers), input
the default password '1234567890', then click to join. Then the system will connect to the repeater.
c) Connect aircraft: Start APP, after enter the APP main interface, click the icon '+' on the right upper corner of APP interface, an
interface of 'Connect Aircraft WiFi' pops up. Choose aircraft (The initial name is: MOLA_X435_xxxx, xxxx is an serial No. composed
with letters and numbers), click 'Add', the APP will show it has connected the aircraft with a prompt box.
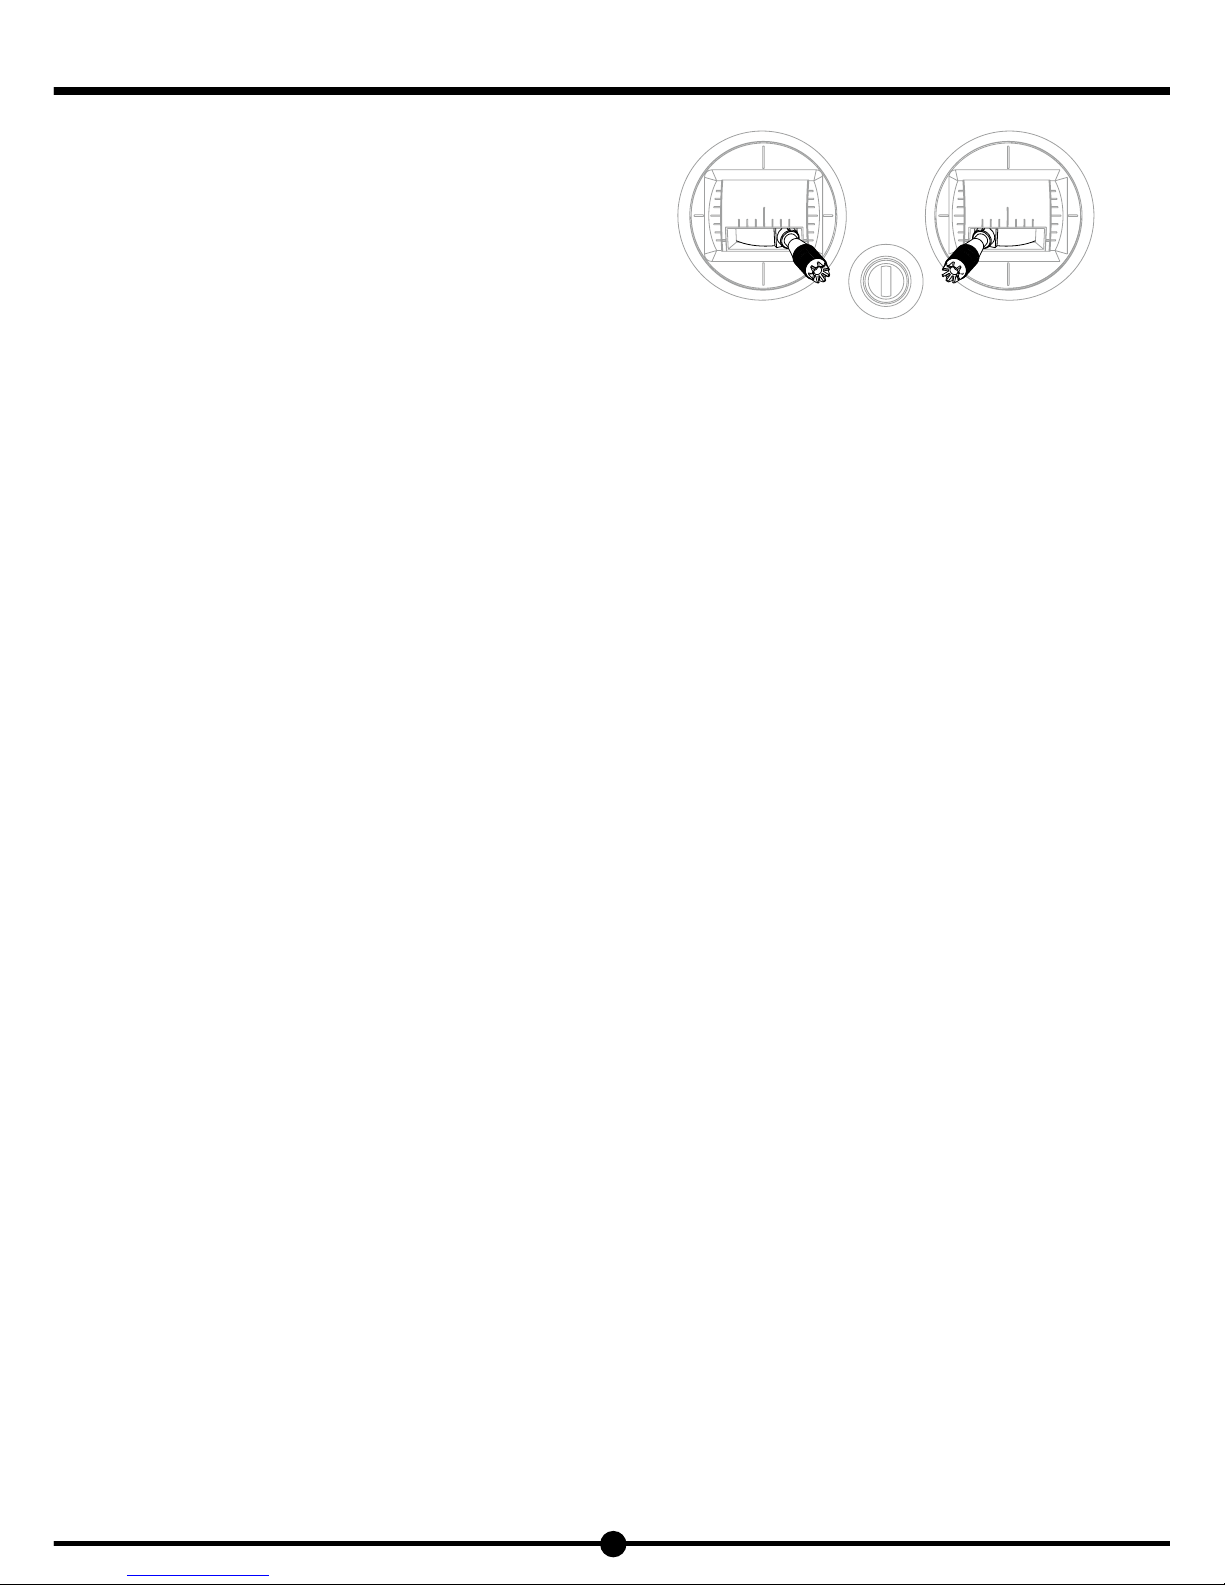
Figure 19
14
Tourist 1
NE-MASF33
4) Start Motors
(1) As shown in the Figure 19, simultaneously move the left stick to
its bottom right corner and right stick to its bottom left corner.
(2) When the propellers start to spin, loose the sticks and let them
back to the Middle.
5) Take-off, Hover and Landing
(1) Take-off: Propel slightly the throttle stick upwards to make the
Aircraft take off and slowly ascend until to the height you expect.
(2) Hover: Loose the throttle stick and let it back to the middle, then the Aircraft will keep hovering.
With GPS flight mode and more than 8 pcs satellites connected, aircraft can keep hovering in good status.
With Attitude flight mode, aircraft may slowly drifts a little bit.
(3) Landing: Slightly move the throttle stick downwards so that the aircraft land slowly, until the aircraft lands on the ground.
6) Stop motors
Once aircraft lands on ground, hold the throttle stick to its lowest position until propellers stop rotating, then release the throttle stick
to its middle position.
Please keep away from the strong magnetic zone such as big metal stones or steel bar constructions for
calibration, or keys and mobile phone while calibration.

5.8G Hz
: 5.8GHz
241
317
Figure 20
15
Tourist 1 NE-MASF33
10 Technical Parameter and Specification
1) Aircraft (NE-MASF33)
Overall weight (battery included) :
About 930g
Maximum ascent speed : 4m/s
Maximum descent speed : 3m/s
Maximum horizontal flying speed : 6m/s
Operating Environment : 0~40
°C
Time Flight : appox. 25 minutes
Satellite Systems :
GPS/GLONASS dual module
2) Remote Controller (NE-TXOS219B)
Flight controlling System
Operating Frequency :
2.4G Hz
Image Transmission System
Operating Frequency :
Signal effective distance : 1500m
Input : DC11.1V, 1A
Mobile device holder : Support phone & ipad
3) Battery
Type : LiPo 3S
Standard Voltage : 11.1V
Standard Capacity : 3500 mAh
Power : 38.85Wh
Operating Environment : 0~40
°C
Battery Weight : About 250g
4) Charger
Input voltage : AC110~240V 50/60Hz
Power : 35W/3A
5) Gimbal (NE-OT018B)
Axis : 3 Axis
Pitch Controllable Rang : +0~-90°
6) Camera (Model number : NE-OT017 )
Image Sensor
:
Hi3516D + OVT4689 4.0 Mega-pixels image sensor
Lens
:
90 degree Wide angle lens, F2.6
ISO Range
:
100-2400
Digital Shutter speed
:
Automatic adjustment
Picture Shooting Mode
: Single shoot
Video Resolution
: 1080P@60P (1920*1080)
Max. video stream
: 14M bps
File format
: JPEG,MP4
Supported SD card
: Micro SD card, maximum support 32GB capacity
Operating temperature
: 0°~40°C
WiFi standard:
: 802.11 a/n
Operating frequency
Image transmission distance
: About 1000 meters (without any barrier or interference)

Figure 21
04 05
03 06
01
+Aircraft
02
1
3
4
5
2
6
16
Tourist 1
NE-MASF33
11 Introduction of APP main functions
This APP will be used not only for real-time monitoring of camera captured image, photo shooting and video-taking, control of
camera visual angle, setting of aircraft’s parameters, assistance to radio-controlled flying, but also for flying control by itself with
multi-modes.
1) Main menu
〖01〗Add Camera: Connect mobile device and aircraft 〖04〗Album: Download, delete, share photos and videos
〖02〗Video Preview Window 〖05〗the User Center: Download instructions or watch tutorial videos
〖03〗Aircraft: Enter into manipulation interface 〖06〗General Settings :aircraft settings and APP settings
Adding Camera
Enter into WiFi signal list interface choose Aircraft Connection. Mobile device of IOS system needs to connect aircraft in IOS system
phone's WiFi Setting.
Video Preview Window
After connecting with camera, real-time preview of camera image will be shown here. Double click it to enter into control interface.
Main Control Interface
When it is in other interface, click this icon to enter main interface.
Album
(1) After connecting to camera, user can preview, play, download or delete photos & videos stored in camera.
(2) When connected to internet, user can preview, play, delete or share photos & videos which were downloaded into mobile
devices.
The user Center
(1) User information Registration, login, check and maintenance of account information.
(2) Community: Edit and share photos or videos, and view other's photos or videos in the community.
(3) Technical Support: User manual is available for downloading and watching tutorial video after connecting with internet and
clicking its link.
General Setting
(1) Aircraft Parameter Settings
Customize the aircraft's name, reset password, appropriate flying parameter, aircraft calibration, controlling mode, etc. Checking the
stored camera information, aircraft version information etc are available.
(2) Offline Map
After connecting internet, review the map of flying area, then it caches on the mobile device. The map can be used when flying.
(3) APP Storage Management
Checking the stored mobile device information is available.

10
11
12
14
Figure 22
GPS Mode
07 08 09 11
10
12
13 14
7
9
8
13
17
Tourist 1 NE-MASF33
(4) Language
Both Chinese and English are available.
(5) Parameter Unit
Both metric or imperial units are available.
(6) About
You can refer to the APP version information, relevant information and contact information of MOLA in this interface.
Checking for updates: Click on the icon to see if there's new version firmware. If there's new version firmware, please follow
instruction to update the firmware.
2) Main Control Interface
Return to the Main interface
Prompt box for aircraft status
Real-time display of aircraft's current status.
Green : Strong GPS signal for safe flight.
Yellow: Weak GPS signal, recommend for manual operation.
Red: Breakdown or other failures, to be solved before new flying.
Photo
Click Photo icon to take one photo. Keep pressing the icon, camera will take photos continuously.
Video
Click Video shooting to start (the icon Video shooting on the screen will flash), and click this icon again to stop video shooting.
Show/Hide 'Camera position indication and adjustment tool bar'
Click the icon, 'Camera position indication and adjustment tool bar' shows in the display.
Map
Press it to change into map interface .
Indicator of flight parameters
On left side, the compass indicates the orientation of aircraft's nose, roll, pitch attitude. On right side, current flight parameters:
distance, height, cruise speed.
WIFI, GPS signal and battery status
Pay attention to WIFI, GPS signal and battery status . Once signal is weak or battery is low, user need to adjust the position of the
aircraft and take appropriate measures.
This manual suits for next models
1
Table of contents
Other Nine Eagles Quadcopter manuals

Nine Eagles
Nine Eagles galaxy visitor7 User manual

Nine Eagles
Nine Eagles Galaxy Visitor 7 User manual

Nine Eagles
Nine Eagles Galaxy Visitor 3 NE2529M1 User manual

Nine Eagles
Nine Eagles Galaxy Visitor 2 User manual

Nine Eagles
Nine Eagles GALAXY VISITOR 3 User manual

Nine Eagles
Nine Eagles Galaxy Visitor 2 NE-MASF11 User manual


