Ninja Kitchen System Pulse BL200NZ User manual

®
BL200NZ
OWNER’S GUIDE
Kitchen System Pulse™

1CUSTOMER CARE - NZ: 0800 002 999
IMPORTANT SAFETY INSTRUCTIONS
For Household Use Only
WHEN USING ELECTRICAL APPLIANCES,
BASIC SAFETY PRECAUTIONS SHOULD
ALWAYS BE FOLLOWED, INCLUDING THE
FOLLOWING:
READ ALL INSTRUCTIONS BEFORE USING
YOUR NINJA®PULSE™.
IMPORTANT:
This appliance is not intended for use
by persons with reduced physical,
sensory or mental capabilities, or lack
of experience and knowledge, unless
they have been given supervision
or instruction concerning use of the
appliance by a person responsible for
their safety.
Children shall not use or play with
this appliance. Close supervision is
necessary to keep appliance out of
reach of children during use.
WARNING:
The blades are not affixed to the unit. They
are removable and very sharp. Handle with
care!
CAUTION:ln order to avoid a
hazard due to inadvertent resetting of
the thermal cut-out, this appliance must
not be supplied through an external
switching device, such as a timer, or
connected to a circuit that is regularly
switched on and off by the utility.
WARNING:
TO REDUCE THE RISK OF FIRE, ELECTRIC SHOCK
OR INJURY:
1. To protect against electrical shock, do not
submerge the appliance or allow the power
cord to come into contact with water or any
other liquid.
2. DO NOT allow young children to operate the
appliance or use as a toy. Close supervision
is necessary when any appliance is used
near children.
3. Never leave an appliance unattended when in
use.
4. Turn the appliance off and remove the power
cord from the electrical outlet when not in
use, before assembling or disassembling
parts, accessing parts that move while in use
and before cleaning. To unplug, grasp the
plug and pull from the electrical outlet. Never
pull from the power cord.
5. DO NOT abuse the power cord. Never carry
the appliance by the power cord or yank it
to disconnect from electrical outlet; instead,
grasp the plug and pull to disconnect.
6. DO NOT use with damaged cord or plug.
Contact Customer Service or Service Center
for the repair or replacement of the line cord.
7. DO NOT USE if the appliance is not working,
has been dropped, dropped into water,
damaged or left outdoors.
8. NO SERVICEABLE PARTS. Incorrect re-assembly
or repair can cause a risk of electrical shock
or injury to persons when the appliance is
used. Contact Customer Service or Service
Center for the repair or replacement under
the warranty agreement.
9. DO NOT let the power cord hang over the edge
of table or counter or touch hot surfaces such
as the stove.
10. Always use the appliance on a dry, level
surface.

2
CUSTOMER CARE - AU: 1800 890 840
25. DO NOT overfill. DO NOT exceed max fill line.
26. DO NOT operate the appliance empty.
27. To reduce the risk of burns, always allow the
appliance to cool before taking off parts and
before cleaning.
28. Max ON time is 1 minute under 700W load.
If the appliance overheats, a thermal switch
will become activated and shut off the motor.
To reset, unplug the appliance and let it cool
down for approximately 30 minutes before
using again.
29. In the event that the unit overloads, the
control panel lights will flash and the unit
will shut down. Unplug the unit and wait 30
minutes to reset.
30. CAUTION: When mixing pizza dough or any
heavy mix such as bread or pastry dough,
mix for up to 1 minute, then let the appliance
rest for approximately 1 minute before mixing
again to prevent overheating of the appliance.
31. The maximum rating is based on the Cookie
Paddle inserted into the 1L bowl. This drives
the greatest power. Other recommended
attachments may draw significantly less
power or current.
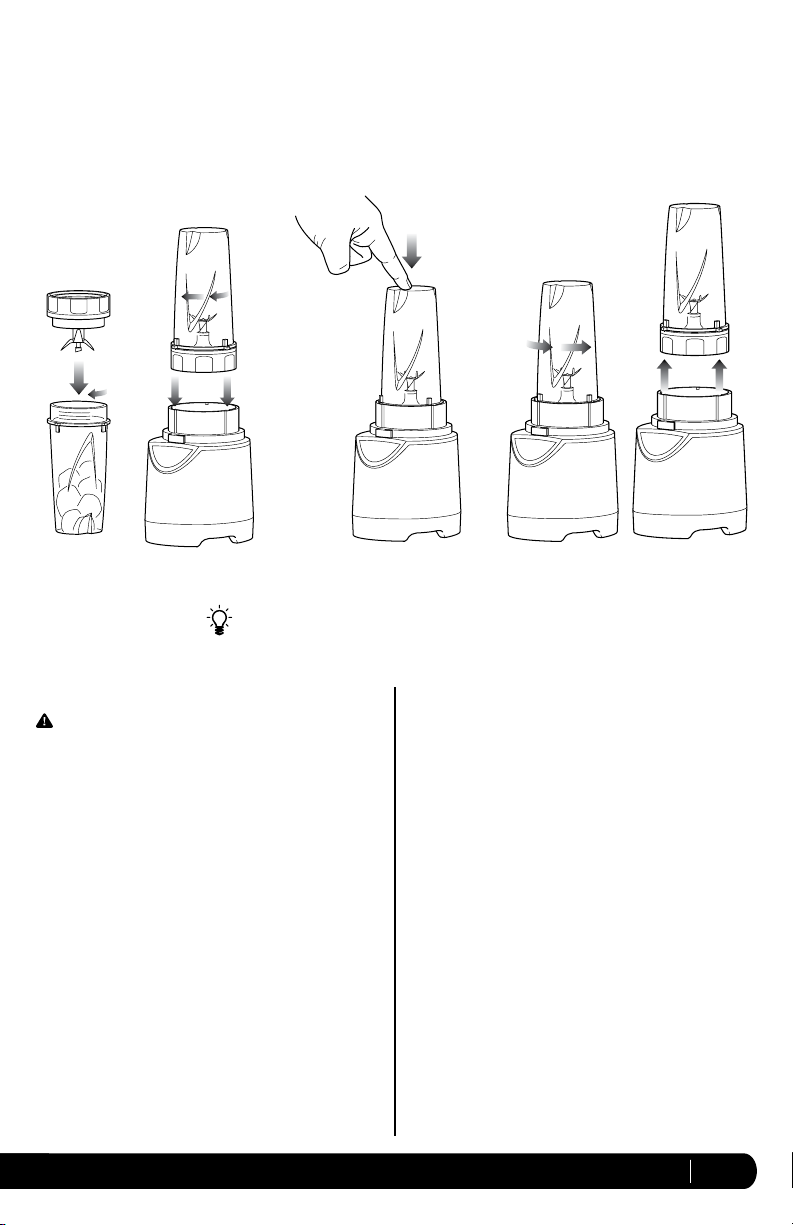
32. To avoid injury, never attempt to place the
single serve blade assembly onto the motor
base without first assembling the blade
assembly to the single serve cup.
33. DO NOT push food into the food chute with
your fingers. Always use the food pusher
provided.
34. THIS PRODUCT IS INTENDED FOR HOUSEHOLD
USE ONLY. Do not use this appliance for
anything other than its intended use. Do not
use outdoors.
WARNING: Extension cords are not
recommended for use with this product.
11. Keep hands, hair, clothing, as well as utensils
out of container while processing or blending
to reduce the risk of severe injury to persons
or damage to the appliance. A scraper may
be used but only when the appliance is not
running.
12. CAUTION: The blades are not affixed to the unit.
They are removeable and extremely sharp.
When handling the blades or the chopping
blades, do not hold the blades but rather always
hold by the shaft. Blades are sharp. Handle
carefully!
13. Avoid contact with moving parts.
14. DO NOT attempt to sharpen blades.
15. DO NOT use the appliance if either set of
blades are bent or damaged.
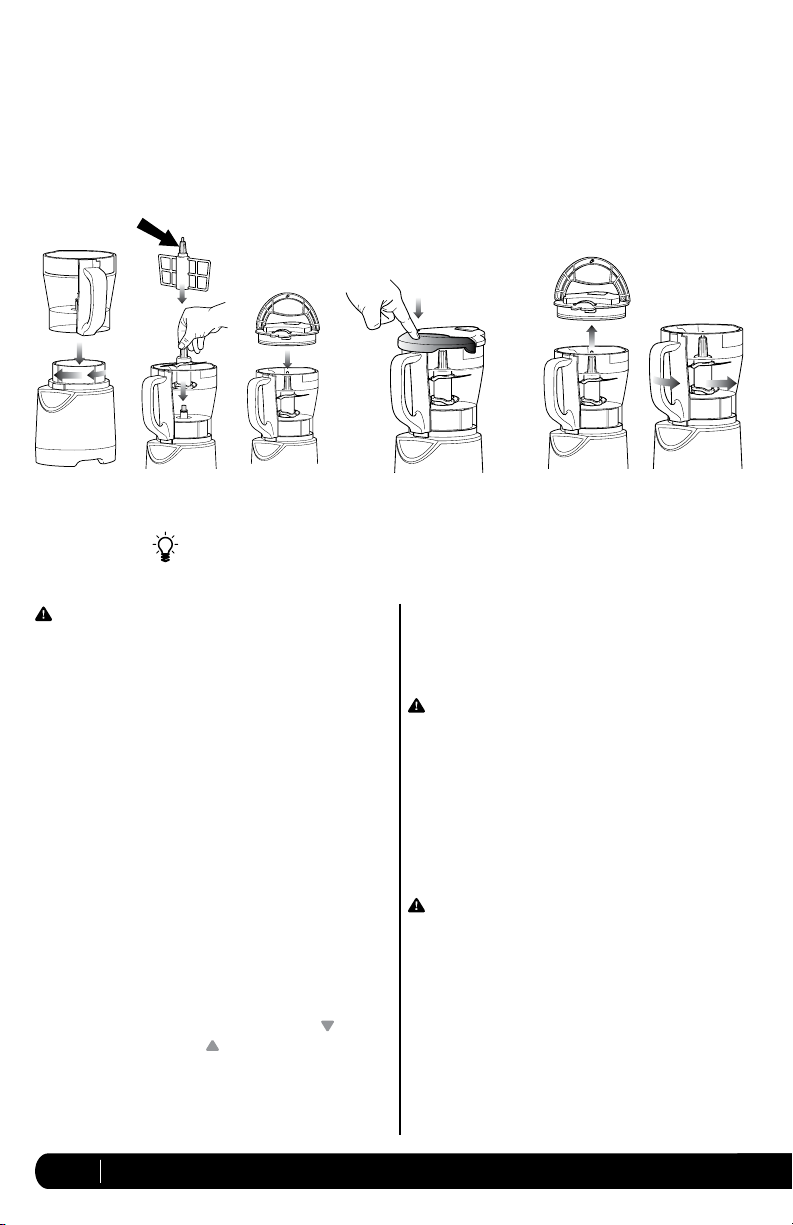
16. To reduce the risk of injury, never assemble
the blades in the pitcher or the chopping
blade in the bowl without the pitcher or the
bowl properly attached to the motor base.
17. DO NOT operate this appliance on or near any
hot surfaces (such as gas or electric burner
or in a heated oven).
18. The use of attachments or accessories
including canning jars, not recommended by
the manufacturer may result in fire, electric
shock or personal injury.
19. DO NOT remove any container from the motor
base while the appliance is in operation.
Always unplug the unit when not in use.
20. To reduce the risk of injury, NEVER operate the
appliance without the lid in place; DO NOT try
to defeat or bypass the interlock mechanism.
When using the removable blades, make sure
they are properly installed before operating
the appliance.
21. CAUTION: DO NOT BLEND HOT LIQUIDS.
22. Extreme caution must be used when moving
an appliance containing hot food, water or
other liquids.
23. DO NOT expose containers to extreme
temperature changes.
24. CAUTION: DO NOT process hot foods or hot
liquids. Allow hot ingredients to cool before
processing.
SAVE THESE
INSTRUCTIONS

3CUSTOMER CARE - NZ: 0800 002 999
THIS BOOK COVERS MODEL NUMBERS:
BL200NZ 30
TECHNICAL SPECIFICATIONS
Voltage: 220-240V~, 50/60Hz.
Power: 700 Watts
Bowl Capacity: 1L
Pitcher Capacity: 1.5L
Single Serving Cup Capacity: 470 ml
Euro-Pro, Ninja, and Kitchen System Pulse are trademarks
of Euro-Pro Operating LLC.
Z854

4
CUSTOMER CARE - AU: 1800 890 840
Contents
Getting to Know Your Ninja®Kitchen System Pulse™..................................................5
Assembling the Ninja®Kitchen System Pulse™..........................................................7
Assembly and Use for the Single Serve Cup................................................................8
Assembly and Use for the 1L Bowl ............................................................................9
Assembly and Use for the Shredding/Slicing and Grating Discs ..................................10
Assembly and Use for the 1.5 L Pitcher....................................................................11
Suggested Uses......................................................................................................12
Care & Maintenance ...............................................................................................13
Troubleshooting Guide.............................................................................................14
Warranty ................................................................................................................18
Thank you for
purchasing the
Ninja® Kitchen
System Pulse™.

5CUSTOMER CARE - NZ: 0800 002 999
Getting To Know Your Ninja®Kitchen System Pulse™
HIGH PULSE
LOW DOUGH
SMOOTHIE
SINGLE
SERVE
PUREE FROZEN
BLENDING
a
d
q
o
e
g
HIGH PULSE
LOW DOUGH
SMOOTHIE
SINGLE
SERVE
PUREE FROZEN
BLENDING
b
HIGH PULSE
LOW DOUGH
SMOOTHIE
SINGLE
SERVE
PUREE FROZEN
BLENDING
c
f
k
n
m
l
h i j
p
i4-Blade Assembly (1L bowl)
j Spindle (1L bowl)
kSlicer/Shredder Lid (1L bowl)
lFood Pusher
mShredding/Slicing Disc
nGrating Disc
o1.5 L. Pitcher
p6-Blade Assembly (1.5L pitcher)
aSingle Serve To-Go Cup (x 2)
bSingle Serve Blade
cTo-Go Single Serve Lids (x 2)
d1L Bowl
eStorage Lid
fLid with Locking Handle
gCookie Paddle (1L bowl)
hDough Blade (1L bowl)
qMotor Base
rPower Cord (not shown)
NOTE: Attachments are not
interchangeable.

6
CUSTOMER CARE - AU: 1800 890 840
The Ninja®Kitchen System Pulse™is a high powered innovative tool with a compact design and outstanding performance.
It is perfect for ice crushing, chopping, blending, kneading and complete juicing. The Ninja®Kitchen System Pulse™also
features a unique capability to knead dough for cookies, breads, pizza and more! Blend and go with the convenient single
serve cup, create delicious drinks to get you out the door! Best results are achieved when you Pulse.
FEATURES:
• Ninja®Blade Technology
• Pitcher, Bowl and Single Serve Drink Cup - BPA Free
•Cord storage
• Pulse Power: Controlled blending, processing, juicing, and kneading by using short pulses. In short intervals, press
down on the top of the single serve drink cup or the handle of the lid and pulse to the perfect consistency.
• Single Serve Blending: Fill, blend, and go! Blend right in the single serve drink cup and twist on the to-go lid for a
healthy, convenient snack with little clean up.
• Dough Mixing: Mix and knead pizza dough, cookie dough, bread dough and more!
• Slicing/Shredding/Grating
For best results, be sure to carefully read all the instructions contained in the manual before using this appliance.

7CUSTOMER CARE - NZ: 0800 002 999
Assembling the Ninja®Kitchen System Pulse™
BEFORE FIRST USE
1Remove all packaging material and labels from the
appliance.
2Wash the lids, pitcher, bowl, single serve cups and
attachments in warm, soapy water with a soft cloth.
Use caution when washing the blade assemblies as the
blades are very sharp.
3Rinse and dry thoroughly.
4The pitcher, bowl, single serve cups, lids and
attachments are all dishwasher safe. It is recommended
that the lids and attachments be placed on the top
rack. Ensure that the attachments are removed from
the containers before placing in the dishwasher.
PLEASE KEEP THESE IMPORTANT
SAFEGUARDS IN MIND WHEN USING THE
APPLIANCE:
CAUTION: DO NOT BLEND HOT LIQUIDS.
IMPORTANT: Always place the attachment in the
Bowl or the Pitcher before adding any ingredients.
IMPORTANT: Attachments are not
interchangeable.
CAUTION: Blades are sharp! Use extreme caution
when handling the blade assemblies. Always hold
them by the shaft.
IMPORTANT: When mixing dough. Mix dough
for up to 1 minute, then let appliance rest for 1
minute before mixing again.
IMPORTANT: Never run the appliance empty.
CAUTION: Never attempt to remove the container
while the appliance is still running.
WARNING: Never leave the appliance unattended
while in use.

8
CUSTOMER CARE - AU: 1800 890 840
5Wipe the motor base clean with a damp cloth.
IMPORTANT: Make sure that the motor base is
plugged in for use.
1Place the motor base on a clean, dry, level surface such
as a counter or table top.
2Add ingredients to the single serve cup.
3Place the single serve blade onto the cup and screw it
tightly until you have a good seal. (Fig. 1)
4Turn the single serve cup upside down and place it onto
the motor base, aligning the tabs on the cup with the
motor base. Turn to the left, the unit is ready for use.
(Fig. 2)
5Press down on the top of the cup in short intervals to
activate. (Fig. 3)
Fig. 1 Fig. 2
Assembly and Use for the Single Serve Cup
Fig. 3 Fig. 4 Fig. 5
ASSEMBLY PULSE REMOVAL
6When you have reached your desired consistency, stop
the appliance by removing your hand from the single
serve cup. Then turn the single serve cup to the right
(Fig. 4) and pull straight up to remove. (Fig. 5)
NOTE: Do not overfill! To avoid spilling, do not add
ingredients past the “Max” fill line.
7Turn the cup upright and remove the single serve blade
by twisting the blade assembly anti-clockwise.
8 Place the To-Go drinking lid onto the single serve drink
cup, twist to seal and enjoy!
9Make sure that the motor base is unplugged when not in
use.
For best results, use short “PULSES”... Practice makes perfect!!

9CUSTOMER CARE - NZ: 0800 002 999
7Push down on the “PULSE” on the handle to start the
appliance. (Fig. 9)
NOTE: Pulse ingredients for even chopping by pressing
down in short intervals.
IMPORTANT: When using the dough blade or cookie
paddle hold the appliance to secure the appliance to the
counter or table top.
8When you have reached your desired consistency, stop
pressing the lid handle and wait for the attachment to
stopturning.
9To remove the lid, pull the lid handle up to a 90° angle.
Turn the bowl anti-clockwise to lift off the base.
(Fig. 10, Fig. 11)
CAUTION: Never insert your hands in the pitcher as the
blades are sharp. Always use a spatula to dislodge food
that has stuck to the sides of the pitcher.
10 Make sure that the unit is unplugged when not in use.
IMPORTANT: Make sure that the motor base is plugged
in for use.
1Place the motor base on a clean, dry, level surface such
as a counter or table top.
2Align and lower the bowl onto the motor base.
(Fig. 6) Handle should be aligned slightly to the left of
the “LOCK” symbol on the motor base.
3Rotate the container to the left as far as it will go to lock
in place. (Fig. 6)
4Holding the desired attachment by the shaft, place it
onto the drive gear inside the container. Ensure that the
attachment is seated properly and is standing upright.
(Fig. 7)
NOTE: The blade will fit loosely on the drive gear.
5Add the ingredients to the bowl, making sure that they
do not exceed the highest measured marking line on the
side of the bowl.
6Holding the lid by the handle in the upright position,
place it on top of the bowl aligning the arrow ( ) located
on the lid with the arrow ( ) located on the bowl’s
handle. (Fig. 8)
Assembly and Use for the 1L Bowl
Fig. 9 Fig. 10 Fig. 11
ASSEMBLY PULSE REMOVAL
Fig. 7
Fig. 6
Shaft
Fig. 8
Or
It’s best to add the liquid ingredients first and then the dry ingredients.

10
CUSTOMER CARE - AU: 1800 890 840
Assembly and Use for the Shredding/Slicing and Grating Discs
Fig. 12 Fig. 14 Fig. 15
On/Off
Switch
IMPORTANT:
Never feed food by hand. Always use the
food pusher to add food through the feeder tube on the
fully assembled unit.
IMPORTANT:
Avoid contacting moving parts.
1
Place the motor base on a clean, dry, level surface such
as a counter or table top.
2
Align and lower the bowl onto the motor base. Handle
should be aligned slightly to the left of the “
LOCK
”
symbol on the motor base.
3
Rotate the container to the left as far as it will go to lock
inplace.
4
Insert the spindle into the bowl.
(Fig. 12)
5
Hold the disc by the plastic hub and carefully place
the shredding/slicing disc or the grating disc onto the
spindle.
(Fig. 13)
CAUTION:
Shredding/Slicing Disc and Grating Disc are sharp! Handle with care. Make sure that the appliance
is unplugged from the power source before inserting or removing the shredding/slicing or grating disc and
beforecleaning.
Fig. 13
Or
6
Holding the lid by the feeder tube, place it on top of the
bowl aligning the on/off switch with the bowl’s handle.
(Fig. 14)
7
Place food into the feeder tube. Using the food pusher,
add food through the feeder tube. Push the on/off
switch forward to the “On” position.
(Fig. 15)
8
When you have finished slicing, shredding or grating,
release the on/off switch to turn the appliance off. Wait
for the disc to stop turning and then remove the lid.
9
Hold the disc by the hub to remove and then remove the
spindle. Empty the food from the bowl.
10
The spindle, shredding/slicing disc, grating disc, lid and
food pusher are all top rack dishwasher safe.
CAUTION: SHREDDING/SLICING DISC AND
GRATING DISC ARE SHARP! HANDLE CAREFULLY
WHEN CLEANING.

11 CUSTOMER CARE - NZ: 0800 002 999
Assembly and Use for the 1.5L Pitcher
6 Holding the lid by the handle in the upright position,
place it on top of the bowl aligning the arrow
( ) located on the lid with the arrow ( ) located on the
pitcher’s handle. (Fig. 18)
7Push down on the “PULSE” on the handle to start the
appliance. (Fig. 19)
NOTE: Pulse ingredients for even chopping by pressing
down in short intervals.
8When you have reached your desired consistency, stop
pressing the lid handle and wait for the attachment to
stop turning.
9 To remove the lid, pull the lid handle up to a 90° angle.
Turn the pitcher clockwise to lift off the base.
CAUTION: Never insert your hands in the pitcher as the
blades are sharp. Always use a spatula to dislodge food
that has stuck to the sides of the pitcher.
(Fig. 20, Fig. 21)
10 Make sure that the unit is unplugged when not in use.
IMPORTANT: Make sure that the motor base is
plugged in for use.
1Place the motor base on a clean, dry, level surface such
as a counter or table top.
2Align and lower the pitcher onto the motor base.
(Fig. 16) Handle should be aligned slightly to the left of
the “LOCK” symbol on the motor base.
3Rotate the container to the left as far as it will go to lock
in place. (Fig. 16)
4Holding the desired attachment by the shaft, place it
onto the drive gear inside the container. Ensure that the
attachment is seated properly and is standing upright.
(Fig. 17)
NOTE: The blade will fit loosely on the drive gear.
5Add the ingredients to the pitcher, making sure that
they do not exceed the highest measured marking line
on the side of the pitcher.
ASSEMBLY PULSE REMOVAL
Fig. 19 Fig. 20 Fig. 21
Fig. 17
Fig. 16 Fig. 18
It’s best to add the liquid ingredients first and then the dry ingredients.

12
CUSTOMER CARE - AU: 1800 890 840
Suggested Uses
*IMPORTANT: When mixing pizza dough or any heavy mix such as bread dough or pastry dough, mix for up to 1
minute, then let the appliance rest for approximately 1 minute before mixing again to prevent overheating of the
appliance.
**IMPORTANT: When chopping, operate the appliance for 15 seconds and let it rest for 1 minute before choppng again.
FUNCTION CONTAINER ATTACHMENT TYPE OF FOOD
Mincing Single Serve
1 L Bowl Blade Assembly
Onion
Garlic
Herbs
Kneading* 1L Bowl Dough Blade Bread Dough
Pizza Dough
Dough Mixing* 1L Bowl Cookie Paddle
Cookie Dough
Dessert Bars
Biscuits
Scones
Batters
Blending
Single Serve
1L Bowl
1.5L Pitcher
Blade Assembly
Smoothies
Milkshakes
Frozen Drinks
Dips
Spreads
Grating 1L Bowl Grating Disc Cheese
Bread Crumbs
Slicing/Shredding 1L Bowl Slicing/Shredding Disc Vegetables
Lettuce
Chopping** 1L Bowl Blade Assembly
Salsa
Vegetables
Egg Salad
Ice Crushing
Single Serve
1L Bowl
1.5L Pitcher
Blade Assembly
Ice
Slushies
Snow Cones
Complete Juicing
Single Serve
1L Bowl
1.5L Pitcher
Blade Assembly Fruit & Vegetable Drinks

13 CUSTOMER CARE - NZ: 0800 002 999
HOW TO STORE
1Store the Ninja®Kitchen System Pulse™upright with
the 1L bowl on the motor base, 4-Blade assembly
inside and lid on the bowl. Secure the power cord
underneath the base by wrapping the cord around
the cord wrap. Do not place anything on top. Store
the single serve cups, the pitcher and the rest of the
attachments along side the appliance where they will
not be damaged and won’t cause a hazard.
RESETTING THE MOTOR THERMOSTAT
The Ninja®Kitchen System Pulse™features a unique safety
system which prevents damage to the unit’s motor and drive
system should you inadvertently overload your appliance.
If the appliance is being overloaded, the motor will stop. To
reset the appliance, follow the resetting procedure below:
1Unplug the appliance from the electrical outlet.
2Remove and empty the container and ensure that no
food is jamming the cutting blades or attachments.
3Allow the appliance to cool for approximately 30
minutes.
4Re-install the container onto the base and re-plug the
appliance into the electrical outlet.
5Proceed to use the appliance as before making sure not
to exceed the recommended maximum capacities.
HOW TO CLEAN
CAUTION: Make sure that the motor base is unplugged
from the power source before inserting or removing any
attachment and before cleaning.
CAUTION: DO NOT immerse the motor base into water
or any other liquid.
1Separate/remove all parts from each other.
2Clean the motor base and gear shaft with a damp cloth
and wipe dry.
3Place the bowl and single serve cups in the dishwasher.
Place the lids and attachments on the top rack. Use
caution when handling the blade assemblies as the
blades are very sharp.
NOTE: You may also wash the containers by filling the
container with no more than 700 ml of warm water
and a drop of dish washing detergent, placing the
corresponding lid on the container and pulsing a few
times. Do not fill the container with more than 700 ml
of water because it will overflow. Once clean, remove
the container from the motor base. Rinse the container,
attachment and lid under running water. Allow all the
parts to dry before storing.
Care & Maintenance

14
CUSTOMER CARE - AU: 1800 890 840
PROBLEMS POSSIBLE REASONS & SOLUTIONS
Motor doesn’t start or
attachment doesn’t rotate.
• Make sure the container is securely aligned and locked, (bowl or pticher)
on the motor base.
• For the single serve cup, make sure that the tabs are seated in the slots
and turned to the left.
• Make sure the lid is securely on the bowl or the pitcher in the correct
position with the arrows aligned.
• Check that the plug is securely inserted into the electrical outlet.
• Check the fuse or circuit breaker in your electrical box.
• The unit could be overloaded. Unplug and wait approximately 30
minutes before using again.
• The unit could be overheated. Unplug the unit and wait 30 minutes to
reset.
Food is unevenly chopped.
• Either you are chopping too much food at once, or you are not pulsing
properly. Remove some of the food items.
Food is too finely chopped or
too watery.
• The food has been over processed. Pulse ingredients for best results.
Press down on the single serve cup or lid handle in short intervals.
You cannot achieve snow
from ice cubes.
• For best results use ice straight from the freezer. Try using short pulses
instead of one long one.
Single serve cup is leaking.
• Make sure that the single serve blade set is tightly screwed on to the
cup before blending. Turn the lid tightly clockwise.
Unit doesn’t turn on.
• Make sure the unit is plugged in.
• Rotate and press down on the single serve cup or the “pulse” handle on
the lid to turn the unit on.
Unit doesn’t turn off.
• Release your hand from the single serve cup or the “pulse” handle on
the lid to turn the unit off.
Doesn’t mix well.
• Pulse ingredients for best results. Press down on the cup in short
intervals for even blending and chopping. For frozen ingredients, pulse in
short intervals of 2-5 seconds and repeat.
Troubleshooting Guide

15 CUSTOMER CARE - NZ: 0800 002 999
Notes Or Your Favorite Recipes

16
CUSTOMER CARE - AU: 1800 890 840
Notes Or Your Favorite Recipes

17 CUSTOMER CARE - NZ: 0800 002 999
Notes Or Your Favorite Recipes

18
CUSTOMER CARE - AU: 1800 890 840
ONE (1) YEAR
LIMITED REPLACEMENT WARRANTY STATEMENT
If your product becomes defective due to faulty material or workmanship within a period of 1 year from the date of
purchase, we warrant to do the following:
•For New Zealand Consumers: We will replace the product with a new product, free of charge, or repair
the product at our cost, at our discretion.
•For Australian Consumers: Our goods come with guarantees that cannot be excluded under the
Australian Consumer Law. You are entitled to a replacement or refund for a major failure and for
compensation for any other reasonably foreseeable loss or damage. You are also entitled to have the goods
repaired or replaced if the goods fail to be of acceptable quality and the failure does not amount to a major
failure.
Your warranty is subject to the following conditions:
•DO NOT operate the appliance with a damaged plug or cord, or if the unit has been dropped, damaged or
dropped in water. To avoid the risk of electric shock, do not disassemble or attempt to repair the appliance
on your own. If the supply cord is damaged, it must be replaced by a qualified electrician in
order to avoid a hazard. Incorrect re-assembly or repair can cause a risk of electrical shock or injury to
persons when the appliance is used.
•The product has not been misused, abused, neglected, altered, modified or repaired by anyone.
•The product has been subjected to fair wear and tear.
• Theproducthasnotbeenusedfortrade,professionalorhirepurposes.
• Theproducthasnotsustaineddamagethroughforeignobjects,substancesoraccident.
Your warranty does not cover:
• Componentsthataresubjecttonaturalwearandtearcausedbynormaluseinaccordancewithoperating
instructions.
• Unauthorised/impropermaintenance/handlingoroverloadisexcludedfromthiswarranty.
• Forguaranteeclaimsyouwillneedtosubmitaproofofpurchaseintheformofavalidreceiptthatdisplays
date and place of purchase.
This warranty does not replace but is in addition to your statutory rights.
This warranty does not apply to accessories supplied with the product.
This warranty applies only to the original purchaser and may not be transferred.
Replacement products will be covered by the limited warranty for the balance of the warranty period from the date
of the original purchase.
Please note:
Only defective product or parts returned to place of purchase will be replaced under this warranty.
New Zealand Contact: Australia Contact
Brand Developers Limited Brand Developers Aust Pty Ltd
UnitH,686RosebankRoad, 461PlummerStreet,
Avondale1026,Auckland,NewZealand PORTMELBOURNE,VIC3207
FAX:+6493068203 FAX:+61396817825
NZCustomerCare0800002999 AUSTCustomerCare:1800890840

Printed in China
Illustrations may differ from actual product.
BL200NZ.SAA.30.E.140520.1
Z854
Table of contents
Other Ninja Blender manuals

Ninja
Ninja BL642REF User manual

Ninja
Ninja BL492ANZ User manual

Ninja
Ninja 1000 User manual

Ninja
Ninja QB3000NZ User manual

Ninja
Ninja BL450C User manual

Ninja
Ninja BL480SO User manual

Ninja
Ninja NJ600 Series User manual

Ninja
Ninja Foodi Series Installation instructions

Ninja
Ninja BL660C User manual

Ninja
Ninja H5 User manual

Ninja
Ninja BL810 User manual

Ninja
Ninja Foody POWER NUTRI CB100UK User manual

Ninja
Ninja NINJA 1100 User manual

Ninja
Ninja BL682 User manual

Ninja
Ninja bl820 User manual

Ninja
Ninja Foodi POWER NUTRI DUO SS101Q User manual

Ninja
Ninja BL580VSM Series User manual

Ninja
Ninja BL450 User manual

Ninja
Ninja BL610 User manual

Ninja
Ninja Foodi CO351B Series User manual