Nipponia Cit-e User manual

Cit-e

NO.
DESCRIPTION
NO.
DESONCRIPTION
①
Diagram of instrument
⑦
Recovery button
②
Headlampbutton
⑧
Winker button
③
Rearview mirror
⑨
Horn button
④
Speed control handle
⑩
Brake handle
⑤
Speed mode button
⑪
Rearview mirror
⑥
Parkingbutton
⑫
High/Low beam switch button
USER’S MANUAL
Welcome to the family of owners! We will guide you to know each function for the right and safe use of electric scooters. To ensure
your safety, please read this manual carefully before riding and make sure you are always following the requirements below:
Fully understand the information in this manual, including but not limited to the relevant instructions, precautions and warnings.
Fully understand the operation and contingency measures of electric scooters.
Be fully aware of warning labels of electric scooters.
We will not take any responsibility resulting from the unauthorized modification, failure to use original spare parts, or installation of components that
affect the performance and safety of the scooter.
Please contact the Local Customer Service Center if you have any questions about this bike. We are at our service at any time. Wish you safe and
pleasant riding experience.
Safety Instructions
To ensure the safety of you and others, please make sure to observe the following matters:
Do not ride after you take medications which may affect your riding ability, drink alcohol, or when you are unwell.
Observe traffic regulations and traffic signs and confirm the surrounding road conditions and scooter conditions at any time, so as to actively avoid danger.
Wear safety equipment, such as helmet, and appropriate protective clothing if necessary, such as gloves and boots.
Perform a basic check each time before riding, so as to confirm the light, brake, tread and tire pressure and check other parts for looseness or abnormal noise,
and regularly go to Local Service Center for maintenance.
In order to ensure the safety of you and others, please DO NOT use high beam in good lighting conditions. The continuous use of high beam will cause the
visual disturbance to vehicles and pedestrians on the opposite side, thus affecting normal driving.
Please do not make or answer any call during riding, which is likely to cause traffic accidents.
Electric Scooters Structure Drawing
The Head Part

1
1
1
1
1
1
1
1
1
1
The Body Part
Main Operation Introduction
Installationof Rearview Mirrors
1
Take out the Left and Right mirrors, Insert the hole and rotate the
mirror clockwise to the correct position.
2
Use the spanner to fasten the nut, make sure the left and right mirror
is on the same line and suitable for the driver’s view.
Brake
Front Brake
The brake is an important safety part of the electric vehicle, which should always be adjusted in an appropriate
position. From the start of braking to when the front wheels just have a feeling of brake holdup, the distance the end
of the front brake handle moves is called the free stroke of the front brake handle.
Rear Brake
From the start of braking to when the rear wheels just have a feeling of brake holdup, the distance the end of the
rear brake handle moves is called the free stroke of the rear brake handle.

NO.
LOCATION
FUNCTION
Can the key be taken out?
①
LOCK
Direction setting is locked,
motor and lights cannot be used
YES
②
OFF
Motor and lights cannot be used
YES
③
ON
Motor and lights can be used
NO
Diagramof InstrumentPanel
TIPS:
Only when L(LOW) flashes, the remaining power of the battery can make the vehicle drive more than 3-5 km, so please charge it as soon as possible.
NO. LAMP DESCRIPTION FUNCTION
①Odometer Displaytotal driving kilometers
②Speedometer Displaycurrent speed
③ECO ECO mode indicator
④Right Lamp Signal The indicator light is on when the right operation
⑤RReverse gear The indicator light is on during reverse
operation
⑥Charging Lamp
When charging, this indicator light is on,
meanwhile, the electric motor is in a power-off
state
⑦ReadyIndicator
The “READY” light is always on after opening the
power switch lock. This indicate that the electric
motor is in a drivable state
⑧High light indicator
This light is on when the headlight emits a beam
of a high light
⑨
Position Light and Daytime
Light
According to the ambient brightness ,turn on
the light switch
⑩Left Lamp Signal The indicator light is on when the left operation
⑪
Battery display indicator
Displaythe capacityof the battery
Steering Lock
Turning vehicle direction handle bar to the left all the time, pressing the power switch key inward and rotating it to the position (b)at the
same time,then it’s done to lock the vehicle direction handle bar. After then, taking off the power switch key.
Press the power switch key inward and rotate it to the Position (C) at the same time, then it’s done to open the lock of direction handle bar.
During driving, please do not turn the power switch key to the position (C ) , otherwise will cause vehicle out of control.

Left Start Button
Right Start Button
①High/Lowbeam switch button
Press right to turn on the high beam.
Press left to turn on the low beam.
②Winker button
Dial to the left side to turn on the Left winker.
Dial to the right side to turn on the Right winker.
③Horn button
Press to make a sound and release to stop.
①Headlampbutton
Dial up to turn on the headlamp. Turn downward to AUTO to automatically turn on the headlights.
The headlights turn on automatically according to the brightness of the environment.
Dail down to turn off the headlamp.
②Speed mode button
The bike has three (3) Gear modes,1 "Eco", 2 "Cruise", and 3 "Sport". Dial rightwards for "Eco", middle for "normal"
and left for "sport".
③Parking button
Parking button has two modes: press to park the bike and parking indicator P goes on; and press again
to exit the parking status.
④Recovery button
When the scooter have failure warning on the motor/Controller/Brake/Accelerator, always press this button, slow driving to
nearby service center for repairs.
Remote Control
①
Unlock
Press the unlock button, and the start button stays on. The scooter enters into the
[Unlocked State].
②
Lock
When the scooter is in the [Static State], press the lock button, and the start button flashes.
The scooter enters the [Locked State].
③Remote keyless
entry
After unlock the scooter, press this button twice within two (2) seconds, and the scooter
will be in the “Powered”state without key.
④Search
key
Press this witch within 50m, “Bee Bee”sounds searching the
scooter.
A
f
t
e
r
u
n
With the advanced Smart Remote Controller, you can easily lock or unlock
your
electric scooter by simply
pressing the button within 50
meters.

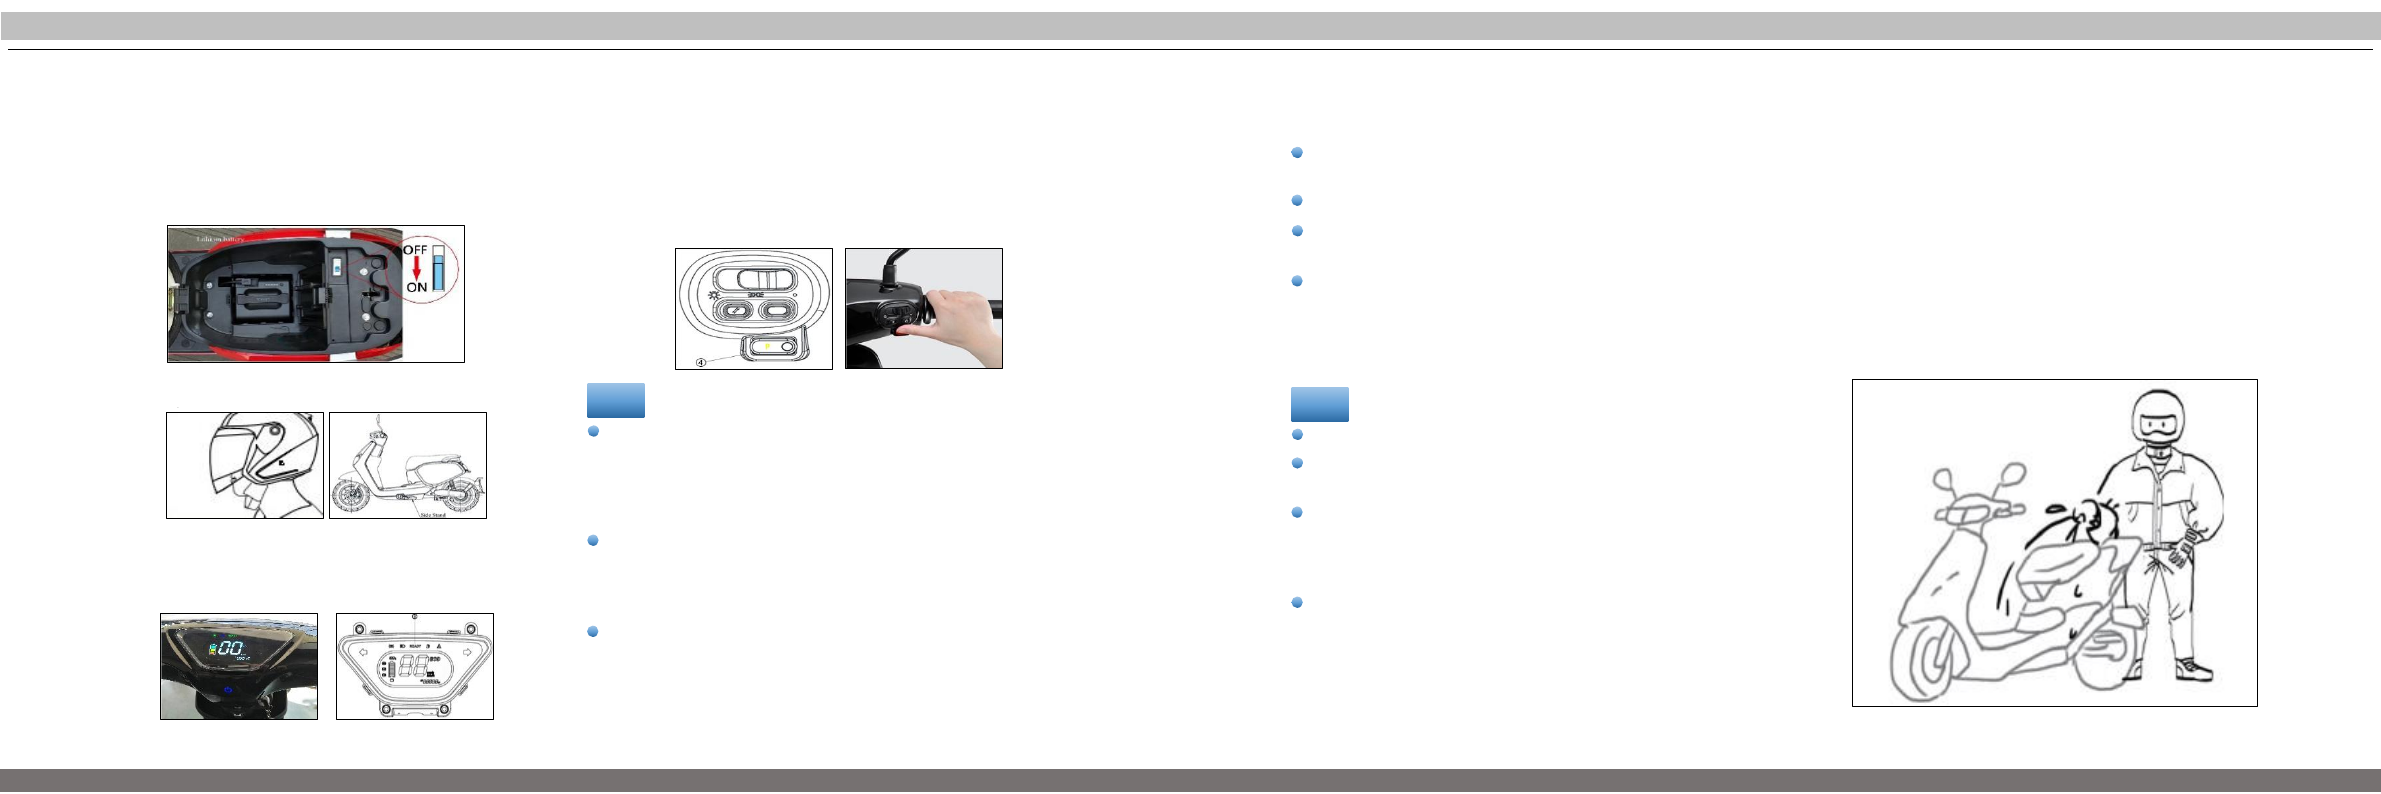
Power switch
The power switch is located in the luggage compartment. Open the luggage compartment according to the steps and you
will see the switch.
As the protection switch for the main power of electric scooter, the main switch will automatically disconnect to ensure safety
when the scooter circuit is abnormal or the current caused by short circuit exceeds the set safe value.
The "OFF" position of the main switch shown in the figure indicates that the power system of
the vehicle is closed.
Switch the main switch to the opposite position "ON", indicating that the power system of
the vehicle is connected. At this time, turn on the power switch of the vehicle and the
vehicle will enter the operational state.
NOTES: In order to protect your safety, please turn off the main switch when cleaning,
storing the scooter for a long time, or re- moving the battery pack.
Open the Seat with the key, plug the battery cable inside the socket, connecting the battery
with scooter.
Unlock and Remove the battery case step by step
Open the Seat with the key, unplug the power cable, then pull up the battery case with one
hand.
Saddle Lock
Please noted that the saddle lock is together with the power switch. Insert the power switch key and turn it counterclockwise
to open the saddle.
How to lock the saddle? Just put the saddle down and press down with both hands until the lock is closed.
Please be sure to lock the saddle before driving the electric car.
The maximum load of the suitcase is 10 kg. It is strictly prohibited to exceed the maximum load of the suitcase, otherwise will harm
to the operation of the electric scooter and the stability.
Inflammable, explosive or heat-sensitive items are strictly prohibited in the suitcase.

NO.
DESCRIPTION
FUCTION
①
Output charger
Connect with charge socket on the
scooter or the battery’s charge
socket.
②
Input of charger plug
Connecting with home power
socket on the wall.
③
Status lamp
Red lamp blinking when charging.
Green lamp after full charge.
Please unplug the power cable and battery output cable after full
charge. Please use standard charger to charge the battery, the
charge time is 6 hours.
Charger
How to Charge the Battery
Pull up the battery from scooter, Insert the main charger plug into the charging socket of the battery. Insert the charger AC
power plug into the home
power
socket, and the battery starts charging when the charger indicator turns red. The battery is
fully charged if the charger indicator turns from red to
green.
TIPS:
Do not expose the battery to water, and prevent it
from being damped by water or rained.
Charge temperature: 0-45 °C , discharge temperature: -20-45 °C; Battery capacity will be reduced when placed in a
low-temperature environment.
Charge the battery when you use it, but make sure to charge it before the capacity is lower than 20%. When it is not
used for a long time, please remove it from the scooter.
Short circuit of the cathode and the anode at the battery's input.
Keep it away from children, fire and heat source. It is strictly forbidden to throw it into the fire; Violent movements,
shock and extrusion are prohibited.
Only the specified charger can be used, and other chargers are prohibited to charge the battery.
This product has been subject to strict inspection before leaving factory, and it is strictly prohibited to dismantle it.
Please contact our company's after-sales department for any question.
Operating instructions for driving a vehicle
Checks Before Riding
TIPS:
Incorrect maintenance or incorrect handling of vehicle faults or hidden dangers before driving may cause serious
personal injury or vehicle damage. So need to make a habit of checking the vehicle before driving.
Make sure to check the following items before riding an Electric Scooter, which will guarantee your safety on the road.
①Whether the handlebar is stable and flexible when turning.
②Whether the switches on the right and left handlebars can work normally.
③Whether the speed accelerator can work normally.
④Make sure the tire pressure is normal. The suggested tire pressure is 26-29psi for front wheel and 29-32 psi for rear wheel.
⑤Check tire surface for cracks, damage, wear, and foreign matter puncture or attachment.
⑥Whether the tread depth is sufficient (>0.8 mm).
⑦Whether any fault warning light on the instrument panel goes on after being powered.
⑧Whether the battery is fully charged.
⑨Whether the head and tail lights, brake lights and winkers can work normally.
⑩Whether the horn can work normally.
⑪Whether the rear mirrors are clean. Adjust them to the appropriate angle.
⑫Whether the brake oil is sufficient, and whether the handlebars and brake system can work normally.
⑬For any abnormality or operational concern, please contact local Customer Service Center.
①Insert the key and turn leftwards, Open the saddle,
open the cap to connect the battery cable, Turn on
the power switch.
②Put on the helmet, and retract the electronic side.
stand.
③Insert the key and turn rightwards, “Powered”state
is started, the Instrument is opened, and the
“READY”light is ON, scooter is ready for driving now.
④Press the "P" button with three (3) seconds, to exit the
Parking state, and the “P” indicator goes off, then you
can start driving. Gently turn the handlebar to ride on
the road.
TIPS:
Before riding, make sure the electronic side stand retracted and
rotate the handlebar to ensure that the handlebar lock is closed.
If the Parking button is pressed when riding, the bike will be dis-
energized. So DO NOT press it when riding for avoiding danger
caused by the sudden loss of power.
If the electronic side stand is extended when riding, the bike will
be dis-energized. So DO NOT extend the electronic side stand when
riding for avoiding danger caused by the sudden loss of power.
The scooter must be fully stopped before starting. In case of
abnormality during riding, please ride carefully or push it to a
safe place. DO NOT try restarting the bike during riding or on the
lane so as to avoid danger.
Make sure to check the following items before riding, which will guarantee your safety on the road.
Routine Cleaning and Maintenance
In order to protect the surface coating, please clean the vehicle regularly and check if there will be damage, wear and battery
leakage of the vehicle.
Please use clean water and neutral detergent to clean it, and use soft cloths and sponges to clean the surface.
It is prohibited to use metal brushes, sandpaper or the like to clean it, in order not to scratch the parts surface. After cleaning,
dry it with soft cloths.
When washing, it is not allowed to spray water directly to the brake drum, motor and front and rear axles in order to prevent
water from affecting the performance and life of related parts. At the same time, it should avoid water flowing impact on the live
parts such as the wiring harness connectors and fuses (especially the charging sockets. No Water!), and make sure the luggage
won’t get water into it.
TIPS:
Please disconnect the power switch before cleaning.
Do not use strong water jet to directly wash it, so as to avoid the default
of mechanical parts caused by water invasion.
Storage: try to park it in a dry and cool room to reduce the exposure to
sun and rain and avoid the reduction of service life due to corrosion of
parts. When left unused for a long time, please turn off the power
switch and disconnect the power supply circuitto prevent over
discharging.
After long-term storage, please fully charge it before use.

FAILURE
CAUSES
SOLUTIONS
The scooter has no electricity, and
the READY lamp does not shine.
Battery is poorly connected.
Power switch is not turned on.
Connect the battery properly at its main
plug. Turn on the power switch.
When turning the speed regulating
steering handle-bar, the motor
does not turn after being powered.
Low battery volume.
Side stand is not retracted.
Brake handle does not reach the
right position. Steering handlebar
failure.
The controller plug is loose.
Controller failure.
Charge the battery.
Put away the side stand. Close the parking
key.
Place the brake handle at the right
position. Change handlebar.
Re-plug controller. Change controller.
Speed is slow or mileage is short.
Low battery.
Under-inflated tire. Heavily
overloaded. Brake pads
interference.
Battery aging or normal scrap.
Charge the battery.
Inflate the tire, and check the tire pressure
before riding.
the brake pads and check the brake system
before riding. Change battery.
Check whether the main plug is in a right
place Use the special charger.
Battery can not be charged.
Poor contact of the main plug of
the charger. Do not use the wrong
charger.
Battery aging or normal scrap.
Battery low-voltage protection.
Connect the main plug again.
Contact with local service office of battery.
Regular Inspection and Maintenance
The new scooter must be subject to the first inspection and maintenance in the Service Center when it reaches 1,000 km
or two months (whichever comes first). The scooter is recommended to be subject to regular inspection and maintenance
in the Service Center at every 3,000 km or six months (whichever comes first).
Foster a good habit, and keep the appropriate load Change.
TIPS:
Please disconnect the power switch before cleaning.
Do not use strong water jet to directly wash it, so as to avoid the fault of mechanical parts caused by being damped.
Regular maintenance can improve the service life and driving safety of the electric scooters. Please refer to
the fol-lowing suggestions and take care of your scooter.
Storage,
Maintenance
and Transportation
Please charge the battery to half-saturation state when storing or transporting it (after the battery is discharged, charge it for 3 hours),
Place it in a dry and ventilated place.
Battery and charger should be kept in a clean, dry, and ventilated place. Keep them away from corrosive materials, power source
and heat source; Storage conditions: ambient temperature -20-35 °C , humidity <65% RH.
When storing the charger, please disconnect it from the battery.
Regular maintenance can enhance the service life and driving safety of the electric scooter. Please refer to the following suggestions
and take care of your scooter.
Battery and charger should be kept in a clean, dry, and ventilated place. Keep them away from corrosive
materials, power source and heat source; Storage conditions: ambient temperature -20-35 °C, humidity <65%
RH;
When storing the charger, please disconnect it from the battery.
Regular maintenance can enhance the service life and driving safety of the electric scooter. Please refer to the
following suggestions and take care of your scooter.

Table of contents
Other Nipponia Scooter manuals

Nipponia
Nipponia F3 User manual

Nipponia
Nipponia Volty Instruction manual

Nipponia
Nipponia Neon User manual

Nipponia
Nipponia Volty User manual

Nipponia
Nipponia Dion 125 User manual

Nipponia
Nipponia BRIO 125-3 User manual

Nipponia
Nipponia E-Viball 1S Instruction manual

Nipponia
Nipponia Miro 125 User manual

Nipponia
Nipponia PRIDE User manual


