Nitty-Gritty PASSI TEST PLUS User manual

PASSI TEST PLUS
Tester di passivazione/Controllo Qualità
Stainless Steel passivation/Quality Control Tester
Testeur de passivation/Control de Qualité
MANUALE D'USO
OWNER’S MANUAL
MANUEL DE L’UTILISATEUR
NITTY-GRITTY S.r.l.
Via dei Marmorari 36, Spilamberto (MO) - ITALY
+39 (0)59 785210
www.nitty-gritty.it - info@nitty-gritty.it


PASSI TEST PLUS
Tester di passivazione
Passivation Tester
Testeur de passivation
NUMERO DI SERIE/SERIAL NUMBER
ANNO DI COSTRUZIONE/YEAR OF CONSTRUCTION
2016
LEGGERE ATTENTAMENTE IL MANUALE PRIMA DELL'UTILIZZO
READ CAREFULLY BEFORE USE
LIRE ATTENTIVEMENT AVANT L’UTILISATION
1
3(Retro)
2
2
10
11
Fig. 1
4
5
8
9
7
6
12

PASSI TEST PLUS
5
ITALIANO
Attenzione
Prima di qualsiasi operazione leggere attentamente le istruzioni contenute in questo manuale.
Questo manuale fornisce le principali informazioni per una adeguato e sicuro utilizzo dello strumento.
Il manuale fa parte integrante dello strumento e deve essere conservato con cura fino allo smantellamento finale dello
strumento stesso. La lingua ufficiale scelta dal costruttore per la realizzazione del manuale è l’italiano. Non si assumono
responsabilità per traduzioni, in altre lingue, non conformi al significato originale. Il presente manuale rispecchia lo stato dello
strumento al momento della fornitura e non potrà essere ritenuto inadeguato solo perché successivamente aggiornato in base a
nuove esperienze.
IL SERVIZIO ASSISTENZA CLIENTI NITTY-GRITTY ( l +39 059 785210) è a Vostra disposizione per rispondere alle domande relative
all’acquisto, all’impiego e alle regolazione dello strumento e dei suoi accessori.
1. PRESENTAZIONE DELLO STRUMENTO
PASSI TEST PLUS è uno strumento progettato e realizzato per verificare lo stato di passivazione dell'acciaio inossidabile attraverso uno
specifico test elettrochimico.
Lo strumento è in grado di rilevare in pochi secondi un valore stabile e preciso relativo allo stato di ossidazione dell'acciaio; tale
dato è direttamente associato alla resistenza alla corrosione del metallo.
2. CARATTERISTICHE DELLO STRUMENTO
Lo strumento PASSI TEST PLUS è realizzato nel rispetto delle norme comunitarie in materia di sicurezza ed è fornito
con marcatura CE.
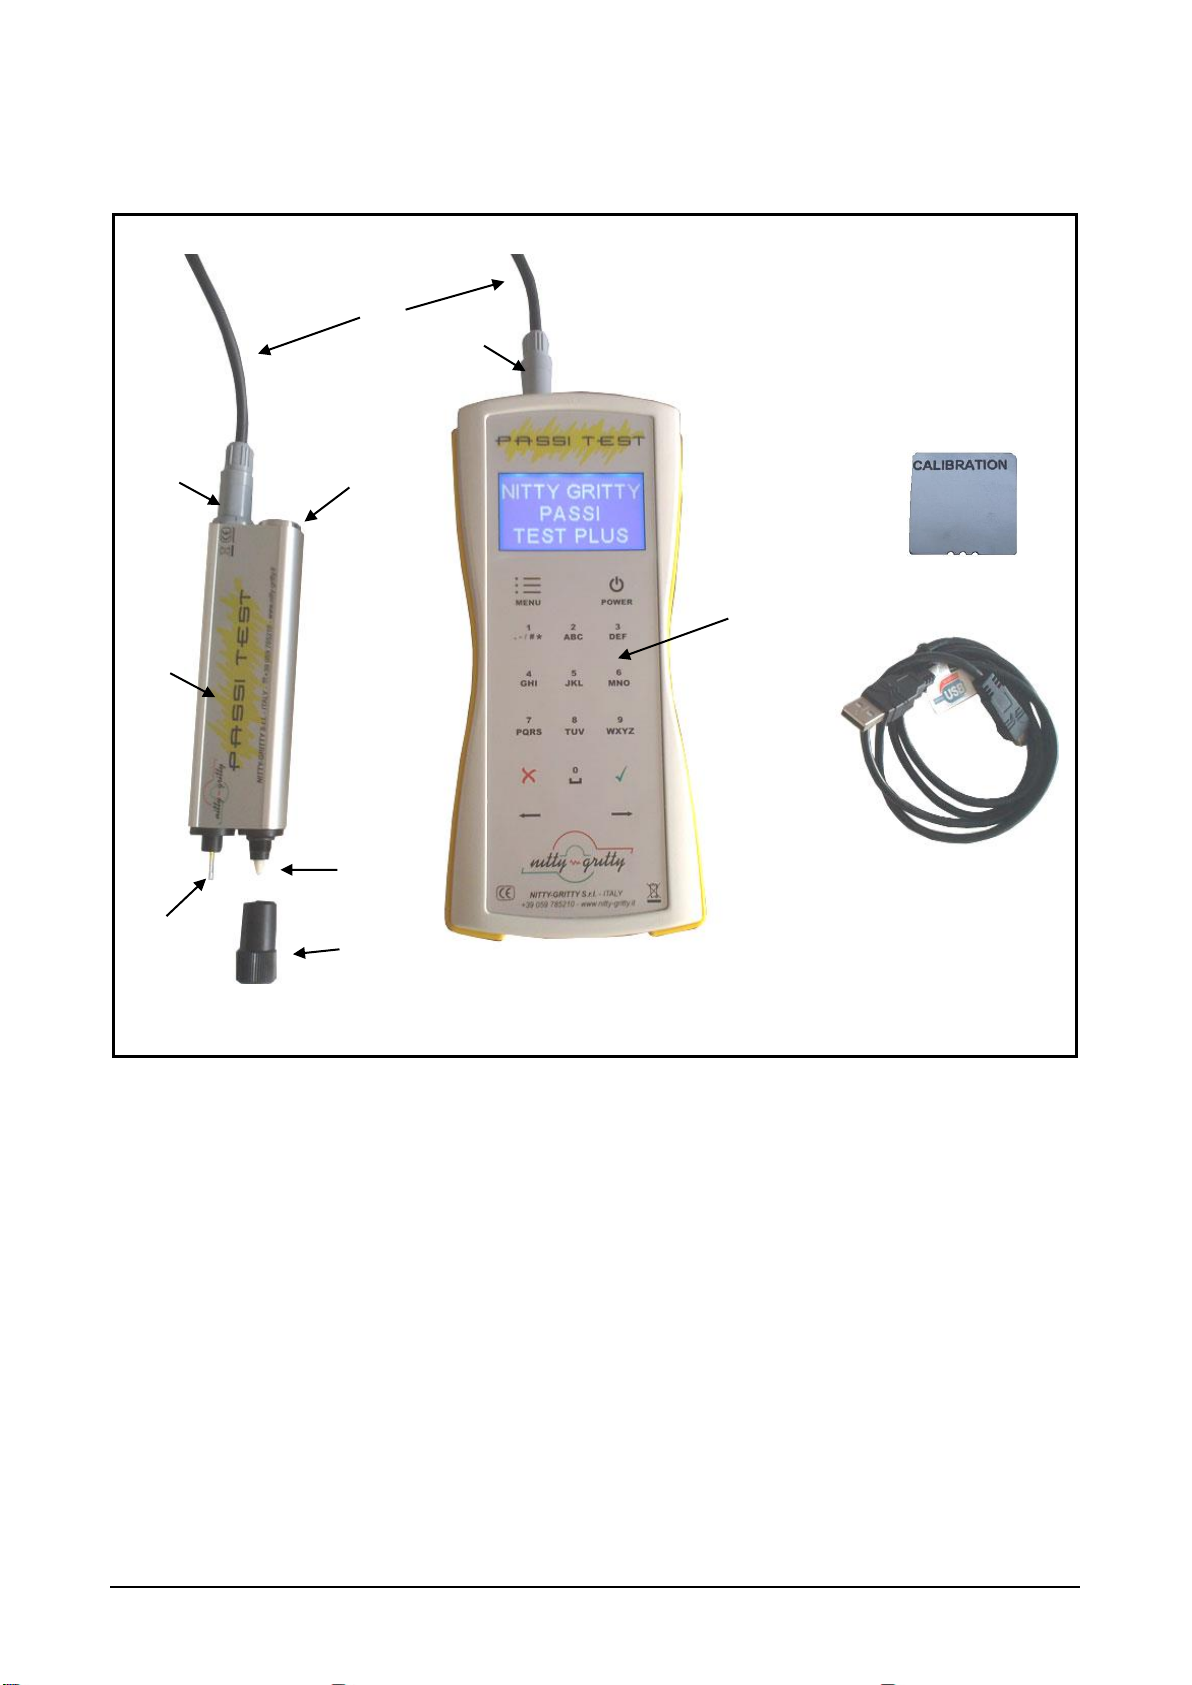
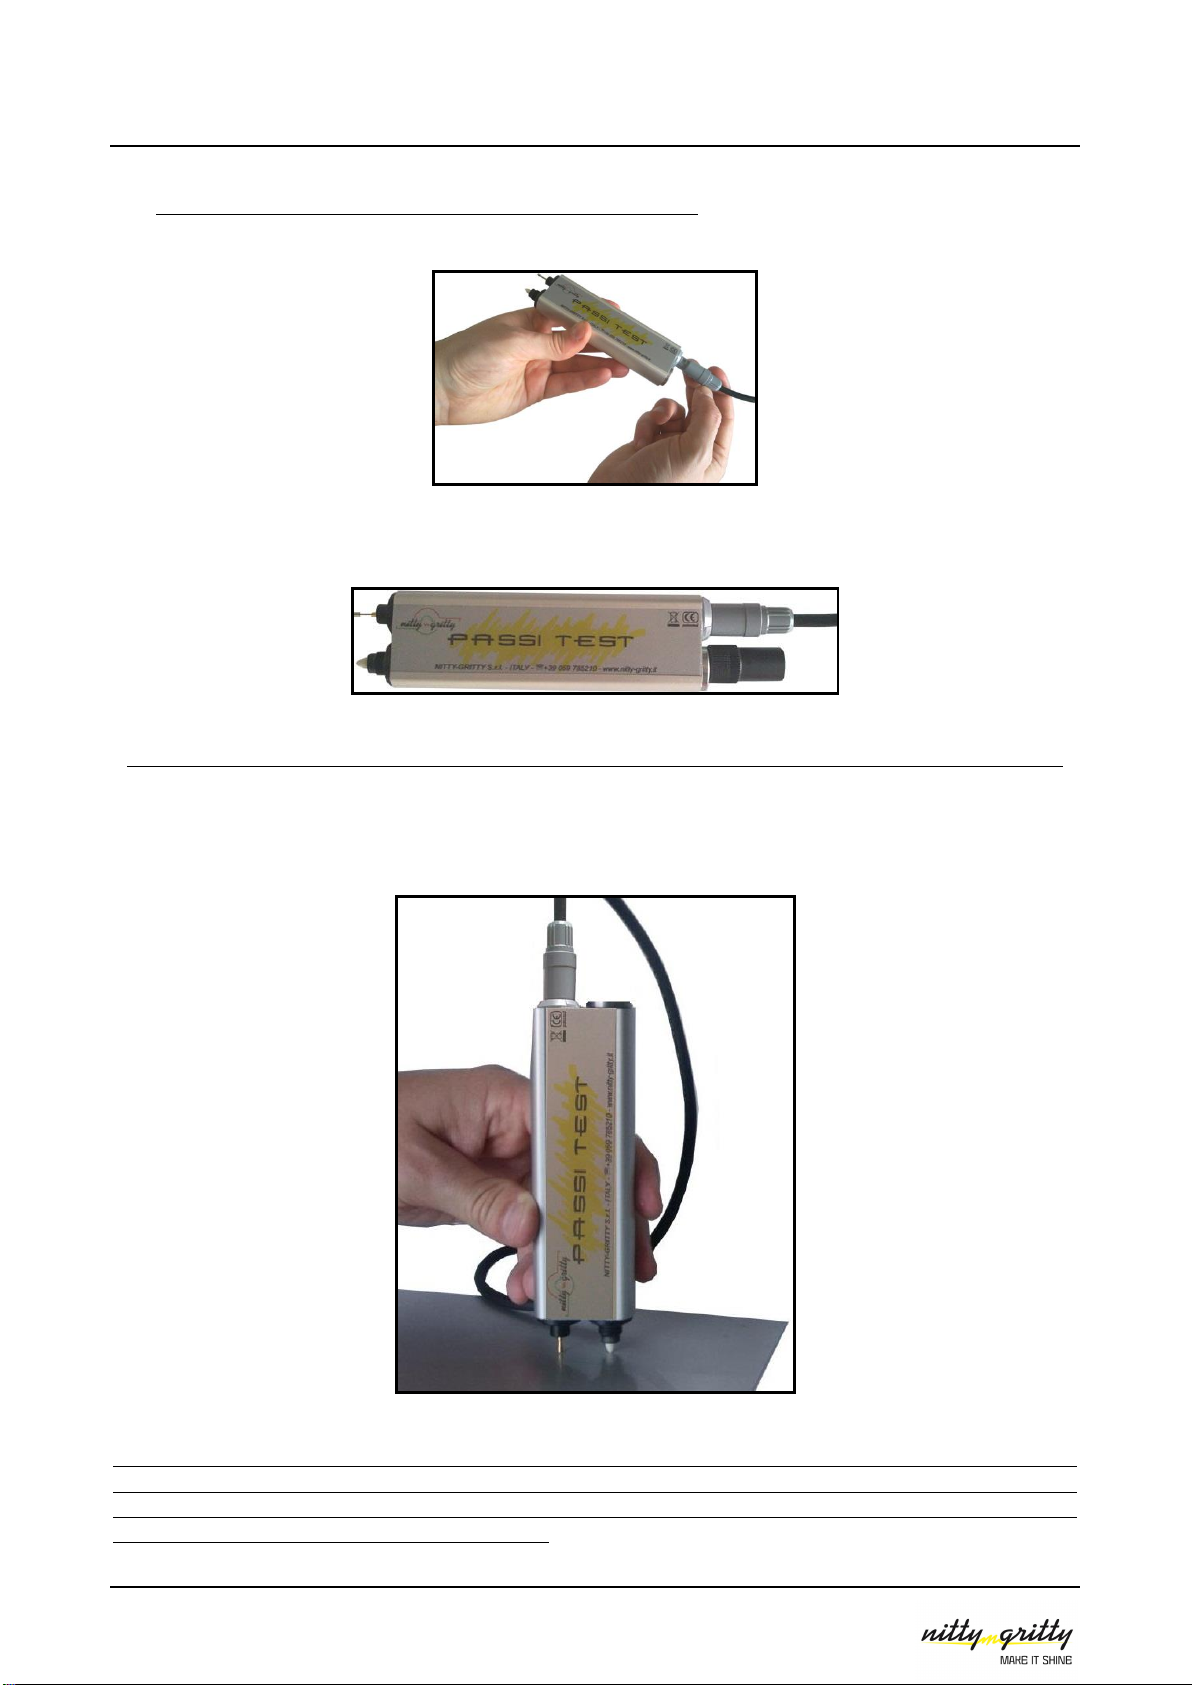
2.1 PRINCIPALI COMPONENTI DELLO STRUMENTO (FIG.1,PAG.4)
1. PASSI TEST +: Unità esterna;
2. PASSI TEST +: strumento sonda;
3. Vano batteria (parte posteriore display);
4. Connettore 4 poli su unità esterna;
5. Connettore 4 poli su strumento sonda;
6. Cavo connessione 4 poli;
7. Chiusura vano Refill / Alloggiamento per il tappo;
8. Sonda;
9. Tappo;
10. Puntale di massa;
11. Cavo USB;
12. Piastrino di controllo calibrazione.
2.2 DATI TECNICI
Modello
PASSI TEST PLUS
Tensione di alimentazione
6 V
Peso
220 g
Dimensioni (mm)
156x40x20
2.3 DOTAZIONE
Nr. 1 PASSI TEST PLUS completo di display e strumento sonda
Nr. 1 Cavo di collegamento Sonda-Tester a 4 poli
Nr. 1 Cavo di collegamento USB
Nr. 1 Piastrino per controllo della Calibrazione
Nr. 1 CD Software
Nr. 1 Manuale d'uso
Nr. 1 Punta di ricambio

PASSI TEST PLUS
6
3. INSTALLAZIONE DELLE BATTERIE
1. Rimuovere il coperchio (3) posto sul retro del display.
2. Inserire/sostituire le batterie (4 x AA 1,5V).
3. Chiudere il vano batteria con l'apposito coperchio.
NOTA: Lo strumento viene fornito già dotato di pile.
4. SOSTITUZIONE DEL REFILL
1. Svitare il tappo di chiusuradella sede del refill aiutandosi con un cacciavite (Fig. 2).
2. Estrarre il refill e sostituirlo con uno nuovo.
3. Richiudere il vano refill (Fig.2).
ATTENZIONE: si consiglia di utilizzare un paio di guanti durante la sostituzione del refill per evitare il contatto con la soluzione elettrolitica che vi
è contenuta.
Fig. 2
5. SOSTITUZIONE DELLA PUNTA
Ove fosse necessaria la sostituzione della punta (es: in caso di inquinamento), è possibile la sostituzione seguendo le istruzioni sotto
riportate.
ATTENZIONE: si consiglia di utilizzare un paio di guanti durante la sostituzione del refill per evitare il contatto con la soluzione elettrolitica che vi
è contenuta.
1. Estrarre il refill come indicato nel Par. 4.
2. Estrarre la punta bianca dal refill come indicato in figura (Fig. 3)
3. Inserire la nuova punta nel refill.
4. Inserire il refill nello strumento
5. Richiudere il vano refill (Fig.2).
Fig. 3
PASSI TEST PLUS
7
6. FUNZIONI DEL TESTER
6.1 ACCENSIONE /SPEGNIMENTO
Per accendere l’unità esterna del tester di passivazione, tenere premuto per due secondi il
tasto
POWER
. Il tester si accenderà e dopo un breve messaggio di benvenuto si posizionerà
sul menu principale.
Per spegnere l’unità tenere premuto il tasto
POWER
per due secondi.
NOTA: In qualunque momento è possibile ritornare al menu principale premendo il tasto
MENU
.
6.2 IMPOSTAZIONE LINGUA
Per impostare la lingua dei menu, dal menu principale, selezionare
SETTINGS
e premere
; scorrere utilizzando le frecce direzionali fino a
LANGUAGE e p
remere è possibile
impostare le seguenti lingue:
- Inglese
- Francese
- Tedesco
Selezionare la lingua desiderata premere per confermare.
6.3 IMPOSTAZIONE DATA/ORARIO
Per impostare la data e l’orario, dal menu principale selezionare
SETTINGS
e premere ;
scorrere utilizzando le frecce direzionali fino a
DATE
e/o
TIME
e premere ; per
impostare il valore utilizzare i tasti numerici della tastiera e premere per confermare.
NOTA: La data e l’orario impostati compariranno nel report di controllo qualità.
6.4 IMPOSTAZIONE USER ID /PASSWORD
Per impostare lo User ID, dal menu principale, selezionare
SETTINGS
e premere ;
utilizzando le frecce direzionali selezionare
USER
ID e premere ; per inserire lo User
utilizzare la tastiera e premere per confermare. Viene quindi richiesta la password; per
inserire la password utilizzare la tastiera e premere per confermare.
PASSI TEST PLUS
8
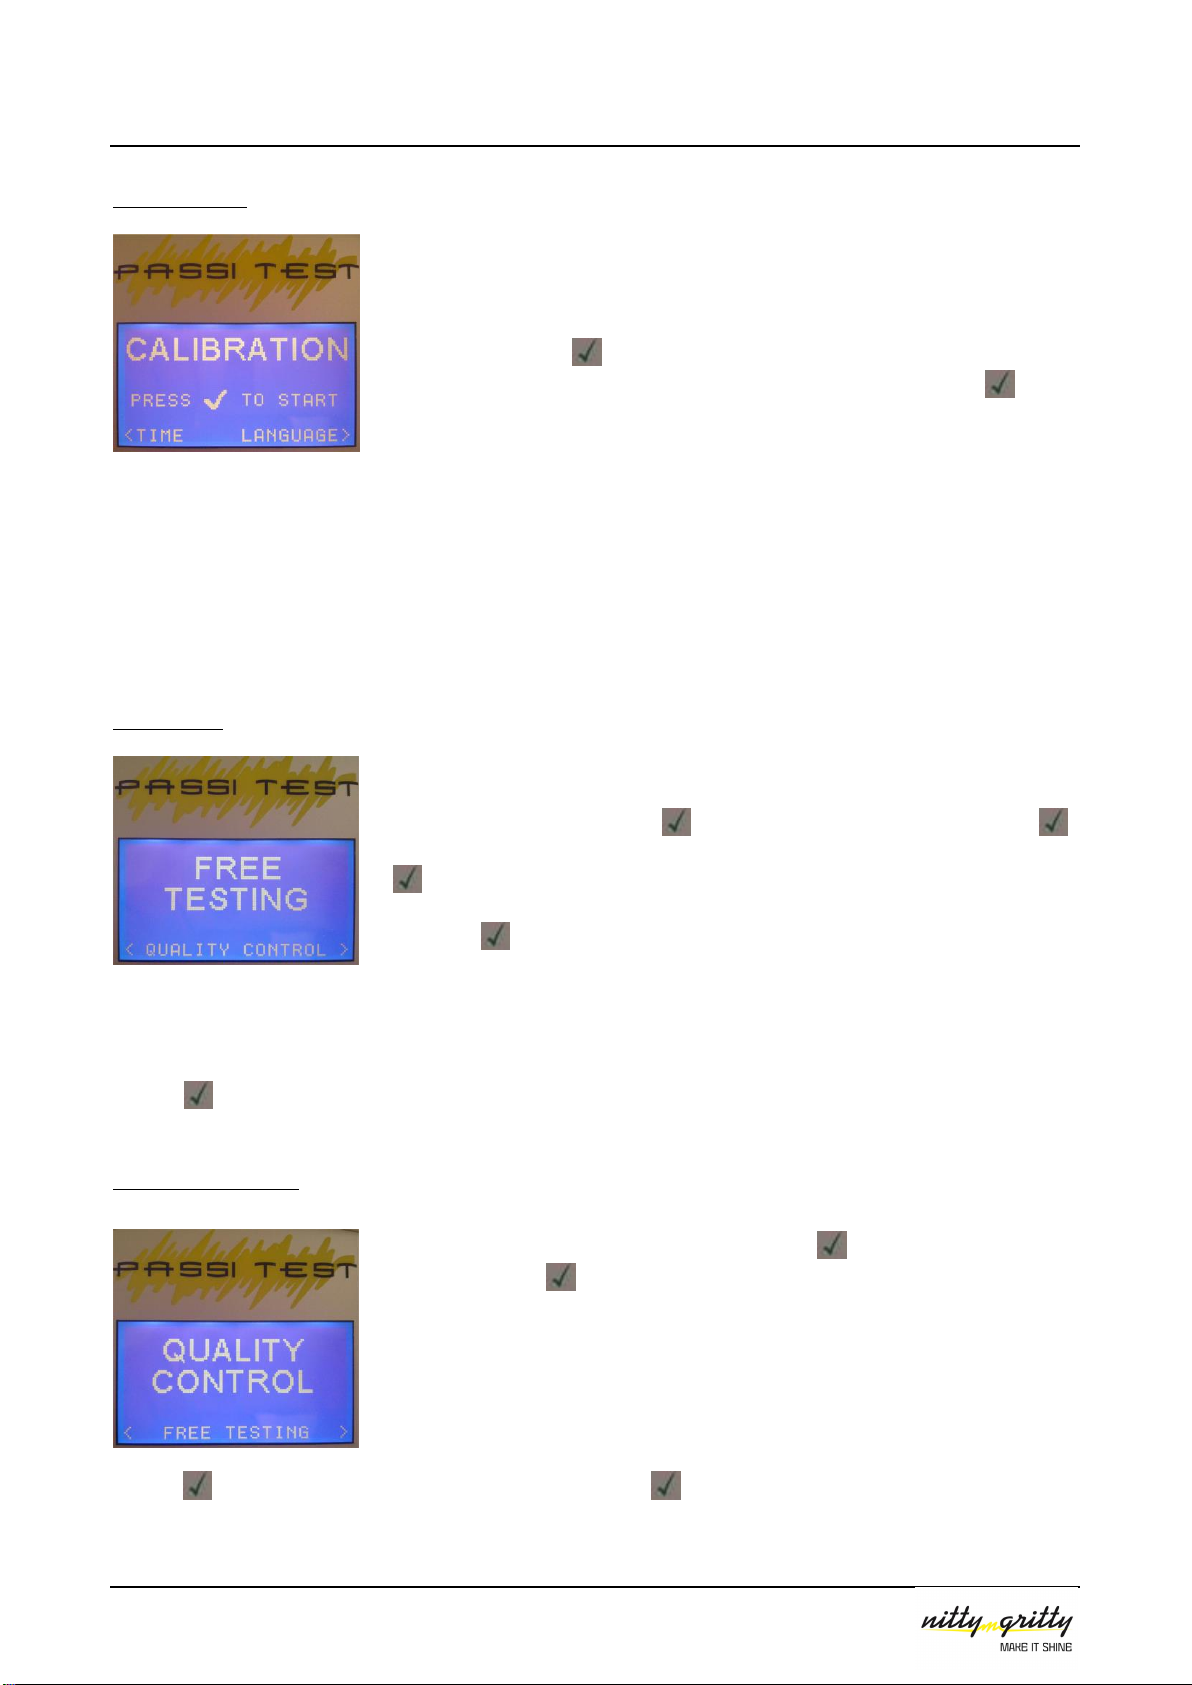
6.5 CALIBRAZIONE
E’ consigliato, in particolar modo prima di una sessione di controllo qualità, effettuare il
controllo della calibrazione dello strumento.
Per accedere alla funzione di controllo della calibrazione, dal menu principale, selezionare
SETTINGS
e premere ; scorrere con le frecce fino alla funzione
CALIBRATION
e
posizionare la sonda sul piastrino di calibrazione in dotazione, quindi premere . Inizierà
un test di calibrazione della durata di 5 secondi, al termine del quale si avrà un messaggio
di
OK
in caso la calibrazione sia corretta.
In caso contrario, lo strumento suggerirà di controllare lo stato del refill e/o della punta. (
CHECK TIP/REFILL
)
La perdita della calibrazione può essere infatti causata da due fattori:
- Esaurimento dell’elettrolita contenuto nel refill v. Par. 4 –Sostituzione del refill
- Inquinamento della punta (ad es. se si è effettuato un test su un pezzo sporco) v. Par. 5 –Sostituzione della punta
Si consiglia di effettuare la prova di calibrazione anche in caso di uso dopo un prolungato periodo di inutilizzo del tester.
6.6 FREE TEST
La funzione di Free Test permette di effettuare un test di passivazione senza però salvare il
dato nella memoria dello strumento. Per accedere alla funzione, dal menu principale
selezionare
NEW TEST
(premere ) e successivamente
FREE TEST
(premere ).
Compare una schermata che invita a posizionare la sonda sul pezzo da testare e premere
.
Premendo avrà inizio il test della durata 15 secondi, scanditi da una barra grafica
indicante l’avanzamento.
Al termine del test, sul display viene indicato il valore numerico di OCP, ed una valutazione grafica della dello stato di passività
dell’acciaio inossidabile indicata tra un valore buono (
GOOD
) e non passivo (
BAD
).
Premere per tornare alla sezione
FREE TEST
oppure
MENU
per tornare al menu principale.
6.7 CONTROLLO QUALITA’
Dal menu principale, selezionare NEW TEST (premere ) e successivamente QUALITY
CONTROL (premere )
Per accedere alla funzione di controllo qualità, è necessario effettuare il login utilizzando il
proprio username/password, precedentemente registrati nella sezione
SETTINGS
. (V. Par.
6.4 –Impostazione User ID/Password)
Effettuato l’accesso, viene richiesto il
PROJECT N°
(Numero di Lotto), che rimarrà
memorizzato durante tutte le prove della sessione corrente. Inserire il project n° e
premere (nb: il campo può essere lasciato vuoto, premendo il tasto )
PASSI TEST PLUS
9
Viene quindi richiesto il
SERIAL N°
(Numero di serie del pezzo che si sta testando). Questo dato sarà memorizzato per il test
corrente (il campo può essere lasciato vuoto, premendo ); al termine del test, lo strumento ritornerà a questa finestra, dando
la possibilità di inserire il numero seriale successivo. Per modificare il valore, premere ed inserire il dato utilizzando la
tastiera dello strumento.
Una volta inserito il SERIAL N°, premendo , compare una schermata che invita a posizionare la sonda sul pezzo da testare e
premere .
Premendo avrà inizio il test della durata 15 secondi, scanditi da una barra grafica indicante l’avanzamento.
Al termine del test, sul display viene indicato il valore numerico di OCP, ed una valutazione grafica della dello stato di passività
dell’acciaio inossidabile indicata tra un valore buono (
GOOD
) e non passivo (
BAD
).
Premere per tornare all’inserimento del numero seriale –mantenendo quindi la sessione corrente ed il numero di lotto –
oppure premere il tasto
MENU
per terminare la sessione e tornare al menu principale.
NOTA: Il tester è dotato di 50 blocchi di memoria; una volta utilizzati tutte le celle disponibili, per effettuare nuovi test di
controllo qualità, sarà necessario svuotare la memoria utilizzando l’apposita funzione software (V. Par. 8.3.2 –
Cancellazione
Test/User ID
)
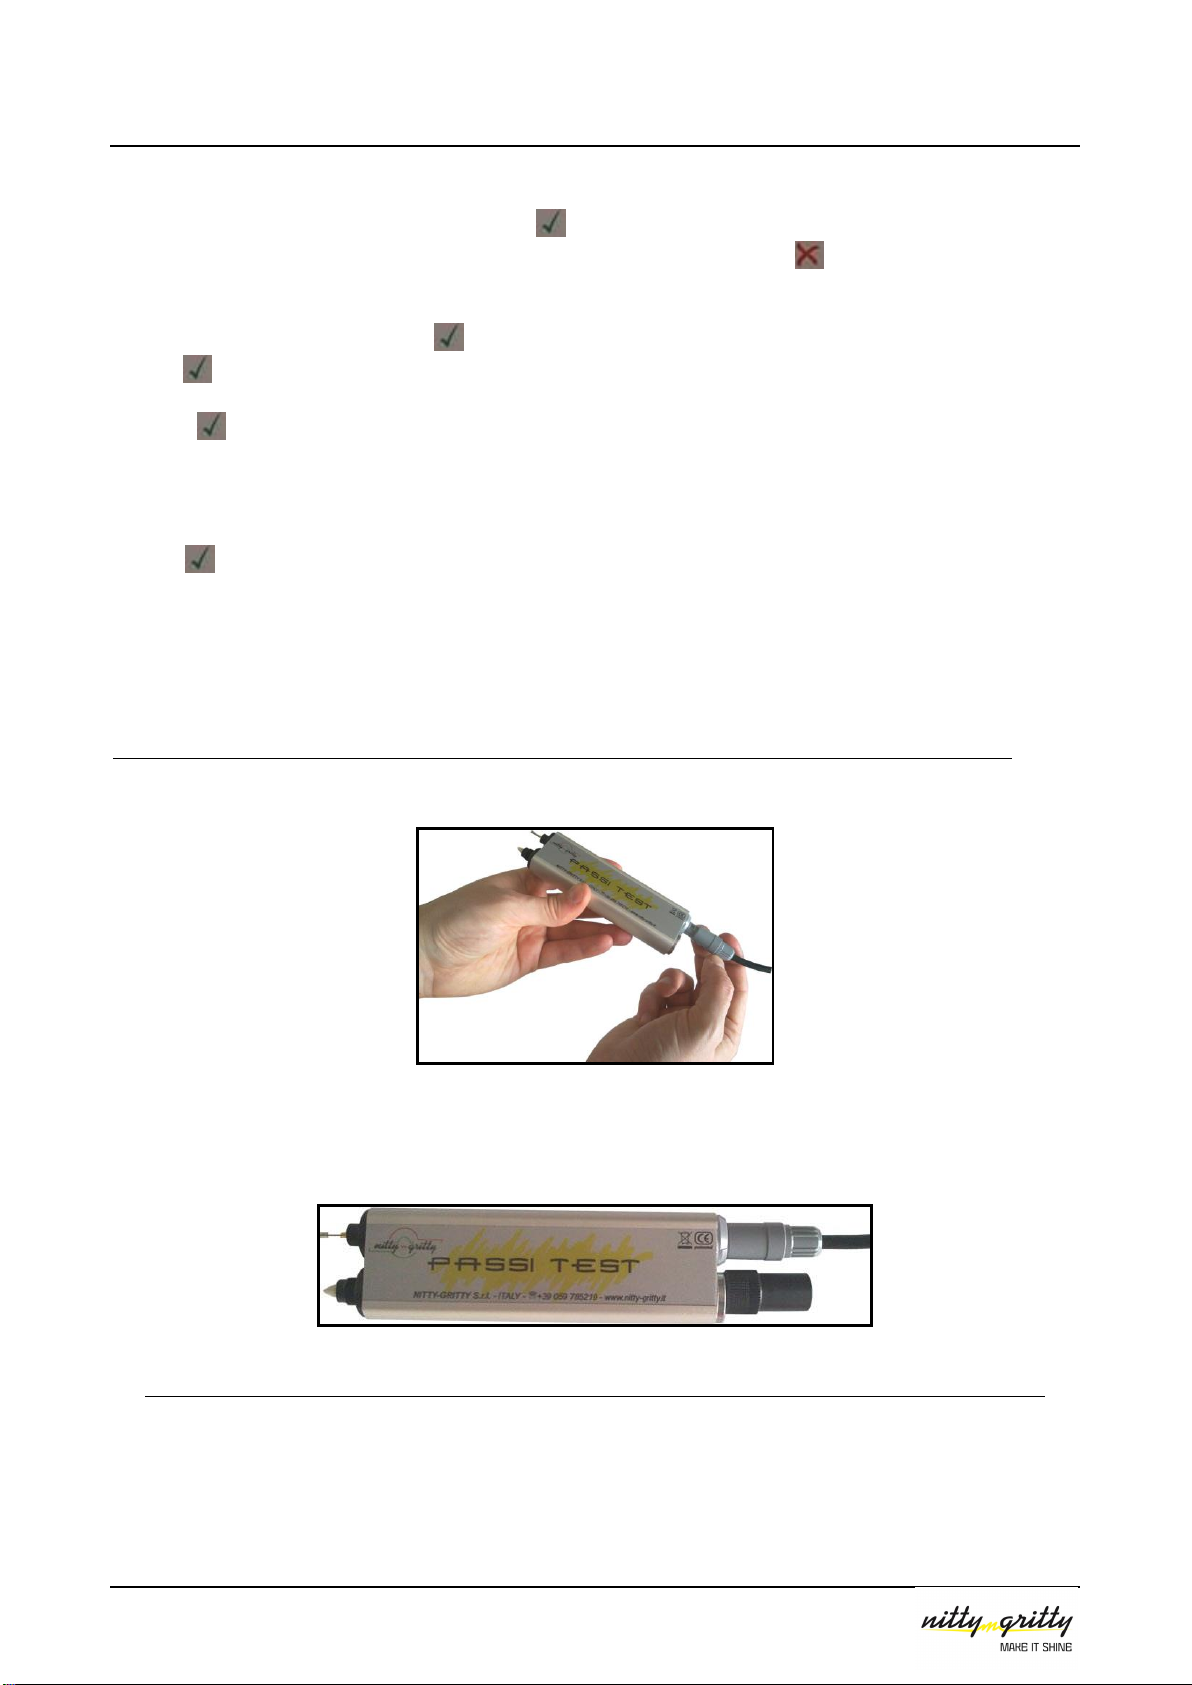
7. UTILIZZO DELLO STRUMENTO SONDA PER EFFETTUARE IL TEST DI PASSIVAZIONE
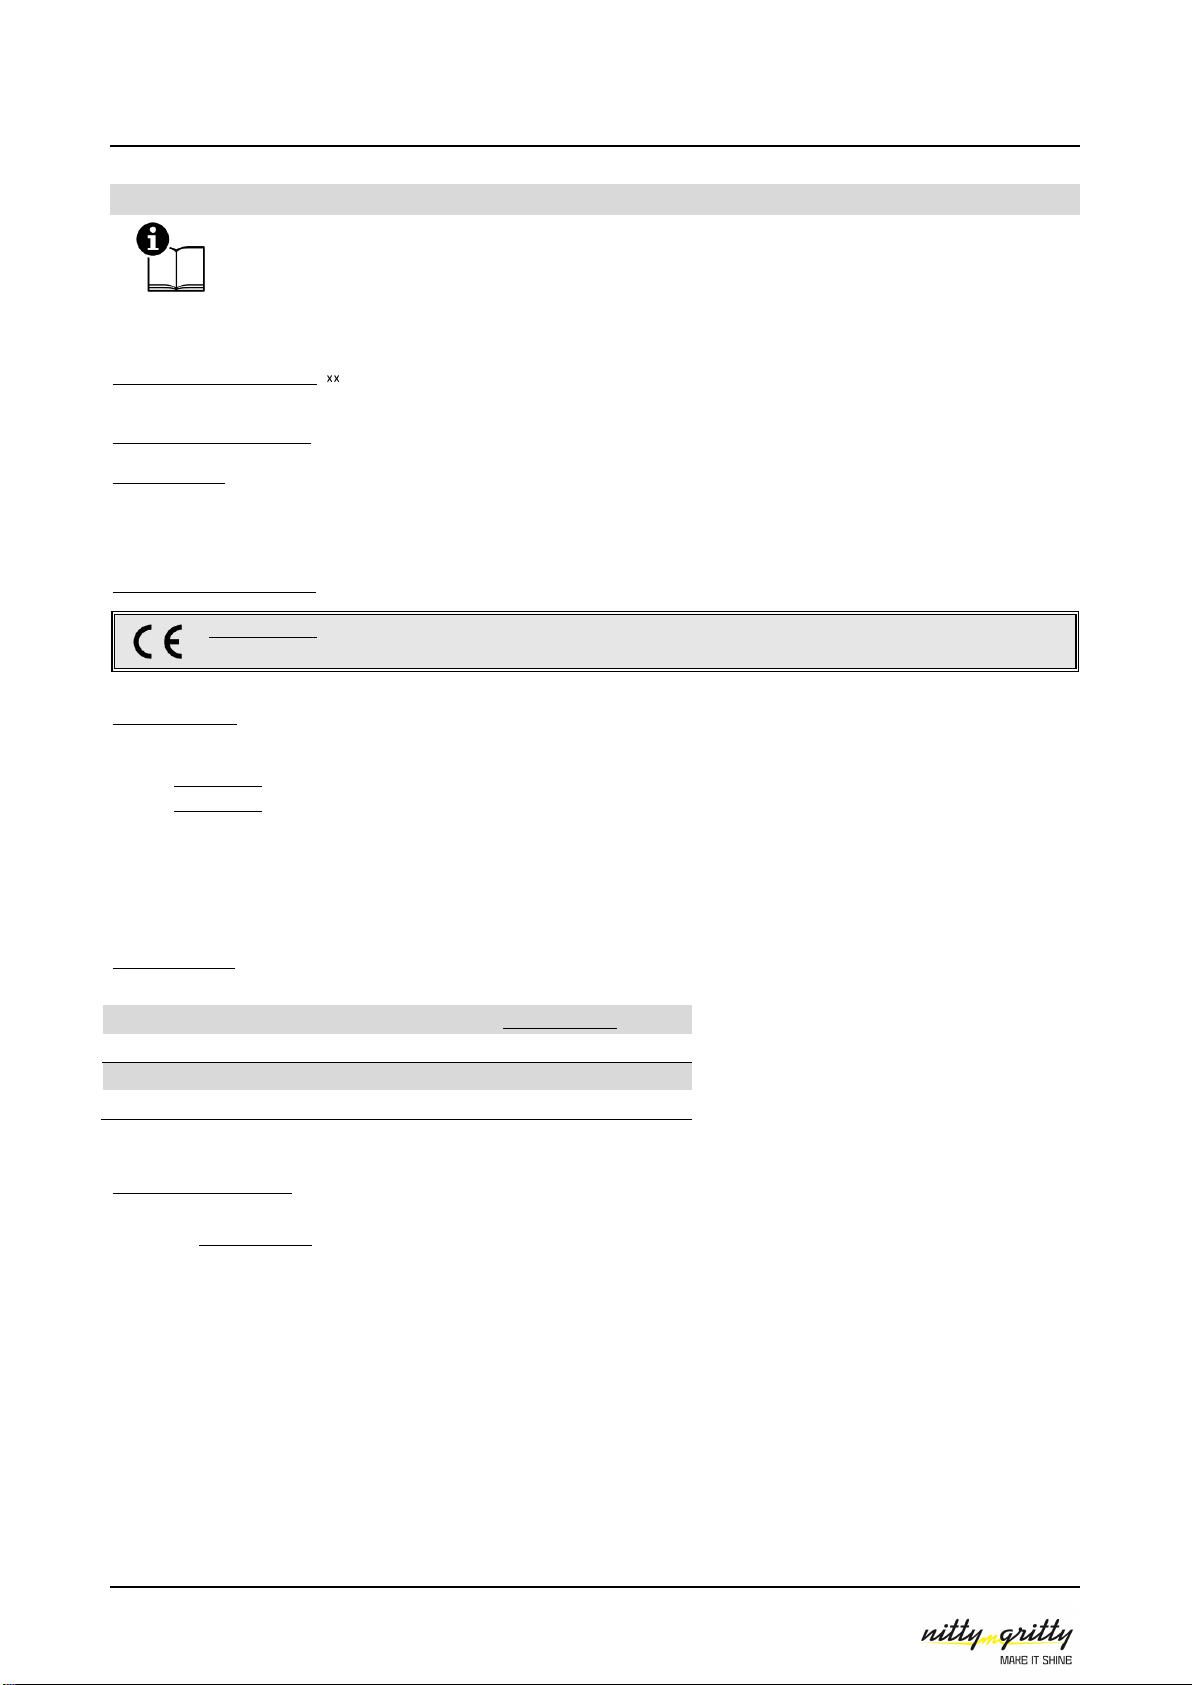
1. Collegare la sonda allo strumento utilizzando l'apposito cavo (Fig.4).
Fig. 4
2. Rimuovere il tappo di protezione della sonda e posizionarlo nell'apposito alloggiamento (Fig. 5).
Il tappo resterà in posizione grazie ad un piccolo magnete.
Fig. 5
NB: Si consiglia di pulire la zona da testare da eventuali residui oleosi e/o polveri, per evitare l’inquinamento della punta
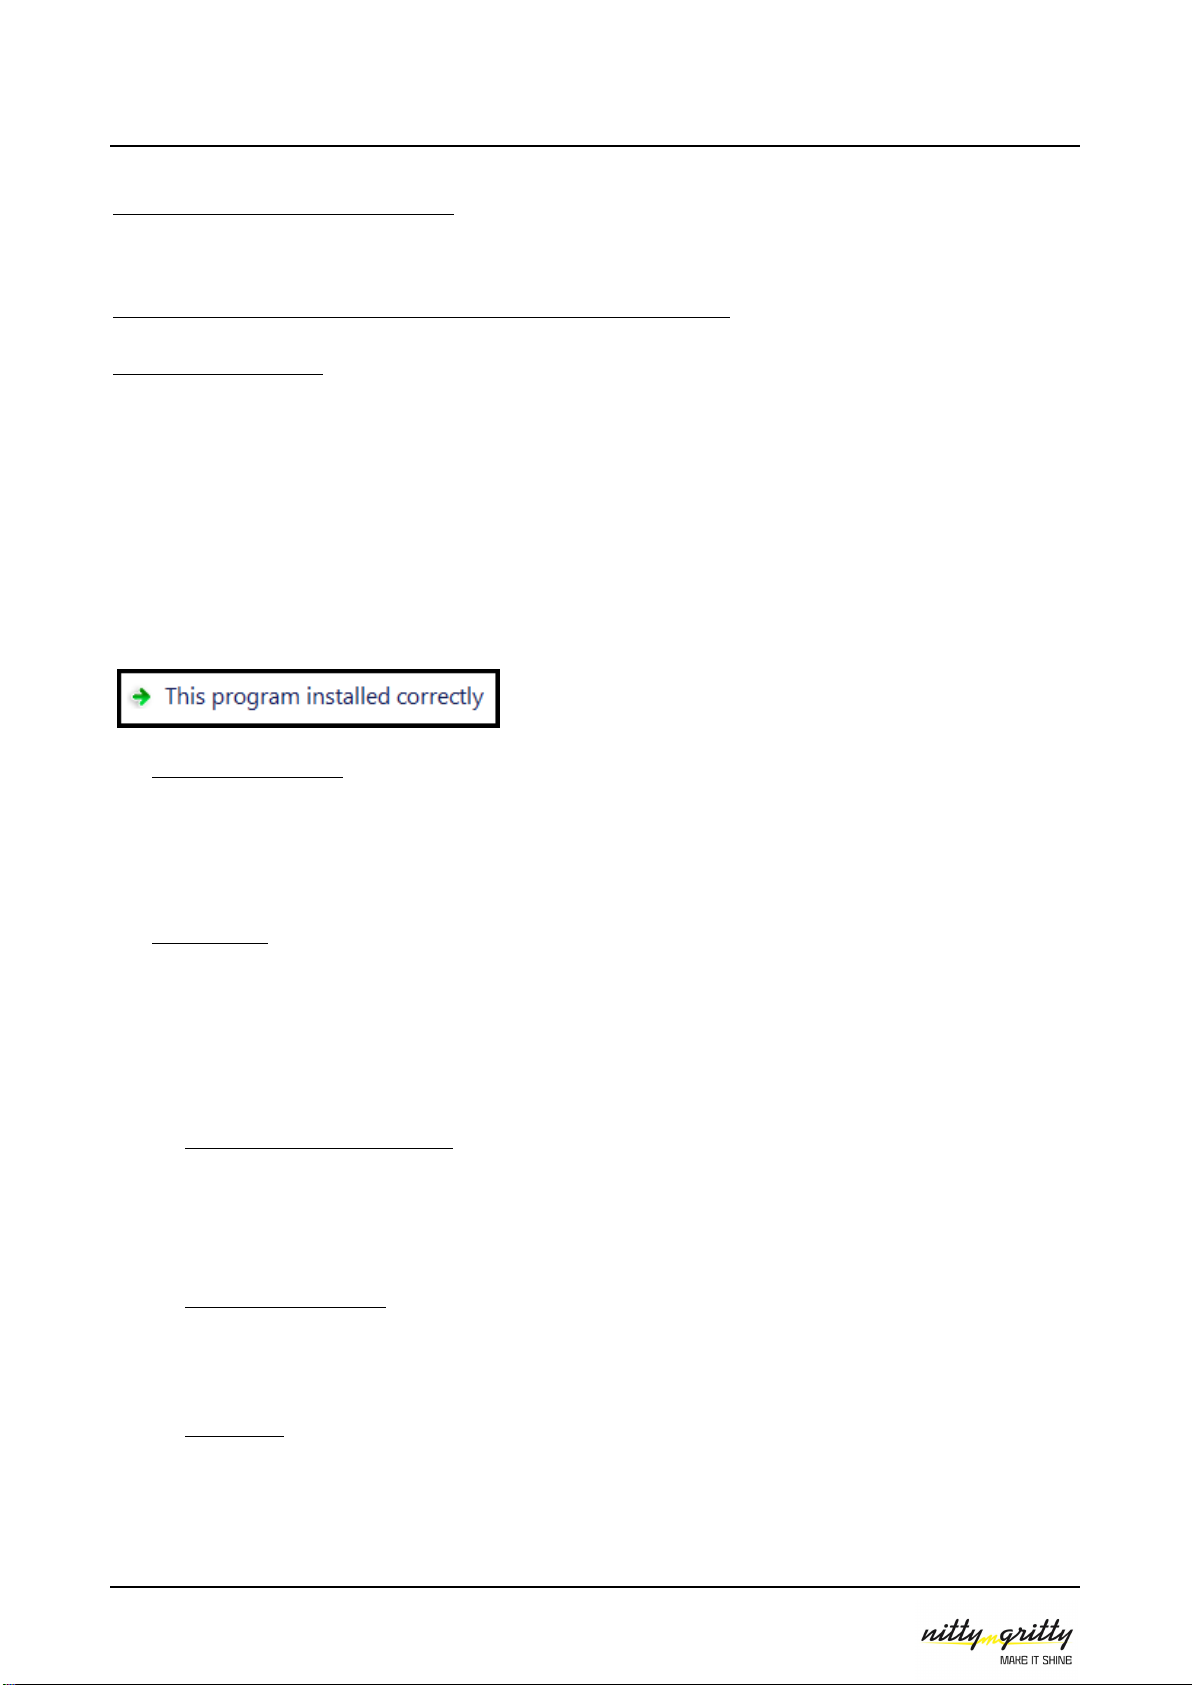
3. Posizionare lapuntadellasondanel puntoda analizzare,mettendo acontattoil puntale dimassa conil metallo.
4. Mantenere il contatto evitando movimenti bruschi per tutta la durata del test (Fig. 6).
5. Al termine del test, rimuovere l’eventuale residuo di elettrolita dal punto analizzato, utilizzando un panno imbevuto di
acqua.

PASSI TEST PLUS
10
Fig. 6
AVVERNTENZA: E’ cosa nota che, laddove è stato effettuato un processo di saldatura, il trattamento termico altera lo
stato di passivazione dell’acciaio inox, formando uno strato di ossidi non protettivi, scorie ed iridescenze. Si sconsiglia
l’utilizzo del tester in queste zone, senza averle preventivamente pulite, in quanto potrebbero dare dei risultati falsati
dalla dielettricità degli ossidi non protettivi e delle scorie, rischiando peraltro di inquinare irrimediabilmente la punta
e falsare di conseguenza le successive letture.

PASSI TEST PLUS
11
8. PASSI TEST PLUS SOFTWARE
Passi Test Plus può essere collegato ad un pc tramite porta USB, permettendo di scaricare ed archiviare i dati raccolti con la
funzione
Quality
Control
.
Prima di connettere l’unità esterna al pc, installare il software in dotazione, che contiene i driver necessari al corretto
riconoscimento da parte del sistema.
8.1 INSTALLAZIONE DEL SOFTWARE
Inserire il CD nel lettore cd/dvd. L’installazione si avvierà automaticamente. Se la funzione di autorun non fosse attiva, aprire la
cartella nel cd e cliccare sul file "
Installer
".
Seguire le istruzioni a schermo.
Al termine del processo il software si avvierà automaticamente, a conferma della corretta installazione.
NOTE: col sistema operative Windows7, potrebbe accadere, a seconda delle impostazioni, di ricevere ad installazione terminata
un messaggio che richiede se reinstallare usando le impostazioni del sistema o mantenere l’installazione corrente. Scegliere di
mantenere l’installazione corrente selezionando “Si, l’installazione è stata eseguita correttamente”.
8.2 INSTALLAZIONE HARDWARE
Connettere l’unità esterna alla porta USB del pc utilizzando il cavo in dotazione.
Il tester si accenderà ed inizierà l’installazione dei driver.
8.3 UTILIZZO DEL SOFTWARE
Aprire il programma cliccando sull’icona presente sul Desktop oppure dal Menu Start Programmi Passi Test Plus
Connettere l’unità esterna alla porta USB del pc utilizzando il cavo in dotazione.
Il tester si accenderà automaticamente e dopo pochi secondi i tasti funzione "Read", "Reset" and "Export"
presenti nel programma si attiveranno.
8.3.1 DOWNLOAD DEI DATI QUALITY CONTROL
Per scaricare I test di Controllo Qualità, cliccare su “
TEST
” nel box “Read”.
Inizierà il trasferimento dei dati raccolti, secondo il seguente schema
Dato –User –Project N° –Serial N° –Data/Orario
8.3.2 CANCELLAZIONE TEST –USER ID
Per cancellare i test memorizzati, cliccare “
TEST
” nel box “Reset”
Per cancellare gli User ID e le rispettive password, cliccare su “
USER
” nel box “Reset”.
8.3.3 ESPORTARE/STAMPARE I TEST
E’ possibile esportare I dati acquisiti in un file .pdf, permettendo sia il salvataggio sia la stampa.
Per salvare i file, cliccare su “
PDF
” nel box “Export”
NOTA: Una volta salvato, il file si aprirà automaticamente nel PDF reader.

PASSI TEST PLUS
12
9. SMALTIMENTO E ROTTAMAZIONE
Attenzione:
deve essere perseguito l’obiettivo di assicurare la
massima tutela dell’ambiente.
Imballaggio:Sono rifiuti assimilabili agli urbani e possono essere smaltiti negli impianti per rifiuti urbani (discariche di prima
categoria) senza creare maggior pericolo per l’uomo e per l’ambiente.
Sonde e refill esausti: Sono rifiuti speciali da smaltire secondo la normativa vigente.
Macchinari ed apparecchiature obsolete:
Sono rifiuti speciali da destinarsi alla rottamazione in funzione della tipologia. In riferimento alla direttiva CE-
2002/96 sui rifiuti di apparecchiature elettriche ed elettroniche (RAEE), l'utilizzatore, in fase di dismissione, deve
separare i componenti elettrici ed elettronici e smaltirli negli appositi centri di raccolta autorizzati, oppure
riconsegnarli ancora installati al venditore all'atto di un nuovo acquisto.
PASSI TEST PLUS
13
ENGLISH
This manual contains information concerning proper and safe use of testing device. The manual is an integral part of the device
and must be kept throughout the entire service life of the device for future consultation.
NITTY-GRITTY CUSTOMER CARE ( +39 059 785210) is at your disposal for purchasing, installation and technical informations.
1. TOOL OVERVIEW
PASSI TEST PLUS is an electrochemical testing device that provides a numeric value of the quality of the protective chromium
passive layer on stainless steel. The device provides within seconds a stable and precise value related to the state of the
passivation process.
2. TOOL FEATURES
PASSI TESTPLUS is built in compliance with established EU safety standards and bears the CE mark.
2.1 COMPONENTS (FIG.1,PAG.4)
1. PASSI TEST +: external unit;
2. PASSI TEST +: probe;
3. Battery Box (Rear Side);
4. 4 pin connector on external unit;
5. 4 pin connector on test probe;
6. 4 pin connection cable;
7. Refilling cartridge cap/ Cap placement;
8. Testing tip;
9. Cap;
10. Ground tip;
11. USB cable;
12. Calibration plate.
2.2 DATI TECNICI
Model
PASSI TEST PLUS
Voltage
6 V
Weight
220 g
Dimension (mm)
156x40x20
2.3 INCLUDED IN THE KIT
Nr. 1 PASSI TEST PLUS
Nr. 1 4 pin connection cable
Nr. 1 USB Cable
Nr. 1 Calibration control plate
Nr. 1 Software CD
Nr. 1 Owner’s manual
Nr. 1 Spare testing tip

PASSI TEST PLUS
14
3. BATTERIES INSTALLATION
1. Unscrew the cover of the battery box compartiment.
2. Insert/replace the batteries (4x AA 1,5 V).
3. Close the cover of the battery compartiment.
NOTE: Batteries are included with the tester.
4. REFILL REPLACEMENT
WARNING: Wear gloves during the operation to avoid direct contact between the electrolyte solution and the skin.
1. Unscrew the cap (7) of the cartridge compartiment.
2. Remove and replace the cartridge by a new one.
3. Screw the cap (7) back on the compartiment. (Fig. 2)
Attention:
Ensure the cap is screwed on properly to avoid the evaporation of the electrolytic solution
Fig. 2
5. TIP REPLACEMENT
Replace the tip when worn or dirty by following the instructions below.
WARNING: Wear gloves during the operation to avoid direct contact between the electrolyte solution and the skin.
1. Remove the cartridge as described inSection. 4.
2. Remove the whitetip as shown in the image (Fig. 3)
3. Insert the new tip into the cartridge.
4. Insert the cartridge in its compartiment.
5. Screw back onto the compartiment (7). (Fig. 2)
Fig. 3

PASSI TEST PLUS
15
6. TESTER FUNCTIONS
6.1 SWITCH ON/OFF
Turn on the external unit of the passivation tester by pressing and holding down the
POWER
button for two seconds. The tester will light up and the main menu will appear.
Turn the unit off pressing and holding down the
POWER
button for two seconds.
NOTE: It is possible to return to the main menu by pressing
MENU
button on the external
unit.
6.2 LANGUAGE SETTING
To set the menu language, from the main menu, select
SETTINGS
and press scroll
using the arrow keys to
LANGUAGE
and press .
The following languages are available:
- English
- Italian
- French
- German
Select the desired language and press to confirm.
6.3 DATE/TIME SETTING
To set the date and time, from the main menu, select
SETTINGS
and press , using the
arrow keys to scroll to
DATE
and / or
TIME
and press to set the value use the numeric
keys on the keyboard and press to confirm.
NOTE: The date and time set appears in the quality control report.
6.4 SETTING USER ID /PASSWORD
To set the User ID, from the main menu, select
SETTINGS
and press , using the arrow
keys to scroll to
USER
and press ; to set the value use the numeric keys on the
keyboard and press to confirm. Then, choose and enter password; to set the value use
the numeric keys on the keyboard and press to confirm.

PASSI TEST PLUS
16
6.5 CALIBRATION
To access the calibration control function, from the main menu, select
SETTINGS
and press
; scroll with the arrows to the
CALIBRATION
selection and place the probe on the
calibration plate supplied, then press . A 5 seconds calibration test will start, after which
there will be an
OK
message confirming proper calibration.
In the eventuality that the calibration cannot be completed, a message to verify the
cartridge and/or tip;
CHECK TIP / REFILL
will be displayed.
The loss of the calibration can be in fact caused by two factors:
- Exhaustion of the electrolyte contained in the refill see Par 4 –Refill Replace
- Pollution of the tip (eg. If you performed a test on a piece of dirt) see Par 5 –Tip Replace
It is recommended to perform the calibration test after a prolonged storage period.
6.6 FREE TEST
The Free Test function allows to make a passivation test without saving the data in
memory. To access this feature, from the main menu, select
NEW TEST
(press ) and
then
FREE TEST
(press ).
Position the probe on the test piece and press to begin the test.
After pressing the test will start and a graphic bar will show the progression of the
test (duration: 15 seconds).
After testing, the display shows the numeric value of the quality of the passive layer of
stainless steel between a maximum value (
GOOD
) and totally not passive (
BAD
).
Press to return to the
FREE TEST
section or press
MENU
to return to main menu.
6.7 QUALITY CONTROL
From the main menu, select
NEW TEST
(press ) and subsequently
QUALITY CONTROL
(press )
To access the quality control function, you must login using their username / password,
previously recorded in the
Settings
section. (see par. 6.4 User ID / Password setting)
Once logged in, you are requested for
PROJECT N°
., which will remain stored during all the
tests of the current session. Enter the project No and press (note: the field can be left
blank, pressing the key)
Than it is required the
SERIAL N°
. This data will be stored for the current test (the field can
be left blank, press ); after testing, the instrument will return to this window, giving the possibility to enter the next serial
number. To change the value, press and enter the data using the keyboard.
Insert the
SERIAL N
° and press , than position the probe on the test piece and press to begin the test.
After pressing the test will start and a graphic bar will show the progression of the test (duration: 15 seconds).
After testing, the display shows the numeric value of the quality of the passive layer of stainless steel between a maximum
value (
GOOD
) and totally not passive (
BAD
).
Press to return to the insertion of the serial number -thus maintaining the current session and the Project N°- or press the
MENU
button to end the session and return to the main menu.
NOTE: The tester has 50 memory blocks; once used all the available cells, to perform new QC tests it will be necessary to clear
the memory using the provided software function (see. section 8.3.2 –Deleting Tests –User ID).
PASSI TEST PLUS
17
7. HOWTOUSETHEPROBETOVERIFYTHEPASSIVATION
1. Connect the probe to the external unit using the 4 pin cable supplied. (Fig. 4).
Fig. 4
2. Unscrew the tip protector and place it on the refilling cartridge compartiment cover (Fig. 5).
Fig. 5
For optimal results clean the area to be tested to remove residue and dust, to keep the tip of the test probe clean
3. Place the tip of the test probe on the area to be tested and the ground in contact with metal
4. Maintain the contact in position for the entire duration of the test (Fig. 6)
5. After testing, remove any residual electrolyte solution fromthe test area, using a humid cloth.
Fig. 6
NOTICE: It is well known that where a welding process occurred the heat treatment altered the passivation of the stainless steel,
forming a layer of not protective oxides, slug and iridescence. It is not recommended to use the tester in this areas, without prior
cleaning, as they may cause false results due to the dielectric behaviour of the not protective oxides and slug, risking to irreparably
pollute the tip and therefore distort the subsequent readings.
!
PASSI TEST PLUS
18
8. PASSI TEST PLUS SOFTWARE
Surfox Passivation Tester can be connected to a pc with USB cable, allowing the download of recorded data.
Before connecting the external unit to the computer, install the software supplied.
8.1 SOFTWARE INSTALLATION
Insert the CD supplied in the computer. The installation will automatically begin through the AutoRun function. If this feature is
disabled, simply open the folder contained on the CD and click on the file "
Installer
".
Follow the onscreen instructions.
After installation the software will start automatically, confirming the proper installation.
NOTE: in some cases (with Windows 7) a message may appear mentioning to keep the installation as performed or reinstall
according to the Windows settings.
Select “This program installed correctly”
8.2 HARDWARE INSTALLATION
Connect the external unit to the USB port of the computer using the USB cable supplied.
The tester will automatically turn on and driver installation will start.
8.3 SOFTWARE USE
Click on the icon on the desktop or select the program from Start menu to open the program.
Connect the external unit to the USB port using the USB cable supplied.
The tester will automatically turn on and after a few seconds will activate the function keys on the software screen, in the boxes
"Read", "Reset" and "Export"
8.3.1 QUALITY CONTROL DATA DOWNLOAD
To download the Quality Control test , click on "
TEST
" in the "Read" box.
The transfer of all the tests stored in memory will begin.
8.3.2 DELETING TESTS –USER ID
To delete the tests performed, click on "TEST" in the "Reset" box.
To delete user ID and their passwords from the memory of the unit, click on "USER" in the " RESET t" box.
8.3.3 TEST EXPORT
It is possible to export the downloaded data to a .pdf file , to save the document in your files or to print it.
To save the files, click on "PDF" in the "Export" box.
NOTE: Once saved, the file will automatically open in the PDF reader.

PASSI TEST PLUS
19
9. DISPOSAL
Attention:
Protect the environment!
Packaging: dispose as regular waste.
Spent refill: the disposal of special waste must be in compliance with the regulations in force.
Obsolete tools:
With reference to CE2002/96 directive (WEEE), the user must separate the electrical and the electronic components
and dispose them in the appropriate authorized collection centers or give them back as they are to the seller, when a
new purchase is made.
PASSI TEST PLUS
20
FRANÇAIS
Ce manuel-ci donne les informations principales pour un utilise adéquat et sans danger. Le manuel représente une partie
intégrante de l’appareil et doit être conservé avec soin jusqu'au démantèlement de l’outillage. Ce manuel reflet l'état de
l’appareil au moment de la fourniture et il ne pourra pas être retenu inadéquat lors que successivement il sera mis à jour sur la
base de nouvelles expériences.
LE SERVICE D’ASSISTANCE POUR LES CLIENTS NITTY-GRITTY (Tel +39 059 785210) est à votre disposition pour répondre à vos questions
concernant l’achat et l’utilise de l’instrument.
1. PRÉSENTATION DE L'INSTRUMENT
Le testeur de passivation PASSI TEST PLUS est un appareil de test électrochimique qui fournit une valeur numérique pour évaluer
la qualité de la couche de protection passive de chrome présente sur l’acier inoxydable. L’appareil est en mesure de fournir une
valeur précise et stable en quelques secondes pour
évaluer l’état du processus de passivation.
2. CARACTÉRISTIQUES DE L’APPAREIL
PASSI TEST PLUS été réalisé en respectant les règles communautaires pour ce qui concerne la sécurité et il est è doué
de marque CE.
2.1 ÉLEMENTS DE L’APPAREIL (FIG.1,PAG.4)
1. PASSI TEST +: Unité de contrôle;
2. PASSI TEST +: sonde de test;
3. Boîtier de piles (à l’arrière);
4. Connecteur à 4 broches de l’unité;
5. Connecteur à 4 broches de la sonde;
6. Câble à 4 broches;
7. Capuchon de la cartouche;
8. Pointe de test;
9. Capuchon;
10. Pointe de mise à la terre;
11. Câble USB;
12. Plaque de calibrage.
2.2 DONNEES TECHNIQUES
Modèle
PASSI TEST PLUS
Tension électrique
6 V
Poids
220 g
Dimensions (mm)
156x40x20
2.3 INCLUS DANS LA TROUSSE
Nr. 1 PASSI TEST PLUS et Sonde de Test
Nr. 1 Câble à 4 broches
Nr. 1 Câble USB
Nr. 1 Plaque de contrôle du calibrage
Nr. 1 CD du logiciel
Nr. 1 Guide de l’utilisateur
Nr. 1 Pointe de rechange
Other manuals for PASSI TEST PLUS
1
Table of contents
Languages:
Other Nitty-Gritty Test Equipment manuals


