Noble CX3 User manual

WWW.NOBLE-BIKES.COM
1

WWW.NOBLE-BIKES.COM
2
SECTION 01 I WELCOME TO THE FAMILY............................................................3
SECTION 02 I TECHNICAL INFORMATION............................................................4
SECTION 03 I MAINTENANCE............................................................................4
SECTION 04 I EXPLODED VIEW..........................................................................5
SECTION 05 I CABLE ROUTING..........................................................................6
SECTION 06I TORQUE SPECIFICATIONS...............................................................8
SECTION 07I REGISTRATION.............................................................................9
SECTION 08I ASSEMBLY...................................................................................9
SECTION 09I WARRANTY.................................................................................9

WWW.NOBLE-BIKES.COM
CONGRATULATIONS ON YOUR PURCHASE OF A NOBLE BIKE. WEL-
COME TO THE FAMILY!
Thank you for purchasing a Noble, we are condent that you will be happy
with your new bike. At Noble we strive to deliver high quality, excellent
value performance bikes that are within reach of the everyday enthusiast.
By purchasing a Noble, you’re leng us know we’re doing something
right. Thank you.
Yes, we know you’re excited to get rolling on your new rig, but please take
a moment to read this manual before you saddle up.
OWNER’S MANUAL
In addion to this model specic manual, we also have a generic owner’s
manual. Please download and read the owner’s manual. Cycling can be a
dangerous acvity and the owner’s manual contains important safety,
performance and service informaon. Please read the manual before you
take your new ride for a spin and keep it for reference.
The manual contains many warnings and cauons intended to keep you
safe. Failure to follow these recommendaons can result in a potenally
dangerous situaon, which if not avoided can result in serious injury or
death.
COMPONENT MANUALS
All Noble Bikes come equipped with components from a variety of suppli-
ers. If you are missing any of the component manuals, please download
the appropriate manual from the manufacturer’s website.
SERVICE AND MAINTENANCE
It is crical for your safety that your bike is properly maintained and ser-
viced at all mes. Bicycle technology is advancing at an ever increasing
pace, making bicycle components more complex. In order to minimize the
chances of injury, it is crical that all work on your bike is performed by a
qualied mechanic.
3

WWW.NOBLE-BIKES.COM
FRAME TECHNICAL SPECIFICATIONS
Your new CX3 comes with high quality components, but even the best
components will eventually wear out. In order to make the replacement
process as easy as possible, reference the list below when it’s the me for
some new parts.
Technical informaon
Fork Length 400mm
Fork Oset 52mm
Headset Top 1.125”-ID 42mm, Boom 1.5”-ID 52.1mm
Boom Bracket PF BB86, ID 41mm
Front Brake Flat Mount 160
Rear Brake Flat Mount 160
Front Axle 122x12mm, M12x1.5 Pitch
Rear Axle 172x12mm, M12x1.5 Pitch
Seat Post Diameter 27.2mm
Seat Clamp 31.8mm
Maximum Chain Ring 44 Tooth
Maximum Tire Size 700x40C
Warranty 5 Year
SHEDULE
WEEKLY
MONTHLY
3 MONTHS
ANNUALLY
Clean and lube chain X
Check re pressure X
Clean bike of dirt and debris X
Check brake funcon X
Check bolts and ghten if necessary X
Check brake pads, replace if necessary X
Check res, replace if necessary X
Check spoke tension, ghten if necessary X
Check chain for wear, replace if necessary X
Complete tune-up by qualied mechanic X
OVERVIEW
Following these guidelines will help keep your CX3 in good running order
and prevent most problems from arising. It is important to remember that
these service intervals vary depending on climate condions, road/trail
condions and your riding frequency. If you are unsure about working on
your own bicycle, always consult a qualied mechanic for more infor-
maon on bicycle maintenance.
4

WWW.NOBLE-BIKES.COM
ITEM# PART# DESCRIPTION QTY
1YU913-0-XXX CX3 FRAME, ALUMINUM, CYCLOCROSS, 700X33C 1
2UCHK03-M12 CX3 FORK, CARBON CYCLOCROSS, 700X33C 1
312Q52M12503 FRONT AXLE 125x12mm, M12x1.5 PITCH 1
412Q52M17201 REAR AXLE 172x12mm, M12x1.5 PITCH 1
502B-26158 CX3 HANGER KIT, DERAILLEUR HANGER 1
602B-26158 CX3 HANGER KIT, FLOATING NUT 1
702B-26158 CX3 HANGER KIT, STEP SCREW, SHCS M4XL13 1
8022-12011 CX3 CABLE GUIDE KIT, CABLE GUIDE 1
9022-12011 CX3 CABLE GUIDE KIT, FHCS M3XL6 1
5

WWW.NOBLE‐BIKES.COM
REARDERAILLEURCABLEREPLACEMENT
TheCX3hasinternalcableroungandreplacingtherearderailleurcable
cangosmoothlywiththerighttoolsandbyfollowingthesesteps.It’sa
straighorwardjobthatshouldtakearound30minutes.
STEP01.Witha4mmallenkey,
removethederailleurcablenut.
STEP02.Pullcableandhousing
throughthechainstaytoremove.
STEP03.Witha2mmallenkey,re‐
movetheboombracketcable
guide.
STEP04.witha2mmallenkeyre‐
movethedowntubecableguide
STEP05.Removecablehousingand
foamprotectorfromdowntube.
STEP06.Unwrapgeltapefromhan‐
dlebar.Ifyoudothiscarefully,you
canre‐usethetape.
TOOLSNEEDED
‐4mmAllenKey ‐2mmAllenKey
‐CableandHousingCuer ‐AdjustablePliers
‐SideCuers‐HookandPickTools
‐OponalParktoolInternalRoungKit
‐Foropmalperformance,werecommendusinghighqualityshiercables
andhousingsuchasJagwire,SRAMorShimano.
NOTE;Feedingthenewcablethroughthechainstayisbestdonewiththe
bikeupsidedown.Gravitywillhelptoguidethecabletothecableentryon
topofthechainstay.TheParktoolInternalRoungKitcanalsobevery
usefulforfeedingnewhousingandcablethroughtheframe.
6

WWW.NOBLE‐BIKES.COM
STEP11.Install,cableguideand
foamprotectorovercablehousing.
STEP12.Feedcable,housingand
protectorthroughdowntube.Exit
housingatBoomBracket.
STEP13.Feedhousingthrough
boombracketcableguide.
STEP15.Tapederailleurhousing
andbrakelinetohandlebar.3M
strappingtapeworksreallywell.
STEP16.Rewrapthehandlebar,
payingaenontomirrortheoppo‐
siteside.
STEP07.Completelyremovethe
shierhousingfromthehandlebar.
STEP08.Withtheshierinthebig‐
gestgear,pushthecableunlit
comesoutoftheshierandremove
thecable
STEP09.Insertthenewcableand
pushunlitcomesoutoftheside
oftheshier.
STEP14.Installdowntubecable
guideandghtenwith2mmallen
key.
STEP10.Cutanewpieceofcable
housingtocorrectlengthandin‐
stalloverthederailleurcable
7
WWW.NOBLE‐BIKES.COM
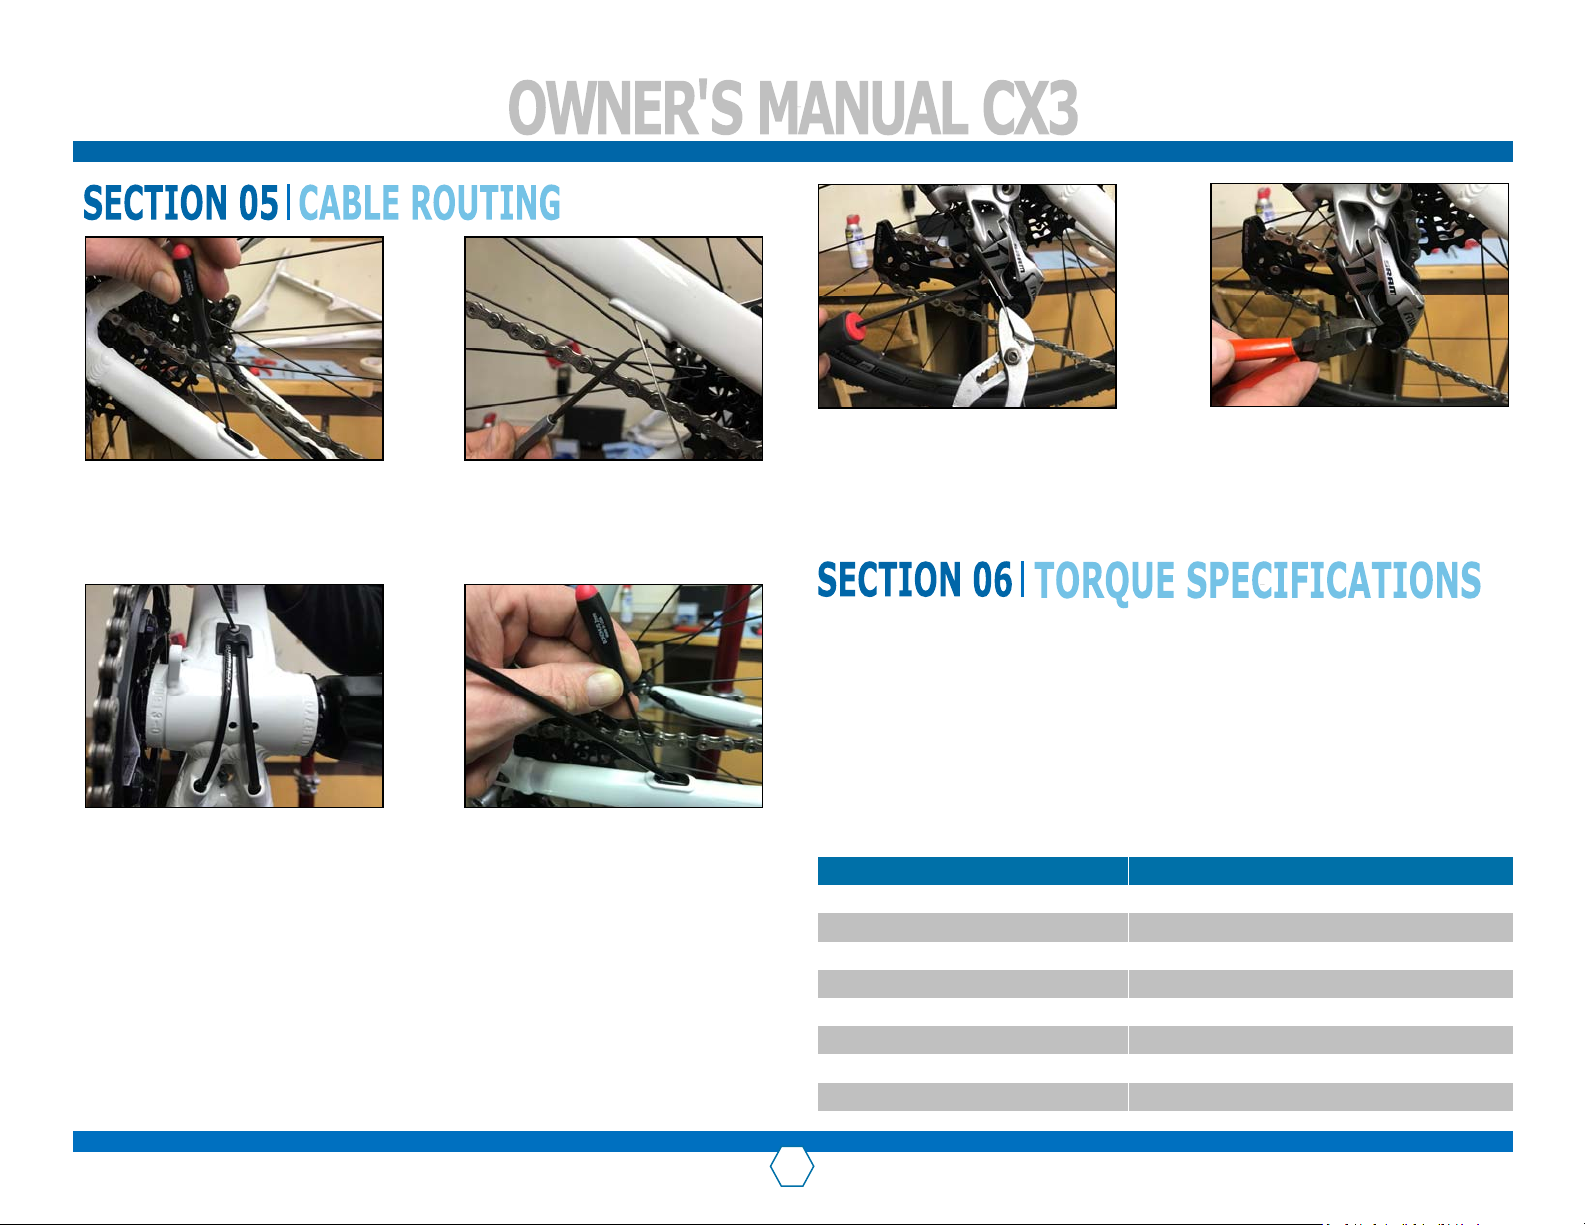
STEP17.Usinga2mmallenkey,
removethechainstaycableguide.
STEP18.Feedthecablethroughthe
chainstay.Thisisbestdonewiththe
bikeupsidedown.(Gravityisyour
friend)
STEP19.Usinga2mmallenkey
installtheboombracketcable
guide.Itisbesttodothisaerthe
housingisfedthroughthechain
stay.
STEP20.Usinga2mmallenkey,
installthechainstaycableguide.
STEP21.Installderailleurhousing
andghtenthecablenutwitha
4mmallenkey.
FASTENERTORQUESPECIFICATIONS.
Correctghteningtorqueofthreadedfastenersisveryimportanttoyoursafety.
Alwaysghtenfastenerstothecorrecttorque.Incaseofaconflictbetweenthe
instruconsinthismanualandinformaonprovidedbyacomponentmanufacturer,
consultwithaqualifiedmechanicorthemanufacturer’scustomerservicerepre‐
sentaveforclarificaon.
Alwaysuseacorrectlycalibratedtorquewrenchtoghtencricalfastenersonyour
bike.Carefullyfollowthetorquewrenchmanufacturer’sinstruconsonthecorrect
waytosetandusethetorquewrenchforaccurateresults.
8
STEP22.Withthecableinstalled,
adjustthederailleuraccordingto
themanufacturer’sspecificaons
andinstallanendcaptoprevent
frayingofthecable.
COMPONENT TORQUE
Derailleurhangerscrews 1‐2N.m,unlessotherwisespecified
RoadStemsteererclampscrews 5‐6N.m,unlessotherwisespecified
Stemhandlebarclampscrews 5‐6N.m,unlessotherwisespecified
Seatpostclampscrew 4‐5N.m,unlessotherwisespecified
Seatpostsaddleclampscrews 9‐10N.m,unlessotherwisespecified
Throughaxlefront 10‐11N.m,unlessotherwisespecified
Throughaxlerear 10‐11N.m,unlessotherwisespecified
Brandedcomponents Followmanufacturerstorquespecificaons

WWW.NOBLE-BIKES.COM
9
HERE’S WHAT YOU NEED TO KNOW ABOUT OUR WARRANTY.
All Noble Bikes are manufactured to high quality standards. We stand behind our
products, and we cover our bikes against manufacturing or material defects. Every
product has a useful life cycle and this will vary depending on the materials used and
the type of use the bike is subjected to. For this reason, we oer bike specic war-
ranty terms. The warranty applies to the original owner from the date of the retail
purchase and is not transferable. At the me of a claim, you must be able to present
proof of purchase.
The length of the warranty period for your bike is determined by the category of
use. Our bikes are separated in two categories. We oer a 3-Year, or a 5-Year war-
ranty to the original owner.
3-YEAR WARRANTY
Mountainbikes
5-YEAR WARRANTY
Gravel bikes and Cyclocross bikes
NOBLE BIKES
15641 19th Ave. SW
Burien, WA 98166
P: (206) 607-7764
PLEASE REGISTER YOUR NOBLE.
Registering your bike enables us to provide full warranty support and help us stay in
touch with you. In addion, it provides a record of your serial number, should your
bike ever get lost or stolen. To register your Noble Bike, you must create a Noble
account, or sign in to your account using the link at the top of any page on the Noble
website. When signed in, go to the “Register you Noble” secon and complete the
registraon.
ASSEMBLY INSTRUCTION VIDEOS.
All Noble Bikes require assembly. Our bikes come 85% assembled and the remaining
assembly can be performed by anyone with reasonable bicycle assembly skills. We
have created assembly videos that document the steps required to complete the
assembly of your bike. These videos are extremely helpful, especially if you have
never fully assembled a bike before.
To assure your safety, please take your bike to a qualied mechanic if you nd your-
self unsure about how to perform any of the steps required to assemble your bike.
Visit the support secon on the Noble website for the latest assembly videos.
Table of contents
Other Noble Bicycle manuals


