Nokia 3310 User manual

We've observed how the exciting buzz of life surrounds you at work
or at play. Every minute is vibrant and every day is an adventure.
But no matter what you may be doing, we've seen that there are
always opportunities for you to have a bit of fun.
That's why you need a companion that shares your outlook in life. A
companion that is witty, energetic and allows you to plunge into all
the diversity and excitement that life offers. After all, life is all
about enjoying moments.
Pulling the result of our observations together gave us the new
Nokia 3310. This fully featured model is the evidence of your uniqueness.
You can personalise it with different ring tones, profiles, screensavers
and changeable Xpress-on™ colour covers*. Voice dialling also
makes it more convenient to reach your friends by just pressing a
button and using your voice.
To help you stay constantly in touch with your family, friends and
colleagues, there's the new and exciting SMS Chat feature. Chatting
with someone has never been easier or more fun!
With the new Nokia 3310, you'll be able to take the opportunity to
have a bit of fun whatever you may be doing. You may call it having
fun staying in touch. At Nokia, we just call it technology.™
•Colour cover is an optional accessory to be purchased separately.
Hello

• Used for various purposes
in different functions
NaviTM Key
• Performs the function
indicated by the text
above it.
• Dials a phone number and
answers a call
End key
• Ends or rejects a call. Also
exits from any function and
goes to the previous menu.
Scroll keys
• Scrolls through names,
phone numbers, menus
or setting options.
• When pressed during
a call - adjusts the
earpiece volume.
Number keys
• Enter numbers and
characters.
•calls your voice mailbox
when pressed and held.
Welcome to
yourNokia
phone
Power key
• Switches the phone
on or off.
• When pressed briefly during
a call or when the display is
clear: enters the list of
profiles.

Your Nokia
menu map
Let us help you learn about your new Nokia phone.
The menu map you see on the next two pages will
take you through the main menu functions in the
order that they appear on your phone.
We’ve included visuals of the 12 menu functions and
they are numbered 1 - 12 so you can see the sequence
at a glance. And right next to each menu function
screen we’ve listed the special features in your Nokia
phone, also in order of appearance so they’ll be easy
to find.

■List of menu functions
1. Phone book
1. Search
2. Service Nos. 1
3. Add name
4. Erase
5. Edit
6. Assign tone
7. Send b’card
8. Options
1. Type of view
2. Memory status
9. Speed dials
10. Voice tags
2. Messages
1. Write messages
2. Inbox
3. Outbox
4. Picture messages
5. Templates
6. Smileys
7. Message settings
1. Set 12
1. Message centre number
2. Messages sent as
3. Message validity
2. Common 3
1. Delivery reports
2. Reply via same centre
3. Character support
8. Info service
9. Voice mailbox number
10.Service command editor
3. Chat
4. Call register
1. Missed calls
2. Received calls
3. Dialled numbers
4. Erase recent call lists
5. Show call duration
1. Last call duration
2. All calls’ duration
3. Received calls’ duration
4. Dialled calls’ duration
5. Clear timers
6. Show call costs
1. Last call cost
2. All calls’ cost
3. Clear counters
7. Call cost settings
1. Call cost limit
2. Show costs in
8. Prepaid credit
1Shown only if supported by your SIM card.
2The amount and names of sets may vary. Each set appears in its own submenu.
3The shortcut number depends on the amount of sets available.
!

5. Tones
1. Ringing tone
2. Ringing volume
3. Incoming call alert
4. Composer
5. Message alert tone
6. Keypad tones
7. Warning and game tones
8. Vibrating alert
9. Screen saver
6. Settings
1. Call settings
1. Automatic redial
2. Speed dialling
3. Call waiting options
4. Own number sending
5. Phone line in use
6. Automatic answer 1
2. Phone settings
1. Language
2. Cell info display
3. Welcome note
4. Network selection
5. Lights2
6. Confirm SIM service actions
3. Security settings
1. PIN code request
2. Call barring service
3. Fixed dialling
4. Closed user group
5. Phone security
6. Change access codes
4. Restore factory settings
7. Call divert
8. Games
9. Calculator
10.Reminders
11. Clock
1. Alarm clock
2. Clock settings
3. Date setting
4. Stopwatch
5. Countdown timer
6. Auto update of date and time
12. Profiles
13. SIM services3
1
Shown only if the phone is connected to the PPH-1 handsfree car kit or the HDC-5 headset.
2Shown only if the phone is connected to the PPH-1 handsfree car kit.
3The availability, name and contents depend on the SIM card used.
!

DECLARATION OF CONFORMITY
We, NOKIA MOBILE PHONES Ltd declare under our sole responsibility that the
product NHM-5NX is in conformity with the provisions of the following Council
Directive: 1999/5/EC.
Copyright ©Nokia Mobile Phones 2000. All rights reserved.
Reproduction, transfer, distribution or storage of part or all of the contents in this document
in any form without the prior written permission of Nokia is prohibited.
US Patent No 5818437 and other pending patents. T9 text input software Copyright (C)
1997-2000. Tegic Communications, Inc. All rights reserved.
Nokia is a registered trademark of Nokia Corporation. Other product and company names
mentioned herein may be trademarks or tradenames of their respective owners.
Navi and Nokia Xpress-on are trademarks of Nokia Mobile Phones. Nokia tune is a trademark
of Nokia Corporation.
Nokia operates a policy of continuous development. Nokia reserves the right to make
changes and improvements to any of the products described in this document without prior
notice.
Under no circumstances shall Nokia be responsible for any loss of data or income or any
special, incidental, consequential or indirect damages howsoever caused.
The contents of this document are provided "as is". Except as required by applicable law, no
warranties of any kind, either express or implied, including, but not limited to, the implied
warranties of merchantability and fitness for a particular purpose, are made in relation to the
accuracy, reliability or contents of this document. Nokia reserves the right to revise this
document or withdraw it at any time without prior notice.
The availability of particular accessories may vary by region. Please check with the Nokia
dealer nearest to you. Please dispose of batteries properly.
9352896
issue 2
!"

Contents
General information .............................1
Stickers on the sales package .................... 1
Network services............................................ 1
Accessories and batteries............................ 1
Access codes ................................................... 2
Detailed user guide ....................................... 2
1.Getting started....................................3
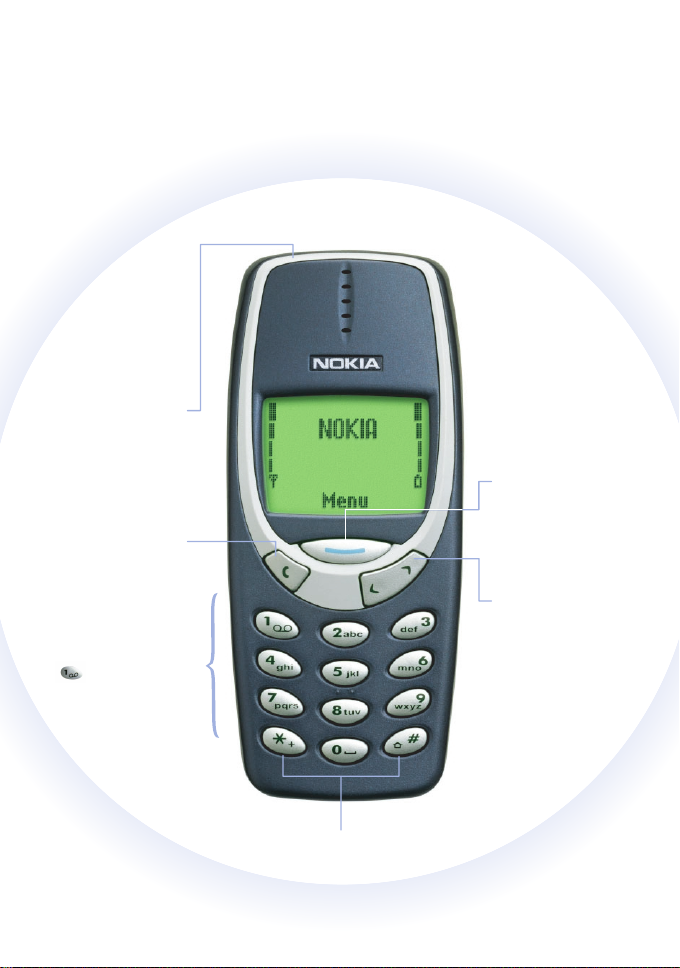
Keys ................................................................... 3
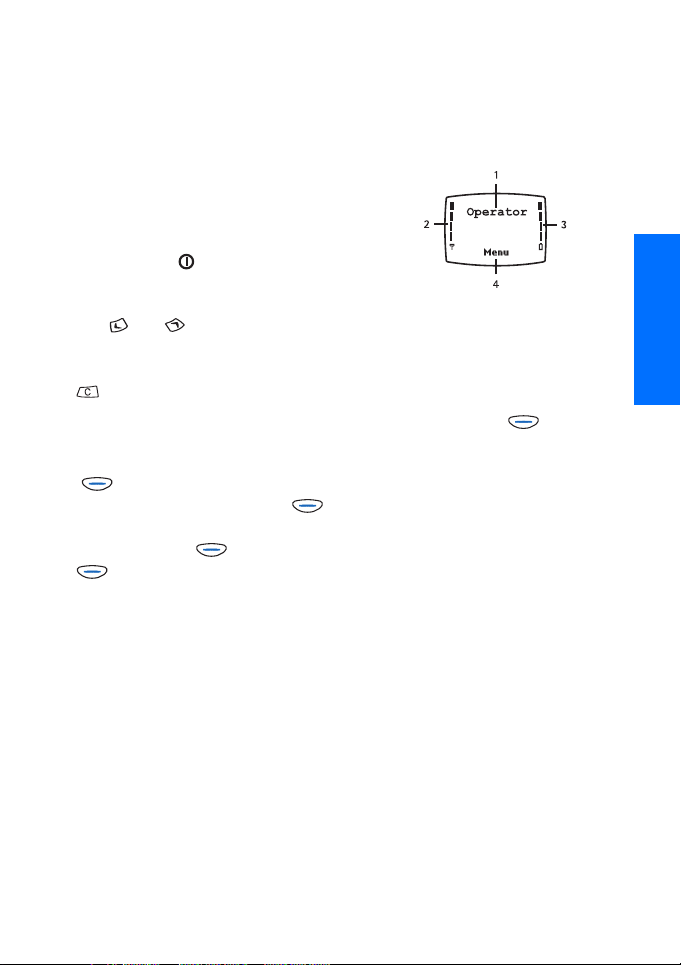
Display and standby mode.......................... 3
Inserting a SIM card ..................................... 3
Charging the battery .................................... 4
Switching on or off ....................................... 5
Changing the covers..................................... 6
2.Basic functions ...................................7
Making a call .................................................. 7
Making a call with Phone book............ 7
Other ways to make a call ..................... 7
Answering a call............................................. 7
In-call functions ............................................ 8
Listening to voice messages....................... 8
Locking the keypad ....................................... 8
Storing a phone number.............................. 8
Writing text..................................................... 8
Input methods........................................... 9
Text input display ..................................... 9
Switching between input methods ...10
Zhuyin input method.............................11
Stroke input method..............................12
Inputting English letters, numbers,
spaces, symbols and punctuation
marks..........................................................15
Delete the contents keyed in ..............16
Predictive English text input...............16
3.Menu functions ............................... 18
Accessing a menu function ......................18
By scrolling...............................................18
By shortcut...............................................18
Exiting a menu function............................18
Phone book (Menu 1) .................................19
Messages (Menu 2).....................................20
Writing and sending a text message
(Menu 2-1)...............................................20
Reading a text message (Menu 2-2) 21
Viewing a message you have saved
(Menu 2-3) ...............................................22
Picture messages (Menu 2-4) .............22
Templates (Menu 2-5)...........................22
Smileys (Menu 2-6)................................23
Message settings (Menu 2-7) .............23
Info service (Menu 2-8) ........................23
Voice mailbox number (Menu 2-9) ...23
Service command editor
(Menu 2-10).............................................24
Chat (Menu 3)...............................................24
Call register (Menu 4).................................24
Tones (Menu 5).............................................25
Settings (Menu 6)........................................27
Call settings (Menu 6-1) ......................27
Phone settings (Menu 6-2)..................27
Security settings (Menu 6-3)..............28
Restore factory settings (Menu 6-4).29
Call divert (Menu 7)....................................29
Games (Menu 8)...........................................29
Calculator (Menu 9)....................................29
Reminders (Menu 10) .................................30
Clock (Menu 11)...........................................31
Profiles (Menu 12).......................................32
SIM services (Menu 13)..............................32
4.Battery information........................ 33
Care and maintenance...................... 35
Important safety information ......... 36
Important User Information ............ 39
Introduction...................................................39
Deactivating/Activating The EFR Codec 39
Suggested Tip................................................40
Genuine Accessories .......................... 41
BATTERY..........................................................42
INDOOR...........................................................42
INDOOR & VEHICLE.....................................43
VEHICLE ..........................................................44
Mobile inductive loopset for people with
hearing aids (LPS-3)....................................45
Index....................................................... 46

General information
1
English
General information
■Stickers on the sales
package
The stickers contain important
information for service and customer
support purposes. Keep these stickers
in a safe and secure place.
Attach the sticker to detail page of
this owner’s guide.
■Network services
The wireless phone described in this
guide is approved for use on the GSM
900 and GSM 1800 networks.
Note that dual band functionality is a
network dependent feature. Check
with your local operator if you can
subscribe to and use this
functionality.
A number of features included in this
guide are called Network Services.
They are special services provided by
wireless service providers. Before you
can take advantage of any of these
Network Services, you must subscribe
to these service(s) from your home
service provider and obtain
instructions for their use.
■Accessories and
batteries
This apparatus is intended for use
when supplied with power from ACP-
7, ACP-8, LCH-9, and DCV-10. Other
usage will invalidate any approval
given to this apparatus and may be
dangerous.
Warning! Use only batteries,
chargers and accessories
approved by the phone
manufacturer for use with
this particular phone model.
The use of any other types
will invalidate any approval
or warranty applying to the
phone, and may be
dangerous.
For availability of approved
accessories, please check with your
dealer.
When you disconnect the power cord
of any accessory, grasp and pull the
plug, not the cord.
" !

2
■Access codes
The access codes below allow you to
avoid unauthorised use of your phone
and SIM card.
•Security code: Protects your
phone against unauthorised use.
This code is supplied with the
phone. The preset code is 12345.
Change the code and set the
phone to request it using the
Change access codes and Phone
security functions of the Security
settings menu (page 28). Keep the
new code in a safe and secure
place, separate from the phone.
•PIN code: This code, supplied with
the SIM card, protects the card
against unauthorised use. If the
PIN code request function of the
Security settings menu (page 28)
is set on, the code is sought when
the phone is switched on.
If you enter an incorrect PIN code
three times in succession, the SIM
card is blocked. Key in the PUK
code and press (OK). Key in a
new PIN code and press (OK).
Key in the new code again and
press (OK).
•PIN2 code: This code is supplied
with some SIM cards and is
required to access some functions,
such as charging unit counters. If
you enter an incorrect PIN2 code
three times in succession, you are
asked for the PUK2 code.
•PUK and PUK2 code: These codes
may be supplied with the SIM
card. If this is not the case, contact
your local service provider.
■Detailed user guide
For a more detailed user guide, visit
Nokia's Web site at www.nokia.com.
!

Getting started
3
English
1. Getting started
■Keys
The basic functions of the phone keys
are described below. More
information is given throughout this
user guide.
The power key (on top of the
phone) switches the phone on or off
when pressed and held. The scroll
keys and browse through the
names and phone numbers stored in
the Phone book. The clear/exit key
deletes characters from the
display and exits from different
functions.
The function of the Nokia Navi™ key
( ) depends on the text shown
above it. In this user guide, the
symbol is followed by the related
guiding text, e.g. (Menu) or
(Select).
■Display and standby
mode
The indicators described below are
shown when the phone is ready for
use, with no characters keyed in by
the user. This screen is called ‘standby
mode’.
1. Indicates in which cellular network
the phone is being used.
2. Shows the signal strength of the
cellular network at your current
location.
3. Shows the battery charge level.
4. Shows the current function of the
Nokia Navi™ key ( ).
■Inserting a SIM card
• Keep all miniature SIM cards out
of small children’s reach.
• The SIM card and its contacts can
easily be damaged by scratches or
bending, so be careful when
handling, inserting or removing
the card.
• Before installing the SIM card,
always make sure that the phone
is switched off and then remove
the battery.
!

4
1. Press the locking catch (1), slide the
cover (2), and lift the cover (3). Push
the two catches in the opposite
directions (4) and remove the
battery (5).
2. Slide the SIM card carefully into
the SIM card slot (6).
Make sure that the golden
connectors on the card are facing
downwards and that the bevelled
corner is on the left.
3. Align the golden connectors on
the battery with the corresponding
connectors on the phone and push
the opposite end of the battery
until it snaps into place (7).
4. Insert the two catches of the back
cover in the corresponding slots in
the phone (8) and slide the cover
towards the bottom of the phone
until it locks into place (9).
■Charging the battery
Do not charge the battery when one
or both of the phone covers is
removed. See also “Battery
information” on page 33.
1. Connect the lead from the charger
to the base of the phone.
# !

Getting started
5
English
2. Connect the charger to an AC wall
outlet. The battery indicator bar
starts scrolling.
• Charging the battery supplied
with the phone may take up to
six hours when using the ACP-
7 charger.
•IfNot charging is displayed,
wait for a while, disconnect the
charger, plug it in again and
retry. If charging still fails,
contact your dealer.
3. When the battery is fully charged,
the bar stops scrolling. Disconnect
the charger from the AC outlet and
the phone.
■Switching on or off
Press and hold the key for a
second.
If the phone requests for a PIN code
or security code when switching on:
Key in the code and press (OK).
Warning! Do not switch on
the phone when wireless
phone use is prohibited or
when it may cause
interference or danger.
Note:
•Use the phone only with
both covers mounted.
• Normal position: Hold the phone
as you would any other telephone.
• Your phone has a
built-in antenna
(grey area in
picture). As with
any other radio-
transmitting
device, do not touch the antenna
unnecessarily when the phone is
switched on. Contact with the
antenna affects call quality and
may cause the phone to operate at
a higher power level than
otherwise needed. Not touching
the antenna area during a call
optimizes the antenna
performance and the talk-time of
your phone.
!

6
■Changing the covers
• Before changing the Nokia Xpress-
on™ covers, always switch off the
phone and disconnect it from the
charger or any other device.
• Always store the phone with the
covers attached. Read carefully
“Care and maintenance” on page
35.
1. Press the locking catch (1), slide the
cover (2), and lift it off the phone
(3).
2. Gently pull the cover off the phone
starting from the bottom of the
phone (4).
3. Align the top of the phone with
the top of the front cover and push
the phone towards the cover until
it locks into place (5).
4. Insert the two catches of the back
cover in the corresponding slots in
the phone (6) and slide the cover
until it locks into place (7).
$ !

Basic functions
7
English
2. Basic functions
■Making a call
1. Key in the phone number including
the area code using the keys
to . If you make a mistake,
press to delete the character to
the left.
To use the number when abroad:
Add the + character (press
twice) and country code in front of
the area code (remove the leading
0 if necessary).
2. Press (Call) and wait for the
answer.
Adjusting the volume: Press
to increase or to decrease the
earpiece volume.
3. Press (End) to finish the call
(or to cancel the call attempt).
Making a call with Phone
book
In standby mode, press (Menu)
and then (Select) twice. Key in
the first letter of the name and press
(OK). Scroll with or to the
desired name (press and hold for
the related number) and press
(Call).
Alternatively: Press in standby
mode. Find the desired name and
press (Call).
Other ways to make a call
Redialling
To redial one of the last 20 phone
numbers you have called or
attempted to call: Press once in
standby mode, scroll with or
to the desired phone number or name,
and press (Call).
Speed dialling
To call a phone number that you have
assigned to a speed dialling key using
the Speed dials function of the Phone
book menu (see page 19): Press the
given key ( to ) and then
(Call) in standby mode.
Alternatively: If the Speed dialling
function (see page 27) is on, press and
hold the speed dialling key until the
call is started.
Voice dialling
See “Voice tags” on page 19.
■Answering a call
To answer the call, press
(Answer). To divert or reject the call,
press .
% !

8
■In-call functions
During a call, press and then
(Options) for the following functions
(some of them are network services):
Mute/Unmute, Hold / Unhold, Send
DTMF, New call, Answer, Reject,
Swap, End active call, End all calls,
Phone book, Send.
Swap switches between the active
call and the call on hold.
If you selected Send DTMF, key in a
DTMF string and press (OK).
■Listening to voice
messages
In standby mode, press and hold
to call your voice mailbox. You can
obtain the voice mailbox number
from your service provider.
■Locking the keypad
The keypad lock prevents keys from
being accidentally pressed when, for
example, the phone is in your pocket
or handbag.
To turn the lock on or off: In standby
mode, press and then
quickly.
When the keypad is locked:
• The indicator is shown.
• You can answer, end or reject a
call in the normal way. During a
call, you can operate the phone as
usual.
• The headset HDC-5 can be used as
usual.
Note: When the keypad is
locked, calls may be possible
to the emergency number
programmed into your phone
(112). The number is
displayed only when all the
digits have been keyed in.
■Storing a phone number
In standby mode, press (Menu)
(Phone book is displayed) and then
(Select). Scroll to Add name and
press (Select). Key in the desired
name (see “Writing text” on page 8)
and press (OK). Key in the area
code and phone number, and press
(OK).
Quick save: In standby mode, key in
the phone number. Press or
and then (Save). Key in the
name and press (OK).
■Writing text
This phone is equipped with Stroke
and Zhuyin input methods for writing
Traditional Chinese text. With these
input methods, you can easily write
Chinese characters. For writing Latin
text (eg. English), the phone is
equipped with Upper case, Lower case
and Number input methods. In
addition, Predictive text input method
is available for writing English text.
With this method, you can write
!

Basic functions
9
English
English text much quicker and with
easy. This section describes the input
methods in detail.
Input methods
The input methods Stroke and Zhuyin
are available only when the Phone
language (Menu 6-2-1) is set to
Traditional Chinese. The Predictive
text input method is available only
when the Phone language is set to
English. The other input methods (for
writing Latin text) such as Upper case,
Lower case and Number are always
available irrespective of the language
selected.
TIP: The “Menu 6-2-1” mentioned
above is the shortcut number for the
menu function. In standby mode, by
pressing (Menu) and quickly
entering the shortcut number, you
can easily access the corresponding
menu function, for example,
Language mentioned above. For
details, see “By shortcut” on page 18.
Below please find the indicators on
the display and the name of each
input method:
Zhuyin
Stroke
Latin character, upper case
Latin character, lower case
Number input
Text input display
1. Symbol area: Shows the symbol of
the current input method. The
symbol in the illustration above
indicates that Stroke is the current
input method.
Tip: Pressing the key toggles
between the available input
methods for the selected language.
2. Text area: Shows the final selected
and currently keyed-in characters.
When the input area (No.3 in the
sketch above) is empty, pressing
and can move the cursor (a
continuously flashing vertical line)
left or right among the characters
shown in text area to insert it. The
latest keyed-in text is shown to the
left of cursor.
3. Input area: When using Chinese
input methods, zhuyin or stroke
symbols keyed in through number
key are displayed in this area. When
using English or Number input
methods, the characters keyed in
will go directly into Text area.
6
4
1
2
3
5
!

10
4. List of candidate characters: When
using Chinese input methods, as you
key in characters into Input area by
pressing the number keys, Chinese
characters matching the keyed-in
characters will appear in the list of
candidate characters for you to
choose.
indicates that there are more
characters to the right of currently
selected text. You can press to
scroll the highlighted part to right to
select other characters.
indicates that there are more
characters to the left of currently
selected text. You can press to
scroll the highlighted part to left to
select other characters.
TIP: When the desired Chinese
character appears in the list of
candidate characters, you can select
it and input it. You need not key in
all the Zhuyin or Strokes of it.
Pressing (OK) can insert the
highlighted Chinese character (e.g.
the first character in the example
above) to the Text area.
Pressing and can move the
highlighted part to select other
candidate characters.
5. Function of selection key: Shows
the functions of the selection key.
6. Remained character number/
message entries (only appears
when writing messages): When
writing a message, up to 201
characters (including Chinese
characters, English letters,
punctuation marks and numbers)
can be keyed in. The number on
the left of slash indicates how
many more characters can be still
keyed in. The number on the right
of slash indicates the number of
messages into which the keyed in
content will be divided and sent.
Each of these sent messages can
contain up to 70 characters only.
Switching between input
methods
When writing text, you can switch
between the available input methods
by:
• pressing repeatedly, until the
symbol of the desired input
method is displayed on the upper-
left corner of the display.
• pressing and holding to
switch quickly between number
input and other input methods.
• pressing , and then choosing
the desired input method, if the
indicative text Options is
displayed above .
!

Basic functions
11
English
Zhuyin input method
Note: If you have not yet read the
first three sections of “Writing text”
on page 8, please do it first for better
understanding of the following.
Using Zhuyin input method
1. Key in Zhuyin symbols: Press
number keys ( to )
repeatedly, until the desired Zhuyin
symbols appear in the Input area.
Tip: After you have keyed in whole
Zhuyin symbols, you can also press
to key in the tone marks to reduce
the number of characters in the list of
candidate characters. This will make it
easier to find the desired Chinese
character quickly. Press once for
the first tone mark, twice for the
second tone mark, and so forth. Press it
five times to input the light tone mark.
Please see the following table for the
relationship between the number keys,
Zhuyin symbols and the tone marks.
Tip: Press to delete the Zhuyin
symbols or text wrongly keyed in. For
details, please see “Delete the
contents keyed in” on page 16.
2. Press or to select the
desired Chinese character from the
list of candidate characters, and
then press (OK). The selected
Chinese character will be shown in
the Text area.
Note: If you need to add a space in
the text, please switch to other input
method temporarily and press .
!

12
Example of Zhuyin input--To write
"Happy Birthday" (
)
1. In
Language
(Menu 6-2-1), set the
display text language to
Trad.
Chinese
, if necessary.
2. Scroll to Write message (Menu 2-1),
switch to Zhuyin input method.
3. Key in Zhuyin for "": Press
three times, four times, then
press once for the first tone
mark.
4. Select "" from the list of
candidate characters and press
(OK). It will appear in the
Text area.
5. Key in Zhuyin for "": Press
four time, then press four
times for the fourth tone mark.
6. Select "" from the list of
candidate characters and press
(OK). It will appear in the
Text area.
7. Key in Zhuyin for " ": Press
twice, twice, once,
then press four times to get
the fourth tone marks.
8. Select " " from the list of
candidate characters and press
(OK). It will appear in the
Text area.
9. Key in Zhuyin for " ": Press
four times, three times, then
press four times to get the
forth tone mark.
10. Select " " from the list of
candidate characters and
press (OK). It will appear in
the Text area.
Stroke input method
If you have not yet read the first three
sections in “Writing text”on page 8,
please do it first for better
understanding of the following.
Stroke input method summarizes the
strokes constituting Chinese characters
into five classes: Horizontal, Vertical,
Left-falling, Dot and Turning (for more
information on the five classes, please
see the table of classification of strokes
later in this section). For the five classes
corresponding to number keys from
to , please see this table.
!

Basic functions
13
English
Using Stroke input method
1. Key in strokes: According to the
standard stroke order, press the
number keys ( to ) to get
the strokes.
Tip: If you forget how to write a
stroke, or you are not sure about its
classification, you can press as a
substitution for that stroke, then
continue with the following strokes. A
question mark will appear in the Input
area to indicate that stroke.
Tip: Press to delete the strokes and
text which are wrongly keyed in. For
details, please see “Delete the contents
keyed in”on page 16.
2. Press or to select the
desired Chinese character from the
list of candidate characters, then
press (OK). The selected
Chinese character will go into the
Text area.
Tip: Although no more than six strokes
can be shown in the Input area, there is
no limit on the number of strokes that
can be keyed in. The more strokes are
keyed in, the more quickly you can find
the desired Chinese characters.
!
Other manuals for 3310
14
Table of contents
Other Nokia Cell Phone manuals

Nokia
Nokia 8910 User manual

Nokia
Nokia X2-02 Quick start guide

Nokia
Nokia E61i User manual

Nokia
Nokia 6708 - Cell Phone 18 MB User manual

Nokia
Nokia 6290 - Cell Phone 50 MB Quick start guide

Nokia
Nokia E7 User manual

Nokia
Nokia N 80 User manual

Nokia
Nokia Lumia 520 User manual

Nokia
Nokia E72 User manual

Nokia
Nokia 8860 - Cell Phone - AMPS User manual

Nokia
Nokia NAVIGATOR 6210 User manual

Nokia
Nokia NAVIGATOR 6210 User manual

Nokia
Nokia 3310 User manual

Nokia
Nokia RM-230 User manual

Nokia
Nokia 6700 classic User manual

Nokia
Nokia X6-00 User manual

Nokia
Nokia RM-308 User manual

Nokia
Nokia 002P2W7 User manual

Nokia
Nokia RAE-6 Guide

Nokia
Nokia N82 User manual