Nokia 6225 User manual

User’s Guide for Nokia 6225

LEGAL INFORMATION
Copyright ©2004 Nokia. All rights reserved.
Nokia, Nokia 6225, Xpress-on Colour Covers, Pop-Port, Nokia Connecting People, and
the Nokia Original Enhancements logos are trademarks or registered trademarks of
Nokia Corporation. Other company and product names mentioned herein may be
trademarks or trade names of their respective owners.
US Patent No 5818437 and other pending patents. T9 text input software Copyright
©1999-2003. Tegic Communications, Inc. All rights reserved.
Includes RSA BSAFE cryptographic or security protocol software from
RSA Security.
Java is a trademark of Sun Microsystems, Inc.
The information contained in this user guide was written for the Nokia 6225 product.
Nokia operates a policy of ongoing development. Nokia reserves the right to make
changes to any of the products described in this document without prior notice.
UNDER NO CIRCUMSTANCES SHALL NOKIA BE RESPONSIBLE FOR ANY LOSS OF DATA
OR INCOME OR ANY SPECIAL, INCIDENTAL, AND CONSEQUENTIAL OR INDIRECT
DAMAGES HOWSOEVER CAUSED.
THE CONTENTS OF THIS DOCUMENT ARE PROVIDED “AS IS.” EXCEPT AS REQUIRED BY
APPLICABLE LAW, NO WARRANTIES OF ANY KIND, EITHER EXPRESS OR IMPLIED,
INCLUDING, BUT NOT LIMITED TO, THE IMPLIED WARRANTIES OF MERCHANTABILITY AND
FITNESS FOR A PARTICULAR PURPOSE, ARE MADE IN RELATION TO THE ACCURACY AND
RELIABILITY OR CONTENTS OF THIS DOCUMENT. NOKIA RESERVES THE RIGHT TO REVISE
THIS DOCUMENT OR WITHDRAW IT AT ANY TIME WITHOUT PRIOR NOTICE.
EXPORT CONTROLS
This product contains commodities, technology or software exported from the United
States in accordance with the Export Administration regulations. Diversion contrary to
U.S. law is prohibited.
Issue 2
ii Copyright © 2004 Nokia. All rights reserved.

Copyright © 2004 Nokia. All rights reserved. iii
Contents
1 For your safety. . . . . . . . 1
2 Welcome . . . . . . . . . . . . 3
About your device . . . . . . . . . 3
Network services . . . . . . . . . . 3
Shared memory. . . . . . . . . . . . 4
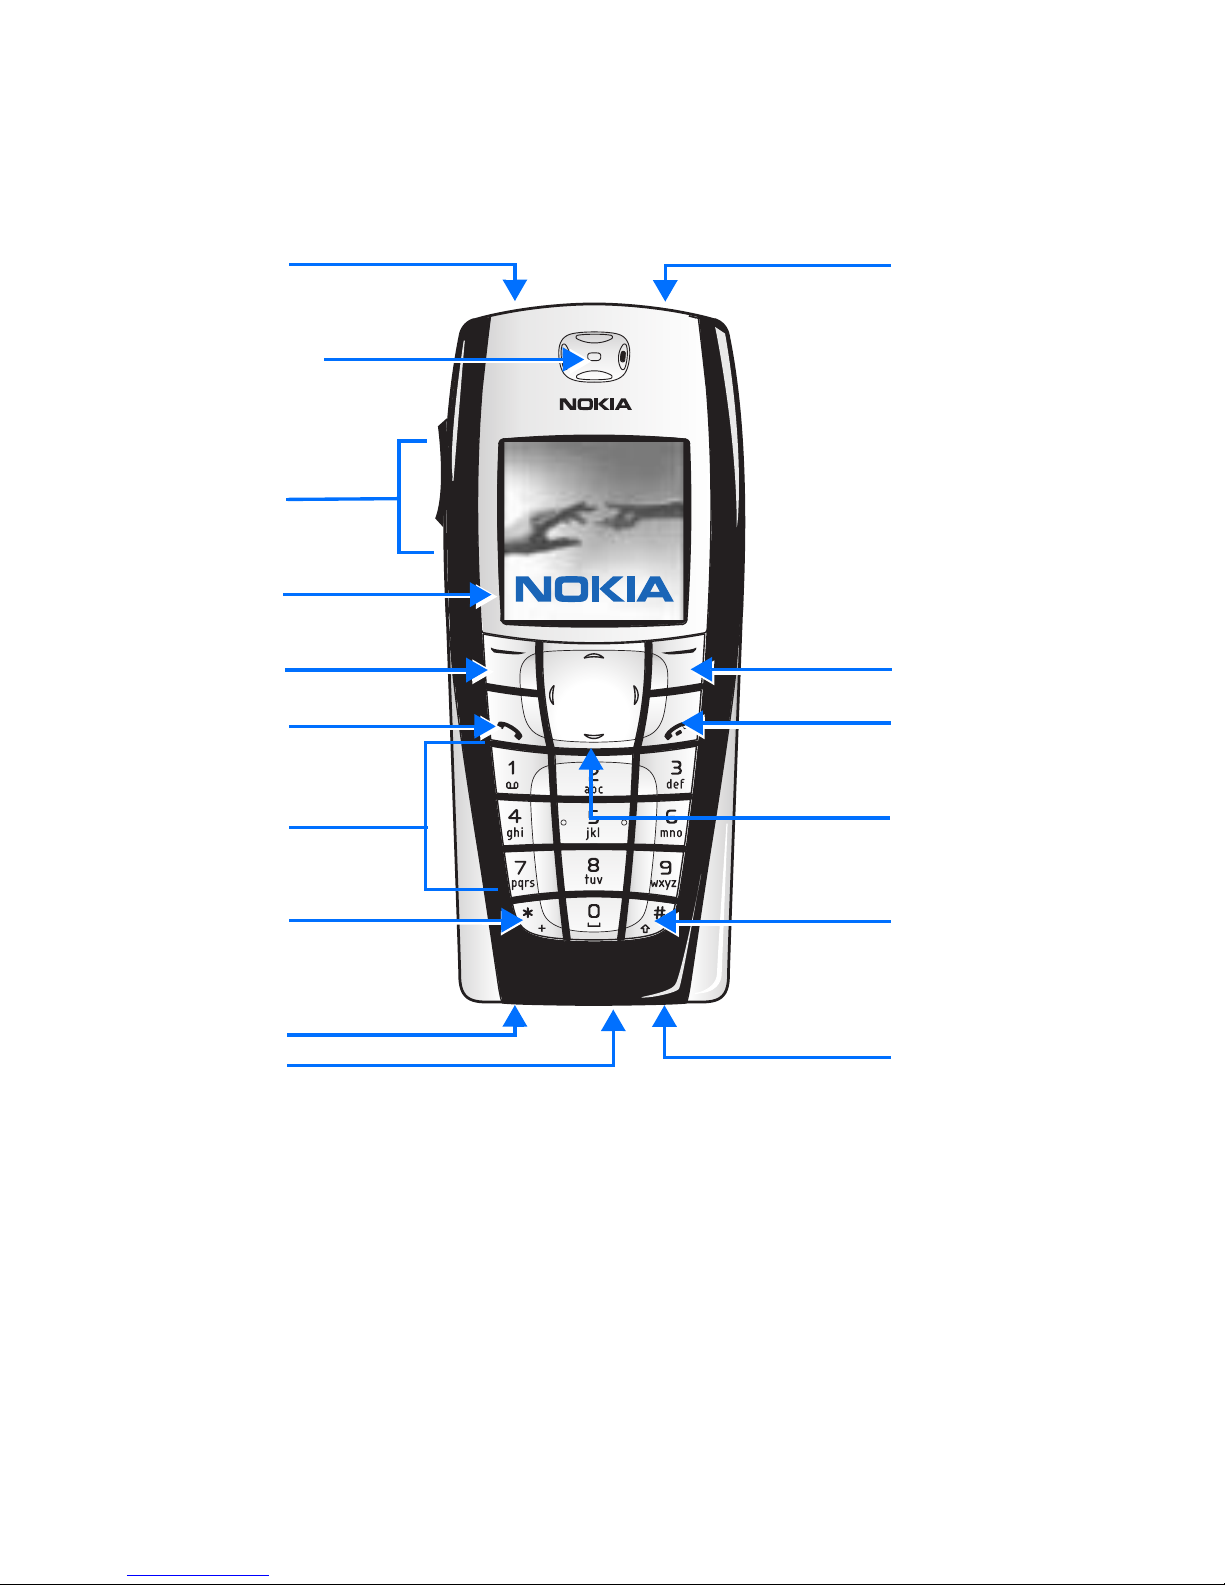
Nokia 6225 phone
at a glance . . . . . . . . . . . . . . . 5
Get the most out of
this guide . . . . . . . . . . . . . . . . 8
Phone menus . . . . . . . . . . . . . 8
3 Set up your phone . . . . 10
Make a call . . . . . . . . . . . . . . 12
Answer calls . . . . . . . . . . . . . 13
Keyguard . . . . . . . . . . . . . . . . 14
4 Text entry . . . . . . . . . . 15
Standard mode . . . . . . . . . . . 15
Predictive text input . . . . . . 16
5 Contacts list. . . . . . . . . 17
Add new contacts. . . . . . . . . 17
Edit contacts list entries . . . 19
Delete contacts
list entries . . . . . . . . . . . . . . . 20
View the contacts list . . . . . 20
Send and receive contacts
(business cards) . . . . . . . . . . 21
6 Messages (Menu 1) . . . 23
Text messages. . . . . . . . . . . . 23
Multimedia messages . . . . . 26
Voice messages. . . . . . . . . . . 29
Picture messages . . . . . . . . . 31
Minibrowser messages. . . . . 33
E-mail messages. . . . . . . . . . 33
Message folders . . . . . . . . . . 33
Delete messages. . . . . . . . . . 35
7 Call register (Menu 2). . . 36
View missed calls . . . . . . . . . 36
View received calls. . . . . . . . 36
Dialled numbers . . . . . . . . . . 37
Delete Call registers . . . . . . . 37
Duration of calls. . . . . . . . . . 37
Duration of data/fax calls . . 38
Duration of minibrowser . . . 39
8 Profiles (Menu 3) . . . . . 40
Activate. . . . . . . . . . . . . . . . . 40
Personalise a profile. . . . . . . 40
Set a timed profile . . . . . . . . 40
9 Settings (Menu 4) . . . . . 41
Right selection key
settings . . . . . . . . . . . . . . . . . 41
Call settings . . . . . . . . . . . . . 41
Phone settings . . . . . . . . . . . 44
Time and date settings . . . . 46
Display settings . . . . . . . . . . 47
Enhancement settings . . . . . 48
Security settings. . . . . . . . . . 49
Network services . . . . . . . . . 52
Tone settings . . . . . . . . . . . . 53
Restore factory settings. . . . 53
10 Network (Menu 5). . . . . 54
Roaming options . . . . . . . . . 54
Mode . . . . . . . . . . . . . . . . . . . 54
11 Radio (Menu 6) . . . . . . . 55
Turn on and off. . . . . . . . . . . 55
Options . . . . . . . . . . . . . . . . . 55
Save a channel . . . . . . . . . . . 55

iv Copyright © 2004 Nokia. All rights reserved.
12 Camera (Menu 7) . . . . . 57
Take a photo . . . . . . . . . . . . . 57
Self-timer . . . . . . . . . . . . . . . 58
Settings . . . . . . . . . . . . . . . . . 58
13 Gallery (Menu 8) . . . . . 59
Open the gallery. . . . . . . . . . 59
View folders . . . . . . . . . . . . . 59
14 Games (Menu 9) . . . . . 60
Play a game . . . . . . . . . . . . . 60
Game settings. . . . . . . . . . . . 60
Game options . . . . . . . . . . . . 60
15 Voice (Menu 10) . . . . . 61
Voice dialling . . . . . . . . . . . . 61
Voice commands. . . . . . . . . . 62
Voice recorder. . . . . . . . . . . . 63
16 Minibrowser
(Menu 11) . . . . . . . . . . 64
17 Organiser (Menu 12) . . 68
The alarm clock. . . . . . . . . . . 68
The calendar . . . . . . . . . . . . . 69
The to-do list . . . . . . . . . . . . 71
The calculator. . . . . . . . . . . . 72
The countdown timer. . . . . . 73
The stopwatch . . . . . . . . . . . 73
The calorie calculator. . . . . . 75
18 Applications
(Menu 13). . . . . . . . . . . 76
Launch. . . . . . . . . . . . . . . . . . 76
Download . . . . . . . . . . . . . . . 76
Memory status . . . . . . . . . . . 76
19 PC Connectivity . . . . . . . 77
20 Enhancements . . . . . . . . 79
21 Reference information . . 80
Batteries and chargers. . . . . 80
Additional safety
information. . . . . . . . . . . . . . 81
Care and maintenance. . . . . 83
Certification Information
(SAR) . . . . . . . . . . . . . . . . . . . 84
Battery information . . . . . . . 85
Index . . . . . . . . . . . . . . . . . 86

Copyright © 2004 Nokia. All rights reserved. 1
For your safety
1 For your safety
Read these simple guidelines. Not
following them may be dangerous or
illegal. Read the complete user guide
for further information.
SWITCH ON SAFELY
Do not switch the phone on
when wireless phone use is
prohibited or when it may
cause interference or danger.
ROAD SAFETY COMES FIRST
Obey all local laws. Always
keep your hands free to
operate the vehicle while
driving. Your first
consideration while driving
should be road safety.
INTERFERENCE
All wireless phones may be
susceptible to interference,
which could affect
performance.
SWITCH OFF IN HOSPITALS
Follow any restrictions.
Switch the phone off near
medical equipment.
SWITCH OFF IN AIRCRAFT
Follow any restrictions.
Wireless devices can cause
interference in aircraft.
SWITCH OFF WHEN REFUELING
Don't use the phone at a
refuelling point. Don't use
near fuel or chemicals.
SWITCH OFF NEAR BLASTING
Follow any restrictions.
Don’t use the phone where
blasting is in progress.
USE SENSIBLY
Use only in the normal
position as explained in the
product documentation.
Don't touch the antenna
unnecessarily.
QUALIFIED SERVICE
Only qualified personnel may
install or repair this product.
ENHANCEMENTS AND
BATTERIES
Use only approved
enhancements and batteries.
Do not connect incompatible
products.
WATER-RESISTANCE
Your phone is not water-
resistant. Keep it dry.
BACKUP COPIES
Remember to make back-up
copies or keep a written
record of all important
information stored in your
phone.
CONNECTING TO OTHER
DEVICES
When connecting to any
other device, read its user
guide for detailed safety
instructions. Do not connect
incompatible products.

For your safety
2 Copyright © 2004 Nokia. All rights reserved.
EMERGENCY CALLS
Ensure the phone is switched
on and in service. Press the
End key as many times as
needed (e.g. to exit a call, to
exit a menu, etc.) to clear the
display and return to the
main screen. Key in the
emergency number, then
press the Talk key. Give your
location. Do not end the call
until given permission to do
so.

Copyright © 2004 Nokia. All rights reserved. 3
Welcome
2Welcome
Congratulations on your purchase of
the Nokia 6225 mobile phone. Your
phone provides many functions
which are practical for daily use,
such as a radio, hands-free
loudspeaker, alarm clock, calculator,
calendar, and more. Your phone can
also connect to a PC, laptop, or other
device using a data cable or the
built-in IR port. To personalize your
phone, you can set your favorite ring
tones, create a go-to-menu, and
select an Xpress-onTM colour cover.
• ABOUT YOUR DEVICE
The wireless phone described in this
guide is approved for use on the
AMPS 800, CDMA 800 and 1900,
and 1XRTT networks. Contact your
service provider for more
information about networks.
When using the features in this
device, obey all laws and respect
privacy and legitimate rights of
others.
Warning: To use any features
in this device, other than the
alarm clock, the phone must
be switched on. Do not
switch the device on when
wireless phone use may
cause interference or danger.
• NETWORK SERVICES
To use the phone you must have
service from a wireless service
provider. Many of the features in this
device depend on features in the
wireless network to function. These
Network Services may not be
available on all networks or you may
have to make specific arrangements
with your service provider before you
can utilize Network Services. Your
service provider may need to give
you additional instructions for their
use and explain what charges will
apply. Some networks may have
limitations that affect how you can
use Network Services. For instance,
some networks may not support all
language-dependent characters and
services.
Your service provider may have
requested that certain features be
disabled or not activated in your
device. If so, they will not appear in
your device menu. Contact your
service provider for more
information.

Welcome
4 Copyright © 2004 Nokia. All rights reserved.
• SHARED MEMORY
The following features in this device
may share memory: contacts, text
and multimedia messages, photos,
graphics, and ringing tones in
gallery, calendar and to-do notes,
games and applications. Use of one
or more of these features may
reduce the memory available for the
remaining features sharing memory.
For example, saving many calendar
notes, may use all of the available
memory. Your phone may display a
message that the memory is full
when you try to use a shared
memory feature. In this case, delete
some of the information or entries
stored in the shared memory
features before continuing. Some of
the features, such as multimedia
messages, photos, graphics, or ring
tones in gallery, images, and
applications may have a certain
amount of memory specially allotted
to them in addition to the memory
shared with other features.

Copyright © 2004 Nokia. All rights reserved. 5
Welcome
• NOKIA 6225 PHONE AT A GLANCE
Earpiece
Volume keys
Display screen
End key
Right selection key
Four-way scroll key
Number keys
Talk key
Left selection key
# key
* key
+
-
Microphone
Charger port
IR Port Power key
Pop-portTM
Connector

Welcome
6 Copyright © 2004 Nokia. All rights reserved.
The start screen
The start screen is “home base” and
indicates your phone is in idle mode.
Signal strength — A higher bar
indicates a stronger network signal.
Battery level — A higher bar
indicates more power in the battery.
Menu — Press the Left selection key
to select this option.
Contacts — Press the Right selection
key to select this option.
Quick keys
At the start screen, the four-way
scroll key instantly takes you to
frequently-accessed menus:
•Scroll up key — Go to the
contacts list.
•Scroll right key — View the
calendar.
•Scroll down key — Go to the
contacts list.
•Scroll left key — Create a
message.
Signal
strength
Menu
Battery
level
Contacts

Copyright © 2004 Nokia. All rights reserved. 7
Welcome
Indicators and icons
Icon Indicates...
You have one or more text or picture messages. See “Read and
reply” on page 24.
You have one or more multimedia messages. See “Read and
reply” on page 27.
You have attached a picture to a multimedia message.
See “Write and send” on page 27.
You have one or more voice messages. See “Voice messages” on
page 29.
Your phone’s keypad is locked, see “Lock the keypad” on
page 14.
Your phone is set to the Silent profile. See “Profiles (Menu 3)”
on page 40.
The alarm clock is set to On. See “The alarm clock” on page 68.
The countdown timer is running. See “The countdown timer” on
page 73.
The stopwatch timing is running in the background, see “The
stopwatch” on page 73.
When shown continuously, the IR connection is activated and
your phone is ready to send or receive data via its IR port; when
blinking, your phone is trying to connect to the other device or
a connection has been lost. See “Send and receive data using IR”
on page 45.
All calls are forwarded to another number. See “Call diverting”
on page 52.
Integrated handsfree is active, see “The loudspeaker” on
page 14.
The timed profile is selected, see “Profiles (Menu 3)” on page 40.
or An enhancement is connected to the phone.
or Voice privacy encryption is active (or is not active) in the network.
You are in a 1XRTT network. See “Network services” on page 3.
You are in a digital network. See “Network services” on page 3.

Welcome
8 Copyright © 2004 Nokia. All rights reserved.
• GET THE MOST OUT OF
THIS GUIDE
The following sections illustrate the
various components of your phone.
Familiarize yourself with these
sections to help you understand the
instructions that follow.
This guide uses certain terms for the
steps that you are asked to perform.
•Press means to press and release
a key quickly. For example,
Press 7 means press the key on
the keypad that is labeled with
the number 7and the letters
“p, q, r, s”.
•Press and hold means to press
and hold a key for 2–3 seconds,
then release the key.
•Selection keys are used to select
a menu option. To select an
option, press the selection key
below the menu item on the
phone’s screen.
•Scroll keys are used to move up,
down, left, or right in the menus.
•Talk and End keys: Press the Talk
key to place a call or to answer
an incoming call. Press the End
key to end a call or press and
hold to return to the idle screen.
• PHONE MENUS
Phone features are grouped
according to function and are
accessed through the main menus.
Each main menu contains submenus
and lists from which you can select
or view items and personalise your
phone features. You can access these
menus and submenus by using the
scroll method or by using a shortcut.
Note: Some features may not
be available, depending on
your network. For more
information, contact your
wireless provider.
The scroll method
1At the start screen, select Menu
and scroll through the main
menus using the up and down
four-way Scroll key.
A scroll bar moves up or down
on the display screen as you
scroll through the menus,
providing a visual
representation of your current
position in the menu structure.
2When you arrive at a menu,
press Select (the Left selection
key) to enter submenus.
•PressBack (the Right
selection key) to return to
the previous menu.
•PresstheEnd key to return
to the start screen from any
menu or submenu.
Scroll up
Scroll
left
Scroll
right
Scroll
down

Copyright © 2004 Nokia. All rights reserved. 9
Welcome
Shortcuts
You can go directly to almost any
menu or submenu, as well as
activate most features by using a
shortcut.
At the start screen, select Menu,
then within 3 seconds, press the key
or keys associated with the menu
function you would like to view or
activate.
For example, to select the Meeting
profile, select Menu 3-3-1 from the
start screen (Menu > 3Profiles >
3Meeting > 1Select). After a brief
pause, the Meeting profile is
activated.
In-phone help
Many features have brief
descriptions (help text) which can be
viewed on the display. To view these
descriptions, scroll to a feature and
wait for about 10 seconds. Press
More to view all of the description,
or press Back to exit.
In order to view the descriptions, you
must first activate help text.
1At the start screen, select Menu
> Settings >Phone settings >
Help text activation and press
Select.
2Scroll to On or Off and press
Select.

Set up your phone
10 Copyright © 2004 Nokia. All rights reserved.
3 Set up your phone
The antenna
Your device has an internal antenna
located towards the top of the
phone. Hold the phone as you would
any other telephone with the
antenna area pointed up and over
your shoulder.
Note: As with any other
radio transmitting device, do
not touch the antenna
unnecessarily when the
device is switched on.
Contact with the antenna
affects call quality and may
cause the phone to operate
at a higher power level than
otherwise needed. Avoiding
contact with the antenna
area when operating the
phone optimizes the antenna
performance and the battery
life.
The battery
Always switch the device off and
disconnect the charger before
removing the battery.
REMOVE THE BACK COVER
1With the back of the phone
facing you, push down on the
back cover release button.
2Slide the back cover toward the
bottom of the phone and remove.
REMOVE THE BATTERY
3After you have removed the back
cover, insert your finger into the
finger grip and lift the battery
from its compartment.
REPLACE THE BATTERY
1Position the battery so the gold-
coloured contacts match up
with those on the phone.
The battery label should be
facing away from the phone.
2Insert the battery, gold-coloured
contact end first, into the
battery slot.

Copyright © 2004 Nokia. All rights reserved. 11
Set up your phone
3Push down on the other end of
the battery to snap the battery
into place.
REPLACE THE BACK COVER
4Slide the back cover toward the
top of the phone until you hear
a click and see the back cover
release button.
CHARGE THE BATTERY
1Plug the charger transformer in
to a standard ac outlet.
2Insert the charger output plug
into the round jack at the
bottom end of the phone.
After a few seconds, the battery
indicator in the display starts to
scroll from bottom to top. If the
battery is completely flat, it may
take a few minutes before the
charging indicator appears on
the display or any calls can be
made.
Turn your phone on or off
1To turn your
phone on or off,
press and hold
the power key
on top of the
phone for at
least 3 seconds.
2Enter the
security code if necessary and
press OK. See “Security code” on
page 51 for more information.
Connect the headset
A compatible headset may be
purchased with your phone or
separately as an enhancement.
(See “Enhancements” on page 79 for
information.)
1Plug the headset connector into
the Pop-PortTM
connector at the
bottom end of your phone.
2Position the headset on your ear.
With the headset connected,
you can make, answer, and end
calls as usual.

Set up your phone
12 Copyright © 2004 Nokia. All rights reserved.
• Use the keypad to enter
numbers.
•PresstheTalk key to place a
call.
•PresstheEnd key to end a
call.
Change the Xpress-onTM
covers
Note: Before removing the
cover, always switch off the
power and disconnect the
charger and any other device.
Avoid touching electronic
components while changing
the covers. Always store and
use the device with the covers
attached.
REMOVE THE BACK COVER AND
THE BATTERY
See “Remove the back cover” and
“Remove the battery” on page 10 for
instructions on removing the back
cover and battery.
REMOVE THE FRONT COVER
1Gently pull the bottom of the
front cover away from the rest
of the phone and remove.
INSTALL THE KEYMAT AND FRONT
COVER
2Remove the key mat from the
old front cover and place it into
the new front cover as shown.
3Press the front cover and keymat
against the phone and snap the
front cover into place.
REPLACE THE BATTERY AND BACK
COVER
See “Replace the battery” on
page 10 and “Replace the back
cover” on page 11 for instructions on
replacing the battery and back cover.
• MAKE A CALL
Using the keypad
1Enter the phone number
(including the area code), and
press the Talk key. (To delete a
character to the left of the
cursor, press Clear.)
2Press the End key to end the call
or to cancel the call attempt.

Copyright © 2004 Nokia. All rights reserved. 13
Set up your phone
Using the contacts list
1At the start screen, scroll to the
entry you wish to view.
2Press the Talk key to make the
call, or press Details to view
details of the entry.
Using the last dialled
number
1At the start screen, press the Talk
key to display the last 20
numbers dialled.
2Scroll to the number (or name)
you wish to redial and press the
Talk key.
Conference calling
Conference calling is a Network
Service that allows you to take part
in a conference call with two other
participants.
1Make a call to the first
participant.
2With the first participant on the
line, select Options >New call
and press Select.
3Enter the phone number of the
second participant, or press
Search to retrieve a number
from the contacts list.
4Press Flash.
The first participant is put on
hold.
5When the second participant
picks up, press the Talk key to
connect the calls.
6To end the conference call, press
Options > End all calls or press
the End key.
• ANSWER CALLS
Answer or silence an
incoming call
1Press the Talk key to answer the
call.
2Press the End key or Silence to
mute the ringing tone; you can
then press Answer to answer the
call or press Reject (or do
nothing) and the call is
eventually diverted to voicemail.
Please contact your service
provider to activate Voicemail.
Answer a call with the
keypad locked
To answer a call with the keypad
locked, simply press the Talk key.
During the call, all features function
as normal. When you end or reject
the call, the keypad automatically
re-locks. See “Keyguard” on page 14
for details.
When the phone is locked, calls still
may be possible to the official
emergency number.

Set up your phone
14 Copyright © 2004 Nokia. All rights reserved.
Adjust the earpiece volume
• To increase the volume of a call,
press the top of the volume key
on the left side of the phone.
• To decrease the volume of a call,
press the bottom of the volume
key on the left side of the phone.
• When adjusting the volume, a
bar chart appears in the display
indicating the volume level.
The loudspeaker
You can use your phone as a
loudspeaker during a call. Do not
hold the phone to your ear during
the loudspeaker operation.
• To activate the loudspeaker,
press Loudsp.
• To deactivate the loudspeaker
during a call, press Handset.
The loudspeaker is deactivated
automatically when a call (or a call
attempt) ends or when certain
enhancements are connected.
Options during a call
Many of the options that you can
use during a call, are Network
Services. Check with your wireless
service provider for more
information.
1Press Options during a call to
display a list of options available
during a call.
2Scroll to an option and press
Select to activate the option or
enter its submenu.
• KEYGUARD
With keyguard, you can lock the
keypad to prevent keys from being
pressed accidentally. Remember to
lock your phone keypad to prevent
accidental calls. If the keypad is
locked, it unlocks when you receive a
call. After the call, the lock
automatically reactivates.
When the keyguard is on, calls still
may be possible to the official
emergency number. Key in the
emergency number and press the
Talk key.
Lock the keypad
Select Menu with the Left selection
key, then press the *key within two
seconds.
Unlock the keypad
Select Unlock with the Left
selection key, then press the *key
within two seconds.
Volume
key

Copyright © 2004 Nokia. All rights reserved. 15
Text entry
4 Text entry
You can use two methods for
entering text and numbers:
• Standard mode is the only way
to enter text into such things as
the contacts list, calendar notes,
and to rename caller groups.
• Predictive text input is a quick
and easy method for writing
messages, creating a calendar
note, or making a to-do list.
• STANDARD MODE
Text (Abc)
• Press a key once to insert the
first letter on the key, twice for
the second letter, etc. If you
pause briefly, the last letter in
the display is accepted and your
phone awaits the next entry.
•Pressthe0key to enter a space
thereby accepting a completed
word.
•Pressthe1key to enter a period
(.).
•Pressthe*key to display special
characters. Scroll to highlight a
character, then press Use to
insert it.
Numbers (123)
To switch to 123 mode from Abc
mode, press and hold the #key at
any message entry screen until the
icon in the upper left corner of the
display switches from Abc to 123 (or
vice versa).
•PressClear to backspace the
cursor and delete a character
• Press and hold Clear to
backspace continuously and
delete characters
Punctuation and special
characters
While at any text entry screen, press
the *key to display special
characters (press and hold the *key
if predictive text is on). The
following special characters are
available:
You can navigate through the list of
special characters by using the four-
way scroll key. Once a character is
highlighted, press Use to insert the
character into your message.
.,‘?!“-()
@/ : _ ; +&
%*
=<>$ [ ] {} \
~^ ¡ ¿#l

Text entry
16 Copyright © 2004 Nokia. All rights reserved.
• PREDICTIVE TEXT
INPUT
Predictive text input allows you to
write messages quickly using your
keypad and the phone’s built-in
dictionary. It is much faster than
standard mode method, because for
each letter, you only press the
corresponding key on your keypad
once.
Activate/deactivate
At any text entry screen, press and
hold Options. Predictive text
(Dictionary) is turned on and off,
depending on its previous mode.
OR
1At any text entry screen, select
Options > Dictionary and press
Select.
2Scroll to the language of your
choice and press Select.
Note: The language setting
affects the time and date
formats of the clock, alarm
clock, and calendar.
Text entry
The illustration below simulates your
display each time a key is pressed.
For example, to write Nokia with
predictive text on and with the
English dictionary selected, press
each of the following keys once:
the 6key the 6key the 5key the 4key the 2key
•Pressthe0key to enter a space
and begin writing the next word.
• If a displayed word is not
correct, press the *key to see
other matches. To return to the
previous word in the list of
matches, press Previous.
•If?appears after a word, press
Spell to add the word to the
dictionary.
•Pressthe1key to insert a period
into your message.
• Press and hold the *key to
display special characters. Press
the *key again to cycle through
all available characters.
•Pressthe#key to switch
predictive text on or off and to
use predictive text in various
modes. As you press the #key,
the following icons (not the
descriptions) appear in the
upper left of the display screen:
Uppercase text; standard
mode is On
Lowercase text; standard
mode is On
Sentence case text;
standard mode is On
Sentence case text;
predictive text is On
Lowercase text;
predictive text is On
Other manuals for 6225
5
Table of contents
Other Nokia Cell Phone manuals

Nokia
Nokia Lumia 1320 User manual

Nokia
Nokia 3205 User manual

Nokia
Nokia 6233 - Cell Phone 6 MB User manual

Nokia
Nokia 3208c User manual

Nokia
Nokia 6610 - Cell Phone 625 KB User manual

Nokia
Nokia 301 User manual

Nokia
Nokia 3155i User manual

Nokia
Nokia 2170 User manual

Nokia
Nokia 6800 User manual

Nokia
Nokia TFE-4 User manual

Nokia
Nokia N86 8MP User manual

Nokia
Nokia E52 User manual

Nokia
Nokia XpressMusic 5130 User manual

Nokia
Nokia 6101 - Cell Phone 4.4 MB User manual

Nokia
Nokia 2720 User manual

Nokia
Nokia N Series User manual

Nokia
Nokia 5190 - Cell Phone - GSM User manual

Nokia
Nokia 1661 RH-121 User manual

Nokia
Nokia 3585 User manual

Nokia
Nokia X5-00 User manual