norbar T-BOX XL User manual

OPERATOR’S MANUAL
T-BOX XL™
FOR USE WITH T-BOX XL™ FITTED WITH (VERSION 2.1.0.X)
SOFTWARE
Part Number 34396 | Issue 2 | Original Instructions (English)


1
CONTENTS
Introduction 3
Software Compatibility 3
Features and Functions 4
Quick Start 5
Before Use 6
Preparation 6
Setup for Use 8
Measure 9
Preparation 9
Transducer 9
Tool 10
Work ID 10
Target 11
Units 11
Zero Display 11
Mode 12
Take Results (Calibrate) 12
Data Logging 14
Save Results 15
View / Delete Results 16
Mains / Battery 16
Setup 17
Target 18
Tool Templates 19
My Tools 19
Non-Smart Transducer Setup 20
USB In/Out 20
Instrument Setup 21
Language 21
Modes Setup 22
Sleep After 23
Password 23
Date & Time 24
Angle Display 24
Units 24
Serial Port 25
Specification – General 26
Specification - Transducer Interface 27
Smart Transducers 27
Non-Smart Transducers 27
Pin Connections 27
Connector Type 27
Specification - Ancillaries 28
Pin Connections 28
External Print / Reset Input 28
Limit Outputs 28
Tool Stop Output 28
Analogue Output 29
External Snug Trigger Input 29
Connector Type 29

2
Specification - Serial Port 30
When is Data Sent? 30
What Data is Sent? 30
Serial Port Options 30
Pin Connections 30
Data Output Example 30
Connector Type 30
Connecting Lead 30
Specification – USB 31
Specification – Modes 32
Track 32
1st Peak 32
Peak 32
Extra Features 32
Pulse 33
Graph 34
Specification – Targets 35
Specification – Hand Torque Tool Classification 36
Maintenance 38
T-Box XL™ Calibration 38
Transducer Calibration 38
Battery Replacement 38
Repair 38
Cleaning 38
Product Disposal 38
Battery Disposal 38
Trouble Shooting 39
Glossary of Terms 40

3
INTRODUCTION
The T-Box XL™ is a hand held torque measuring instrument with a user friendly colour touch screen
interface. Both hand and powered torque tools can be measured, calibrated or viewed in graph mode. The
comprehensive instrument functions in 12 languages, all common torque units, pre-loaded Tool calibration
templates and has a large measurement memory for storage of test results. T-Box XL™ features a USB
interface to the Torque Data Management System (TDMS) software for data archiving of Test, Calibration
and Graphical results on a PC.
Part numbers covered by this manual (43258 T-Box XL™).
Parts Included
Part Number
Quantity
T-Box XL™ Instrument.
43258
1
T-Box XL™ Stand.
39411.RED3001
1
Bolts for stand (M10 x 25).
25355.25
2
USB flash drive (Operator’s Manual / Software).
61132
1
Quick Reference Guide.
34395
1
Power supply adapter.
39705
1
USB lead to PC.
39483
1
Neck strap screws.
25498
2
Neck strap clip.
38881
2
Neck strap spacer.
38882
2
Neck strap.
38883
1
Hex Key for neck strap.
24933
1
Stylus.
39484
1
Power cord.
-
1
Calibration Certificate.
-
1
T-Box XL™ carry case.
26775
1
Accessories Available
Part Number
T-Box XL™ to 10 way lead, for Norbar Rotary Transducers.
60216.200
T-Box XL™ to 6 way lead, for Norbar Static & Annular Transducers.
60217.200
T-Box XL™ to no connector (for non-Norbar transducers).
60223.200
Extensive range of torque transducers.
Contact Norbar
Serial Data Lead Kit.
60248
NOTE: The suffix after the lead part number indicates the length of the lead in cm, thus
XXXXX.200 = 2 metres. If Transducer leads are required of a non-standard length, the new
suffix must be added to the part number when ordering (to the nearest metre).
The maximum length for a single transducer lead is 7 metres.
The maximum combined length of all attached transducer leads is 8 metres.
SOFTWARE COMPATIBILITY
T-Box XL™
TDMS
Software version 1.0.2.27
2.2.3
Software version 2.1.0.X
3.2.X

4
FEATURES AND FUNCTIONS
7” WVGA Colour touch screen with clear icons for ease of use.
Hand held with neck strap or bench mounted.
4 transducer inputs with ergonomic front panel selection switch.
Automatically recognises any ‘SMART’ Norbar transducer.
Can also work with most mV/V transducers from Norbar or other manufacturers.
5 digit resolution for all Norbar transducers.
Operational from internal rechargeable battery or power supply adaptor.
Multiple Targets to indicate status of Torque & Angle results. The Targets status is shown as symbols and
background colours on the display, as well as outputs on the ancillaries connector and serial port.
Continuous Data logging of Torque or Torque & Angle results for transfer to TDMS.
Ability to link targets for applications that require tightening in a sequence.
Selectable frequency response for each mode of operation.
Password protection of all selectable features to virtually eliminate operator induced errors.
Ancillaries connector with analogue output & GO/NO GO control for external equipment.
Serial Port for data output to a PC or printer.
93MB results memory. An example of memory storage.
Item
Memory Each
Example of Storage
Instrument setup
5KB
5KB
Transducer
2KB
40 transducers = 80KB
Audit (20 results)
6KB
1000 sets of 20 results 6,000KB
Targets (20 off)
2KB
100 targets = 10KB
Template (20 off)
4KB
250 templates = 50KB
Graph
5KB
100 graphs = 500KB
Total
6,645KB (7% of memory)
Templates for all Norbar tools (Torque Wrenches, PneuTorques & EvoTorques) to enable the operator to
easily perform calibrations on their tools to the relevant ISO standard using the in-built calibration
program.
In addition templates exist for all torque tools covered in ISO 6789:2003 with other tools easily added.
Pre-programmed calibration routines to ISO6789:2003.
Automatically guides the user through the calibration routine required for the Tool.
2 USB ports for data transfer. Can be used with Bar code scanner, Mouse, Keyboard, Printer, Hub, etc.
12 languages.
8 modes for torque tool measurement: ‘Track’, ‘Click’, ‘Dial & Electronic’, ‘Stall’, ‘Screwdriver’,
‘Hydraulic’, ‘Graph’ (for visual analysis of torque profiles) and ‘Pulse’ (with a unique pulse tool algorithm
to accurately determine pulse tool torque output).
All Peak and 1st Peak modes can be configured for either Manual or Auto Reset.
13 Torque units. Plus custom units for measurement of load, pressure, etc.
Time & date stamp with results.
Displays torque only, torque & angle, torque & speed, torque & power, torque & turns and torque & rate.
TDMS (Torque Data Management System) software included for complete data management and
archiving to a PC. Includes seamless data synchronisation. See TDMS Operator’s Manual part number
34342 for more information.

5
QUICK START
Follow flowchart to use the T-Box XL™. To just measure torque follow the RED bold path.
For more comprehensive details refer to BEFORE USE, MEASURE, SETUP and SPECIFICATION sections.
NOTE: If Target, Tool Templates, Tools or Non-Smart Transducers do not exist, add via Setup.

6
BEFORE USE
Preparation
NOTE: If the equipment is used in a manner not specified by the manufacturer, the protection
provided by the equipment may be impaired.
WARNING: ALLOW THE T-BOX XL™ TO EQUALISE TO THE AMBIENT
TEMPERATURE/HUMIDITY BEFORE SWITCHING ON. WIPE OFF ANY
MOISTURE BEFORE USE.
1. For Bench Use:
a. Fix stand to bench, use M10 bolts provided. Do not tighten
above 10 N·m.
b. Mount T-Box XL™ on stand, tighten fixing screw by hand.
TIP: The T-Box XL™ will
mount on a standard
tri-pod (not supplied).
2. For Portable Use:
a. Connect neck strap to right & left of T-Box XL™.
b. Fix with hex key provided.
3. Connect up to 4 transducers to transducer
connectors TD1, TD2, TD3 & TD4.
4. Select transducer from front (TD1 is fully anti-clockwise.)

7
5. If using with a control or shut-off system; connect to ANCILLARIES connector.
6. If using RS232 to output results; connect to Serial Output.
7. Connect back panel USB to PC (cable included) for use with TDMS software.
TDMS software is included on the USB flash drive. To load the TDMS software onto a PC:
a. Insert USB flash drive into PC.
b. Open TDMS Operator’s Manual (Part No 34342) & follow instructions.
The TDMS software features the following:
USB connection to Norbar T-Box XL™ instrument for fast data transfer.
RS232 connection to other Norbar instruments such as TTT series 3.
Data Base for archiving of data for calibration (and Use) of Torque Tools.
Statistical Process Control (SPC) on Test results for USE of Tools.
Setup individual (or multiple) T-Box XL’s with Tools, Tool Templates, Targets and Non-Smart
Transducers via the synchronisation options.
Multilingual Calibration Certificate (English / French / German / Spanish / Italian / Russian /
Hungarian / Norwegian / Finnish).
Calibration certificate templates to ISO6789:2003.
Calibration certificate templates for PneuTorques etc.
Ability to add a Setting (i.e. p.s.i.) and setting values against Torque calibration results on a
Calibration Certificate.
Air pressure graphs can also be saved, viewed and printed.
Compatible with Windows® 2000, XP, Vista, 7 & 8.
8. The T-Box XL™ can be powered from mains or battery. It is essential to charge the internal battery for
200 minutes (3 hours & 20 minutes) for full charge. To charge the internal battery, connect the Power
supply adapter between the T-Box XL™ (9 V d.c. input) and a live a.c. supply.
TIP: If the power cord has no plug fitted, wire as follows:
BROWN-LIVE BLUE-NEUTRAL GREEN / YELLOW-EARTH
If in doubt consult a qualified electrician.
TIP: Insert 9 V d.c. connector into T-Box XL™ before applying a.c. mains to ensure correct
charging.
TIP: The T-Box XL™ can be used whilst the battery is charging.
Recharging is independent of the on/off switch. The battery can be charged continuously.
9. Connect USB flash drive to T-Box XL™ front socket to transfer data.
The USB flash drive contains:
T-Box XL™ Operator’s Manual (Part # 34396)
TDMS software (Part # 37748)
TDMS Operator’s Manual (Part # 34342)
To access the Operator’s Manuals & TDMS software, plug USB
flash drive into your PC. Copy the Operator’s Manual to your PC
and open to view.

8
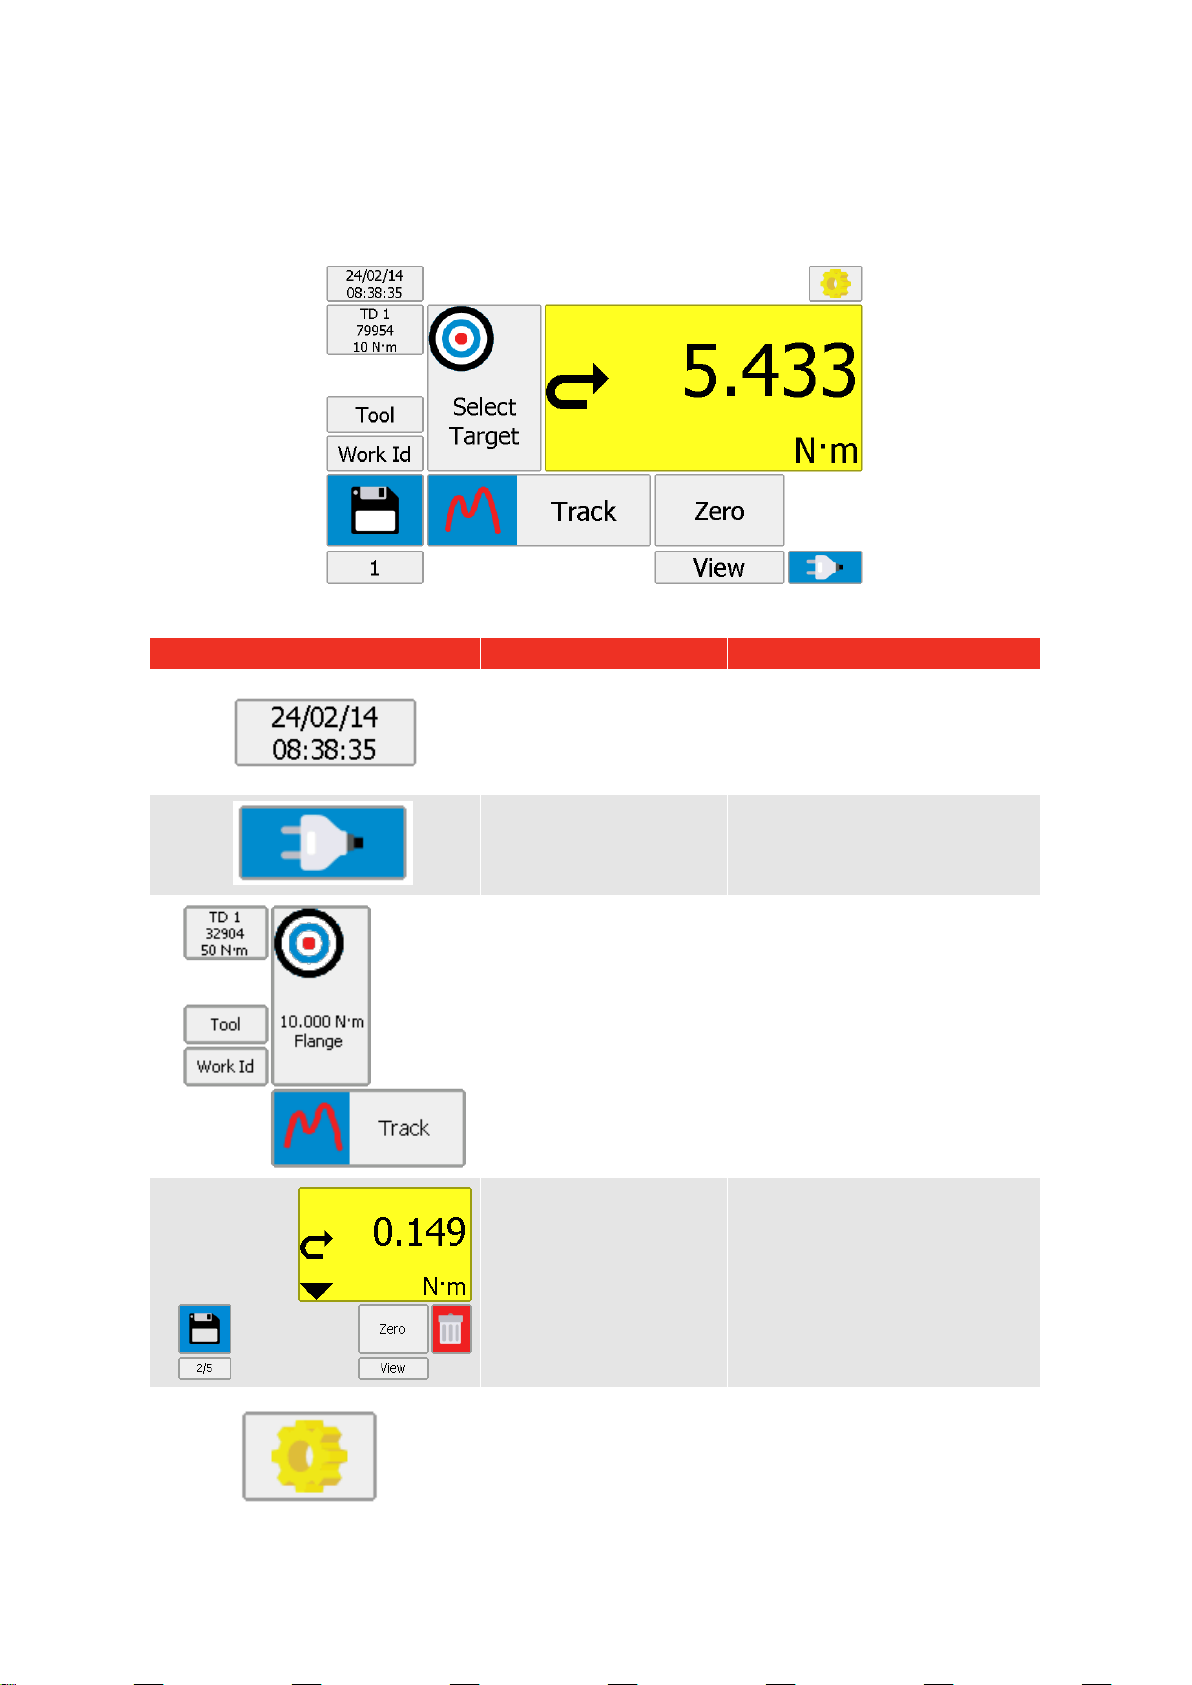
Setup For Use
Turn T-Box XL™ on. The Norbar logo appears. Wait for the green progress bar at the bottom of the logo
screen.
The measure screen will then be shown.
Screen Area
Action
Further Information
Date & Time.
Press to view Logo
screen.
T-Box XL™ Software Version #,
Serial # and date last calibrated
will also be shown.
Press screen to return to
Measure.
Battery / Mains condition.
Press to show current power
state.
Press screen to return to
Measure.
Choose options for
Transducer, Tool,
Work Id, Target & Mode.
See MEASURE.
Measure & save / delete
results.
See MEASURE.
SETUP:
Targets, Tool Templates,
My Tools, Transducers,
USB, Language, Modes,
Units, etc.
See SETUP.
NOTE: For more information see SPECIFICATION pages.

9
MEASURE
Preparation
1. Turn T-Box XL™ on.
The measure screen will be shown:
2. Before taking measurements ensure the T-Box XL™ is prepared correctly.
The following icons are used to navigate:
Meaning
Scroll
Exit
(no change)
Exit
Icon
Transducer
Press to show / select transducer details:
NOTE: For more information see SPECIFICATION – TRANSDUCER INTERFACE.
For SMART transducer
details are shown.
For non-SMART Transducer
shows ”TD1 Connect transducer”.
Press to select transducer.
Add new transducer in SETUP.

10
Tool
Press ‘Tool’ to select the tool to be calibrated or used.
A Tool can be a Torque wrench, PneuTorque®, EvoTorque®, Torque screwdriver, etc.
Enter / select “Tool Serial #” (If not required select “No Tool”).
TIP: If tools are bar coded, a USB bar code scanner (not supplied) can be used to enter the number.
TIP: To help find a tool serial #, connect a USB keyboard (not supplied).
Enter the first characters to display all tool serial # with that prefix.
Select “Tool Template”, this specifies full details of the tool for calibration purposes.
Tick Option
Reason
Comment
Calibrate a tool.
Pre-programmed calibration sequence
for Torque Wrenches, PneuTorques,
EvoTorques, Torque screwdrivers etc.
Use a tool.
(Take torque results from a
task, application or job).
Selecting a tool serial # is important for
data management.
If tool serial # is not selected, the results
will be saved as “No Tool”.
NOTE: To remove the tool PRESS & HOLD the tool area until “Tool” is shown.
Work ID
‘Work ID.’ (Work identification) is a reference to the task, application, job or operator.
Example of Work ID.
Cal
Operator name.
Use
Could include a bolted flange, engine cylinder head, vehicle wheel nuts, etc.
NOTE: To remove the Work Id PRESS & HOLD the Work Id area until “Work Id” is shown.

11
Target
NOTE: Not required for as target is set in the Tool Template.
Select target (if required).
If an angle transducer is used, an angle target can also be shown:
NOTE: To remove the target PRESS & HOLD the target area until “Select Target” is shown.
Units
NOTE: The units available for are set in the Tool Template.
Press to select required units.
Zero Display
Ensure in TRACK mode.
Exercise the transducer in required direction of use.
Press ‘Zero’ to zero display.
TIP: If the displayed reading does not zero the transducer may be overstrained.
Contact a Norbar approved distributor for further advice.
NOTE: It is also possible to zero the display in other modes (e.g. CLICK mode), when the reading
is within the ‘Active from’ threshold (by default this is set to 1.8% of full-scale)

12
Mode
NOTE: The modes available for are set in the Tool Template.
Select mode for the Tool being used.
The currently selected mode is shown with a BLUE border.
Take Results
Operate tool and measure torque on T-Box XL™.
Calibrate
The measurement point is displayed on the left of the display for an ISO6789 Tool
Template (eg: 20%, 60% & 100%). This is a % of the maximum torque value of the torque
tool (or at the nominal / set value for tools of Type II, Classes B and E).
If the measurement points have been set as torque values rather than % values in the tool
template, they will be shown as torque values rather than % values in this box.
The Target area shows the first (and subsequent) measurement targets in torque units.
Set the tool to the required value.
The results counter (bottom left) shows the number of measurements at that target.
E.g. 1/5 is result 1 of 5.
Take Results
Take results (for this example it will be 5 results at 20% of full scale).
For full details of the mode operation see SPECIFICATION – MODES.
After each result the results counter will increase by 1 (to show 2/5….3/5….4/5….5/5).
When 5 results are taken, the % area changes to the next measurement value; in this
example it will be 60%. The Target area will confirm the torque value required.
Again take the results (5 in this example).
The % area changes to the next measurement value, in this example 100%.
The Target area will confirm the torque value required.
Again take the results (5 in this example).
(To exit calibrate mode before complete, PRESS & HOLD the TOOL button until “Tool” is
shown).
TIP: COMPLETE will flash up in red if any tests (that are outside of the pass
limits) are done on a Tool prior to (or post to) the save button being pressed.

13
Setting Values
(optional)
If the Tool template has Setting Values (e.g. for air pressure settings when calibrating
pneumatic tools) the following screen will be displayed before each set of torque readings
are taken:
The Setting Value (in this example 2 P.S.I.) can either be accepted or changed to a
different value.
The Setting Values can then be added to the Certificate after synchronising to TDMS.
TIP: The Setting Values can be changed again in TDMS if required.
Calibration
Results
At the end of the Calibration, the ‘Calibration Results’ screen will be displayed:-
The results are colour coded Green for readings which are OK (within tolerance), Blue for
readings which are LO (below tolerance) and Red for readings which are HI (above
tolerance).
Pressing the Home button exits Calibrate mode, returns to the Measure screen and
deselects the Tool.
Pressing the Cal button returns to Calibrate mode with the same Tool selected, to perform
another calibration. This is intended for As-Found followed by As-Left calibrations (and/or
Clockwise followed by Anti-Clockwise calibrations).
Pressing the Use button exits Calibrate mode and returns to the Measure screen with the
current Tool still selected.

14
Data Logging
Use
Individual
results
For details of the mode operation see SPECIFICATION – MODES.
Continuous
results
(Data
Logging)
To enable Data Logging, configure the Serial Port Setup as follows:
On screen 74 - Tick “Continuous Output”.
On screen 93 – “Minimum angle change for output” = 1 (for example). In this example Torque
& Angle values are logged for every 1 degree change in the angle.
On screen 93 – Tick “Log All Serial Output”.
Select the Tool (if required), select USE.
Enter the Work Id (if required).
NOTE: To remember the Work Id, enable a Target (The number of readings within
the target must be more than the number of readings you are expecting to
receive).
To use Data Logging:
Use TRACK mode for data logging control (other modes will log continuously, with no
control).
Data is automatically logged at 5 readings per second (factory default). The save button has
no effect.
For Torque transducer:
Data logging starts when the torque passes above 1.8% of transducer capacity.
Data logging stops when the torque passes below 1.8% of transducer capacity.
For Torque and Angle transducer:
If “Minimum Angle change for output = 0” – Data is logged whilst in the measurement screen.
If “Minimum Angle change for output = 5” (for example) – In this example Torque & Angle
values are logged for every 5 degree change in the angle.
NOTE: To view large amounts of data will take many seconds (Only the last 20,000
logged results can be viewed).
To avoid this delay, transfer logging data directly from the T-Box XL™ to the USB stick by
pressing the following setup button:

15
Save Results
When is a measurement saved?
Reset Type
Save Button Action
Description:
Result
Saved?
Result Displayed
at Top of Screen?
Manual reset
Press to save.
SAVE
√
√
Auto reset
BLUE
Wrench setup
X
√
GREEN
SAVE
√
√
NOTE: The maximum number of save requests in track mode is 1 per second.
The ZERO button becomes RESET in memory modes. Press RESET to reset the memorised reading,
without the result being saved.
NOTE: The RESET button reverts to a ZERO button in memory modes when below the Active
From threshold (1.8% of full-scale by default).
Every SAVE will add 1 to the Number of Tests counter.
When a result has been saved the ‘BIN’ symbol appears:
Press ‘BIN’ to:
1. Delete the last test result from any saved data.
2. The last measurement will be removed from the top of the screen
3. The Number of Tests counter will decrease by 1.
3. The BIN symbol will disappear.
At the end of CALIBRATION or when ‘# of Tests’ complete; T-Box XL™ displays: COMPLETE
Use
Number of Tests
Counter Example
Explanation
Use
without Target
1
Number of Tests counter.
Press counter to reset.
Use
with Target
1/100
Test 1 of 100
(with “# of Tests” set to 100) in
Target Setup.
CALIBRATION
1/5
The measurement number for
the measurement point, e.g. 1/5
for measurement ‘1’ of ‘5’

16
View / Delete Results
To view results for use, calibrations & graphs:
Select result then press:
TICK to view [Shows: Tool, Mode, Transducer and results (with LO/OK/HI if target was used)].
RED CROSS to delete (via the password if set).
The results are listed in DATE order, with the latest at the top. The action is defined as:
Type of
Results
Tool Selected
(Tool Serial # shown,
e.g. 12345)
Tool not Selected
Use
Use of 12345
Use of No Tool
Cal
Calibration of 12345
Calibration of No Tool
Graph
Graph of 12345
Graph of No Tool
If a Work Id has been specified, it will appear in brackets.
E.g. If the Work Id is “FLANGE 6” the display will show “Use of 12345 (FLANGE 6)”.
Mains / Battery
Mains or Battery
Icon
Power State
Mains.
Charging.
Full charge in
200 minutes.
Charged.
Battery.
Full.
Low.
Flat.
NOTE: The Battery Icon includes the remaining % charge value.

17
SETUP
T-Box XL™ SETUP covers: Targets, Tool Templates, My Tools, Non-Smart Transducers, USB, Language,
Modes, Sleep, Password, Time & Date, Angle Display, Units and Serial Port.
The TDMS software can also setup the Targets, Tool Templates & Transducers.
Press: in measure to show:
Throughout SETUP and Selection, the following functions are used:
Icon
Meaning
Scroll
Add
Edit
Delete
(may be password protected)
Exit (no change)
Exit

18
Target
Press to show:
Select Target to Add, Edit or Delete.
Target Options
Comment
Name
Target name.
Description
Target description.
Target
Target torque value.
Units
Select units or press to enter custom units.
(Custom Units allow load cells and other non-torque transducers to be used).
Upper Limit %
The % of the Target value allowed above the Target value.
Lower Limit %
The % of the Target value allowed below the Target value.
Direction
(, , & )
Direction Torque Target operates.
# of tests
The number of tests / measurements saved at this target.
Tool Stop
Torque value at which the STOP output on Ancillaries connector changes to logic 1.
Internal Snug
Torque Trigger
NO-TICK = Snug torque triggered from Ancillaries.
TICK = Snug torque triggered when Torque value reaches ‘Snug torque’ value in T-Box XL™.
Snug Torque
Torque value to start measuring angle.
Direction
(, , & )
Direction Angle Target operates.
Angle Limits?
UN-TICK = No angle limits.
TICK = Use angle limits.
Target Angle
Target angle value in degrees.
Upper Limit
The number of degrees allowed above the target.
Lower Limit
The number of degrees allowed below the target.
Next Target
Ability to link to the next target. Required for sequence tightening to different targets.
Targets can also be setup in the TDMS software.
Table of contents
Other norbar Measuring Instrument manuals