manuals.online logo
Brands
  1. Home
  2. •
  3. Brands
  4. •
  5. Nordpeis
  6. •
  7. Indoor Fireplace
  8. •
  9. Nordpeis ME Pedestal User manual

Nordpeis ME Pedestal User manual

ME Pedestal
Art.no: SN-ME000-P24, SN-ME000-P14
Last updated: 19.11.2018
Test Report No: RRF 40 17 4683, NS 17 4683
NO Monterings- og bruksanvisning 2
SE Installations- och bruksanvisning 9
GB Installation- and user manual 15
FI Asennus- ja käyttöohje 21
DE Installations- und Benutzerhandbuch 27
FR Manuel d’installation et d’utilisation 36
15
GB
,03257$176$)(7<35(&$87,216
1. Please follow the installation manual when
FRQQHFWLQJ\RXUVWRYH¿UHSODFHWRWKHFKLPQH\
ÀXHSLSH,IFRQQHFWHGGLႇHUHQWO\IURPLQVWUXFWLRQ
SOHDVHFRQVLGHUWKHKHDWUDGLDWLRQIURPWKHÀXH
pipe to the surrounding materials.
2. Before use, please carefully read the user manual
and follow the instructions.
,QWHJUDWHGRUGH¿QHGFRQYHFWLRQRSHQLQJVPD\
never be reduced or partially obstructed. This may
lead to overheating, which again can cause house
¿UHRUVHULRXVGDPDJHWRWKHSURGXFW
8VHRQO\GHVLJQDWHG¿UHVWDUWHUV1HYHUXVH
JDVROLQHGLHVHORURWKHUOLTXLGVWRVWDUWWKH¿UH
7KLVPD\FDXVHH[SORVLRQV
5. Never use other fuel than natural dry chopped
wood. Briquettes, peat, coke, coal and waste
from construction materials develops far higher
temperatures and emissions than natural wood.
Since your product has been designed for use
with natural wood only, other fuels may damage
the product, chimney and surrounding
constructions.
6. In case of damage to glass or door gasket, all use
of the product must be discontinued until the
damage has been repaired.
)DLOXUHWRIROORZWKHVHSUHFDXWLRQVZLOOOHDYH\RXU
ZDUUDQW\YRLGDQGH[SRVHSHRSOHDQGSURSHUW\WR
GDQJHU
$GYLVHEven if not required in your area, it is always
ZLVHWRKDYHDTXDOL¿HGVWRYH¿UHSODFH¿WWHUGRWKH
LQVWDOODWLRQRUDWOHDVWWKH¿QDOLQVSHFWLRQEHIRUHXVH
INDEX
%HIRUH,QVWDOOLQJD1HZ6WRYH 
Chimney Draught 16
Air Supply 16
7HFKQLFDO,QIRUPDWLRQ 
'LVWDQFHWR&RPEXVWLEOH0DWHULDO 
$VVHPEO\ 
Operating Control 17
Connecting the Flue 17
/LJKWLQJWKH¿UHIRUWKH¿UVWWLPH 
0DLQWHQDQFH 
Cleaning and inspection 17
Ashes 18
Thermotte™ Insulating Plates 18
Door and glass 18
:DUUDQW\ 
$GYLFHRQOLJKWLQJD¿UH 
6RPHDGYLFHLQFDVHRIFRPEXVWLRQSUREOHPV 
 ,03257$17:KHQOLIWLQJRUKDQGOLQJWKHVWRYHZHVWURQJO\UHFRPPHQGWKDWWKHVWRYHUHPDLQLQ
LWVSDOOHWFULERUOLIWHGXVLQJWKHSURYLGHGKDUQHVV/LIWLQJLQWKHGRRURUDSSO\LQJSUHVVXUHWRWKHJODVV
PD\UHVXOWLQSHUPDQHQWGDPDJHDQGZLOOQRWEHFRYHUHGE\WKHZDUUDQW\
!
16 GB
a soot deposits in the chimney.
:DUQLQJ .HHSWKHDLULQWDNHVVXSSO\LQJ
FRPEXVWLRQDLUIUHHIURPEORFNDJH
,IWKHUHTXLUHPHQWVIRUYHQWLODWLRQDUH
127FRPSOLHGZLWKWKHSURGXFWFDQRYHUKHDW
7KLVFDQFDXVHD¿UH
:DUUQLQJ([WUDFWRUIDQVZKHQRSHUDWLQJ
LQWKHVDPHURRPRUVSDFHDVWKHDSSOLDQFH
PD\FDXVHSUREOHP
For your own safety, comply with the assembly instructions.
All safety distances are minimum distances. Installation of the
stove must comply with the current rules and regulations of
the country where the product is installed. Nordpeis AS is not
responsible for wrongly assembled stoves.
The illustrations indicate the approximate centre height of the
UHFHVVIRUWKHÀXH&RQVLGHUSRVVLEOHLQFOLQDWLRQRIWKHÀXH
SULRUWRSHUIRUDWLQJWKHFKLPQH\'LVWRUWLRQVLQÀRRUVDQGZDOOV
PD\DOVRLQÀXHQFHWKHKHLJKW3ODFHWKHVWRYHIRUDFFXUDWH
KHLJKWDQGSRVLWLRQLQJRIWKHÀXHFKLPQH\FRQQHFWLRQ
Subject to errors and changes.
For the latest updated version go to www.nordpeis.com.
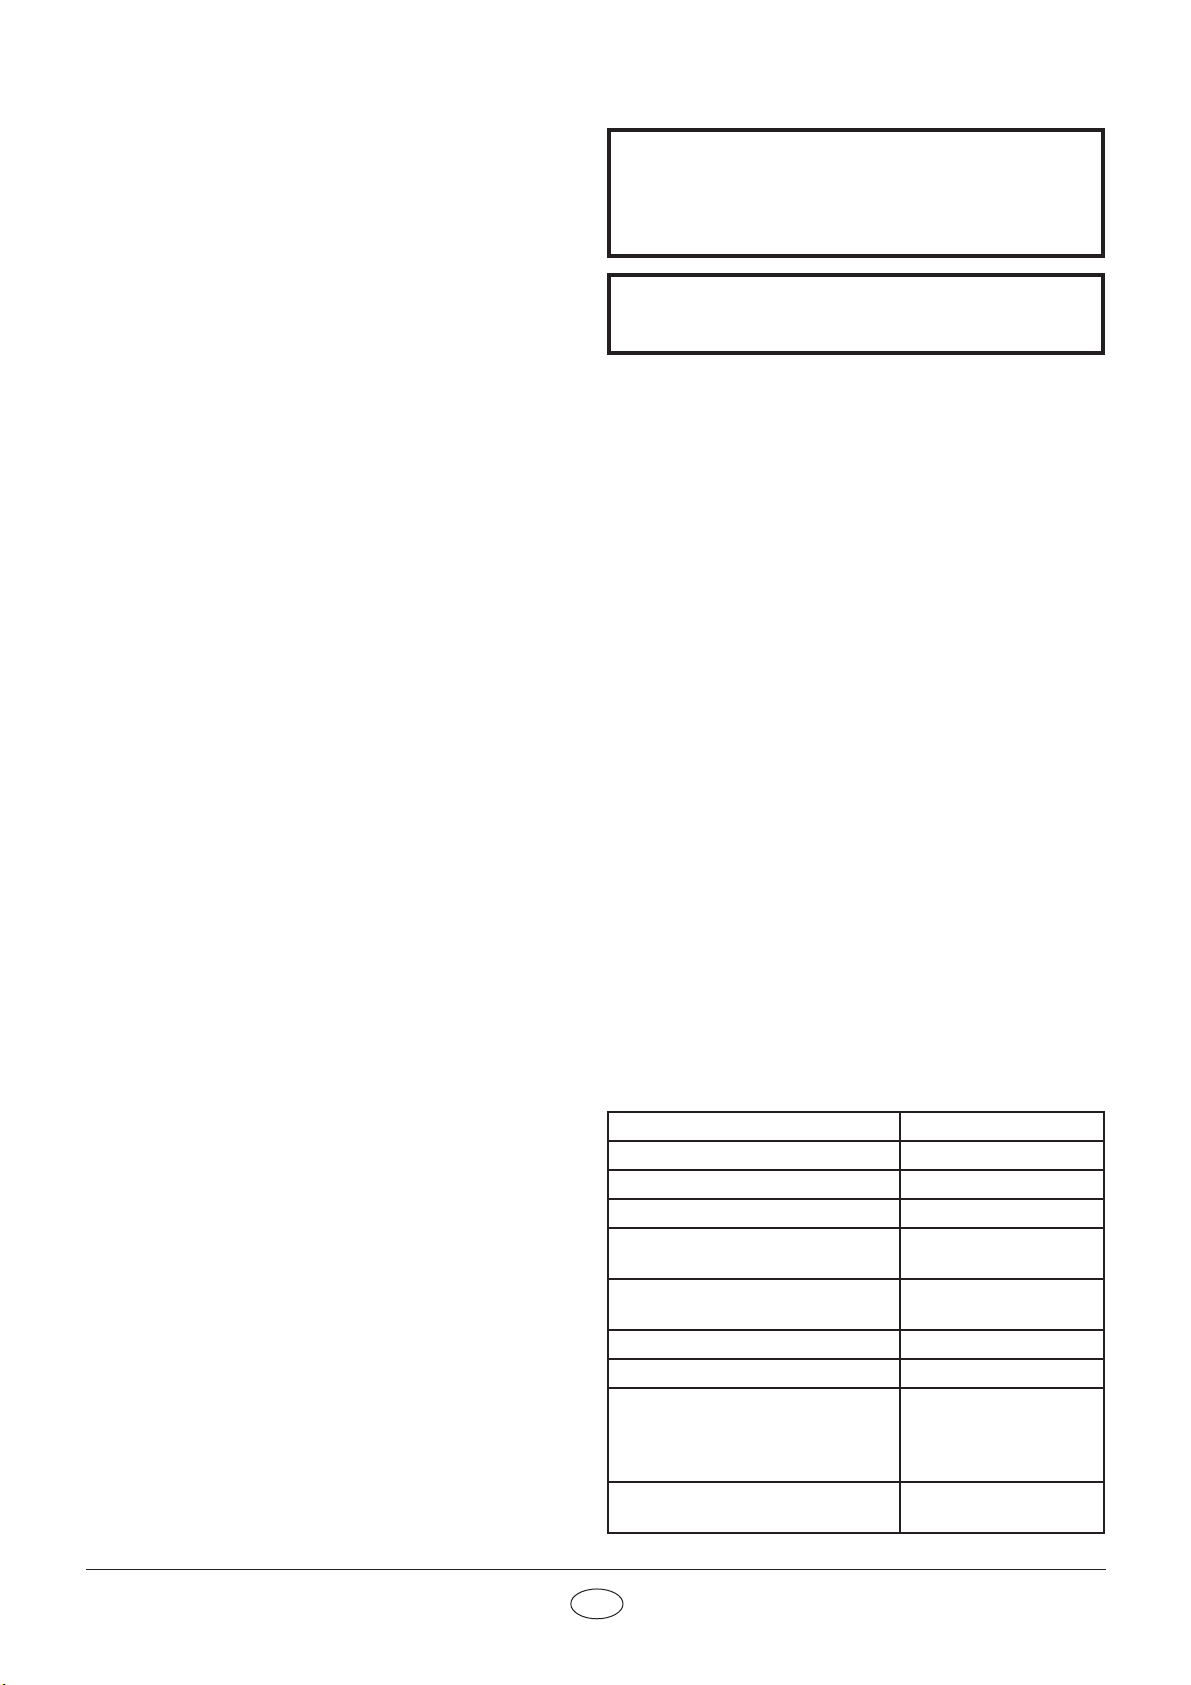
7HFKQLFDOLQIRUPDWLRQ
The stoves from Nordpeis all have secondary
combustion and are clean burning. The combustion
WDNHVSODFHLQWZRSKDVHV¿UVWWKHZRRGEXUQVDQG
then the gases from the fumes are lit by the hot air.
This ensures that these new stoves have minimal
emissions of soot particles and un-burnt gases (such
as CO) and are thus better for the environment. Clean
burning stoves require a small amount of wood in order
to obtain a good heat output. Use exclusively clean and
GU\ZRRG:HUHFRPPHQGVHDVRQHGKDUGZRRGZLWKD
maximum moisture content of 20%.
Material Steel
:HLJKWNJ
ZLWKVLGHJODVVZRVLGHJODVV 83 / 86
'UDXJKWV\VWHP Air vent control
&RPEXVWLRQV\VWHP Secondary combustion
(clean burning)
2SHUDWLQJUDQJH&OHDQEXUQ
N: 3-6
0D[LPXPIXHOOHQJWKFP 37
Flue outlet Top and rear
)OXHPP
Outer Ø 150 mm
*Alternative versions
exsists due to National
requirements
)OXHJDVWHPSHUDWXUHDWÀXH
FRQQHFWRU& 388
%HIRUHLQVWDOOLQJDQHZVWRYH
All our products are tested according to the latest
European requirements and also WRWKH1RUZHJLDQ
standard NS 3058 and NS 3059, which include particle
tests. However, several European countries have local
UHJXODWLRQVIRULQVWDOODWLRQRI¿UHSODFHVZKLFKFKDQJH
regularly. It is the responsibility of the client that these
regulations are complied with in the country/region
ZKHUHWKH¿UHSODFHLVLQVWDOOHG1RUGSHLV$6LVQRW
responsible for incorrect installation.
Important to check :
• GLVWDQFHIURP¿UHER[WRFRPEXVWLEOHÀDPPDEOH
materials
• insulation materials/requirements between
¿UHSODFHVXUURXQGDQGEDFNZDOO
• VL]HRIÀRRUSODWHVLQIURQWRI¿UHSODFHLIUHTXLUHG
• ÀXHFRQQHFWLRQEHWZHHQ¿UHER[DQGFKLPQH\
• LQVXODWLRQUHTXLUHPHQWVLIÀXHSDVVHVWKURXJKD
ÀDPPDEOHZDOO
&KLPQH\GUDXJKW
Compared with older models, the clean burning stoves
RIWRGD\SXWVLJQL¿FDQWO\KLJKHUGHPDQGVRQWKH
chimney. Even the best stove will not work properly
if the chimney does not have the right dimensions or
is not in good working order. The draught is mainly
controlled by gas temperature, outside temperature,
air supply as well as the height and inner diameter of
WKHFKLPQH\5HFRPPHQGHGHႇHFWLYHFKLPQH\KHLJKW
is minimum 4 meters with a diameter of 150 – 200mm.
The diameter of the chimney should never be less than
WKDWRIWKHÀXHFKLPQH\FROODUFor draft requirements at
nominal heat output, see technical table
The draught increases when:
• The chimney becomes warmer than the outside air
• The active length of the chimney over the hearth
increases
• There is good air supply to the combustion
,WFDQEHGLႈFXOWWRREWDLQWKHULJKWGUDXJKWFRQGLWLRQV
in case the chimney is too large relative to the stove,
as the chimney does not heat up well enough. In such
cases you should contact professional for evaluation
of possible measures. Draught that is too strong can
be controlled with a damper. If necessary, contact a
chimney sweeper.
$LUVXSSO\
A set for fresh air supply is available as accessory.
This will ensure that the air supply to the combustion
FKDPEHULVOHVVDႇHFWHGE\YHQWLODWLRQV\VWHPV
kitchen fans and other factors which can create a
down-draught in the room. In all new construction, we
strongly recommend that it is designed and prepared
for direct supply of outside air. In older houses, the use
of fresh air supply set is also recommended. ,QVXႈFLHQW
air supply can cause down-draught and thereby low
FRPEXVWLRQHႈFLHQF\DQGWKHSUREOHPVWKDWWKLVHQWDLOV
VRRWVWDLQVRQWKHJODVVLQHႈFLHQWXVHRIWKHZRRGDQG
17
GB
'UDIWDWÀXHFRQQHFWRU
UHFRPPHQGHG3D 15 - 25
1RPLQDOKHDWRXWSXWN: 5,8
(ႈFLHQF\ 79
&2#2 0,07
)OXHJDVWHPSHUDWXUH& 324
'UDIW3D 15
)XHOUHFRPPHQGHG :RRG
)XHOOHQJWKUHFRPHQGHGFP 30-35
)XHOFKDUJHNJ 1,20
5HIXHOLQJLQWHUYDOPLQXWHV 45
Operation Intermittent*
,QWHUPLWWHQWFRPEXVWLRQUHIHUVWRQRUPDOXVHRID¿UHSODFHLHQHZ
wood is inserted when the previous load has burned down to ember
:DUQLQJ,IWKHUHTXLUHPHQWVIRUYHQWLODWLRQDUH
127FRPSOLHGZLWKWKHFRROLQJDLUÀRZDURXQGWKH
SURGXFWZLOOEHFRQVLGHUDEO\UHGXFHGDQG
WKHSURGXFWFDQRYHUKHDW
7KLVFDQFDXVHD¿UH
'LVWDQFHWRFRPEXVWLEOHPDWHULDO
Ensure that the safety distances are respected
(FIG 1A and 1B).
:KHQFRQQHFWLQJDVWHHOFKLPQH\WRWKHWRSRXWOHWXVH
the security distances required from the manufacturer.
$VVHPEO\
• FIG 2 - Rear air connection
• FIG 3 - Bottom air connection
• ),*5HDUÀXHFRQQHFWLRQ
• ),*7RSÀXHFRQQHFWLRQ
• FIG 6, 7 - Thermotte plates disassembling
• FIG 8 - Air vent control
2SHUDWLQJFRQWURO
:KHQWKHVWRYHLVLQDQXSULJKWSRVLWLRQDQGSULRU
to connecting it, control that all functions are easy to
manoeuvre and appear satisfactory.
&RQQHFWLQJWKHÀXH
3OHDVHEHDZDUHZKHQFRQQHFWLQJWKHPPÀXHWR
WKHVPRNHGRPHWKDWWKHÀXHLVSODFHGRXWVLGHWKHÀXH
outlet collar. *Alternative versions exsists due to
1DWLRQDOUHTXLUHPHQWV)RUWKHÀXHFRQQHFWLRQWRWKH
chimney, follow the recommendations from the chimney
manufacturer. :HUHFRPPHQGDPD[LPXPFKLPQH\
ZHLJKWRINJ
/LJKWLQJWKH¿UHIRUWKH¿UVWWLPH
:KHQWKHVWRYHLVDVVHPEOHGDQGDOOLQVWUXFWLRQVKDYH
EHHQREVHUYHGD¿UHFDQEHOLW
Take care when inserting logs into the burn chamber,
in order not to damage the Thermotte plates. Please
note that there might be some humidity in the insulation
SODWHVZKLFKFDQUHVXOWLQDVORZHUEXUQUDWHWKH¿UVWIHZ
times the stove is used. These will be resolved once the
humidity has evaporated. ,WLVDGYLVDEOHWRYHQWLODWH
WKHURRPZHOOZKHQ¿ULQJIRUWKH¿UVWWLPHDVWKH
YDUQLVKRQWKHVWRYHPD\UHOHDVHVRPHVPRNHRU
smell. Both the smoke and smell will disappear and are
not hazardous.
/LJKWLQJD¿UH
Insert small dry pieces of kindling wood,open the air
YHQWFRQWURODQGLJQLWH:KHQWKHÀDPHVDUHVWDEOHDQG
the chimney is warm, the air supply is regulated with the
air vent control.
:KHQWKHUHLVDJORZLQJOD\HURIDVKQHZZRRGORJV
can be inserted. Pull the hot ember to the front of the
combustion chamber when inserting new logs so that
WKHZRRGLVLJQLWHGIURPWKHIURQW7KH¿UHVKRXOGEXUQ
ZLWKEULJKWDQGOLYHO\ÀDPHV
8VLQJWKHVWRYHZLWKORZFRPEXVWLRQHႇHFWDQG¿ULQJ
around the clock increase pollution as well as the risk
IRUD¿UHLQWKHFKLPQH\1HYHUDOORZWKHVWRYHRUÀXH
WREHFRPHJORZLQJUHG7XUQRႇWKHDLUYHQWFRQWURO
should this happen. Regulation of the air vent control
takes some experience, but after a little while a natural
UK\WKPIRUWKH¿UHZLOOEHIRXQG
,03257$17$OZD\VUHPHPEHUWRRSHQWKHDLU
YHQWFRQWUROZKHQQHZZRRGORJVDUHLQVHUWHG
LQWRDKRWEXUQFKDPEHU/HWWKHÀDPHVJHW
HVWDEOLVKHGRQWKHZRRGEHIRUHWKHDLUVXSSO\LV
UHGXFHG
:KHQWKHGUDXJKWLQWKHFKLPQH\LVORZDQG
WKHYHQWVDUHFORVHGWKHJDVIURPWKH¿UHZRRG
FDQEHLJQLWHGZLWKDEDQJ7KLVFDQFDXVH
GDPDJHVWRWKHSURGXFWDVZHOODVWKHLPPHGLDWH
HQYLURQPHQW
6. 0DLQWHQDQFH
&OHDQLQJDQGLQVSHFWLRQ
The stove should be inspected thoroughly and cleaned
at least once per season (possibly in combination
with the sweeping of the chimney and chimney pipes).
Ensure that all joints are tight and that the gaskets are
rightly positioned. Exchange any gaskets that are worn
or deformed.
5HPHPEHUWKDWWKHVWRYHPXVWDOZD\VEHFROG
ZKHQLQVSHFWHG
18 GB
Ashes
The ashes should be removed at regular intervals.
Be aware that the ashes can contain hot ember even
VHYHUDOGD\VDIWHUWKH¿UHLV¿QLVKHG8VHDFRQWDLQHU
of non-combustible material to remove the ashes. It is
recommended to leave a layer of ashes in the bottom
as this further insulates the burn chamber. Take care
with the Thermotte plates when the ashes are removed,
particularly when using an ash shovel, so as not to
damage them.
7KHUPRWWHLQVXODWLQJSODWHV
The insulation plates (Thermotte - FIG 7Bb) are
FODVVL¿HGDV³ZHDUDQGWHDU´SDUWVZKLFKZLOOUHTXLUH
to be exchanged after some years. The wear time will
depend on the individual use of your product.
1RUGSHLVRႇHUVDRQH\HDUZDUUDQW\RQWKHVHSDUWV
After this, replacements can be purchased.
If new plates are needed, contact your dealer:
$%DႉHSODWH
B. Back plate
C. Fire plate
D. Right bottom plate
E. Left bottom plate
F. Lateral plate right - w/o side glass (*)
G. Lateral plate left - w/o side glass (*)
Please note: Wood logs that are too long can cause
strain and crack the plates, due to the tension created
between the side plates.
'RRUDQGJODVV
Should there be any soot on the glass it may be
necessary to clean it. Use dedicated glass cleaner, as
other detergents may damage the glass. (Attention!
Be careful, even dedicated glass cleaner can damage
the varnish on the door frame). A good advice for
cleaning the glass is to use a damp cloth or kitchen roll
paper and apply some ash from the burn chamber.
5XEDURXQGWKHDVKRQWKHJODVVDQG¿QLVKRႇZLWKD
piece of clean and damp kitchen roll paper. Attention!
2QO\FOHDQZKHQWKHJODVVLVFROG
Check regularly that the transition between the glass
and the door is completely tight. Periodically, it may be
necessary to change the gaskets on the door to ensure
that the burn chamber is air tight and working optimally.
These gaskets can be bought as a set, usually including
ceramic glue.
Ceramic glass should
be disposed of as resid-
ual waste, together with
pottery and porcelain
CERAMIC GLASS
CANNOT BE
RECYCLED
5HF\FOLQJRIWKHFHUDPLFJODVV
Ceramic glass cannot be recycled. Old glass, breakage
or otherwise unusable ceramic glass, must be discarded
as residual waste. Ceramic glass has a higher melting
temperature, and can therefore not be recycled together
with glass. In case it would be mixed with ordinary
glass, it would damage the raw material and could, in
worst case end the recycling of glass. It is an important
contribution to the environment to ensure that ceramic
glass does not end up with the recycling of ordinary
glass.
3DFNDJLQJUHF\FOH
The packaging accompanying the product should be
recycled according to national regulations.
:DUUDQW\
:DUQLQJ
8VHUHSODFHPHQWSDUWVUHFRPPHQGHGRQO\E\
WKH0DQXIDFWXUHU
:DUQLQJ
$Q\XQDXWKRUL]HGPRGL¿FDWLRQRIWKHDSSOLDQFH
ZLWKRXWZULWWHQSHUPLVVLRQRIWKH0DQXIDFWXUHU
are prohibited.
)RUGHWDLOHGGHVFULSWLRQRIWKHZDUUDQW\FRQGLWLRQVVHH
WKHHQFORVHGZDUUDQW\FDUGRUYLVLWRXUZHEVLWH
ZZZQRUGSHLVFRP
$GYLFHRQOLJKWLQJD¿UH
7KHEHVWZD\WROLJKWD¿UHLVZLWKWKHXVHRIOLJKWHQLQJ
briquettes and dry kindling wood. Newspapers cause a
lot of ash and the ink is damaging for the environment.
$GYHUWLVLQJÀ\HUVPDJD]LQHVPLONFDUWRQVDQGVLPLODU
DUHQRWVXLWDEOHIRUOLJKWLQJD¿UH*RRGDLUVXSSO\LV
important at ignition.
:DUQLQJ,QRUGHUWRDYRLGLQMXULHVSOHDVHEH
DZDUHWKDWWKHVXUIDIDFHPD\EHFRPHKRWGXULQJ
RSHUDWLRQDQGWKDWH[WUDFDUHQHHGWREHWDNHQWR
DYRLGVNLQEXUQ
19
GB
:DUQLQJ1(9(5XVHDOLJKWLQJIXHOVXFKDV
SHWURONHURVHQHDOFRKRORUVLPLODUIRUOLJKWLQJ
D¿UH7KLVFRXOGFDXVHLQMXU\WR\RXDVZHOODV
GDPDJLQJWKHSURGXFW
Use clean and dry wood with a maximum moisture
content of 20%. Humid wood requires a lot of air for
the combustion, as extra energy/heat is required for
GU\LQJWKHKXPLGZRRGDQGWKHKHDWHႇHFWLVWKHUHIRUH
minimal. This in addition creates soot in the chimney
ZLWKWKHULVNRIFUHRVRWHDQGFKLPQH\¿UH
,QFDVHRIDFKLPQH\¿UHFORVH the door and air
VXSSOLHVRQWKHVWRYHDQGFDOOWKH)LUH
%ULJDGH$IWHUDFKLPQH\¿UHWKHFKLPQH\PXVWLQ
DOOFDVHVEHLQVSHFWHGE\DQDXWKRUL]HGFKLPQH\
VZHHSHUEHIRUH\RXXVHWKHDSSOLDQFHDJDLQ
6WRULQJRIZRRG
In order to ensure that the wood is dry, the tree should
be cut in winter and stored during the summer, covered
and in a location with adequate ventilation. The wood
pile must never be covered by a tarpaulin lying on the
ground as the tarpaulin will then act as a sealed lid that
will prevent the wood from drying. Always keep a small
amount of wood indoors for a few days before use so
that moisture in the surface of the wood can evaporate.
8VDJH
Not enough air to the combustion may cause the glass
WRVRRW+HQFHVXSSO\WKH¿UHZLWKDLUMXVWDIWHUWKH
ZRRGLVDGGHGVRWKDWWKHÀDPHVDQGJDVHVLQWKH
combustion chamber are properly burnt. Open the air
YHQWLQRUGHUIRUWKHÀDPHVWRHVWDEOLVKSURSHUO\RQWKH
wood.
Note that the air supply for the combustion also can
EHWRRODUJHDQGFDXVHDQXQFRQWUROODEOH¿UHWKDWYHU\
quickly heats up the whole combustion chamber to an
extremely high temperature (when using with a closed
or nearly closed door). For this reason you should never
¿OOWKHFRPEXVWLRQFKDPEHUFRPSOHWHO\ZLWKZRRG
&KRLFHRIIXHO
All types of wood, such as birch, beech, oak, elm, ash
DQGIUXLWWUHHVFDQEHXVHGDVIXHOLQWKHVWRYH:RRG
VSHFLHVKDYHGLႇHUHQWGHJUHHVRIGHQVLW\WKHPRUH
dense the wood is, the higher the energy value. Beech,
oak and birch has the highest density.
$WWHQWLRQ:HGRQRWUHFRPPHQGXVLQJIXHO
EULTXHWWHVFRPSDFWZRRGLQRXUSURGXFWV8VHRI
VXFKIXHOPD\FDXVHWKHSURGXFWWRRYHUKHDWDQG
H[FHHGWKHWHPSHUDWXUHVGHWHUPLQHGVDIH
%XUQLQJEULTXHWWHVFRPSDFWZRRGLVGRQHVRDW
\RXURZQULVNDQGRQO\VPDOODPRXQWVPD[RI
QRUPDOORDGVKRXOGEHXVHGIRUHDFKORDG
:DUQLQJ
1(9(5XVHLPSUHJQDWHGZRRGSDLQWHGZRRG
SO\ZRRGFKLSERDUGUXEELVKPLONFDUWRQV
SULQWHGPDWHULDORUVLPLODU,IDQ\RIWKHVHLWHPV
DUHXVHGDVIXHOWKHZDUUDQW\LVLQYDOLG
&RPPRQWRWKHVHPDWHULDOVLVWKDWGXULQJ
FRPEXVWLRQWKH\FDQIRUPK\GURFKORULF
DFLGDQGKHDY\PHWDOVWKDWDUHKDUPIXOWR
WKHHQYLURQPHQW\RXUVHOIDQGWKHLQVHUW
+\GURFKORULFDFLGFDQDOVRFRUURGHWKHVWHHOLQ
WKHFKLPQH\RUPDVRQU\LQDPDVRQU\FKLPQH\
$OVRDYRLGEXUQLQJZLWKEDUNVDZGXVWRURWKHU
H[WUHPHO\¿QHZRRGDSDUWIURPZKHQOLJKWLQJ
D¿UH7KLVIRUPRIIXHOFDQHDVLO\FDXVHD
ÀDVKRYHUWKDWFDQOHDGWRWHPSHUDWXUHVWKDWDUH
WRRKLJK
:DUQLQJ
0DNHVXUHWKHLQVHUWLVQRWRYHUKHDWHGLWFDQ
FDXVHLUUHSDUDEOHGDPDJHWRWKHSURGXFW6XFK
GDPDJHLVQRWFRYHUHGE\WKHZDUUDQW\
6RXUFH³+nQGERNHႇHNWLYRJPLOM¡YHQQOLJYHGI\ULQJ´E\(GYDUG
Karlsvik SINTEF Energy Research AS and Heikki Oravainen
20 GB
6RPHDGYLFHLQFDVHRIFRPEXVWLRQSUREOHPV
Error Explanation Solution
1RGUDXJKW
The chimney is blocked Contact a chimney sweeper / dealer for more information or clean
WKHÀXHVPRNHEDႉHDQGEXUQFKDPEHU
7KHÀXHLVVRRW\RUWKHUHLVDFFXPXODWHGVRRWRQWKH
VPRNHEDႉH
7KHVPRNHEDႉHLVZURQJO\SRVLWLRQHG 9HULI\WKHDVVHPEO\RIWKHVPRNHEDႉHVHHDVVHPEO\LQVWUXFWLRQV
7KHVWRYH
release smoke
ZKHQOLJKWLQJ
WKH¿UHDQG
GXULQJFRPEXV-
tion
Downdraught in the room caused by no draught, that the
KRXVHLVWRR³DLUWLJKW´
/LJKWWKH¿UHZLWKDQRSHQZLQGRZ,IWKLVKHOSVPRUHELJJHUYHQWV
must be installed in the room.
Downdraught in the room – caused by extractor and/or
central ventilation system that pulls too much air out of
the room.
7XUQRႇUHJXODWHH[WUDFWRUDQGRURWKHUYHQWLODWLRQ,IWKLVKHOSV
more vents must be installed.
7KHÀXHVIURPWZR¿UHSODFHVVWRYHVDUHFRQQHFWHGWR
the same chimney at the same height.
2QHÀXHPXVWEHUHSRVLWLRQHG7KHKHLJKWGLႇHUHQFHRIWKHWZRÀXH
pipes must be of at least 30 cm.
7KHÀXHLVLQDGHFOLQLQJSRVLWLRQIURPWKHVPRNHGRPH
to the chimney.
7KHÀXHPXVWEHPRYHGVRWKDWWKHUHLVDQLQFOLQDWLRQRIDWOHDVW
10º from smoke dome to chimney. Possibly install a smoke suction
device*.
7KHÀXHLVWRRIDULQWRWKHFKLPQH\
7KHÀXHPXVWEHUHFRQQHFWHGVRWKDWLWGRHVQRWHQWHULQWRWKH
chimney but ends 5 mm before the chimney inner wall. Possibly
install a smoke suction device*.
Soot hatch in the basement or attic that is open and thus
creating a false draught.
Soot hatches must always be closed. Hatches that are not tight or
are defected must be changed.
'DPSHUWRSGUDXJKWYHQWVRUGRRUVRQ¿UHSODFHVWKDWDUH
not in use are open and create a false draught.
&ORVHGDPSHUGRRUVDQGWRSGUDXJKWYHQWVRQ¿UHSODFHVWKDWDUH
not in use.
$QRSHQKROHLQWKHFKLPQH\DIWHUWKDWD¿UHSODFHKDV
been removed, thus creating a false draught. +ROHVPXVWEHFRPSOHWHO\VHDOHGRႇZLWKPDVRQU\
Defect masonry in the chimney, e.g. it is not airtight
DURXQGWKHÀXHSLSHHQWU\DQGRUEURNHQSDUWLWLRQLQVLGH
the chimney creating a false draught.
Seal and plaster all cracks and sites that are not tight.
The cross-section in the chimney is too large which
results in no or very low draught.
7KHFKLPQH\PXVWEHUH¿WWHGSRVVLEO\LQVWDOODVPRNHVXFWLRQ
device*.
The cross-section in the chimney is too small and the
chimney cannot carry out all the smoke.
&KDQJHWRDVPDOOHU¿UHSODFHRUEXLOGQHZFKLPQH\ZLWKDODUJHU
cross section. Possibly install a smoke suction device*.
The chimney is too low and hence a poor draught. Increase the height of the chimney and/or install a chimney cap/
smoke suction device*.
7KHVWRYH
releases smoke
inside when
LWLVZLQG\
outside.
The chimney is too low in relationship to the surrounding
terrain, buildings, trees etc.
Increase the height of the chimney and/or install a chimney cap/
smoke suction device*.
Turbulence around the chimney due to the roof being
WRRÀDW
Increase the height of the chimney and/or install a chimney cap/
smoke suction device*.
7KHVWRYHGRHV
not heat suf-
¿FLHQWO\
The combustion receives too much oxygen due to a
leakage under the lower border of the stove or too strong
FKLPQH\GUDXJKW'LႈFXOWWRUHJXODWHWKHFRPEXVWLRQDQG
the wood burn up too quickly.
$Q\SRVVLEOHOHDNDJHPXVWEHVHDOHGRႇ$GUDXJKWUHJXODWRURU
possibly a damper can reduce the chimney draught. NB! A leakage
of only 5 cm2 is enough for 30% of the heated air to disappear.
7RRPXFK
GUDXJKW
7KHVPRNHEXႇHULVZURQJO\SRVLWLRQHG 9HULI\WKHSRVLWLRQLQJRIWKHVPRNHEXႇHU±VHHDVVHPEO\LQVWUXF-
tions.
In case of using oven-dried wood, this requires less air
supply than when using normal wood. Turn down the air supply.
7KHJDVNHWVDURXQGWKHGRRUDUHZRUQDQGWRWDOO\ÀDW Replace the gaskets, contact your dealer.
The chimney is too large. Contact chimneysweeper or other professional for more details.
7KHJODVVLV
VRRW\
The wood is too wet. Only use dry wood with a humidity of maximum 20%.
The air vent control is closed too tightly.
2SHQWKHDLUYHQWFRQWUROWRDGGDLUWRWKHFRPEXVWLRQ:KHQQHZ
wood logs are inserted all vent controls should be completely
RSHQHGRUWKHGRRUVOLJKWO\RSHQHGXQWLOWKHÀDPHVKDYHDJRRG
take on the wood.
:KLWHJODVV
Bad combustion (the temperature is too low) Follow the guidelines in this user guide for correct combustion.
Using wrong material for combustion (such as: painted
or impregnated wood, plastic laminate, plywood etc) Ensure to use only dry and clean wood.
Smoke is relea-
sed when the
door is opened
A levelling out of pressure occurs in the burn chamber. Open the air vent control for about 1 min before opening the door
– avoid opening the door too quickly.
7KHGRRULVRSHQHGZKHQWKHUHLVD¿UHLQWKHEXUQ
chamber. Open the door carefully and/or only when there is hot ember.
:KLWHVPRNH The combustion temperature is too low. Increase the air supply.
The wood is humid and contains water damp. Ensure to use only dry and clean wood.
%ODFNRUJUH\
EODFNVPRNH ,QVXႈFLHQWFRPEXVWLRQ Increase the air supply.
42

















0H3HGHVWDO PPDLUFKLPQH\
43
0(VWRYHZLWKVLGHJODVV



XQLQVXODWHGFKLPPH\
0(VWRYHZLWKRXWVLGHJODVV




ŝŶƐƵůĂƚĞĚĐŚŝŵŵĞLJ
= Brennbart materiale/ Brännbart material/ Combustible material/ Palavasta materiaalista/ Brennbarem Material/ Matières combustibles
0(VWRYHVDIHW\GLVWDQFHVFIG 1A
450
450
80
80
FIG 1B
44
= Brannmur/ Brandmur/ Firewall/ Palomuuri/ Hitzenschutzwand/ Mur pare feu
= Brennbart materiale/ Brännbart material/ Combustible material/ Palavasta materiaalista/ Brennbarem Material/ Matières combustibles
>700 mm
700 mm
400 mm
0(3HGHVWDOZLWKVLGHJODVVVDIHW\GLVWDQFHV
1100 mm
1100 mm
= 0DWHULDáSDOQ\
45
300 mm
100 mm
>700 mm
0(3HGHVWDOZRVLGHJODVVVDIHW\GLVWDQFHV),*&
= Brannmur/ Brandmur/ Firewall/ Palomuuri/ Hitzenschutzwand/ Mur pare feu
= Brennbart materiale/ Brännbart material/ Combustible material/ Palavasta materiaalista/ Brennbarem Material/ Matières combustibles
1100 mm
1100 mm
%DNUHOXIWVWLONREOLQJ%DNUHOXIWDQVOXWQLQJ
5HDUDLUFRQQHFWLRQ3DODPLVLOPDOLLWlQWlWDNDQD
+LQWHUHU/XIWDQVFKOXVV5DFFRUGHPHQWG¶DLUSDUO¶DUULqUH
46
FIG 2 0(3HGHVWDOZLWKVLGHJODVVZRVLGHJODVV
1. 2.
Dersom hverken DV-settet eller annen utelufttilkobling brukes må luftilkoblingen
under ovnen åpnes for å sikre tilstrekkelig forbrenningsluft.
Om varken DV friskluftsanslutning (tilluft genom skorsten) eller annan extern
lufttillförsel används, måste lufttillförseln i botten öppnas för att säkra nödvändig
förbränningsluft.
If neither DV-kit, nor other external air connection is used, the bottom air connection must be
opened in order to secure required combustion air.
Jos DV-kit paloilmansyöttö tai muu ulkoa tuotu paloilmaputki on käytössä, niin
pohjassa oleva paloilma-aukko on myös oltava auki jotta paloilmaa saadaan
tarpeeksi.
:HQQNHLQH[WHUQHU/XIWDQVFKOXVVYHUZHQGHWZLUGPXVVGHU%RGHQOXIWDQVFKOXVVJH|ႇQHW
werden, um die benötigte Verbrennungsluft zu sichern.
Si ni le kit DV, ni aucune autre connexion d’air externe n’est utilisée, la connexion d’air
LQIpULHXUHGRLWrWUHRXYHUWHSRXUJDUDQWLUXQDSSRUWG¶DLUFRPEXVWLRQVXႈVDQW
NO
FI
GB
SE
DE
FR
47
FIG 2a
1. 2.
TORX
21-30011-408 x4
22-ME000-550
T
1HGUHOXIWVWLONREOLQJ8QGUHOXIWDQVOXWQLQJ
%RWWRPDLUFRQQHFWLRQ3DODPLVLOPDOLLWlQWlSRKMDVVD
8QWHUHU/XIWDQVFKOXVV5DFFRUGHPHQWG¶DLUSDUOHEDV
FIG 3 0(3HGHVWDOZLWKVLGHJODVVZRVLGHJODVV
A. B.
AIR
AIR
48
1. 2.
FIG 3a
FIG 3b
1.
TORX
O
RX
2.
4.
3.
49
),*F
1. 2.
TORX
22-ME000-550
21-30011-408 x4
3.
FIG 4
%DNUHU¡\NU¡UVWLONREOLQJ%DNUHU|NU|UVDQVOXWQLQJ5HDUÀXHFRQQHFWLRQ
6DYXSLLSSXOLLWlQWlWDNDQD+LQWHUHU5DXFKJDVDEVFKOXVV5DFFRUGHPHQWGXFRQGXLWSDUO¶DUULqUH
1. 2.
0(3HGHVWDOZLWKVLGHJODVVZRVLGHJODVV
FIG 4a
FIG 5
YUHU¡\NU¡UVWLONREOLQJgYUHU|NU|UVDQVOXWQLQJ7RSÀXHFRQQHFWLRQ
6DYXSLLSSXOLLWlQWlNDQQHVVD2EHUHU5DXFKJDVDEVFKOXVV5DFFRUGHPHQWGXFRQGXLWSDUOHKDXW
0(3HGHVWDOZLWKVLGHJODVVZRVLGHJODVV
50
1. 2.
21-30001-520 x2
SP-ME000-070
4 mm
1. 2.
FIG 5b
),*F
1. 2.
21-30001-520 x2
SP-ME000-070
4 mm
51
1. 2.
3. 4.
4 mm
FIG 6
1. 2.
0(3HGHVWDOZLWKVLGHJODVV
'HPRQWHULQJDY7KHUPRWWHSODWHU'HPRQWHULQJDYWKHUPRWWHSODWWRU
7KHUPRWWHSODWHVGLVDVVHPEOLQJ7KHUPRWWHOHY\MHQLUURWXV
7KHUPRWWH3ODWWHQ$XVEDX'pPRQWDJHGHV3ODTXHV7KHUPRWWH
6HHJHQPRQWHULQJVDQYLVQLQJ
6HHVHSDUDWHLQVWUXFWLRQ
6HHJHQPRQWHULQJVDQYLVQLQJ
Katso erilliset ohjeet
%HDFKWHQ6LHGLHVHSHUDWH0RQWDJHDQOHLWXQJ
9RLUOHPDQXHOG¶LQVWDOODWLRQVpSDUp
0H&RYHUULQJIRUQRQLQVXODWHGÀXHSLSH
52
FIG 6a
1
2
FIG 6b
53
FIG 6d
),*F
54

Other manuals for ME Pedestal

2

This manual suits for next models

2

Other Nordpeis Indoor Fireplace manuals

Nordpeis GLASGOW User manual

Nordpeis

Nordpeis GLASGOW User manual

Nordpeis FP-CH002-200 User manual

Nordpeis

Nordpeis FP-CH002-200 User manual

Nordpeis Quadro High top SA-QUADR-340 User manual

Nordpeis

Nordpeis Quadro High top SA-QUADR-340 User manual

Nordpeis Geilo User manual

Nordpeis

Nordpeis Geilo User manual

Nordpeis ME Pedestal User manual

Nordpeis

Nordpeis ME Pedestal User manual

Nordpeis Madrid User manual

Nordpeis

Nordpeis Madrid User manual

Nordpeis Smarty User manual

Nordpeis

Nordpeis Smarty User manual

Nordpeis Praha User manual

Nordpeis

Nordpeis Praha User manual

Nordpeis N-29PX User manual

Nordpeis

Nordpeis N-29PX User manual

Nordpeis Odense Exclusive High FP-ODE02-2X0 User manual

Nordpeis

Nordpeis Odense Exclusive High FP-ODE02-2X0 User manual

Nordpeis Sakai User manual

Nordpeis

Nordpeis Sakai User manual

Nordpeis FP-CAN01-100 User manual

Nordpeis

Nordpeis FP-CAN01-100 User manual

Nordpeis Ellen User manual

Nordpeis

Nordpeis Ellen User manual

Nordpeis Stockholm High User manual

Nordpeis

Nordpeis Stockholm High User manual

Nordpeis Roma Kjokken User manual

Nordpeis

Nordpeis Roma Kjokken User manual

Nordpeis X-25F User manual

Nordpeis

Nordpeis X-25F User manual

Nordpeis Q-34AL - Powerstone User manual

Nordpeis

Nordpeis Q-34AL - Powerstone User manual

Nordpeis Lisboa User manual

Nordpeis

Nordpeis Lisboa User manual

Nordpeis Salzburg S User manual

Nordpeis

Nordpeis Salzburg S User manual

Nordpeis Me Basic User manual

Nordpeis

Nordpeis Me Basic User manual

Nordpeis N-36A Exclusive User manual

Nordpeis

Nordpeis N-36A Exclusive User manual

Nordpeis Ronda 160 User manual

Nordpeis

Nordpeis Ronda 160 User manual

Nordpeis S-31A User manual

Nordpeis

Nordpeis S-31A User manual

Nordpeis Odense User manual

Nordpeis

Nordpeis Odense User manual

Popular Indoor Fireplace manuals by other brands

Dik Geurts Instyle 800 Instructions for installation

Dik Geurts

Dik Geurts Instyle 800 Instructions for installation

Quadra-Fire VOYA-GRAND-MBK owner's manual

Quadra-Fire

Quadra-Fire VOYA-GRAND-MBK owner's manual

Kingsman Fireplaces HBZDV3624 installation instructions

Kingsman Fireplaces

Kingsman Fireplaces HBZDV3624 installation instructions

Honeywell Kromschroder TZI Series technical information

Honeywell

Honeywell Kromschroder TZI Series technical information

Masport LE4000 Specification & installation guide

Masport

Masport LE4000 Specification & installation guide

Heatilator B-Vent Gas Fireplace BCBV36 owner's manual

Heatilator

Heatilator B-Vent Gas Fireplace BCBV36 owner's manual

Empire Comfort Systems DVCT50CBP95-1 Homeowner's manual

Empire Comfort Systems

Empire Comfort Systems DVCT50CBP95-1 Homeowner's manual

Wamsler KF101-RONA User instruction

Wamsler

Wamsler KF101-RONA User instruction

Napoleon LHD50N Installation and operating instructions

Napoleon

Napoleon LHD50N Installation and operating instructions

Twin-Star International ClassicFlame 42II042FGT manual

Twin-Star International

Twin-Star International ClassicFlame 42II042FGT manual

Barbeques Galore BVDA18M owner's manual

Barbeques Galore

Barbeques Galore BVDA18M owner's manual

SUPREME FUSION 18 owner's manual

SUPREME

SUPREME FUSION 18 owner's manual

Superior WRT40CRWSI Installation and operation instructions

Superior

Superior WRT40CRWSI Installation and operation instructions

Town & Country Fireplaces TC30.NG05D installation instructions

Town & Country Fireplaces

Town & Country Fireplaces TC30.NG05D installation instructions

Astria Fireplaces MONTEBELLO ST Series Supplemental instructions

Astria Fireplaces

Astria Fireplaces MONTEBELLO ST Series Supplemental instructions

Harman Stove Company R7R1 Exception Wood Fireplace Installation and operating manual

Harman Stove Company

Harman Stove Company R7R1 Exception Wood Fireplace Installation and operating manual

Crossfire CF-2100 SERIES operating instructions

Crossfire

Crossfire CF-2100 SERIES operating instructions

Lennox ADAGIO-MN installation instructions

Lennox

Lennox ADAGIO-MN installation instructions

manuals.online logo
manuals.online logoBrands
  • About & Mission
  • Contact us
  • Privacy Policy
  • Terms and Conditions

Copyright 2025 Manuals.Online. All Rights Reserved.