Norton Clipper CE414-350 User manual

ENGLISH 1
OWNERS
MANUAL
High Speed Hand Held Electric
Models:
CE414-350
FORM: CE414-350 rev 5-2016

ENGLISH 2
WARRANTY
Norton warrants all products manufactured by it against defects in workmanship
or materials for a period of one (1) year from the date of shipment to the
customer.
The responsibility of Saint-Gobain Abrasives under this warranty is limited to
replacement or repair of defective parts at Saint-Gobain’s, Plainfield Indiana
facility, or at a point designated by it, of such part as shall appear to us upon
inspection at such point, to have been defective in material or workmanship, with
expense for transportation borne by the customer.
In no event shall Saint-Gobain Abrasives be liable for consequential or incidental
damages arising out of the failure of any product to operate properly.
This warranty is in lieu of all other warranties, expressed or implied, and all such
other warranties are hereby disclaimed.
Important: Before placing equipment in operation, record the following information:
MODEL:_________ SERIAL NO.___________
PURCHASE FROM: _____________________
ADDRESS: ____________________________
CITY_______ STATE ______ ZIP ________
TELEPHONE NO. ______________________
Before using this equipment, make sure that any person using it
reads and understands the instructions in this owner’s manual.

ENGLISH 3
Instruction Manual Electric Hand Held High Speed Saw CE414-350
Dear customer
Thank you for purchasing this quality product from Saint-Gobain Abrasives.
For many decades, we have been a producer of professional duty construction equipment. Each of
our products has been rigorously tested to withstand use of the everyday professional operator and to
meet all safety regulations.
With the main body composed primarily of high quality aluminium and reinforced plastic components
our products promise long service life with minimal down time.
We know you will be satisfied with your purchase because we have put a lot of care and attention to
the assembly and testing of your product.
Before operating this machine, read and fully understand these operating instructions and
always observe all safety regulations and instructions. If you have any further questions
after reading these operating instructions, contact Saint-Gobain Abrasives customer service
at 800-554-8003.
Observe the maintenance guidelines closely to ensure the long service life and safe
operation of your equipment

Table of Contents
ENGLISH 4
1Information about these operating instructions .............................................................................. 5
1.1Notational conventions used in the operating instructions ........................................................... 5
2Warning, Instruction and Notice Icons.............................................................................................. 5
3Safety Provisions ................................................................................................................................ 8
3.1Correct Use .................................................................................................................................. 8
3.2General Safety Notes................................................................................................................... 8
Dust and Silica Warning............................................................................................................... 7
3.3Prescribed Work Clothing / PPE (Personal Protection Equipment).............................................. 8
3.4In Transport.................................................................................................................................. 9
3.5Before Use.................................................................................................................................... 9
3.6Electrical Safety............................................................................................................................ 9
3.7During Work.................................................................................................................................. 9
4Power Tool Description and Features............................................................................................. 13
4.1Technical Data............................................................................................................................ 13
4.2Scope of Delivery ....................................................................................................................... 14
4.3Important Operating and Function Features............................................................................... 14
4.4Power trigger usage ................................................................................................................... 15
4.5Electrical safety system.............................................................................................................. 16
5Preparing for Use .............................................................................................................................. 17
5.1Installing/Removing the Blade.................................................................................................... 17
5.2Adjusting the Blade Guard.......................................................................................................... 18
5.3Water Connection for Wet Cutting.............................................................................................. 18
6Power Tool Use ................................................................................................................................. 19
6.1Cutting Blades............................................................................................................................ 18
6.2Permissible Cutting Area and Danger From Kickback or Drawing Along................................... 20
6.3Working Behaviour and Working Technique.............................................................................. 21
6.4Cutting Metal .............................................................................................................................. 21
6.5Cutting Concrete/Masonry Materials.......................................................................................... 21
7Operating and Maintenance Notes .................................................................................................. 22
7.1Cleaning and Care...................................................................................................................... 22
7.2Replacing the Carbon Brushes................................................................................................... 23
7.3Using the Kick Stand.................................................................................................................. 24
8Warranty............................................................................................................................................. 25
9Service Parts...................................................................................................................................... 25
Table of Contents

ENGLISH 5
These operating instructions are an integral part of the motor device.
They contain important information and instructions for handling the motor device. Always
follow any specified safety regulations and instructions, as they are a prerequisite for
ensuring that you are working safely with the equipment.
These operating instructions must be kept available at the place of use of the equipment at all
times, and they must be read carefully by everybody who works on or with the equipment
(including for maintenance, care and repairs).
These operating instructions must only be used as operating instructions for the motor device
CE414-350. Any utilisation of the contents (text and graphics illustrations) – even in excerpts –
without our prior written consent shall be forbidden and may be prosecuted.
Text highlights
Xxxxx Underlined text marks interim headlines.
Xxxxx Text in italics marks advice and notes that facilitate use of the motor device for the user.
1 Xxxxx Numbered text with a black background marks main chapter headlines.
1.1 Xxxx Numbered text with a grey background marks main subchapter headlines.
Xxxxxxx Frames mark especially highlighted sections.
Structure
The operating instructions are structured by numbered main and subchapters. The table of contents
on page 4 shows an overview of the structure.
Header
To make it easier for the user to find the chapters, the header names the main chapter to which the
content on the respective page belongs.
Pictures and diagrams
Some graphical illustrations in these operating instructions are schematic illustrations or principle
illustrations and may not show exactly your device model. The conveyed contents, however, are
binding in any case.
Important: If one or several icons in these operating instructions are centred and directly below a
chapter header the notice applies for the entire chapter.
1 Information About These Operating Instructions
1.1 Notational Conventions Used in the Operating Instructions
2 Warning, instruction and Notice Icons
ENGLISH 6
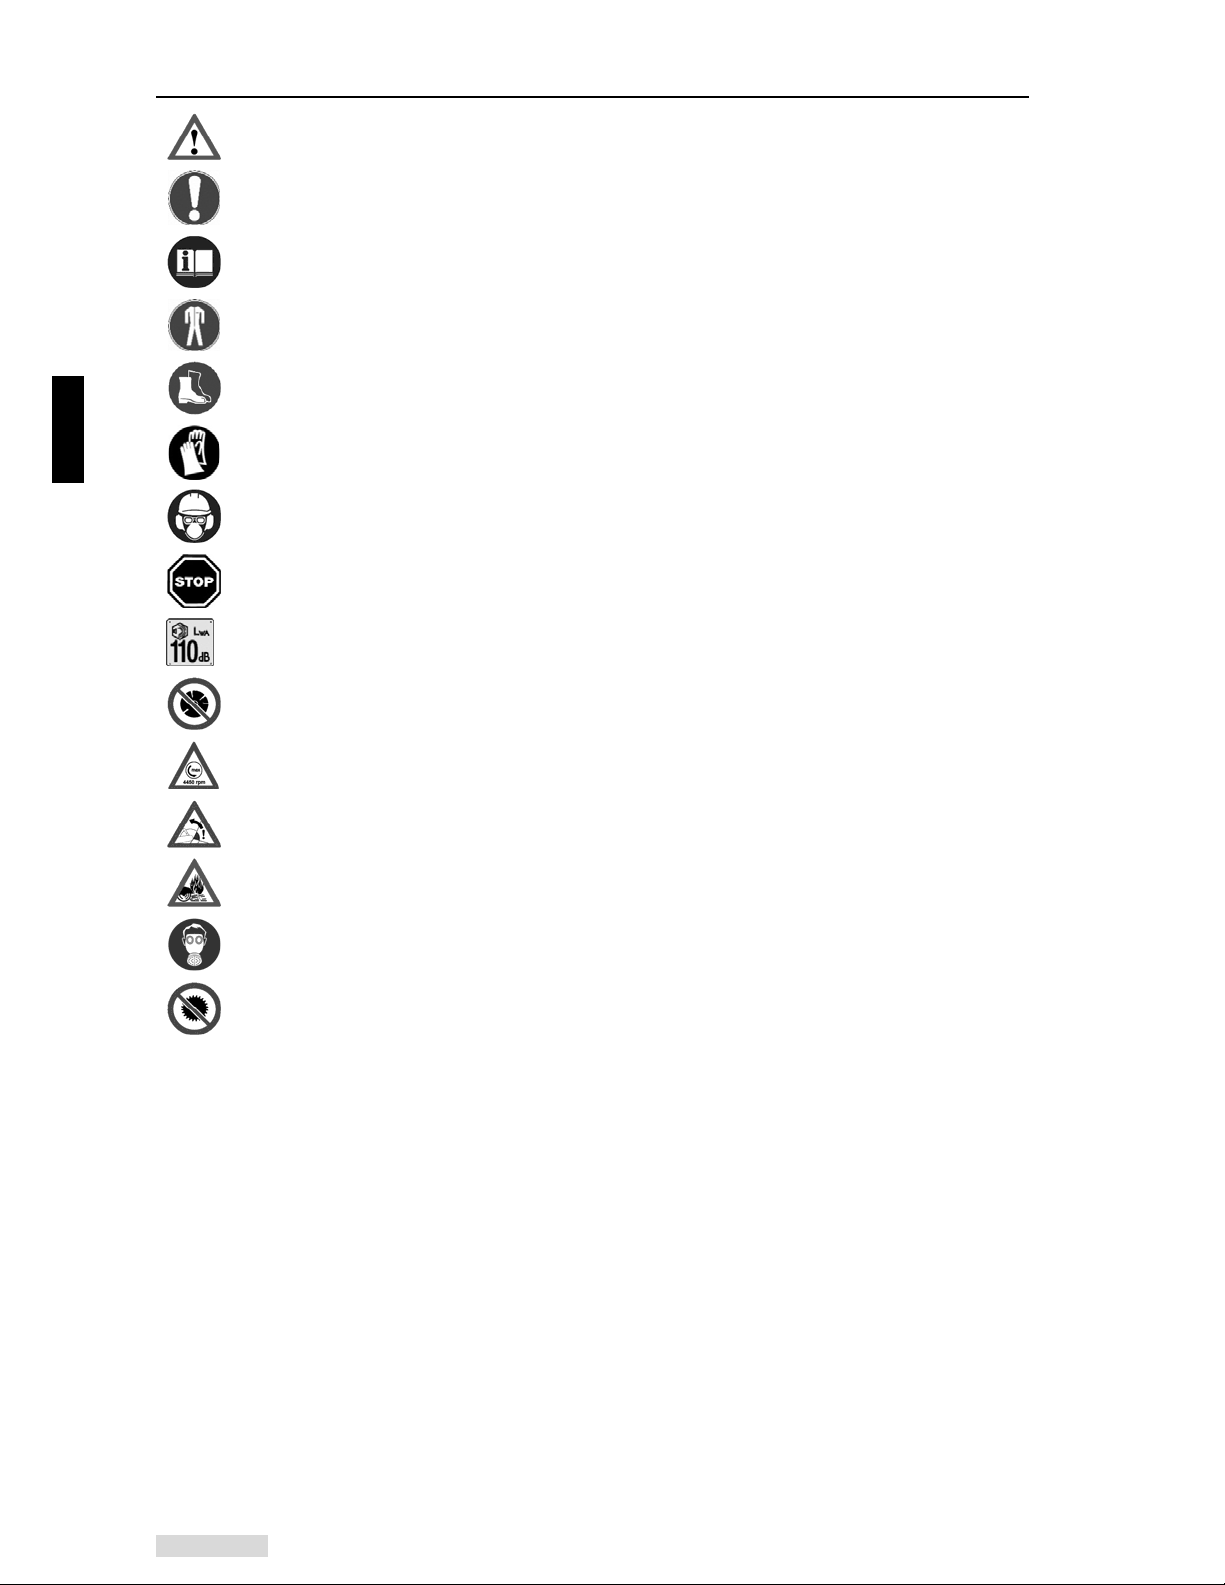
Warning, Instruction and Notice Icons used in the Operating Instructions and on the Equipment:
Danger! Failure to comply with the instructions could cause accidents with potentially life-
threatening injuries
Caution! Failure to comply with the instructions could result in damage to the equipment or other
material damage
Carefully read the operating instructions. This applies before taking the equipment into operation
and before any cleaning, maintenance or assembly work.
Always wear the prescribed clothing. Chap. 3.3, page 9
Always wear sturdy shoes with good grip.
Wear safety gloves. This applies to all work with or on the equipment
Before use, put on helmet, ear defenders and a visor.
Switch off the motor!
Noise level LWA= 100 dB(A).
Never continue work with damaged cutting discs.
Only use cutting discs approved for a speed of ≥3.900 rpm (min-1)
Attention: Kickback!
Notes in chap. 6.2 as of page 20 must be observed under all circumstances!
Attention: Danger of fire from sparks.
Wear breathing protection.
Do not use circular saw blades.

ENGLISH 7
Dust and Silica Warning
Grinding/cutting/drilling of masonry, concrete, metal and other materials can generate dust, mists
and fumes containing chemicals known to cause serious or fatal injury or illness, such as respiratory
disease, cancer, birth defects or other reproductive harm. If you are unfamiliar with the risks
associated with the particular process and/or material being cut or the composition of the tool being
used, review the material safety data sheet and/or consult your employer, the material
manufacturer/supplier, governmental agencies such as OSHA and NIOSH and other sources on
hazardous materials and make certain to comply with all product warnings and instructions for the
safe and effective use of the material being cut. California and some other authorities, for instance,
have published lists of substances known to cause cancer, reproductive toxicity, or other harmful
effects.
Control dust, mist and fumes at the source where possible. In this regard use good work practices
and follow the recommendations of the manufacturer/supplier, OSHA/NIOSH, and occupational and
trade associations. Water should be used for dust suppression when wet cutting is feasible. When
the hazards from inhalation of dust, mists and fumes cannot be eliminated through engineering
controls such as either vacuum and/or water mist, the operator and any bystanders should always
wear a respirator approved by NIOSH/MSHA for the material being cut.
California Proposition 65 Message
Some dust created by power sanding, sawing, grinding, drilling, and other construction activities
contain chemicals known (to the State of California) to cause cancer, birth defects or other
reproductive harm. Some examples of these chemicals are:
• Lead, from lead-based paints
• Crystalline silica, from bricks and cement and other masonry products
• Arsenic and chromium, from chemically treated lumber
For Addition Information Consult The Following Sources:
http://www.osha.gov/dsg/topics/silicacrystalline/index.html
http://www.cdc.gov/niosh/consilic.html
http://oehha.ca.gov/prop65/law/P65law72003.html
http://www.dir.ca.gov/Title8/sub4.html
Use Approved:
Eye Protection Hearing Protection Respiratory
Protection
Head Protection

ENGLISH 8
This power tool must only be used to cut/shorten metals (hot cut) and mineral materials, such as
concrete, masonry products (brick, block, pavers), with the cutting blade approved for the material
and only for the working situation indicated in chap. 6 on page 19.
For specifically trained users in rescue missions, other approved cutting discs are also offered that
can be used to cut various composites. These special applications are only permitted to specifically
trained users.
This power tool can be used for indoor or outdoor work.
Use of this power tool for any other purpose, such as sawing of wood and to remove/grind off a
material with the side surfaces of the blade is forbidden. Use of cutting tools, such as wood saw
blades (which have a positive rake angle) or knives, must not be installed or used with this product
disc.
WARNING Read all safety warnings and all instructions. Failure to follow the
warnings and instructions may result in electric shock, fire and/or serious injury.
Save all warnings and instructions for future reference.
The term “power tool” in the warnings refers to your mains-operated (corded) power tool or
battery-operated (cordless) power tool.
1. Work area safety
a. Keep work area clean and well lit. Cluttered or dark areas invite accidents.
b. Do not operate power tools in explosive atmospheres, such as in the presence of
flammable liquids, gases or dust. Power tools create sparks which may ignite the
dust or fumes.
c. Keep children and bystanders away while operating a power tool. Distractions
can cause you to lose control.
2. Electrical safety
a. Power tool plugs must match the outlet. Never modify the plug in any way. Do
not use any adapter plugs with earthed (grounded) power tools. Unmodified plugs
and matching outlets will reduce risk of electric shock.
b. Avoid body contact with earthed or grounded surfaces, such as pipes, radiators,
ranges and refrigerators. There is increased risk of electric shock if your body is
earthed or grounded.
c. Do not expose power tools to rain or wet conditions. Water entering a power tool
will increase the risk of electric shock.
d. Do not abuse the cord. Never use the cord for carrying, pulling or unplugging
the power tool. Keep cord away from heat, oil, sharp edges or moving parts.
Damaged or entangled cords increase the risk of electric shock.
e. While operating a power tool outdoors, use an extension cord suitable for
outdoor use. Use of a cord suitable for outdoor use reduces the risk of electric shock.
f. If operating a power tool in a damp location is unavoidable, use a ground fault
circuit interrupter (GFCI) protected supply. Use of an GFCI reduces the risk of
electric shock.
3. Personal safety
a. Stay alert, watch what you are doing and use common sense when operating a
power tool. Do not use a power tool while you are tired or under the influence of
drugs, alcohol or medication. A moment of inattention while operating power tools
may result in serious personal injury.
3 Safety Provisions
3.1 Correct use
3.2 General Power Tool Safety Warnings

ENGLISH 9
b. Use personal protective equipment. Always wear eye protection. Protective
equipment such as dust mask, non-skid safety shoes, hard hat, or hearing protection
used for appropriate conditions will reduce personal injuries.
c. Prevent unintentional starting. Ensure the switch is in the off-position before
connecting to power source and/or battery pack, picking up or carrying the tool.
Carrying power tools with your finger on the switch or energising power tools that have
the switch on invites accidents.
d. Remove any adjusting key or wrench before turning the power tool on. A wrench
or a key left attached to a rotating part of the power tool may result in personal injury.
e. Do no overreach. Keep proper footing and balance at all times. This enables
better control of the power tool in unexpected situations.
f. Dress properly. Do no wear loose clothing or jewellery. Keep your hair, clothing
and gloves away from moving parts. Loose clothes, jewellery or long hair can be
caught in moving parts.
g. If devices are provided for the connection of dust extraction and collection
facilities, ensure these are connected and properly used. Use of dust collection
can reduce dust-related hazards.
4. Power tool use and care
a. Do not force the power tool. Use the correct power tool for your application. The
correct power tool will do the job better and safer at the rate for which it was designed.
b. Do not use the power tool if the switch does not turn it on and off. Any power tool
that cannot be controlled with the switch is dangerous and must be repaired.
c. Disconnect the plug from the power source and/or the battery pack from the
power tool before making any adjustments, changing accessories, or storing
power tools. Such preventative safety measures reduce the risk of starting the power
tool accidentally.
d. Store idle power tools out of the reach of children and do not allow persons
unfamiliar with the power tool or these instructions to operate the power tool.
Power tools are dangerous in the hands of untrained users.
e. Maintain power tools. Check for misalignment or bindings of moving parts,
breakage of parts and any other condition that may affect the power tool’s
operation. If damaged, have the power tool repaired before use. Many accidents
are caused by poorly maintained power tools.
f. Keep cutting tools sharp and clean. Properly maintained cutting tools with sharp
cutting edges are less likely to bind and are easier to control.
g. Use power tool, accessories and tool bits etc. in accordance with these
instructions, taking into account the working conditions and the work to be
performed. Use of the power tool for operations different from these intended could
result in hazardous situation.
5. Service
a. Have your power tool serviced by a qualified repair person using only identical
replacement parts. This ensure the safety of the power tool is maintained.
In order to prevent injuries, please make sure that you wear the prescribed clothing and protective
equipment.
Clothes should be tight-fitting (no labels), but not hindering. When performing any work,
wear a working suit of firm materials with sufficient flame resistance so that cannot catch fire
by sparks flying (materials of leather, cotton after flame-inhibiting treatment or heavy close-
meshed linen fabrics).
Check the information in the work clothes and ensure that no flammable materials and no easily
melting materials like polyester or nylon are contained in the clothes. The working clothes must
never be contaminated with flammable substances such as petrol or similar.
3.3 Prescribed Work Clothing / PPE (Personal Protection Equipment)

ENGLISH 10
Never wear scarves, ties, jewellery or other clothes that may get caught in the cutting disc or blade,
or objects in the environment, or the power tool. Tie back long hair and secure it under a helmet.
Wear a protective helmet during any work. Use personal hearing protection.
Eye/face protection is mandatory pursuant to ANSI Z 87.1.
Wear firm safety shoes with steel toes and a good grip.
Wear protective gloves with non-slip palms.
Use breathing protection for dry cutting as protection from dust.
Before carrying the power tool (even for short distances), always switch off the motor, wait until
the cutting disc has stopped, and disconnect the power supply. Carry the power tool by the top
handle and have the cutting blade facing down and to the rear. Never carry the power tool by the
power cable.
Never carry or transport the power tool with the cutting disc or blade turning.
Advice: We recommend that you keep the original packaging in order to protect the equipment
against transport damage in case you ever need to ship it or transport it.
Before starting, check the entire power tool for operationally safe condition such as:
The power trigger must move freely and return automatically to the idle position where the auto
lock can engage fully. It must not be possible to operate saw without pushing (unlocking) the
power trigger.
The cutting blade/disc must be attached firmly to the spindle.
In case of irregularities, recognisable damage, improper settings or limited function, the power unit
must not be started. In such cases, have the power tool inspected by specialist workshops
authorised by us.
Only use the power tool if it is in completely assembled condition.
All guards/cowl should be in place. Never use the machine if they have been removed!
Keep at least 3 metres distance from any flammable material when operating this machine.
Plug the power tool into the appropriate matching grounded outlet. Do not attempt to adapt the
plug head to use with a non matching outlet.
Avoid contact with earthed or grounded surfaces to avoid electric shock.
3.4 In Transport
3.5 Before Use
3.6 Electrical Safety

ENGLISH 11
Keep the power tool away from water. Do no leave the machine outside where it may be rained
upon. Water exposure will increase the risk of electric shock.
Do not pressure wash or wash the machine. Water exposure will increase the risk of electric
shock.
Do not carry the tool by the power cord. Do not use the machine if the cord is damaged. A
damaged cord will increase the risk of electric shock. If damaged have the cord repaired by a
certified technician immediately.
Use extension cables with the correct length and gauge. Refer to section 4.1 and view the
recommended extension cable chart if not known what type of extension cable to use.
Keep extension cables unravelled during use to maintain the power tool’s efficiency.
Only use undamaged extension cables to reduce the risk of electric shock.
When operating the power tool, make sure the power cable is always behind you.
Do not use the power tool if the power trigger does not turn on the motor. A malfunctioning power
switch should be repaired by a certified technician.

ENGLISH 12
In addition to the safety provisions already listed, the following safety provisions also apply when
working with the motor device:
Secure the workplace against accidental access by third parties, e.g. with warning signs. Only
persons involved and wearing protective clothes must be present within 100’ (30 m) around the
working area.
Check the site of deployment for possible dangers.
– If spark created during cutting work must never be performed close to potentially explosive
gases of liquids, or easily flammable objects.
– No electrical lines must be placed in the area to be cut.
– Objects that may fall off or topple over during work must be secured or removed from the
working environment first.
– Prepare the workplace so that secure backing away is possible.
The work piece to be cut must be free of foreign bodies such as screws, nails or stones.
When working in residential areas, observe the noise protection provisions.
Work carefully, considerately and calmly and do not endanger any other persons.
– Ensure good vision and light conditions.
– Always remain within calling distance of other persons who may administer first aid in
emergencies.
– Put in working breaks in time.
– Be attentive towards possible danger sources and take the corresponding preventive
measures. Consider that use of hearing protection limits perception of sounds. Signal
sounds, calls, etc. that announce danger may also be missed.
– Observe tripping dangers and obstacles. Never work on unstable surfaces.
– Always hold on to the power tool with both hands and always ensure a safe and firm stance.
– Never cut standing on a ladder.
– Guide the power tool so that no body part is located in the extended swivel range of the cutting
disc.
– Only process the work piece to be cut with the cutting disc running; never touch the floor or
other objects with the cutting disc running.
– Do not use the power tool to lever off and shovel away objects.
Switch off the motor when the power tool starts to behave noticeably differently.
Danger of hearing damage!
3.7 During Work

ENGLISH 13
Model C414-350
Motor Brush Motor
Power Amp 15
Voltage V 115
Hertz hz 60
Spindle Diameter in / mm 0.787 (20mm)
Spindle Diameter with Bushing in / mm 1 (25.4)
Blade Shaft Speed rpm 3,900
Blade Flange Diameter in / mm 4 (100)
Sound of Motor Without Cutting Blade dB 100 dB
Maximum Blade Diameter in / mm 14 (350)
Cutting Depth in / mm 5 (125)
Dimensions Height x Width x Length in / mm 11.1 (282) h x 11.3 (286) w x 28.7 (730) l
Weight without cutting disc lb / kg 22.4 (10.2)
Recommended Extension
Cables
12 AWG 50’
10 AWG 75’
8 AWG 100’
4 Power Tool Description and Features
4.1 Technical data

ENGLISH 14
Machine CE414-350
Tool: Universal Wrench
Operating instructions
1. Cutting Blade 10. Carbon Brush Cover
2. Blade Guard 11. Blade Shaft Screw
3. Grip for Blade Guard Adjustment 12. Power Cable
4. Top Handle 13. Water Hose to Coupling
5. Water Hose 14. Water Coupling Connection (Wet Cutting)
6. Rear Handle 15. Power and Overload Indicator
7. Spindle Lock Button 16. Circuit Breaker
8. Kick Stand 17. Power Trigger Lock
9. Trigger Assemble 18. IC Board
4.2 Scope of Delivery
4.3 Important Operating and Function Features
1
3
5
2
8
10
7
4
15
6
9
13
8
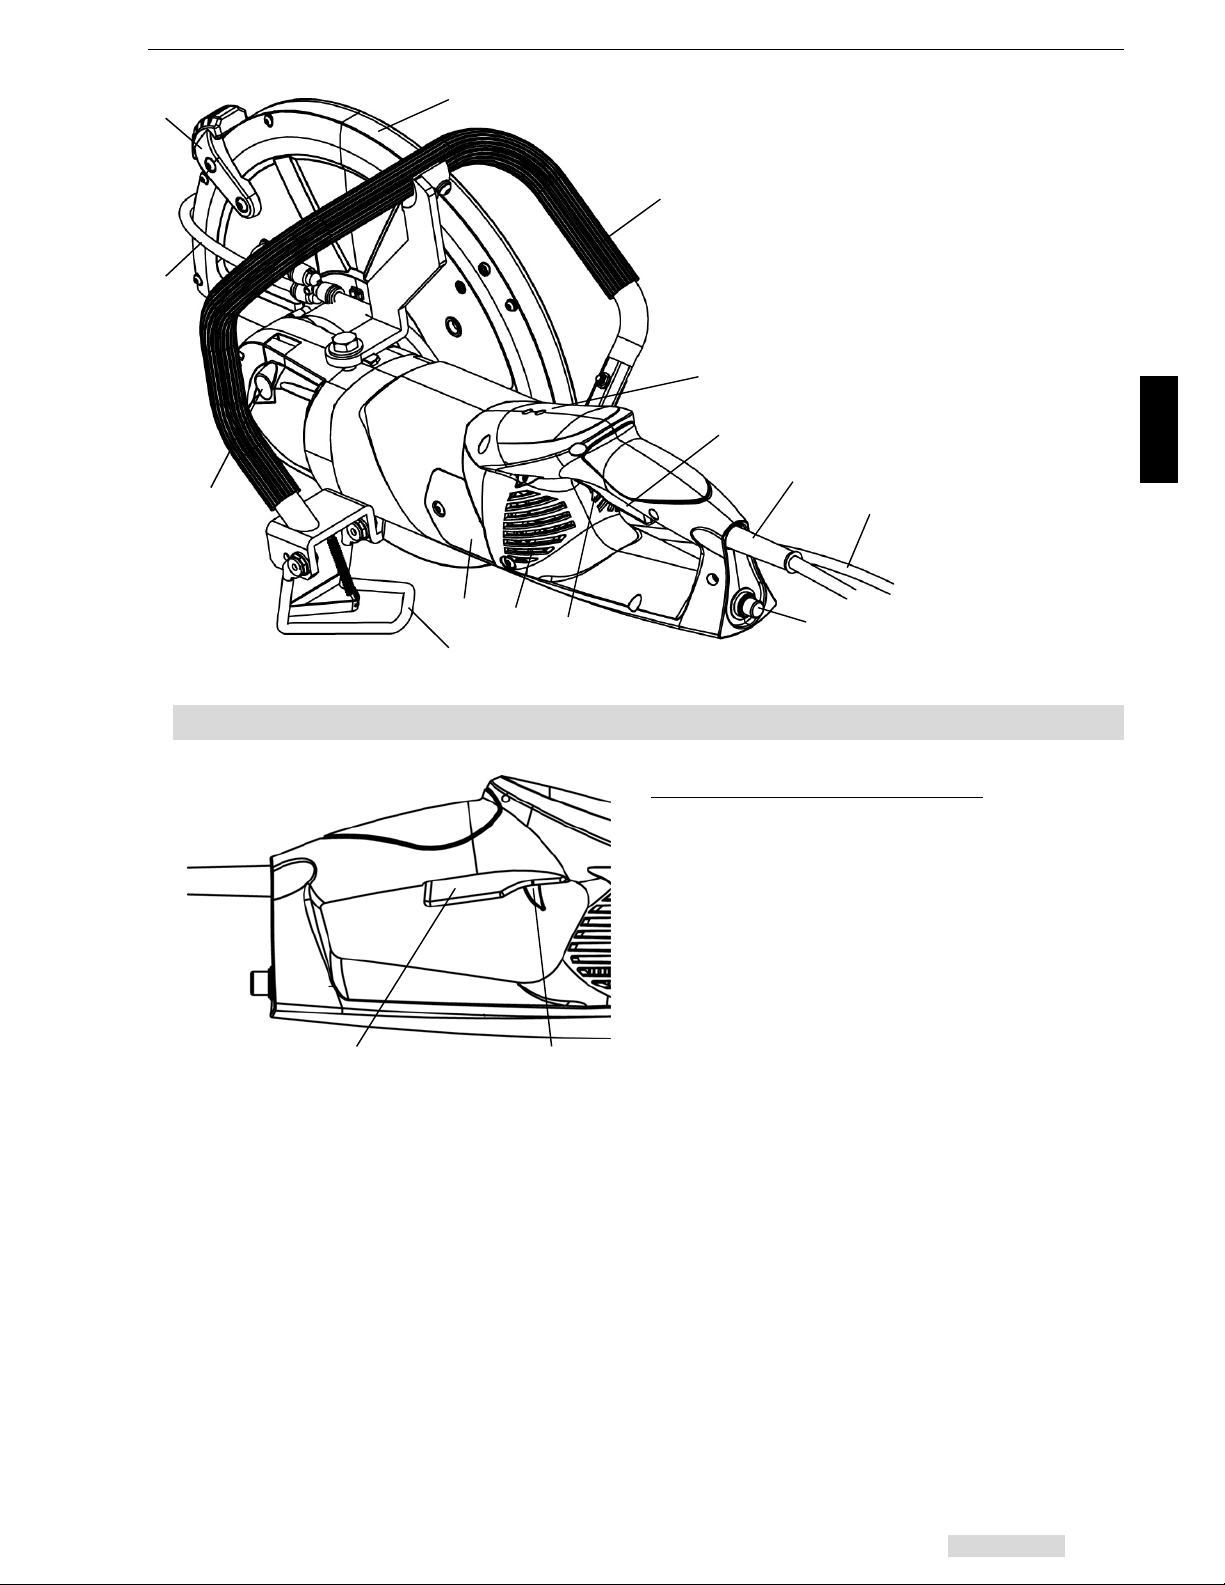
ENGLISH 15
Testing functionality of power trigger
To test the power trigger, connect the machine to
the correct power supply, grasp the handle to
position your fingers next to the power trigger.
Using the index finger and push to disengage the
lock trigger (17), shown on the left. With the lock
disengaged, pull the power trigger up (9) and
then release. The motor should turn on and then
off when the trigger is released.
If the motor does not turn off or blade does not
stop spinning, have the switch assembly serviced
immediately by a certified technician. In the
mean time discontinue use of the power saw.
The power trigger lock should also be tested.
This time pull the power trigger only (9). If the
motor turns on then the lock trigger is damaged
and needs to be serviced. Have the switch
assembly serviced by a certified technician. In
the mean time discontinue use of the power saw.
4.4 Power Trigger Usage
9 17
3
5
2
7
4
16
9
13
8
10
15
12
17
18
ENGLISH 16
The heavy duty power switch in the power saw is
coupled with two safety features. A soft start
system (18) which prevents unintentional power
trips during start-up, and overloads. Source of
overload can be from user applying too much
cutting force or from the blade jamming. The
overloaded state has to be reset by releasing the
power trigger (a) and then depressing it once again
to return power to the motor. Before performing the
reset, the source of overload should be corrected.
A second safety device that runs in tandem with
this system is a traditional non fuse circuit breaker
(b). To reset this breaker the user must release the
power trigger and depress the circuit breaker
button located below the power cable. Now power
can be sent to the motor once again.
4.5 Electrical Safety System
16 18
9

ENGLISH 17
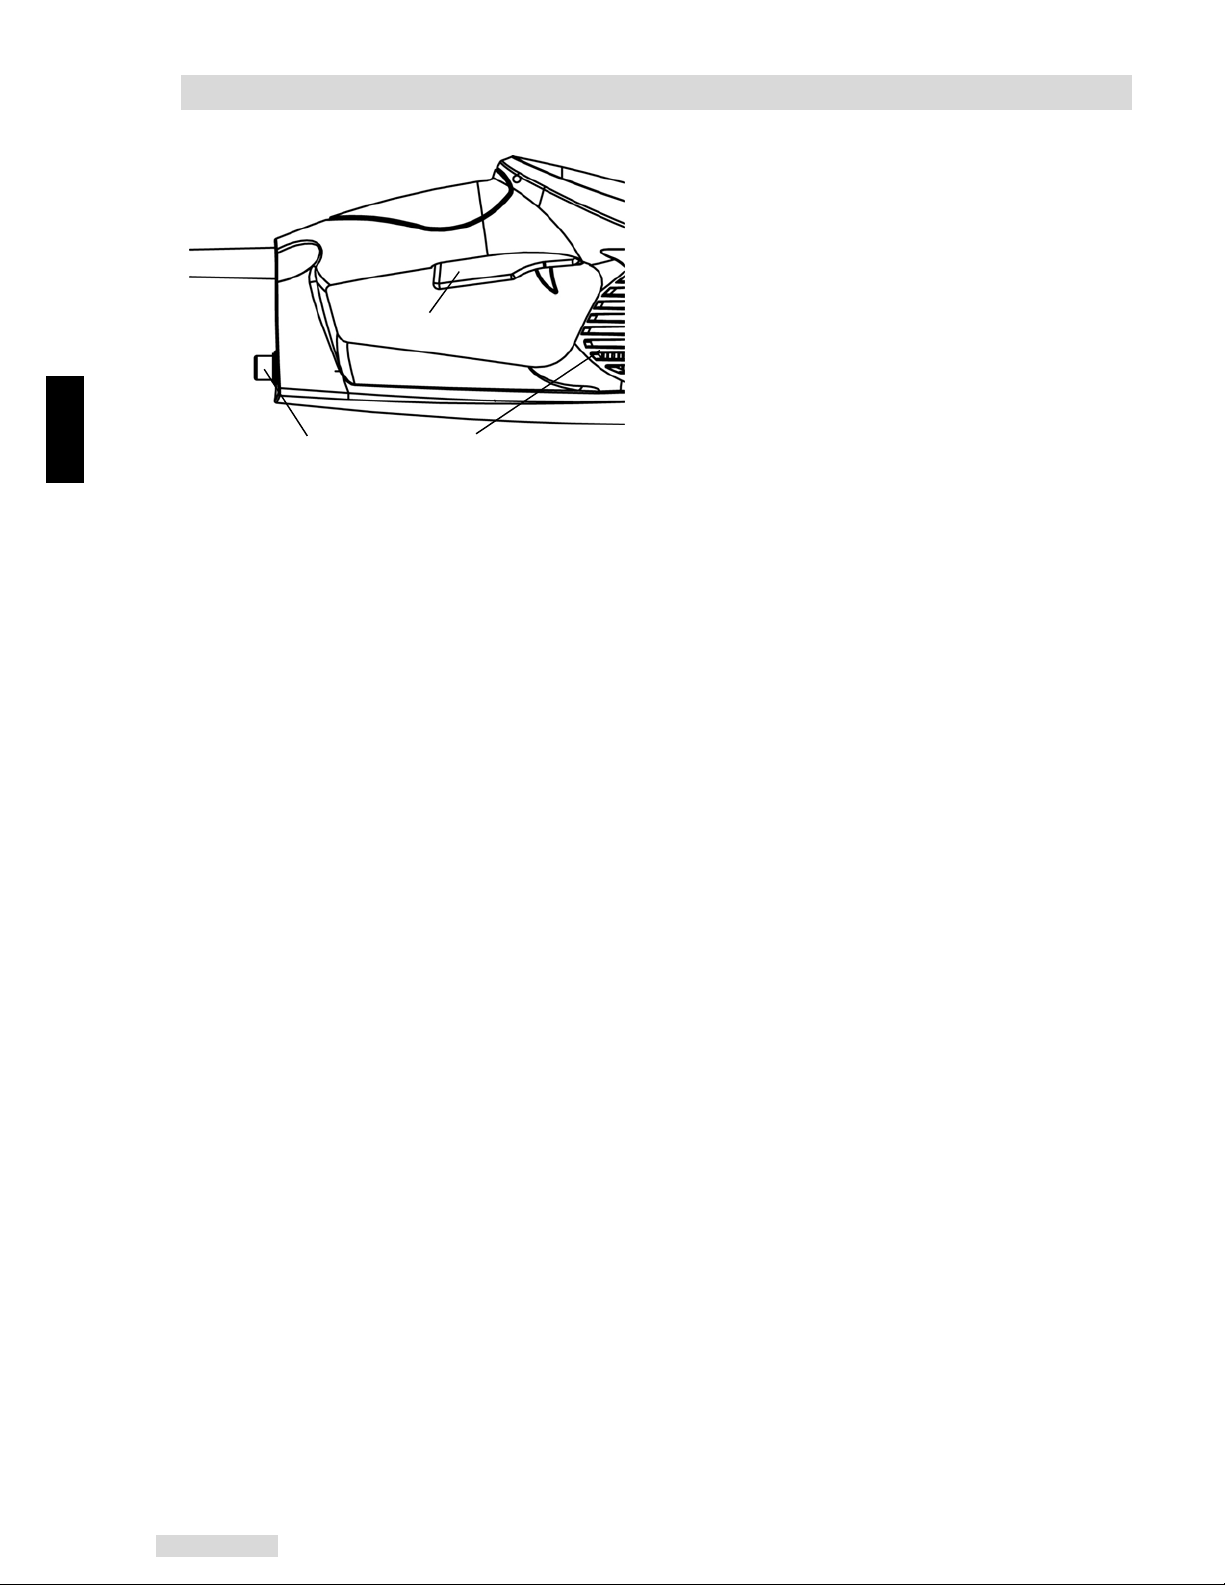
The cutting discs used must correspond to the specifications from chap. Error! Reference
source not found. on page Error! Bookmark not defined.!
The power tool uses a 20mm spindle is paired with an adapter blade adapter for use with 1
inch (25.4mm) bore cuttings blade. The components are assembled as shown below, along
with the universal wrench (e) included with the power tool to remove the blade bolt (d).
For blade installation, the power tool must be put securely on the ground and unplugged. With the
power tool handle facing you place left arm on the power tool body and use the correlating hand
to press the spindle lock button (7) shown below. With the free hand use the universal wrench (e)
to turn the blade bolt (d) clockwise, or away from you. Apply slight downward force from the left
arm onto the motor body to keep the tool from moving, if it should:
Remove the blade bolt (d), its washer (c) and outer flange (b). Install the cutting disc (1), and
make sure the bore of the disc slides onto the adapter (a) all the way. Also locate the spinning
direction of the disk and match it with the diagram above’s note. If you are facing the blade guard,
facing the side you are installing the cutting disc from. The disc must rotate clockwise.
Once the cutting disc (1) is properly seated, reinstall the outer flange (b), washer (d) and blade
bolt. Press the spindle lock button (7) again and this time use the universal wrench (e) to turn the
blade bolt counter-clockwise until tight.
5 Preparing for Use
5.1 Installing/Removing the Cutting Disc
1
a
b
c
de
7
Rotating direction
of the cutting disc
ENGLISH 18
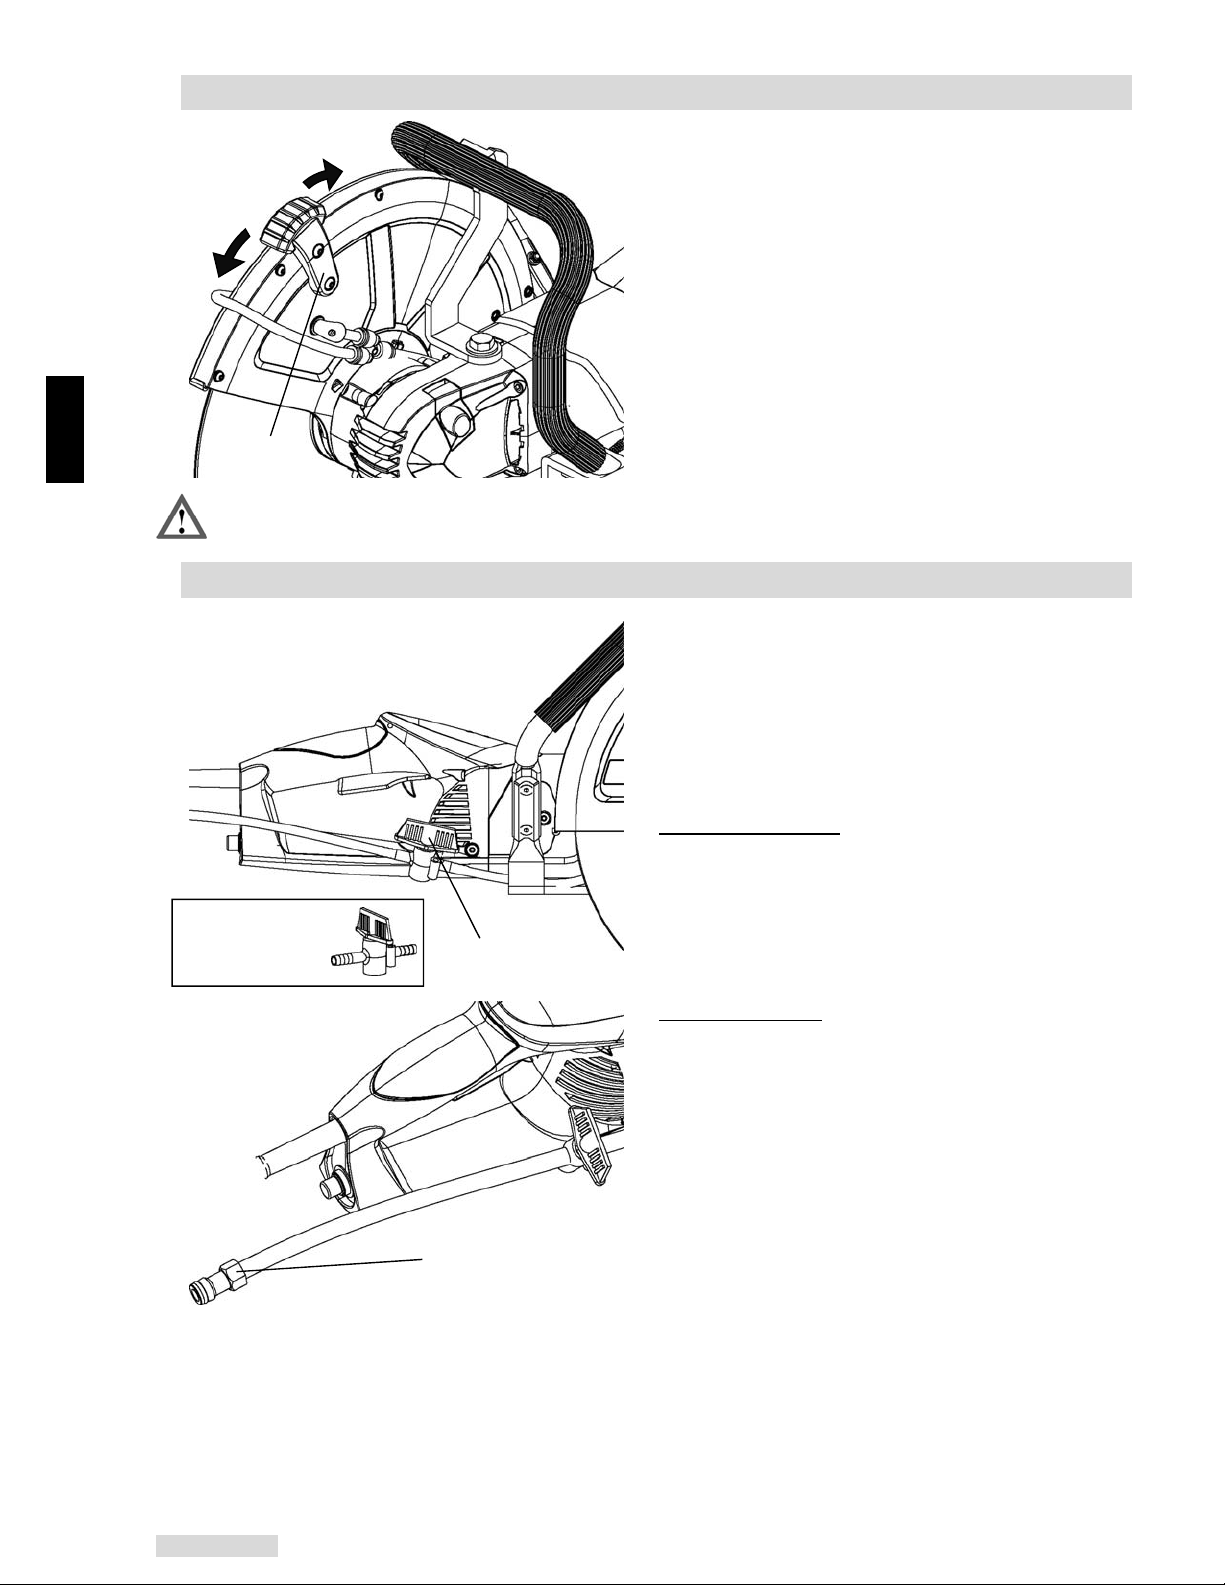
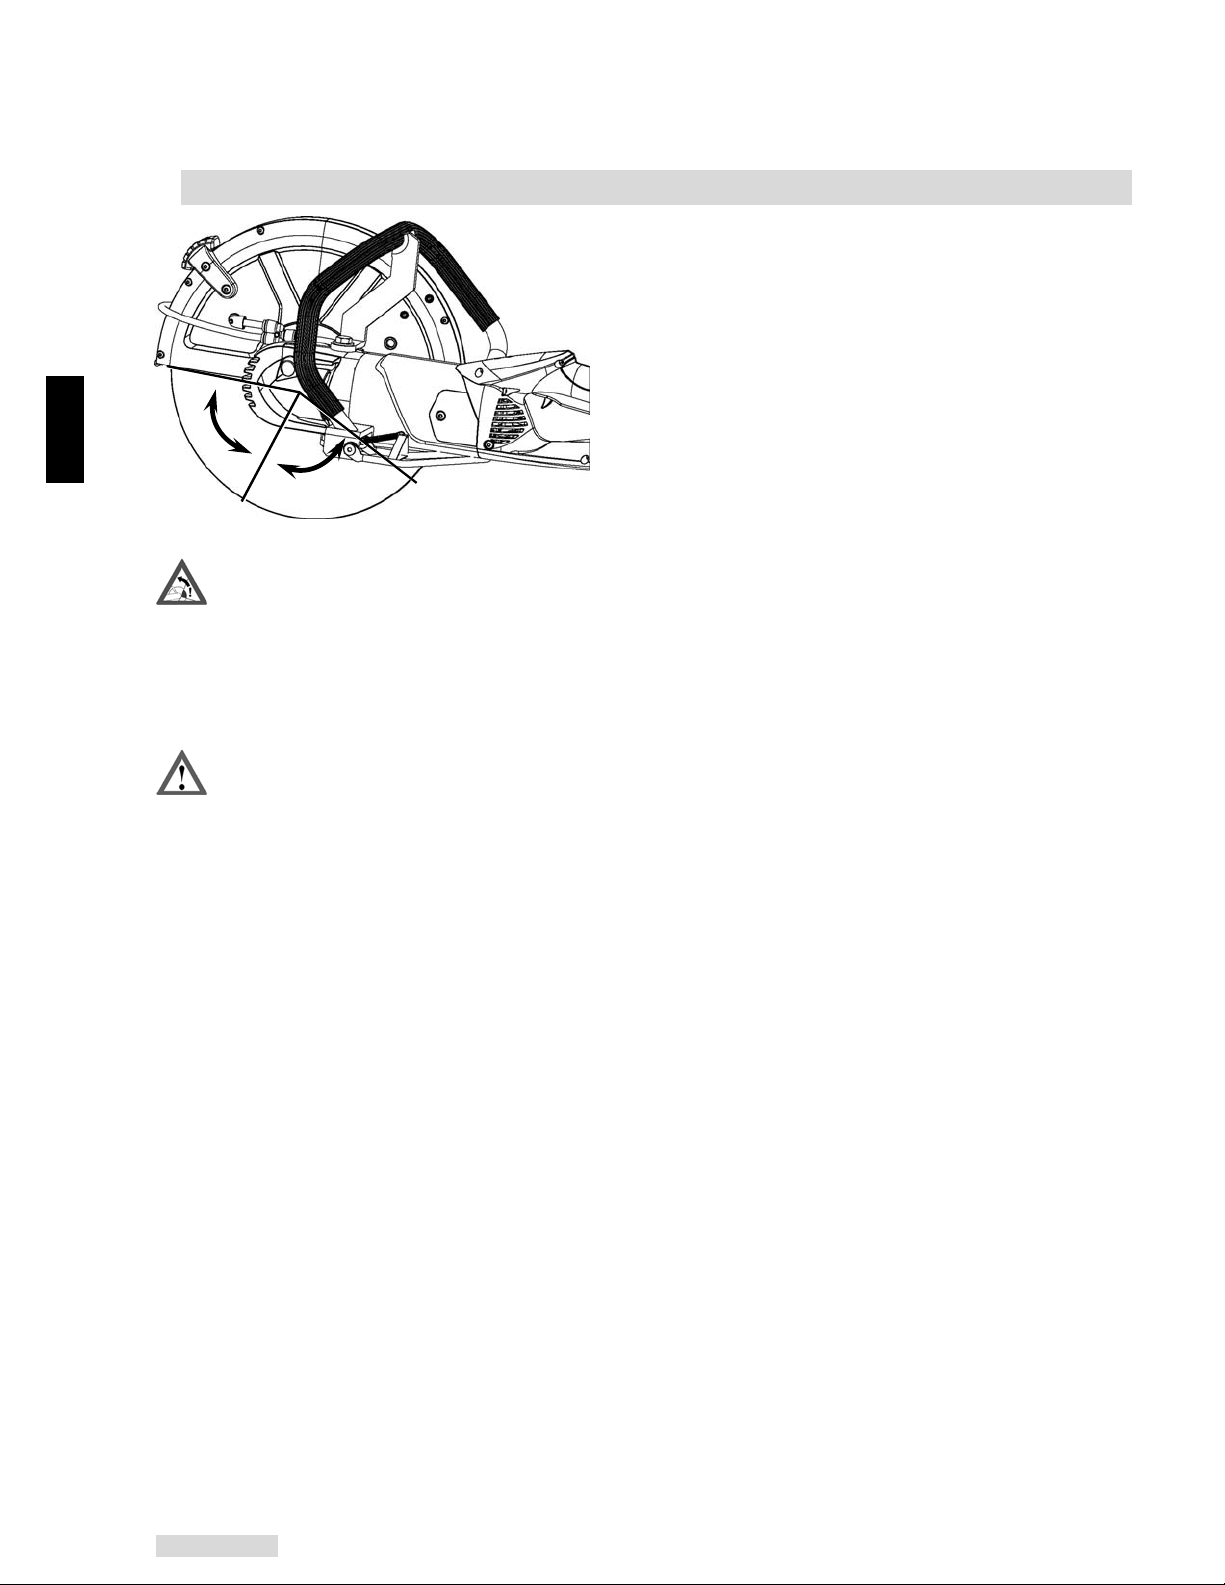
The blade guard shown on left can be swivelled
forward and backward in a limited area.
For adjustment of the blade guard, the power tool
must be put securely on the ground with the power
supply disconnected. Securely hold the power tool
at the top handle (4) with the one hand and push it
firmly onto the ground. With the other hand at the
handle for the blade guard adjustment (2), swivel
the protective cowl accordingly.
To keep sparks and particles from being thrown at
the operator, the blade guard should always be
swivelled forward as far as the working situation
permits.
When adjusting the blade guard ensure that the water supply line is not crimped and that
blade does not contact water supply line.
Lots of fine dust occurs when cutting mineral based
materials. We recommend using the water
connection when using diamond blades suitable for
the material and rated for wet cutting. When cutting
with the water, visibility of the material is improved,
and blade life can increase due to the cooling effect
of the water.
Before Wet Cutting:
Connect suitable water line (maximum 80 PSI) or
suitable pressure tank to the coupling connection
(g).
Operate the valve lever (f) to open or close the
water supply to the desired flow rate.
After Wet Cutting:
Close the water supply, i.e. put the valve lever
perpendicular to the valve body.
Let the cutting disc run at high speed for another
approx. 30 seconds to completely remove the
water.
5.2 Adjusting the Blade Guard
5.3 Water Connection for Wet Cutting
2
f
Rotate to close
the valve (valve
lever across)
g
ENGLISH 19
Always observe all safety instructions and all information in this document before using this
machine!
Check list for use (keywords only!) ...........................................................
Before start-up:
– Power tool in an operationally safe condition! ................................. Operating instructions complete
– Prescribed work clothes ................................................................. Chap. 3.3, page 9
– Working area inspected and secured ............................................. Chap. 3.2, page 8, and
Chap. 3.7, page 9
– Blade installed Correctly ................................................................. Chap. 5.1, page 17, and
Chap.
Error! Reference source
not found.
, page 19
– Blade Guard in best position .......................................................... Chap. 5.2, page 18
During work – generally safe work: ....................................................... Operating instructions complete
– Inspecting the working environment ............................................... Chap. 3.7, page 9,
Chap. 6.2, page 20, and
Chap. 6.3, page 21
– Water connection for wet cutting ..................................................... Chap. 5.3, page 15
– Proper cutting technique ................................................................ Chap. 6.3, page 21,
Chap. 6.4, page 21, and
Chap. 6.5, page 21
After work: ............................................................................................ Operating instructions complete
– Cleaning and care .......................................................................... Chap. 0, page 22
– Replacing the carbon brushes ........................................................ Chap. 7.2, page 20
– Using the flip stand ......................................................................... Chap. 7.3, page 22
–
Maintenance ................................................................................... Operating instructions complete
Only use Diamond Blades that correspond to the standards EN 12413 and EN 13236
and that are perfectly undamaged. The approved maximum speed of the cutting disc
must be ≥4,450 rpm (min-1).
For cutting of metals (hot cutting) and cutting of mineral based materials – block, brick, concrete,
stone (cold cutting), different cutting discs are offered. Use only the blades that are approved for the
material to be cut.
Diamond cutting blades are only approved for cutting mineral based materials. When installing the
diamond blade, always observe the rotating direction indicated on the diamond blade; otherwise, the
cutting effect will reduce quickly from diamond loss.
Rotating direction of the blade in the installation process see: Chap. 5.1, page 17
Synthetic resin based thin wheel cut of blades must not be exposed to moisture. The water
connection for wet cutting must not be used when using synthetic resin cut off blades. Synthetic
resin blades must not be used in high humidity or in rain. Only use synthetic resin blades until the
end of the best-before date imprinted on the blade blotter or shipping box.
The power tool's spindle is designed for cutting discs with an inner bore of 20 mm.
Blades with an 1" inner bore must only be installed with the spindle adapter provided with the
CE414-350. Using other spindle adapters may not allow the blade to be properly secured to the
machine.
Installation of blades with 1" inner bore see: Chap. 5.1, page 14
Blades with other inner bores must not be installed!
6 Power Tool Use
6.1 Blades
ENGLISH 20
New blades must be tested for at least 60 seconds at the indicated maximum speed before the first
cutting process. Take care that no body parts are in the path of the blade.
The upper part of the blade must not be
used for cutting!
Only the lower part of the blade can be used
for cutting!
Danger of injury from kickback!
Kickback results when the upper part of the blade is used for cutting.
The power tool is can be pushed towards the user's causing lost of operator control which can
result in injury.
Never cut with the upper area of the blade!
Take special care at insertion into cutting areas already started!
Danger of injury from drawing along!
Drawing along results when the cutting path becomes very narrow or from pinching the blade
and the power tool is pulled away from the operator.
The power tool can accelerate away from the operator at high speeds and can result in injury.
Always perform cutting at full rpm and repeated insertion into the cut at points already started.
Always support the work piece so that the cutting point does not move and so that the cutting
blade is not clamped or pinched.
When starting a cut, always carefully move the cutting blade to the work piece; do not force the
blade into the work.
Only cut one item at a time!
Ensure that no other work piece is touched when cutting.
6.2 Permissible Cutting Area and Danger From Kickback or Drawing Along
ok
Table of contents
Other Norton Clipper Saw manuals

Norton Clipper
Norton Clipper C1316SS User manual

Norton Clipper
Norton Clipper C914P User manual

Norton Clipper
Norton Clipper CS 451 E User manual

Norton Clipper
Norton Clipper CM 601 User manual

Norton Clipper
Norton Clipper CB 511 User manual

Norton Clipper
Norton Clipper C914P User manual

Norton Clipper
Norton Clipper CST 100 User manual

Norton Clipper
Norton Clipper C1318P User manual

Norton Clipper
Norton Clipper CWT 450 User manual

Norton Clipper
Norton Clipper CE414-350SS User manual


