Seing Up Your Machine
Insert male end of power cord into electrical
outlet. Test the ground fault breaker by
pressing the reset button.
Cleaning & Maintenance
• Unscrew solution cup and empty excess solution. Rinse empty cup with warm water
• Add clean warm water or HVLP gun cleaner to solution cup and spray through.
TIP: Turn solution control knob clockwise several full turns to allow more water to pass
through for thorough cleaning. Be sure to adjust back to desired atomization setting
before next use.
• Unscrew solution cup and pull the trigger lightly. Tap against the cup rim to release
any solution in the pick up straw.
• With the solution cup detached, turn machine on and pull the trigger allowing air to
blow any excess water out of the pick up straw and nozzle.
• Thoroughly dry the solution cup before attaching back to the machine.
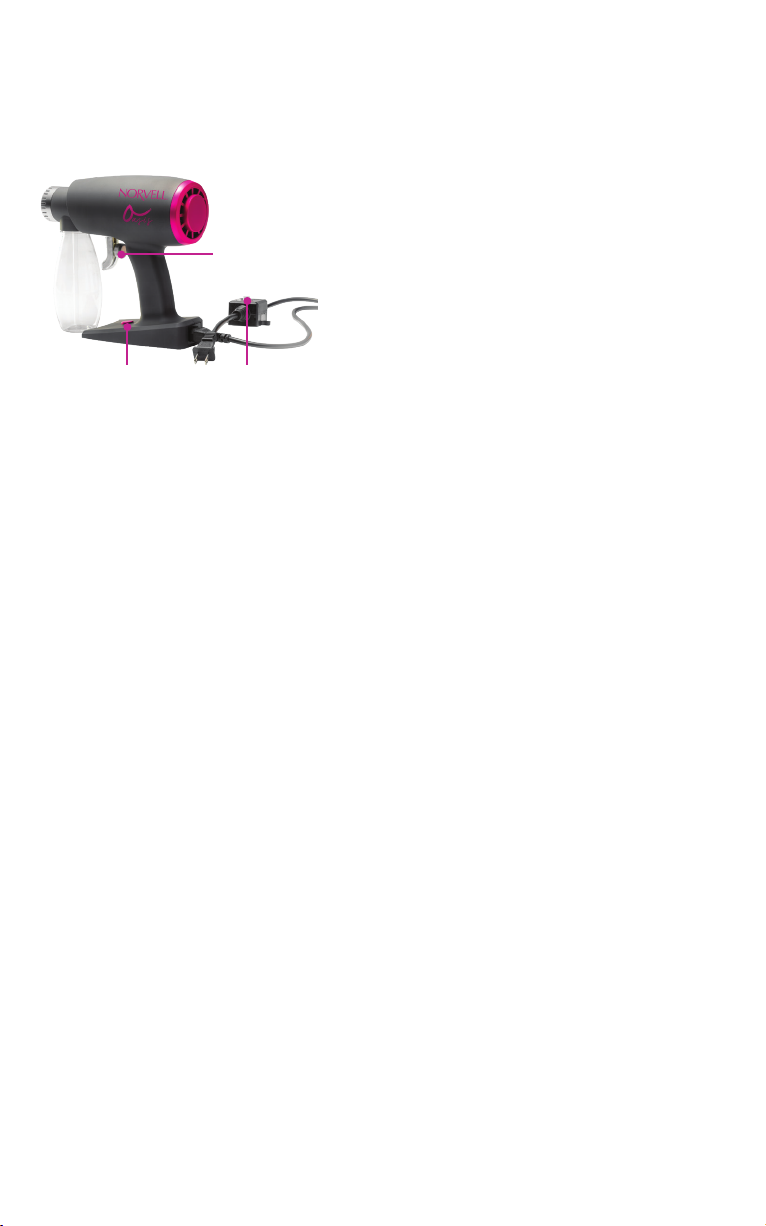
STEP 1 Plugging your spray
tanning machine in. STEP 2 Setting up your machine
To nd optimal setting for solution control
knob turn clockwise until tight. This is the
0 position that indicates 100% full spray.
Now, adjusting backwards to optimize your
atomization and spray pattern see below:
1. Full turn counter clockwise
for heavy spray
2. 1.5 turn counter clockwise
for medium spray
3. 2 full turns counter clockwise
for the lightest spray
Expert Tips
• If you take your spray gun apart DO NOT DO THIS OVER A SINK. Disassemble over
your counter, preferably in a large bowl or on a towel.
• Do not spray HOT water through your gun. Only use cold or warm water.
• Spray water through your gun when you are done spraying for the day. Then take the
cup off and pull trigger to spray the gun dry.
• To test solutions to see if they are still developing, use a q-tip and apply a quarter size
spot on your body in a discreet area and let the tan develop the amount of hours
required. This helps in case your solution was frozen or heated in shipping and
you’re not sure if it’s still good.
• Store solution in cool dry area.
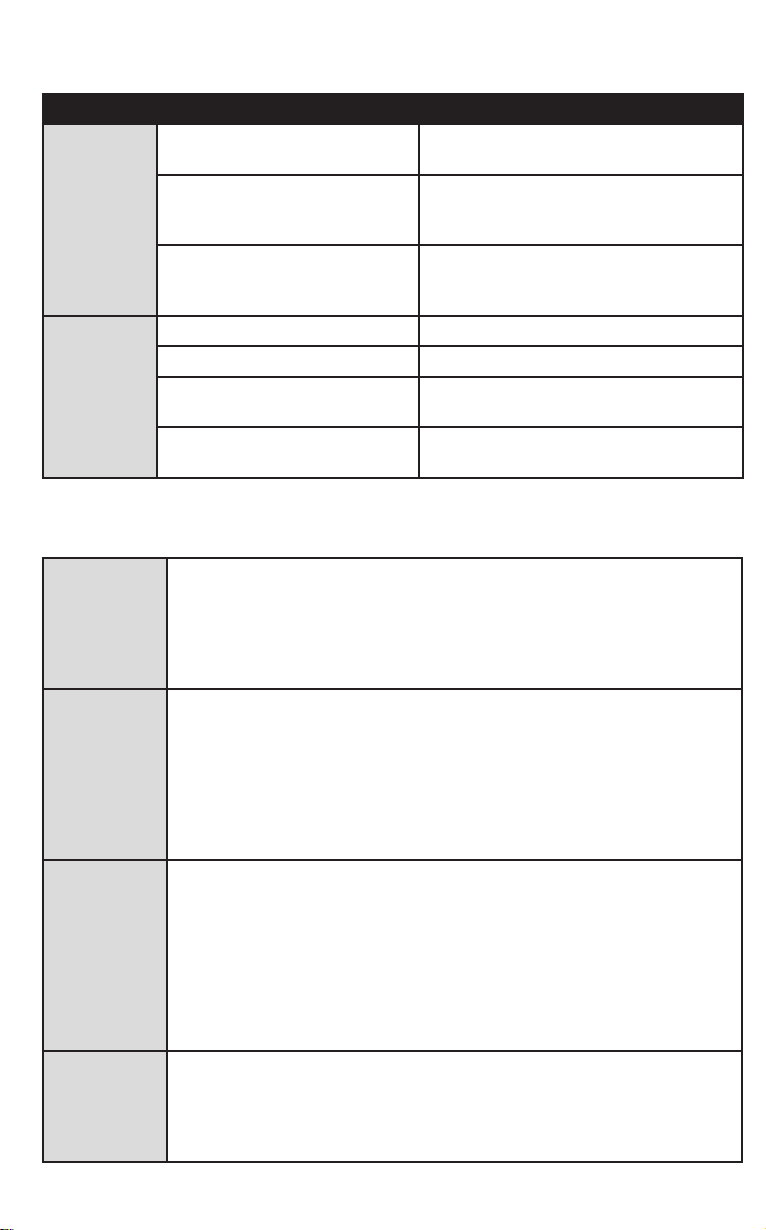
Machine Troubleshting
H V L P Gun Troubleshting
Problem Cause What to Do
Machine
won’t
turn on
The power cord is not
securely attached
Make sure that the power cord is pushed
rmly into the machine and outlet
The electrical outlet needs to
be reset or is bad
Try pressing the reset button on the
outlet. If that does not work then try
another outlet.
Breaker tripped
Unplug power cord from outlet, press
ground fault breaker reset button.
Plug power cord back into outlet.
Gun or cup
leaking
The solution cup is not tight Make sure the solution cup is nger tight
Cup gasket is missing or damaged Replace gasket
Solution cup is overlled Pour out excess solution. Cup should not
be lled over 3/4 of the cup.
Machine is not being help upright You must keep the spray gun level at ALL
times. DO NOT TILT the machine.
Solution is
intermittently
spraying
• Check solution dial and make sure that it is open.
- Nozzle may be blocked. To check, try spraying warm water through
applicator.
• If no water comes through, check under your nozzle for blockage.
• There is not enough solution in the cup.
• Cup tube is loose.
Spray
applicator
is leaking
• Spray gun cup is not tight enough. Make sure that cup is nger tight.
• Solution cup seal is missing or damaged. Replace seal.
• There is too much solution in the cup.
- Nozzle may be blocked. To check try spraying warm water through
applicator. If no water comes through, check under your nozzle for
blockage.
• Be sure to hold your spray gun level and only spray vertical or horizontal.
Do not tilt or turn spray gun.
Spray is
sputtering
or speckled
• Solution may be too low. Add more solution to your cup.
• Applicator is on an angle. Make sure that you are holding the gun level.
• Nozzle may be blocked. To check, try spraying warm water through
applicator.
- If no water comes through check under your nozzle for blockage.
• Filter on machine may be blocked. Remove, rinse thoroughly, dry and
re-insert.
• Solution control knob is set too low.
• Cup tube is loose.
Continual
spray
• Trigger is jammed. To unjam, spray warm water through the applicator
repeatedly.
• Try back bubbling. To do this, pour warm water in your cup then place your
nger over the nozzle and pull until trigger solution bubbles into the cup.
Release and spray. Any trash in the line should back bubble into the cup.
Get the #1 Rated Handheld Spray Tan Training Program – visit NorvellTanning.comGet the #1 Rated Handheld Spray Tan Training Program – visit NorvellTanning.com
Solution
Control Knob
Power Button Ground Fault Breaker