Norvell Z3000 Guide

Equipment Manual Version 2.0
Instruction Manual and User Guide
Z3000™

norvellsunless.com
Norvell Skin Solutions, the leader in designing, developing, and
Manufacturing state of the art spray tanning systems for
use within professional Salons, Spas,
Health Clubs, Med Spas, and Tanning Salons is
proud to introduce the Norvell Z3000 tanning system.
Our goal is to provide the highest quality tanning results along
with unparalleled customer service, support and technology. As a customer
having committed to such an investment you deserve nothing less.
Welcome to the Future of Sunless.
Z3000™
888.829.2831 • 615.529.1250 - 1 -
REGISTER YOUR EQUIPMENT TO RECEIVE
THE MOST OUT OF YOUR PURCHASE
AND TO INITIATE YOUR EQUIPMENT
WARRANTIES.
Record your equipment serial numbers below:
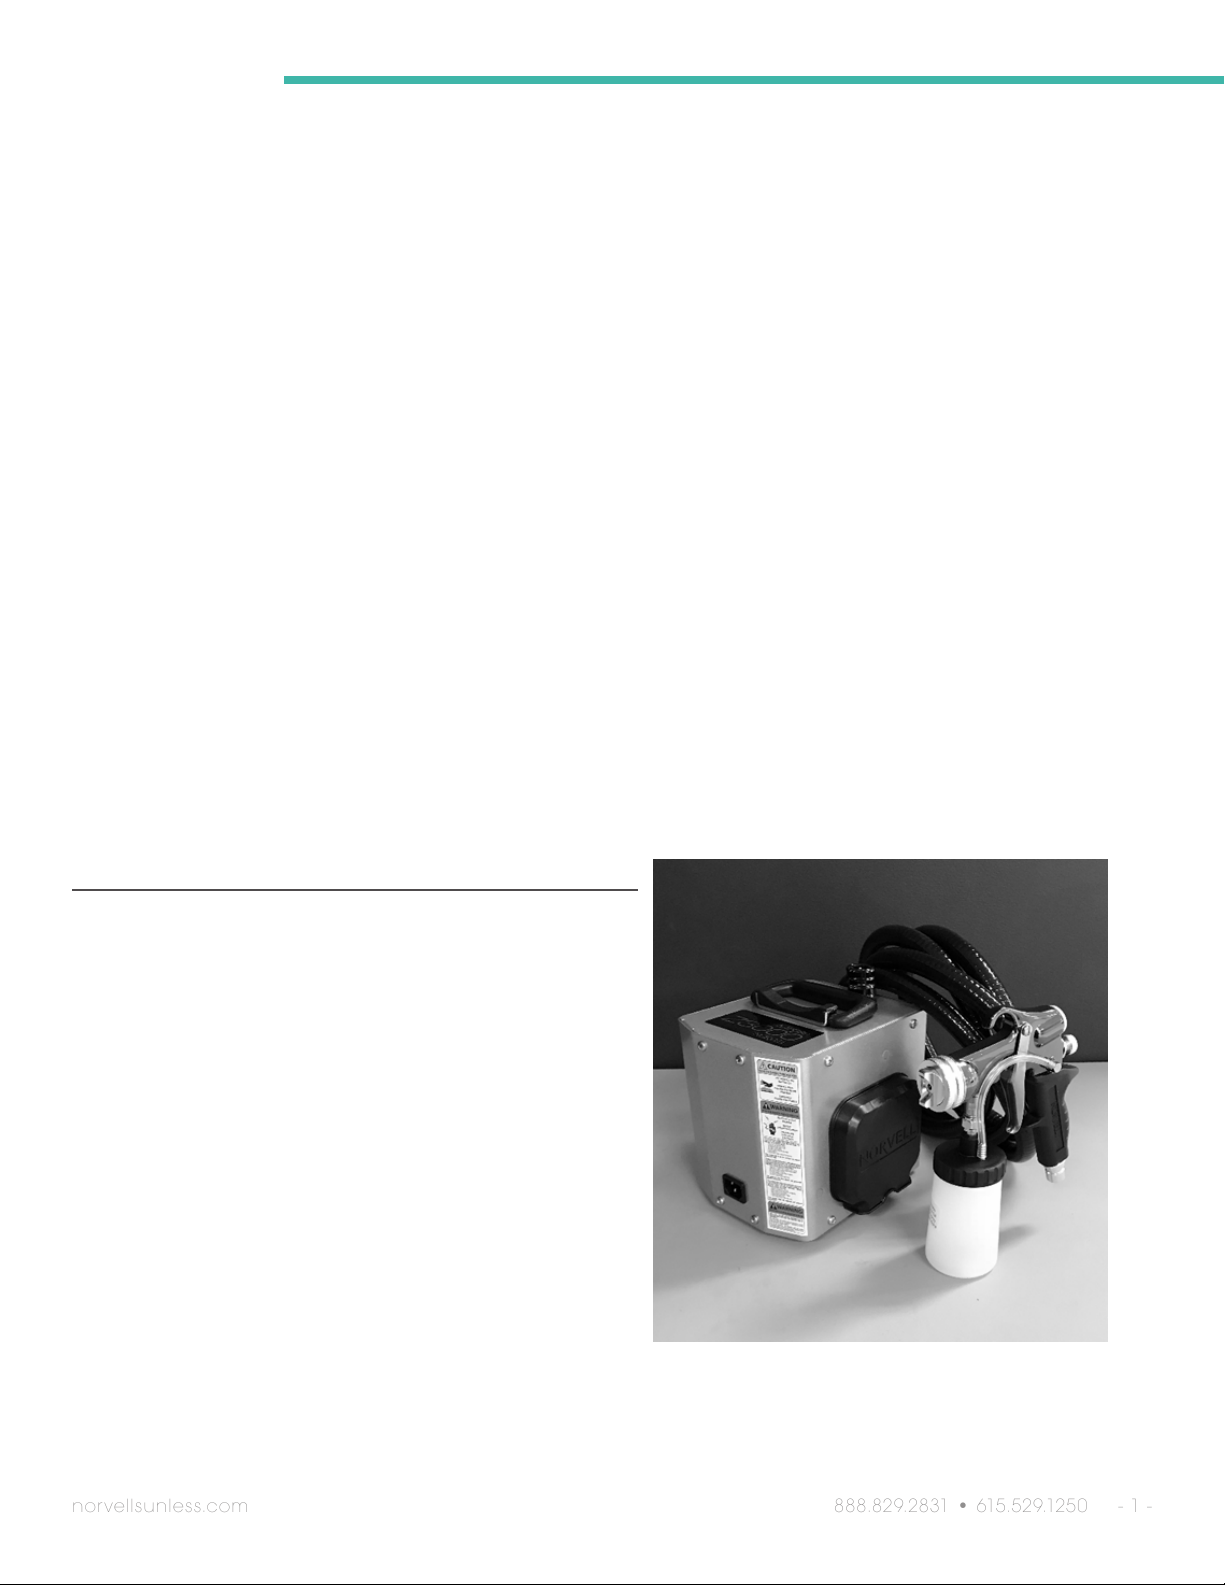
Mobile Z3000 Turbine: Z3-
NOTE:
Please read this manual carefully and
thoroughly before operating your Arena.
This manual contains important operation
instructions and safety information.
Retain this manual for future reference.
IMPORTANT!

norvellsunless.com
Z3000™
888.829.2831 • 615.529.1250 - 2 -
Your safety and the safety of others is very important. Please read and obey all safety
messages outlined below.
General Safety Information
Electrical Requirements
Z3000 SPRAY UNIT: 115-120VAC, 5.5A, 60 Hz,
Z3000 SPRAY UNIT: 115 (ALT)-120VAC, 7.5A, 60 Hz,
(A GFCI 110V OUTLET IS RECOMMENDED) OR
Z3000 SPRAY UNIT: 220-240VAC, 3.5A, 50/60 Hz
It is the responsibility of the owner and operator to comply with all appropriate safety
and health laws, as well as other applicable national, state and local laws and ordinances
when operating and maintaining Norvell equipment. When using an electrical appliance,
basic precautions should always be followed.
Norvell Equipment is to be operated only by those who have been professionally
trained. Complete interactive training courses are available through Norvell University.
The class schedule can be found online at www.NorvellUniversity.comThe class schedule
can be found online at www.NorvellUniversity.com
WARNING! To reduce the risk of burns, fire, electrical shock, death
or injury to persons, read the following important safety precautions
and all instructions before operating/using the Norvell Z3000 Interior
components are not to be disassembled except by trained and qualified
personnel.
READ ALL SAFETY INFORMATION PROVIDED BELOW BEFORE USE:
•Carefully read this manual and follow all instructions given herein.
•Heed all warnings laid out in this manual, as well as, all warnings located on the unit.
•Use this product only as intended per the instructions in this manual.
•Do not use attachments or accessories unless recommended and authorized by Norvell.
•Use only genuine manufacturer replacement parts.
•Only spray liquids/fluids through the unit that have been approved by the equipment
manufacturer.
•Do not spray flammable or combustible liquids, such as gasoline, or use in areas where
they may be
•present.
•Do not use without the filters in place.
•Position the turbine unit outside of the spray area to prevent overspray from being
recirculated through the turbine air intake. Overspray buildup inside the unit will
damage the turbine motor and void all warranties.
•Make sure the room is well ventilated. Avoid all ignition sources, such as static
electricity sparks, open flames, hot objects, sparks from connecting and disconnecting
power cords, and working light switches.

norvellsunless.com
888.829.2831 • 615.529.1250 - 3 -
Z3000™
•In Mobile situations, always position the turbine behind the spray technician.
•Do not spray into switches or power sockets.
•Do not allow the unit to run unattended.
•Unplug from outlet before cleaning, troubleshooting and/or servicing.
•Do NOT allow to be used as a toy. Close attention is necessary when used by or
near children.
•This product is not intended for use by persons (including children) with reduced
physical, sensory or mental capabilities, or lack of experience and knowledge, unless
they have been given supervision or instruction concerning use of the appliance
by a person responsible for their safety.
•The use of a respirator, mask, or nose filter whenever there is a chance that
vapors may be inhaled, especially with prolonged usage is recommended.
•Consult a physician before use if you are pregnant or think you may be pregnant,
or if you have a diabetic condition.
•Norvell sunless solutions are not a sunscreen or a substitute for proper sun protection.
•Indoor Use ONLY. Do not use outdoors or on wet surfaces.
•Do not use your spray tan equipment near bathtubs, showers, basins, or other vessels
containing water.
•Do not immerse any portion of equipment in liquids. Do not operate the spray gun
if it is wet or leaking.
•Do not allow water to accumulate on the floor around the unit.
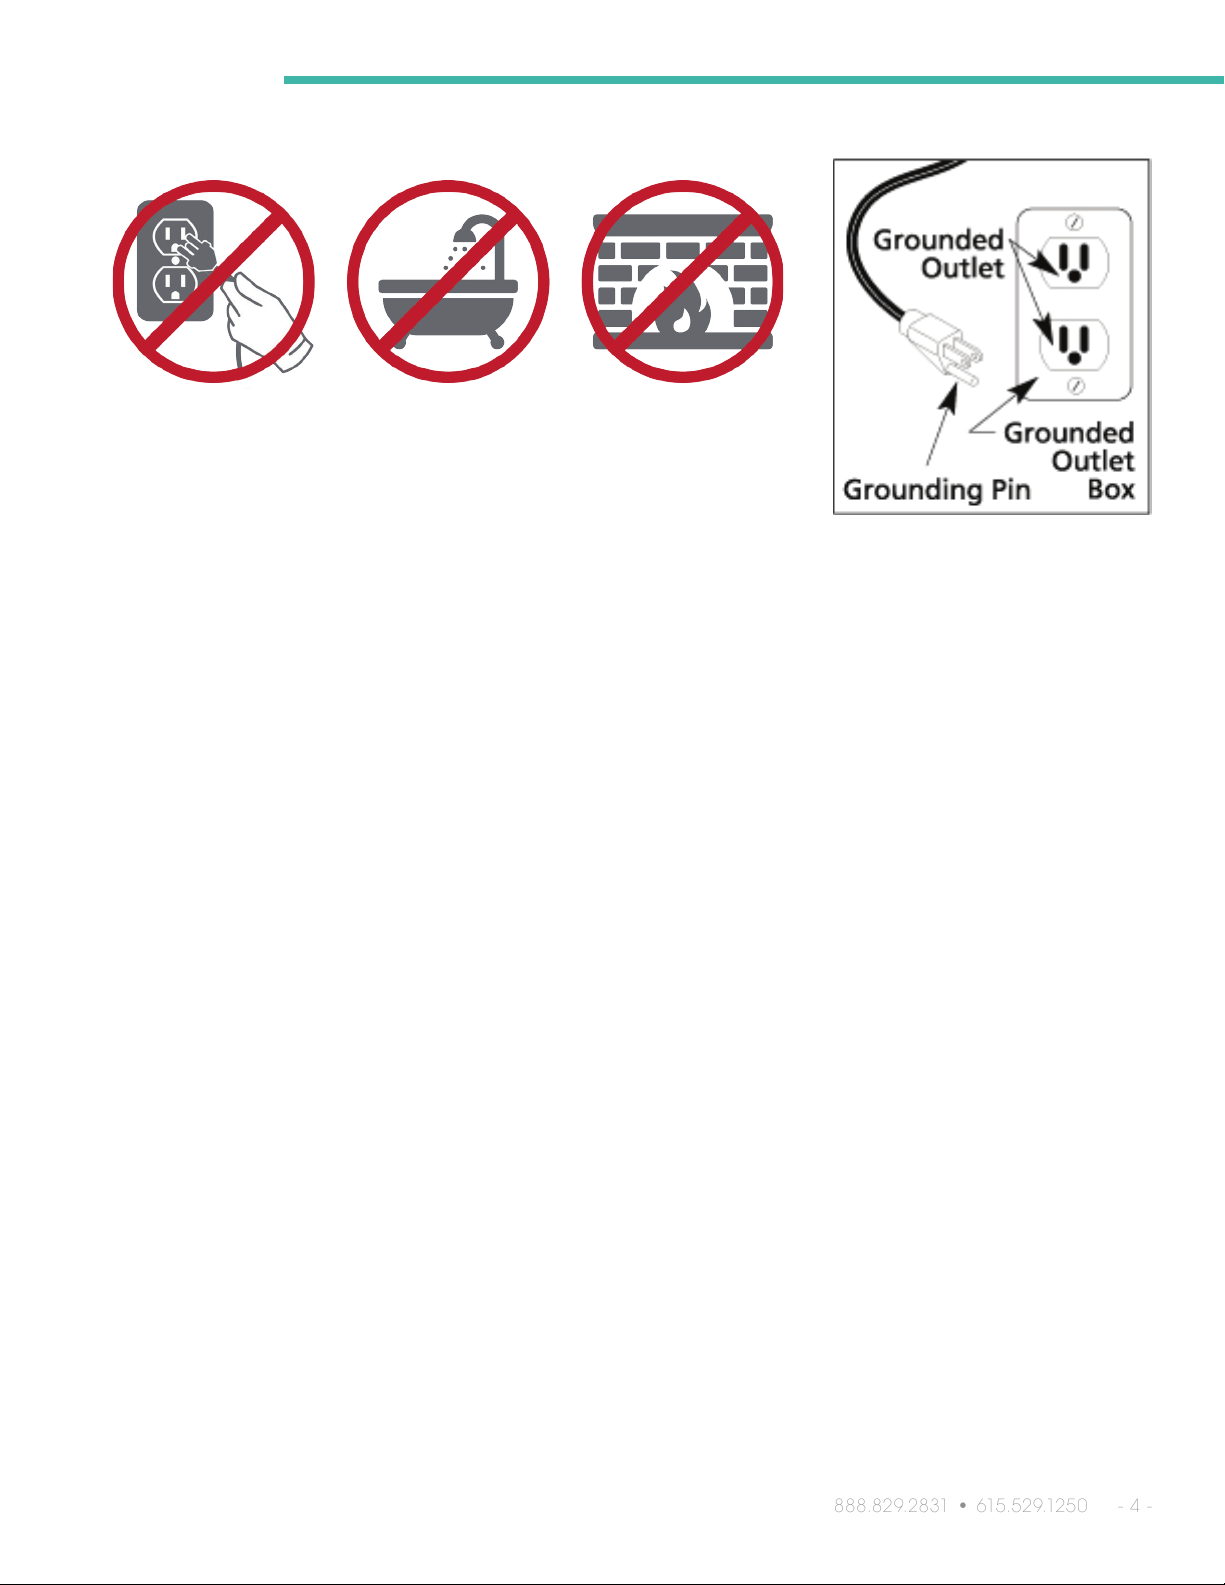
•Never handle the plug, cord, base unit, or spray gun with wet hands.
•To reduce the risk of fire or electric shock, do not expose this unit to rain or moisture.
•Do not overload wall outlets. Overloaded wall outlets, lose or damaged wall outlets,
extension cords, frayed power cords, or damaged or cracked wire insulation
are dangerous. Any of these conditions could result in electric shock or fire.
•Do not use the equipment if power cord is damaged. In the event of damage,
discontinue use immediately. If the supplied cord is damaged, it must be replaced
by an authorized Norvell technician.
•Protect the power cord from physical or mechanical abuse, such as being twisted,
kinked, pinched, closed in a door, or walked upon. Pay particular attention to plugs,
wall outlets, and the point where the cord exits the unit.
•Keep all electrical cord away from heated surfaces.
•Turn off all controls before unplugging. Do not unplug by pulling on cable. To unplug,
grasp the plug to remove from outlet, not the cable.
•Do not use an extension cord unless the cord complies with local region electrical
safety standards.
•Periodically inspect the power cord for signs of damage.
•Do not use the equipment with a voltage inverter or any device designed to convert
the electrical supply from a different source. If the provided plug does not fit into your
outlet, consult an electrician for replacement of the outlet.
•Do not modify the machine plugs.
•Always plug the power cord into a properly configured grounded outlet.

888.829.2831 • 615.529.1250 - 4 -
Z3000™
25’ cord ........10, 12, or 14 Gauge
50’ cord ........10 or 12 Gauge
100’ cord …...10 Gauge
Do not pull on
cables.
Do not submerge in
water or get wet.
Do not use near
open flames.
Fig. 1

norvellsunless.com
888.829.2831 • 615.529.1250 - 5 -
Z3000™
Z3000 CONTENTS
1 - Mobile Z3000™ Turbine Unit
1 - 10ft Auto Lock Power Cord
1 - HVLP Pro Series Spray Z-Gun™
1 - Air Hose
1 - Operator’s Manual
Package Contents:
Inspect All Contents
Carefully unpack all packages and inventory contents upon arrival.
All missing or damage claims must be made to Norvell Customer
Service ASAP by calling 888.829.2831 or 615.529.1250. Norvell
must be notified of any damaged or missing items within 7 business
days from the date of receipt.

Norvell Mobile Z3000 System™
The Norvell Z3000 HVLP Turbo spray tanning system has three components:
(1) Turbine unit (2) Air Hose and (3) Spray Gun.
The turbine unit when connected to the correct electrical power supply in the “on”
position provides a continuous source of clean, warm, and dry High Volume Low
Pressure (HVLP) air. The air hose connects the turbine unit to the Spray Gun. Air
flows through the hose to the nozzle of the specially designed Z3000 Spray Gun.
Atomization of the tanning solution is achieved when the air mixes with the stream of
fluid passing through the tip/ nozzle. This low-pressure atomization principle achieves
minimal overspray (wasted spray) to the environment when applied correctly.
•The Z3000 Turbine unit has one air hose outlet on the top of the case and is designed
to run one only one Spray Gun at a time.
•Your Norvell Z GUN offers many options. You can adjust (turn/click) the air cap
below to three positions. One will produce a horizontal pattern for spraying across,
another will produce a vertical pattern for spraying up and down, and the third will
produce a round pattern for detailing muscles or other intricate parts of the body.
SPRAY PATTERN DIAGRAM: (ZGun air-cap/nozzle spray pattern positions)
norvellsunless.com
888.829.2831 • 615.529.1250 - 6 -
Z3000™

Familiarizing Yourself with Your ZGUN™
Familiarize yourself with the controls on the Spray Gun. There are three principal controls.
The Rotating Air Cap, the Solution Flow Control Screw and the Air Cap Locking Ring.
Click the Rotating Air Cap into each position. Horizontal, Vertical and 45° diagonal. When
the air cap is in the 45° position the pattern is round, this is useful for spraying detail
areas such as muscle toning or contouring. Flow will increase when using the diagonal
position and it is usually necessary to reduce the flow by adjusting the flow screw.
Turn the Solution Flow Control Screw counter-clockwise to open or release more fluid,
clockwise to close or reduce solution flow.
norvellsunless.com
888.829.2831 • 615.529.1250 - 7 -
Z3000™
#1 Rotating
Air Cap
#3 Air Cap
Locking Ring
#2 Solution Flow
Control Screw

Preparing to Use Your Norvell Z3000™ Spray Tanning System
for Mobile Operation
1. Select a safe, well ventilated area where you will spray your client. Locate your Norvell
Z3000 turbine unit away from the area where you will be directly spraying so you
can keep the filters cleaner. Do not cover or enclose the turbine unit in anything
other than the authorized Norvell Quiet Box or the Norvell Pro Travel Bag. NOTE:
Place the Mobile Z3000 Unit in an area that will be behind the spray technician.
2. Connect the Air Hose to the turbine unit. Pull back the spring loaded quick disconnect
coupler and insert the male connector on the air hose into the quick disconnect.
Release the ring. Your air hose will be locked into place. CAUTION: If you have just
finished spraying, the metal coupler at the turbine end may be hot, use caution when
removing the hose.
3. Connect the Pro Series HVLP ZGun to the Air Hose. Pull back the spring loaded
quick disconnect coupler and insert the male connector of the Z Gun into the
quick disconnect. Release the ring and the Z Gun will be locked into air hose.
4. Install the Mobile Electrical Cord (Provided) into the front of the Z3000 Unit. Plug
the electric cord into a correctly grounded electrical outlet. Be sure the electric
current is the correct voltage. If you need to use an extension cord, be sure it is at
least 12-gauge wire and has a correctly grounded outlet. (240v units for use outside
of the United States are often only supplied with an electric cord. A correct plug
must be installed prior to use. Make sure the ground wire is properly connected).
5. It is important to draw cool/ambient air through the turbine unit for optimum
performance and motor longevity. Avoid placing the turbine in a warm environment
or in direct sunlight.
Preparing to Spray
Quality results with the Norvell spray tanning system is a combination of: careful client
preparation, a proper spraying environment, a basic knowledge of the sunless solution
technology and how these solutions work with the Norvell Mobile Z3000 spray tanning
system.
The Norvell Mobile Z3000 turbine unit is designed to run at maximum speed. Make sure
the filters are in place prior to operation. Press the On/Off switch on the rear panel to
start the turbine unit.
norvellsunless.com
888.829.2831 • 615.529.1250 - 8 -
Z3000™

Proper Spray Technique
norvellsunless.com
888.829.2831 • 615.529.1250 - 9 -
Z3000™

Using Your ZGUN
•The Norvell ZGUN is certified, meaning your Spray Gun only uses approximately 3psi or
less. All passages and air ports are much larger than an airbrush system. If one of these
air passages becomes blocked, or buildup of solution starts to occur, your spray
pattern will become distorted. Therefore, always keep your Spray Gun clean.
•Your ZGun comes fitted with a custom size tip/nozzle (Z Gun Fig. item #6 and needle
(Z Gun Fig. item #15). This size has been designed to perfectly atomize and a variety of
UV Sunless tanning solutions. Using this size tip/nozzle and needle you can achieve
between a 1/4” to 7” fan pattern, simply by rotating the air cap (Z Gun Fig. item#2) to
the desired fan type (See Spray Patterns, Gun Fig. above), opening the material flow
screw (Z Gun Fig. item#18) counter-clockwise and moving the Spray Gun closer or
further away from the client. A little practice will enable you to master this very easy
technique
•PRACTICE: Remove the cup from your Spray Gun. Fill the Spray Gun Cup
approximately half way with water or DHA FREE Training Solution.
•Re-attach the cup to the body of the Spray Gun. Attach the Spray Gun to the air hose.
Turn the turbine unit on. You will notice air is now flowing through the air cap, this is
normal and correct. Position the air cap (Z Gun Fig. item#2) in the horizontal position;
turn the solution flow screw (Z Gun Fig. item#18) counter clockwise approximately
1 to 1 1/2 turns. Point the Spray Gun away from yourself (and anyone else) and pull the
trigger all the way back. You should see a “V” shaped
mist (or triangle) called a fan pattern.
•Now, with the trigger depressed, slowly begin to turn the solution flow screw (Z Gun
Fig. item#18) clockwise (closing the solution flow). Notice that the fan pattern is
beginning to get smaller.
•Now, reverse this and notice the pattern get larger. Take a large piece of cardboard or
paper and direct the pattern at the surface. Turn the solution flow screw 2 full turns and
hold the Spray Gun approximately 6” from the surface.
•Pull the trigger. Observe the outline and size of the pattern. Now, turn the solution flow
screw clockwise (closing the solution flow). Move the Spray Gun an inch or two closer
to the surface of the paper. Pull the trigger. Notice the pattern has become smaller.
•You can continue reducing the solution flow and move the Spray Gun even closer to the
paper and the pattern will continue to get smaller and smaller. Next, rotate the air cap
to a diagonal 45˚ position (See Spray Patterns, Spray Pattern Fig. above). Vary the
solution flow and the distance of the Spray Gun from the work surface. Notice the
changein pattern size.
•CAUTION: Even when the turbine unit is turned off, pressure will remain in the
spray cup. If you pull the trigger back, a stream of fluid will flow. To prevent
accidents, turn solution flow screw (Z Gun Fig. item#18) clockwise until it is
completely closed. The trigger is now locked in the closed position.
norvellsunless.com
888.829.2831 • 615.529.1250 - 10 -
Z3000™

norvellsunless.com
888.829.2831 • 615.529.1250 - 11 -
Z3000™
Pro Series HVLP ZGun
Parts List and Diagram
Norvell Customer Service
888-829-2831
www.NorvellSunless.com
Diagram # Description
1Air cap ring
2Air cap
3Air distributor plate (stainless)
4Air Distributor spring (stainless)
6Fluid nozzle/jet (stainless)
7Fluid nozzle gasket
8Air feed connector
9Gun casting (main body)
10 Trigger bushing
11 Trigger pivot screw (stainless)
12 Trigger screw washer
15 Needle (stainless)
16 Needle spring (stainless)
17 Flow screw insert
18 Material flow adjusting screw
19 Gun casting (handle
20 Handle tube
22 Gland seal
23 Gland nut (stainless)
24 Trigger (stainless)
26 Material pick up tube
27 Lid assembly
28 Gasket (white poly)
29 8-oz. plastic cup
35 Fluid connector, 1/4” (stainless)

norvellsunless.com
888.829.2831 • 615.529.1250 - 12 -
Z3000™
Daily Spray Gun Maintenance and Cleaning
REFER TO PRO SERIES HVLP ZGUN FIG. ON PREVIOUS PAGE TO LOCATE SPECIFIC
GUN PARTS
1. It is not necessary to empty and clean your Spray Gun when you pause between
applications. However, it is critical to clean your Spray Gun thoroughly at the
end of each day. Do NOT leave solution in your Spray Gun overnight.
2. Pay careful attention in keeping the cup threads clean, this includes the threads on the
main gun body as well. Dried material on the threads can cause the cup to lock onto
the surface making removal difficult, or improper pressurization of the internal gun
components. When you have finished spraying for the day, disconnect the spray
gun from the Quick Disconnect Air Hose. Pour the remainder of your solution out
of the Spray Gun cup into an airtight storage cup or bottle. Turn you gun upside
3. down in a sink and run warm water down the tube while pulling your trigger back.
You should see a steady stream of water running from the gun nozzle. Allow all
bronzers to drain out of the end of the nozzle until the clear water is running out.
4. Pour in a small amount HVLP Gun Cleaning fluid into the Solution Cup. Shake the
Spray Gun and reattach the gun to the Quick Disconnect Air Hose. Turn the turbine
on and spray the cleaner through the gun. This will lubricate the internal gun
mechanism. Remove the gun from the Quick Disconnect Air Hose. Remove the Solution
Cup, lay upside down on paper or salon towel and allow to completely air dry before
reassembly.
5. Remove the Air Cap Ring (1) by turning counter-clockwise and set aside. Next,
lift out the Air Cap (2) and set aside. Remove the Air Distributor Plate (3) and Air
Distributor Spring (4) and set aside. A standard wrench (provided with gun) will
fit the flanges on the fluid nozzle. Remove the Fluid nozzle (6) and nozzle washer
(7). Be careful not to lose or misplace the nozzle washer. Rinse with all parts
with warm water or HVLP Gun Cleaner, give special attention to inner and outer
Air Cap threads. NOTE: Do NOT perform this step over sink. Lay all parts out
on paper or salon towel and allow to completely air dry before reassembly.
6. Remove the fluid needle assembly by turning the Solution Adjusting Screw (18)
counter-clockwise until it has been removed from the Spray Gun, exposing the
Needle Spring (16) and Needle (15). Carefully remove the Needle Spring (16) and
set aside. Pull the needle assembly back towards you out of the back of the Spray
Gun. Do Not force the needle in or out of the Spray Gun. If you find it difficult to
remove the Needle, pull back on the gun trigger to release the needle from the
internal tip. Rinse with all parts with warm water or HVLP Gun Cleaner, give special
attention to all threads. NOTE: Do NOT perform this step over sink. Lay all parts
out on paper or salon towel and allow to completely air dry before reassembly.
7. Wipe the exterior of the gun and all exposed areas clean again giving special attention
to the cup threads.

norvellsunless.com
888.829.2831 • 615.529.1250 - 13 -
Z3000™
8. Although they might not need attention every time you spray, you should be aware
of two additional important parts on your Spray Gun.
•The Cup Gasket (28) insures that the cup is properly sealed to the Spray Gun
body, the cup is properly pressurized and no fluid leaks from the Spray Gun cup.
Replace
if necessary.
•The fluid needle packing (22/23) compresses around the fluid needle assembly
to prevent fluid from leaking around the needle. This is adjusted by tightening
(or loosening) the needle packing screw (23). Be sure that this screw is not
too tight as to not permit free movement of the needle assembly. Be sure
that this screw is not too loose as to permit fluid to leak around the needle.
Normally, this is preset at the factory and should need no adjustment. If it
becomes impossible to prevent leaking, contact Norvell Technical Support
888.829.2831 or 615.529.1250 to troubleshoot or schedule maintenance.
9. Once all parts have completely air dried, re-assemble your Spray Gun. If necessary,
apply a thin layer of Gun Lubricant to the Air Cap Thread, Needle, and Solution Flow
Screw.

norvellsunless.com
888.829.2831 • 615.529.1250 - 14 -
Z3000™
Additional Spray Gun Maintenance and Cleaning
After 50 hours of use or when necessary Norvell recommends the following maintenance
be performed. Check Cup Gasket, Nozzle Gasket, Gland Seal, Air Feed Connectors and
Air Tube, Nozzle and Needle Assembly and Solution Feeder Tube for any damage or need
for additional cleaning. Clean or replace parts as needed. Call Norvell 888-829-2831 for
genuine replacement parts. Failure properly maintain equipment may void your warranty.
Z3000 Turbine Unit Maintenance
•The turbine unit needs virtually no maintenance. The turbine
has sealed bearings that are pre-lubricated, and no service
is necessary. Periodically, the turbine unit air filters should
be examined. Clean filters are critical to good performance
and equipment longevity. Clean and/or change filters every
50 hours or when necessary.
•Your Norvell Z3000 HVLP Turbine has 2 replaceable filters
located on either side of the turbine unit. The filters can be
removed from the Noise Reduction Filter Covers by sliding
them out of the bottom of the covers. No tools required!
•Rinse filters with warm water and gently press excess water
out of filters with paper or salon towels. Do not squeeze
or ring water out of filters. Allow filters to air dry. Do not
install wet or damp filters in unit. Norvell recommends
keeping an extra set of filters on hand for quick replacement
as needed.
•Wipe excess dirt and dust away from surface of turbine.
Dirty filters will reduce the air being drawn through the
turbine, causing the unit to run abnormally hot, diminish
spray performance and reduce the life of the motor.
•Clean and/or replace. Use the maintenance record sheet
to keep track of your equipment use and make sure you
change them every 50 hours.
Call Norvell at 888.829.2831 for genuine replacement
filters. Failure to clean or replacing the filters may void
your warranty.

norvellsunless.com
888.829.2831 • 615.529.1250 - 14 -
Z3000™
Troubleshooting Guide
Problem Possible Resolution
Spray is spitting, weak or ceases to spray.
•Is the solution cup securely connected?
•Are the Air Feed Connectors and Air Feed
Tube securely connected and undamaged?
•Is the Cup Gasket in place and undamaged?
•Is the Solution Flow Screw dialed within the
appropriate range for a spray session?
•Is the Air Speed Setting set within the
appropriate range for the spray session?
•Have you checked all air hoses for
leaks and proper connection?
•Have you broken your gun down to check for
clogs within the nozzle or buildup around the
gun needle?
Unit will not power on.
•Is the equipment plugged into a properly
grounded electrical outlet?
•
Is the equipment plugged into a 110v/15AMP
outlet?
•
If the electrical outlet is a GFCI outlet
does the outlet need to be reset?
•
Is the equipment plugged directly into an
outlet or through another power source such
as an extension cord or surge protector?
If so are all connections complete?
Solution is spraying too heavy.
•Is the Solution Flow Screw dialed within the
appropriate range for a spray session?
•Is the Air Speed Setting set within the
appropriate range for the spray session?
•Are you using the correct solution
formulation for your equipment?
Solution is leaking from the front of my gun.
•Is the air cap ring properly tightened?
•The fluid nozzle or needle may need to be
replaced.
Solution is leaking from around the cup top.
•Is the solution cup securely connected?
•Is the Cup Gasket in place and undamaged?
•The Cup Gasket may need to be replaced.
Solution is spraying out of my gun, but I am not
pulling the trigger.
•The fluid nozzle or needle may need to be
replaced.
I think I am getting too much overspray.
•Make sure you are holding your Spray Gun
between 6 and 10 inches from the spray
surface.
•Adjust the Solution Flow Screw down to
decrease the amount of fluid flow.
Air continually flows trough.
•This is normal as the HVLP Turbine and Gun is
a “bleeder” applicator. This is necessary and
desirable to ensure longevity of the turbine
motor.

Warranty and Technical Support
For all technical questions please call Sunless, Inc./Norvell at 888-829-2831.
For spraying technique visit www.norvellsunless.com
Technical Support: Available Monday-Friday, 8am-5:00pm, CST.
Norvell Sunless Solutions
888-829-2831
www.Norvellsunless.com
Sunless, Inc./Norvell
The Norvell Mobile Z3000 Turbine is WARRANTED by Norvell Spray Systems for a total
period of TWO years from the ORIGINAL date of purchase by the ORIGINAL PURCHASER.
Proof of purchase should be included and all SHIPPING CHARGES to be pre-paid when
sending back to Norvell for repair.
NORVELL SPRAY SYSTEMS, upon examination of the machine/equipment will replace or
repair at their discretion any defects in material or workmanship.
This WARRANTY does NOT include: miss-use, damage, neglect, alterations, disassembled
equipment or modifications, lack of maintenance, cleaning, water damage to electrical
parts and INCORRECT VOLTAGE CONNECTION. This WARRANTY is in lieu of all
other express warranties, any WARRANTY implied by law, including but not limited
to implied warranties of merchantability or fitness, is excluded to the maximum extent
permitted by law and, if not excludable, it is limited to the duration of the express
Warranty.
No representative or person is authorized to extend this Warranty or to create for
NORVELL SKIN SOLUTIONS, LLC, any other liability in connection with the sale of any
NORVELL SPRAY SYSTEM product.
Sunless, Inc./Norvell shall not be liable for any consequential, incidental, or special
damages of any kind directly or indirectly resulting from breach of any express or
implied Warranty.
norvellsunless.com
888.829.2831 • 615.529.1250 - 16 -
Z3000™

norvellsunless.com
Norvell® is a registered trademark of Norvell Skin Solutions, LLC. © 1983-2015 Norvell Skin Solutions, LLC. All Rights Reserved.
8909 S. Freeway Dr. |Macedina, OH 48056 |888.829.2831 |615.529.1250 |norvellsunless.com
Norvell Skin Solutions, LLC
Customer Service 888-829-2831 or 615-529-1250
www.norvellsunless.com
DO NOT USE EQUIPMENT BEFORE
READING THIS MANUAL!
This manual contains important warnings and instructions.
Please read these instructions carefully and keep for your reference.
Table of contents
Other Norvell Personal Care Product manuals
Popular Personal Care Product manuals by other brands

Hang ups Teeter
Hang ups Teeter Power V Assembly instructions

Core Products
Core Products Pain Remedy Plus instruction manual

Sensede
Sensede CA15S operating instructions

mychway
mychway LT-110D user manual

SEVERIN
SEVERIN MANIKÜRE-PEDIKÜRE-SET HG 7713 datasheet

Orliman
Orliman Maternity OMT611 Use and maintenance instructions

Coopers of Stortford
Coopers of Stortford 10986 Instructions for use

BLAKLADER
BLAKLADER clim8 388020329900 operating manual

BaByliss
BaByliss Twist Secret TS1100E manual

Michael Todd
Michael Todd soniclear elite Instructions for use

Halo Monitoring
Halo Monitoring myHalo manual

Waterpik Technologies
Waterpik Technologies WaterFlosser WP-120 quick start guide