Novalynx 110-WS-16RC User manual

NOVALYNX CORPORATION
MODEL 110-WS-16RC
TIPPING BUCKET RAIN GAUGE
INSTRUCTION MANUAL
REVISION DATE: NOV 2005

i
Receivin and Unpackin
Carefully unpack all components an compare to the packing list. Notify NovaLynx
Corporation imme iately concerning any iscrepancy. Inspect equipment to etect any
amage that may have occurre uring shipment. In the event of amage, any claim for
loss must be file imme iately with the carrier by the consignee. Damages to
equipment sent via Parcel Post or UPS require the consignee to contact NovaLynx
Corporation for instructions.
Returns
If equipment is to be returne to the factory for any reason, call NovaLynx between
8:00 a.m. an 4:00 p.m. Pacific Time to request a Return Authorization Number (RA#).
Inclu e with the returne equipment a escription of the problem an the name,
a ress, an aytime phone number of the sen er. Carefully pack the equipment to
prevent amage or a itional amage uring the return shipment. Call NovaLynx for
packing instructions in the case of elicate or sensitive items. If packing facilities are not
available take the equipment to the nearest Post Office, UPS, or other freight service
an obtain assistance with the packaging. Please write the RA# on the outsi e of the
box.
Warranty
NovaLynx Corporation warrants that its pro ucts are free from efects in material an
workmanship un er normal use an service for a perio of one year from the ate of
shipment from the factory. NovaLynx Corporation's obligations un er this warranty are
limite to, at NovaLynx’s option: (i) replacing; or (ii) repairing; any pro uct etermine to
be efective. In no case shall NovaLynx Corporation's liability excee pro uct's original
purchase price. This warranty oes not apply to any equipment that has been repaire
or altere , except by NovaLynx Corporation, or that has been subjecte to misuse,
negligence, or acci ent. It is expressly agree that this warranty will be in lieu of all
warranties of fitness an in lieu of the warranty of merchantability.
Address
NovaLynx Corporation
4055 Grass Valley Hi hway, Suite 102
Auburn, CA 95602
Phone: (530) 823-7185
Fax: (530) 823-8997
Email: nova@novalynx.com
Website: www.novalynx.com
Copyright © 2000-2005 by NovaLynx Corporation

ii
TABLE OF CONTENTS
Section No. Pa e No.
1.0 INTRODUCTION .................................................. 1
2.0 TESTING THE RAIN GAUGE . . . . . . . . . . . . . . . . . . . . . . . . . . . . . . . . . . . . . . . . 1
3.0 INSTALLATION . . . . . . . . . . . . . . . . . . . . . . . . . . . . . . . . . . . . . . . . . . . . . . . . . . . 2
3.1 Choose a Location . . . . . . . . . . . . . . . . . . . . . . . . . . . . . . . . . . . . . . . . . . . . . . 2
3.2 Install the Rain Gauge . . . . . . . . . . . . . . . . . . . . . . . . . . . . . . . . . . . . . . . . . . . . 2
4.0 CALIBRATION . . . . . . . . . . . . . . . . . . . . . . . . . . . . . . . . . . . . . . . . . . . . . . . . . . . . 3
5.0 MAINTENANCE ................................................... 4
6.0 TROUBLESHOOTING .............................................. 4
6.1 Rainfall is not registering on the isplay or has a large error . . . . . . . . . . . . . . 4
6.2 Rainfall amount shown on the isplay has a small error . . . . . . . . . . . . . . . . . . 5

iii
MODEL 110-WS-16RC
EQUIPMENT CONFIGURATION AND IDENTIFICATION
The 110-WS-16RC Rain Gauge inclu es the following components. Please make sure
you have all liste components before continuing.
!
Rain Gauge with Cable - The rain gauge comes with the cone attache to the
base. The stan ar version of the rain gauge comes with a 40' (12m) cable.
!
Debris Screen - This screen is place into the rain gauge cone to
help prevent ebris from clogging the funnel hole. In a ition, it
ai s in irecting the flow of water into the tipping bucket at high
rates of rainfall.
!
Mounting Arm - The mounting arm provi es easy mounting of the gauge to the
tripo mast using a 1-3/4" u-bolt.
This illustration below shows the internal components of the rain gauge, many of which
are reference in this manual.
1
NovaLynx Corporation
Model 110-WS-16RC Tippin Bucket Rain Gau e
Instruction Manual
1.0 INTRODUCTION
The 110-WS-16RC Rain Gauge is a tipping bucket rain gauge esigne to meet the
gui elines of the Worl Meteorological Organization. Rain enters the collector cone,
passes through a ebris-filtering screen, an collects in one chamber of the tipping
bucket. The bucket tips when it has collecte an amount of water equal to 0.01"
(0.254 mm) of rainfall. As the bucket tips, it causes a switch closure an brings the
secon tipping bucket chamber into position. The rain water rains out through the
screene rains in the base of the collector.
The bo y an base of the collector are constructe of tough, UV resistant plastic. The
tipping bucket pivots on bearings that minimize friction an wear. Stainless steel
a justment screws un er each chamber of the tipping bucket allow you to fine-tune the
calibration. Mounting holes are pre- rille in the base an a built-in leveling trough ai s
in installation.
2.0 TESTING THE RAIN GAUGE
Before installing the rain gauge:
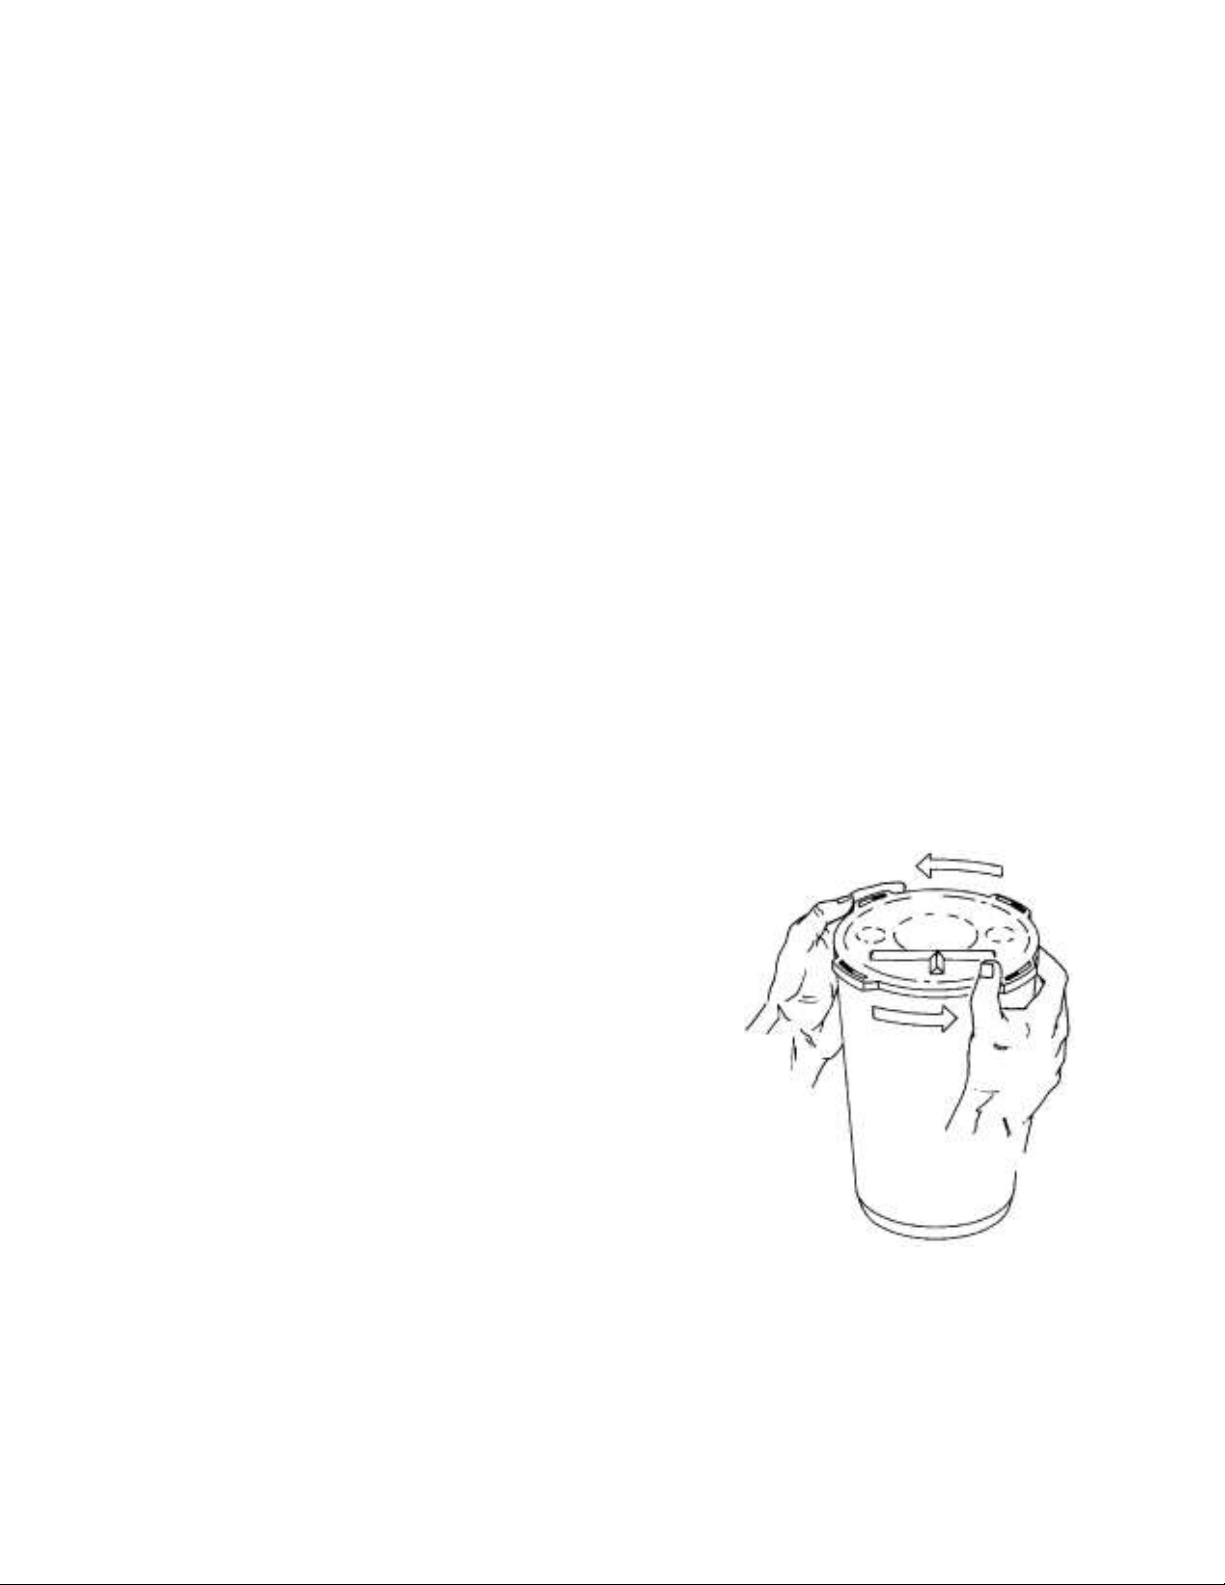
1. Turn the rain gauge upsi e own an remove the
cone from the base by rotating the base until the
latches on the cone line up with the latch opening in
the base then lifting the base away from the cone.
2. Remove the foam or rubber ban which hol s the
bucket in place uring shipping.
3. Attach the two lea s of the rain gauge cable to the
appropriate connectors on the ata acquisition mo ule:
re wire to P3, black wire to GND.
4. While watching the WS-16 observation isplay, tip
the bucket until it rops to the opposite si e. If the
rainfall amount isplaye on the console increases by
the expecte increment (usually 0.01" or 0.254 mm) each time you tip the bucket, your
rain gauge is working properly.

2
3.0 INSTALLATION
3.1 Choose a Location
The location of the rain gauge is very important to the successful operation of the
instrument. The most accurate measurements are ma e in relatively sheltere areas
protecte from gusting an turbulent win s. Openings in orchar s or a grove of trees
offer the best exposure for the rain gauge. Fences an other structures can help serve
as a win break as long as they are not too tall.
Generally, the heights of objects near a rain gauge shoul be proportional to the
istance away from the gauge. The istance of a nearby object shoul be at least twice
the height of the object above the gauge.
Keep the following in min when choosing a location for your rain gauge.
The rain gauge must be level. Verify using a bubble level or by pouring water into the
T-shape leveling trough in the base of the gauge.
Choose a location which is easily accessible for normal cleaning an is istant from
trees or other sources of heavy pollen or ebris.
3.2 Install the Rain Gau e
1. Separate the cone from the base.
2. If necessary, isconnect the rain
gauge cable from the ata acquisition
mo ule.
3. A mounting arm is supplie with the
rain gauge. Mount onto the vertical
mast of the tripo supplie with the
station, using the attache u-bolt.
4. Attach the two lea s of the rain
gauge cable to the appropriate
connectors on the ata acquisition
mo ule: re wire to P3, black wire to
GND. Note: The 4-con uctor cable
supplie with the gauge has been
converte to a 2 wire connection
marke with re an black shrink
sleeving. (See iagram below.)
3
Rain Gauge Black Cable WS-16D Termination
(Internal Colors)
Red
| BLACK GND
Black |
Yellow
| RED P3
Green |
5. To be certain the rain gauge is functioning properly after installation, re-test the unit
as escribe in “Testing the Rain Gauge” above.
6. Once you are sure the unit is functioning properly, place the cone back onto the base
by putting the latches on the cone into the latch openings in the base an rotating the
cone clockwise until the latches “lock” into place.
7. Place the ebris screen, points own, into the cone. The screen prevents large bits
of ebris from blocking the funnel hole.
8. To prevent fraying or cutting of the cable where it is expose to weather, it is
important that you secure it so it oesn’t whip about in the win . Use cable clips or
weather resistant cable ties to secure the cable. Place clips or ties approximately every
3 to 5 feet (1 to 1.6 m). Do not use metal staples or a staple gun to secure cable. Metal
staples, especially when installe with a staple gun, ten to cut the cable.
9. If the cable length supplie with the rain gauge is not long enough for your purpose,
you may exten it. The maximum length of cable is 900 feet (270 m).
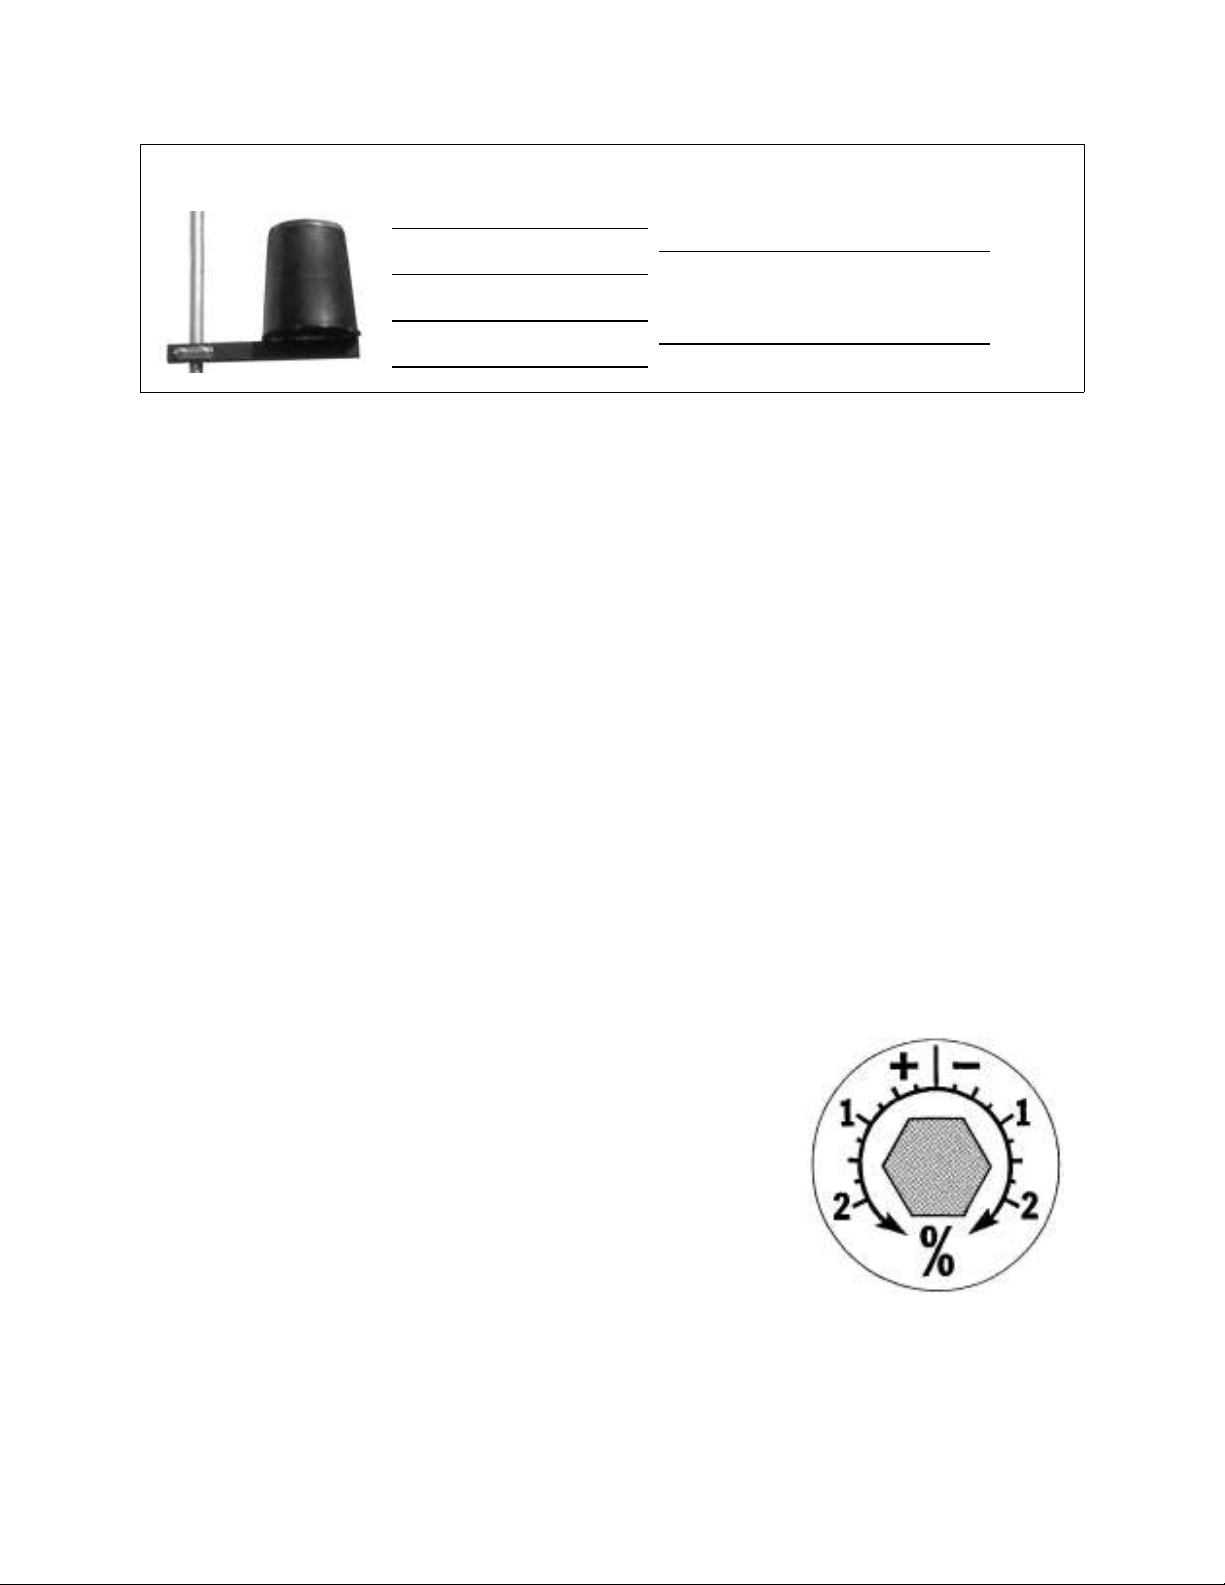
4.0 CALIBRATION
The rain gauge is calibrate at the factory so the bucket tips
for each 0.01" (or 0.254 mm) of rainfall. To a just the
calibration slightly, use a 3/16" (5 mm) wrench to rotate the
a justment screws which are locate un erneath the bucket.
The a justment gui e embosse in the platform shows how
far you must rotate both screws in turn to effect a 1% an
a 2% change.
The funnel size is 6.5" in iameter, therefore
0.01" of rainfall = 5.44 ml of water.
Moving the screws in the positive (+) irection causes the bucket to tip more times (i.e.
give a larger count) for a given amount of water.

4
544 ml of water poure into the rain gauge *very slowly woul be equal to 1.00 inch of
rainfall or 100 tips.
* Very slowly means at least 30 minutes for this amount of water, poure into the gauge
at a near constant rate.
5.0 MAINTENANCE
For greatest accuracy, you shoul thoroughly clean the rain gauge at least once or
twice a year.
1. Disconnect the rain gauge cable from the ata acquisition mo ule.
2. Separate the cone from the base.
3. Use warm soapy water an a soft cloth to clean pollen, irt, an other ebris from the
cone, cone screen, an bracket.
4. Use a pipe cleaner to clear the funnel hole in the cone an the rain screens in the
base.
5. When all parts are clean, rinse with clear water.
6. Reattach the cone an replace the screen.
7. Reconnect the rain gauge cable to the ata acquisition mo ule.
6.0 TROUBLESHOOTING
Before calling technical support, carefully check the following troubleshooting gui e.
You may be able to solve the problem yourself.
6.1 Rainfall is not re isterin on the display or has a lar e error
!
Check the cable connections from the sensor to the mo ule. Cable connections
account for a large portion of the potential problems. Connections shoul be
firmly seate in the terminal strip an plugge in straight. If you think a
connection may be faulty, try jiggling the cable while looking at the isplay. If a
rea ing appears intermittently on the isplay as you jiggle the cable, the
connection is faulty.
!
Make sure there is no magnetic, steel, or iron object near the rain gauge.
!
Make sure the funnel hole in the cone is clear so water can empty into the
bucket.

5
!
Make sure the bucket moves freely when tipping to both si es. The isplay
shoul show an increase in rainfall for each tip of the bucket.
!
Check signal with an ohmmeter. A momentary switch closure shoul be
observe each time the bucket tips.
6.2 Rainfall amount shown on the display has a small error
!
Make sure the rain gauge is mounte on a level surface. Use the a justment
screws to a just the rain gauge’s sensitivity, if necessary.
Table of contents
Other Novalynx Measuring Instrument manuals


