Novar ED&S KarizmaPlus User manual

Intruder alarm system
Operating instructions
Introduction
The purpose of this user guide is to describe how to operate Karizma plus system. Some of the features
described in this guide may not be applicable to your installation and should be ignored. The engineer from the
alarm company will have completed the System Information Sheet (SIS) in this guide which gives information
specific to your installation. You will need to refer to this as you read this guide in order to check if certain
features have been used. If in any doubt consult your alarm company.
Alarm company (Installer) name: __________________________________________
Telephone number: _____________________________________________________
Account number: _______________________________________________________
Installation date: _______________________________________________________
1
KarizmaPlusTM

Keypad and Entry
codes
Keypads
You operate your intruder alarm system by means of
a keypad. Each keypad has numeric keys (0 to 9),
ENTER and ERROR. Over each key is a label which
describes the secondary function of each key. The
key will perform their secondary function when the red
FUNCTION indicator is lit.
Entry Codes
Before you can do anything with Karizma+ you will
need to key in a code using one of the keypads.
There are several types of entry code, which permit
different levels of control over the system. Check the
System Information sheet to see which codes have
been enabled. The different types of codes are:
ÿNormal - this code allows the system to be set,
unset, and reset after an alarm.
ÿManager - this code has the same functions as a
user code, but in addition the manager code can
add or delete all other codes, test the system,
view the event log, set the time and date, omit
24Hr points, and set the chime function.
ÿCleaner - special code which unsets only part of
the system, providing restricted access only to
certain areas of the premises.
ÿDuress - a special code which although
appearing to work exactly like a standard user
code will also cause the signalling device to
signal a Personal Attack alarm to the central
station. Do not use this code unless you are
under threat to set or unset the system.
"Always press the Enter key
after keying in your code or when making
a selection.
2
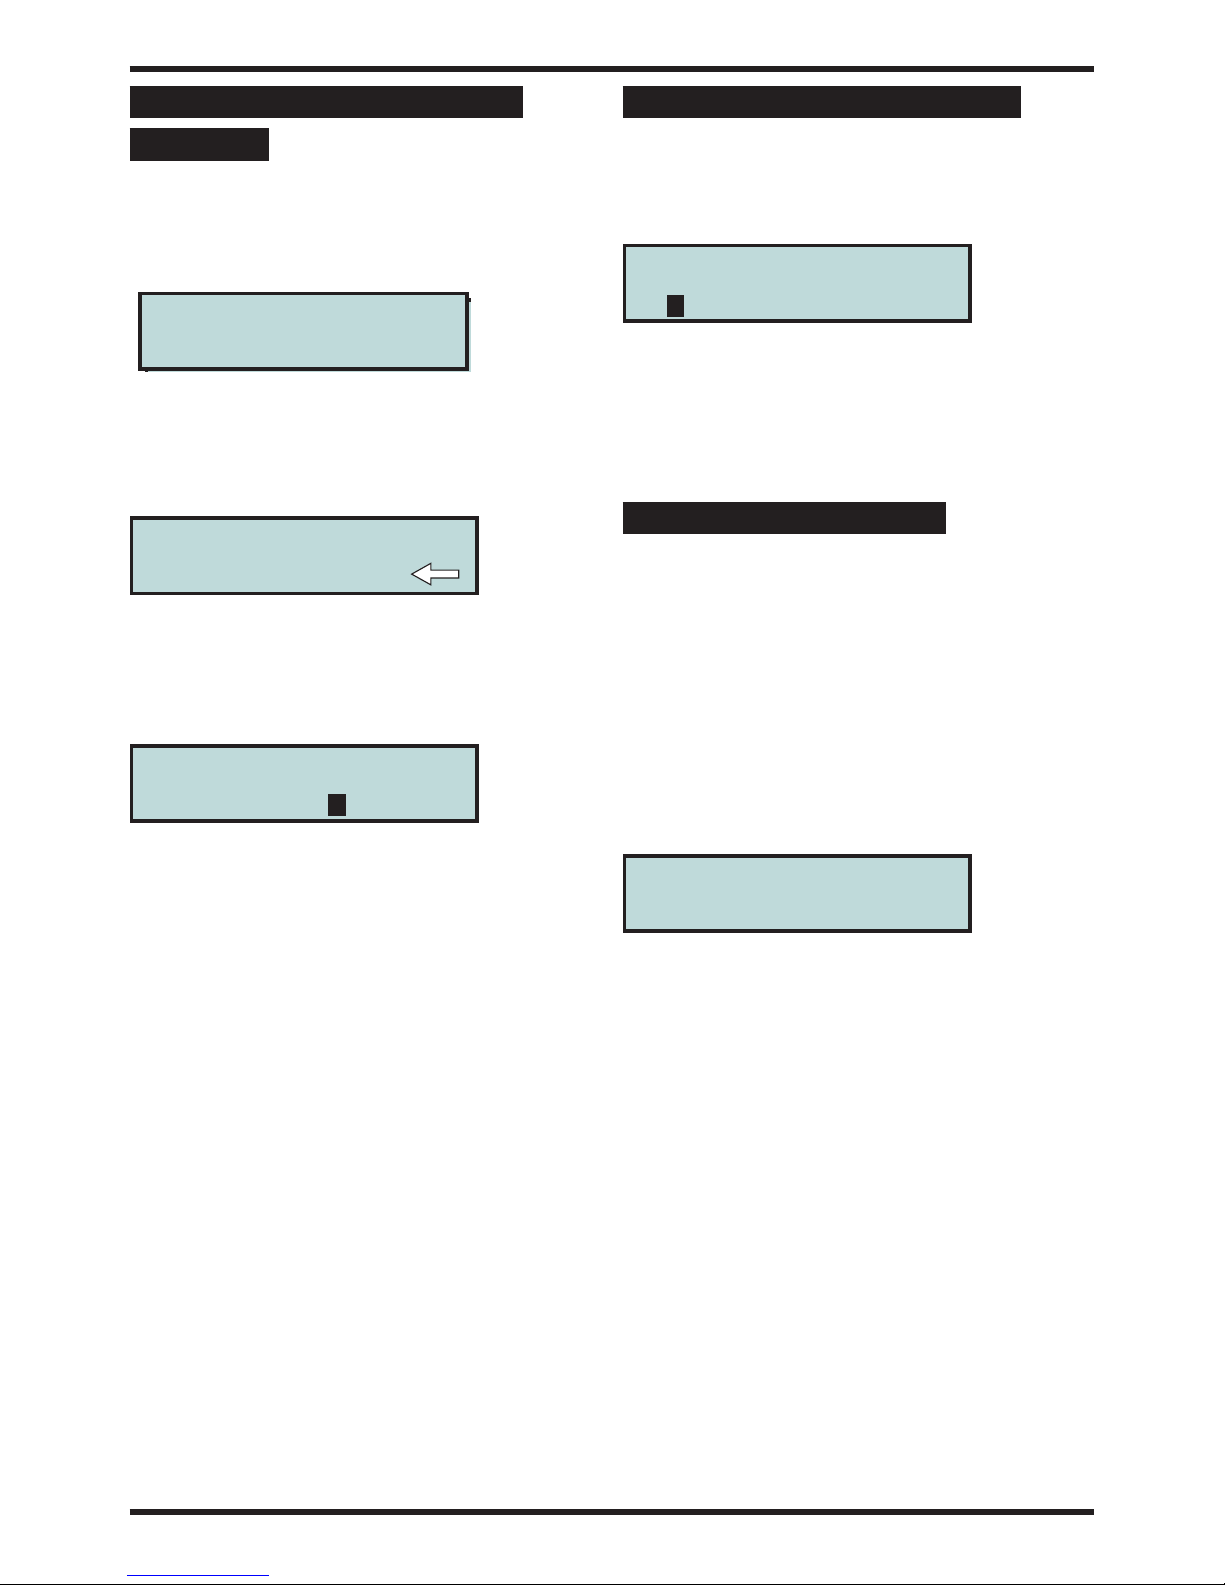
Operating instructions
Thursday 06-Jan
17:00:36
FUNCTION
DAY
2
DEF
SET B
1
ABC
SET A
3
GHI
SET C
8
VWX
GOTO
7
STU 9
YZ
5
MNO
AREA
4
JKL
OMIT
6
PQR
QSET
0
SPACE
ERROR ENTER
Karizma
Plus
Display 2 - lines of
16 characters per line
Primary functions
Secondary functions
Secondary functions are actioned when the FUNCTION LED is lit
DAY mode LED
Function LED
ENTER

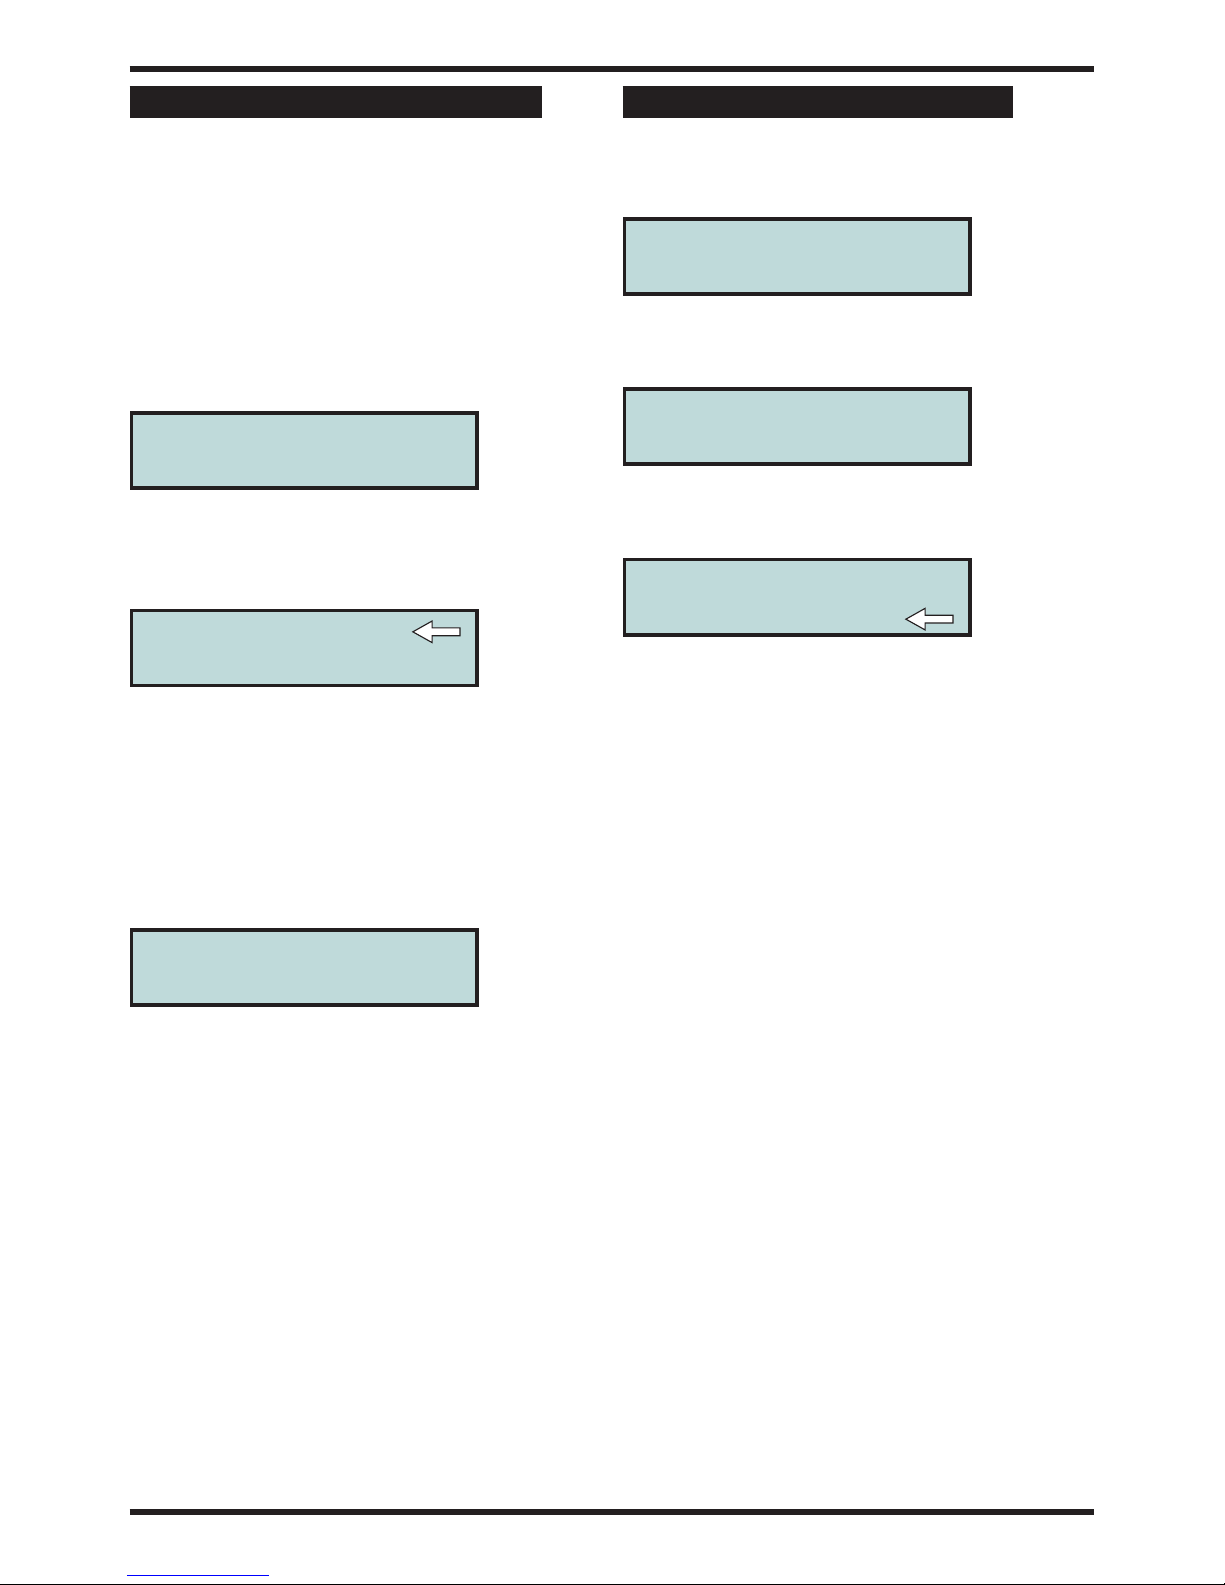
Setting the
system
Fully Setting the system
When the premises are to completely vacated you
should set the full system. First, check that the
premises are physically secure - are all windows shut,
and all external doors locked ?
Key in a normal user code at the keypad nearest the
final exit door and press the ENTER key.
The exit period will start and the inside sounder will
produce the exit sound - a pip-pip-pip sound. The
display identify the program that you are setting.
The bottom line on the display may have been editted
during installation to read a different message, for
example it may read FULL SYSTEM.
You must now vacate the premises by the exit route
described in the SIS. The length of time that you have
to vacate the premises depends on the exit mode that
has been programmed. Check your SIS to find out the
exit mode of programme A.
Part-Set the System
A part-set allows detection points in part of the
protected premises to be set (turned on), while those
in other areas are not set. In a domestic installation it
is usual for a part-set to be programmed for use at
night time. This would allow the detection points
around the perimeter of the house (doors, windows,
etc), and all downstairs detectors to be enabled, while
detectors in the bedrooms and on the stairs are
disabled.
Karizma+ has 2 different part-set programs called B
and C. Check your SIS to see if these programs have
been enabled. If they have not been enabled then you
will not be able to use them.
If a part-set has been enabled you can part-set your
system by doing the following: Enter your code at a
keypad and press the ENTER key. The system will
begin to perform a full-set (setting programme A).
Within 5 seconds of entering your code (while the red
FUNCTION indicator is still on) you must press either
the SET B or SET C key to select one of the part-set
programmes and press the ENTER key. The display
will acknowledge this by displaying name of the
program being set.
The bottom line on the display may have been editted
during installation to read a different message, for
example it may read NIGHT TIME. Leave the
protected area by the exit route appropriate for that
part-set.
3
Karizma Plus
Program A Set
PROGRAM A
Program A Set
PROGRAM A
Program B Set
PROGRAM B
1) Set system?

Performing a Quick-Set
It is possible to override the programmed exit time by
use of the Quick Set function. This always gives you
3 seconds to vacate the protected area. Quick Set is
selected during the first 5 seconds of the exit period
(while the red FUNCTION indicator is on) by pressing
the QSET key on the keypad. To use this function
with one of the part-set programmes you must first
select the part-set (SET B or SET C), and then press
QSET.
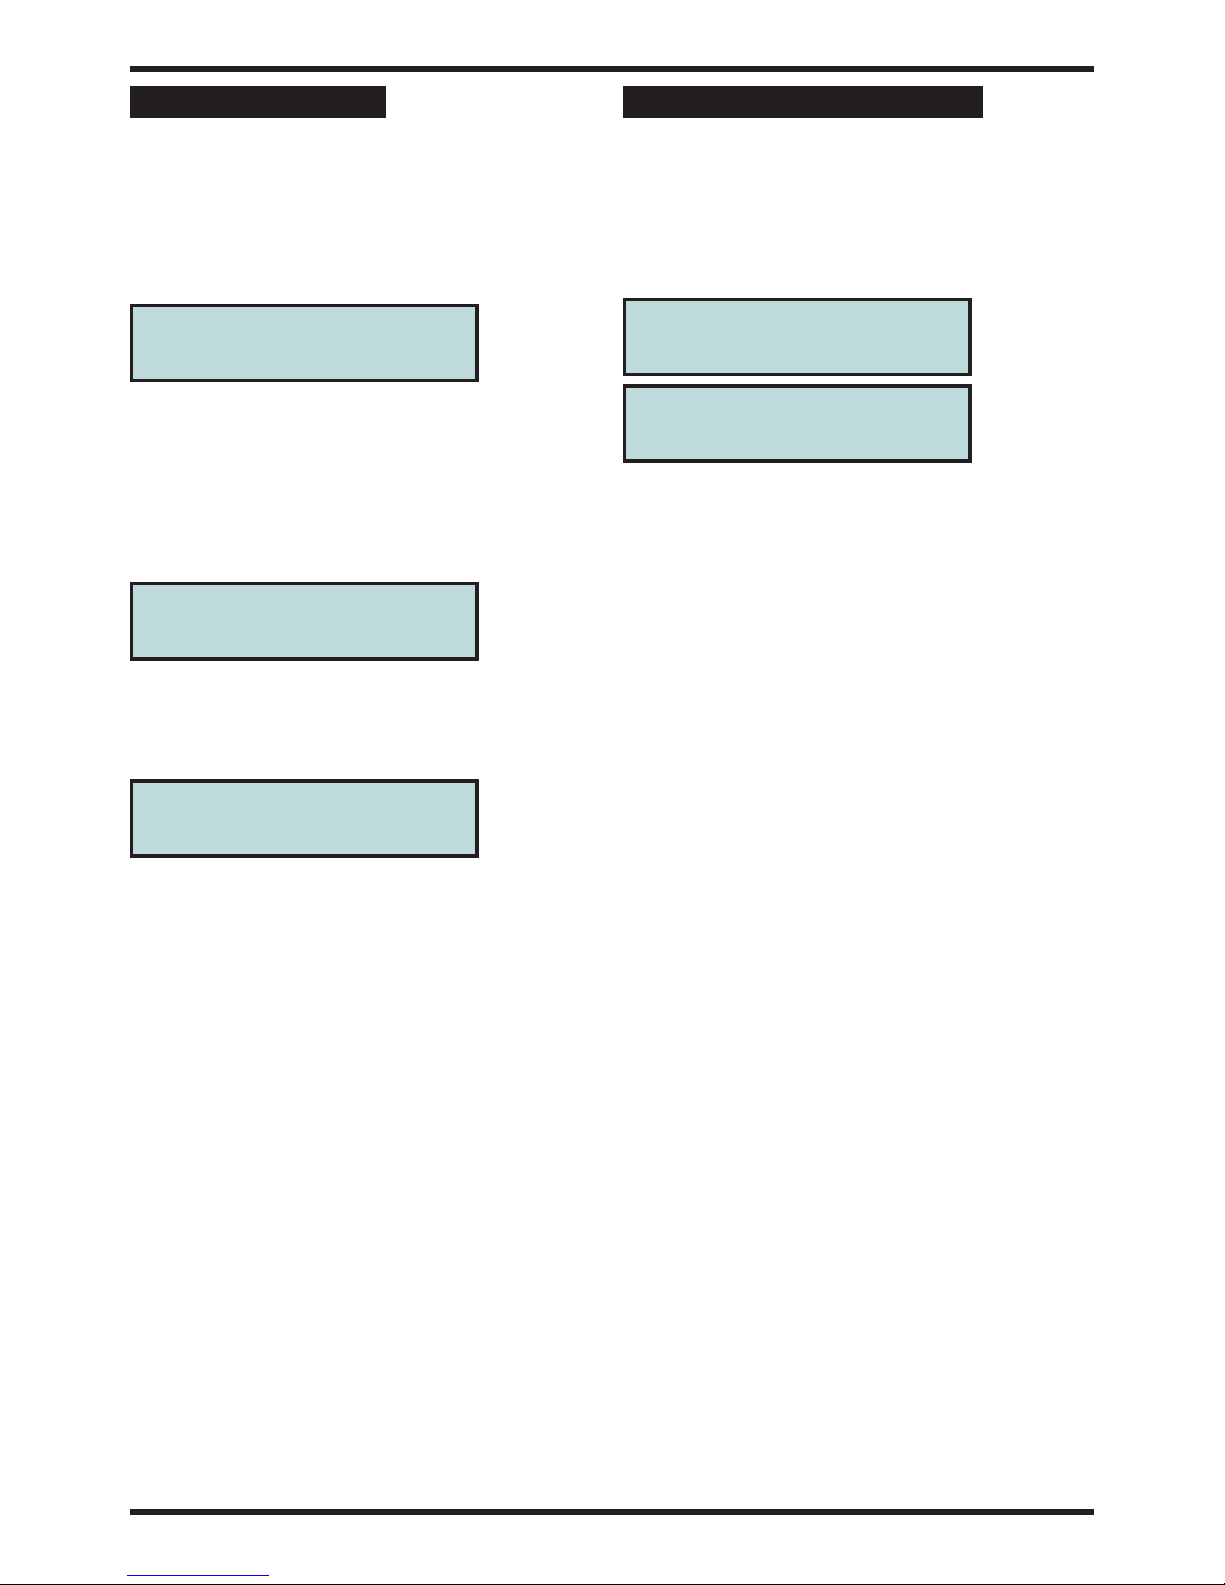
Omitting points during setting
It is possible to omit one or more detection points
when you set the system. The omitted points will not
be able to cause an alarm when the system has set.
This facility may be useful if one of your detection
points has become faulty and keeps producing false
alarms.
Because omitting a detection point degrades the
security provided by your alarm system, your engineer
may have programmed only a limited number of
points to be omittable. Check your SIS to see which
points, if any, can be omitted.
Points can be omitted by pressing the OMIT key
during the first 5 seconds of the exit period (while the
red FUNCTION indicator is on).
The exit sound will stop, and the keypad will display
the first point from a list of points that can be omitted.
Use the çand èkeys (over the 8 and 9 keys) to
step through the list of points until the point you want
to omit is displayed. Now press the ENTER key. The
ïsymbol will move onto the second line of the
display.
Press the èkey to change the NO to YES, and
press the ENTER key.
The point will be omitted and the exit period will start
again.
You can omit as many points as you want using this
procedure. To omit points from a part-set program you
must first select the part-set by pressing SET-B or
SET-C.
4
Operating instructions
01:FRONT DOOR
Omit Point: NO
01:KITCHEN PIR
Omit Point:YES
Program QSet
PROGRAM A

Unsetting the
system
Cancelling the Exit procedure
If you key in your code, and then immediately decide
not to set the system, you can cancel the exit
procedure by one of the following ways:
During the first 5 seconds of the exit period and with
the red FUNCTION indicator still on, just press the
ERROR key twice to cancel the exit procedure.
The inside sounder will stop, the keypad will display
the ‘Goodbye’ message for a few seconds and then
display the time and date. The green DAY indicator
will remain on.
After the first 5 seconds of exit period you must key in
your code to cancel the exit procedure.
The inside sounder will stop, the keypad will display
the ‘System Unset by’ message for a few seconds
and display the time and date. The green DAY
indicator will remain on.
Unsetting the System
Entering the premises by the designated entry route
will cause the entry period to start. The inside sounder
will emit a slow beep-beep-beep sound. You must
now key in your code and press the ENTER key at the
nearest available keypad to cancel the entry period.
The length of time that you have is called the entry
time; check your SIS to see how long this is. During
the last 10 seconds of the entry period the entry tone
will raise in pitch to inform you of the urgency to enter
your code.
If you enter your code within the entry period the
inside sounder will stop, the keypad will display the
‘System Unset’ message for few seconds and then
display the time and date.
The green DAY indicator will light. The system is now
unset.
5
Karizma Plus
System Unset by
MANAGER
System Unset by
MANAGER
Enter your code?
*** Goodbye ***
MANAGER

Silence Alarm and
Reset system
Silencing an Alarm
If an alarm occurs whilst you are in or near to the
premises the alarm can always be silenced by
entering your code. If the system was set it will be
unset at the same time. If the alarm occurs while you
are away from the premises the outside and inside
sounders will automatically stop after the bell time
programmed by the engineer, see your SIS for the
bell time.
When you enter your code after an alarm, the keypad
will display the cause of the alarm on the top line.
The second line shows additional information, such as
the point which caused the alarm. The system will
now need to be reset as described in the next section.
Resetting after an Alarm
After an alarm the system will need to be reset by
entering a suitable reset code. The display will
alternate between the alarm cause and a prompt to
enter a reset code.
If the this prompt is displayed you can reset the
system using your own code. Key in your code and
press the ENTER key.
After the system has been reset it may enter a fault
lockout described in the next section.
If this prompt is displayed you may need to call out
the engineer to reset the system.
6
Operating instructions
Enter Your
Code
Engineer Reset
Required
INTRUDER
BACK DOOR

Fault Lockout
After resetting the system the keypad display will
either display the ‘System Reset’ message, or it will
show a count of the faults which still exist. This is
called fault lockout.
These faults must be cleared before the system can
return to Day mode.
To see a list of the faults press the ENTER key. The
keypad will display each fault for 5 seconds. When all
of the faults have been displayed it will again display a
count of the faults. It will often be necessary to call out
the engineer in order to clear these faults.
If you can, clear the faults until the display shows no
faults, then press the ENTER key to return to Day
mode.
Remote Reset
If the system needs to be reset by an engineer code
you may need to call out the engineer. Before you do
this, check the SIS to see if either the Remote Reset
or Anti-code Reset options have been enabled. If
either have been enabled it may be possible to reset
the system by following one of the procedures
described here:
Remote Reset
Your engineer will have given you instructions on how
to request a remote reset. Usually you will have to
telephone the central station, give details of the alarm,
and quote a password. The central station can then
reset your system via the signalling device which is
fitted to your system.
When the remote reset is received by your system,
the keypad will display the ‘System Reset’ message
for a few seconds. It will then either revert to the time
and date display, or display the number of faults
which still exist - this is a fault lockout.
Reset by Anti-code
If Anti-code reset has been enabled the keypad will
display the 4-digit Quote code. Make a note of this
number (it is different each time you use this facility)
and telephone your central station. You may need to
give details of the alarm and quote a password. You
will also need to quote the 4 digit number. The central
station will give you a 6 digit number called an
anti-code. Key in the anti-code to reset the system.
The keypad will either display the time and date, or it
will display the number of faults which still exist - this
is a fault lockout.
7
Karizma Plus
Quote Code
1400
System Reset by
STU
Faults: 1
ENTER to View
Faults: 0
ENTER to Exit
System Unset by
STEVE

Cleaner Access
Karizma+ has a code which permits selected areas of
the protected premises to be unset for the purpose of
cleaning or maintenance. This cleaner code works in
conjunction with cleaner access points which have
been programmed by the engineer. Check your SIS to
see if any points have been programmed for cleaner
access.
"The cleaner code cannot be
used to reset the system in alarm.
Group Shunt
The Group shunt facility allows part of the protected
premises to be unset without unsetting the whole
system. This is often used to allow access to a garage
or loading-bay area independently from the main area
of the protected premises. Check your SIS to see if
this facility has been provided.
The detection points in the group will operate
normally; they will be set when the system is set, and
unset when the system is unset. However, they can
also be unset (dis-armed) at any time by operating the
group shunt keyswitch. Your installation engineer
will give you details on how to do this.
Re-arming the group is done with the keyswitch.
However, if a detection point in the group is in fault,
eg a door has been left open, the group cannot be
re-armed. An led located close to the keyswitch will
light, or a buzzer may sound, when it is not possible to
re-arm the group. You must dis-arm the group by the
keyswitch; this will turn off the led or buzzer. Enter the
protected area and clear the faults before trying to
re-arm the group again.
8
Operating instructions

Manager Facilities
The manager code is normally used to carry out
system management functions. It is used to allocate
and delete other user codes, test the system, view the
event memory, etc.
On entry of the manager code in Day mode the
keypad will display the first managers menu option
The manager has 10 similar menu options. Use the
çand èkeys to move through the menus. To
perform a function press the ENTER key.
The manager code can be used to unset the system
in the normal way. It can also be used to set the
system, but the procedure is slightly different to the
normal user code.
MENU 1 - Set System
Menu 1 allows the manager to set the system. Go to
this menu and press the ENTER key.
The system will start to set as if a normal user code
had been entered. The options available to the normal
user, such as part-set and omit, are available in the
normal way.
MENU 2 - View Event Log
Menu 2 allows the manager to view the event log,
which is a list of the last 200 events to occur. Go to
menu 2 and press the ENTER key.
The keypad will display the last event to be logged. In
the example here, 145 is the event number (events
are numbered 1 to 200), USER RESET is the
description of the event.
The bottom line is the time and date that the event
was logged. Use the çand èkeys to move through
the event log. Press the ERROR key to return to
menu 2.
Some events have additional information which can
be viewed by pressing the ENTER key when the
event is displayed.
MENU 3 - Print event log
With the ADE Opus-42 printer connected it is possible
to print out the entire event log.
With menu 3 on display press the ENTER key.
Karizma+ will start to print the event log, starting with
the newest event first. Press ERROR at any time to
stop the printer.
9
Karizma Plus
Printing...
ERROR to Stop
2) View
Event Log?
145) USER RESET
09:36:21 19-Nov
1) Set System?
1) Set System?
MENU 4 - Change User Type
and Name
Menu 4 allows you to add, change or delete users
from the system.
With menu 4 on display press the ENTER key.
The keypad now displays the first code from a list of
16. The top line of the display identifies the user, and
the bottom line gives the user type. Use the çand
èkeys to go to the user to be changed and press
the ENTER key.
The ïsymbol moves onto the second line. Now use
the çand èkeys to select the user type (refer to
section 3 for a description of the different user types),
and press the ENTER key.
The keypad now displays the name associated with
the code. The flashing cursor will be at the right of the
name. To change the name press the ERROR key
several times until the existing name has been
deleted and the cursor is at the left of the display.
Names are entered one letter at a time by using the
numeric keys on the keypad. On each key are either 2
or 3 letters, for example on the ‘1’ key are the letters
ABC. To enter the letter C press ‘1’-a1isdisplayed,
press it again and the 1 changes to A, press it again
and the A changes to B, press it again and the B
changes to C. Now press the ENTER key to register
the C and move on to the next letter. Once you have
entered the name press the ENTER key again to
accept it. Momentarily press the ERROR key to exit
the menus.
MENU 5 - Change User Code
Each user hasa2to6digit code. Menu 5 allows this
code to be changed. Use the çand èkeys to
select the code to be changed and press the ENTER
key.
Now key in a code of between 2 and 6 digits, and
press the ENTER key. If the code is already in use by
another user it will be rejected. Momentarily press the
ERROR key to exit the menus.
MENU 6 - Chime Points
The manager can put any security point on chime.
When a chime point is activated keypad will display
the name of the point, and the inside sounder will emit
a single dee-daa sound and then stop. This is often
useful in shops to warn of a customer entering
through the shop door, or in a house to warn of a
potential intrusion through the back door.
Menu 6 allows you to put a point on chime. Select the
point using the çand èkeys and press the ENTER
key.
Use the çand èkeys again to put the point on
chime, or remove it from chime, and press the ENTER
key again. Momentarily press the ERROR key to exit
the menus.
10
Operating instructions
01:FRONT DOOR
Chime Pt: NO
01:User Code
?
01:User Name
? USER 2
01:MANAGER
MANAGER
01 : MANAGER
MANAGER
02:USER 2
NOT USED
MENU 7 - Omit 24 hour points
A 24H point is armed all of the time, whether the
system is set or not. Violating that point will always
cause an alarm. The manager can omit a 24H point if
it has been programmed as omittable by the engineer.
A point which has been omitted cannot cause an
alarm. Check your SIS to see if any 24H points are
omittable.
Menu 7 allows you to omit 24H points. Go to menu 7
and press the ENTER key.
The keypad displays the first point in a list of 24H
points that can be omitted. Use the çand èkeys to
select the point to be omitted, then press the ENTER
key.
The ïsymbol moves onto the second line of the
display. Now use the çand èkeys to change NO
to YES and press the ENTER key.
Re-Instating 24 hour Points
To re-instate a 24H point which was previously
omitted follow the procedure described above, but
change YES to NO.
If the point cannot be re-instated because it is still
open the keypad will display an error message. You
must close the point and repeat the procedure.
Any 24 hour points which have been omitted by the
manager will automatically be re-instated when the
system is set. It is not possible to omit 24H points
when setting the system.
MENU 8 - Set Time and Date
Select menu 8. The keypad displays the current time
in 24 hour format, so 1am is 13:00. Key in the correct
time and press the ENTER key.
The keypad will now display the current date, in a
day-month-year format. Key in the correct date and
press the ENTER key.
The keypad will now display the current day of the
week. Use the çand èkeys to change the day and
press the ENTER key.
The keypad will give a double beep to indicate that
the date has been accepted.
11
Karizma Plus
Time and Date
Time? 00:05
Time and Date
Date? 21-02-03
Point Fault
7)Omit
24 Hr Points?
06:FIRE DOOR
Omit 24hr:No
Time and Date
Friday
MENU 9 - Walktest
The walktest allows you to check the operation of all
of the security points in your system in order to prove
that they still work correctly. Your engineer will advise
how often you should carry out a walktest.
In menu 9 press the ENTER key to start the walktest.
The keypad display will show a ‘*’ for each point which
has been enabled but has not yet been tested. Points
which have not been enabled are displayed as dots.
The top left of the display represents point 1, the top
right is point 15, the bottom left is point 16, the bottom
right is point 30. The ‘A’ in the top left indicates that
the points in program A are being tested.
Each time that an enabled point is activated the inside
sounder will produce a warble sound, and the display
will change to show a ‘1’ in the appropriate position.
The inside sounder will stop when all points are clear.
Initially the walktest will allow you to test Security
points that are used in program A. To test security
points used in programs B or C press either 2 or 3
when the walktest is running to select program B or C
respectively. The keypad will display the selected
program at the top left. Press 1 to reselect program A.
Press ERROR at any time to stop the walktest.
Momentarily press the ERROR key to exit the menus.
MENU 10 - Test OUTPUTS
Menu 10 allows you to test any of the outputs from the
system. It presents you with a list of the outputs which
may be tested. To turn on any output press the
ENTER key, to turn it off press any key. The following
outputs may be tested: BELL, STROBE, SOUNDER
(LOW VOL), and SOUNDER (HIGH VOL).
12
Operating instructions
A1111*...*......
................
A1111...........
................
10)Test Output
BELL
BELL
ON
A******...*.....
................

System Information Sheet (SIS)
Detection Points
13
Karizma Plus
No. Description Type SET A SET B SET C Permit
Omit
Cleaner
access
Group
shunt
1
2
3
4
5
6
7
8
9
10
11
12
13
14
15
16
17
18
19
20
21
22
23
24
25
26
27
28
29
30

Programmes
Programme Enabled Exit
Mode
Entry time Exit
time
Local
alarm
Entry/exit
route
Aü
B
C
User number
Level Normal,Manager,
Cleaner and Duress Code
1
2
3
4
6
7
8
9
10
11
12
13
14
15
16
Signalling Device fitted
Engineer Reset
Permit Entry Deviate
Remote Reset
Anti-code Reset
Bell time minutes
Bell delay minutes
14
Operating instructions

Notes
15
Karizma Plus

16 4188-756_issue 1_2/03
Operating instructions
The panel conforms to the
requirements of the European EMC
and Low Voltage directives, and
carries the CE mark.
For Technical Support
: 0906 302 0999
This is a premium rate line, calls are charged at
50 pence per minute
Novar ED&S
The Arnold Centre
Paycocke Road
Basildon
SS14 3EA
Table of contents
Other Novar ED&S Security System manuals


Popular Security System manuals by other brands


Monoprice
Monoprice 4 Cameras and 4 Channel DVR Video Security System... user manual

DMP Electronics
DMP Electronics 265HINT installation guide

Arlo
Arlo Pro quick start guide

Thales
Thales SafeNet ProtectServer Network HSM Plus 5.8 Installation and configuration guide

CAME
CAME GARD series installation manual

Lutron Electronics
Lutron Electronics radioRA RA-QS-SEC-1 manual

PGST
PGST CT-PG-100 user manual

DPS Telecom
DPS Telecom Building Status Unit II user manual

Watts
Watts SentryPlus 113RFP Installation, operation and maintenance manual

Yale
Yale Sync Alarm installation manual

Honeywell
Honeywell PROSiXSIRENO Installation and setup guide

AQUADYNE
AQUADYNE OCTOPUS 4000 Installing