NovaSail NS-START PRO User manual

Operating Manual
v1.0

2
Introduction. . . . . . . . . . . . . . . . . . . . . . . . . . . . . . . . . . . . . . . . . .3
Installation. . . . . . . . . . . . . . . . . . . . . . . . . . . . . . . . . . . . . . . . . . .4
Controls and display description . . . . . . . . . . . . . . . . . . . . . . . .5
Operations. . . . . . . . . . . . . . . . . . . . . . . . . . . . . . . . . . . . . . . . . . 6
• Screens and modes......................................................... 6
• Switching power on and off.............................................. 7
• Switching backlight on and off ......................................... 8
• Run screen ......................................................................
• Start screen .....................................................................
• Timer ...............................................................................
• Start line distance .......................................................... 10
• GPS data logger ............................................................ 12
• Waypoint screen............................................................ 12
• Current GPS coordinates .............................................. 14
• Max speed and average speed ..................................... 14
Advanced operations . . . . . . . . . . . . . . . . . . . . . . . . . . . . . . . . . . . . 15
• SET mode...................................................................... 15
• PC mode........................................................................ 1
Limited Warranty . . . . . . . . . . . . . . . . . . . . . . . . . . . . . . . . . . .
Disclaimer . . . . . . . . . . . . . . . . . . . . . . . . . . . . . . . . . . . . . . . . . 3
Contents
3
Welcome to the
The has been designed to provide essential
information with a very simple and user friendly interface. Speed, heading, timer,
start line distance and GPS coordinates functions are all accessible at the push of
a button and clearly displayed on the backlit LCD, ideal for night sailing and
enhanced safety.
The new features a Bluetooth communication
transceiver offering a wide range of functions and applications:
•
Record up to 1248 hours of racing (1 point / 30 seconds)
•
Replay on Google Earth and other navigational software
•
Computer management of 10 waypoints, including their coordinates and
descriptions
•
Updates with new features
The usage of the is greatly simplified with large and
dedicated buttons for starting the timer and defining the start line points at your
finger tips.
Powered by only one AA battery, the gives sailors
accurate information for over 30 hours. It can be installed in minutes and there is
no need to drill a hole in the hull or use a wired connection.
We hope you enjoy sailing with the . We encourage you
to read this manual thoroughly to learn about the many features of your exciting
new NOVASAIL product.
Introduction

4
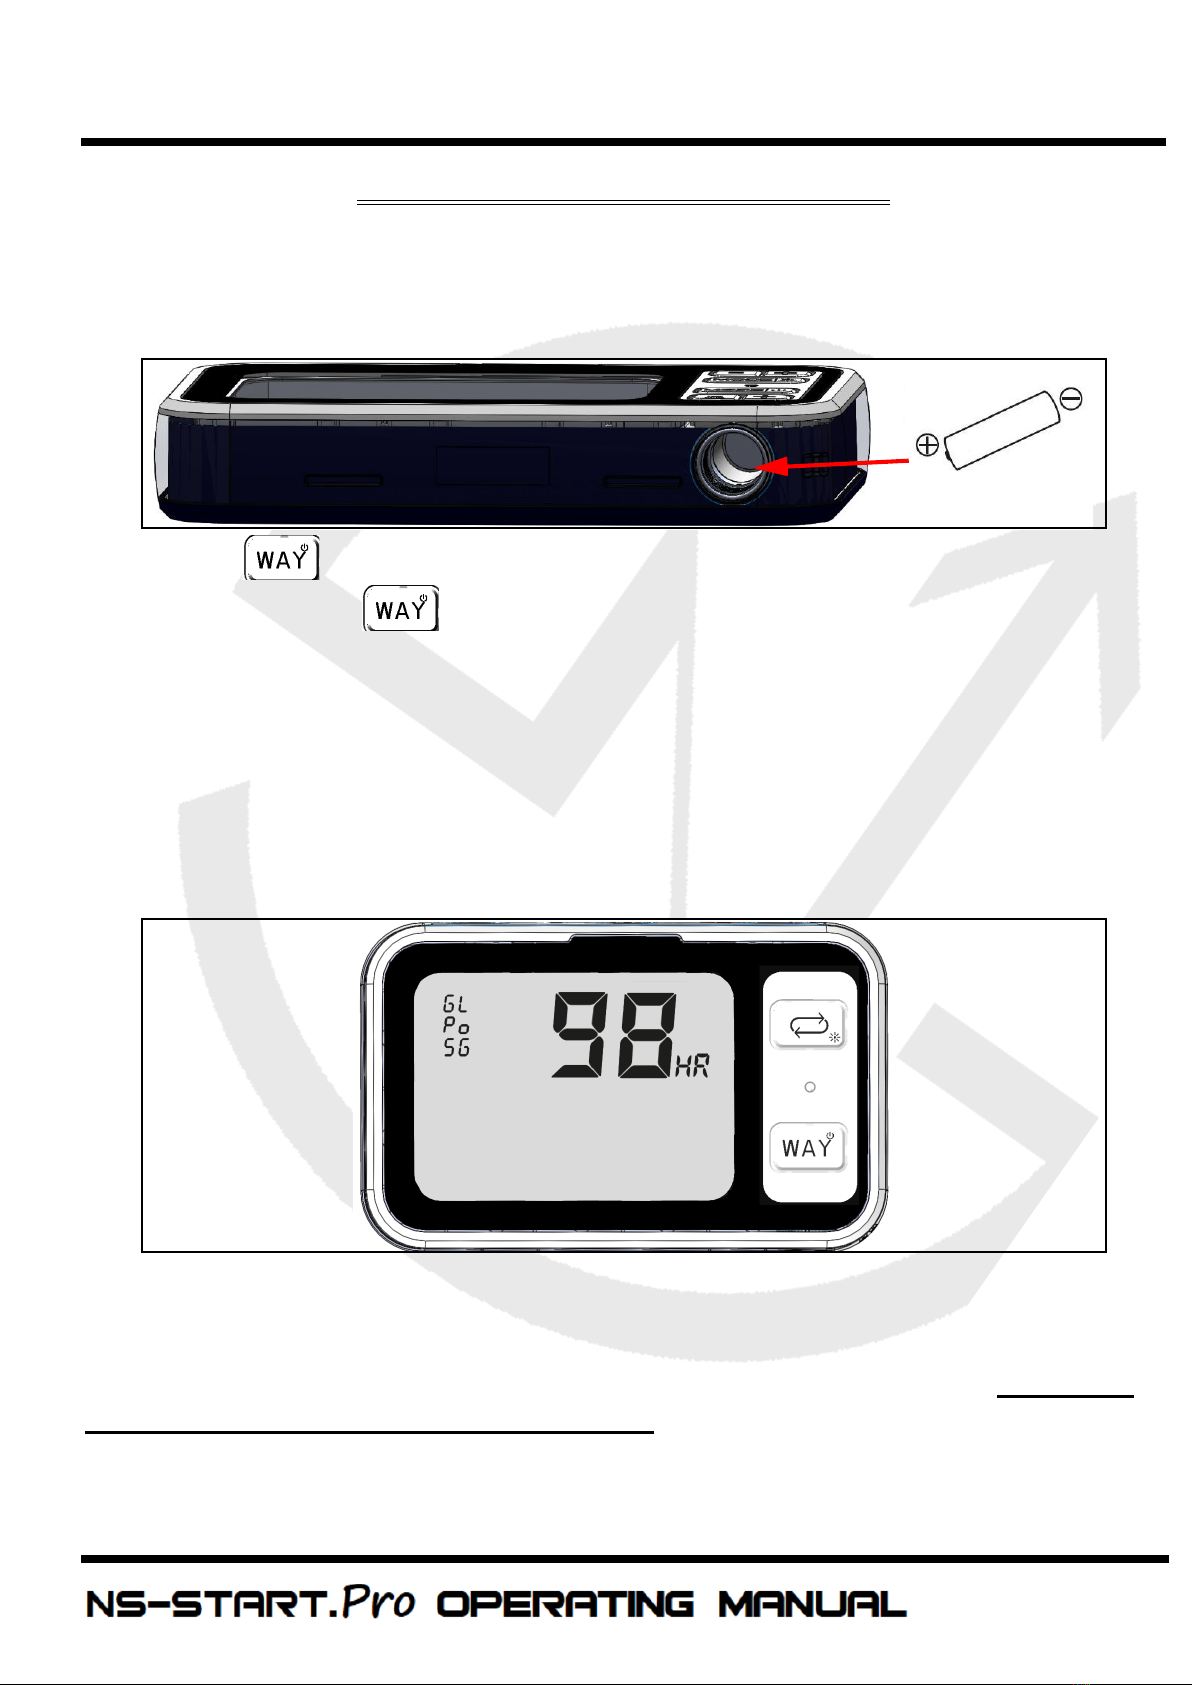
Wherever you mount the , it shouldn’t be flush to any
thick surface such as the hull, so that the sensitivity of the embedded GPS
receiver is not affected. Also a direct mount on a metal surface will reduce the
receiver sensitivity.
Installation

5
Buttons & display
Timer
RUN/START screen
mode selection
Backlight ON/OFF
Comittee Boat reference (SLD)
Setup mode entry
Safety leash
attachment
Pin reference (SLD)
PC mode entry
Screen
mode
display
GPS record status
Light sensor
Battery cap
Backlight indicator
Battery level indica-
tor
Timer ON
indicator
Units
Waypoint screen
mode
Controls and display description
6
Screens and modes
The has 2 main modes of operation : the RUN
screen and the START screen. Switching screens is made by pressing the
button .
RUN Screen
Course Over Ground- GPS Compass: COG
Speed Over Ground: SPE
START Screen
Timer: TIM
Start Line Distance: SLD
The has 1 Waypoint screen : it is displayed by by
pressing the button .
Waypoint Screen
Course Over Ground: COG
Waypoint information: WAY
The has 1 information screen. The GPS coordinates
and the average/max instant speed recorded during the current trip can be
displayed by a holding and simultaneously (and another press
on or to select the desired information)
Information screen
Current GPS coordinates Latitude
Longitude
Max instant speed recorded SPE MAX
Average speed recorded SPE AVG
Operations
7
Switching power on and off
•
Make sure the battery is installed with the correct polarity and has enough
remaining power (positive pole inserted first)
•
Press to start the device. A beep will be emitted
•
Press and hold for more than 4 seconds until the screen displays OFF
and the sequence “3”, “2”, “1” is finished. A beep will be emitted when the
device turns off
The device will turn off automatically when it cannot receive any GPS signal for 20
minutes. A beep will be emitted 3 seconds before it turns off.
During the power up, the remaining time for the data logger is displayed for 5
seconds. This time, called GPS LOG, is given in hours as shown below.
Note
: If the device does not turn on, check that the battery is fully charged, that
the battery compartment is clean and dry, and the polarity is correct. No liquid
should get into the battery compartment as it may cause internal damage. The
2 springs for +/- contacts in the battery compartment can be removed and
cleaned with rubbing alcohol or similar and then put back in place.
Operations
8
Note :
ntil enough satellites are locked, the is not
ready to use. For all modes requiring the GPS data, the screen will display ”---”
until it is ready. If the number of satellites is low, the display will blink.
Note :
Disposable alkaline batteries are not recommended, but can be used to
reach the maximum 40-hour battery life of the . It is
mandatory to remove disposable batteries if the device is not going to be used
for a prolonged period of time (a week or more) to avoid battery leakage, as this
will irreversibly damage the battery compartment. Therefore we recommend
that rechargeable batteries with a low self discharge rate should be used (normal
rechargeable batteries lose their stored energy quickly even when they are not
being used), and will last for 30 hours or more. Recommended batteries are
SANYO ENELOOP, GP RECYKO+, NIROSS HYBRIO (2000mA or more typical
capacity).
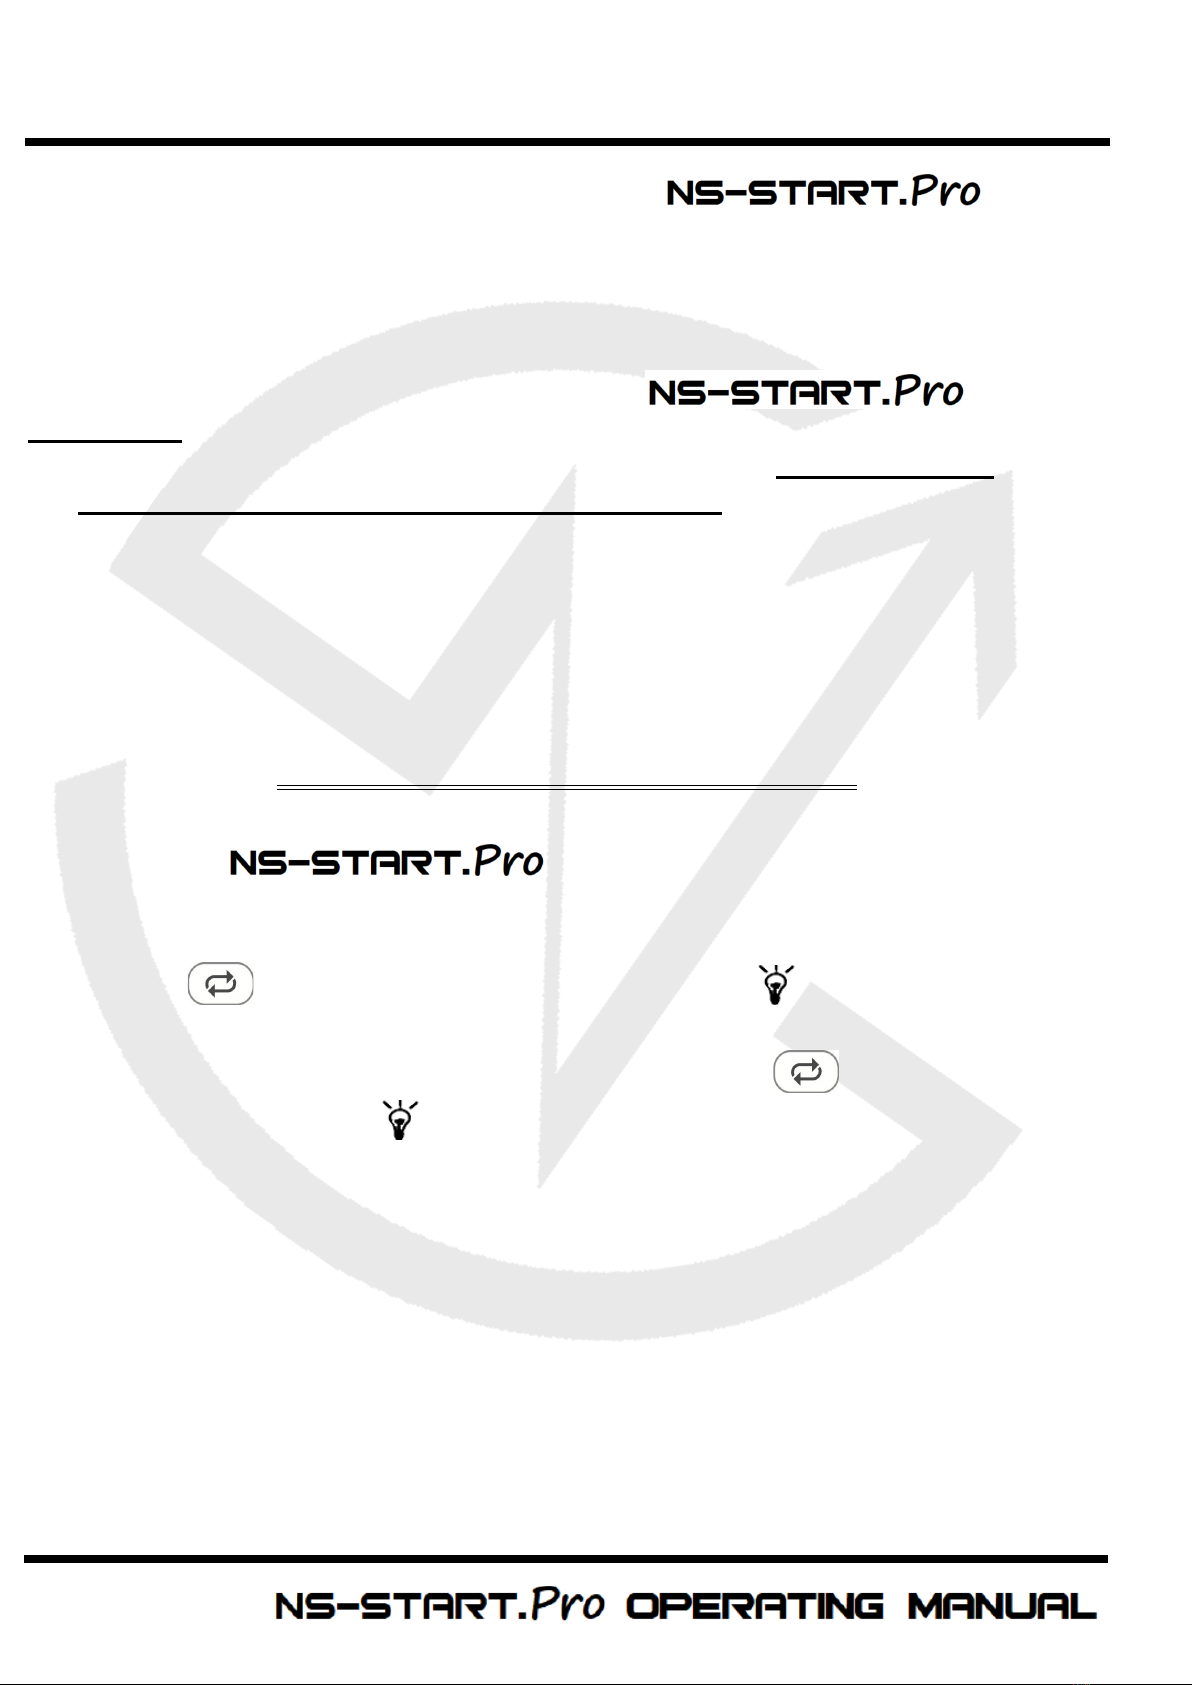
Switching backlight on and off
•
After the is turned on, the backlight is
automatically switched ON/OFF by the internal light sensor detector.
•
The backlight can be manually switched ON or OFF: press and hold the
upper for more than 1 second until the icon is displayed on the
screen.
•
To turn off the backlight, press and hold the upper for more than 1
second until the icon disappears from the screen.
Note
:
Once the backlight has been switched ON or OFF manually, the
automatic light sensor detector will no longer be used and will resume upon the
next power cycle.
Note
:
In PC mode (see Advanced Operations, page 22), the backlight can be
only switched ON or OFF manually.
Operations

9
un Screen
This screen provides the heading and the speed of the vessel.
COG (compass)
, upper line : The course over ground (heading in degrees)
as measured by the GPS receiver is displayed. The value displayed can be
averaged, see the SET mode.
SPE (speed)
, lower Line : The speed over ground is displayed with a
resolution of 0.1 knots (kts). The minimum speed is 0.5 knot, the maximum speed
is . knots. The value displayed can be averaged, see the SET mode.
Start Screen
TIMER
, upper Line : This mode offers a 5 minutes countdown timer, which can
be synchronized to 5, 4 and 1 minutes.
When counting down, a short beep sounds:
•
each minute until the last minute
•
each ten seconds until 10 seconds
•
each second until the start time ’0:00’
At the start time:
•
a long beep sounds
•
the timer starts counting the race duration in minutes and hours
To synchronize the TIME when it is stopped:
•
Long press to synchronize to 5, 4 or 1 minutes (starting time).
To start the TIME :
•
Short press to start the timer from the value previously set.
Operations

10
To synchronize the TIME when it is running:
•
Short press to synchronize to 5, 4 or 1 minutes. If the timer value is
greater than 2:45, the timer will synchronize to 4 minutes. If lower than 2:45,
it will synchronize to 1 minute. The timer continues counting down.
To stop the TIME :
•
Press and hold .
Note :
With the GPS logger synchronized to the upcounting of the timer, the
GPS logger stops when the timer is stopped or restarted in order to log the end of
the current sail.
Note
Note Note
Note :
When the countdown timer reaches ’0:00’, the timer and the start line
distance will switch automatically to the ‘R N’ screen (compass and speed).
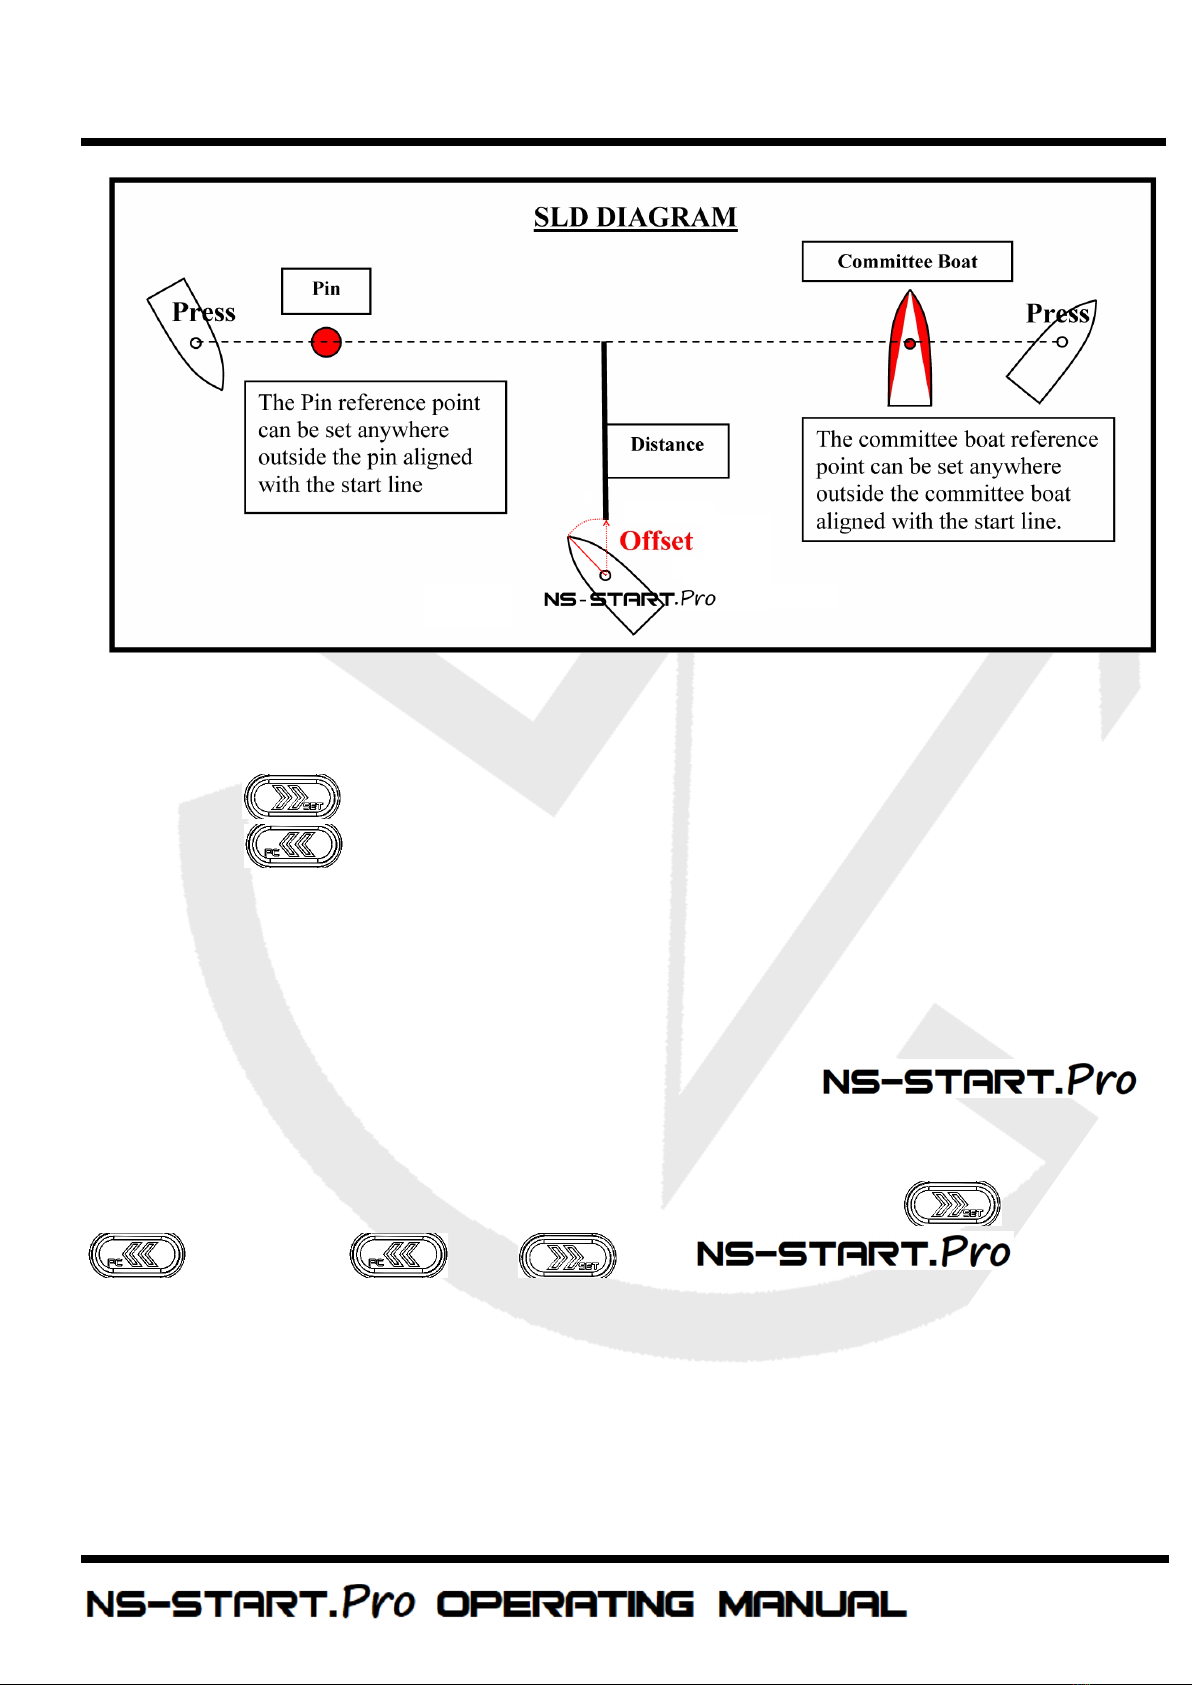
Start Line Distance (SLD)
, lower line : knowing the exact distance in
meters to the start line gives a huge advantage in helping you start ahead of the
fleet and win the race. The boat offset parameter allows you to set the distance
from the bow to the line.
The resolution of the distance to the line is 1 meter. The maximum distance is
meters.
The start line consists of 2 points which have to be aligned with the start line:
•
: Commitee boat
•
: Pin
Operations
11
To memorize the start line points
•
Press when you reach the committee boat reference point.
•
Press when you reach the pin reference point.
•
The distance in meters is now displayed on the data line.
Note :
If the start line is modified by the committee, you may be required to re-
enter one or both reference points.
Note :
The distance from the front of the boat to the
can be defined in the SET mode.
Note :
if the pin and the boat references are recorded with and
(instead of and ) the will show
a sign ‘-’ instead of a ‘+’ for the distance to the line (only the sign is changed, the
overall distance calculation is not impacted)
Operations
12
GPS Data Logger
A GPS data logger is embedded in the
allowing you to
download all your sailing data to your computer using the
Wireless Manager PC app companion software.
pon setting the GPS data logger start parameter, the logger will start recording
as soon as enough satellites are locked and/or when the timer reaches ‘0:00’.
The recording interval can be set using the parameter GPS Logger Timing (see
the SET mode, page 18 for details).
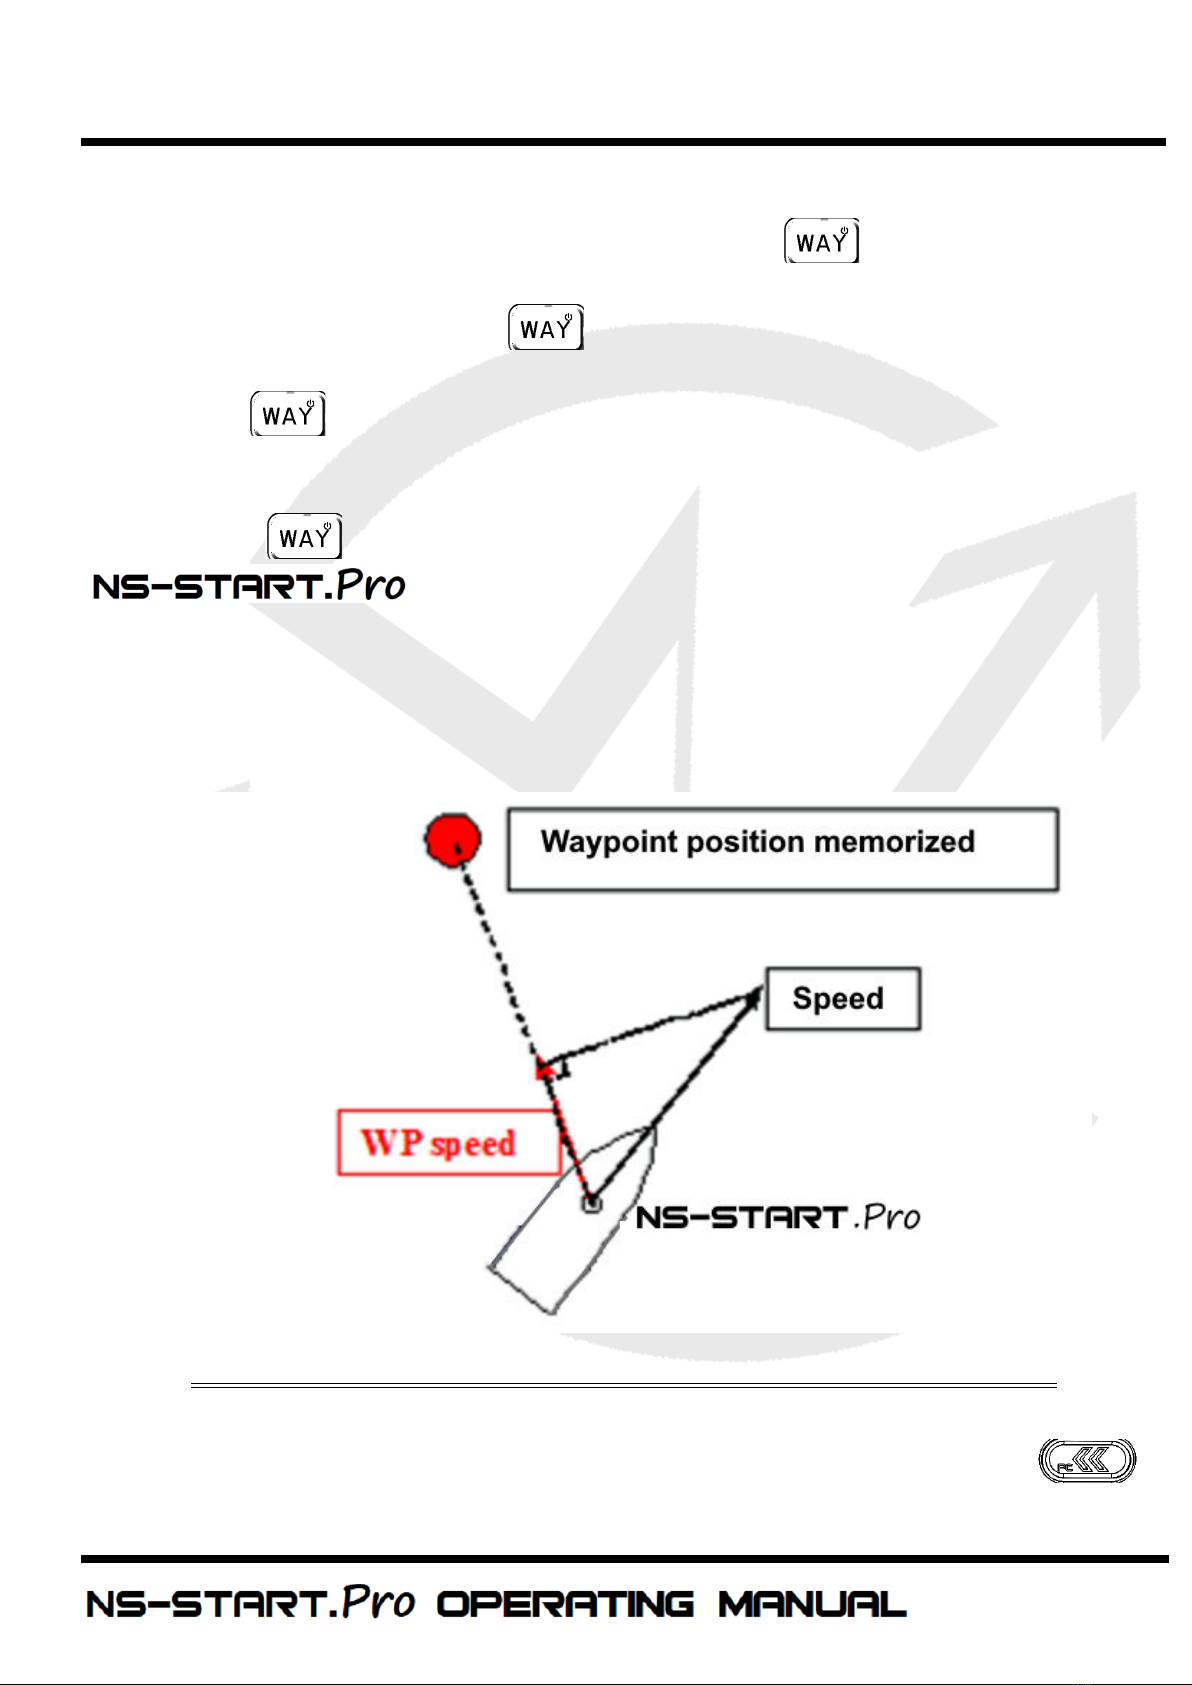
Waypoint screen mode: Wxx
The Waypoint screen is entered by pressing .This mode displays
information such as the direction, angle difference, projected speed and distance
to reach the selected pre-defined waypoint. Up to 10 waypoints can be
memorized: W00 to W0 . For each waypoint selected: the direction, the heading
difference between the boat and the direction to the waypoint, the projected
speed and the distance needed to reach it are displayed sequentially.
Note:
The display timings of the directions, angle, speed and distance are
defined by the parameters Waypoint Heading, Waypoint Speed, Heading
Difference and Waypoint Distance in the SET mode (also settable in the “NS-
START.Pro Novasail Wireles Manager” PC software). Please refer to the installed
online documentation for more details.
Note:
If all the display durations are set to ‘OFF’ the Waypoint screen mode will
be disabled.
To use a waypoint
•
By default, W00 is displayed on the mode line.
•
Press the button to select the required waypoint, from W00 to W0 .
•
The direction, speed, distance and heading difference are displayed
sequentially.
Operations
13
To Memorize a waypoint while sailing
•
The waypoint screen must be displayed. Press to select the waypoint
(from W00 to W0 ) that you want to overwrite.
•
Press and hold the button to memorize the current boat position into
the selected waypoint. The screen will display “WAY SAVE”, release the
button to confirm the memorization.
•
The direction, speed and distance to reach it are displayed sequentially.
Note:
If the button is pressed for a prolonged period of time the
will enter the shutdown sequence: the memorization will
be skipped and no position will be recorded.
Note:
The waypoint speed displayed in knots is calculated using the waypoint
position, the boat position, the boat speed and the heading.
Information screen : current GPS coordinates
This mode allows the latitude and longitude of the current position to display (in
degrees and decimal minutes). To activate this mode, press the arrows
Operations

14
and simultaneously (if needed select this screen by a subsequent press
on OR ). The latitude is displayed on the upper line and the
longitude on the lower line. Press or to exit this mode.
Information screen : max speed and average speed
This mode allows the display of the max instant speed on the upper line and the
max average speed on the lower line. To enter this mode, press the arrows
and simultaneously (if needed select this screen by a
subsequent press on OR ). The average speed (lower line, ‘AVG
x’, x=3 to 10) is computed on a 3 to 10 seconds time interval, based on the
parameter entered in the setup menu (see the SET mode, page 11 for details).
Press or to exit this mode.
Operations

15
SET mode
The SET mode allows the adjustment of your
parameters sequentially as follows :
•
Speed sensitivity
•
GPS heading sensitivity
•
Boat offset
•
GPS logger interval
•
GPS logger start condition
•
Average speed timing in seconds
•
Current embedded firmware version
To enter the SET mode :
•
Your device must be switched OFF.
•
Press first then simultaneously. The device will enter the
setup menu: SET will be displayed on the upper line
•
Each parameter is displayed on the lower line. The required value is
adjusted by the button or .
•
The parameter is memorized when you press the button .
•
The SET mode is exited by switching off the device (the current setting is
memorized when switching off).
Name Display Description
Speed sensitivity SPE
•
Hi: High sensitivity
•
Med: Medium sensitivity
•
Low: Low sensitivity
GPS heading
sensitivity
COG
•
Hi: High sensitivity
•
Med: Medium sensitivity
•
Low: Low sensitivity
Advanced operations

16
Note:
You can exit the SET mode any time by restarting the device.
Boat offset BOA OFS
This is the length between the front of the
boat and the
Default value 0, can be adjusted in 0.1
meter increments.
GPS logger
Interval
LOG TIM
Timing interval between 2 data (GPS
coordinates). Default is 3 seconds, can be
adjusted in 1 second increments up to 30
seconds.
GPS logger start LOG STA
•
On (starts as soon as enough
satellites are locked)
•
Off
•
Tim (starts when timer reaches 0:00)
Waypoint screen,
display time for the
heading to
waypoint
WAY
HEAD
0 (OFF) to 10 seconds display time
Waypoint screen,
display time for the
speed to waypoint
WAY SPE 0 (OFF) to 10 seconds display time
Waypoint screen,
display time for the
distance to
waypoint
WAY DIS 0 (OFF) to 10 seconds display time
Waypoint screen,
display time for the
heading difference
to waypoint
WAY DIFF 0 (OFF) to 10 seconds display time
Average time for
the max speed
SPE AVG 3 to 10 seconds average time
Firmware version VER Firmware version number
Advanced operations

17
Speed Over Ground sensitivity : SPE
•
Hi: High sensitivity
The high sensitivity setting allows a very sensitive reading of any speed variation.
•
Med: Medium sensitivity
This sub-mode provides an average speed of the boat over a short period of time.
This is particularly useful when sailing with big waves upwind or downwind.
•
Lo: Low sensitivity
This sub-mode provides an average speed of the boat over a longer period of
time. This is particularly useful in rough conditions with lots of speed changes.
GPS Heading sensitivity : COG
•
Hi: High sensitivity
When sailing with light winds and flat seas, high sensitivity allows you to
appreciate very small wind variations.
•
Med: Medium sensitivity
Medium sensitivity is more suitable for race boats under medium wind and sea
conditions. Dinghy racers will appreciate this mode.
•
Lo: Low sensitivity
Under low sensitivity more subtle variations due to big waves and sudden gusts
are filtered.
Boat offset: BOA OFS
The boat offset corresponds to the distance from the front of the boat to the
. The remaining distance to the start line is calculated by
taking the boat offset into account. The default value is 0, the maximum value is
20.0 meters and the increment is 0.1 meter.
Example: The actual distance between the front of the boat to the
is 3.2 meters. You need to enter a boat offset of 3.2
meters. Then, considering that the is 10 meters from
Advanced operations

18
the line, when you face the start line, the displayed remaining distance is equal to
10-3.2 meters, 6.8 meters rounded down to 6 meters.
GPS Logger interval: LOG TIM
The GPS Logger recording interval can be set between 1 to 30 seconds with a
default value of 3 seconds. For example if set to 3, then every 3 seconds GPS
data is recorded. Once downloaded on your computer, the lower the value of the
interval the more accurate the trace and the post race analysis will be.
GPS Logger Start: LOG STA
•
OFF: GPS Logger is turned off
•
ON: The GPS Logger records the data when the
is ON and as soon as enough satellites are locked
•
TIM: The GPS Logger starts to record the data when the timer reaches 0
and continues until the timer is reset
Waypoint screen mode: data to waypoint display time
WAY HDG: display time for the heading to waypoint
WAY SPE: display time for the projected speed to waypoint
WAY DIS: display time for the distance to waypoint
WAY DIFF: display time for the heading difference to waypoint
Set the display time from 0 (OFF) to 10 seconds for the display of the data to
WAYPOINT: the values are shown consecutively on the lower line
Average time for the recorded max speed: SPE AVG
The max speed displayed in the information screen mode (see “Information
screen : max speed and average speed”, page 14) is averaged based on the time
entered, from 3 to 10 seconds.
Firmware version: VE
The firmware version is displayed (for example: 1.3).
Advanced operations

19
PC Mode
The PC mode is activated to exchange data between the
Bluetooth wireless transceiver and the computer. The
"NS-START Pocket V2 Wireless Manager" software allows you to check the
communication status, upgrade the embedded firmware & setup the device.
Please refer to the Novasail Wireles Manager documentation for more details; the
online manual can be open with a right click on the "NS-START.Pro Wireless
Manager" main window.
To enter in PC connectivity mode
•
With the product switched off, press first then simultaneously.
“PC” is displayed on the data line of the upper screen (blinking) (blinking)
with “blu” (bluetooth) shown
•
To exit the PC mode, press and hold the button .
Troubleshooting
•
Make sure the Bluetooth connectivity is activated on the PC
•
Make sure to allow any Bluetooth device to find the PC in the operating
system
•
Close/re-open the "NS-START.Pro Wireless Manager" app. Remove the
from the previously paired bluetooth devices and
launch a new pairing process
•
Make sure the PC mode on the is turned on: “PC”
must be blinking on the main display and “blu” (Bluetooth) must be shown
on the lower line
•
Confirm the is indicated on the available Bluetooth
devices on the PC
•
The message ’connected’ should appear in green at the bottom of the "NS-
START.Pro Wireless Manager" window within a minute (the delay is PC
hardware dependant)
Note:
to save batteries the will shut down
automatically if no PC connectivity is detected for 10 minutes.
Advanced operations

20
Screen capture example, Windows 10 (version 1703/build 15063.413) Bluetooth
settings. Once the is paired the device appears as
followed:
In the Bluetooth options (Windows 10 screen capture), additional information
should be displayed as followed (the COM port numbers may be different):
Advanced operations
Table of contents
Other NovaSail GPS manuals


