Noztek Xcalibur User manual


WARRANTY/SAFETY 2
SPECIFICATION 3
DIAGRAMS 3
START UP GUIDE 4
USER INTERFACE 4
CONNECTING TO A COMPUTER 5
CHANGING THE NOZZLE 5
COLOUR MIXING 5
MAINTENENCE 5
LUBRICATION 6
BARREL JAM 6
MOTOR BLOCK 6

WARRANTY
Equipment manufactured by Noztek carries the standard machine tool guarantee of freedom from de-
fects in workmanship and material for one year from date of shipment.
TO INSURE THAT YOUR WARRANTY IS HELD IN EFFECT, PROPER OPERATION PROCEDURES MUST BE OB-
SERVED.
NOTE: READ THE SAFETY PRECAUTIONS BEFORE OPERATING THIS MACHINE.
SAFETY
• Know your equipmentwell before operating it
• Carefully read the instruction manual.
• Learn the proper, safe use and limitations of the equipment.
• DO NOT operate or use this equipment for any purpose other than its intended use.
• DO NOT modify this equipment.
• DO NOT perform adjustments or maintenance while system is operating or energize
• DO NOT clean the equipment with ammable solvents.
• DO NOT wash down the equipment with water. This could cause an electrical hazard.
• DO NOT probe into extruder vent with the machine running. Never Use a metal probe in the vent
area. The screw may shear the probe, causing extensive damage to the barrel and screw. A wooden
probe is recommended.
• DO wear a face shield, insulated gloves when operating and when in close proximity to the extruder
during operation. These protective items must also be worn when adjusting the die, cleaning the
screw, etc. The extruder temperatures are extremely hot and failing to protect yourself may cause
serious injury.
• The feed hopper MUST be installed on the extruder feed section at all times when in operation
• NEVER put hands in the feed section or vent to remove material.
• DO NOT switch on the motor until the recommended temperature has been reached.
HEATER BANDS
FAN
MOTOR
TOUCH SCREEN INTERFACE
FILAMENT GUIDE
EMERGENCY POWER OFF
HOPPER
POWER ON/OFF
USB SOCKET
2

Weight: 32 Kg
18CM
112CM
54cm
Programme Memory
The last used target temperature and speed will be remembered after a restart. Last used timer settings
will also be kept.
Computer connection
The Xcalibur Controller enables you to take control of the machine via USB connection.
Warm-Up
Designed to allow the barrel to fully heat after 10 minutes so unmelted materials do not block the motor.
This avoids damaging to motor or machine.
Emergency shutdown
The ability to quickly, electrically shutdown the Xcalibur in any urgent event.
Motor blocking management
If the motor cannot run for any reason, a message will be prompted and the motor will be stopped.
Sensor malfunction detection
If the temperature readings are incorrect a message will be prompted.
3

START UP GUIDE
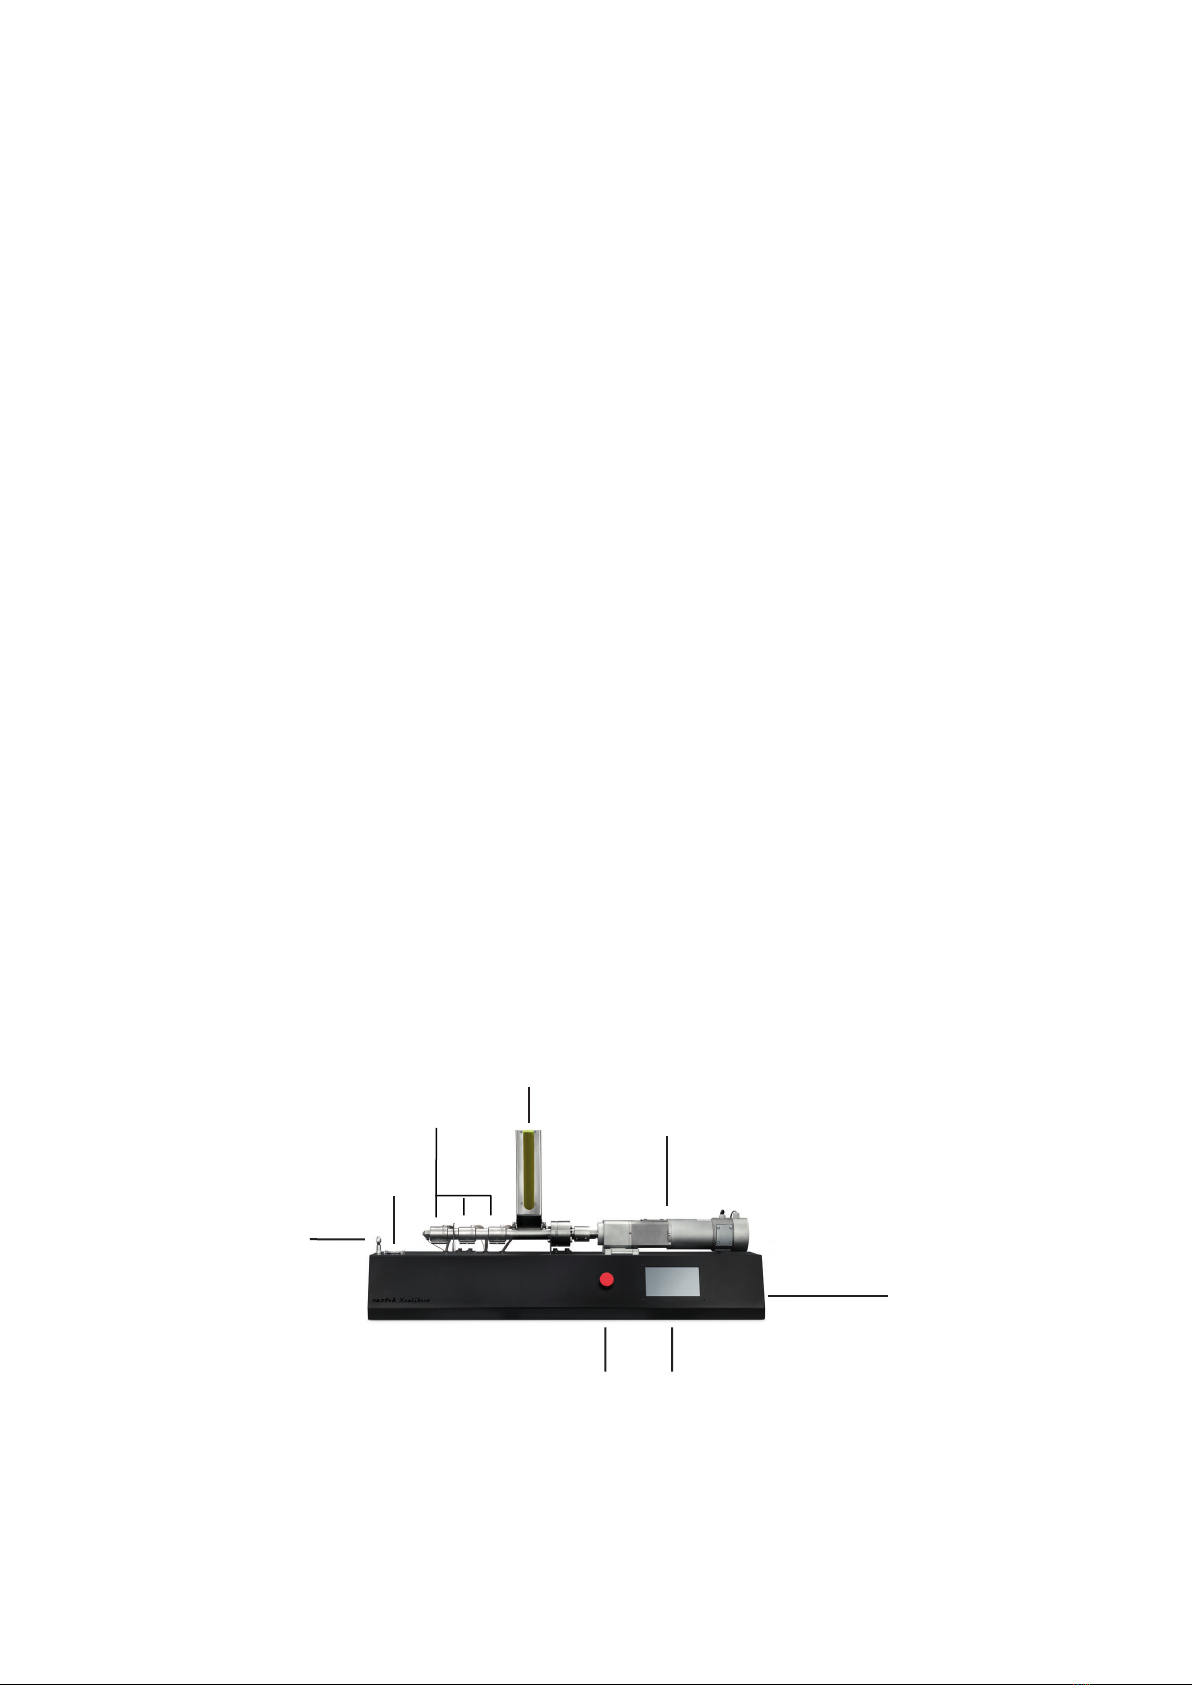
The Noztek Xcalibur features an illuminated on/o switch on the back and a red emergency shutdown
button on the front. In an emergency simply hit the button and the machine will completely switch o.
To restart, simply untwist the button (anti-clockwise), to release.
First attach the hopper; the bolts are located in the bolt holes in the barrel. Then you are ready to swicth
on the power.
Once powered up, the Xcalibur will take a short period to boot before presenting the touch screen user
interface
It is recommended that you read through all intructions BEFORE turning on your machine for the rst
time, to get aquainted with the process of operating the machine.
USER INTERFACE
This screen shows the current temperature of each
heating band, the speed of the motor, the fan status,
the timer progress, and access to the Menu screen.
You can alter each of the settings either through the
corresponding red box, or through the menu screen.
Temperature Settings Screen
Control each heater band from here. Upon acti-
vating the heating bands, the Xcalibur display will
switch to the“warm up” screen while each band
heats up.
If you would like to cancel your modications, press
BACK.
Warm-up Screen
This screen is displayed when you heat for the rst
time or when the temperature dropped under the
target. This warm up is to ensure that the barrel has
reached a certain temperature before being able to
run the motor safely.
The Xcalibur will not exit this screen until the heater
bands are at the set tempaerature, or the user aborts
the heating process. This is a safety measure as it can
be dangerous to begin extruding before the barrel
has heated up suciently.
4

Speed Settings Screen
Use the slider to choose the speed and press SET to
start the motor and return to the home screen
The max speed is ___rpm
If you would like to cancel your modications, press
‘Back’.
Timer Settings Screen
Use the +/- buttons to set the extrusion timer.
When this timer runs out, the heating and motor will
stop, but the mahcine will not power o.
Do not leave extruder unattended.
CONNECTING TO A COMPUTER
The Xcalibur Controller software enables you to control the Xcalibur and collect data using a USB connec-
tion. The data can then be saved to a “.csv” le in order to be opened in a spreadsheet software. You will
also be able to see the data on a graph.
To visualize the data on a graph, go to Display > Display data on graph. To export you data just click on
“Export data to .csv” on the bottom right of the window.
Note: For safety reasons, the warm-up cannot yet be launched via controller.
CHANGING THE NOZZLE
Before attempting this operation please use insulated gloves. To switch between nozzle sizes to heat up
the unit to175c. Unscrew the nozzle, clean o any excess plastic from the internal threads, then screw on
new nozzle.
COLOUR MIXING
Adding colours is simple. Mix the natural and the colorant at the given ratio, then pour it into the hopper.
It will take 10-20 minutes to see changes in the colour. It is also possible to mix colorants to create new
colours. For example, mix blue and yellow will make green.
MAINTENTANCE
Regular cleaning of your plastic extrusion tooling during the disassembly process lengthens tooling life,
helps reduce waste and helps maintain reliable tolerances for your nal product. Use a wire brush and
ne metal pick to clean the threads and the screw assembly.
5

LUBRICATION
The thrust bearing assembly will require occasional lubrication; this is a relatively simple operation,
simply unscrew the brass grease nipple and squirt a 2 second burst of a lubricant like WD40 Lithium
Grease. For optimal performance we recommend this procedure is carried out every 100 hours of oper-
ation.
BARREL JAM
Depending on what type of resin you are using, you may experience a barrel jam. If at any time during
extrusion the motor starts to labour and slow right down then you should switch o the motor imme-
diately. A good way to free the jam is to turn the temperature up to around 230-240c and leave this
for 15 – 20 minutes, then switch on the motor again; this should allow the screw to rotate again. Also
using a blow torch to heat the barrel just past the hopper will usually release any solidied plastic
and free the screw.
MOTOR BLOCK
When the motor blocks, it’s likely that the fuse has blown. Check inside the casing, you’ll see it fuse
xed to the bottom, Replace with a 15amp fuse
CONTACT NOZTEK
Please see our FAQ help section on our website at www.noztek.com for further troubleshooting.
If the answer to your quey is not found here, please contact the Noztek
expert team directly.
Noztek Ltd
Unit C3 Dolphin Industrial Estate Evershed Way, Shoreham by Sea
West Sussex
BN43 6QB ENGLAND
44 (0) 203 384 6208
info@noztek.com
www.noztek.com
6
Other manuals for Xcalibur
1
Table of contents
Other Noztek Laboratory Equipment manuals
Popular Laboratory Equipment manuals by other brands

Biosan
Biosan RCP-24 User instructions

Esco
Esco ETS-Lindgren GTEM! 5411 installation manual

Okolab
Okolab H301-PI-736-ZR1S user manual

VERDER
VERDER Carbolite Gero HT 5/350 Installation, operation and maintenance instructions

REITEL
REITEL RETOMIX EASY operating instructions

Safex
Safex Tintschl Engineering FlowMarker instruction manual