Bioer ThermoShaker MB-202 User manual

ThermoShaker Mixing Block
MB-202 Type
Oscillating Dry Bath
Operation Manual
H a n g z h o u B i o e r T e c h n o l o g y C o . , L t d .

Operation Manual for Oscillating Dry Bath Important Notes
—I—
Caution:
All rights reserved. Hangzhou Bioer Technology Co., Ltd. reserves the
right to modify this manual at any time without notice.
All rights reserved. Without prior written consent from Hangzhou Bioer Technology
Co., Ltd., any part of the manual shall not be duplicated, reproduced or translated into
any other languages.
Document No.: BYQ66140000000ESM
Document Version: March 2017, Version 1.0
Before the initial use of this instrument, please carefully
read this manual!

Operation Manual for Oscillating Dry Bath Important Notes
—II —
Important Notes
1. General Practice
Caution:
Important information is contained in any item and should be carefully read. Failure
to observe the instructions would result in damage to or malfunction of the
equipment.
Warning!
The warning message requires extremely careful operation of a certain step. Failure
to observe the instructions may result in serious personal injuries.
2. Safety
During operation, maintenance and repair of this instrument, the following basic safety measures
shall be observed. In case of failure to follow these measures or the warnings or notes indicated herein,
the basic protection provided by the instrument, its safety criteria of design and manufacture, and its
predicted use range would be impaired.
Hangzhou Bioer Technology Co., Ltd. would be irresponsible for any consequence resulted from
the user’s failure to observe the following requirements.
Caution:
This instrument is for indoor use.
a) The ground connection
To avoid the electric shock, the input power line must be reliably grounded. The instrument is
equipped with the three-pin plug that has the third pin (the pin connects the ground), therefore, the plug
shall be used with the grounded power socket only. This is a kind of safety device. If the plug cannot
be plugged into the power socket, please ask the electrician to install a correct power socket, so as to
make the grounded plug to work for safety.
b) Keeping apart from the live circuit
The operator shall not disassemble the instrument without permission. Only qualified
professionals are allowed to replace elements or adjust the machine inside. Replacement of elements
under energizing state is prohibited.
c) Be careful of the power supply
Before the instrument is connected with the AC power source, the voltage of the power source
shall be the same with the required voltage of the instrument (a deviation of 10% is allowed). The
rated load of the power socket shall not be lower than the requirements of the instrument.
d) Be careful of the power line
Usually, the instrument shall use the power line attached to it. If the power line is destroyed, it

Operation Manual for Oscillating Dry Bath Important Notes
—III —
must be replaced but not be repaired. The replacement shall be carried out with the power line of the
same type and same specification. No goods shall be put on the power line when the instrument is
working and please do not put it in a frequently-visited place.
e) The plugging in and removing of the power line
The user should hold the plug to remove the power line. When plugging in the plug, the user
should make sure that it has been fully plugged in; when removing the plug, do not pull the power line
forcefully.
f) Placement of the instrument
This instrument shall be fixed in a low RH and low dust place apart from water source (e.g. water
pool and water pipeline) and the room shall be well ventilated, and free of corrosive gas and
interference of strong magnetic field. The instrument shall not be placed in a wet or dusty location.
The openings on this instrument are for ventilation circulation and in order to avoid over-heat of
the instrument body, they shall not be blocked or covered. When a single set of instrument is used, the
interval between ventilation openings before and after the instrument and the nearest object shall not
be less than 25cm. Also, don’t use the instrument on loose or soft surface, or the air inlet at instrument
bottom might be blocked.
Excessive temperature would impair the test performance or result in fault of instrument. This
instrument shall not be used in location subjected to direct sunshine. The instrument shall be kept away
from hot gas, stove and all other heat sources.
If the instrument is to be set aside for a long time, the power plug shall be withdrawn and the
instrument covered with soft cloth or plastic film to avoid entrance of dust.
Caution:
In any of the following cases, immediately cut off the power supply, withdraw the
power plug from the power socket, and contact the supplier for treatment:
Liquid drops into the inside of the instrument;
The instrument is rained or watered;
The instrument works abnormally, especially generates abnormal sound or
odor;
The instrument is dropped or its casing is damaged;
The function of instrument obviously changes.
g) Warning sign
Warning!
There is a sign of “HOT SURFACE” on the instrument. The metal part (module)
near the sign shall not be touched with any part of the body when the instrument is
operating in a high temperature state or just finishes this operation to avoid scald!
3. Module Installation and Instrument Maintenance
The instrument module is not fixed by screws. At the time of installation, the bevel at the left

Operation Manual for Oscillating Dry Bath Important Notes
—IV —
bottom of the module should be tangent with the left bevel of the transition plate of the instrument;
press the right side down; if a buckle sound is heard, it means the module has been installed
successfully. At the time of disassembly, hold the module with the left hand and press the button on the
right of the module with the right hand, then the module will be separated from the mainframe.
The bore-hole of the instrument should be regularly cleaned with a wet swab to ensure the test
tube be well contacted with the wall of the bore-hole so as to have good heat conduction.
If the surface of the instrument is polluted, it can be cleaned with soft cloth which is soaked and
then squeezed.
Warning!
At the time of cleaning the surface of the instrument, the power supply must be
cut off;
The power supply must be cut off at the time of replacing the module;
Do not start the oscillating operation when the module is not installed;
The instrument surface shall not be cleaned with the corrosive cleaning agent.
4. After-sales Service
a) Warranty content
Hangzhou Bioer Technology Co., Ltd. is responsible for the replacement for failures caused
by material and manufacturing defects within 1 month after goods delivery.
Hangzhou Bioer Technology Co., Ltd. is responsible for maintenance of failures caused by
material and manufacturing defects within 12 months after goods delivery. Hangzhou Bioer
Technology Co., Ltd. is responsible for selectively repairing and replacing instruments with confirmed
defects within warranty period.
Maintained products shall be sent to maintenance department designated by Hangzhou Bioer
Technology Co., Ltd. by the user. The freight incurred thereof shall be borne by the user. Hangzhou
Bioer Technology Co., Ltd. will bear the freight incurred by returning instrument. (For domestic users
only)
For maintenance out of warranty period, Hangzhou Bioer Technology Co., Ltd. will charge for
certain maintenance cost.
b) Warranty scope
The abovementioned warranty does not apply to damages incurred by improper use and
maintenance, using under unqualified conditions, unauthorized maintenance or modification.
Hangzhou Bioer Technology Co., Ltd. does not provide any other warranty expressions
otherwise; and does not bear liabilities for business promotion under special circumstances.
Caution:
After unpacking, immediately check the goods against the packing list. In case of
damaged or missed goods, please immediately contact the supplier.
After qualification of acceptance, properly fill in the product acceptance sheet and
send (or fax) the copied sheet to the supplier for filing and maintenance.
After unpacking, the packing box and packing materials shall be well kept for future
repair. For the damage of instrument occurring during transporting to the repair
department due to improper package, Hangzhou Bioer Technology Co., Ltd. shall
bear no liabilities.

Operation Manual for Oscillating Dry Bath Contents
Contents
CHAPTER I INTRODUCTION--------------------------------------------------------------------------------------1
CHAPTER II FEATURES---------------------------------------------------------------------------------------------2
1 NORMALWORKING CONDITIONS ---------------------------------------------------------------------------2
2 TRANSPORTATION AND STORAGE CONDITIONS-------------------------------------------------------2
3 BASIC PARAMETERS AND PERFORMANCE---------------------------------------------------------------2
CHAPTER III PREPARATORY WORK---------------------------------------------------------------------------4
1 STRUCTURE DIAGRAM-------------------------------------------------------------------------------------------4
CHAPTER IV OPERATION GUIDE -------------------------------------------------------------------------------5
EXAMINATION BEFORE STARTUP------------------------------------------------------------------------------5
CHAPTER V FAULT ANALYSIS AND TROUBLESHOOTING ------------------------------------------- 13
FAULTANALYSIS AND TROUBLESHOOTING ------------------------------------------------------------- 13
2 DISPLAY FAULTALARM MESSAGE PROMPT COMPARISON TABLE --------------------------- 14
APPENDIX 1: MB-202 WIRING DIAGRAM------------------------------------------------------------------- 15

Operation Manual for Oscillating Dry Bath Chapter I Introduction
—1—
Chapter I Introduction
This product is a dry bath adopting advanced microcomputer control, which can choose a
variety of metal modules applicable to a variety of test tubes. It can be widely used in the
preservation of samples, preservation and reaction of all kinds of enzymes, electrophoresis
pre-degeneration, serum coagulation, incubation and culture of all kinds of molecular biological
experiments with oscillation requirements, etc. This product has the following characteristics:
LCD true color high brightness display;
Simultaneous display of set temperature and instant temperature;
Simultaneous display of set time and run time;
The use of metal modules, so that the samples can be free of pollution;
The metal modules can be easily replaced, cleaned and disinfected, and can apply to a variety of
test tubes;
The built-in over-temperature protection device makes it more reliable for use;
Run end reminder function;
Temperature deviation calibration.

Operation Manual for Oscillating Dry Bath Chapter II Features
—2—
Chapter II Features
This chapter mainly introduces the usage, transportation and storage conditions of the instrument, as
well as its basic parameters, performance and functions.
1 Normal Working Conditions
Ambient temperature: 10C ~ 30C
Relative humidity: ≤70%
Power supply: AC220V22V 1.5A 50Hz1Hz
Surface for placement: Horizontal, stable
Caution:
Before using the instrument, please confirm whether the working conditions meet the
above requirements. Pay special attention to whether the power line is reliably
grounded, and whether the work surface is stable.
2 Transportation and Storage Conditions
Ambient temperature: -20C ~ +55C
Relative humidity: ≤80%
3 Basic Parameters and Performance

Operation Manual for Oscillating Dry Bath Chapter II Features
—3—
Model
MB-202
Temperature setting
range
0~100℃
Temperature control
range
Room temperature -15°C to 100°C (minimum temperature 0°C)
Time setting
1min~99h59min
Temperature
fluctuation
20℃-45℃≤±0.5℃;<20°C 或>45°C≤±0.8℃
Temperature control
accuracy
≤0.5℃(15℃~100℃)
Module temperature
uniformity
20℃-45℃≤±0.5℃;<20°C 或>45°C≤±0.8℃
Ambient temperature20℃~25℃
Humidity:≤70%
Number
Module
Heating time
Cooling time
Oscillation
frequency
weight
(kg)
Module
lid
included
Rise from
25℃to 95℃
Drop 10℃
from the
room
temperature
Drop from
95℃to
25℃
A
384
≤12min
≤12min
≤12min
3000rpm
0.36
Yes
B
96×0.2mL
≤12min
≤12min
≤12min
2000rpm
0.33
Yes
C
54×0.5 mL
≤12min
≤12min
≤12min
2000rpm
0.43
None
D
35×1.5 mL
≤12min
≤12min
≤14min
2000rpm
0.45
None
E
35×2.0 mL
≤12min
≤12min
≤14min
2000rpm
0.45
None
F
12×5.0 mL
≤18min
≤18min
≤18min
1000rpm
0.62
None
G
12×15 mL
≤21min
≤18min
≤21min
1000rpm
0.91
None
H
4×50mL
≤21min
≤18min
≤21min
1000rpm
0.98
None
J
20×1.5 mL
+32×0.2
mL
≤12min
≤12min
≤14min
2000rpm
0.5
None
Dimensions (mm)
311×210×145
Net weight
5.9kg(without module)
Power supply
AC110V-240V,50-60Hz,180W
Caution:
The metal module can be custom-made. If the custom-made module is needed, please
contact with the supplier.
Operation Manual for Oscillating Dry Bath Chapter III Preparatory Work
—4—
Chapter III Preparatory Work
This chapter mainly describes the structure, operating keyboard and function of each button of the
instrument, as well as the preparatory work before the startup. When using this instrument for the first time,
familiarize yourself with the content of this chapter before starting up.
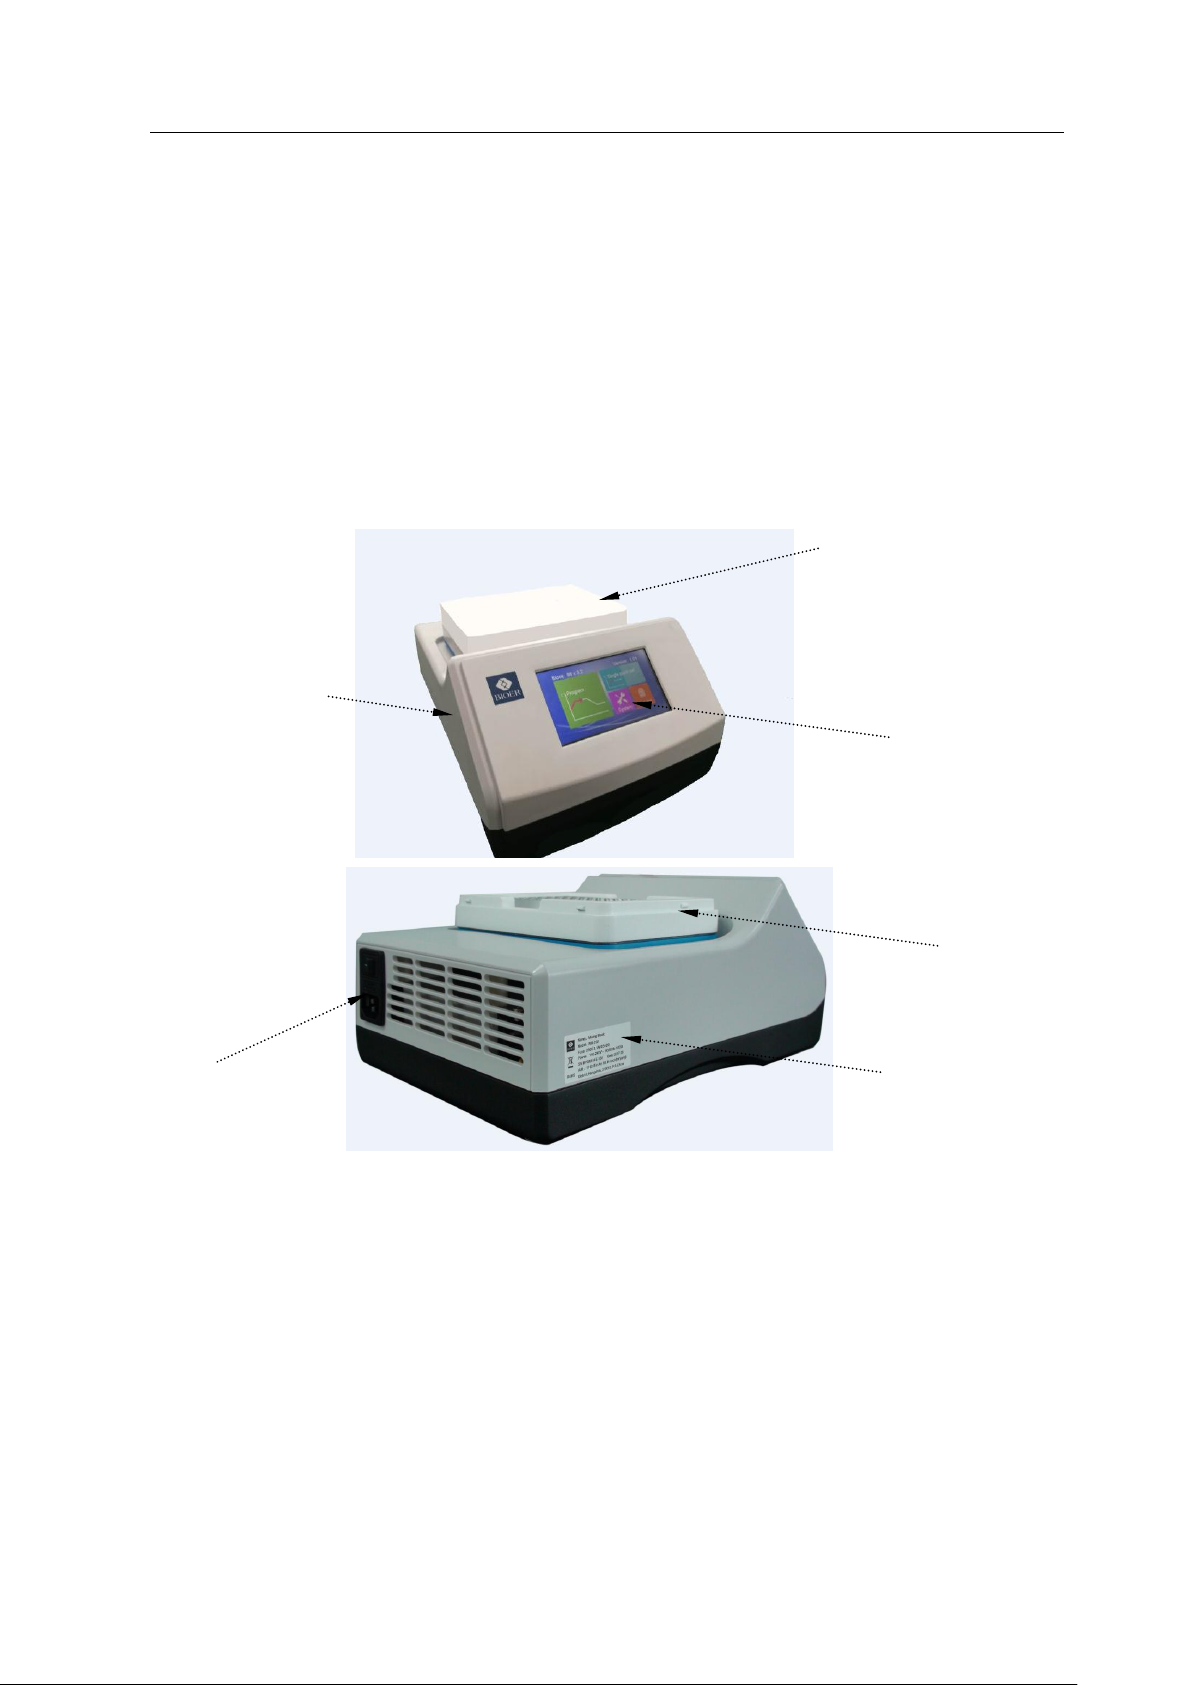
1 Structure Diagram
①Lid ②Housing ③Display window
④Module ⑤Power outlet, fuse wire, switch ⑥Nameplate
①
②
③
④
⑤
⑥
Operation Manual for Oscillating Dry Bath Chapter IV Operation Guide
—5—
Chapter IV Operation Guide
This chapter describes in detail the method of temperature setting, oscillation time setting and
oscillation speed setting of the oscillating dry bath, as well as how to correct the error between the actual
temperature and the display temperature, and the setting of the buzzer.
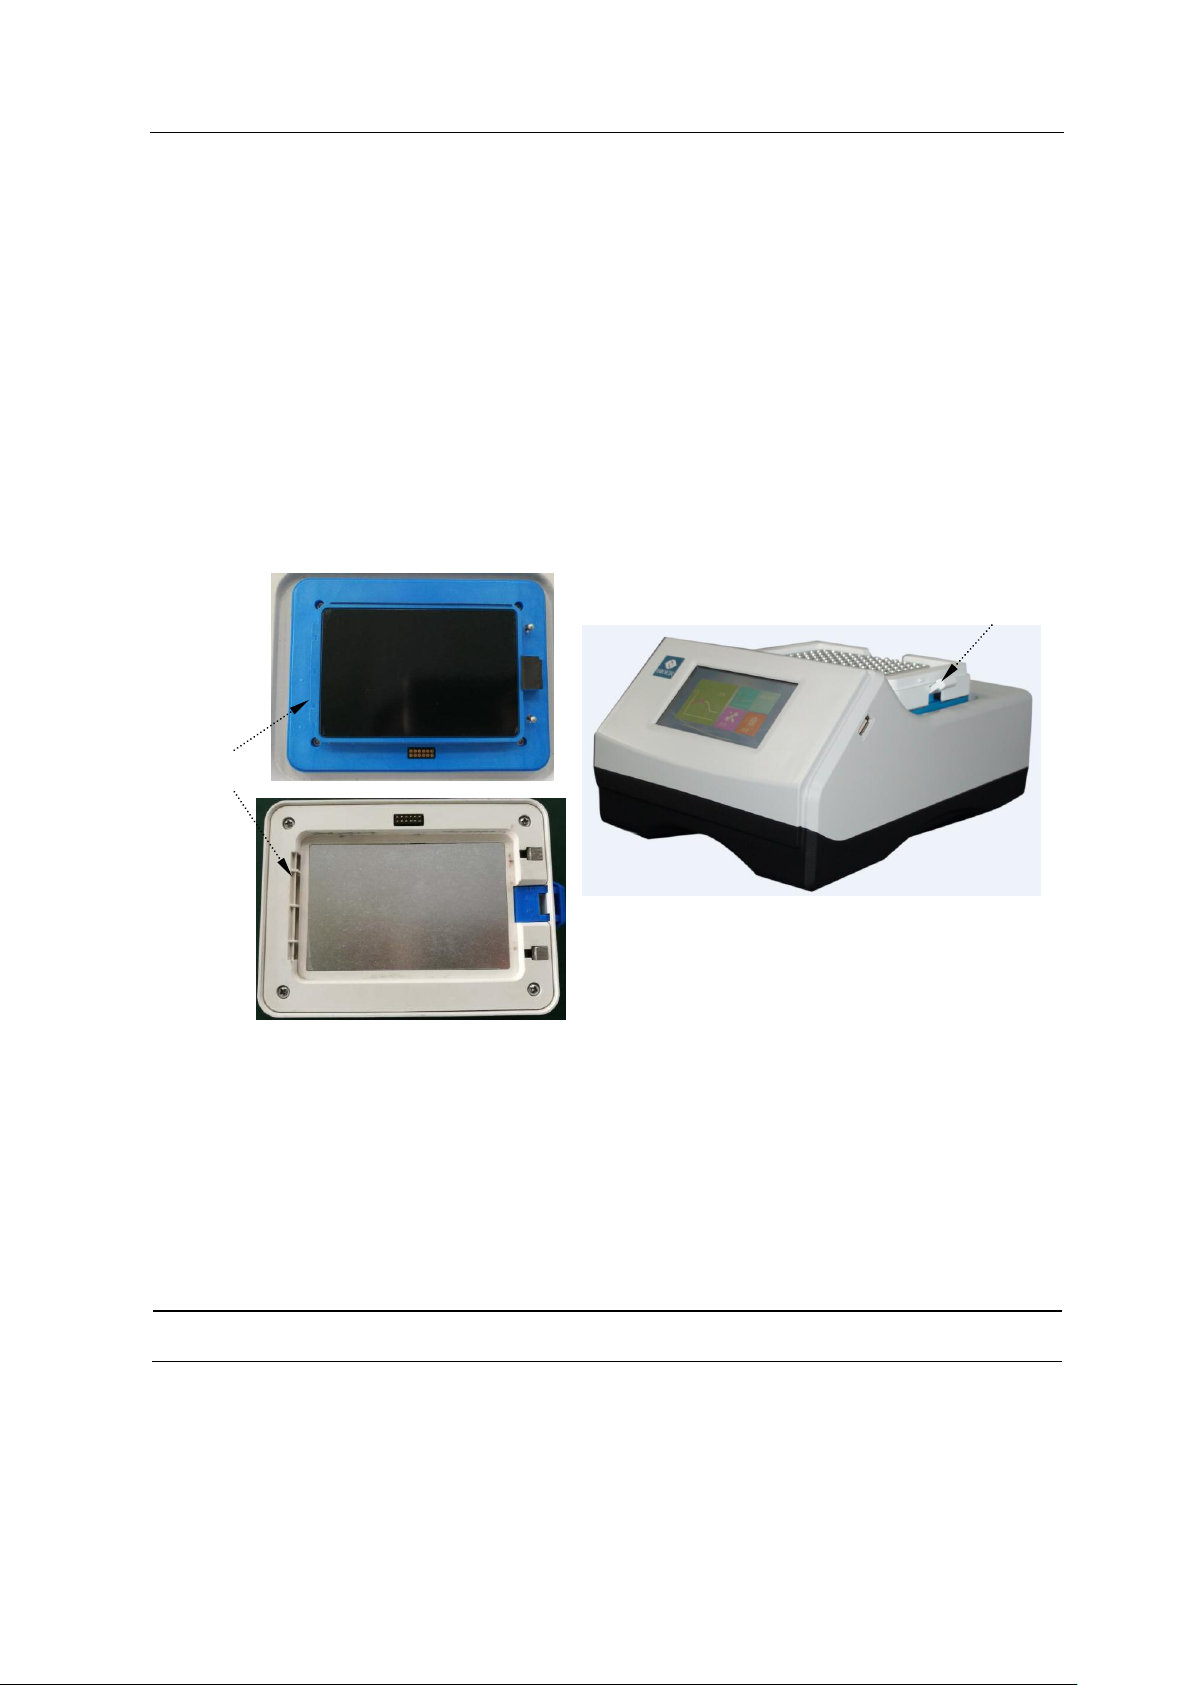
Assemble And Disassemble The Module
The module can be replaced according to requirements. To assemble the module, attach the module
chute to the host chute, then fix the module. To disassemble the module, press the module button, the
module will be set up and separated from the host.
Examination Before Startup
Please confirm the following content before plugging the plug into the power socket.
1 Whether the surface for placement of the instrument is horizontal and stable;
2 Whether the power supply is in line with the voltage required for the instrument; (refer to Chapter II
of this file for the power supply requirements)
3 Whether the power line plug has been securely plugged into the power outlet;
4 Whether the power line is reliably grounded;
5 Whether the module and the mainframe are securely fixed.
Warning!
If the display of the instrument is abnormal after startup, please turn off the power source
immediately and contact with the supplier.
Are you ready? Let's start!
Button
Chut

Operation Manual for Oscillating Dry Bath Chapter IV Operation Guide
—6—
1. Main interface
After the instrument is powered on, turn on the power switch and the display will enter the main
interface. The main interface includes Program, Single Point Set, System, Inching these four option
buttons.
Main Interface
2. Program editing
Click the "Program" option in the main
interface to enter the file list interface. The
maximum number of files that can be saved is
10. Click the "Back" button to return to the
main interface.
File List Interface

Operation Manual for Oscillating Dry Bath Chapter IV Operation Guide
—7—
Click "Delete" in the file list interface,
and the deletion confirmation box will pop up;
click "Yes" to confirm the deletion of the file
and click "No" to cancel the deletion. After the
operation is done, go back to the file list
interface.
删
D
Deletion Confirmation Box
In the file list interface, click "Add" or
select a certain file and click on the file to
enter the file editing interface. In the file
editing interface, operate on the file program.
The 1-5 in the first line of the interface
represent the number of sections, and a file can
be set up to 5 sections. Click "Back" to return
to the file list interface. When the number of
sections of a file is greater than or equal to 2,
click "Delete" to delete the selected section.
File Editing Interface
In the file editing interface, click "Add" to add a section after the selected section and enter the section
information editing interface. The section information includes temperature, time and speed. Click on the
white edit box to select the corresponding information and set the selected information with the 12 keys on
the right. After the setting is done, click "OK" to add the section successfully, click "Cancel" to give up
adding, and then return to the file editing
interface.
In the file editing interface, click on the
selected section to enter the section
information editing interface and modify the
information of the selected section as needed.
After the modification is done, click "OK" to
modify it successfully, click "Cancel" to give
up the modification, and then return to the file
editing interface.
Section Information Editing Interface

Operation Manual for Oscillating Dry Bath Chapter IV Operation Guide
—8—
In the section information editing interface,
click on the option box behind the
temperature to enter the temperature rise / drop
and speed setting interface. Set the temperature
rise / drop and speed with the 12 keys on the right.
Click "OK" to set the speed successfully, click
"Cancel" to abandon the setting, and then return to
the section information editing interface.
Temperature Rise / Drop and Speed Setting Interface
In the section information editing
interface, click on the option box behind the
speed to enter the oscillation setting interface. The
oscillation modes include Forward, Reversal,
Interval, Alternate.The oscillation time and pause
time are required to be set when the intermittent
oscillation is selected. Select the corresponding
time and set the time with the 12 keys on the right.
Click "OK" to set successfully, click "Cancel" to
abandon the setting, and then return to the section
information editing interface.
Oscillation Setting Interface
Forward: Clockwise
Reversal: Counterclockwise
Interval: Intermittent clockwise or intermittent counterclockwise
Alternate: Intermittent clockwise and counterclockwise, that is clockwise, intermittent, then
counterclockwise, with this cycle.
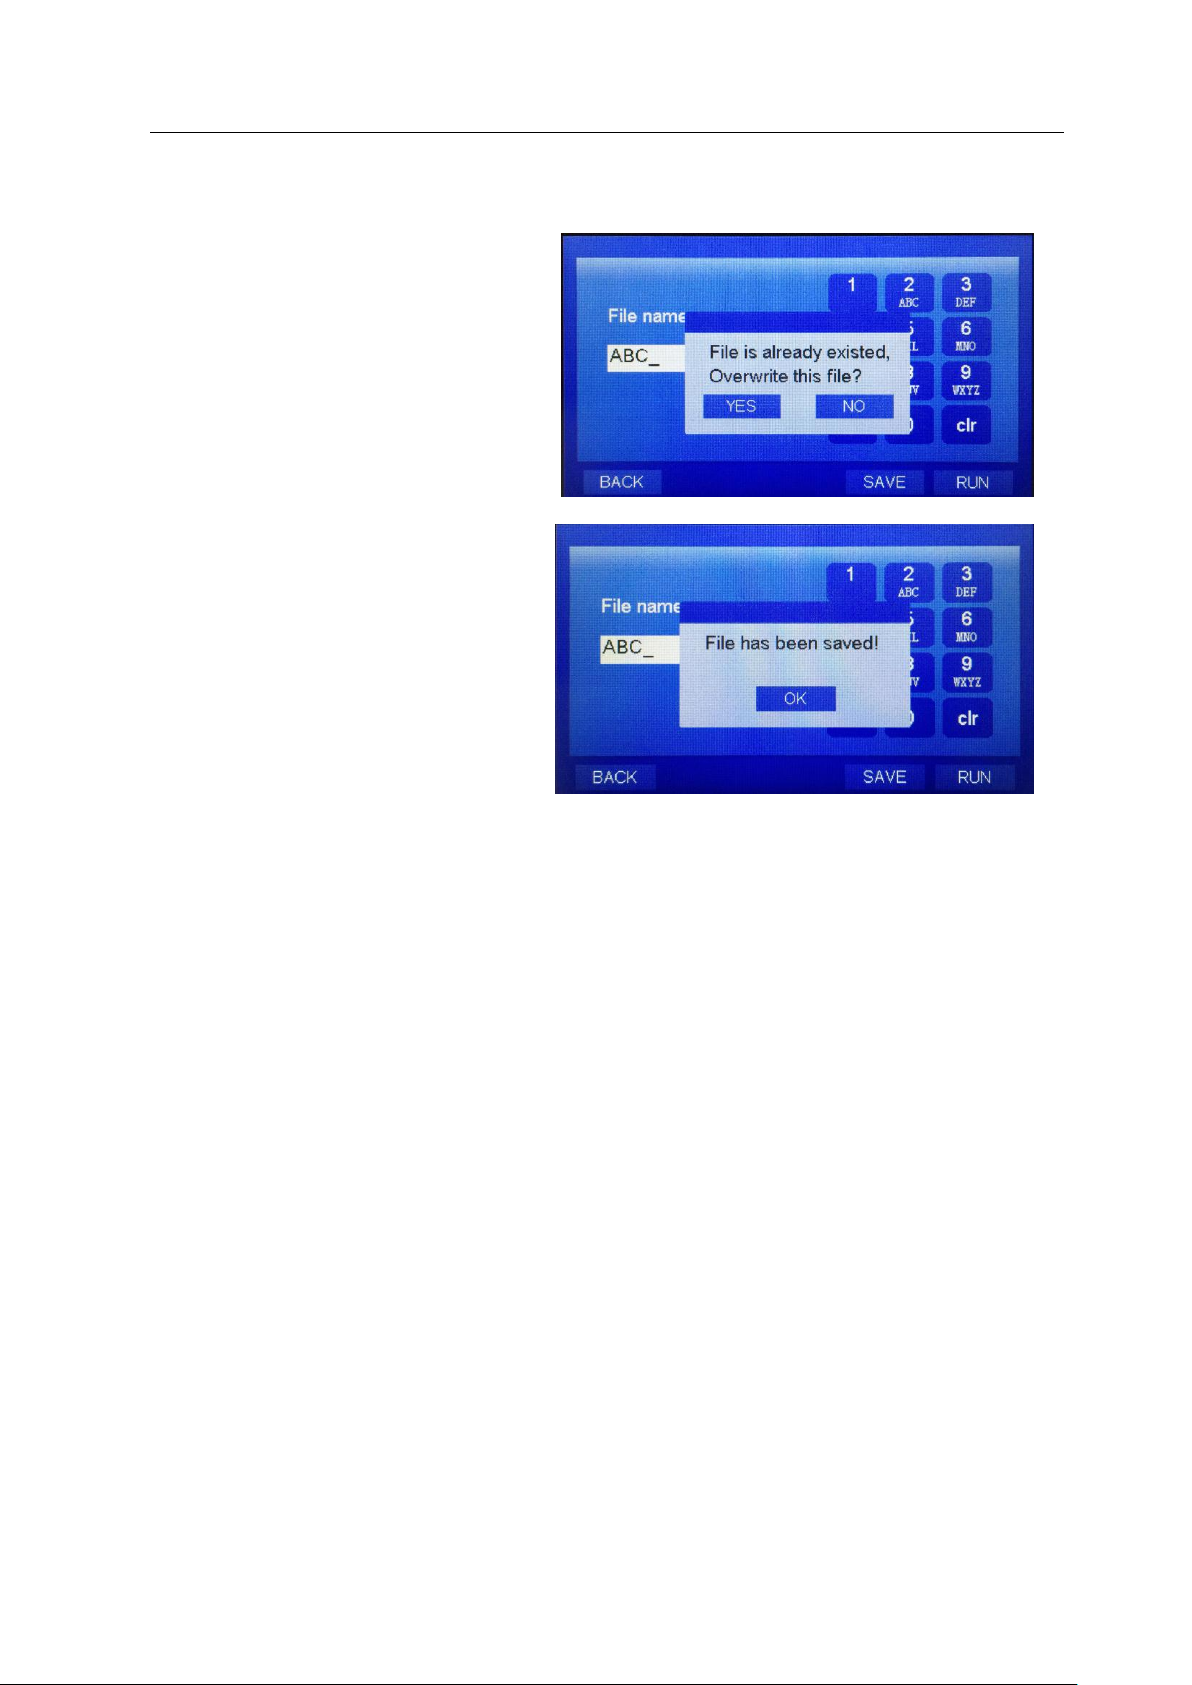
In the file editing interface, click "Save" to
enter the file saving interface. Use the 12 keys on
the right to set the file name. The file name is up
to 8 digits. Click "Back" to return to the file
editing interface.
文
件
保
File Saving Interface
Click "Save" in the file saving and editing interface, if the file name already exists, then a warning box
Operation Manual for Oscillating Dry Bath Chapter IV Operation Guide
—9—
will pop up. Select "Yes" to overwrite the
existing file, select "No" to go back to the file
saving interface, and finally save the file after
modifying the file name.
After the file is saved successfully, a
prompt box saying “The file has been
saved!”will pop up.

Operation Manual for Oscillating Dry Bath Chapter IV Operation Guide
—10 —
3. Single point set
Different from a file, a single point has only one
section. In the main interface, click "Single Point Set"
to enter the single point setting interface. The
operation is similar to that of the section information
editing interface, and the difference is that because it
has only one section, you can click "Run" to run
directly after the section information editing is done.
Click "Back" to return to the main interface.
4. Run
Click "Run" in the interface with a "Run"
button to enter the running interface. The running
interface displays the information of the running
section, including which section is currently
running, the current temperature, the remaining
constant-temperature time of the section, the
oscillation speed and mode.
Running Interface
Click "Pause" in the running interface, the run
time will be suspended and a prompt box will pop up.
Click "Continue" to continue the current section.
Click "Next" in the running interface to skip
the current section and go on to the next section. If the
current section is the last section, a “Stop Running”
prompt box will pop up. Click "Stop" to stop running
and a “Stop Running”prompt box will pop up. Select
"Yes" to stop running, or select "No" to return to the
current running section to continue running.
Stop Running
Pause Running

Operation Manual for Oscillating Dry Bath Chapter IV Operation Guide
—11 —
Click "Details" in the running interface to enter
the running details interface. The details interface
includes not only the running information of the
current section, but also the entire running file
information and the total run time. Click "Back" to
return to the running interface. Other operations are
the same as that of the running interface except
"Back".
Running Details Interface
When the running is finished, an “End of Run”
prompt box will pop up. If a prompt tone for the End
of Run has been set in the system settings, the
instrument will send out the prompt tone to indicate
that the program running has finished. Click "OK" in
the “End of Run”prompt box to return to the main
interface.
5. System settings
In the main interface, click "System" to enter
the system settings interface. The system settings
include language and sound settings. The languages
include Chinese and English; the prompt tones
include button, alarm and end of run. After
modifying the settings, click "OK" to save the
settings, click "Cancel" to give up the modification,
and return to the main interface.
6. Inching
In the main interface, hold “Inching”, and the instrument will oscillate. The oscillation speed is a
single point set speed, and the oscillation mode is forward. Release "Inching" and the instrument will stop
the oscillation.
7. Alarm interface
When the instrument is running, if the sensor breaks down, an alarm box will pop up. The error
System Settings Interface

Operation Manual for Oscillating Dry Bath Chapter IV Operation Guide
—12 —
code 0x1 means short-circuit of the sensor; 0x2 means open-circuit of the sensor. If an alarm prompt tone is
set in the system settings, the instrument will make a sound to indicate it when a fault occurs.
Alarm Interface
8. Firmware upgrade
The oscillating dry bath adopts a U disk for firmware upgrade. First create a firmware directory in the
U disk, and then copy the upgrade program BYQ6614_cpu _****.bin to the directory, and rename
BYQ6614_cpu _****.bin as Firmware.bin. After the above operation, a firmware upgrade U disk for the
oscillating dry bath is made successfully.
Insert the firmware upgrade U disk into the USB interface of the instrument, press and hold the display,
and turn on the power to enter the upgrade mode. After clicking UPGRADE, the upgrade program in the U
disk will be read and the upgrade will start. When Upgrade Finish is displayed, it indicates the upgrade is a
success. Restart the instrument and the upgrade is completed.
When reading the upgrade file, if “Read file error”is displayed, it indicates that the file reading is
unsuccessful, then you can click UPGRADE to reread it. If the error persists, it means that Firmware.bin
does not exist or is damaged.

Operation Manual for Oscillating Dry Bath Chapter V Fault Analysis and Troubleshooting
—13 —
Chapter V Fault Analysis and Troubleshooting
This chapter mainly introduces the possible fault phenomena, causes analysis and troubleshooting of
this instrument.
1
Fault Analysis and Troubleshooting
Serial
No.
Fault Phenomenon
Cause
Solution
Remarks
1
The display window is
not bright after the
power switch is turned
on.
The power is
not connected
Check the power
and turn it on
The fuse is
burned out
Replace the fuse
(250V 1.5A
Ф5x20mm)
The customer can replace
it according to the
specifications.
The switch is
damaged
Replace the switch
Other
Contact the supplier
or manufacturer
2
At the time of oscillating
operation, the instrument
body vibration is very
large accompanied by
abnormal sound.
The wrong
module parts
are applied
Replace the module
parts
Contact the supplier or
manufacturer to confirm
whether the module part of
this model is available for
this instrument.
The surface for
placement is
uneven or
unstable
Replace the
workplace, and
place the instrument
on a horizontal and
stable work surface
The spherical
foot wears
seriously or has
other defects
Replace the foot
Other
Contact the supplier
or manufacturer
3
The module temperature
uniformity is not good
The module is
not installed
correctly
Reinstall the
module
Before installing the
module, first clean the
contact surface with
alcohol; at the time of
installation, note that the
four screws should be
tightened with uniform
force.
Poor cooling
parts
Contact the supplier
or manufacturer

Operation Manual for Oscillating Dry Bath Chapter V Fault Analysis and Troubleshooting
—14 —
4
Crash phenomenon
occurs at the time of
replacing the module
parts
Poor grounding
of the
instrument
Check the power
line to ensure good
grounding; replace
the module when
the power is turned
off.
5
The temperature is
seriously inconsistent
with the actual
temperature
The sensor is
damaged or the
contact is not
good
Contact the supplier
or manufacturer
6
The cooling rate of the
module significantly
becomes slower or the
temperature cannot drop
below the room
temperature
The cooler is
damaged
Contact the supplier
or manufacturer
The fan is
damaged or not
running
7
The module is neither
heated nor cooled
The
temperature
sensor is
damaged
Contact the supplier
or manufacturer
The cooler is
damaged
8
The vibration stops
The driver is
damaged
Contact the supplier
or manufacturer
The motor is
damaged
The fuse is
burned out
Replace the fuse
(250V 1.5A Ф5 ×
20mm)
The customer can replace
it according to the
specifications.
2
Display Fault Alarm Message Prompt Comparison Table
Alarm Message Prompt
Cause of Fault
0x1
Short-circuit of the sensor
0x2
Open-circuit of the sensor
Caution:
The user is not allowed to open the housing of the instrument for inspection by
himself during the warranty period. If any failures that require opening of the housing
for inspection occur, the supplier or manufacturer should be contacted timely.
Table of contents
Other Bioer Laboratory Equipment manuals


Popular Laboratory Equipment manuals by other brands

CBM
CBM SST 1700B instruction manual

Endress+Hauser
Endress+Hauser Analytik Jena TOPwave operating manual

Raven
Raven Sidekick Pro Installation and operation manual

Zeiss
Zeiss HBO 50 operating manual

M&C
M&C SP Series instruction manual

Weinmann
Weinmann ACCUVAC WM 15261 Description of the equipment and instructions for use


