manuals.online logo
Brands
  1. Home
  2. •
  3. Brands
  4. •
  5. NRS Healthcare
  6. •
  7. Protection Device
  8. •
  9. NRS Healthcare Double EasyFit Bedguard User manual

NRS Healthcare Double EasyFit Bedguard User manual

1
USER INSTRUCTIONS
NRS DOUBLE EASYFIT BEDGUARD
P78222 NRS Double EasyFit Bedguard
2. SAFETY
318mm
Min
WARNING: To avoid possible entrapment, you must
always position the product a minimum of 318mm
from the headboard or footboard.
WARNING: To avoid possible entrapment, you must
always position the product a minimum of 318mm
from solid objects/furniture such as bedside drawers
or cabinets.
WARNING: NRS recommends a maximum mattress
thickness of 254mm (10”). The distance from the
top of the uncompressed mattress to the top of the
bedguard rail should be at least 220mm.
YOU MUST carry out a risk assessment to assess
the use and suitability of the bed rail in relation to the
users physical and cognitive ability, as well as the
surrounding environment.
DO NOT install this product to a damaged bed.
MAKE SURE there is no gap between the bed rail
and the mattress.
MAKE SURE The bedguard is always be positioned
as close as possible to the mattress, to prevent user
entrapment.
DO NOT fit this product to height adjustable or
profiling beds.
DO NOT use this product as a bedrail. It will not
support the users bodyweight.
Note: Some tasks within these instructions may
require two people.
3. UNPACKING
1
4
3
2
2
5
5
3
Remove the packaging and check all parts carefully.
Contact your supplier immediately if parts are
missing or damaged and do not try and assemble.
3.1 Contents:
1. Base-frame
2. Bedguard Rail x 2
3. Bedguard Extension Rail x 2
4. Base Adjustment Rail
5. Mesh Cover x 2
General Safety Warning
Please make sure that you read and follow these
instructions carefully. Keep these instructions in a
safe place for future reference.
1. INTENDED USE
The NRS Double EasyFit Bedguard is designed to prevent adult users (taller than 1.46m) from rolling out of
bed. The bedguard has adjustable sliding guard mechanisms, which can be extended or retracted for easy
access on and offeither side of the bed.
The bedguard can be used on divan and slatted beds, from single to king size. The bedguard rail sections
can be removed to make bed making easy.
2
4. ASSEMBLY AND INSTALLATION
4.1 Fitting the Bedguard Rail
The bedguard is packaged in three parts. To
assemble, attach the bedguard rails to the base-
frame assembly as follows:
1
1
2
22
1
1
2
22
1. Slot the bedguard rail into the base-frame
assembly.
2. Push and hold the bedguard rail button-clips,
then push the bedguard rail into the base-frame
assembly until the button-clips click into position
in the base frame holes.
3. Repeat the steps for the opposite side.
Note: Make sure that the button-clips have fully
engaged into the holes.
4.2 Adjusting the base width:
Note: The following steps may require two people.
1
2
2
2
1
A
BCD
Standard
Single
Small
Double
Standard
Double
King
Size
Bed Width 900mm 1200mm 1350mm 1500mm
Position ABCD
1. Push and hold the button-clips on the base
adjustment rail.
2. Slide the base adjustment rail out from the base-
frame until the button-clips click into the required
hole positions for your bed.
Note: Some wood framed beds may not allow the
adjustment rail to extend fully for the button-clips to
engage, this will not affect the safety of the bedguard.
4.3 Fitting the Bedguard to the bed:
Note: The following steps may require two people.
Remove the mattress and place the bedguard on the
bed base.
4.4 Position the Bedguard
Position the bed rail so the user can reach the
handle from a relaxed lying position without having
to stretch.
318mm
Min
WARNING: To avoid possible entrapment, you must
always position the product a minimum of 318mm
from the headboard or footboard.
WARNING: To avoid possible entrapment, you must
always position the product a minimum of 318mm
from solid objects/furniture such as bedside drawers
or cabinets.
3
4.5 Replace the Mattress
Replace the mattress on top of the bedguard.
WARNING: The bedguard must always be
positioned with the extending bedguard rails facing
away from the headboard.
5. OPERATION AND USE
5.1 Extending the Bedguard Rails
The bedguards can be extended to give the user
better protection from bed roll-out.
1
1
Button
-clip
To extend the bedguards, pull the bedguard
extension rail out from the main bedguard rail until
the bedguard extension rail button-clip clicks into
position.
Note: Make sure that the button-clip has fully
engaged into the hole.
5.2 Retracting the Bedguard Extension Rail
The bedguard extension rail must be closed to let
the user exit the bed.
To close the bedguard extension rail, press and hold
the button-clip, then slide the bedguard extension
into the main bedguard rail.
5.3 Remove the Bedguard Rail
The bedguard rails can be removed to enable the
user to make the bed.
2
3
3
1
1. Push and hold the right-hand side bedguard rail
button-clip, then pull the bedguard rail until the
button-clip disengages from the hole.
2. Repeat step 1 for the left-hand side.
3. Make sure both button-clips have disengaged
from the holes, then pull the bedguard rail out
from the base frame.
4. To refit the bedguard rail, refer to Section 4.1.
5.4 Remove the Mesh Cover
The bedguard is supplied with the mesh cover fitted
to the bedguard rails, to remove for cleaning, please
do the following:
Undo the Velcro fastener and slide the mesh cover
offthe bedguard rail.
5.5 Refit the Mesh Cover
1. Slide the mesh cover onto the bedguard rail and
secure with the Velcro fastener.
2. Make sure that the mesh cover is fully secure
before use.
4
6. CLEANING
6.1 Cleaning the Bedguard
Note: Please check the suitability of the cleaning
products before use. Do not use abrasive cleaners
or cloths as these could permanently damage the
surface and invalidate any warranty.
1. Clean regularly using a general purpose, neutral
detergent and warm water.
2. To disinfect, wipe with a dilute bleach solution
and rinse with fresh water.
3. Allow the product to dry fully before use or
storage.
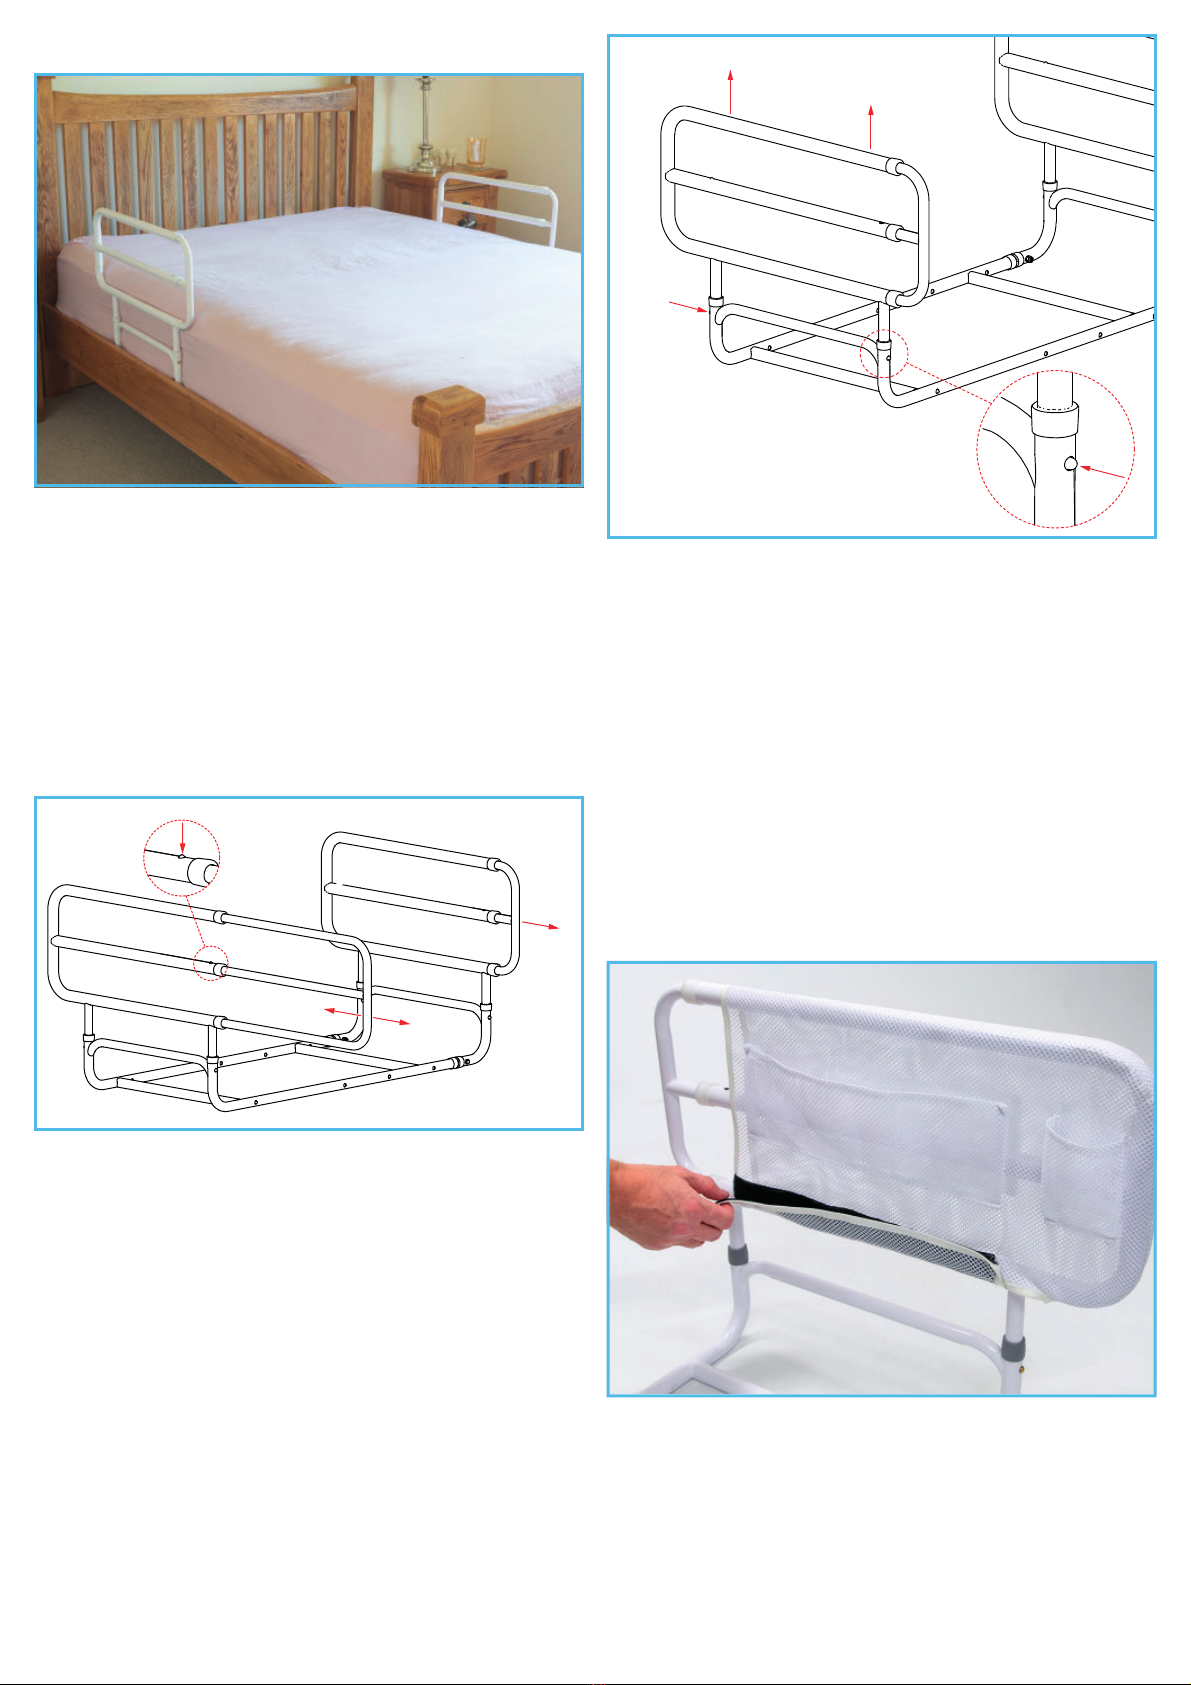
6.2 Cleaning the Mesh Covers
1. Hand-wash the mesh covers using a mild fabric
detergent and warm water.
2. Rinse the mesh covers with warm water.
3. Allow the product to dry fully before use or
storage.
7. MAINTENANCE
Check the bedguard is correctly positioned and that
all button-clips have engaged securely.
Inspect the product for signs of wear or damage at
regular intervals. Any suspected faults or damage
must be reported to the supplier and the product
taken out of use immediately.
8. ACCESSORIES & SPARE PARTS
P42744: Spare Mesh Cover (white).
For more details please visit our website:
www.nrshealthcare.co.uk or call Customer Services.
9. PRODUCT DISPOSAL
This product should be thoroughly cleaned prior to
disposal.
This product is manufactured from metal and plastic
and can be disposed of through Local Authority
Household Waste and Recycling Centres or through
Local Trade Waste Collectors.
10. PRODUCT GUARANTEE
NRS Healthcare guarantee this product for a period
of 12 months, from the date of purchase, against
faulty materials and workmanship.
This guarantee does not cover; fair wear & tear,
abuse, misuse, interference or tampering with any
part of the product.
Any guarantee issued by NRS Healthcare does not
affect your statutory rights.
If you have any problems with our products, please
contact us at the address below.
If you have experienced an injury, contact us but feel
free to contact the Medical and Healthcare products
Regulatory Agency at:
[email protected].uk
NRS HEALTHCARE Sherwood House,
Cartwright Way, Forest Business Park, Bardon
Hill, Coalville, Leicestershire, LE67 1UB, UK.
NRS HEALTHCARE 4C Altona Road, Blaris
Industrial Estate, Lisburn, Co Antrim,
Northern Ireland BT27 5QB
Tel: Customer Services: 0345 121 8111 Email: [email protected]
NRS Healthcare is a leading supplier of community equipment and daily living aids.
Please visit one of our websites to view our full range of products:
www.healthcarepro.co.uk or www.completecareshop.co.uk
P78222-UI-2 03-08-2021

This manual suits for next models

1

Popular Protection Device manuals by other brands

EMC Data Domain DD9500 Field Replacement Guide

EMC

EMC Data Domain DD9500 Field Replacement Guide

Geobrugg GBE-3000A product manual

Geobrugg

Geobrugg GBE-3000A product manual

Startco FPU-16 manual

Startco

Startco FPU-16 manual

Protecta EuroProt+ Series quick start guide

Protecta

Protecta EuroProt+ Series quick start guide

cias BF installation manual

cias

cias BF installation manual

ensto Arcteq AQ-M257 instruction manual

ensto

ensto Arcteq AQ-M257 instruction manual

Leviton 52120-7MS Installation

Leviton

Leviton 52120-7MS Installation

Silverline 140810 manual

Silverline

Silverline 140810 manual

Anest Iwata AIRFED MASK 2020 User instruction manual

Anest Iwata

Anest Iwata AIRFED MASK 2020 User instruction manual

Asco 457 Installation & operation manual

Asco

Asco 457 Installation & operation manual

Schweitzer Engineering Laboratories SEL-311C instruction manual

Schweitzer Engineering Laboratories

Schweitzer Engineering Laboratories SEL-311C instruction manual

STI SA5500 Installation

STI

STI SA5500 Installation

Arcteq AQ-101 instruction manual

Arcteq

Arcteq AQ-101 instruction manual

Hoffman Controls 610-012A Series Installation & operating instructions

Hoffman Controls

Hoffman Controls 610-012A Series Installation & operating instructions

Num'axes CAS1021 user guide

Num'axes

Num'axes CAS1021 user guide

Micom P634 Technical manual

Micom

Micom P634 Technical manual

GE M60 instruction manual

GE

GE M60 instruction manual

Mitsubishi Electric PUZ-ZM60VHA Guide

Mitsubishi Electric

Mitsubishi Electric PUZ-ZM60VHA Guide

manuals.online logo
manuals.online logoBrands
  • About & Mission
  • Contact us
  • Privacy Policy
  • Terms and Conditions

Copyright 2025 Manuals.Online. All Rights Reserved.