NuWave Nutri-Master User manual

Owner’s Manual & Complete Recipe Book
NuWave Nutri-Master™
Slow Juicer

4
IMPORTANT SAFEGUARDS
All users of this appliance must read and understand these safety precautions
before operating to avoid personal injury or damage to the appliance.
Important Safeguards
WARNING
Hazards or unsafe practices that could result in appliance damage, serious
personal injury or death.
1. When using electrical appliances, basic safety precautions should always be
followed. Read all instructions before using the NuWave Nutri-Master™ Slow Juicer.
2. Close supervision is necessary when any appliance is used near children.
3. To protect against risk of electrical shock, do not put the main body (motor) in
water or any other liquid.
4. Avoid contact with moving parts.
5. Unplug from outlet when not in use, before assembling or taking off parts and
before cleaning.
6. To protect against electric shock, DO NOT immerse cord, plug or any part of the main
unit in water or any other liquids.
7. Do not operate any appliance with damaged cord or plus, or after the appliance
malfunctions, or is dropped or damaged in any manner. Return appliance to
NuWave, LLC for examination repair or electrical or mechanical adjustment.
8. Always make sure hopper is securely fastened in place before motor is tuned on.
Do not unfasten hopper while juicer is in operation.
9. Do not let cord hang over edge of table or counter.
10. Be sure to turn switch to off position after each use of your juicer. Make sure
the motor stops completely before disassembling.
11. Do not put your ngers or other objects into the juicer while it is operation. If food
becomes lodged in opening, use food pusher or another piece of fruit or vegetable to
push it down. When this method is not possible, turn the motor off and disassemble
juicer to remove the remaining food.
12. Do not place on or near a hot gas or electric burner or in a heated oven.
13. Do not use outdoors.
14. Do not use appliance for other than intended use.
15. Do not use chamber if it is cracked or chipped.
16. Do not use attachments not recommended or sold by the product manufacture.
17. Do not plug or unplug the product into/from the electrical outlet with a wet hand.
18. To disconnect from an electrical outlet, pull directly on the plug: do not pull on the
power cord.
19. Children should be supervised to ensure that they do not play with the appliance.
5
Save These Instructions
IMPORTANT SAFEGUARDS (Continued)
SAVE THESE INSTRUCTIONS
CAUTION
Hazards or unsafe practices that could result in minor personal
injury or appliance damage.
1. Do not operate without locking the Hopper properly.
2. Do not attempt to juice hard materials such as large seeds (those that cannot
be swallowed or chewed), pits, or ice.
3. Do not attempt to move the base while operating.
4. Do not put any parts into the dishwasher or use abrasives to clean. Expose
to heat or abrasives can cause damage.
5. Do not operate the appliance while the Chamber is empty. Operating without
adding any ingredients will damage the Auger.
6. If food gets stuck in the feeding tube, do not use anything other than
provided pusher.
7. Do not use for more than 30 minutes continuously (for household use only).
8. If the appliance gives off an unpleasant smell or smoke or overheats,
stop using immediately and contact customer service. When using a new
appliance, it may give off a smell, which will disappear naturally over time.
9. Do not input fruit preserved in sugar, honey, alcohol, etc, as the hopper may
not open easily.
10. Always unplug the appliance after use.
11. Always place the product on a at, level, stable surface.
12. Keep the product out of reach of children and pets. This product is not
intended for use by children.
13. After using the Slow Juicer, user should clean the Auger with mild detergent
and cooking oils such as olive oil or canola to remove color from pigment
from the fruit.
20. Do not let the power cord come in contact with hot surfaces, including the stove.
21. Do not operate the appliance if the rotating sieve is damaged.
22. Only operate the appliance if the pulp container is in place.
23. Never insert ingredients by hand. Always use the provided food pusher.
24. Do not attempt to remove parts when locked in place. Always ensure that parts are
rotated to the open position before removing.

6
1
6d
2
5b
6a
4a
9
3
5a
8
10
76b
4b
Pusher
Model# 27121
Hopper
Model# 27133
Auger
Model# 27122
Fine Strainer
Model# 27123
Coarse Strainer
Model# 27124
Spinning Brush
Model# 27125
Silicone Brush
Model# 27126
Chamber
Model# 27127
Pulp Spout
Juice Spout
Juice Cap
Model# 27128
Cleaning Brush
Model# 27132
Base
Model# 27131
Pulp Container
Model# 27130
Juice Container
Model# 27129
1
2
3
4a
4b
5a
5b
6a
6b
6c
6d
7
8
9
10
PARTS DESCRIPTION
Parts Description
6c

7
ASSEMBLY INSTRUCTIONS
Place the Strainer (Fine or Coarse) inside the
Spinning Brush. Push the Strainer into the Spinning
Brush until the edges properly align and the Strainer
easily rotates within the Spinning Brush.
Lower the Spinning Brush with Strainer attachment
into the Chamber. Place the Spinning Brush inside
the Chamber so that the Red Dots are properly
aligned. Do not force the Spinning Brush downward
during assembly.
Place the Auger directly in the middle of the Strainer
attachment and carefully rotate the Auger clockwise
until it is properly secured and aligned.
Ensure that the Juicer power switch is set to the
OFF position. Place the Hopper on top the Chamber
with OPEN aligned with the arrow on the Chamber.
Rotate the Hopper clockwise until CLOSE is aligned
with the arrow on the Chamber and the Hopper is
locked into place.
Place the Chamber onto the
Base ensuring that the arrow on
the back of the Hopper is aligned
with the arrow on the base.
The Chamber must be properly
sealed and aligned on the Base
to function.
1
2
4
3
5
Assembly Instructions
Hopper
Base
Back of the Hopper
Strainer
Chamber
Both the Strainer
and Chamber
have Red Dots which
indicate proper alignment.
1
2
4
3
5
8
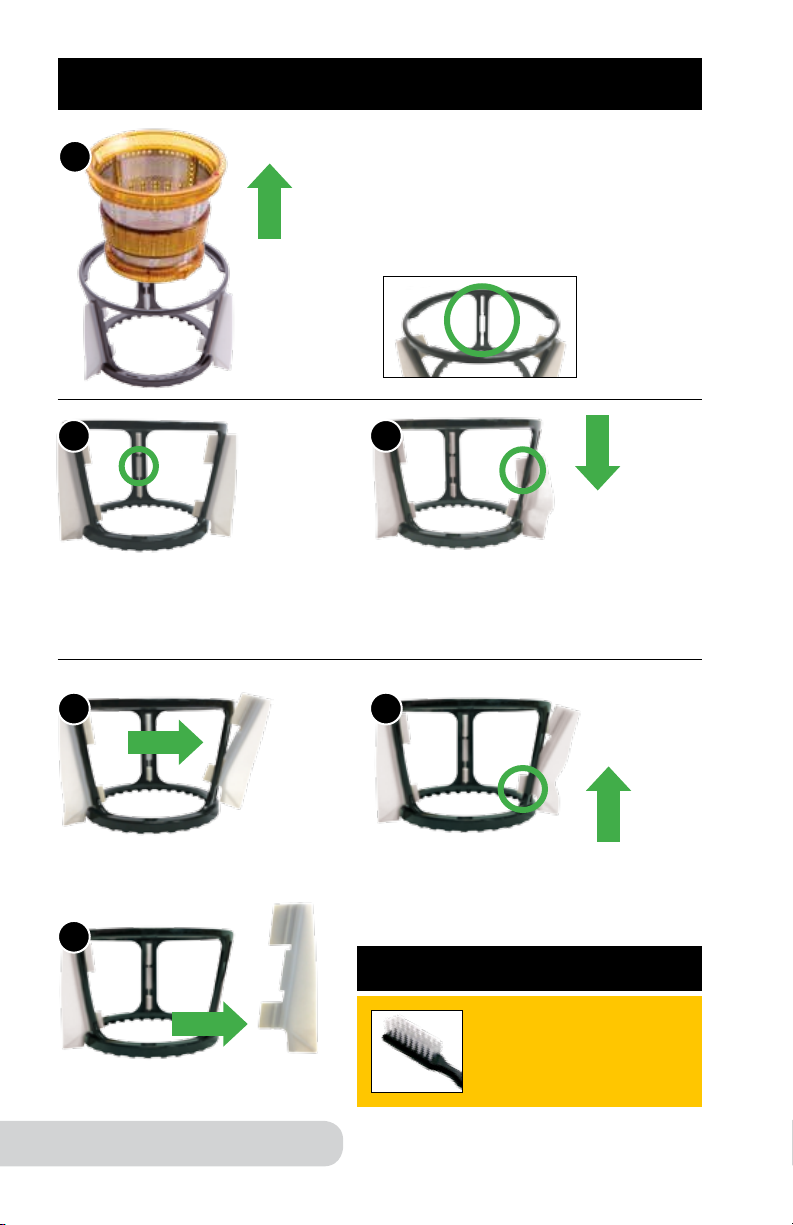
SPINNING BRUSH DISASSEMBLY
• Remove the Strainer from
the Spinning Brush.
• Locate the inner groves
on the Spinning Brush.
• Push the top of the Silicone
Brush down towards the
center opening.
• Pull the bottom of the
Silicone Brush up towards
the center opening.
Spinning Brush Disassembly
• Pull the center tab
of the Silicone Brush out.
• Pull the top tab out.
• Pull the bottom tab out.
Note: Use the Cleaning Brush to
clean the Spinning Brush, Silicone
Brush and Strainers.
2
4
3
5
6
• Reverse steps to assemble
1
9
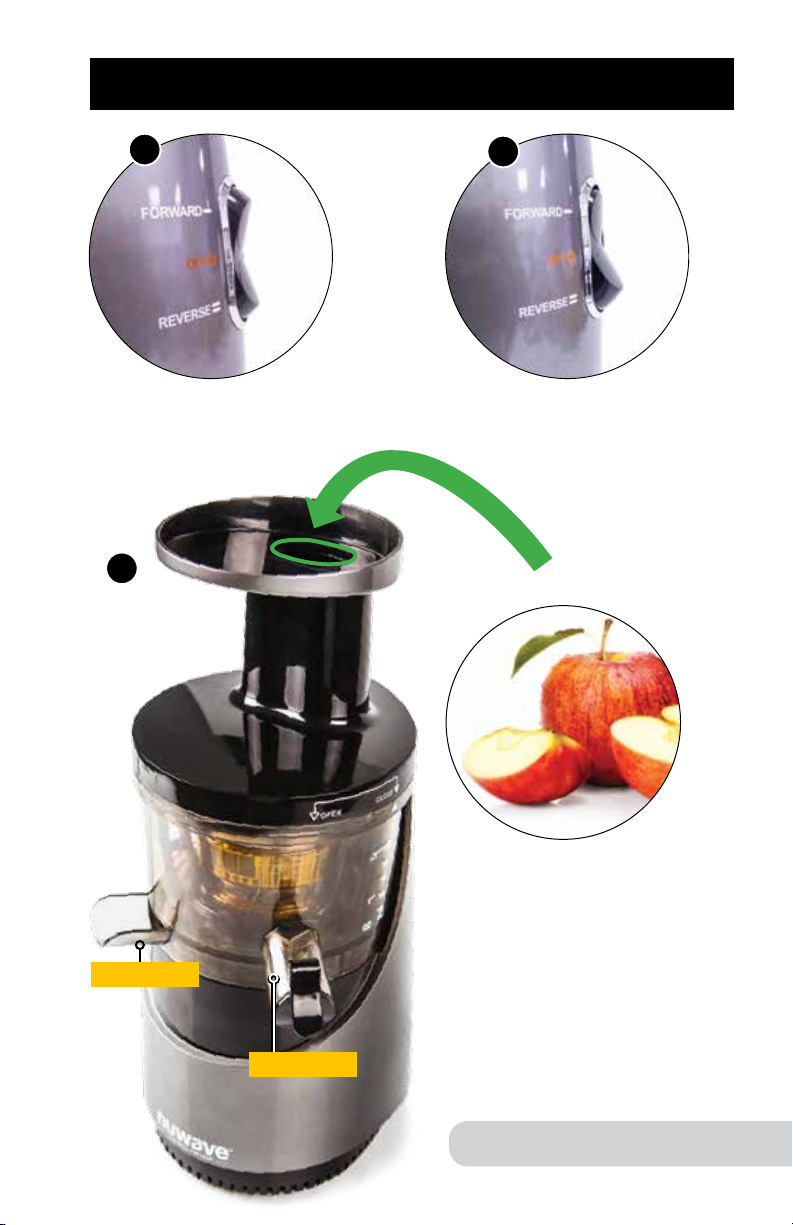
OPERATING INSTRUCTIONS
• Ensure that the power switch
is set to OFF before operating.
• Set the power switch
to FORWARD to begin.
• Gently insert ingredients
into the Hopper to juice.
Only use the Pusher if
ingredients become lodged
in the Hopper.
• Once juicing is complete
and all pulp has been ejected,
set the power switch to OFF.
Operating Instructions
12
3
Pulp Spout
Juice Spout

10
WARNING
Ensure that the Auger has completely stopped moving before
setting the power switch to FORWARD or REVERSE.
Cleaning
Once you’re done juicing, ensure the power switch is set to OFF and
position the pulp spout over your sink or waste receptacle. Set the
power switch to REVERSE to easily and quickly remove excess pulp
from the chamber.
Are you unable to open the Hopper after juicing?
• After juice extraction, pour water into the hopper. The hopper will open
easily after simple cleaning.
• Press and hold the power switch on REVERSE for 3-4 seconds.
This releases pressure from the chamber and makes opening
the Hopper easier.
Continued
Operating Instructions
DO NOT
SUBMERGE
BASE UNDER
WATER.

11
PRECAUTIONS
WARNING
Ignoring or otherwise disregarding directions and label
warnings may result in serious injury or death. Do not plug
or unplug the appliance with wet hands or when water is
present near the power source. This may cause electric
shock or injury.
Only operate the appliance with a power source of 120V AC.
Not doing so may result in suboptimal performance, electric
shock or even re. If the power source uses a different
voltage, it may result in motor failure.
Plug the power cord into a proper outlet, pushing it tightly and securely
into place. Failing to properly plug in the power cord may result in electric
shock or re.
If the power cord is damaged, do not plug it into an electric outlet
or attempt to operate the appliance. This may result in electric shock,
injury or re.
IF THE POWER CORD IS DAMAGED, IT MUST BE REPLACED BY
THE MANUFACTURER.
Do not alter, disassemble or otherwise alter the appliance. Do not insert
foreign objects into the appliance. This may result in appliance failure,
electric shock or re.
For technical support, contact our customer service department by calling
1-877-689-2838 or emailing help@nuwavenow.com Monday-Friday
from 7:00AM to 8:00PM (CST).
Do not dampen or otherwise splash water on the Base. Never operate
the appliance with wet hands. Always ensure that liquids do not get into
the power switch. This may result in electric shock or re.
Never insert your ngers or other foreign objects such as kitchen utensils
into the Hopper or Chamber during operation. Never disassemble the
Chamber during operation. This may result in appliance failure or injury.
KEEP OUT OF REACH OF CHILDREN. THIS APPLIANCE MUST
NEVER BE USED BY CHILDREN.
Precautions

12
CAUTION
When violating the labeling requirement, it may cause serious injury
or damage to the appliance.
Do not operate without locking the hopper properly. It may cause an
injury or a failure.
DO NOT INSERT A FINGER OR FOREIGN OBJECT INTO THE CHAMBER.
If the Auger has stopped rotating during normal operation, press and hold the
power switch on REVERSE for 3-4 seconds. Then, set the power switch to
FORWARD to resume juicing. If this fails to solve the problem, then disassemble
and reassemble the Chamber and try again. If the Auger repeatedly stops
rotating during operation, parts may be damaged and performance may be
compromised. Should this problem continue to occur, immediately cease
operation and contact the customer service department for assistance.
Do not attempt to move the Base, disassemble the Chamber or attempt to lock
parts while the appliance is in operation. This may result in appliance failure or
injury. Should you need to attempt any of these actions, set the power switch to
OFF and unplug the power cord before doing so.
Exercise caution when operating the appliance while wearing loose clothing such
as neckties and scarves in order to prevent accidents.
Always place the appliance on a at, stable surface.
Do not operate the appliance for more than 30 continuous minutes. This may
cause the motor to overheat and fail. Let the appliance rest for about 1 hour in
order for the motor to cool down sufciently before operating once again.
Only add ingredients to the Hopper safely using your hands or the provided
Pusher, when necessary. Do not use any other objects as inserting foreign
objects into the Hopper may cause appliance failure or injury.
Always use care when operating or transporting the appliance.
If the appliance begins to smoke or gives off an unpleasant smell, cease
operation immediately and contact the customer service department for
assistance.
Always unplug the appliance between uses. Disconnect the appliance from the
power supply when left unattended and before assembly or disassembly. When
unplugging the appliance, always hold the power cord directly. Pulling on the
wire may cause electric shock or re.
Do not clean the appliance at temperatures 176°F (80°C) or higher. Do not place
the appliances in a microwave oven, dishwasher or dryer. This may cause the
parts to deform and appliance failure.
Precautions
Other manuals for Nutri-Master
1
Table of contents
Other NuWave Juicer manuals


