Nvix Unicorn MV-5000R User manual


1
Unicorn Information System
#Table of contents
3912) Troubleshooting
3211) Menu summary
31- Playlist
097) Hard disk insertion
086) Remote Control
075) Front and Rear Panel
064) Specifications
053) Features
021) Important information
2) Safety & Precautions
26- Driver installation for Windows 98SE 25-FirmwareSetup 24- Setup/Various 23- Audio/Video Setup
10) MVIX Setup Menu
22- Connection to Computer 21- Connection to Optical output 21- Connection to Coaxial output
9) Installation and Connection
16- Making partition and formatting the HDDs under Windows 2000/XP 12- Making partition and Formatting the HDDs under Windows 98SE/ME
8) Hard disk formatting and partition
04- Limitations and Usage Precautions 03- Do’s and Don’ts
27- Video Files Playback 26- Driver installation for Windows ME/XP/2000
20- Connection to 2CH(RCA) of normal TV 20- Connection to Component output 19- Connection to S-Video output 19- Connection with ordinary (Composite) TV output
30- All Files Playback 29- Photo Files Playback 28- Audio Files Playback

2
Unicorn Information System
1Important Information
Congratulations for having bought this product. We are sure that you will be entirely satisfied
with this multi-media player. Please take some time to read thoroughly this manual of
Instruction so that you can use the unit to its best possibilities. Keep carefully this instruction
manual and refer to it any time when you will need it.
Do not let any liquid or foreign substance be inserted inside
the unit that could result in a short circuit with fire or
electrocution hazards.
In case of a faulty operation, do not attempt to repair the unit
yourself. Opening the unit have you exposed to electrocution
hazards. Please refer to a qualified person.
Do not use this unit near any heating source, especially hot air
vents, stove or any other appliance producing heat. Do not
Expose this unit to temperatures lower than 5℃or higher
than35℃
Do not use this unit near a humid area as a bath, sink,
swimming pool or a flowerpot.
Do not handle the supply cable if you have wet hands. Do not
use a damaged power cable.
Do not place your unit in front of a light projector or near a
heating source.
Do not cut, deteriorate, or place any heavy object on the
power cable that could result in a short circuit with fire or
electrocution hazards.
During the installation of the hard drive, please assure yourself
to unload the unit of any electrostatic charge.
Do not drop the unit or let it be subjected to impacts that could
seriously damage your unit or the hard drive.
Do not use any substance containing alcohol, gasoline,
detergent or any other flammable products to clean the
surface of the unit.
□Important Information

3
Unicorn Information System
Do’s
◈Visit mvixusa.com for additional product information & for troubleshooting.
◈When cleaning the Mvix product, disconnect the power and then wipe the unit with a
soft piece of dry cloth. Do not use any chemicals or sprays for cleaning.
◈Do read all safety information and follow all instructions in this user manual.
◈When connecting or disconnecting AV cables, disconnect the power first.
◈Protect the power cord from being walked on or pinched, particularly at plugs, or at the
point where they exit from the player.
◈Do not defeat the safety purpose of the polarized or grounding-type plug. A polarized
plug has two blades with one wider than the other. The wide blade is provided for your
safety. If the provided plug does not fit into your outlet, consult an electrician for
replacement of the obsolete outlet.
◈Unplug the player during lightning storms or when unused for long periods of time.
Don’ts
◈Do not mix batteries (old and new or carbon and alkaline, etc.) in the Mvix Remote
Control. Remove batteries when the unit is not used for a long time.
◈Do not touch the power plug with wet hands or use defective power cables & electric
outlets. Doing so might result in electric shock or fire. Only use attachments
accessories specified by the manufacturer.
◈Don’t drop the MVIX unit. This might cause irreversible damage to the unit and the
Hard Drive.
◈Don’t attempt disassembling or remodeling the unit.
◈Don’t block the vents. Free airflow should be maintained around the unit.
◈Don’t expose your MVIX unit to water, oil, dust or magnetic materials.
◈Don’t expose your MVIX unit to heat sources or high temperatures.
2Safety & Precautions
▣Do’s and Don’ts

4
Unicorn Information System
2Safety & Precautions
▣Limitations and Usage Precautions
Please read the following Limitations and Usage Precautions before using your
Mvix player.
◈While Mvix players support dozens of file formats and codec, they are not intended to
work with every codec-variation. Mvix players provide limited support to standardized
versions of codec as stated in the Technical Specifications of this manual.
◈Turn off your Mvix player when connecting or disconnecting USB devices. Failure to do
so may result in malfunction and/or loss of data on your USB device.
◈We strongly recommend backing-up your data or media files stored on the Mvix-HDD.
Power surge, HDD-failure, accidental deletions are common causes of data loss. Place
your Mvix player away from magnetic sources.
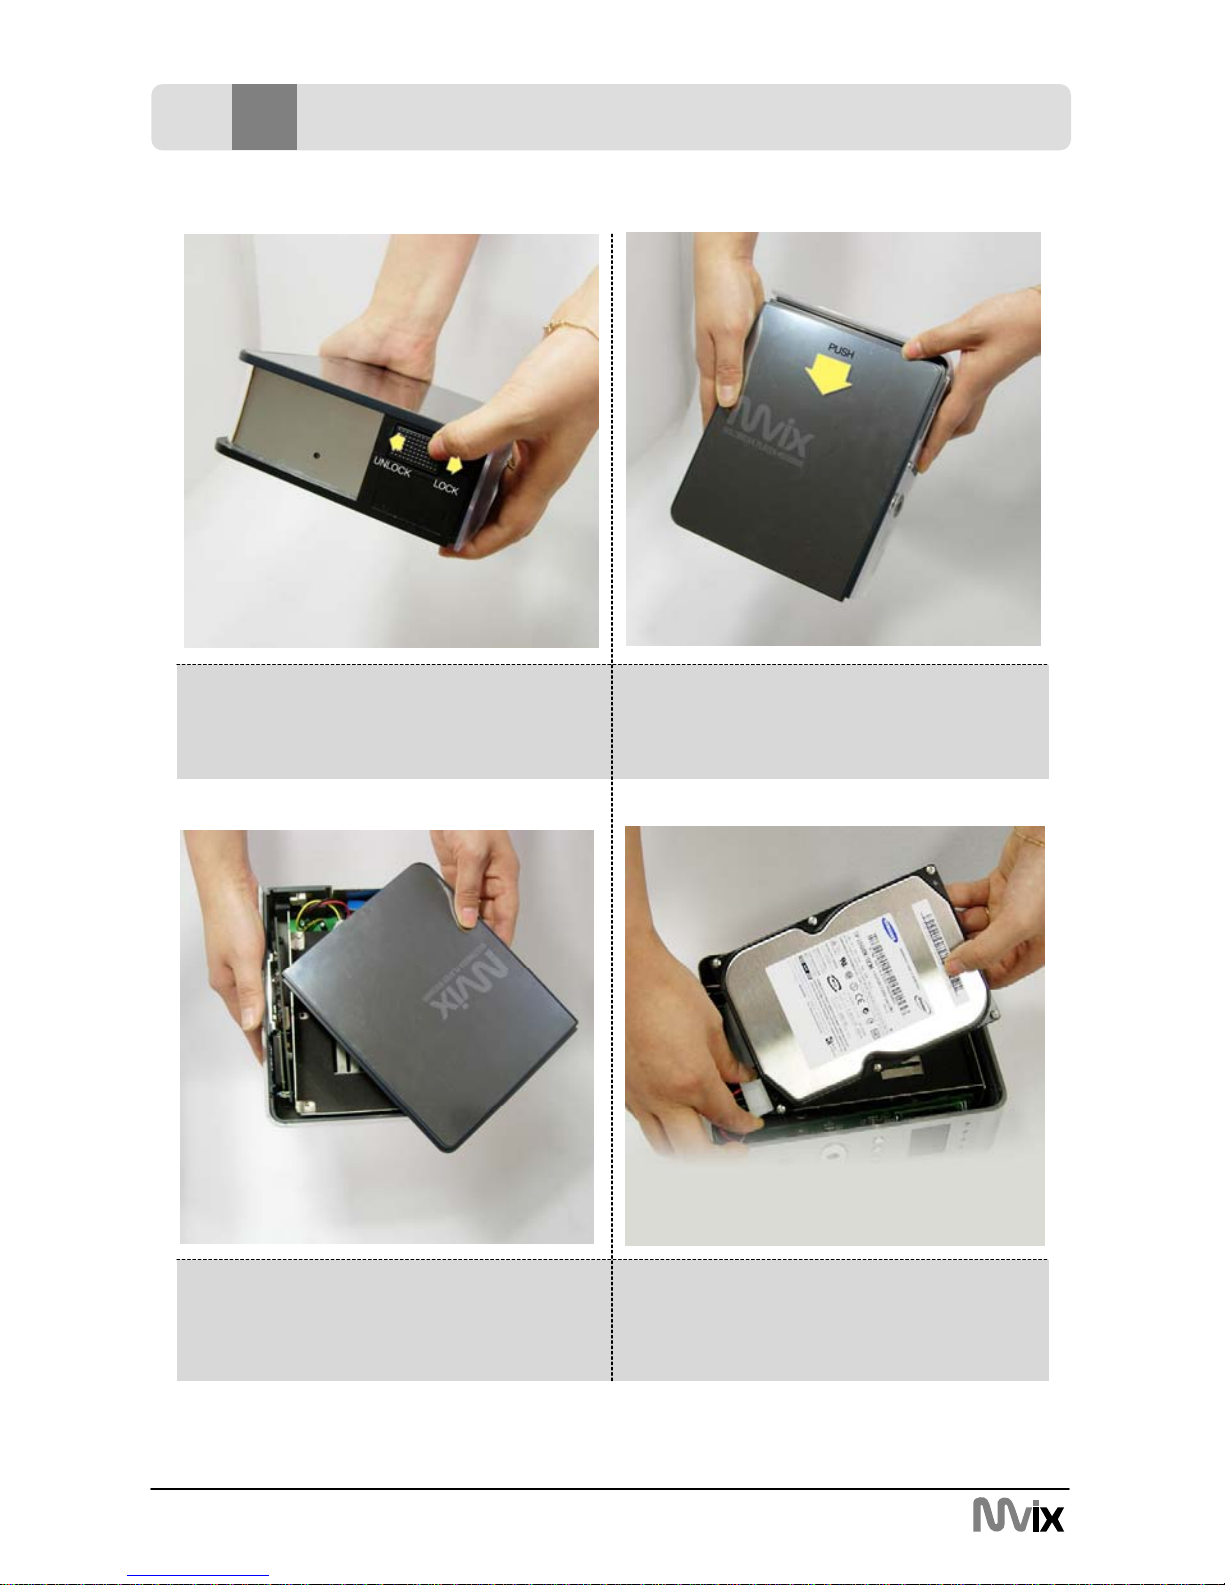
◈Mvix supports 3.5” Hard Disk Drives only. Kindly ensure that the jumper setting on your
Hard-disk Drive (HDD) is set to MASTER or SINGLE before installing it in the Mvix
Player. Some HDDs (depending on the manufacturer) may work with the SLAVE or
CABLE SELECT (CS) jumper combination. If your PC fails to recognize Mvix as an
external storage device, try changing the setting to SLAVE or CS. Do not forget to
format and partition your HDD after installing it in the Mvix player. “Primary Partition” is
recommended when creating two or more partitions within a single Hard Disk Drive.
◈When connected to the computer through the USB cable the Mvix player works like an
external USB storage device (During this operation, there is no video/audio playback).
To resume playback mode, disconnect the USB cable connected to your PC and turn
on the Mvix player.
◈The supplied cables and accessories are recommended for customized best
performance of the Mvix Media Player. Using any other (after-market) cables or
accessories may not provide best performance
◈In order to unplug your Mvix Media Player, press the STOP button before removing
cables or turning off the power.
◈Do NOT open the unit and service or modify the basic assembly. Do NOT modify the
firmware of the Mvix unit. Improper or unauthorized repair will VOID your warranty
coverage.

5
Unicorn Information System
3Features
Enjoy your Movie and Video Files on TV !
Supports a variety of digital video files like DivX® 3/4/5, Xvid,
MPEG1, MPEG2, MPEG4, DVD(IFO, VOB), VCD(DAT). Ideally
suited for backing up all your DVD movies on a hard-Disk for
easy access.
Digital Music Box
A perfect companion for the music junkies. Play variety of audio
files like MP3, OGG, WMA etc. Advanced in-built Jukebox
supports customized playlists and music shuffle/repeat functions.
Multilanguage Subtitles
Supports multi-language .SMI, .SRT, .SUB subtitle files
(for use with DivX®, XviD, AVI video and movie files)
Digital Photo Album
Now enjoy your vacation photos with the family. Store and
Playback all your digital photos. Enjoy customized Slideshows with
background Music.
Portable HDD Storage
Quite simply, an ideal mass-storage device for all your backup and
digital storage needs.
(Note: HDD-Hard Disk Drive NOT INCLUDED)
Easy Firmware Upgrading
A Simple and Efficient firmware upgrade process. (Download:
www.eunicorn.co.kr, www.mvix.co.kr or www.mvixusa.com).
Firmware Upgrades provide continuous support to new codecs
and formats.
Car Media Center (Optional)
Mvix can also be used in a car with its optional car pack.
The Car Pack bundle contains Car Power Adapter, Ext IR
Extender, Compact Remote Control and Audio Cable

6
Unicorn Information System
4Specifications
5.71 x 6.3 x 2.05 (inches) or 145 x 160 x 52 (mm)Dimensions
MVIX Media Player
AC Power Adapter
RCA 2-CH, AV Cables,
USB Cable (for PC),
Manual,
Driver CD
Retail Kit
Includes
Various languages 'smi, sub, srt' file
Supported
Languages
External 12V/2.5A DC adapter
Power
FAT32, NTFS
Partition Type
Windows 98SE, ME, 2000, XP or later
Operating
System
Full Featured IR-Remote control
Buttons : Power, Play, Stop, Cancel, Up, Down, Left, Right
LCD panel (128X64)
User Interface
IR-Ext
Audio : RCA L//R, Coaxial, Optical
Composite Video : RCA and S-Video
Component Video : RCA Y, Pr, Pb
USB 2.0
Input & Output
JPEGPhoto
AC3, MP2, MP3, DTS pass through, Ogg, WMA, MPGA,
MPA
Audio
MPEG1/2, Div3.11, Div4.0, Div5.0, Divx, Xvid, DVD
(IFO, VOB), VCD(DAT), M2V
Video
Supported File
Formats

7
Unicorn Information System
5Front and Rear Panel
LCD
STOP
SETUP
ON/OFF
IN BROWSER
Audio out
Front Panel
Rear Panel
Coaxial
S-Video
USB2.0
Slave
Power Fan
Ext.IR
Component out
Optical
Video out

8
Unicorn Information System
6Remote Control
17. Volume -/+
16. Play
15. Stop
14. Bookmark
13. Play Lists
12. ENTER to confirm the selection
11. Navigation – Arrow Keys
10. Menu for DVD
9. Show the info for file playing
8. Title for DVD
7. Goto
6. Function Key
5. Number Keys
24. Random
23. Restricted Key
22. MEDIA switch from
MIXED→VIDEO →AUDIO →PHOTO →
MIXED
21. Skip backward and forward
20. Rotation to rotate the picture
19. Fast Forward / Reverse
18. Pause
4. Mute
28. RETURN to the last folder
27. SUB-T select the subtitles
26. Zoom
25. AUDIO select the audio track
30. Page Up
29. A-B setup repeat segment
31. Repeat
32. Page Down
3. Change the VIDEO OUT mode
2. Setup
1.Power

9
Unicorn Information System
7Hard disk insertion
4. Connect the 4-pin power cable using
the white plug. Take note of the shape of
the power cable plug. The plug can only
be inserted in one direction.
3. Open the top-cover.
2. Once unlocked, slide the top-cover as
shown above.
1. Slide the lock toward the “UNLOCK”
direction

10
Unicorn Information System
7Hard disk insertion
8. Prepare and fasten the HDD to the
bracket with two screws (supplied).
7. Once inserted, the HDD should snugly
fit between the brackets as shown.
6. Carefully insert the HDD inside the
MviX case as shown above.
5. Connect flat IDE cable. Again examine
the socket of the IDE cable. The IDE
cables socket can only be inserted in one
direction.

11
Unicorn Information System
7Hard disk insertion
10. Slide and close the lock toward the
“LOCK” direction
9. Once secured, slide the top-cover as
shown above

12
Unicorn Information System
8Hard disk formatting and partition
Making partition and Formatting the HDDs under Windows 98SE/ME
Click “Start” and select “Run” and the “Run”
window will appear as shown below.
Type “fdisk” in the text box of the “Run”
window then click the “OK” button
1) Select “5. Chang current fixed disk drive”
and press [Enter].
2) Type the last Disk number in 0% usage.

13
Unicorn Information System
3) Select “1. Create DOS partition or Logical
DOS Drive” and press [Enter].
4) Select “ 1. Create Primary DOS Partition ”
and press [Enter]
5) Wait until finishing verifying the drive
integrity.
8Hard disk formatting and partition
Making partition and Formatting the HDDs under Windows 98SE/ME

14
Unicorn Information System
6) After finishing drive integrity verification,
type “Y” at “Do you wish to use the
maximum available size for a Primary DOS
Partition (Y/N)”
7) Type the capacity or % which you want to
use and press [Enter].
8) Drive integrity verification will start again.
After finishing that, press [ESC] key when
the “Primary DOS Partition created,
drive letters changed or added” message
displays.
9) Press [ESC] key again. “ Shut down
Windows before restarting” message will
be displayed. Press [ESC] key finally for
exiting FDISK.
10) Type “exit ”command at
“C:₩WINDOWS>”and press [Enter]
for returning to windows screen.
8Hard disk formatting and partition
Making partition and Formatting the HDDs under Windows 98SE/ME

15
Unicorn Information System
11) Unplug the MviX and plug again. New volume will be appeared at [My Computer].
Click mouse right button at the new volume and select [Format]
8Hard disk formatting and partition
Making partition and Formatting the HDDs under Windows 98SE/ME

16
Unicorn Information System
Making partition and formatting the HDDs under Windows 2000/XP
1. Right click on “My Computer”. Choose
“Manage” from the pop up menu and
“Computer Management” window will appear.
Under “Storage”, choose the
“Disk Management” folder.
2. The disk list will appear on the right side of
the “Computer Management” windows.
Right click the Mvix HDD (marked as
“Unallocated HDD”) from the list and from
the pop up menu choose “New Partition” to
make partitions on the chosen disk.
The drive is initially not visible in Windows
Explorer. For the drive to been seen in Windows
Explorer it needs to be configured via the disk
management Utility. Win-XP will normally
recognize the unformatted /unpartitioned
drive when you open disk management and
start the wizard.
3. The New Partition Wizard opens up.
Click Next.
8Hard disk formatting and partition

17
Unicorn Information System
Making partition and formatting the HDDs under Windows 2000/XP
4. Select the appropriate Partition Type.
Choose Primary partition.
Primary –Normal selection for less than 4
partitions. Extended – Used for 4 or more
partitions.
5. Select the Partition Size. If you want one
partition, simply click “Next”.
Set the size of the partition (The full drive
capacity is the default). If the full Partition
Size is not used, right click on the remaining
free space once the wizard has completed to
partition that space. Repeat the Partition
Wizard until the drive is how you want it.
Remember: For the FAT32 Formatting,
Partition Size is limited to 32GB
6. Select the Driver letter. This allows you to
select the drive letter for this partition. This
will be the identification label of your Mvix
HDD on your PC. We recommend that you
do not change anything on this screen and
simply press “Next”.
8Hard disk formatting and partition

18
Unicorn Information System
Making partition and formatting the HDDs under Windows 2000/XP
7. Select the Partition Format. NTFS is the
default format type in Windows XP, but
FAT32 is popular for users that dual boot
between XP and 9X. There is a limit that
Windows XP cannot create a partition larger
than 32 GB using FAT32.If you want the
FAT32, Partition Size is limited to 32GB.
8. When the formatting is completed, detailed
information will appear as shown. Click the
“FINISH” button to complete the work.
9. Once the drive has been initialized,
partitioned, and formatted it will display as
a healthy drive with the size and type of
partition below the volume name and drive
letter.
8Hard disk formatting and partition

19
Unicorn Information System
9Installation and Connection
Connection with ordinary
(Composite) TV output Connection to S-Video output
- Connect MviX and your TV using the
yellow video cable (cable supplied).
- Connect your MviX Multimedia player and
your TV to a power .
- Select appropriate video input mode on
your TV until you get the initial MviX screen.
- Connect MviX and your TV using the S-
Video cable (cable not supplied).
- Turn on the MviX and TV.
- Select appropriate video input mode on
your TV until you can get the initial MviX
screen.
- S-Video provides much better quality as
compared to a composite connection
Yellow Cable
Black, Round Cable
Video and Audio Connections
Your MviX multimedia player supports Composite, S-Video or Component connections.
Depending on the capabilities of your TV, you only need to make one video connection from
these options. To hear sound through your TV, use audio connectors (RCA 2-CH) to connect
the MviX multimedia player to the corresponding AUDIO-IN jacks on your TV or Hi-Fi Device.
Table of contents
Languages: