manuals.online logo
Brands
  1. Home
  2. •
  3. Brands
  4. •
  5. NYMAS
  6. •
  7. Bathroom Fixture
  8. •
  9. NYMAS 343005 User manual

NYMAS 343005 User manual

Installation and Operating Instructions
PI_343005_Rev 00
Polished chrome toilet roll holder
Polished chrome toilet roll holder 343005
Available colours:
POLISHED CHROME (CP)
Congratulations on the purchase of your product.
Warnings:
• Always read the installation, operating and maintenance
instructions.
• Due to manufacturing tolerances we do not recommend
pre-drilling fixing holes before physically receiving this
product.
• A thorough check must be carried out on receiving
delivery of this product and report any defects
immediately.
• Opening the packaging without due care and attention
could result in damage to the product or injury to
yourself or others.
• This product must be stored in a dry place, the right way
up and not stacked under other equipment on site.
• The wall/fixture on which the product is installed must
be flat and capable of taking the load.
• Installation must be carried out by a qualified tradesman
using suitable fixings for the wall substrate.
• Never alter the fixing holes as this could affect the
strength and integrity of the product.
• After installation a functional test must be carried out prior
to use.
• These instructions should be retained by the user of the
product for its whole life time.
• Do not use the product for any purpose other than that for
which it was designed.
• Do not use the product if damaged / not securely fixed as
this may cause injury.
• Keep plastic bag packaging away from children.
• The product should not be subjected to impact.
•To maintain the integrity and functionality of this product,
regular cleaning and inspection is necessary.
• If in doubt, carry out your own risk assessment per
installation.
Installation and Operating Instructions
PI_343005_Rev 00
Installation:
Installation should be carried out by a suitably qualified
tradesman using correct fixings (included). Consult a fixing
manufacturer if different fixings are required.
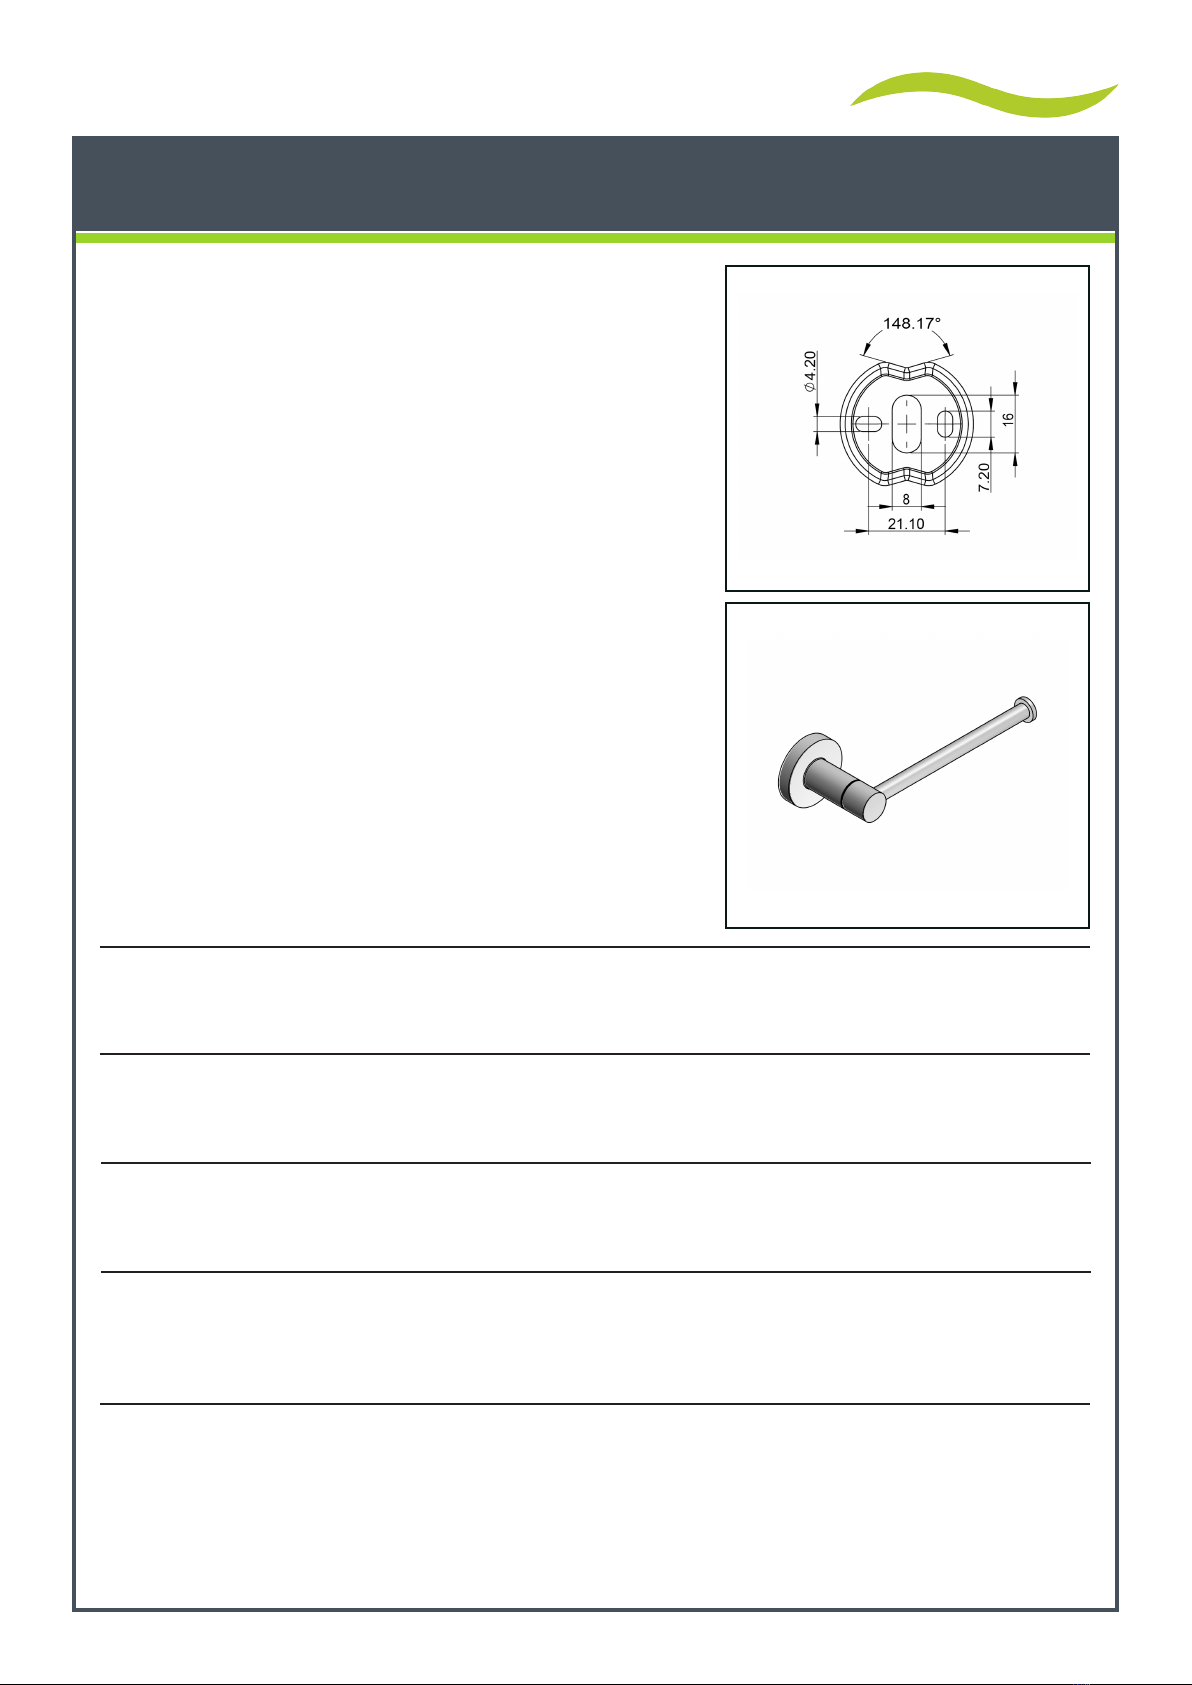
1. 2 x fixings should be employed (see diagram
opposite).
2. Offer the flange plate up to the wall at the position
required.
3. Mark the fixing hole locations.
4. Drill the holes in the wall of a diameter and depth
recommended by supplier of wall fixings and fix the
flange plate in position.
5. Position the hook over the flange plate (A) and fix
into position with the hex screw using the allen key
provided (B)
6. Always carry out a functional test after installation
and report any issues immediately.
7. Please leave these instructions with the user.
Using this product:
Always check this product is fitted securely to the wall and shows no signs of wear or damage prior to use. Please keep
these instructions in a safe place for future use. These instructions are available in braille if required.
Cleaning and maintenance:
This product must be checked regularly by qualified personnel to ensure that it is in perfect working order. This product
can be cleaned using only a very mild detergent. Do not use acidic, alkaline, chlorine based or abrasive cleaning
materials.
Disclaimer:
NYMAS pursues a policy of continuing improvement in design and performance of its products and so reserves the right to
change specifications without prior notice. The information contained on this document was correct at date of issue and
dimensions are provided as a guide only. Some variation may occur due to manufacturing tolerances.
We accept no liability whatsoever for personal injury or damage to property that is or has been caused due to incorrect
assembly, installation, or use of this product. Failure to install / use this product in line with these instructions will invalidate any
warranty and may affect product safety.
Packaging:
This product is supplied in plastic wrapping and cardboard carton to keep the product unsoiled until installation. Both are
suitable for recycling operations and should be disposed of in accordance with local recycling regulations.
Warranty:
The standard of manufacture and quality control allows NYMAS to offer warranties on all products. The W symbol denotes the
number of years covered if different to the standard 2year warranty. Where L appears this means the product is guaranteed for
life (terms and conditions apply).
(A)
(B)

This manual suits for next models

1

Other NYMAS Bathroom Fixture manuals

NYMAS 343009 User manual

NYMAS

NYMAS 343009 User manual

NYMAS 3116 Series User manual

NYMAS

NYMAS 3116 Series User manual

NYMAS 343007 User manual

NYMAS

NYMAS 343007 User manual

NYMAS 343013 User manual

NYMAS

NYMAS 343013 User manual

NYMAS B-105 User manual

NYMAS

NYMAS B-105 User manual

NYMAS 250501 User manual

NYMAS

NYMAS 250501 User manual

NYMAS 343012 User manual

NYMAS

NYMAS 343012 User manual

NYMAS PFGB 18 Series User manual

NYMAS

NYMAS PFGB 18 Series User manual

NYMAS G1235C User manual

NYMAS

NYMAS G1235C User manual

Popular Bathroom Fixture manuals by other brands

Vermeiren Izzie Series user manual

Vermeiren

Vermeiren Izzie Series user manual

Pfister Parisa LF-042-PR Quick installation guide

Pfister

Pfister Parisa LF-042-PR Quick installation guide

agape CARRARA ACER0730S Assembly instructions

agape

agape CARRARA ACER0730S Assembly instructions

Kohler K-701805T-FMSW installation instructions

Kohler

Kohler K-701805T-FMSW installation instructions

Gessi RETTANGOLO 23413 manual

Gessi

Gessi RETTANGOLO 23413 manual

Mustee DuraWall 732 installation instructions

Mustee

Mustee DuraWall 732 installation instructions

Grohe SOMERSET 19 320 manual

Grohe

Grohe SOMERSET 19 320 manual

SFA SANITOP Installation and maintenance instructions

SFA

SFA SANITOP Installation and maintenance instructions

Nadoli PN-RD3601 Installation instruction sheet

Nadoli

Nadoli PN-RD3601 Installation instruction sheet

KEUCO 52916 010000 Mounting instruction

KEUCO

KEUCO 52916 010000 Mounting instruction

noken 100266463 N186490042 installation instructions

noken

noken 100266463 N186490042 installation instructions

Korpinen Sense 21273101-00 installation guide

Korpinen

Korpinen Sense 21273101-00 installation guide

Samo Alya we311 Assembly instruction

Samo

Samo Alya we311 Assembly instruction

Kraus KCV-121 installation manual

Kraus

Kraus KCV-121 installation manual

Cosmo FLORENZ-T Installation and operating instructions

Cosmo

Cosmo FLORENZ-T Installation and operating instructions

newform X-TREND 2418X instructions

newform

newform X-TREND 2418X instructions

Mora INXX II Installation and maintenance  instruction

Mora

Mora INXX II Installation and maintenance instruction

Kohler K-6855 Homeowner's guide

Kohler

Kohler K-6855 Homeowner's guide

manuals.online logo
manuals.online logoBrands
  • About & Mission
  • Contact us
  • Privacy Policy
  • Terms and Conditions

Copyright 2025 Manuals.Online. All Rights Reserved.