~
<b
'\
I;
,-----
-:,·~
/ I I \
/
~
•
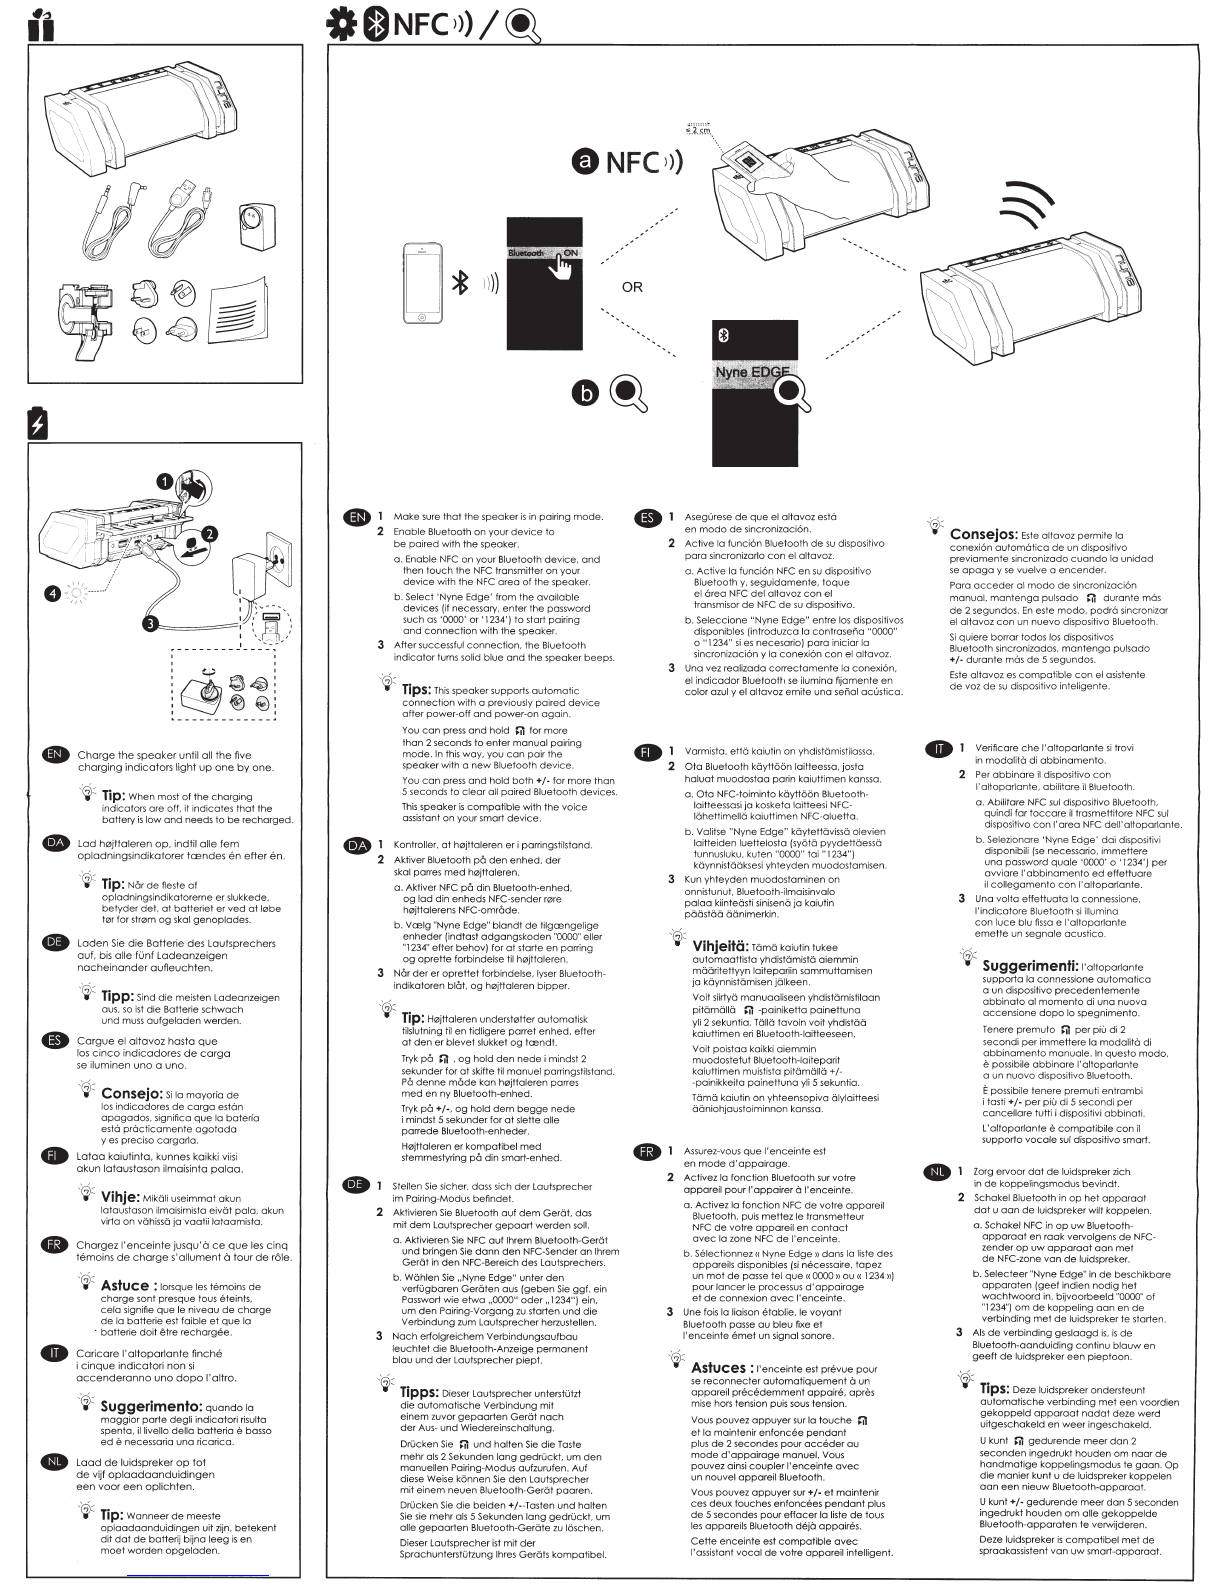
Press
and
hold
C) until
the
Bluetooth
indicator
flashes
blue.
~
For
first-time use, the Bluetooth
indicator
flashes blue quickly,
indicating
that
the speaker
is
in
pairing
mode.
'~::.
Tip:
When you
power
on
the
speaker
again
after
Bluetooth setup,
the
speaker
will search for
the
paired
device
and
the
Bluetooth
indicator
will flash slowly. If
no
paired
device
is
found, it will flash quickly
and
the
speaker will
enter
pairing
mode.
• Tryk
pa
e>
,
og
hold
den
nede,
indtil
Bluetooth-indikatoren
blinker
blat.
~
F0rste
gang
du
bruger
enheden,
blinker
Bluetooth-indikatoren hurtigt for
at
angive,
at
h0jttaleren er i parringstilstand.
'~::.
Tip:
Nor
du
tcender h0jttaleren igen
efter
at
have
konfigureret Bluetooth,
s0ger h0jttaleren
efter
den
parrede
enhed,
og
Bluetooth-indikatoren blinker
langsomt.
Hvis
der
ikke findes
en
parret
enhed, blinker indikatoren hurtigt,
og
h0jttaleren skifter
til
parringstilstand.
•
Holten
Sie C)
gedrOckt,
bis
die
Bluetooth-Anzeige
blau
blinkt.
~
Bei
erstmaliger
lnbetriebnahme
blinkt
die
Bluetooth-Anzeige schnell
blau.
Dies
zeigt an, dass sich
der
Lautsprecher
im Pairing-Modus befindet.
,'~//
7-... •
T1pp:
Wenn
Sie
den
Lautsprecher
nach
der
Bluetooth-Einrichtung
erneut
einschalten, sucht
der
Lautsprecher
nach
dem
gepaarten
Gerat
und
die
Bluetooth-
Anzeige blinkt Iangsam. Wenn kein
gepaartes
Gerat
gefunden
wird, blinkt
die
Anzeige schnell
und
der
Lautsprecher
wechselt
in
den
Pairing-Modus.
• Pulse
e>
y
no
lo
suelte
hasta
que
el
indicador
Bluetooth
parpadee
en
color
azul.
~
Si
es
Ia primera vez
que
utiliza Ia unidad, el
indicador
Bluetooth
parpadea
r6pidamente
en
color
azul
para
indicar
que
el
altavoz
se
encuentra
en
modo
de
sincronizaci6n.
'~::..
Consejo:
Cuando
vuelva a
encender
el altavoz despues
de
configurar Ia
funci6n Bluetooth, el altavoz buscar6 el
dispositive sincronizado y el
indicador
Bluetooth
parpadear6
lentamente.
Sino
se
encuentra
ningun dispositive sincronizado,
parpadear6
r6pidamente
y el altavoz
entrar6
en
modo
de
sincronizaci6n.
•
Pida
e>
-painiketta
painettuna,
kunnes
Bluetooth-ilmaisinvalo
vilkkuu sinisena.
~
Ensimmaisella kayttokerralla Bluetooth-
ilmaisinvalo vilkkuu sinisena nopeasti. Tama
ilmaisee kaiuttimen olevan yhdistamistilassa.
(;;S
.....
v·h·
-., I je:
Kun
kaiuttimeen kytketaan virta
Bluetooth-yhteyden muodostamisen
jalkeen, kaiutin pyrkii yhdistamaan
laitepariin.
Tasso
tapauksessa Bluetooth-
ilmaisinvalo vilkkuu hitaasti.
Jos
laiteparia ei
loydy, ilmaisinvalo vilkkuu nopeasti ilmaisten
kaiuttimen
olevan
yhdistamistilassa.
•
Appuyez
sur Ia
touche
C)
et
maintenez-
la
enfoncee
jusqu'
a
ce
que
le
voyant
Bluetooth
clignote
en
bleu.
~
Lors
de
Ia premiere utilisation, le
voyant
Bluetooth
clignote
en
bleu
en
accelere,
ce
qui
indique
que
I'
enceinte
est
en
mode
d'appairage.
'~::.
Astuce :
sL
apres Ia configuration
Bluetooth, vous rallumez !'enceinte, celle-ci
recherche
l'appareil
appaire
et
le
voyant
Bluetooth
se
met
a
clignoter
lentement.
Si
aucun
appareil
appaire
n'est
detecte,
le
voyant
se
met
a clignoter
rapidement
et
I'
enceinte
passe
en
mode
d'appairage.
•
Tenere
premuto
e>
finche
l'indicatore
Bluetooth
non
lampeggia
in blu.
~
AI
primo utilizzo,
l'indicatore
Bluetooth
lampeggia
in
blu
rapidamente,
indicando
che
l'altoparlante
si
trova
in
modalita
di
abbinamento.
'~::.
Suggerimento: alia successive
accensione
dell'altoparlante
dopo
Ia
configurazione Bluetooth,
I'
altoparlante
cerchera
il
dispositive
abbinato
e
l'indicatore
Bluetooth
lampeggera
lentamente.
Se
non viene rilevato
alcun
dispositive,
l'indicatore
lampeggera
rapidamente
e
l'altoparlante
entrera
in
modalita
di
abbinamento.
•
Houd
C)
ingedrukt
tot
de
Bluetooth-
aanduiding
blauw
knippert.
~
Bij
het
eerste gebruik knippert
de
Bluetooth-aanduiding
snel
blauw,
om
aan
te
geven
dat
de
luidspreker zich
in
de
koppelingsmodus bevindt.
(;;S,
T.
•
1p:
Wanneer
u
de
luidspreker
opnieuw
inschakelt
na
de
Bluetooth-configuratie,
zoekt
de
luidspreker
naar
het
gekoppelde
apparaat
en
knippert
de
Bluetooth-
aanduiding
langzaam.
Als
er
geen
gekoppeld
apparaat
wordt
gevonden,
knippert
de
Bluetooth-indicator snel
en
gaat
de
luidspreker
naar
de
koppelingsmodus.