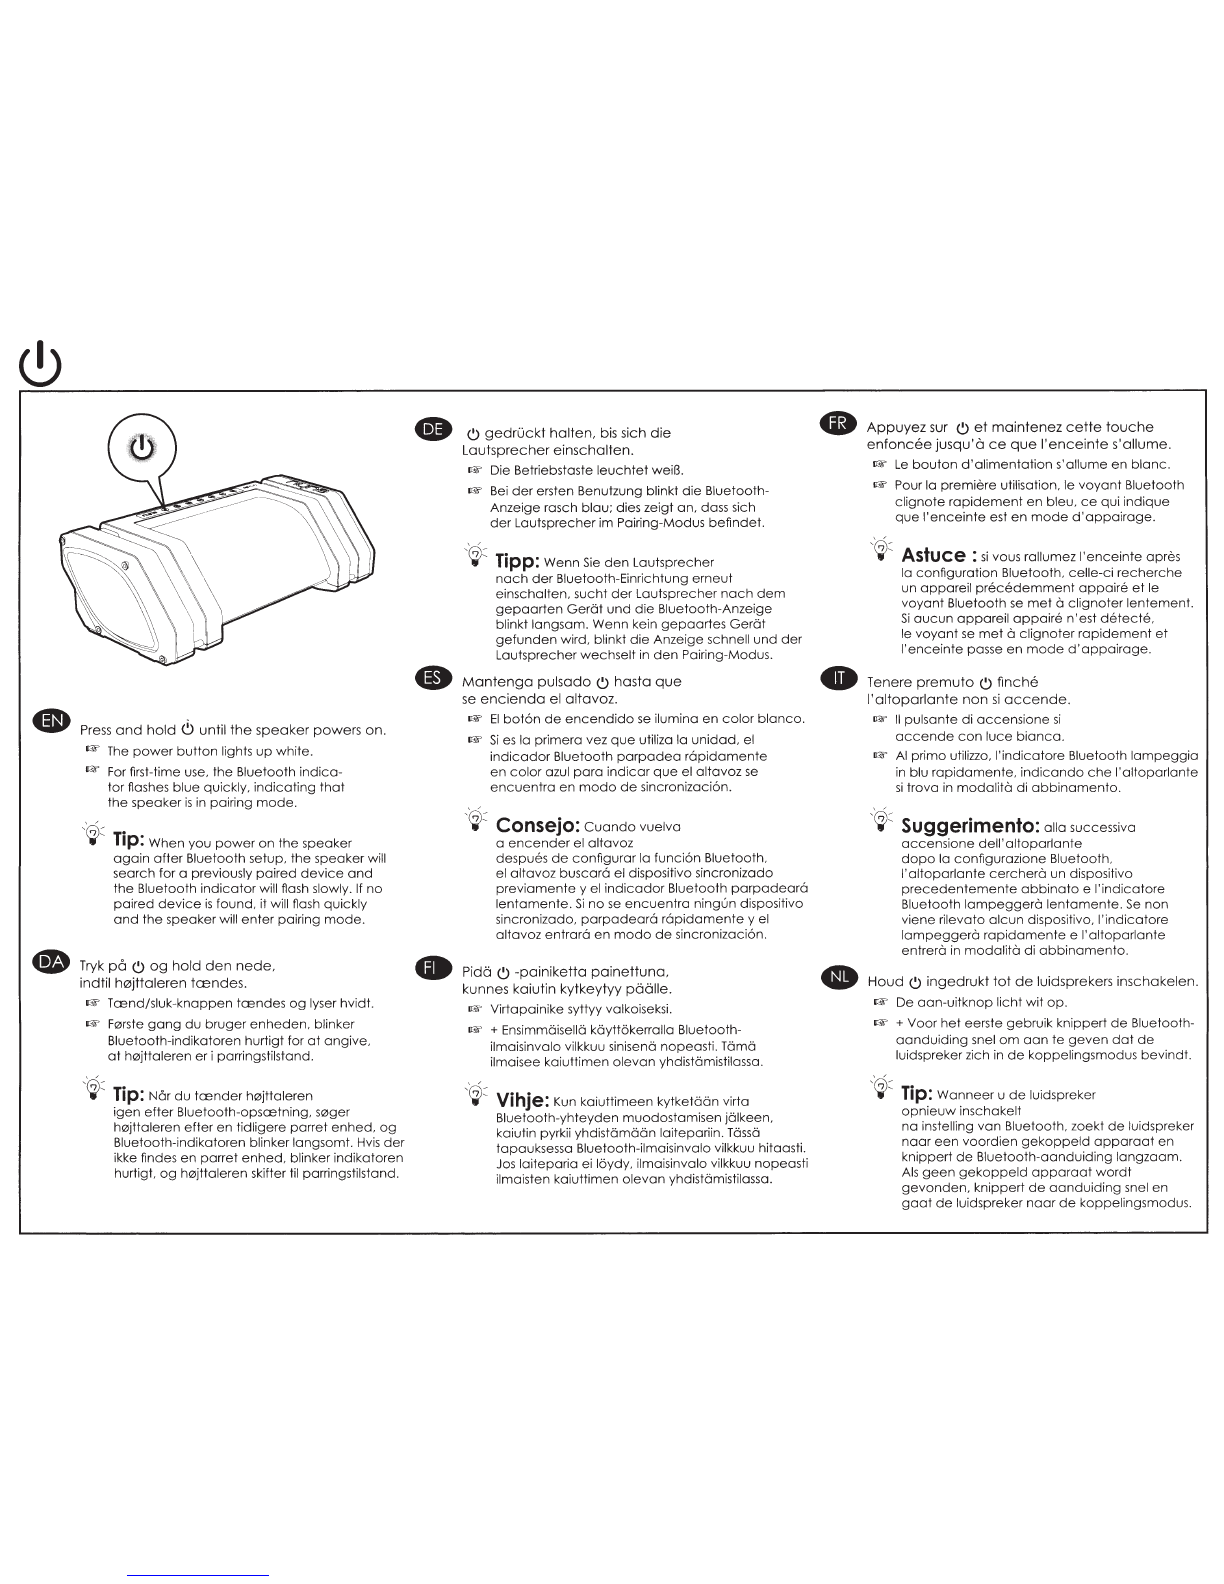
Nyne rock Instruction manual

Rock
@D
Portable
Bluetooth
Speaker
e
Mobiler
Bluetooth-Lautsprecher
• Bc:erbar
h0jttaler
med
Bluetooth
•
Altavoz
Bluetooth
port6til
•
Kannettava
Bluetooth-kaiutin
O
Enceinte
portable
Bluetooth
8 A1toparlante
portatile
Bluetooth
8 Draagbare 8/uetooth-luidspreker
•
Quick
User
Guide
•
• Kurzanleitung 0
• Hurtig
brugermanual
•
• Gufa
r6pida
del
usuario •
nyne.com
Napea
kayttoopas
Guide
d'utilisation
rapide
lstruzioni
d'uso,
semplificate
Snelle
gebruikershandleiding
(
E:
2200

ii
• Ch
arge
t~
e
spea
ker
un
til all five
ch
argm
g rndi
co
tors light up at
on
ce
indicat
in
g
th
e
batt
e
ry
isfully
ch
arged
.
-
~
Tip
:
You
can
press
LEVEL
to
chec
k t
he
battery
s
ta
tus.
When
most
of the
charging
indi
ca
t
ors
are
oiL
it
indic
ate
s
that
the
battery
is
low
and
needs
to
be
r
echarged.
CD
Oprou
lle:jttoleren.
ind
til
aile
fem
opladn
ingsindr
ko
t01er
er
t
ce
nd
t
sam
t
id
ig
sam
ang
i
ve
lse
at.
at
balt
erie t
er
lui
di
Of.ir
uU
c\.
'
~
Tip:
Du kan trykke
pel
LEVEL
for
at
konlrollere
botter
is
t
olus
.
NO
r
de
fleste
or
oplodn
ingsi
ndiko
t
oreme
er sl
ukkede.
betyder
det.
at
batte
riet
er
ved
at
l0bc
t0rt for
st
r
0m
og
skat
ge
noplodes.
• L
oden
s
ie
den
Loutspreche
r
auf
. bis al_le
fOnt
Lo
deanzeigen
auf
ein
mo
l l
eu
chten; dr
es
zeigt
an
. doss
die
Botterie
vall
aufge
l
oden
ist.
;
~
-
Tipp:Sie
kb
nnen
LEVEL
dr
Uc\cen,
um
den
Batteriel
adezu
st
and
zu p
rU
f
en
.
Sin
d
die
meisten l
ad
eonz
eigen
aus. so
is
! die B
otte
ri
e
sc
hwo
ch
und
mu
ss
aufg
el
oden
werden.
4B
~argu
e
e l olt
avoz
haste
que
l
as
c
in
co
1ndi
codores
de c
argo
se
~
uminen
uno
o u
no
para
i
ndi
c
ar
que
Ia
bole
ria
est6
tota!men
te c or
gada.
<:
~
:
Consejo:
P
uede
pulSar
LEVEL
para
comp
r
obo
r
el
estod
o
de
Ia
baterla.
Si
Ia
mayar
ia
de
los i
nd
ic
od
ores de c ar
go
est
6n
a
pagodas,
si
gni
f
1c
a
que
Ia
boterio
es
t6
pr6cticome
nt
e
ogolodo
yes precise
co
r
go
r1
o.
• La t
ao
ka
i
ul
int
o.
~unnes
kaikk:i
vi
isi
akun
la
lau
stason
ilma1sinto p o l
ovot.
-
~
:
Vihje:
V
ai
l
lark
istaa akun lotoustoson
po
inom
ol
lo
LE
VEL.
MikOii
use
i
mmot
okun
lot
ou
st
oso
n il
mo
isimislo eivOt
po
lo.
okun
virta on
vO
hi
ssO
ja
vaalii
lalaomi~
to
.
•
Chorgez
I'e n
ce
i
nte
j
usqu'O
ce
qu
e
les
cinq
t
emo
ins de
cha
r
ge
s
'oll
ume
nt
sim
ullanCment.
ce
qu
i i
nd
i
que
que
Ia
botterie
est
completeme
nt
c
harg
ee.
'
~
:
Astuce :
vouspo
uv
ez
o
pp
uy
er
sur
LEVEL
po
ur ve
ri
fier
l'e
t
ot
de
to
batt
e
ri
e.
Q
uand
Ia
plupor
l
des
temoins
de c
har
ge
sent
ete
ints.
ce
to signifie
que
Ia
ba
tt
erie
es
t
fo
ible et
do
it etre
rech
o
rgee
.
•
Cari
c
ar
e
l'
alto
pa
rl
onte
fin
che
i c
in
que
indica
tori n
on
c i a
cce
nderonno
c on
te
m pora ne
am
e nle
in
dicondo
c he
Ia
bott
eria
e
comp
le t
omen
te c
ori
ca
'
~
;
Suggerimento:
p
rem
er
e
LEVEL
perverific
are
lo
st
ate
della
ba
tt
eria
Qu
and
o Ia
maggior
p
ar
te
deg
li
indic
atori
ri
sul
ta
s
pe
nlo,
it livetlo
de
lla bo
ll
eria
e
basso
ed
e
nec e
ss
ar
ia
una
ri
ca
ri
co
.
•
load
de lui
dsp
rek
er
op
lot
de
vi
jf
oplaodaa
n
duid
1
ng
en t
ege
lijk
opl
ic
ht
en om a
on
te
geve
n
dot
de
ba
tt
e
ri
j
vo
tledig
ge
l
aden
is.
-
~
)::
Tip
:
U ku
nt
op
LEV
EL
drukk
en
om d e
batte
rij
stotus te
controt
eren.
Wonn
ee
r
de
m
eeste
o
ploo
doond
uidin
gen
u
it
gesc
h
ake
ld
zijn.
be
l
de
n!
dll
d
ot
deba
ll
crij
bi
j
na
l
eeg
isen
moe
!
wo
r
den
opge
ta
de
n.
E)
NFC
)>
)
D
I *l
l)
OR
-
• 1
Ma
ke su
re
t
hat
t
he
sp
eaker
is
in
pair
ing
mo
de
2 Enable Bluet
ooth
on
your
de
vi
ce
to
AsegUrese
de
que
el
ol
tavoz
est6
en
modo
de sin
cro
nizoci6n.
be
pa
ir
ed
with
th
e
spea
ker.
o . Enab
le
NF
C on
yo
ur Blu
etoo
th
device
.
and
t
he
n tou
ch
the
NF
C
tran
smi
tt
er
on
your
de
-
vi
ce
w
ith
th
e N
FC
area
at
t
he
speaker
.
b.
Select 'NYNE
Rock
"
from
t
he
av
ailab
le
de
v
ices
[if
neces
sary.
ente
r t
he
password
such as '0000'
or
'1234')
to
st
art
pa
ir-
i
ng
and
conne
cti
on
wi
th
t
he
sp
eaker.
After
successful
connect
i
on.
the
Bl
ue
t
oo
th
i
ndi
ca-
t
or
turns solid blue
an
d
the
speaker
beeps
.
-~
Tips:
This
speaker
su
ppor
ts
au
t
omatic
con
nec
ti
on
with
o
pr
eviously
paired
d
ev
i
ce
af
ter
powe
r-o
ff
and
powe
r-
on
aga
in.
You
con
press
and
hold
0
for
more
tha
n 2
sec
-
onds
lo
en
t
er
manual
pair
ing m
ode
.ln
this w
ay.
you
con
pa
ir
the
speaker
with
o
ne
w Bt
ue
to
oth
device.
You
con
press
and
ho
ld
0
for
more
t
han
10
seco
nds
to
cl
ear
oil
pa
ir
ed
Bluetoo
th
device
s.
Th
is
spea
k
er
is
co
mpat
ibl
e
with
t
he
vo
i
ce
ass
ista
nt
on
your
smart
dev
ic
e.
Acti
ve
Ia
func
i
6n
Bluet
oo
th
de
su
dispositive
para
si
nc
ronizo
rl
o
co
n el
oltovoz
.
o.
Ac
ti
ve
Ia f
unci6n
NF
C
en
su dispositi
ve
Bl
uetoo
th y. se
gu
i
do
me
nte
.
toque
el
6reo
NFC
de
l
altovoz
con
el
tr
onsm
isor
de
NFC
de
su
dispositi
ve
.
b. Se
le
cc
i
on
e "NYNE Roc
k"
entre
los dispositivos
dispo
nib
les
(i
ntroduzco
Ia
controser'ia "0000"
o
'"
1234"
si
es
ne
cesarioJ
para
inici
ar
Ia
si
ncr
oni
zoc
i
6n
y Ia
co
n
ex
i
6n
co
n
el
a
llovoz.
Uno
vez
rea
li
zed
a
correcl
ame
nle Ia
conexi6n
.
el
in
di
cador
Blu
etooth
se ilu
mino
fljamente
en
co
l
or
azul y el
altavoz
em
il
e
una
ser'i
al
act.Js
tico
• 1
Varm
ista,
et
ta
ko
iutin on y
hdi
s!Omislilosso.
2 Oto Bt
ue
t
oo
th
k6y
ll
66n
loit
teesso
yhdist66k
ses
i sen
koiu
ll
imeen.
a.
Ota
NFC-to
iminto
k6ytt66n
Bluetooth
-
lai
tl
e
ess
asi jo kosketo tai
ttee
si
NFC-
I
Ohett
i
me
iiO
ka
iu
tt
im
en
N
FC
-al
uetta
.
4D
1
Kontro
ll
er
.
at
h!2l
j
llol
e
re
n
er
i porringstilsto
nd
.
2
Akt
iver Blu
etooth
pO
de
n
enhed
,
de
r
b.
Vo
litse "NYNE Rock"
k6ytett6vi
ss
0 ol
ev
ien
l
ai
tt
eiden l
uct
telosta (sy6t6
pyy
dell6essa
lunnu
sl
uku
. kuten
"
{)()(X)"
toi " 1234"')
k6yn
nist6Ciksesi
yht
eyden
mu
odost
omise
n.
sk
al parres m
ed
h"'jtt
al
eren
a.
Ak
liv
er
NFC pO
din
Bl
uetooth-e
n
he
d.
og
l
ad
di
n
en
hedsNFC-sender
n21re
h0j
ttoleren
s
NFC
-
omr6de.
b.
Vce
lg
"NYNE
Rock"
blond!
de
til
gce
n
gel
ig
e
enheder
[i
nd
tost
odgongskoden
''OOCO'"
elter
'"1234"
efle
r
behovJ
fo
r o l s
tor
tc
en
porring
og
opre1te
fo
rbi
nde
tse til
h0j
ll
a
le
ren.
N6r
der
er
oprettet
forb
i
nde
ls
e,
lyser Bl
ue
tooth
-
in
diko
toren bl
Ot,
og
hojtta
ler
cn
bipper
,
~
::.
Ti
p:
H0jll
aler
en
u
nd
ersto
ll
er
oul
omot
i
sk
til
slu
t
ning
til
en
tid
li
gc
re
parr
el
en
hed.
af
ter
at
den
er
bl
eve
l
slu
k
ket
og
t
cend
l.
Tryk
p6
G>
.
og
ho
ld d
en
ne
de i minds! 2
sekunder
for
at
skifte til
manuel
porringstil-
ston
d.
P6
denne
m6de
kon
h
ojttoteren
porres
med
en
ny
Bluetoo
lh
-e
nh
ed
. Ou Icon trykke
p6
G)
imindst
10sekunde
rf
or
ot
st
el
te
a
il
e
parrede
Bl
uetooth
-
enhede
r
Hojtto leren er
kompot
i
be
l
med
ste
mm
es
ty
ring pO din
smo
rt-en
he
d
K
un
yhtey
d
en
mu
odostom
i
nen
on onnis
lu
nut
.
Bluet
oo
th
-il
mo
isinvolo
pa
l
oa
kii
nt
eOsti
sinisend jo kaiutin
pd6std6
66n
i
merk
in.
-
~
:::
Yihjei
t6:
16m6
k
oiut
in l
ukee
ou
t
omoottista
yhd
istOmista oi
emm
in
m66ri
t
ettyyn
taiteporiin
som
muttomisen
ja
k6ynn
i
st6m
isen jO!keen.
Va
il siirty6
manuaa
l
is
ee
n
yh
dist6misli
laa
n
pitOmO
II
d
G>
-
pa
inike
tt
o
painc
tt
una yli 2
sek
un
tia. Tdlld ta voin va
il
yhdi
siOd
ko
iu
tl
im
en
e
ri
Bl
uet
ooth
-l
ai
tt
eeseen
.
Va
il
po
i
stoo
ka
ikki
ai
emmin
muodostet
ut
Blu
et
ooth
-
la
ite
par
il
i:.o
i
ull
i
men
muistis
ta
pit
dm6
11
6
0
-
po
ini
kett
o
pa
i
ne
!t
una
v6hint66n
10 sekunnin
oj
an
.
T6m6
ka
iutin
on
yh
te
ensopivo
Otylait-
lee
si
66n
io
hjovsto
imi
nnon
konsso
Ass
urez-vous
que
!'e
nc
einte est
en
mo
de
d'
oppo
iroge
.
Ac ti
vez
to
fonc
tion Blu
etoo
th
sur
vo
tre
op
p
ar
eil
pour
• 1 Slell
en
Sie
si
che
r, doss sich
dc
r l
au
t
sp
re
ch
er
i
mPair
i
ng-Modu
s
befind
el.
l'
appo
ir
er
a !
'enc
ei
nt
e.
o. Ac tivezIa f
onct
i
on
NFC
de
vo
tre
app
are
il
Bluet
ooth
, puis
met
t
ez
le tr
onsmetteur
NFC
de
vo
tre
opporeil
en
con
ta ct
a
I
Aktiv
i
eren
Sie
Bluetoo
th
an
thr
em
Ger6t.
um
es
mil
dem
l
out
s
pr
ec
her
zu
poo
ren.
o. Aktivieren
Sie
NFC
au
f lhrem
Bluetooth
-GerOt
und
br
ingen
Sie
do
nn
den
NF
C-Sender
on
l
hre
m
Ge
rOI in
den
NFC-Bereich
des
Laul
sprec
her
s.
b.
W6
t11
en Sie
.,
NY
NE
Rock"
un
l
er
den
vertUgbo
ren
GerOten
ous
(gebe
n
Si
e
ggt
. ein
Po
ss
wort
wie et
wo
..
OCXXT'
oder
..
1234"
ein
).
um
den
Pair
ing
-
Vorgong
zu s
lo
rlen
und
die
V
erbin
dung
z
um
L
aut
sprec
h
er
herzus
te
ll
en
.
Noch
erfol
gre
ich
em
Ye
rb
ind
ung
souf
bo
u
l
eu
ch
tet
di
e Bluet
oo
th-
Anzeige
perm
an
ent
bt
ou
und
de
r
lo
utsp
re
c
her
piept
.
avec
Ia zo
ne
NF
C
de
I'
enc
e
in
te
b.
S€1ectionnez
11
NY
NE
Rockll
dans
Ia li
sle
des
appareils
di
spo
nible
s
(s
i necessairc .
lopez
un
mo
t
de
passe t
el
que
u(;()()()
))
ou
({ 1234
n)
po
ur l
ancer
le processusd '
op
poi
rog
e
et
de
conne
x
ion
avec
I'en
ce
i
nte.
U
ne
lo
isto liaison et
ab
lie. le
voyant
Bl
ue
l
oa
th
passe
au
bl
ev
fixe
et
I'
en
cei
nte
eme
t
un
si
gnal
sonare.
-
~
~
TippsDieser
Laut
spr
ec
h
er
un
ters!Utzt
die
ou
t
omo
tische
Yerb
in
dun
g mit ei
nem
zu
vor
gepoar
ten Ger6t
-
~
Astuce
s:
!'e
nc
einte
est
prevu
e pour se
re
co
n
necte
r
outo
mo
tiquement 0 un
op
par
eil
prece
de
mm
ent
ap
poire
.
op
n
3s
mise hers
te
nsi
on
pu
issoustension.
vous
pouve
z
oppuy
er sur
Ia
tou
cha
0
no
ch
der
Au
s-
u
nCI
Wle
dere
insch
oltung
.
DrU
cken Sie
0
und
holten Sie d
ie
T
os
te
mehr
ats
2 Sekunden l
ong
ged
r
Uckl
.
um
den
mo
n
ue
ll
en
Pairi
ng
-
Modus
oufzuruf
en
.
Au
f di
ese
Weise
kbn
-
n
en
Sie
den
Lou
tspreche
r
mil
ei
nem
ne
uen
81uetooth-Ger61
poo
ren. Sie
kb
n
ne
n
0
lO
ng
er
ols 10
Sckunden
gedrUcld
halt
en
.
um
aile
gepoort
en
Bluetooth
-G
erOte
zu
IOsc
h
en
.
Oieser L
ou
tsprec
her
ist mit d
er
Spro
ch
unt
-
erstUtzung lhres GerOis
kom
poti
bcl
I'
I
USB
el ra
mo
t
nten
ir e
nf
oncee
pendant
plus
de
2
secondes
po
ur
occede
r
au
mo
de
d '
oppo
iroge
manue
l. Vous
pouvez
oinsi
coupler
!
'enc
einte
avec
un
n
ou
vel
appa
reil
Bl
uelo
oth.
Vous
po
uv
ez
oppuye
r su
0
et
mo
intenir
ce
tt
e tou
che
e
nfon
cee
pendan
t
plus
de
t0
seco
nde
s
po
ur
effa
ce
r Ia lisle
de
ta
us lesappareils Bluet
ooth
dejO
op
pa
i
rEis
.
Celie
en
ce
i
nt
e est
co
mpati
bl
e
avec
I'
as
sistant
voc
al de vo
lre
oppare
il
inl
ellirJent.
• C
ha
r
ge
your
m
ob
i
le
de
vi
ce
th
r
oug
h
the
SV 1A
USB
ch
arg
i
ng
soc
ke
t.
8
Opl
od
di
n m ob
ile
e
nh
ed via 5 v
1 A
US
B-op
!adn
i
ngss
li
kke
t.
8
Loden
S
ie
l
hr
mobi
l
es
G er
dt
Ub
er
de
n
USB
-l
odeonschluss
(5
v.
1
AJ
a
uf.
4B
C
or
g
ue
su di
spo
si
tive m6vil a
tr
ov
es
d e
Ia
t
om
o
de
c arg o USB
de
5
V/1
A.
:
~
:.:
Consejos: Este
ol
t
ovoz
permi
ie lo
co
rlcx
-
i6n
au
t
om6tica
de
un d is
pos
iti
ve
p
re
-
viamente
sin
cronizodo
cuondo
Ia
unid
ad
se
opogo
y
se
vuelve
o
enccndcr
.
Para
occeder
at
modo
de
si
nc
roni7oci6n
manua
l.
mo
nte
ngo
putsodo
0
du
ran
te
m6
s
de
2
segundos
.
En
este
modo
.
podr6
sincronizor
el
altovoz
con
un
nuevo
disposi-
tive Blue
tooth.
Puede
montene
r
pu
l
sodo
0
durante
m6s
de
1a
segu
n
dos
pa
ra
borrar
todos
los
dispm
itivos
Bluetooth
sin
cron
izados.
Este
allavoz
es
compa
tib
le
con
el
asislente
de
voz
de
su dispositive i
nte
li
ge
nte
Verifrcore
che
l
'o
ltopor1ante
si
tr
ov
i
in
modolit
Odi
obb
inom
cn
to
.
Per
obbin
ore
il disposit
ive
con
l'a
lt
opor
l
onte
,
ob
ilito
re
il
Bluetoo
t
h.
a.
Ab
ili
lore
NFC
su
i dispositi
ve
Bl
uc
t
oo
th
.
quin
di
far
tocc
ore il
trosmettito
re NFC
su
i
disp
os
it
i
ve
con
l
'crea
NFC
dell'altop
orlonle
.
b.
Sele
zionare
'NYNERock' doi dispasilivi
disponibili (se n
ecessa
ri
a. i
mmetle
re
uno
pa
ssword
quo
le
"QCXX)
'
o
"1
234")
pe
r
ov
vi
are
l'
abbin
omen
to
ed
effettuar
e
il
coll
eg
o
men
to
con
l'
ol
top
ar
l
an:e
Una
volta
effellua
ta Ia connessione,
l'
ind
icotorc
Btuel
oolh
si ill
um
i
ne
con
l
uce
btu
fisso
e r
ollopor
l
ante
eme
t
te
un
segna
le
ocus
tico
-
:
~
Su
ggerim
en
li: l
'ollopa
r
lan
te
suppor
ta
Ia
connessione
a
ut
oma
tic
o a ur1d
is
positi
ve
preced
ente
m
ente
ob
binato al
mom
en
ta
di
una
nu
ova
a
cce
nsi
one
do
pa
Ia sp
eg'l
im
ento.
T
enere
pr
e
mu
to
0
pe
r piUdi 2 s
ec
ond
i
per
i
mme
tl
ere
Ia m
oda
litO
di
abb
i
name
nlo
ma
n
uo
le. In
questa
modo
.
e
possibilc
abb
in·
ore
l'
oltoporlo
nt
e o
un
nuevo
dispositi
ve
Bl
ue-
tooth
. Tenere p
remuto
0
per
pi
U
di
10sec
ond
i p er
cance
llare
tu
tti i
disp
os
itiv
i
obbinoli
.
L'
ollopor
lon
te
e
compat
i
bile
co
n il
supporto
voco!e
sui disposit
ive
s
mart
.
Zarg
erv
oor
dol
de
lu
idsp
rc k
cr
zich
in
de
ko
p
pe
l
in
gsm
od
us
bev
i
nd
t
Schake
l Bt
ue
l
oo
th
in
op
het
appa
r
aa
t
dot
u aon
de
luidspreker
wi
lt
kop
pe
l
en
.
a.
Scho
i:el NFC in
op
uw Bl
ue
l
ooth
-
opparaa
t
en
roo
k
ve
rvo
lgens
de
NFC-
zende
r
op
uw
ap
poroat
o
on
met
de NFC-1
one
v
an
de
luidspr
eke
r.
b. Se
le
cteer
"
NYNE
Rock" in
de
beschikb
o
re
apparo
te
n (
geef
i
nd
i
en
nod
ig h
et
woc
ht
woord
in.
bi
jv
oo
rbe
eld
'"
0000"
of
"1234") om
de
l::op
pel
ing
aa
n
en
de
ve
r
bin
ding
m
et
de luidspreker te st
arten
.
3
Als
de
verbin
di
ng
ges
!
aogd
i
s.
is
de
Blu
etooth
-aa
ndu
idi
ng
permanen
t
btauw
en g
eefl
de
luidspreker
piepto
nen.
'
~
Tip
s:
De
ze
luidspr
eker
on
de
rst
eu
nt
aut
omo
tische v
erbi
nding
me
t
een
voordi
en
gei:.opp
eld op
po
raa
t nodal d
eze
werd
uit
gesc
h
oke
td
en
wee
r in
gesc
hok
eld
.
U
kunt
0
ge
durende
meer
dan
2
sec
-
onden
ingedru\clhoud
en
om
noar
de
hondmo
tige
koppel
in
gsmo
du
s
te
gaan
.
Op
die
mon
ier ku
nl
u de luids
preke
r
koppe
len
oan
ee
n ni
euw
Bluet
oo
th-opporaa
t.
U
kunl
0
ge
du
re
nd
e meer
da
n 10 se
co
nden
ingedru
kt h
ouden
om
aile
ge
ko
ppe
l
de
Bl
ue
to
o
th
-
app
aro
ten
te
ve
rwijde
re
n.
Deze
l
ui
ds
preker
is
co
m
poti
be
l
me
t
de
spr
aaka
ss
isl
ent
va
n
uw
sm
or
t-
opparaa
l.
. - · I
• l o
too
mobiilif
oi
t
tees
i SV 1A U
SB
-
Ii
i
ttimen
k
au
tt
o. '
•
Charge
z
votr
e di
spos
itif
port
ab
le 0
par
-
tir
de
Ia
prise
d e c ha
rge
US
B 5 V
/ 1 A .
• C
ar
i
core
il d
ispo
siti
ve
mob
il
e
otlro
-
verso
Ia
spina
di
ca
ric a
USB
SV 1
A.
8
Load
uw
mo
bi
el o
ppor
oo
t
op
via
de
SV 1A
USB
-
opl
a
odaans
lu
it
i
ng
.

(!.>
•
Press
and
hold
6
until
the
speaker
powers
on.
~
The
power
button
lights
up
white.
~
For
first-time use,
the
Bluetooth
indica-
tor
flashes
blue
quickly,
indicating
that
the
speaker
is
in pairing
mode.
~'
y·
'W
1p:
When
you
power
on
the
speaker
again
after
Blue
tooth
setup,
the
speaker
will
search for a previously
paired
device
and
the
Bluetooth
indicator
will flash slowly.
If
no
paired
device
is
found,
it will flash
quickly
and
the
speaker
will
enter
pairing
mode.
48
Tryk
pa
C)
og
hold
den
nede,
indtil
h0jttaleren
tcendes.
~
Tc:end/sluk-knappen tc:endes
og
lyser hvidt.
~
Fmste
gang
du
bruger
enheden,
blinker
Bluetooth-indikatoren hurtigt for
at
angive,
at
h0jttaleren
er i parringstilstand.
~'
y·
'W
1p:
Nor
du
tc:ender
h0jttaleren
igen
efter
Bluetooth-opsc:etning, s0ger
h0jttaleren
efter
en
tidligere
parret
enhed,
og
Bluetooth-indikatoren blinker langsomt.
Hvis
der
ikke findes
en
parret
enhed,
blinker
indikatoren
hurtigt,
og
h0jttaleren
skitter til parringstilstand.
• C)
gedruckt
halten,
bis
sich
die
Lautsprecher
einschalten.
~
Die Betriebstaste
leuchtet
weiB.
~
Bei
der
ersten Benutzung blinkt
die
Bluetooth-
Anzeige rasch blau; dies zeigt
an,
doss sich
der
Lautsprecher
imPairing-Modus
befindet.
~'
y·
'W
1pp:
Wenn
Sie
den
Lautsprecher
nach
der
Bluetooth-Einrichtung
erneut
einschalten, sucht
der
Lautsprecher
nach
dem
gepaarten
Gerat
und
die
Bluetooth-Anzeige
blinkt Iangsam. Wenn kein
gepaartes
Gerat
gefunden
wird, blinkt
die
Anzeige schnell
und
der
Lautsprecher
wechselt
in
den
Pairing-Modus.
8
Mantenga
pulsado
C)
hasta
que
se
encienda
el
altavoz.
~
El
bot6n
de
encendido
se
ilumina
en
color
blanco.
~&
Si
es
Ia primera vez
que
utiliza Ia
unidad,
el
indicador
Bluetooth
parpadea
r6pidamente
en
color
azul
para
indicar
que
el
altavoz
se
encuentra
en
modo
de
sincronizaci6n.
-~:::
Consejo:
Cuando
vuelva
a
encender
el
altavoz
despues
de
configurar
Ia
funci6n
Bluetooth,
el
altavoz
buscar6
el dispositive sincronizado
previamente
y el
indicador
Bluetooth
parpadear6
lentamente.
Sino
se
encuentra
ningun
dispositive
sincronizado,
parpadear6
r6pidamente
y el
altavoz
entrar6
en
modo
de
sincronizaci6n.
•
Pida
C)
-painiketta
painettuna,
kunnes
kaiutin
kytkeytyy
paalle.
~
Virtapainike syttyy valkoiseksi.
~
+ Ensimmaisella kayttokerralla Bluetooth-
ilmaisinvalo vilkkuu sinisena
nopeasti.
Tama
ilmaisee
kaiuttimen
olevan
yhdistamistilassa.
~,
v·h·
'W
I je: Kun
kaiuttimeen
kytketaan
virta
Bluetooth-yhteyden
muodostamisen
jalkeen,
kaiutin pyrkii
yhdistamaan
laitepariin.
Tasso
tapauksessa Bluetooth-ilmaisinvalo vilkkuu hitaasti.
Jos
laiteparia
ei loydy, ilmaisinvalo vilkkuu
nopeasti
ilmaisten
kaiuttimen
olevan
yhdistamistilassa.
G
Appuyez
sur C)
et
maintenez
cette
touche
enfoncee
jusqu'a
ce
que
I'
enceinte
s'allume.
~
Le
bouton
d'alimentation
s'allume
en
blanc.
~
Pour Ia
premiere
utilisation, le
voyant
Bluetooth
clignote
rapidement
en
bleu,
ce
qui
indique
que
I'
enceinte
est
en
mode
d'appairage.
'~:::
Astuce :
si
vous rallumez
!'enceinte
apres
Ia
configuration
Bluetooth,
celle-ci
recherche
un
appareil
precedemment
appaire
et
le
voyant
Bluetooth
se
met
a
clignoter
lentement.
Si
aucun
appareil
appaire
n'est
detecte,
le
voyant
se
met
a
clignoter
rapidement
et
!'enceinte
passe
en
mode
d'appairage.
•
Tenere
premuto
C)
finche
l'altoparlante
non
si
accende
.
~
II
pulsante
di
accensione
si
accende
con
luce
bianco.
~
AI
prima
utilizzo,
l'indicatore
Bluetooth
lampeggia
in
blu
rapidamente,
indicando
che
l'altoparlante
si
trova
in
modalita
di
abbinamento.
'~:::
Suggerimento: alia successive
accensione
dell'altoparlante
dopo
Ia
configurazione
Bluetooth,
l'altoparlante
cerchera
un dispositive
precedentemente
abbinato
e
l'indicatore
Bluetooth
lampeggera
lentamente.
Se
non
viene
rilevato
alcun
dispositive,
l'indicatore
lampeggera
rapidamente
e
l'altoparlante
entrera
in
modalita
di
abbinamento.
•
Houd
C)
ingedrukt
tot
de
luidsprekers
inschakelen.
~&
De
aan-uitknop
Iicht
wit
op.
~
+
Voor
het
eerste
gebruik
knippert
de
Bluetooth-
aanduiding
snel
om
aan
te
geven
dot
de
luidspreker zich in
de
koppelingsmodus
bevindt.
,'~/
~
<"}'
•
T1p:
Wanneer
u
de
luidspreker
opnieuw
inschakelt
no
instelling
van
Bluetooth, zoekt
de
luidspreker
naar
een
voordien
gekoppeld
apparaat
en
knippert
de
Bluetooth-aanduiding
langzaam.
Als
geen
gekoppeld
apparaat
wordt
gevonden,
knippert
de
aanduiding
snel en
goat
de
luidspreker
naar
de
koppelingsmodus.

•
•
D
Play
music
on
your
dev
i
ce
paired
and
connected
with
the
spea
ker.
[IJ
Note:
This
s
peaker
suppor
ts
automatic
connect
i
on
with a
pre
viously paired
dev
i
ce
after
power
-
off
a
nd
pow
er-on
again.
During
mu
sic p
la
y:
•
Pr
ess
+
/-
to
adj
ust volume.
•
Pr
ess
1-+11/
~t
o
sk
ip
to
the
pr
evious or n
ex
t song.
•
Press
...
lit
o
pause
or
resume
music
play.
When
you
make
a
ca
ll
or
there
is
an
in
com
ing
ca
l
l,
you
can
use
the
speake
r as a
speaker
phone.
• When there is
an
i
nco
ming
cal
l.
you
c
on
press 0 to r
ecei
ve
the
ca
ll
or
press
0 twi
ce
to rej
ec
t
th
e
ca
ll
.
• Duri
ng
a
call
,
you
con
pr
ess
0 to
end
t
he
call.
• In
BT
mod
e,
you
ca
n pr
ess
0
tw
ice
to
access
th
e
vo
i
ce
assist
an
t
on
yo
ur
sma
rt
dev
i
ce
. To
ex
it
the
vo
i
ce
assistant, press 0 tw i
ce
again
.
·
~
:
Tip:
Music
plo
y is
paused
during a
call
and
resumed
automat
i
ca
lly
when
the
coli
end
s.
You
con
pre
ss
and
hold 0
to
di
scon
ne
ct
th
e
cu
rr
ent
Blue
tooth
co
nnec
ti
on
.
Af
sp
il
mus
ik
pa
den
enh
ed
,
der
er
parret
og
tilslu
tte
t
h0
jt
tal
ere
n.
~~~
Bemcerk:H0
jt
ta
leren underst
0tter
automoti
sk
tilsl
utning
til
en
tidligere
porret
enhed
. e
fte
r
at
den
er
blevet
slukket
og
tcen
dt.
Und
er
musikafspilning
:
•
Tryk
pa
+/-
for
at
justere lydstyrken.
•
Tryk
p6
~
1
11+1
for at
go
til forrige
e
ll
er nceste
mus
ik
nummer
.
• Tryk
pa
~llf
or
at
s
aett
e en
mu
sikofspilni
ng
pa
pa
use eller
genop
t
oge
ofsp
il
nin
ge
n.
Nor
du
foret
ager
op
kald eller
mod
l
ager
et
apka
l
d,
kan
h0
jl
la
l
eren
brug
es s
am
telefo
nh0jtta
ler
• Nor
du
m
od
fo
ger
ef
op
k
ol
d,
sko
l
du
trykke
pa
0 f
or
at
occepte
re
opka
l
det
e
ll
er
trykke
to
gonge
pa
0 for
at
ofvise o
pkold
et.
• Und
er
et
op
kold skol
du
trykke
pa
0
for of ofslu
tt
e op
ka
l
det
.
• I
BT
-tilsto
nd
sk
ol du trykke to
go
n
ge
p6
0
for
at
ok
ti
ve
re st
emmesty
ring
pa
din sm
ort
-
e
nhe
d.
DU
kon
afsl
utfe
s
temme
st
yr
i
ng
ved
at
trykke to
gonge
pa
0 i
gen
.
·
~
~
Tip: En musikafspilning sce
tt
es
pa
pause
und
er
et
opko
ld
og
genoptoges
ou
t
omot
i
sk
. nor
opko
l
de
t ofsluttes.
Try
k
pa
0 ,
og
ho
ld den n
ede
for at af
bryde
den
ok
tue
ll
e Bluetooth-l
orb
i
nde
l
se
.
Geben
Sie
Mu
sik
au
f l
hrem
m
it
d
em
L
au
tsprec
her
ge
paa
rten
und
ve
r
bundene
n Geri:it wied
er.
[I]
Hinweis:Dieser L
ou
ts
pr
ec
her
unt
erstutzt die
outomo
ti
sc
he
Yerbind
u
ng
mit
ein
em
zuvor
ge
p
aar
t
en
Ge
r6t n
ac
h
der
A
us
-
und
Wi
ede
reinsc
haltun
g.
W
i:i
hr
end
de
r
Musikwiedergabe:
•
DrU
cken Sie
+/-
.
um
die La
ut
s
tdrk
e anzu
pas
sen.
•
DrOcken
S
ie
1-+4
/
~
,
um
zum
vorh
er
igen
bzw
.
nii
chst
en
Tif
el
zu
we
chseln.
• DrUc ken S
ie
..
ll
.
um
di
e Musikwie
de
r
go
be
anzu
hal
te
n bzw. fortzuset
zen
.
•
•
•
Wenn
Sie
ei
n
en
Anruf
ti:iti
ge
n m
oc
hfe
n
oder
e
inen
Anruf
er
ha
lten.
konnen
S
ie
den
Lau
tspr
echer
als Frei
sprec
h
einrichtung
verwenden
.
•
Bei
einem
eingehenden
Anruf
k6
nnen
Sie
0
drUcken, um
den
Anruf anzu
ne
hm
en
. o
der
zweimal
0 drOcken,
um
den
Anruf
abz
uweisen.
•
Wbhrend
eines Anrufs kOnnen Sie 0
drOcken,
um
den
Anruf
zu
been
den
.
•
lm
Bluet
oot
h-Modus
k6nne
n Sie 0 z
we
i
mal
dr
ucken.
um
die
Sp
rochsteueru
ng
lh
re
s
Gerd
ts
ou
fzurufe
n.
Um
die
Sprochste
uer
ung
zu
beenden
.
dr
U
cken
Si
e
erneu
t 0
zwe
ima
l.
-'
~:
Tipp: D
ie
Musikwiedergobe
wird
wo
hrend
eine
sAnrufs
outomatisch
un
t
erbroche
n
und
noch
Bee
ndigung
des Anruts f
or
tgesetzt.
Sie
k6
nn
en 0 gedrOckt
holt
en
,
um
die
okfue
lle Bl
uef
oo
th-Verbin
dung
zu
trennen.
Re
produzca
mus
i
ca
en
su dispos
itiv
o
s
in
cro
niza
do
y
co
ne
ctado
co
n el
alta
voz
.
[I]Nota:
Este
altavoz
pe
r
mi
te
Ia
conex
i
6n
au
to
m6
ti
ca
de
un
dispositi
ve
prev
ia
m
ente
sin
cron
iz
ado
cuando
Ia
unida
d se
apaga
y se
vuelve
a
encender
.
Du
rante
Ia
reproducci6n
de
mu
sica :
•
Pu
lse +
/-
p
ara
ojustor el
vo
l
umen
.
• Pulse
~
~
~
para
pasar
a
Ia
ca
n
ci6n
a
nter
i
or
o a
lo
si
guiente
.
•
Pul
se
~II
para
dejar
en pau
se
Ia
rep
ro
ducci6n
de
mus
i
ca
o
para
reanudarla
.
Cuand
a
re
ali
ce
o
reciba
una
llama
do
, p
uede
utilizer
el
al
t
av
oz
como
monos
libre
s.
•
Cua
n
do
rec
ibo
uno
IIa
modo,
puede
pulsar 0
para
responder
lo o pulsar 0
dos
veces
para
rec
ho
zorlo.
• Du
ra
nt
e u
na
llamad
a,
puede
pu
ls
ar
0 p
ara
finolizarlo.
• En mo
do
BT,
pued
e
pulsar
0
dos
veces
pa
ra
acceder
al asist
ente
de
voz
de
su
dispositi
ve
inteli
ge
nte.
Para
solir
de
l asis
tente
de
voz,
vue
l
va
a
pulsar
0 dos
veces.
·~
Consejo:
La
reproducci6n
de musi
co
se
p
one
en
pause
durant
e
un
a
llomado
y
se
reonudo
ou
t
om
6ti
co
me
nte
cuo
ndo
fi
nalize
Ia lla
moda
. Si
deseo
de
socti
var
Ia
conex
i6n
Bl
ue
t
oo
th ac
tua
l,
montengo
pu
l
sado
0 .
Va
il
toist
aa
mu
siikkia la
itt
ee
ll
a, j
os
ta
on
m
uod
ostettu
l
ai
t
epari
kaiuttimen
ka
nss
a.
[IJ
Huomaa:T6m6 kaiutin
tuk
ee
au
tomoottis
lo
yhdi
st6mist6
oiemmin
m66ritett
yyn laiteporiin
sammu
tt
amisen
ja kdynnist
bmisen
jdl
keen
.
Mu
siikin t
oiston
a
ikana:
•
SOOdO
Odnenvoimakkuutta
pa
in
ama
ll
a +I-.
•
Siirry
edell
iseen t
ai
seuraavaan
k
appa
l
ee
s
ee
n
painama
ll
a
~
~
~
.
• Keskeyt6 toij
otko
toist
oo
po
in
omollo
~
11
.
Vo
it
kii
y
ttdi:i
ka
i
ut
i
nto
myo
s
puhe
lim en
ka
i
uttim
e
na
.
•
Vo
if vasfota puheluun
painomal
la 0 -
po
iniketto
to
i
hy
l6ta
puhe
lun
poinamo
llo 0 -
po
inike
tta
kahdesti.
•
Va
il p
ii6tt6ii
puh
elun
poino
ma
llo 0 -
poi
nike
tto
.
• Blu
efoo
th
-t
il
osso
va
il
siirtyii
ii
lyla
itt
ees
i
OO
ni
oh
jaus
toimint
oo
n
pa
i
na
ma
ll
a 0 -
pa
inike
tt
a
ka
hd
esti.
Vo
it
poistua
06
nio
hja
ustoi
mi
n
no
s
ta
paina
mall
a 0 -
pa
inik
etta
koh
de
st
i.
·
~
:
Vihje:Musiikin toisto kesk
ey
tyy
pu
he
lun
ojaksi
ja
jotkuu
outomoott
isesti
puhe
l
un
p66
tt
yess
ii
. Voit kotkoisto
Blu
etoo
th-
yh
t
eyde
n
pit6m6
11
a 0 -poinike
tto
poinetfun
o .
L
ancez
un
ma
rc
eau
de
mu
si
que
sur vat
re
appare
il
ap
paire
en
liaison
ave
c I'
en
c e
int
e.
~~
Remarque :l'enc
ei
nfe est pr
evue
pou
r se
rec
onne
ct
er
aut
omo
ti
qu
em
e
nt
a
un
oppa
re
il
pr
8c8
de
mm
e
nt
a p
pai
re. a
pr
es
mise
ho
rs
ten
sion
pu
issous tension.
Lars de
l'
ec
oute
de
mu
siqu
e:
• Ap
puye
z
su
r +I-
pour
n§gler le
vo
l
um
e.
•
Appuyez
s
ur
~
1
~
pour
pa
ss
er 6 Ia
piste prec
ede
nt
s ou sui
va
nt
e.
• App
uye
z sur
~II
pour
interrompre
ou r
epre
ndr
e Ia l
ec
tur
e.
•
•
Pour em
ettre
un
appe
l
au
r
epo
nd
re 6 un
a
pp
el
entrant.
vous
pouve
z utilis
er
!'en
ce
inte
pou
r
co
nverser
en
mode
ma
in
s-
libres.
• En cos
d'oppel
en
t
ra
n
t.
il
su
ffit d'
oppuyer
s
ur
0
pour
pre
nd
re
l'a
ppe
l
au
d
'appuyer
de
ux fois sur 0
pou
r
ref
user
l'
app
el.
• En cours
de
comm
un
i
cation,
a
pp
uyer
sur 0
permet
de
m
ett
re
fi
n 6 l'
ap
pel.
• En m
ode
Blueto
ot
h, vous
po
uvez
oppuyer
deux
fo
is
sur 0
pou
r
occ8der
a
)'
ass
ist
ant
voc
al de
vo
tre
appore
il intell
ig
ent.Pour
qu
it
ter
l'
assi
s
ta
nt
voc
al.
appuyez
de
nouve
au
6
deux
reprises sur 0 .
·
~
Astuce :Ia
diff
us
ion
de
Ia musique
s'in
terrompt
pen
d
ant
un
oppe
l
et
r
ep
rend
au
to
matiq
uemen
t aIa fin
de
l'
oppe
l.
Appuye
z
su
r 0 et moin
tene
z
ce
tt
e t
ouc
he
enf
on
c8e
si
vo
us pr8f
8rez
desoct
i
ver
to
connexio
n Bl
ue
too
th
ac
tive.
R
ip
r
odurre
musica
sui
dis
pos
iti
ve
abbinato
e
con
nesso
con
l'altapa
rlan
te
.
[IJ
Nota:
l'ol
topar
l
on
te
suppor
to
Ia
conness
io
ne
au
tom
atico
a
un
dis
po
siti
ve
prec
eden
te
m
ente
obb
in
oto
ol
mo
men
ta di
uno
nuovo
accensione
dopa
lo
spegn
i
men
to.
Du
r
an
te Ia ripr
oduz
i
one
musi
ca
le:
Prem
ere
+
f-
per
r
egolare
il
vo
l
um
e.
Prem
ere
~
1
~
per
pas
sare al
bron
c
pr
eced
en
ts
o successi
ve.
Pr
emere
~II
pe
r
metfer
e in
pause
o
ri
pre
ndere
Ia
ripro
duz
ione musi
ca
le.
Quando
si
effettua
o si
rice
ve
una
ch
i
amo
t
a,
e
po
ss
i
bil
e utili
zzare
l'alt
opar
l
ante
c
om
e a
lt
opar
lant
e del telef
ono.
• In
coso
di
chiom a ta in
arr
ivo, p r
eme
re 0
per
ri
ce
vere Ia chi
ama
ta
o
pre
me
re 0
due
volt
e per rifivt
ar
e Ia
ch
i
ama
t
a.
•
Dura
nte
u
na
chi
am
ota. pr
eme
re 0
pe
r t
ermina
re Ia
chio
ma
to .
In
mo
do
lit6
BT.
premer
e 0
due
vo
lte
per
o
ccedere
ol
sup
po
rto
voca
te
de
l dispositi
ve
sm
art
. Per uscire
dol
supporto
vo
cal
e.
pr
em
ere n
uovame
nt
e 0
per
due
volte.
·~
:
Suggerimento: Ia ripr
od
uzione
musi
ca
le vi
ene
int
er
rotta
du
r
an
te
una
c
hiamat
a e viene ri
presa
al
t
erm
i
ne
d
ella
chiomat
o.
Tene
re
pr
emu
to 0
per
sco
ll
egare
Ia
connessi
one
Bl
ue
t
oot
h
corren
te.
S
pee
lt muzi
ek
of
op
hef
apparaat
do
t
gekop
peld isa
an
en
ve
rbon
de
n
is
me
t
de
lui
dsp
r
eker.
[IJ
Opmerking:
Deze lui
ds
pr
ek
er
o
nd
erste
unt
au
tomati
sche
verb
indin
g
m
et
een
voord
i
en
gekoppe
ld
op
poroot
no
d
al
deze
we
rd
uit
geschoke
ld
en
weer
in
geschok
el
d.
Tij
de
ns
mu
zi
ekwee
r
gave
:
• Dr
uk
op
+I-
om
het
vo
lu
me
a
ant
e
passen
.
• Dr
uk
op
r4<1111
1
~
om
nao
r
de
vo
ri
ge
of
vol
gende
song te
goo
n.
• Druk
op
~II
om
de
mu
zi
ekte
pouzeren of te h
erva
tt
en.
W
on
n
ee
r u telefoneert o f er
ee
n
op
r
oep
bi
nnenkomf.
kunt
u
de
l
uid
sp
rek
er
als
lui
dspr
ekerte
l
efao
n
gebrui
ken.
• Wa
nn
eer
er
een
op
roep
bi
nne
nk
om
t,
kunt u op 0 drukk
en
om
de
op
r
oep
te
aan
va
a
rden
. of t
wee
kee
r op 0
druk
ken
om
de
opr
oe
p te wei
ge
ren.
Tijdens
ee
n
oproe
p kunt u
op
0 drukken
om
de
op
r
oep
te
b
ee
i
ndigen.
In de
BT
-m
odu
skunt u
twee
kee
r
op
0
drukken
om
de s
pr
aaka
s
sis
ten
f op uw s
mo
rt-
o
pp
or
aot
te
st
ar
ten. Om de sprookossiste
nt
te
slu
it
en
,
drukt
u
nogmoo
ls
t
wee
keer
op
0 .
•
'$
:
Tip:
De muzie
kw
ee
r
gave
wordt
ge
pauzeerd
t
ij
de
ns
een
o
pr
oe
p en
au
to
mat
i
sch
h
erv
at
wanneer
de
o
proep
word
t
bee
indig
d.
u kunt 0
in
ged
rukt ho
uden
om
de
ll
uidi
ge
Bluet
oo
th-ver
bind
ing fe
ve
rbreken.

To
stream
music
to
multiple
speakers
at
one
time,
connect
the
LINE-OUT
socket
on
you
r NYNE
Rock
to
the
AUX-
IN
socke
t
on
any
other
speaker
via
the
suppli
ed
3.5mm
cable.
Du
kan
str
ea
me
musik til
fi
ere
h0
jltalere
pa
en
gang
ved
at
forbinde
LI
NE-OUT-stikket
pa
din
NYNE
Rock
til AUX-IN-stikket
pa
en
anden
h0jttaler
ved
hjrelp
of
de
l
medf0lgende
3.5
mm-kabel.
Conne
ct an
aux
ili
ary
MP3 devi
ce
to the speaker thro
ugh
t
he
sup-
p
li
ed
3.
5mm
aud
io
cab
le.
2
Pl
ay
and
control
m
us
ic
on
the
MP3
device
.
and
u
se
+I-
on
t
he
speaker
to
ad
just
vo
l
ume
it
nece
ssary.
,>--<
-·
';
F-
Tips:
In
AUX
IN
mod
e. you
can
press
~
II
to
mut
e sound o
ut
pu
t fr
om
th
e
speake
r.
When the 3.5mm
aud
io
cab
le ispl
ug
ge
d
in, the s
peaker
s
wi
tc
he
s to
AUX
IN
mode
aut
o
mati
ca
lly.
When
it
is
unp
lu
gge
d, the
s
peaker
switches
bock
to
Bl
uetooth
mode.
Tilsl
ut
en
ek
stern MP3-enhed til
h0jttaleren
ved
hj
ce
lp
of
de
l
me
df0
l
gende
3,
5
mm
l
ydkab
e
l.
2 Afspil
og
styr rnusikken
pa
MP3-e
nheden
.
og
brug
+I-
p6
h0
jtt
aleren til at justere
lydstyrken,
hv
is
de
l er
n0d
ven
dig
l.
-~~
Tips
: I
AU
X ln-tils
la
nd
kan
du
lrykke
p6
~II
for
at
afbry
de
I
yde
n Ira h0j
tta
leren.
Nor 3,5
mm
l
ydkab
let
er
tilsl
utt
et. skitt
er
h0jttaleren
automotisk
til
AU
X
IN
-
til
s
tand.
Nor l
ydkab
l
et
fjerne
s.
sk
itter
h0
jtt
aleren a
ut
ornatisk t
il
Blue
to
oth.
•
oo:
6
...
~J)
....__..,
c:::::::::..o
Zum
Musik
an
mehrere
Lautspre
cher
gleichzeitig
zu
streamen.
verbinde
n
Sie
den
LI
NE
-OUT-Anschluss
an
l
hrem
N
YNE
Rock
mithilfe
de
s
mitgeliefe
rt
en
3.5-mm-Kabels
mit
dem
AUX-IN-Anschlu
ss
an
einem
be
li
eb
ige
n a
nd
eren L
autspreche
r.
P
ara
escuc
h
ar
music a
en
varios
al
tavoces
a Ia vez.
conecte
Ia
toma
LINE-
OUT
de
su al
tavoz
NYNE
Roc
k
a
Ia
toma
AUX-
IN
de
cuo
l
qui
er
o
tro
altavoz
mediante
el
ca
ble
de
3.5
mm
incluido.
Verbinden
Sie
ein zusatzliches MP3-Gerat
mit
de
m Loutsprecher;
verw
en
de
n
Sie
dozu
das
m
itge
lieferte 3.5-mm-Audiok
obe
l.
2
Fu
hren Sie
die
Ste
u
er
u
ng
u
nd
di
e
Musikwie
de
rgobe
uber
dos
MP3-G
erdt
ous
und
verwe
nd
en Sie
+I-
om
Lauts
pr
ec
her
.
um
die
Lautstdrke
na
ch Bedarf anzupas
se
n.
-
~
;
Tipps; lm
AUX
-
IN
-Modus konnen
S
i
e
~ll
drucken,
um
die
Tonau
sgabe
a
us
dem
Loutsprecher
st
ummzuscha
lte
n.
Wenn dos 3,5-
mm-Audiokobel
eingesteckt
ist
. sc
holtet
der
L
au
tsprec
he
r
out
o
mot
isch
in
den
Modus
AUX
IN
um. W
enn
dos Kabel
ge
tr
ennt wird.
we
chselt
de
r L
au
tsprecher
wied
er
in
den
Bluetooth-Modu
s.
Con
ecte
un dispositi
ve
MP3 auxili
ar
al altavoz uti
li
zand
o el c
ab
le
de
audio
de
3,5
mm
incl
uid
o.
2 Reprod
uzco
y gesti
one
su
mu
sica en el
dispositive MP3 y
ul
ili
ce
+I-
en
el olt
avoz
para
aju
star el
volum
en si es
necesar
io
.
-~
:
:
Co
n
se
j
os;
En
el
modo
de
entr
ada
auxiliar.pu
ede
pu
l
s
ar
~
II
para
silenci
ar
al sali
da
de
aud
io
de
l alt
avo
z.
C
uan
do
se
co
ne
cta el
ca
ble
de
au
dio
de
3.5
mm
, el olt
ovo
z
paso
ou
tom6t
icome
nt
e ol
modo
de
entr
ada
oux
ili
ar
. C
uondo
se
desco
n
ec
to, el
alt
av
ozregr
es
a al
modo
Blu
etooth
.
Lii
td ulko
in
en MP3-
soi
tin ko
iutt
im
een
l
ai
tt
ee
n
mukan
a toimitetun 3,5
mm
;n ka
ope
lin
avu
ll
o.
2
Vo
it toist
oo
jo
hollito toi
st
oo MP3-
soittimellojo sddt
dd
ddn
e
nv
o
im
okkuu
tta
tarvi
ttae
ss
o koi
ut
ti
me
n
+I
--
pa
ini
kk
eillo.
-
~
:
Vihje; Voit mykist
dd
kaiuttimen
AU
X
IN
-tilassa
po
in
o
mal
la
~
11
-
pa
ini
kett
o.
Kaiutin siirt
yy
au
t
omaa
tti
ses
ti AUXIN
-tila
an,
kun siihen l
ii
tet
aan
3.5
mm
:n
aan
ijohto. Kun jo
hto
irrotet
ao
n. koiutin
siirt
yy
t
aka
isin
Blu
et
oo
th-til
aa
n.
•
Voit
suorat
oist
aa
musiikkia
useid
en
kaiu
tinten
kautta
kerra
lla liitta
ma
ll
a NY
NE
Rock
-k
aiuttimen
LINE
-OUT-Iiitin
to
i
sen
kai
u
ttimen
AUX-I
N-Iiittimeen
lait
t
een
muk
ana
toi
mitetu
n
3,5
mm:n
kaa
pe
li
n
avulla.
Pour
diffu
ser
de
Ia
musique
simul
tane
men
t
su
r plusieurs
enceintes
.
rocco
r
dez
Ia
prise
LI
NE
-OUT
de
vo
tre
NY
NE
Rock
6 Ia prise AUX-IN
de
to
u
te
autr
e e
nc
e
int
e
au
moy
en
du
cab
le
de
3,5
mm
fourni.
•
Per
tr
asme
tte
re mus
ic
a a
piu
altoparlanti
con
t
em
poraneament
e,
col
l
egare
Ia
sp
i
na
LI
NE-OUT
di
NYNE
Rock
alia
presa
A
UX
-
IN
di q
ual
siosi
oltro
oltoporlante
ottraverso
il
c
ava
do
3.5
mm
in
dotazi
one.
Om
noar
mee
r
dere
luidspreker
s
tegelijk
te
streamen,
verbindt
u
de
LINE-OUT-a
ans
luiti
ng
op
uw
NYNE
Rock
met
de
AUX
-IN-aansluiting
op
een
a
nd
ere
l
uidsp
r
eker
door
midde
l
van
de
m
eege
l
everde
3,5 mm
kobel.
Rac
co
r
de
z
un
ap
pare
il
MP
3 ouxiliaire
6
!'enceinte
au
moyen
du
cable
aud
io de 3
,5
mm
fourni.
2 L
oncez
un
marceau
de
m
us
ique
sur
l'ap
pareil
M
P3
et
servez-vous
des
t
ou
ch
es
+I-
de
!
'en
ce
inte
pou
r
reg
l
er
le vol
ume.
si
be
soin est.
~
(·
-\
.-
-;
· Astuc
es:
en
mod
e
AUX
IN
(entr
ee
auxiliaire
),
vo
us
pouvez
ap
puyer
s
ur~
II
pour
couper
le
son
de
!'
en
ceint
e.
Lorsque le
cable
aud
io
de
3.5
mm
est
branc
he
6 I'
ence
i
nte
,
ce
ll
e-
ci
posse
automatiquemen
t
en
mod
e
AU
X
IN
(
en
t
ree
oux
ili
o
ir
e
).
Des
que
vou
sle
debran
ch
ez
de
!'
en
c
ein
te,
ce
ll
e-
ci
repasse
en
mode
B
lu
et
oo
th
.
Co
ll
egare
all'oltop
arlante
un
di
spositive
MP3
au
siliario a ttroverso
il
cava
au
dio
do
3
,5
mm
in
dotaz
io
ne
.
2 Epossibile ripr
odu
rr
e e c
on
trollore Ia
mu
si
ca
su
i
dispositive MP3 e usare
+I-
su
ll
'
altopar
l
an
te
per
r
ego
lare il
vo
lu
me
, se necessaria.
'~
~
Sugger
im
en
ti
; In
moda
lit6 AUX
IN
,
pr
e
m
e
r
e
~ll
per
di
s
attivare
I'
audi
o
de
ll'alt
opar
l
an
te.
Quand
o vie
ne
co
llega
to
il
cava
audio
do
3,5
mm
, l
'a
lto
par
la
nte
passa
automat
ic
am
en
te in
m
oda
lit6 AUXIN.
Quando
si scoll
ega
il
ca
va.
l'alto
parlant
e l
orna
alia m
oda
lit6
Blu
etoo
th.
Sluit
een
externe
MP3-speler
aan
op
de luidspreker
me
t
de
meege
l
eve
rde
3,5
mm
aud
i
okabe
l.
2
Be
luister en b
ed
ien
de
muziek
op
het MP3-
apparaat
en
gebr
uik
+I-
op
de
luidspreker
om
indien
gewe
nst het volu
me
oan
te
pa
s
se
n.
''<$
~
Ti
p
s:
In
de
AUX
IN
-modus
ku
nt
u
op
~ll
drukken
om
de geluidsweerga
ve va
n
de luidspreker stil te schakelen.
Wanne
er
de
3,5
mm
aud
io
kabe
l
aanges
-
loten is. sch
ak
elt
de
luidspreker
au
t
oma
tis
ch
naar
de
AUX
IN
-m
od
u
s.
Wonnee
r
de
kabel
wo
rdt uitgetrokken, keert
de
l
uid
s
pr
eker
terug
naor
de
Bl
ue
t
oo
th-modus.

All
registered
and
unregistered
trademarks
are
property
of
their
respective
owners.
Nyne
Multimedia
Inc.
AH
rights reserved.
QUG-Nyne
Rock-11-17-2015-Vl.O

Rock
~
Portable
Bluetooth
Speaker
8
Brerbar
h0jttaler
med
Bluetooth
4D
Altavoz
Bluetooth
port6til
4D
Kannettava
Bluetooth-kaiutin
O
Enceinte
portable
Bluetooth
O
Mob
iler
Bluetooth
-
Lautsprecher
8
Altoparlante
portatile
Bluetooth
0
~-9-:J
)~
Bluetooth
.At::'-7J-
•
Safety
Guide
• Sikkerhedsvejledning
CD
Gufa
de
seguridad
• Turvallisuusopas
nyne.com
BC
0
Guide
de
securite
• Sicherheitsleitfaden
0
Guido
alia
sicurezza
•
1:!-7-r-{-
tJ-1~'
( €
2200

Important
Safety
A
RISK
OF
ELECTRI
CSHOCK
~
DONOT
OPE
N
CAUTION
CA
UTIO
N.
TORfOU(
f_
~
H
E
RI
SK
OF
ELE
CT
RJC
SH
OC
K.
00
N
07
R
EMOVE
CO
VE
R
1Q
R
BA
CK
".10
LISf.C!.S
E
RVKf
A
BLf
PART)
INSIOl
'l[ftR
SE
RYl
C
t-;
C.
TO
')iJAL~
f
W
SERVICE
P[ASQNIII[L
The lightning flash
with
arrowhead
symbol
within
on
equilateral
triangle
is
intended
to
alert
the
user
to
the
presence
of
un-isoloted,
dangerous
voltage
within
the
inside
of
the
device
that
may
be
of
sufficient
magnitude
to
constitute
o
risk
of
electric
shock
to
persons.
Warning:
To
reduce
the
risk
of
electr
ic shock,
do
not
remove
cover
(or
bock)
as
there
ore
no
user-serviceable parts inside.
Refer servicing
to
qualified
personnel.
The
exclamation
point
within
on
equilateral
triangle
is
intended
to
alert
the
user
to
the
presence
of
important
operating
and
servicing instructions in
the
literature
accompanying
the
device
.
WARNING: Where
the
mains
plug/appliance
coupler
is
used
as
the
disconnect
de
v
ice
,
the
disconnect
device
shall
remain
readily
operable
.
WARNING: The
battery
(battery
or batteries or
battery
pock)
snail
no'
be
exposed
to
excessive
heat
such as sunshine, fire
or
the
like.
Read
these
instructions
before
operation.
Keep these instructions for future
reference.
Follow all instructions for installation, use
and
maintenance
of
the
device.
This
device
complies
with
the
IPX3
waterproof
standard.
Before using
the
device
in
the
rain
or
moisty
conditions
or
rinsing
the
de
v
ice
with
fresh
water
,
always
securely close
the
protective
cover
at
the
back
of
the
device.
Never
open
the
protecti
ve
cover
when
the
device
is
still
wet
after
use. Always
clean
with
a soft
dry
cloth
and
let
it
dry
in a
well-ventilated
place
away
from
direct
sunlight.
To
clean
the
device,
disconnect
power
first.
Clean
only
with
soft
and
dry
cloth.
To
ensure
compatibility,
only
use accessories
recommended
by
the
manufacturer.
When
the
device
is
s
uddenly
moved
from
cold
to
warm
surroundings,
condensation
may
form
in
the
housing
of
the
device
. Before use,
leave
the
device
in
the
worm
environment
until
the
moisture
evaporates
.
Keep
the
device
away
from
heat
sources, such as a
radiator,
heater,
oven,
amplifier
,
naked
flames or
direct
sunlight.
No
naked
flame
source
s,
such as
lighted
candles,
should
be
placed
on
the
apparatus.
When
you
use
the
flashlight
or
warning
light features
of
the
device,
the
lens
may
get
very
hot
after
some time.
This
is
not
a
malfunction.
Never
block
any
ventilation
openings
. Install in
accordance
with
the
manufacturer
's instructions.
•
•
Do
not
expose
the
device
to
sand
or dust,
or
cover
it
with
items, such
as
newspapers,
table
cloths, or curtains.
Do
not
operate
the
device
in
an
enclosed
cabinet.
Leave
sufficient free
space
around
the
device
for
adequate
ventilation.

Do
not
attempt
to repair or service
the
device
yourself.
Opening
or
removing
the
cabinet
may
expose
you
to
electric
shock,
and
other
hazards.
If
repair
is
required,
contact
your
dealer
and
refer
a\\ servicing
to
qua\ifted service personnel.
Do
not
use
the
device
if
any
abnormality
occurs
.
If
any
smoke
or
odor
becomes
apparent
,
contact
your
dealer
immediately.
Do
not
try to
repair
the
device
yourself.
Avoid
using
dropped
or
damaged
appliances
.
If
the
device
is
dropped
and
the
housing
is
damaged,
the
internal
components
may
not
function
normally. Stop use
and
contact
your
dealer
for
repair.
Continued
use
of
the
device
may
cause
fire
or
electric
shock.
To
reduce
the
risk
of
electric
shock,
do
not
touch
any
connector
with
wet
hands.
Never
remove
the housing
of
the
device.
Never
lubricate
any
part
of
the
device.
Never
place
the
device
on
top
of
any
other
electrical
equipment.
This
equipment
is
a Class
II
or
double
insulated
electrical
appliance.
It
has
been
designed
in such a
way
that
it
I0 I
does
not
require a safety
connection
to
electrical
earth.
Notice
Modification
Any
modification
(such
as
removing
the
speaker
grill)
to
the
device
,
without
prior authorization from
the
manufacturer,
may
void
your
warranty
and
authority
to
operate
the
device.
FCC
compliance
statement
This
equipment
has
been
tested
and
found
to
comply
with
the
limits for a Class B
digital
device,
pursuant
to
part
15
of
the
FCC
Rules
.These limits
are
designed
to
provide
reasonable
protection
against
harmful
interference
in a residential installation.
This
equipment
generates,
uses,
and
can
radiate
radio
frequency
energy
and
, if
not
installed
and
used in
accordance
with
the
instruction
manual.
may
cause
harmful
interference
to
radio
communications.
However,
there
is
no
guarantee
that
interference
will
not
occur
in
a
particular
installation.
If
this
equipment
does
cause
harmful
interference
to
radio
or
television
reception
,
which
can
be
determined
by
turning
the
equipment
off
and
on,
the
user
is
encouraged
to
try
to
correct
the
interference
by
one
or
more
of
the
following
measures:
•
Relocate
the
receiving
antenna
.
•
•
•
Increase the separation
between
the
equipment
and
receiver.
Connect
the
equipment
into
an
outlet
on
a
circuit
different
from
that
to
which
the
receiver
is
connected
.
Consult
the
dealer
or
an
experienced
radio/TV
technician
for
help.
This
device
complies with Part
15
of
the
FCC
Rules.
Operation
is
subject
to
the
following
two
conditions:
(
1)
This
device
may
not
cause
harmful
interference
,
and
(2)
This
device
must
accept
any
interference
received,
including
interference
that
may
cause
undesired
operation.
This
Class B
digital
apparatus
complies
with
Canadian
ICES
-003.
Cet
appareil
numerique
de
Ia classe B est
conforme
a
Ia
norme
NMB-003
du
Canada.
This
device
complies
with FCC
RF
radiation
exposure limits set
forth for
an
uncontrolled
environment.
This
equipment
should
be
installed
and
operated
with
a
minimum
distance
of
20cm
between
the
radiator
and
your
body.
This
device
and
its
antenna(s) must
not
be
co-located
or
conjunction
with
any
other
antenna
or transmitter.
Cf
statement
(
E:
2200
This
product
complies
with
the
radio
interference
requirements
of
the European
Community
.
Recycling
Packaging
Observe
the
local
regulations for
how
to
dispose
of
the
packaging
materials.

WEEE
NOTICE
The
Directive
on
Waste Electrical
and
Electronic Equi
pment
(WEEE),
which
entered
into
force
as
European
law
on
13th
February 2003, resulted in a
major
change
in
the
treatment
of
electrical
equipment
at
end
-of-
life.
The
purpose
of
this
Directive
is,
as a first priority,
the
preven
t
ion
of
WEEE,
and
in
addition,
to
promote
the
reuse,
recycling
and
other
forms
of
recovery
of
such
wastes
so
as
to
reduce
disposal.
The
WEEE
logo
on
the
product
or
on
its
box
indicating
collection
for
electrical
and
electronic
equipment
consists
of
t
he
crossed
-out
wheeled
bin, as shown
below.
This
product
must
not
be
disposed
of
or
dumped
with
your
other
household
waste.
You
are
liable
to
dispose
of
all
your
electronic
or
electrical
waste
equipment
by
relocating
over
to
the
specified
collection
point
for
recycling
of
such
hazardous
waste.
Isolated
collection
and
proper
recovery
of
your
electronic
and
electrical
-
waste
equipment
at
the
time
of
disposal will
allow
us
to
help
conserving
natural
resources.
Moreover,
proper
recycling
of
the
electronic
and
electrical
waste
equipment
will ensure
safety
of
human
health
and
environment.
For
more
information
about
electronic
and
electrical
waste
equipment
disposal,
recovery,
and
collection
points,
please
contact
your
local
city
center
,
household
waste
disposal service, shop fr
om
where
you
purchased
the
equipment,
or
manufacturer
of
the
equipment.
ROHS
COMPliANCE
This
product
is
in
compliance
with
Directive
2011
I65/EU
of
the
European
Parliament
and
of
the
Council
of
8
June
2011
on
the
restriction
of
the
use
of
certain
hazardous
substances in
electrical
and
electronic
equipment.
FOR
PRODUCTS
THAT
INCLUDE
BATTERIES
fU
Batteries
Diractiva
2006/BB/EG
A
new
battery
directive
2006/66/EC
on
Battery
and
Accumulator
replacing
directive
entered
into
force
on
the
26th
September
2008. The
directive
applies
to
all
types
of
batteries
and
accumulators
(AA
,
AAA
,
button
cells,
lead
acid
,
rechargeable
packs)
including
those
incorporated
into
appliances
except
for
military,
medical
and
power
tool
applications.
The
directive
sets
out
rules
for
collec
t
ion
,
treatment
, r
ecycling
and
disposal
of
batteries
,
and
aims
to
prohibit
certain
hazardous
substances
and
to
i
mprove
environmental
performance
of
batteries
and
all
operators
in
the
supply
cha
in.
Instructions
for
Users
on
Ramovat
Recycling
and
Disposal
of
Used
Batteries
To
remove
the
batteries
from
your
equipment
or
remote
contro
l,
rever
se
the
procedure
described
in
the
o
wner'
s
manual
for
inserting batteries.

For
products
with a built-in
battery
that
lasts for
the
lifetime
of
the
product
,
removal
may
not
be
possible for
the
user.
In
this
case,
recycling
or
recovery
centers
handle
the
dismantling
of
the
product
and
the
removal
of
the battery.
If,
for
any
reason, it
becomes
nece
ssary
to
replace
s
uch
a battery,
this
procedure
must
be
performed
by
authorized service centers.
In
the
European
Union
and
other
location
s,
it
is
illegal
to
dispose
of
any
battery
with household trash.
All
batteries must
be
disposed
of
in
an
environmentallysound
manner.
Contact
your
local
waste-
management
officials for information
regarding
the
environmentally
sound
collection
,
recycling
and
disposal
of
used batteries.
WARNING:
Danger
of
explosion if
battery
is
incorrectly
replaced.
To
reduce
risk
of
fire
or
burn
s,
don
't
disassemble, crush,
puncture
,
short
external
contacts
,
expose
to
temperature
above
60°C
(
140°F)
, or
dispo
se
of
in fire
or
water.
Replace
only
with
specified
batteries.
The symbol
indicating
'
separate
collection'
for
all
batteries
and
accumulators
shall
be
the
crossedout
wheeled
bin
shown
be
l
ow:
In
case
of
batteries,
accumulators
and
button
cells
containing
more
than
0.
0005%
mercury
,
more
than
0.002
%cadmium
or
more
than
0.004 %
lead,
shall
be
marked
with
the
c
hemi
c
al
symbo
l
for
the
meta
l
concerned:
Hg,
Cd
or
Pb
respecti
vely.
Please Refer
to
the
below
s
ymbol:
Copyright
0
Bluetooth
"
Hg
Cd
Pb
The Blueto
oth
word
mark
and
logo
s
are
owned
by
the Blueto
oth
SIG
,
Inc
.
and
any
use
of
such
mark
s
by
Nyne
Multimedia
Inc.
is
under
license.
Specifications
The
technical
s
pe
c
ifi
c
ati
o
ns
are
s
ubject
to c
hange
w
ithout
prior
notice
.
Output
power
Main
: 2 X
12
.5 W
+
2 X 5.5W
Woof
: 1
X
25W
=
D~C~p~
o
~w
~e~
r~
i
~n~p~u~t
__
____________
_
1~8_V~D~C~------
--
---------
Speaker
driver
s
Main:
2 x
76mm
+ 2 x
25mm
Wo
of
: 1x 152mm
S/N
THD+N
Dimen
si
on
Weight
Aud
io
input
Wirele
ss
Bluetooth
profiles
Battery
capacity
Battery
type
Ploy
tim
e
>50dB
<
10
%
21.18
(WJ
X
6.5
(H)
x 9.72
(D)
inc
he
s
7.6kg
1x 3.5
mm
sock
et
1x wirel
ess
input
(Biueto
oth)
Bluetooth
4.1
CLASS
2
HFP,
A2DP, AVRCP
7.4V 6600mAh
Lithium-
ion
8 -
10
hours

Specifications
are
subject
to
change
without
notice.
All registered
and
unregistered
trademarks
are
property
of
their
respective
owners.
Nyne
Multimedia
Inc.
All rights reserved.
SG-
Nyne
Rock-11-21-2015-V. 1.0

n~ne
Thank
You
for
your
purchace
Warranty Card
To
obtain
Limited
Warranty
Services
Please
contact
us
at:
www.nyne.com/support,
email
us
at
Techsupportfanyne.com
or
Call
us
at:
1-805-322-8794
Your NYNE
·"·
Product
has a
warranty
for
a
period
of
1
year
from
the
date
of
r
.
~tail
purchase
by
the
·,
original
purchaser.
Proof
of
purchase
is
required
to
verify
eligibility.
To
receive Special Offers and
the
Latest
News
and
updates
on
products
become a Nyne Club
Member
ra
www.nyne.com
\N\N\N.
nyne.
corn

nL.~ne
Your NYNE
product
is
warranted
against
defects
in
materials
and
workmanship
for
a
period
of (1)
year
from
the
date
of
original
purchase
from
an
authorized
NYNE
dealer
.
If
a
defect
exists,
NYNE·
at
its
option
will
(
1)
repair
the
product
at
no
charge
using
new
or
refurbished
parts,
(2) exchange the
product
with
a
functional
equivalent
product
that
is
new
or
refurbished,
or
(31
refund
the
original
purchase
price
.
This
does
not
mean
you can
abuse
your
NYNE ·
product
and
excellent
warranty
service
. We do
not
cover
normal
wear
and
tear,
blown
speakers,
scratches,
loss
or
theft.
This
warranty
excludes
damages
resulting
rrom
abuse,
accident,
modifications
or
other
causes
that
are
not
defects
in
materials
and
workmanship
. Customizat1on
of
your
product
will
void
your
warranties
Any
recovery
is
limited
to
the
original
purchase
price
.
No
other
person
is
authonzed
to
modify
th1s
limited
warranty
. Your
seller
is
responsible
for
any
other
warranties
.
This
warranty
g1ves
you specific
legal
rights,
and you
may
have
other
original
rights
that
vary
by
state
and
jurisdiction
. These
rights
shall
not
be
affected
by
this
limited
warranty
.
This
warranty
cannot
be
transferred
or
assigned.
visit
us
at
vvvvvv.
nyne.
corn
Other manuals for rock
1
Table of contents
Other Nyne Speakers manuals